
24V-WB1000 - Cordless electric wheelbarrow Sun Joe - Free user manual and instructions
Find the device manual for free 24V-WB1000 Sun Joe in PDF.
| Product type | Cordless electric wheelbarrow |
| Brand | Sun Joe |
| Model | 24V-WB1000 |
| Power source | 24 V lithium-ion battery (4.0 Ah) |
| Motor | 500 W, brushless |
| Maximum load capacity | 151 kg |
| Hopper volume | 75 L |
| Available speeds | Fast forward (3.5 km/h), slow forward (1.6 km/h), reverse (1 km/h) |
| Maximum gradeability | 15° |
| Brake | 17.8 cm disc brake with parking lock |
| Front wheel size | 25.4 cm |
| Central all-terrain wheel | 42.0 cm |
| Rear wheel size | 15.2 cm |
| Net weight | 46.3 kg |
| Maximum charging time | 1 h 50 min |
| Charger input | 120 VAC | 60 Hz |
| Warranty | 2 years (residential use) |
| Lighting | 2 LED headlights |
| Adjustable handle height | 78, 85, 92 cm |
| Safety | Removable safety key, lockable parking brake |
| Maintenance | Clean with water and cloth, monthly check of fasteners and brake |
Frequently Asked Questions - 24V-WB1000 Sun Joe
User questions about 24V-WB1000 Sun Joe
0 question about this device. Answer the ones you know or ask your own.
Ask a new question about this device
Download the instructions for your Cordless electric wheelbarrow in PDF format for free! Find your manual 24V-WB1000 - Sun Joe and take your electronic device back in hand. On this page are published all the documents necessary for the use of your device. 24V-WB1000 by Sun Joe.
USER MANUAL 24V-WB1000 Sun Joe
IMPORTANT! Safety Instructions
All Operators Must Read These Instructions Before Use
Always follow these safety guidelines. Failure to follow all instructions listed below may result in electric shock, fire and/or serious injury.
General Safety
Notice the personal safety alert symbol ⚠️ used in this manual to draw your attention to a WARNING given along with the particular operating instruction. This means that the operation requires special ATTENTION, CAUTION, and AWARENESS.
⚠ WARNING! When using this wheelbarrow, basic safety precautions, including the following, should always be followed to reduce the risk of fire, electric shock, personal injury and material damage.
Work Area Safety
- Keep work area clean and well-lit. Cluttered, dark areas invite accidents.
- Do not operate power tools in explosive atmospheres, such as in the presence of flammable liquids, gases or dust. Power tools create sparks which may ignite the dust or fumes.
- Know your product – Know how to start and stop the machine. Be thoroughly familiar with the controls.
- Keep children, bystanders, and pets away – Distractions can cause you to lose control.
Electric Safety
- Power tool plugs must match the outlet. Never modify the plug in any way. Do not use any adapter plugs with earthed (grounded) power tools. Unmodified plugs and matching outlets will reduce risk of electric shock.
- Avoid body contact with earthed or grounded surfaces, such as pipes, radiators, ranges and refrigerators. There is an increased risk of electric shock if your body is earthed or grounded.
-
Do not expose power tools to rain or wet conditions. Water entering a power tool will increase the risk of electric shock.
-
Do not abuse the cord. Never use the cord for carrying, pulling or unplugging the power tool. Keep cord away from heat, oil, sharp edges or moving parts. Damaged or entangled cords increase the risk of electric shock.
- When operating a power tool outdoors, use an extension cord suitable for outdoor use. Use of a cord suitable for outdoor use reduces the risk of electric shock.
- If operating a power tool in a damp location is unavoidable, use a residual current device (RCD) protected supply. Use of an RCD reduces the risk of electric shock.
Personal Safety
- Stay alert, watch what you are doing and use common sense when operating a power tool. Do not use a power tool while you are tired or under the influence of drugs, alcohol or medication. A moment of inattention while operating power tools may result in serious personal injury.
- Use personal protective equipment. Always wear eye protection. Protective equipment such as dust mask, non-skid safety shoes, hard hat, or hearing protection used for appropriate conditions will reduce personal injuries.
-
Prevent unintentional starting. Ensure the switch is in the off-position before connecting to power source and/or BATTERY pack, picking up or carrying the tool. Carrying power tools with your finger on the switch or energising power tools that have the switch on invites accidents.
-
Remove any adjusting key or wrench before turning the power tool on. A wrench or a key left attached to a rotating part of the power tool may result in personal injury.
-
Do not overreach. Keep proper footing and balance at all times. This enables better control of the power tool in unexpected situations.
-
Dress properly. Do not wear loose clothing or jewelry. Keep your hair, clothing and gloves away from moving parts. Loose clothes, jewelry or long hair can be caught in moving parts.
-
If devices are provided for the connection of dust extraction and collection facilities, ensure these are connected and properly used. Use of dust collection can reduce dust-related hazards.
-
Do not let familiarity gained from frequent use of tools allow you to become complacent and ignore tool safety principles. A careless action can cause severe injury within a fraction of a second.
*Initial no-load voltage, when fully charged, peaks at 24 volts; nominal voltage under typical load is 21.6 volts.
Power Tool Use and Care
- Do not force the power tool. Use the correct power tool for your application. The correct power tool will do the job better and safer at the rate for which it was designed.
- Do not use the power tool if the switch does not turn it on and off. Any power tool that cannot be controlled with the switch is dangerous and must be repaired.
- Remove the battery pack from the power tool before making any adjustments, changing accessories, or storing power tools. Such preventive safety measures reduce the risk of starting the power tool accidentally.
- Store idle power tools out of the reach of children and do not allow persons unfamiliar with the power tool or these instructions to operate the power tool. Power tools are dangerous in the hands of untrained users.
- Maintain power tools and accessories. Check for misalignment or binding of moving parts, breakage of parts and any other condition that may affect the power tool's operation. If damaged, have the power tool repaired before use. Many accidents are caused by poorly maintained power tools.
- Use the power tool in accordance with these instructions, taking into account the working conditions and the work to be performed. Use of the power tool for operations different than those intended could result in a hazardous situation.
- Keep handles and grasping surfaces dry, clean and free from oil and grease. Slippery handles and grasping surfaces do not allow for safe handling and control of the tool in unexpected situations.
Service
- If your appliance requires service, contact an authorized Snow Joe® + Sun Joe® dealer or call the Snow Joe® + Sun Joe® customer service center at 1-866-SNOWJOE (1-866-766-9563). Only identical replacement parts should be utilized for repairs. This will ensure that the safety of the power tool is maintained.
- If the battery charger cable is damaged, it must be immediately replaced to avoid a hazard. Contact the Snow Joe ^® + Sun Joe ^® customer service center at 1-866-SNOWJOE (1-866-766-9563) for assistance.
IMPORTANT!
Safety Instructions for Cordless Wheelbarrow
- Do not use the machine in bad weather conditions, especially when there is a risk of lightning. This decreases the risk of being struck by lightning.
-
While operating the machine, always wear non-slip and protective footwear. Non-skid, closed-toed safety boots and shoes will reduce the risk of injury.
-
Inspect the pathway before hauling objects/materials. Familiarizing yourself with the pathway and ensuring it is wide enough to safely navigate the machine under load will help reduce losing control of the machine.
- Use extreme caution on slippery, loose and unstable terrain. Wet and slippery surfaces, such as wet grassy areas, snow or ice, and loose and unstable terrain, such as sand or gravel surfaces, may cause the machine to lose traction and may adversely affect steering, braking and stability.
- Do not operate the machine on excessively steep slopes. This reduces the risk of loss of control, slipping and falling, which may result in personal injury. Slopes greater than the maximum recommended grade and side grades may increase the risk of instability and may adversely affect the ability to stop safely.
- When working on slopes, always be sure of your footing, always work across the face of slopes, never up or down, and exercise extreme caution when changing direction. This reduces the risk of loss of control, slipping and falling, which may result in personal injury.
- Whenever possible, use level areas for stopping, loading, and unloading, and never leave machine unattended on a slope. The machine is more unstable when resting on a slope than when resting on a level surface.
- When stopping on slopes, face the machine uphill or downhill and block wheels. The machine is less stable when facing across a slope. Wheels can potentially turn and roll downhill even while the front wheel parking brake is set.
- When leaving the machine unattended, set parking brake once the machine is located in a safe stopping area. The parking brake prevents unwanted movement of the middle terrain wheel and can improve stability.
- Ensure the bucket is in its down position and is secured in place when not dumping the load and when storing the machine. Unsecured bucket can unexpectedly open or shift.
- Ensure that ramps are clean, strong and secure. In order to reduce the risk of injury, all ramps must be clear of loose debris and strong enough to withstand the weight of anticipated loads that will be moved over them. They must have adequate blocking underneath and to both sides to eliminate deflections and side-to-side movement under load. All ramps must be wide enough to have sure footing while hauling loads across them.
-
Avoid extending ramps without toe boards or railings over open spaces. Elevated open spaces and open trenches invite accidental falls and increase the potential for serious injury. Use toe boards or railings on ramps over open spaces to prevent driving the machine off the ramp.
-
Ensure all locking screws are tightly secure before using. Locking screws on the wheels, bucket and frames must be secure to prevent unwanted movement of these adjustable parts of the machine.
- Never operate the machine in an overloaded condition. Make sure the machine has the proper capacity rating for the objects or materials that have to be hauled. Excessive loads will make the machine more difficult to maneuver and stop, will increase stopping time and distance, and will increase the risk of instability.
- Never operate your machine in an overstacked condition. Stacking material above the bucket rim or over the sides of the bucket can cause the machine to be out of balance and control.
- Use containers and tie-downs to secure loads. Loose and/or insecure loads are more likely to shift, which can result in loss of stability and control.
- Always maintain a firm grip on handles. Loss of control can increase the risk of personal injury.
- Remove safety key when not in use. The safety key prevents unwanted, powered use of the machine, such as by children or other untrained or unauthorized persons. Without the key, electric power cannot be turned “on”.
- Do not disassemble, repair, or modify this machine.
Operation Safety
- When operating the machine, stand behind the machine and hold the handles firmly.
- Do not allow others to ride on the machine.
- When operating the machine in reverse and walking backward, watch behind you and be careful not to slip or trip.
- Do not use the machine when visibility is poor because there is a risk of striking obstacles.
- When operating the machine on rough ground, decrease speed and exercise caution.
- When using the machine, avoid soft ground to prevent overturn due to the shoulder of the road collapsing.
- Do not operate the machine on upward slopes greater than 15^ .
- If you find any abnormality, stop the machine on flat ground. Before inspecting the machine, pull the brake lever and lock the brake, and then turn the power off.
- Before operating the machine, make sure that the carrier lock is fully engaged. If it's not, there is a risk of accident or injury as the carrier or bucket may be tilted and the objects may fall when going downhill.
Slope Operation
Slopes are major factors related to slip and fall accidents, which can result in severe injury. Operation on all slopes requires extra caution. If you feel uneasy on a slope, do not walk on it.
- Do not cross along slopes.
-
Be sure to decrease speed and exercise caution.
-
Exercise caution when starting or stopping the machine on slopes.
-
If the loads become less stable on slopes, firmly secure the loads with ropes.
-
If the machine becomes unstable due to the condition of the road, keep the load to a minimum.
-
To avoid the view being obscured on slopes, keep the height of the load to a minimum.
-
Never park the machine on steep slopes. Park the machine on flat ground, pull the brake lever and lock the brake, and then turn the power off.
-
Do not change the direction or speed on steep slopes.
-
Do not release the switch trigger on upward slopes. The machine may go in reverse and cause an accident.
-
Make sure that the remaining battery capacity is enough before operating on slopes. If the remaining battery capacity is not enough, charge the battery or replace it with a charged one.
Loading/Dumping Safety
- Do not overload the carrier. When loading objects, be sure to follow the instructions and add load within the load of the wheelbarrow.
- Firmly secure the objects with ropes.
- Load the objects within the carrier or bucket. If the objects protrude from the carrier or bucket, there is a risk of accidents due to the objects falling or making contact with other objects or obstacles.
- Be sure that the height of loaded objects are below eye level. If the load is too high, it is dangerous because the view is obscured. Also, there is a risk of overturning and injury if the load is unbalanced.
- To avoid possible overturning and injury, load the objects on the carrier or bucket evenly.
- Before loading the objects or operating the machine, make sure that the lock lever is fully pulled down and completely locked.
- To keep the weight balance, load heavy objects first.
- Load and unload objects only on flat ground.
- When lifting and tilting the carrier or bucket, hold the handles and frame firmly, and work with a stable posture.
-
When dumping, be alert for unexpected movement of the machine. It is recommended to brace the machine by using the handles and braking functions.
-
Ensure the intended dumping zone has sufficient area for clear and safe dumping. Provide barriers to persons and property as necessary to limit spread of dumped materials. Dumped materials, such as rocks and bricks, can quickly and easily spread or roll away from the intended dumping zone and increase the risk of serious personal injury or damaging nearby property.
Battery & Charger Safety Instructions
We pay a great deal of attention to the design of every battery pack to ensure that we supply you with batteries that are safe, durable and have a high energy density. The battery cells have a wide range of safety devices. Each individual cell is initially formatted and its electrical characteristic curves are recorded. This data is then used exclusively to be able to assemble the best possible battery packs.
Despite all the safety precautions, caution must always be exercised when handling batteries. The following points must be obeyed at all times to ensure safe use. Safe use can only be guaranteed if undamaged cells are used. Incorrect handling of the battery pack can cause cell damage.
IMPORTANT! Analyses confirm that incorrect use and poor care of high-performance batteries are the main factors responsible for personal and/or product damage.
⚠ WARNING! Use only approved replacement batteries; other batteries may damage the power tool and cause it to malfunction, which can lead to serious personal injury.
⚠ WARNING! Do not use a battery pack or appliance that is damaged or modified. Damaged or modified batteries may exhibit unpredictable behavior resulting in fire, explosion or risk of injury.
Have your battery pack serviced by a qualified repair person using only identical replacement parts. This will ensure that the safety of the battery pack is maintained.
⚠️CAUTION! To reduce the risk of injury, use only official iON+ 24V designated chargers with the iON+ 24V battery pack. The use of other batteries or chargers poses a risk of fire, personal injury and damage. Do not wire a battery pack to a power supply plug or car cigarette lighter, as such misuse will permanently disable or damage the battery pack.
- Avoid dangerous environments – Do not charge the battery pack in rain, snow or in damp or wet locations. Do not use the battery pack or charger in the presence of explosive atmospheres (gaseous fumes, dust or flammable materials) because sparks may be generated when inserting or removing the battery pack, which could lead to a fire.
- Charge in a well-ventilated area – Do not block the charger vents. Keep them clear to allow for proper ventilation. Do not allow smoking or open flames near a charging battery pack. Vented gases may explode.
NOTE: The safe temperature range for the battery is 41^ F – 105^ F ( 5^ C – 40.5^ C). Do not charge the battery outside in freezing weather; charge it at room temperature.
- Maintain charger cord – When unplugging the charger, pull the plug, not the cord, from the receptacle to reduce the risk of damage to the electrical plug and cord. Never carry the charger by its cord or yank it by the cord to disconnect it from the receptacle. Keep the cord away from heat, oil and sharp edges. Make sure the cord will not be stepped on, tripped over or subjected to damage or stress when the charger is in use. Do not use the charger with a damaged cord or plug. Replace a damaged charger immediately.
- Do not use an extension cord unless it is absolutely necessary – Using the wrong, damaged or improperly wired extension cord poses a risk of fire and electric shock. If an extension cord must be used, plug the charger into a properly wired 16 gauge or larger extension cord with the female plug matching the male plug on the charger. Make sure that the extension cord is in good electrical condition.
- Charger 24VCHRG-QC is rated for 100 – 240 volt AC only – The charger must be plugged into an appropriate receptacle.
- Do not use an electrical adapter – Use of an adapter is not recommended or sold by the battery charger or battery pack manufacturer.
- Unplug charger when not in use – Make sure to remove battery packs from unplugged chargers.
⚠ WARNING! To reduce the risk of electric shock, always unplug the charger before performing any cleaning or maintenance. Do not allow water to flow into the charger. Use a Ground Fault Circuit Interrupter (GFCI) to reduce shock hazards.
- Do not burn or incinerate battery packs – Battery packs may explode, causing personal injury or damage. Toxic fumes and materials are created when battery packs are burned.
- Do not crush, drop or damage battery packs – Do not use the battery pack or charger if they have sustained a sharp blow, been dropped, run over or have been damaged in any way (i.e. pierced with a nail, hit with a hammer, stepped on, etc.).
- Do not disassemble – Incorrect reassembly may pose a serious risk of electric shock, fire or exposure to toxic battery chemicals. If the battery or charger is damaged, contact an authorized Snow Joe ^ + Sun Joe ^ dealer or call the Snow Joe ^ + Sun Joe ^ customer service center at 1-866-SNOWJOE (1-866-766-9563) for assistance.
-
Battery chemicals cause serious burns – Never let a damaged battery pack contact the skin, eyes or mouth. If damaged, battery chemicals will react violently with air; use rubber or neoprene gloves to safely dispose of the battery. If skin is exposed to battery chemicals, wash the affected area with soap and water. If eyes are exposed to battery chemicals, immediately flush with water for 20 minutes and seek medical attention. Remove and dispose of contaminated clothing.
-
Do not short circuit – When battery pack is not in use, keep it away from other metal objects, like paper clips, coins, keys, nails, screws or other small metal objects that can make a connection from one terminal to another. Shorting the battery terminals together may cause burns or a fire.
- Store your battery pack and charger in a cool, dry place – Do not store the battery pack or charger where temperatures may exceed 105°F (40.5°C), such as in direct sunlight or inside a vehicle or metal building during the summer.
Information about the battery
- The battery pack supplied with your cordless power tool is only partially charged. The battery pack has to be charged completely before you use the tool for the first time.
- For optimum battery performance, avoid low discharge cycles by charging the battery pack frequently.
- Store the battery pack in a cool place, ideally at 77^ F ( 25^ C) and charged to at least 40%.
-
Lithium-ion batteries are subject to a natural aging process. The battery pack must be replaced at the latest when its capacity falls to just 80% of its capacity when new. Weakened cells in an aged battery pack are no longer capable of meeting the high power requirements needed for the proper operation of your cordless wheelbarrow, and therefore pose a safety risk.
-
Do not throw battery packs into an open fire as this poses a risk of explosion.
-
Do not ignite the battery pack or expose it to fire.
-
Do not exhaustively discharge batteries. A complete discharge will damage the battery cells. The most common cause of exhaustive discharge is lengthy storage. Stop working as soon as the performance of the battery falls noticeably or the electronic protection system triggers. For optimum battery performance, charge the battery pack frequently. Place the battery pack in storage only after it has been fully charged.
-
Protect batteries and the tool from overloads. Overloads will quickly result in overheating and cell damage inside the battery housing even if this overheating is not apparent externally.
-
Avoid damage and shocks. Immediately replace batteries that have been dropped from a height of more than 3 feet (1 meter) or those that have been exposed to violent shocks, even if the housing of the battery pack appears to be undamaged. The battery cells inside the battery may have suffered serious damage. In such instances, please read the waste disposal information for proper battery disposal.
-
If the battery pack suffers overloading and overheating, the integrated protective cutoff will switch off the equipment for safety reasons.
IMPORTANT! Do not press the ON/OFF trigger switch any more if the protective cutoff has been activated. This may damage the battery pack.
- Recharge only with the charger specified by the manufacturer. A charger that is suitable for one type of battery pack may create a risk of fire when used with another battery pack.
- Use appliances only with specifically designated battery packs. Use of any other battery packs may create a risk of injury and fire.
- Under abusive conditions, liquid may be ejected from the battery; avoid contact. If contact accidentally occurs, flush with water. If liquid contacts eyes, additionally seek medical help. Liquid ejected from the battery may cause irritation or burns.
- Do not use a battery pack or appliance that is damaged or modified. Damaged or modified batteries may exhibit unpredictable behavior resulting in fire, explosion or risk of injury.
- Do not expose a battery pack or appliance to fire or excessive temperature. Exposure to fire or temperature above 265°F (130°C) may cause explosion.
- Follow all charging instructions and do not charge the battery pack or appliance outside of the temperature range specified in the instructions. Charging improperly or at temperatures outside of the specified range may damage the battery and increase the risk of fire.
Information about the charger and the charging process
- Please check the data marked on the rating plate of the battery charger. Be sure to connect the battery charger to a power supply with the voltage marked on the rating plate. Never connect it to a different mains voltage.
- Protect the battery charger and its cord from damage. Keep the charger and its cord away from heat, oil and sharp edges. Have damaged cords repaired without delay by a qualified technician at an authorized Snow Joe ^® + Sun Joe ^® dealer or call the Snow Joe ^® + Sun Joe ^® customer service center at 1-866-SNOWJOE (1-866-766-9563).
-
Electrical plugs must match the outlet. Never modify the plug in any way. Do not use any adapter plugs with grounded appliances. Unmodified plugs and matching outlets will reduce the risk of electric shock.
-
Keep the battery charger, battery pack(s) and the cordless tool out of the reach of children.
- Do not use the supplied battery charger to charge other cordless tools.
- During periods of heavy use, the battery pack will become warm. Allow the battery pack to cool to room temperature before inserting it into the charger to recharge.
- Do not overcharge batteries. Do not exceed the maximum charging times. These charging times only apply to discharged batteries. Frequent insertion of a charged or partially charged battery pack will result in overcharging and cell damage. Do not leave batteries in the charger for days on end.
- Never use or charge batteries if you suspect that it has been more than 12 months since the last time they were charged. There is a high probability that the battery pack has already suffered dangerous damage (exhaustive discharge).
- Charging batteries at a temperature below 41^ F ( 5^ C) will cause chemical damage to the cells and may cause a fire.
- Do not use batteries that have been exposed to heat during the charging process, as the battery cells may have suffered dangerous damage.
- Do not use batteries that have suffered swelling or deformation or those that exhibit other atypical symptoms (gassing, hissing, cracking, etc.).
Protection from environmental influences
- Wear suitable work clothes. Wear safety goggles.
- Protect your cordless tool and the battery charger from moisture and rain. Moisture and rain can cause dangerous cell damage.
- Do not use the cordless tool or the battery charger near vapors and flammable liquids.
- Use the battery charger and cordless tools only in dry conditions and at an ambient temperature of 41^ F – 105^ F ( 5^ C – 40.5^ C).
- Do not keep the battery charger in places where the temperature may reach over 105^ F ( 40.5^ C). In particular, do not leave the battery charger in a car that is parked in the sunshine.
-
Protect batteries from overheating. Overloads, overcharging and exposure to direct sunlight will result in overheating and cell damage. Never charge or work with batteries that have been overheated – replace them immediately, if possible.
-
Store the battery pack, charger and your cordless tool only in dry locations with an ambient temperature of 41^ F – 105^ F ( 5^ C – 40.5^ C). Protect the battery pack, charger and cordless tool from humidity and direct sunlight. Only place fully charged batteries in storage (charged to at least 40%).
- Prevent the lithium-ion battery pack from freezing. Battery packs that were stored below 32^ F ( 0^ C) for more than 60 minutes must be discarded.
- When handling batteries, be wary of electrostatic charge. Electrostatic discharges can damage the electronic protection system and the battery cells. To avoid electrostatic discharges, never touch the battery terminals.
Safety Symbols
The following table depicts and describes safety symbols that may appear on this product. Read, understand, and follow all instructions on the machine before attempting to assemble and operate.
| Symbols SymbolsDescriptions Descriptions | |||
 | READ THE OPERATOR'S MANUAL(S) – Read, understand, and follow all instructions in the user manual(s) before attempting to assemble and operate. |  | SAFETY ALERT – Indicates a precaution, a warning, or a danger. |
 | WARNING! Do not expose the unit to rain or wet conditions. Keep dry. |  | Pinch and crush hazard. Keep hands clear during operation. |
 | Indoor use only. Only use battery charger indoors. | ||
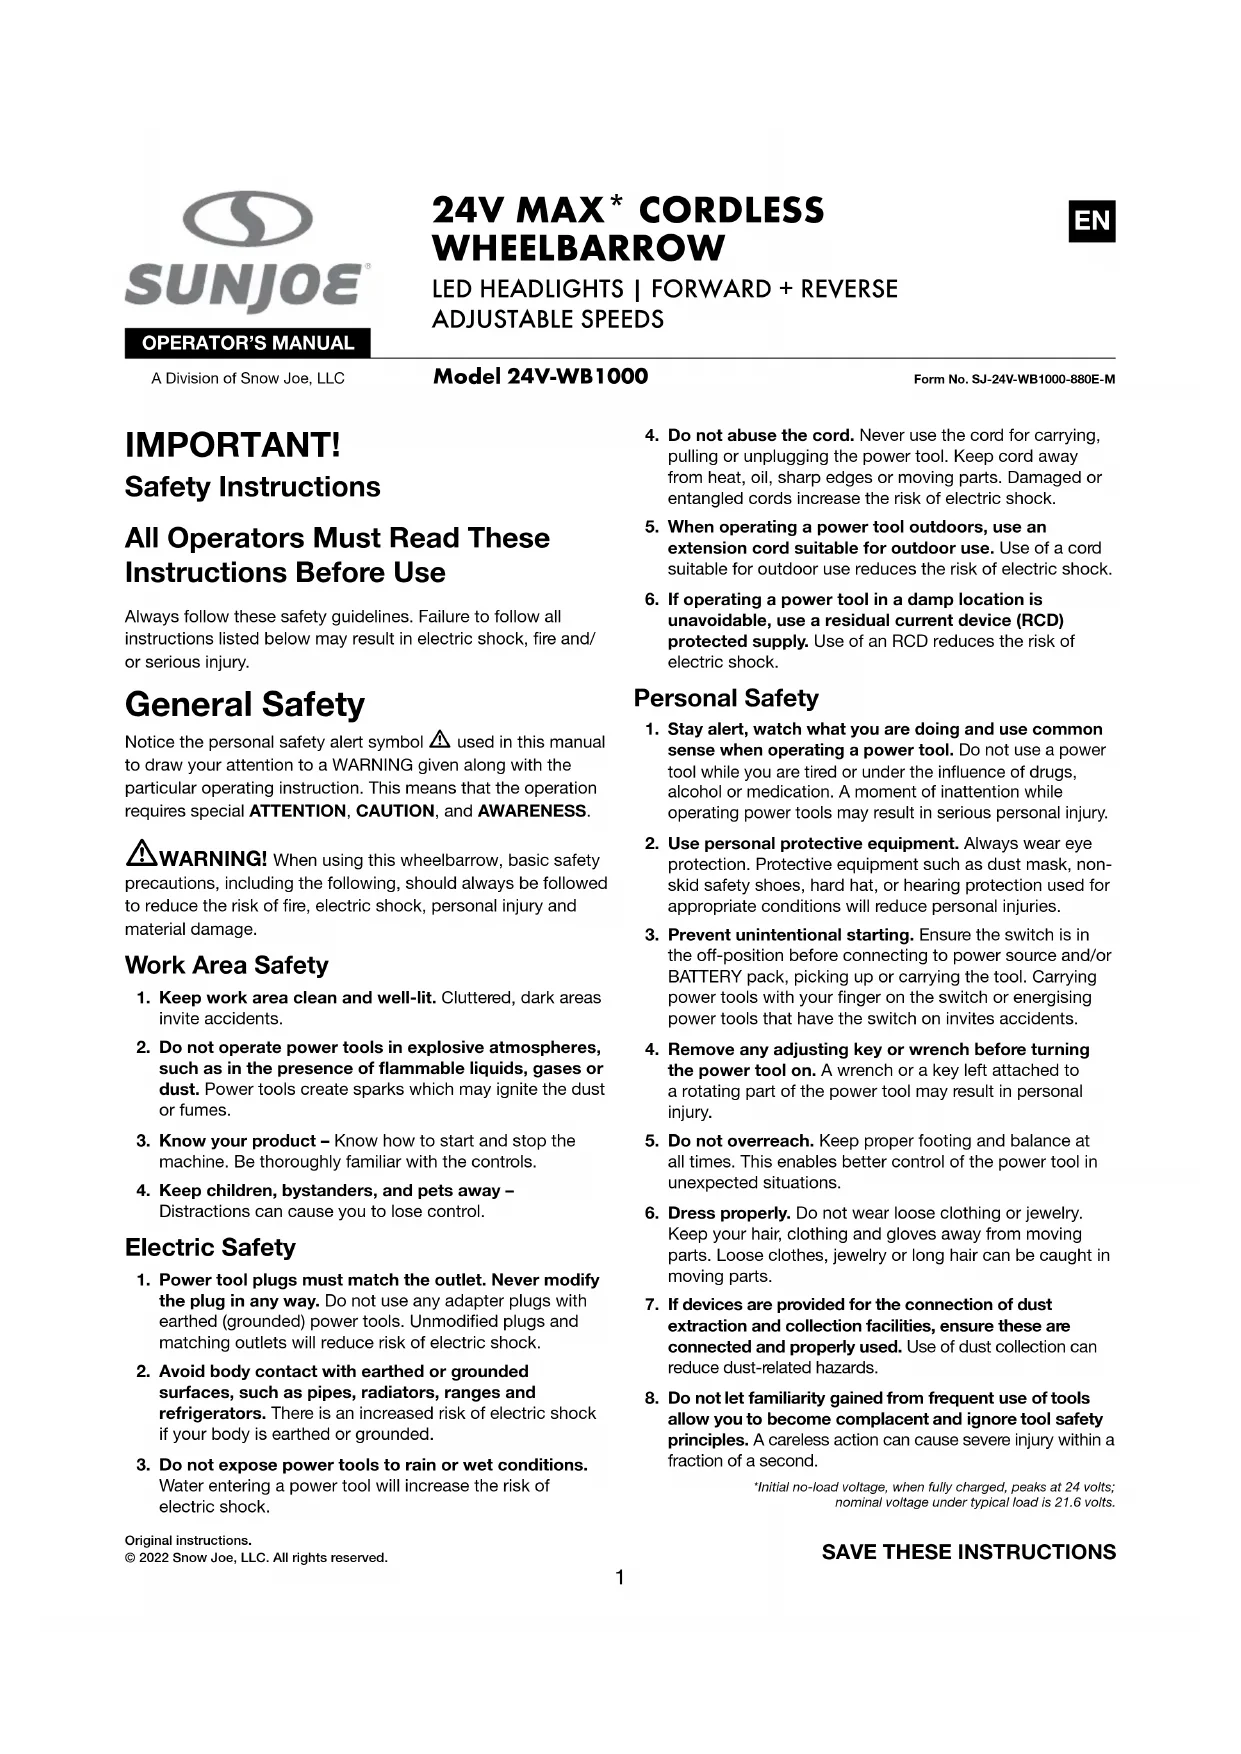
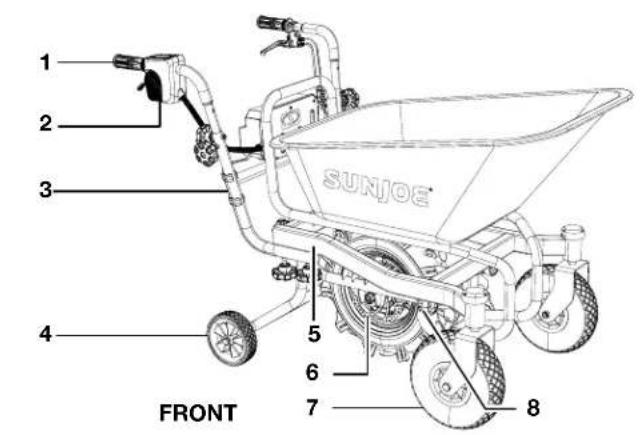
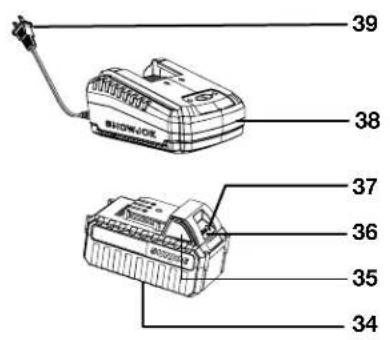
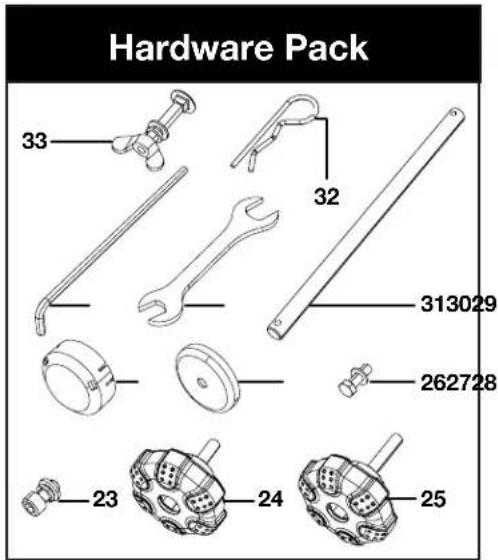
Know Your Cordless Wheelbarrow
Read the owner's manual and safety instructions carefully before operating the cordless wheelbarrow. Compare the illustration below to the cordless wheelbarrow in order to familiarize yourself with the location of the various controls and adjustments. Save this manual for future reference.
-
Handle grips (2)
-
Switch box
-
Battery compartment frame
-
Rear wheels (2)
-
Base frame
-
Brake disc
-
Front wheels (2)
-
LED headlights (2)
-
Bucket
-
Left handle
-
Brake lock button
-
Hand brake
-
Right handle
-
Control panel
-
Drive trigger
-
Safety key
-
Battery compartment
-
Carrier lock
-
Cable clips (4)
-
Rear wheel frame
-
Terrain wheel
-
Carrier frame
-
M6x16 screw + flat washer + spring washer (2)
-
Hand knob with short bolt (8)
-
Hand knob with long bolt (2)
-
M8x20 screw + washer (2)
-
Dust cap (2)
-
Cover cap (2)
-
Hex wrench
-
Wrench
-
Rotary rod
-
Cotter pin (2)
-
Bolt + spring washer + flat washer + wing nut (4)
-
iON+ 24V lithium-ion battery (24VBAT) featuring exclusive EcoSharp® technology
-
Push lock button
-
Battery indicator
-
Push button for battery indicator
-
24V iON+ lithium-ion quick charger (24VCHRG-QC)
-
Charger plug
Technical Data
Motor 500 W Brushless
Battery Voltage Max ^* 24V D.C.
Battery Capacity....4.0 Ah
Charger Input 120V AC | 60 Hz | 75 W
Charger Output 26V DC | 2.2 A
Charge Time Max 1 hr 50 mins
Loading Capacity Max 333 lbs (151 kg)
Cargo Tub Volume 2.65 Cu Ft (75 L)
Speed .... Forward: 2.2 mph High | 1 mph Low Backwards: 0.6 mph
Adjustable Handle Height ..... 36.2 inch | 33.5 inch | 30.7 inch (92 cm | 85 cm | 78 cm)
Max Incline 15°
Brake 7" (17.8 cm) Mechanical disk brake
Wheel Size ...... Front Wheel : 10" (25.4 cm)
Terrain Wheel: 16.5" (42 cm)
Rear Wheel: 6" (15.2 cm)
Net Weight 102 lbs (46.3 kg)
*Initial no-load voltage, when fully charged, peaks at 24 volts; nominal voltage under typical load is 21.6 volts.
Unpacking
Carton Contents
- Wheelbarrow base frame with terrain wheel pre-assembled
- Front wheel assembly (2 sets)
- Battery compartment frame
- Left handle
- Right handle
- Carrier frame
- Bucket
- Rear wheel frame
• 2 LED headlights (connected with the base frame) - Handle knob with short bolt (8 sets)
- Handle knob with long bolt (2 sets)
- Rotary rod + 2 cotter pins
- Bolt + spring washer + flat washer + wing nut (4 sets)
- Dust cap + cover cap + M8x20 screw + washer (2 sets)
• M6x16 screw + flat washer + spring washer (2 sets) - Safety key
- Wrench
-
Hex wrench
-
Cable clips (4)
• iON+ 24V lithium-ion battery - iON+ 24V lithium-ion battery charger
-
Manual with registration card
-
Carefully remove the cordless wheelbarrow and check to see that all of the above items are supplied.
- Inspect the product carefully to make sure no breakage or damage occurred during shipping. If you find damaged or missing parts, DO NOT return the unit to the store. Please call the Snow Joe ^® + Sun Joe ^® customer service center at 1-866-SNOWJOE (1-866-766-9563).
NOTE: Do not discard the shipping carton and packaging materials until you are ready to use your new cordless wheelbarrow. The packaging is made of recyclable materials. Properly dispose of these materials in accordance with local regulations.
IMPORTANT! The equipment and packaging materials are not toys. Do not let children play with plastic bags, foils or small parts. These items can be swallowed and pose a suffocation risk!
Battery Pack Operation
The equipment is powered by a lithium-ion battery. The battery pack is completely sealed and maintenance free.
Battery Charge Level Indicator
The battery pack is equipped with a push button for checking the charge level. Simply press the push button to read off the battery charge level from the LEDs of the battery indicator:
| Lights Light Indicators | |
| Charge level button | |
| The battery is at 30% capacity | |
| The battery is at 60% capacity | |
| The battery is fully charged | |
NOTE: If the battery indicator button does not appear to be working, charge the battery.
NOTE: Immediately after using the battery pack, the battery indicator button may display a lower charge than it will if checked a few minutes later. The battery cells “recover” some of their charge after resting.
Charger Operation
WARNING! Only charge Sun Joe® 24V lithium-ion battery pack with compatible Sun Joe® 24V lithium-ion chargers. Other types of chargers may cause personal injury and damage.
To reduce the risk of electric shock, do not allow water to enter into the charger.
Charging the Battery
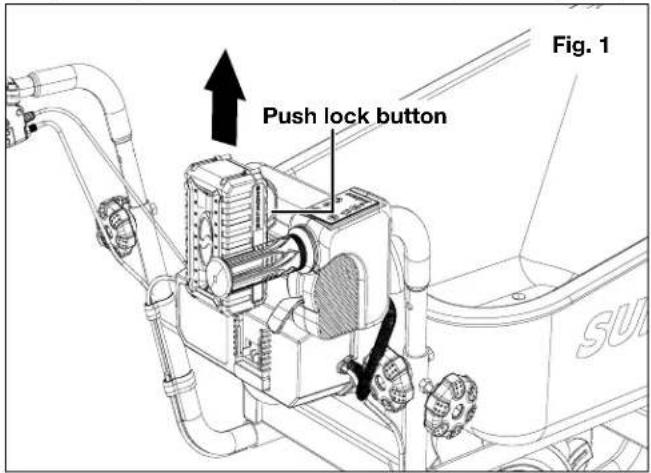
- Push the push lock buttons on either side of the battery pack to pull it out from the battery compartment (Fig. 1)
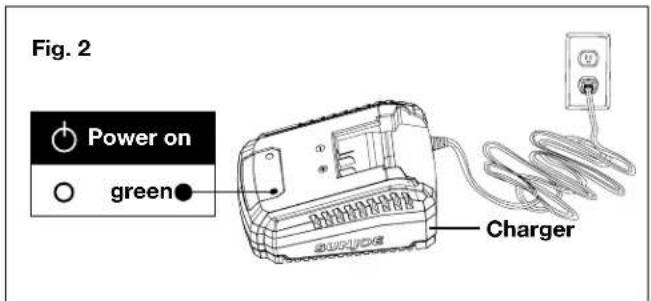
- Check that the mains voltage is the same as that marked on the rating plate of the battery charger. Then, insert the charger's plug into the electrical wall outlet. When you plug in the charger, the top right green light will illuminate and stay green (Fig. 2).
- Place the battery pack into the charger by sliding the pack to lock it into position. When you insert the battery into the charger, the top right green light will go off, and the top left red light will illuminate to indicate that the battery is charging (Fig. 3).
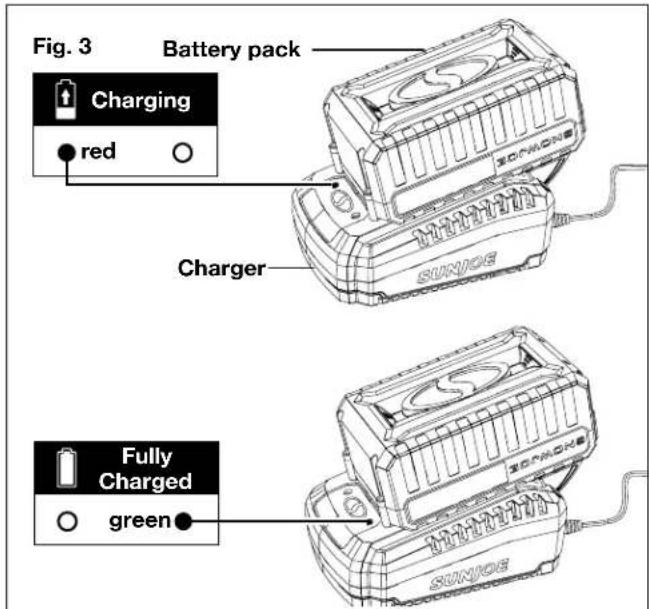
- When the charger light turns green, the battery is fully charged (Fig. 3).
NOTE: A fully discharged pack with an internal temperature in the normal range will fully charge in 1 hr 50 mins (between 32°F/0°C and 113°F/45°C).
-
If the light indicators do not come on at all, check that the battery pack is fully seated into the bay. Remove the battery pack and reinsert. If the problem persists, contact an authorized Snow Joe ^® + Sun Joe ^® dealer or call the Snow Joe ^® + Sun Joe ^® customer service center at 1-866-SNOWJOE (1-866-766-9563) for assistance.
-
When charging is complete, remove the battery from the charger by pressing the push lock buttons and sliding the battery backward to unlock it from the charger.
Assembly
⚠️CAUTION! Make sure the battery is not inserted and the machine is switched off before carrying out any work on the machine.
Front Wheels Assembly
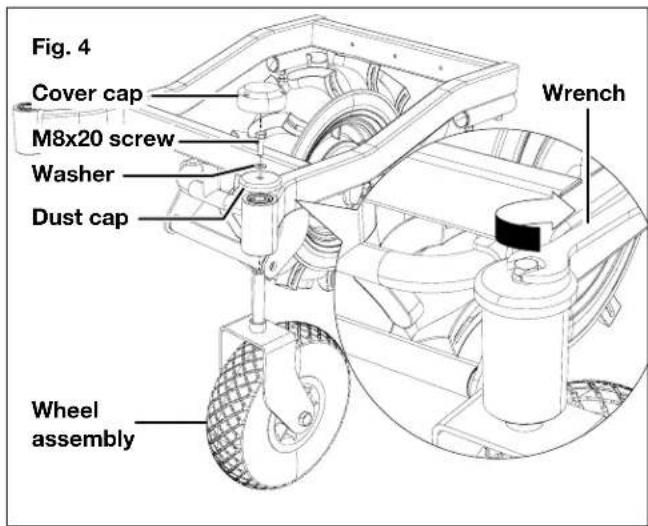
- Insert one of the front wheel assemblies into one opening on the front of the base frame. Cover with the dust cap, and fix with one set of the M8x20 screw + washer as shown below. Use the wrench to rotate the screw clockwise to secure. Place a cover cap on the top (Fig. 4).
- Repeat for the other front wheel assembly.
Base Unit Assembly
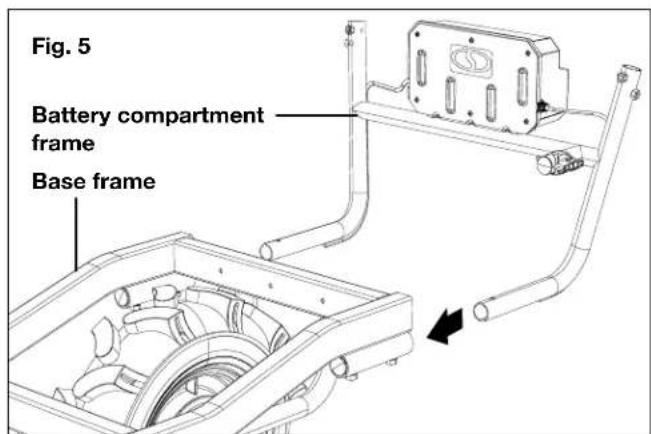
- Place the base frame with wheels on a stable ground. Insert the battery compartment frame into the base frame as shown below (Fig. 5).
- Fix the assembly with 4 sets of hand knobs with short bolt (Fig. 6).

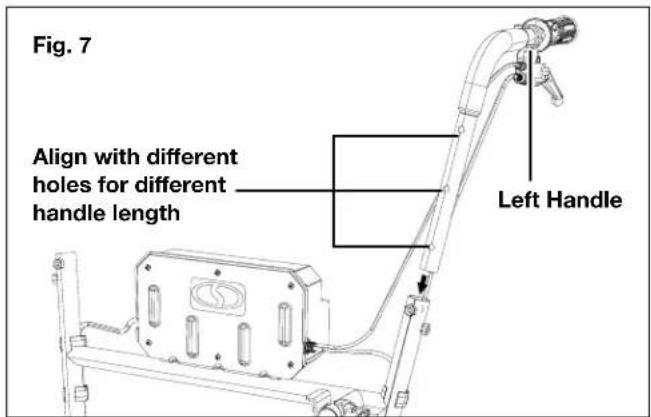
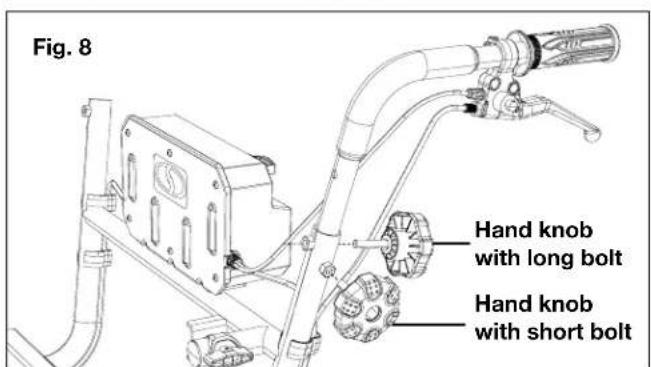
- Insert the left handle into the left side of the battery compartment frame, fix with a hand knob with long bolt from the back and a hand knob with short bolt from the side (Figs. 7 - 8).
NOTE: The height of the handles can be adjusted in 3 levels by aligning the hole on the battery compartment frame with one of the 3 holes on the handle (Fig. 7). Make sure the two handles are set in the same position.
-
Repeat the last operation to assemble the right handle.
-
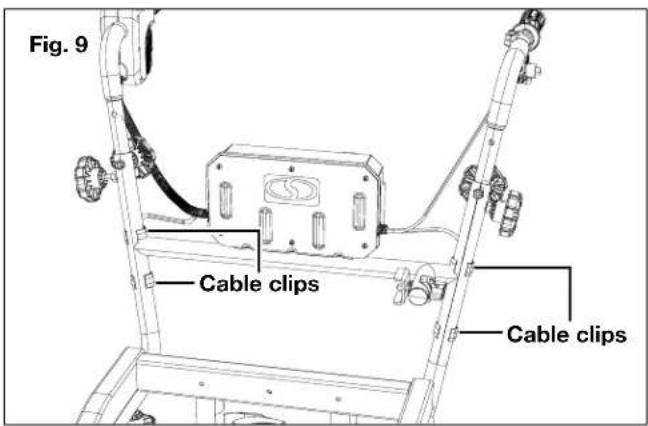
Use the cable clips to clip the cables on the frame as needed (Fig. 9).
Rear Wheel Frame Assembly
- Insert the rear wheel frame into the base frame as shown below (Fig. 10).
NOTE: The height of the rear wheel frame can be adjusted in 3 levels by aligning the hole on the base frame with one of the 3 holes on the rear wheel frame. Insert the remaining 2 sets of handle knob with short bolt in the aligned holes of the rear wheel frame and the base frame as shown (Fig. 10).
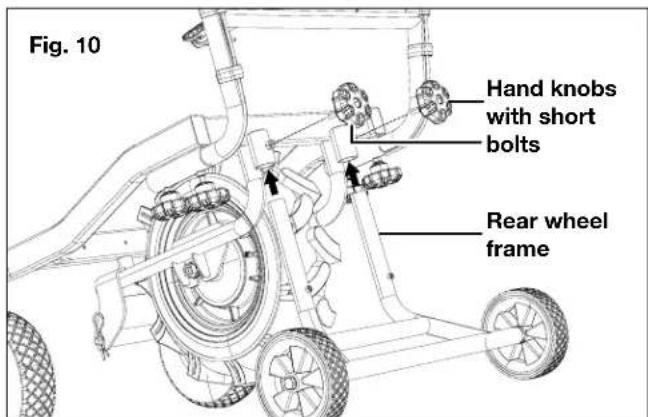
NOTE: When using the wheelbarrow on slope, it's recommended to assemble the rear wheel frame by the lower 2 holes, so the middle terrain wheel will always be on the ground.
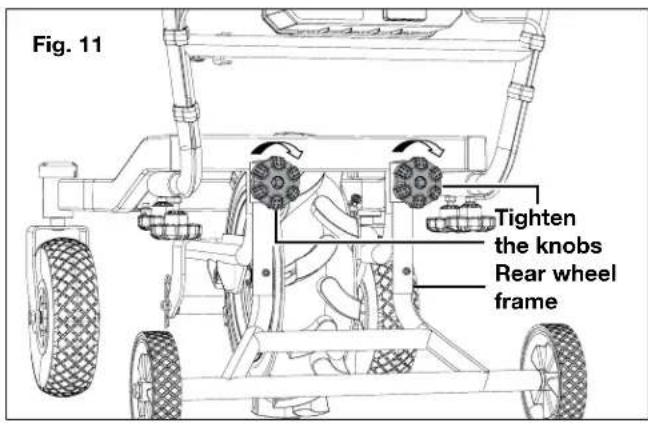
- Secure the assembly by turning the hand knobs clockwise firmly (Fig. 11).
LED Headlights Assembly
- Place one of the light assemblies on the inside of the base frame, as shown. Align the biggest hole with the hole of the base frame (Fig. 12).

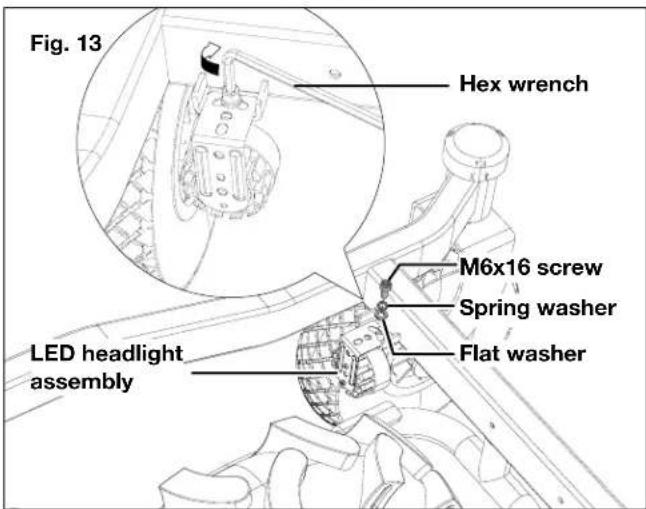
- Secure the LED light assembly with a set of M6x16 screw + flat washer + spring washer. Use the hex wrench to turn the screw clockwise tightly (Fig. 13).
- Repeat the above steps to assemble the other LED headlight.
Carrier and Bucket Assembly
- Fit the carrier frame on the base frame in place, make sure the bolt of the carrier lock is inserted in the opening on the side of the carrier frame, and the end pole of the carrier frame is fit in the middle of the 2 panels under the base frame, as shown. (Fig. 14).
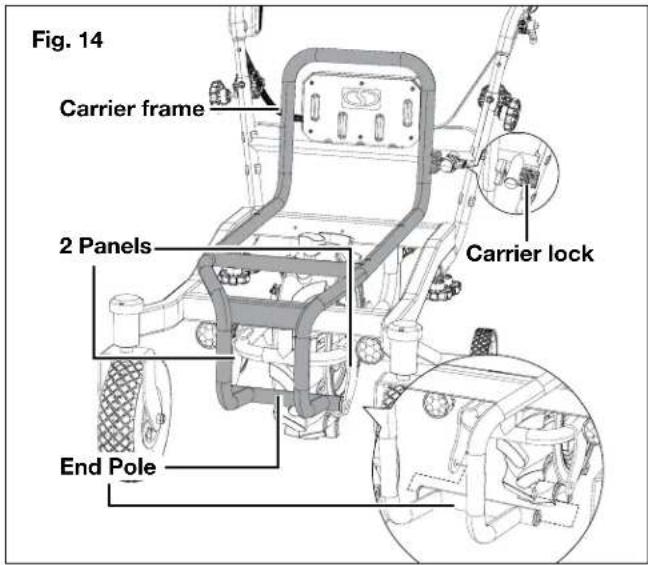
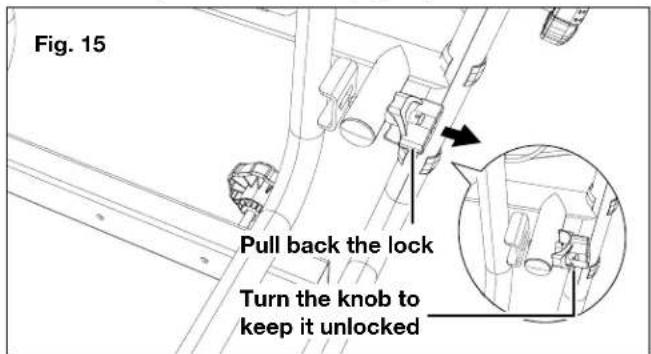
NOTE: Pull the lock backwards to insert the carrier lock bolt in the opening of the carrier frame. You can turn the lock knob 90 degrees to keep it unlocked while assembling the carrier frame (Fig. 15).
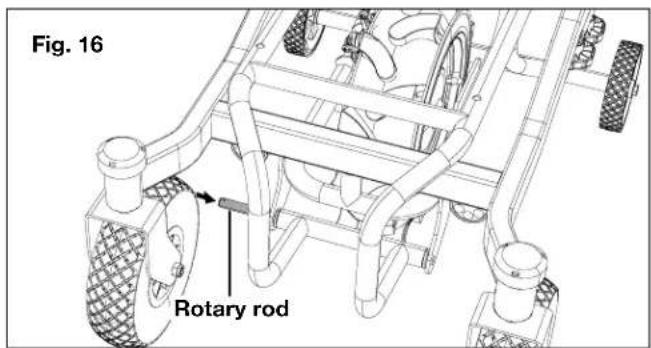
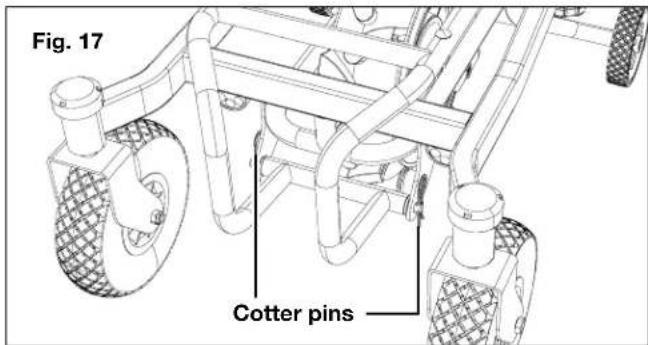
- Insert the rotary rod into the aligned holes of the 2 panels under the base frame and the end of the carrier frame, and lock the assembly with 2 cotter pins on both sides (Figs. 16 - 17).
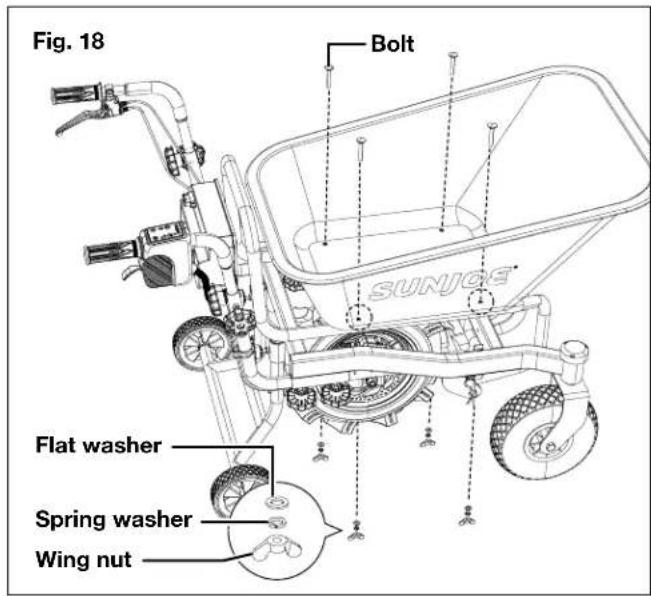
- Fit the bucket onto the carrier frame, making sure the 4 holes on the bottom of the bucket are aligned with the 4 holes on the carrier frame. Fix the bucket and carrier assembly with the provided 4 sets of bolts, spring washers, flat washers and wing nuts, as shown. Tighten securely for a stable assembly (Fig. 18).
Operation
WARNING! Do not allow familiarity with this product
to make you careless. Remember that a careless fraction of a second is sufficient to inflict serious injury.
WARNING! Always remove battery pack from the machine when you are assembling parts, making adjustments, cleaning, or when not in use. Removing battery pack will prevent accidental starting that could cause serious personal injury.
Control Panel (Fig. 19)

- On/Off Button - Press the Ⓞ button to activate the circuit.
- Direction Button – The wheelbarrow is set in forward mode by default. Press the ⏻ button to change to backward direction. Press again to set back in forward mode. The direction indicator LED will lit up correspondingly to indicate the current direction setting.
NOTE: The direction button will not be available while pulling the drive trigger.
NOTE: There will be a short beep sound when operating the machine in reverse.
- Speed Button – The wheelbarrow is set in speed 1 (1 mph) by default. Press the ⏻ button to change to speed 2 (2.2 mph). Press again to set back to speed 1. The speed indicator LED will light up correspondingly to indicate the current speed.
NOTE: The speed setting is only available when the wheelbarrow is set in forward direction. When going backward, the speed will be set in a fixed 0.6 mph.
- Headlight Switch – Press the 😊 to turn on the headlights on the front. Press again to turn off the headlights.
Starting + Stopping
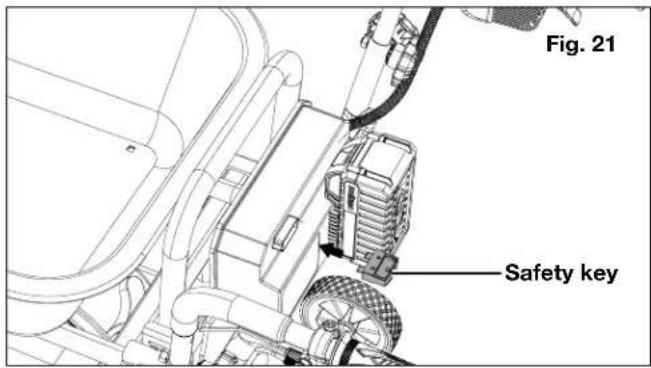
- Make sure the drive trigger is in the off position; insert the battery in the battery compartment. Push to make sure it is locked in place (Fig. 20).

- Insert the safety key into the key slot (Fig. 21).
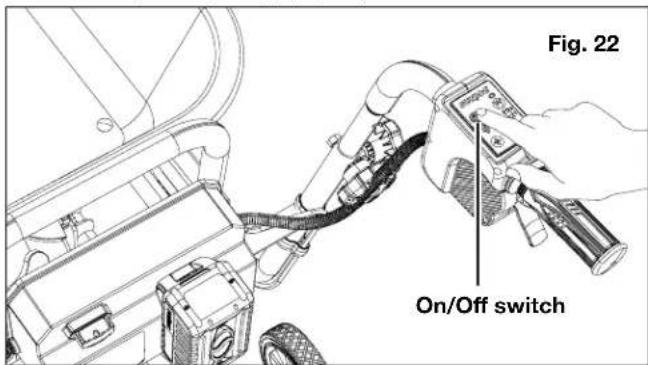
- Press the on/off switch until the LED indicator on the control panel lights up (Fig. 22).
- Adjust the direction and speed as needed.
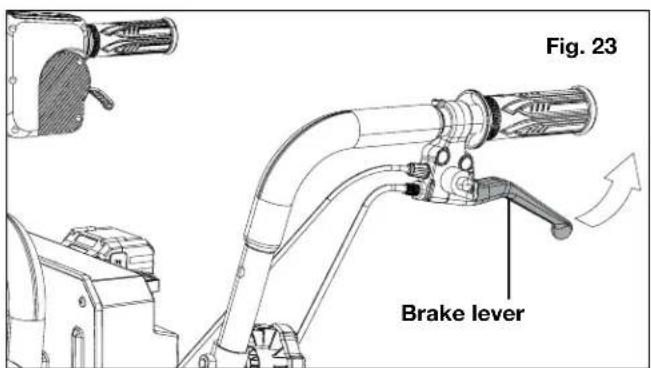
- Release the brake and the brake lock by pulling the brake lever (Fig. 23).
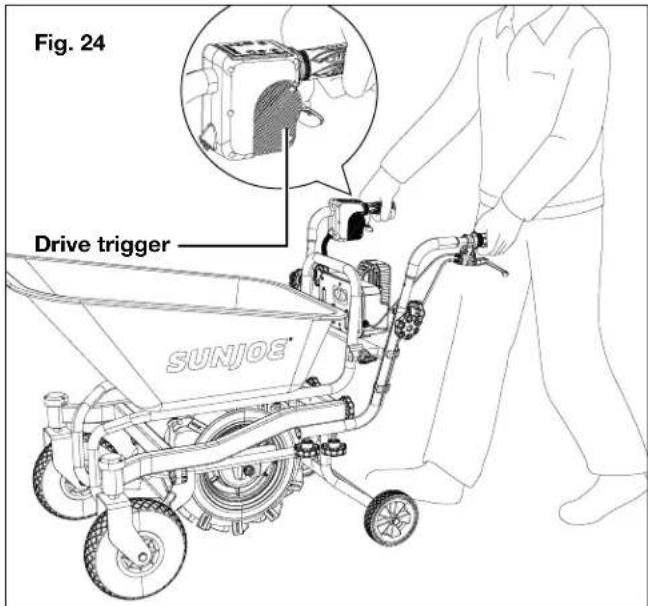
- Stand behind the wheelbarrow and hold the handles firmly with both hands. Squeeze the drive trigger. The wheelbarrow will start moving (Fig. 24).
- To turn off the wheelbarrow, release the drive trigger and pull the brake lever. To lock the brake lever, press the brake lock button while pulling the brake lever (Fig. 25).
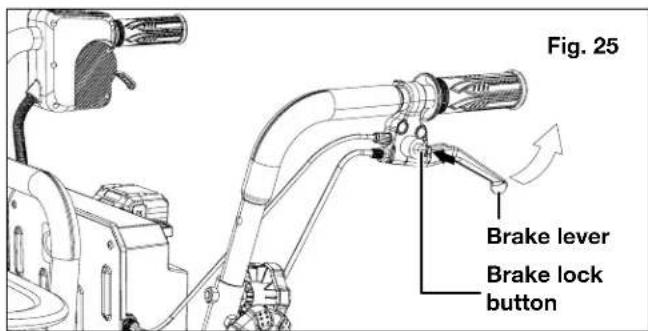
NOTE: It's recommended to engage and lock the brake lever when the wheelbarrow is not working.
- Press the on/off switch to turn off the circuit. Remove the battery pack and safety key.
Loading Objects
⚠️CAUTION! Before loading objects on the machine, make sure that the power is off and the brake lever is engaged and locked.
⚠️CAUTION! Before loading objects on the machine, make sure that the carrier and the bucket are locked securely.
CAUTION! For your safety and that of others:
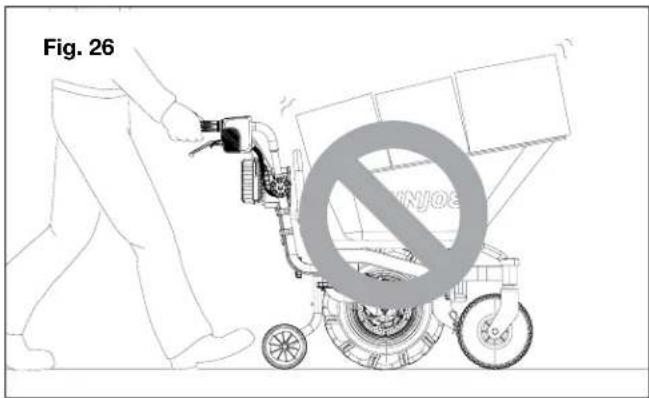
- Be sure to load objects within the bucket. If objects are sticking out of the bucket, they may fall or collapse and cause damage or injury (Fig. 26).
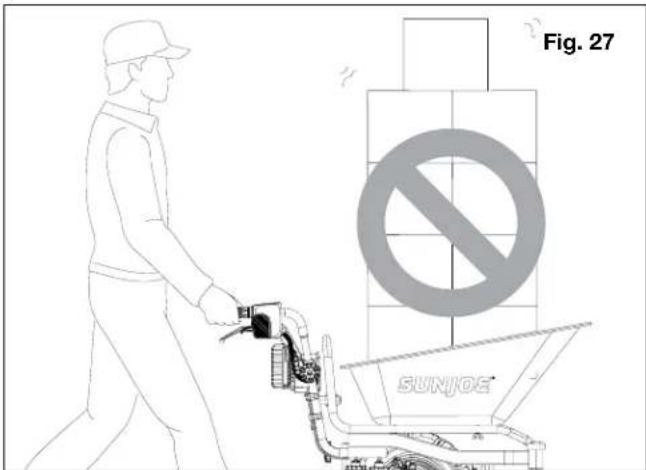
• To avoid the danger caused by blocked view, be sure to load objects only below eye level (Fig. 27).
Dumping Objects
With the rotatable carrier frame, users can easily dump objects without lifting the bucket or the wheelbarrow. Follow the instruction below.
⚠️CAUTION! Only use the rotatable carrier frame on flat and stable ground. Operation on unstable ground may cause accident or injury.
-
Stop the wheelbarrow by releasing the drive trigger, and engage the brake lever and brake lock. If needed, stabilize the wheelbarrow by blocking the middle terrain wheel.
-
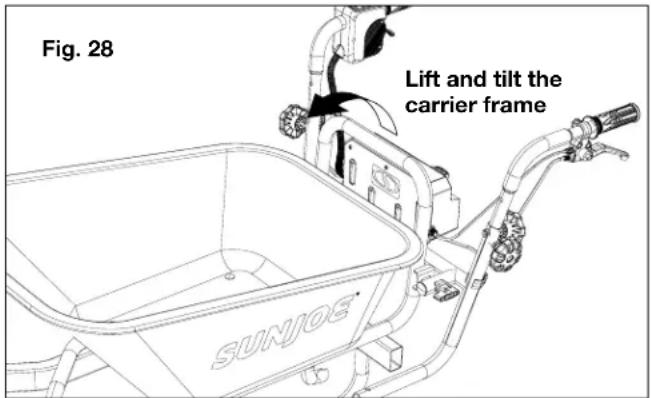
Stand by the side of the wheelbarrow, pull out and turn the carrier lock 90° (either direction) to unlock the carrier frame (Fig. 15), and then lift and tilt the carrier frame with the other hand (Fig. 28). When the carrier frame is unlocked, you can release the carrier lock.
- After dumping the object, return the carrier and bucket and make sure to lock the carrier frame.
⚠️CAUTION! When dumping the object, hold the handle and carrier frame firmly, and work in a stable posture.
⚠️CAUTION! Keep the load to a minimum. If the load is large, do not try to lift the carrier. Reduce the load, and then lift the carrier.
Maintenance
Please contact an authorized Snow Joe ^® + Sun Joe ^® dealer or call the Snow Joe ^® + Sun Joe ^® customer service center at 1-866-SNOWJOE (1-866-766-9563) for all maintenance operations not foreseen in this manual. Any operation performed in an unauthorized service center or by unqualified personnel will completely invalidate the warranty.
⚠️CAUTION! Always be sure to park the machine on flat ground and lock the brake lever before storage or attempting to perform inspections or maintenance.
⚠ WARNING! Always turn off the unit and remove the safety key and battery pack before storage, inspections, or maintenance.
⚠ WARNING! When servicing, use only identical replacement parts. Use of any other parts could create a hazard or cause product damage.
General Cleaning
The wheelbarrow should be kept clean, dry. Use running water to clean the outside of the unit and remove mud and dirt. Wipe dry with a piece of cloth.
⚠ WARNING! Never use gasoline, benzine, thinner, or alcohol to clean the wheelbarrow. It may cause discoloration, deformation or cracks on the unit.
⚠ WARNING! Do not use a pressure washer to clean the unit. Water can penetrate tight areas of the machine and cause damage to spindles, gears, bearings, or the engine.
Periodic Checks
To maintain the optimal performance of the machine, it's recommended to run through the below checklist every few months, or every time before using the machine.
- Check that the bolts and nuts are tightened firmly.
- Check that the carrier frame is locked securely when the lock is fully engaged.
- Check that the brake lever works properly.
NOTE: If the brake lever reaches the handle when you pull the lever, the brake is not working properly. Adjust the brake as instructed below.
- Check to see if any wheel is damaged or flat.
Adjust the Brake
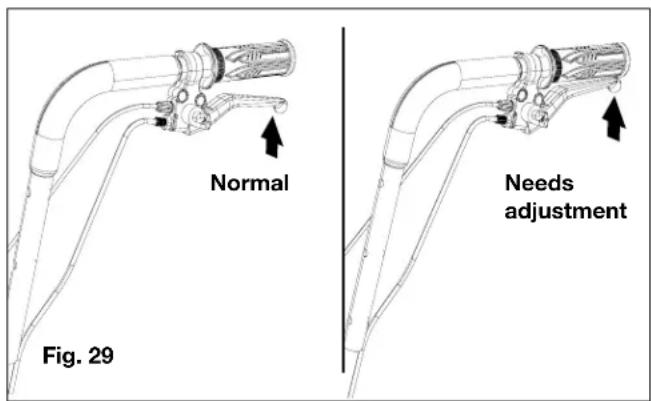
To maintain safe operation of the machine, it's very important that the brake works properly. Check the brake often to see if it will need adjustment. Make sure the brake lever stops halfway when being pulled fully. When the brake lever can be pulled to reach the handle, it needs adjustment as described below (Fig. 29).
- Make sure the wheelbarrow is completely shut down with battery and safety key removed.
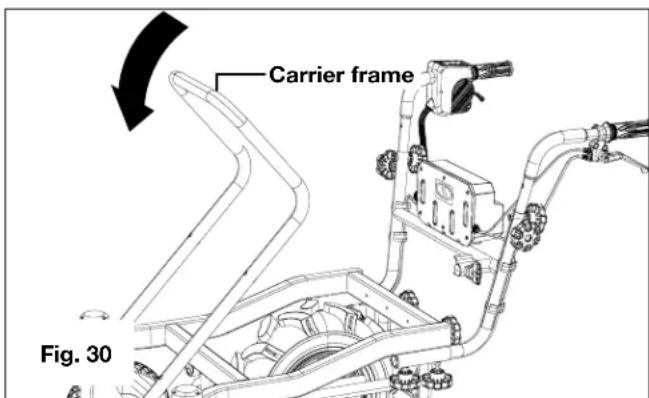
- Remove bucket, and then tilt the carrier frame (Fig. 30).
- Pull the brake lever to release the lock button of the brake lever.
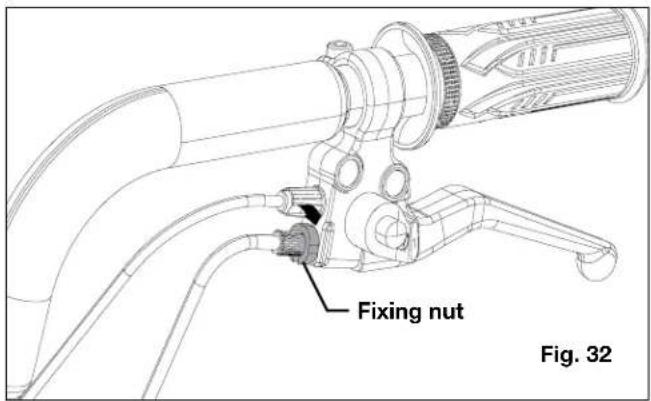
- Loosen the adjusting sleeve and fixing nut by turning them counterclockwise (Fig. 31).
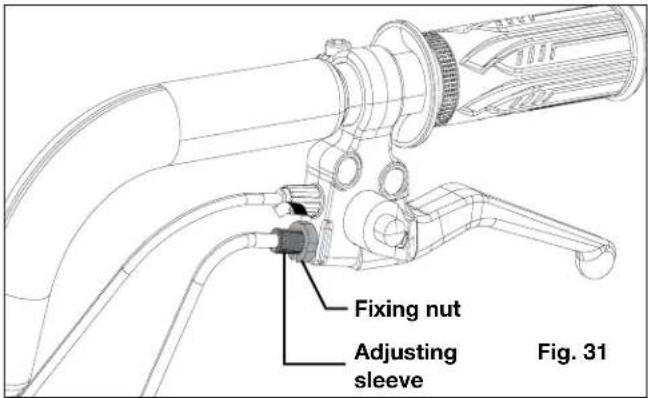
- Tighten the fixing nut only by turning it clockwise (Fig. 32).
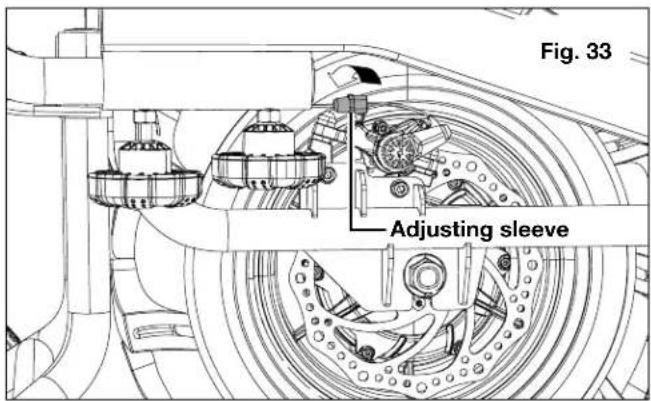
- Loosen the adjusting sleeve located near the terrain wheel by turning it counterclockwise (Fig. 33).
-
Test the brake by pulling it. The brake should stop halfway while fully pulled (Fig. 29). If it does, follow step 11. If it doesn't, follow steps 8-10.
-
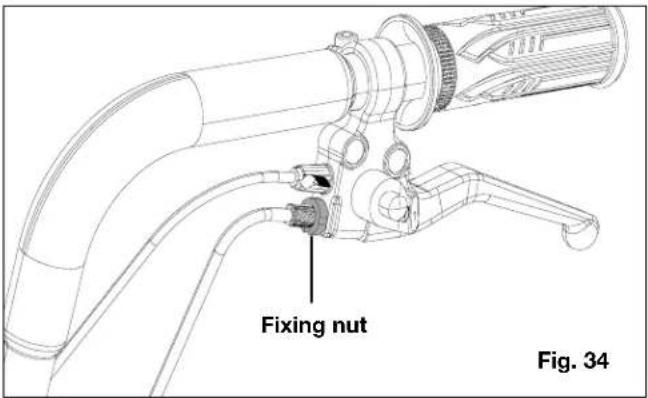
Loosen the fixing nut close to the hand brake by turning it counterclockwise (Fig. 34).
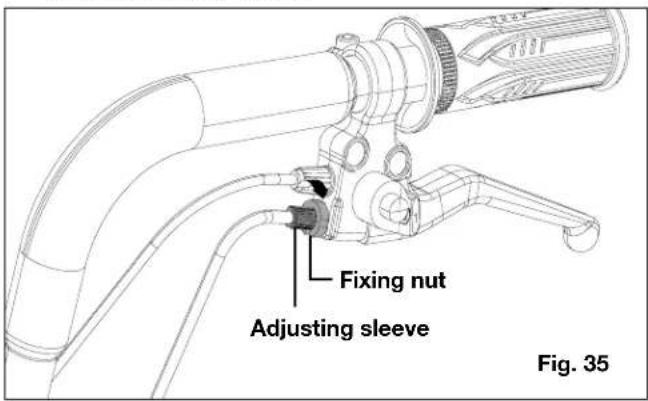
- Tighten the fixing nut and the adjusting sleeve by turning them clockwise (Fig. 35).
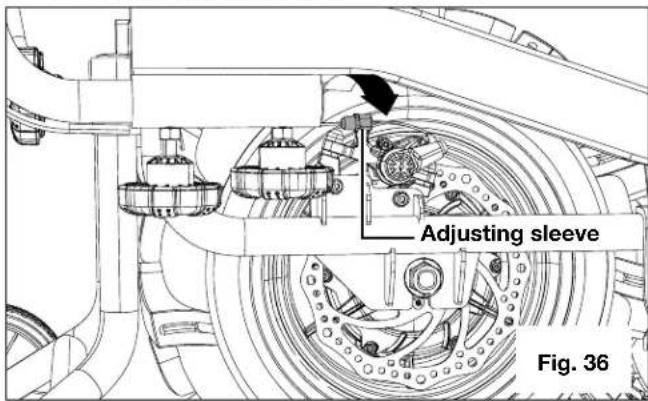
- Tighten the adjusting sleeve near the middle wheel by turning it clockwise (Fig. 36).
- Fold back the carrier frame, and then reattach the bucket.
Storage
- Remove the battery pack and the safety key. Clean and check the wheelbarrow as described.
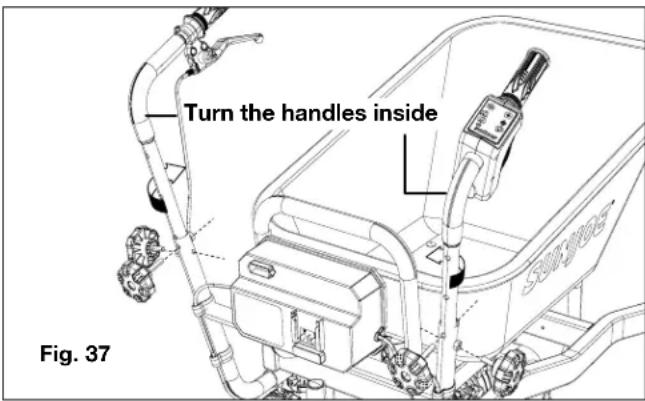
- If needed, remove the handle knobs securing the two handles and turn handles backwards to save more space. Replace the hand knobs and tighten to secure the handles (Fig. 37).
- Store the wheelbarrow with the safety key, the battery and the charger in a safe place out of reach of children. Engage and lock the brake lever.
Battery Caution + Disposal
Always dispose of your battery pack according to federal, state, and local regulations. Contact a recycling agency in your area for recycling locations.
⚠️CAUTION! Even discharged battery packs contain some energy. Before disposing, use electrical tape to cover the terminals to prevent the battery pack from shorting, which could cause a fire or explosion.
⚠ WARNING! To reduce the risk of injury or explosion, never burn or incinerate a battery pack even if it is damaged, dead, or completely discharged. When burned, toxic fumes and materials are emitted into the surrounding environment.
- Batteries vary according to device. Consult your manual for specific information.
- Install only new batteries of the same type in your product (where applicable).
- Failure to insert batteries in the correct polarity, as indicated in the battery compartment or manual, may shorten the life of the batteries or cause batteries to leak.
-
Do not mix old and new batteries.
-
Do not mix Alkaline, Standard (Carbon-Zinc), or Rechargeable (Nickel Cadmium, Nickel Metal Hydride, or Lithium-Ion) batteries.
- Do not dispose of batteries in fire.
- Batteries should be recycled or disposed of as per state and local guidelines.
Recycling + Disposal
The product comes in a package that protects it against damage during shipping. Keep the package until you are sure that all parts have been delivered and the product is functioning properly. Recycle the package afterwards or keep it for long-term storage.

WEEE symbol. Waste electrical products should not be disposed of with household waste. Please recycle where facilities exist. Check with your local authority or local store for recycling regulations.
Service + Support
If your Sun Joe ^® 24V-WB1000 cordless wheelbarrow requires service or maintenance, please call 1-866-SNOWJOE (1-866-766-9563) for assistance.
Model + Serial Numbers
When contacting the company, reordering parts, or arranging service from an authorized dealer, you will need to provide the model and serial numbers, which can be found on the decal located on the housing of the unit. Copy these numbers into the space provided below.

Optional Accessories
WARNING! ALWAYS use only authorized Snow Joe® + Sun Joe® replacement parts and accessories. NEVER use replacement parts or accessories that are not intended for use with this wheelbarrow. Contact Snow Joe® + Sun Joe® if you are unsure whether it is safe to use a particular replacement part or accessory with your wheelbarrow. The use of any other attachment or accessory can be dangerous and could cause injury or mechanical damage.
| ModelAccessor | |||
| 1 |  | 24V iON+ 2.0 Ah Lithium-Ion Battery | 24VBAT-LTE |
| 2 |  | 24V iON+ 2.5 Ah Lithium-Ion Battery | 24VBAT-LT |
| 3 | 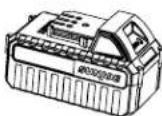 | 24V iON+ 4.0 Ah Lithium-Ion Battery | 24VBAT |
| 4 | 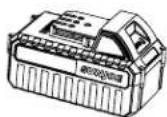 | 24V iON+ 5.0 Ah Lithium-Ion Battery | 24VBAT-XR |
| 5 | 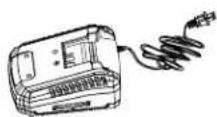 | iON+ 24V Lithium-ion Battery Quick Charger | 24VCHRG-QC |
| 6 | 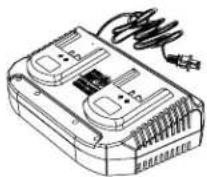 | iON+ 24V Lithium-ion Dual-port Battery Charger | 24VCHRG-DPC |
NOTE: Accessories are subject to change without any obligation on the part of Snow Joe ^® + Sun Joe ^® to provide notice of such changes. Accessories can be ordered online at sunjoe.com or via phone by contacting the Snow Joe ^® + Sun Joe ^® customer service center at 1-866-SNOWJOE (1-866-766-9563).
SNOW JOE® + SUN JOE® CUSTOMER PROMISE
ABOVE ALL ELSE, Snow Joe, LLC (“Snow Joe”) is dedicated to you, our customer. We strive to make your experience as pleasant as possible. Unfortunately, there are times when a Snow Joe ^® , Sun Joe ^® , or Aqua Joe ^® product (“Product”) does not work or breaks under normal operating conditions. We think it’s important that you know what you can expect from us. That’s why we have a Limited Warranty (“Warranty”) for our Products.
OUR WARRANTY:
Snow Joe warrants new, genuine, powered and non-powered Products to be free from defects in material or workmanship when used for ordinary household use for a period of two years from the date of purchase by the original, end-user purchaser when purchased from Snow Joe or from one of Snow Joe's authorized sellers with proof of purchase. Because Snow Joe is unable to control the quality of its Products sold by unauthorized sellers, unless otherwise prohibited by law, this Warranty does not cover Products purchased from unauthorized sellers. If your Product does not work or there's an issue with a specific part that is covered by the terms of this Warranty, Snow Joe will elect to either (1) send you a free replacement part, (2) replace the Product with a new or comparable product at no charge, or (3) repair the Product. How cool is that!
This Warranty gives you specific legal rights, and you may also have other rights which vary from State to State.
PRODUCT REGISTRATION:
Snow Joe strongly encourages you to register your Product. You can register online at snowjoe.com/register, or by printing and mailing in a registration card available online from our website, or calling our Customer Service Department at 1-866-SNOWJOE (1-866-766-9563), or by e-mailing us at help@snowjoe.com. Failure to register your Product will not diminish your warranty rights. However, registering your Product will allow Snow Joe to better serve you with any of your customer service needs.
WHO CAN SEEK LIMITED WARRANTY COVERAGE:
This Warranty is extended by Snow Joe to the original purchaser and original owner of the Product.
WHAT IS NOT COVERED?
This Warranty does not apply if the Product has been used commercially or for non-household or rental applications. This Warranty also does not apply if the Product was purchased from an unauthorized seller. This Warranty also does not cover cosmetic changes that do not affect performance. Wearing parts like belts, augers, chains and tines are not covered under this Warranty, and can be purchased at snowjoe.com or by calling 1-866-SNOWJOE (1-866-766-9563).

1 MPH (1.6 km/hr) baja |
Reversa: 0.6 MPH (1 km/hr)