
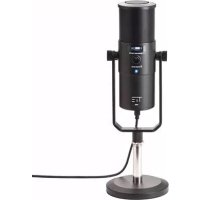
Mobile Digital Recorder - Audio recorder TIE Audio - Free user manual and instructions
Find the device manual for free Mobile Digital Recorder TIE Audio in PDF.

| Product type | Digital audio recorder |
| Brand | TIE Audio |
| Model | Mobile Digital Recorder |
| Dimensions | 100 x 30 x 12 mm (estimated) |
| Weight | 50 g (estimated) |
| Power | Built-in rechargeable lithium polymer battery, 10 h battery life |
| Storage capacity | Supports micro SD card (up to 32 GB estimated) |
| Recording formats | MP3, WAV |
| Recording quality | 32 Kbps to 1536 Kbps |
| Main functions | Stereo recording, MP3 playback, noise cancellation, AGC, VOR, A-B repeat, sound effects (8 modes), Line-In recording, external microphone, timestamp, file encryption, alarm, stopwatch, calendar |
| Inputs/Outputs | USB 2.0 port, headphone jack, microphone input, TF card slot |
| Speaker | Built-in |
| Maintenance and cleaning | Clean with a soft dry cloth. Do not use abrasive products. |
| Safety | Do not expose to moisture or extreme temperatures. Use only the supplied charger. |
| Spare parts and repairability | Contact TIE Audio customer service. Parts are not available separately. |
| General information | Manual available at www.tie-products.com/support/ |
Frequently Asked Questions - Mobile Digital Recorder TIE Audio
User questions about Mobile Digital Recorder TIE Audio
0 question about this device. Answer the ones you know or ask your own.
Ask a new question about this device
Download the instructions for your Audio recorder in PDF format for free! Find your manual Mobile Digital Recorder - TIE Audio and take your electronic device back in hand. On this page are published all the documents necessary for the use of your device. Mobile Digital Recorder by TIE Audio.
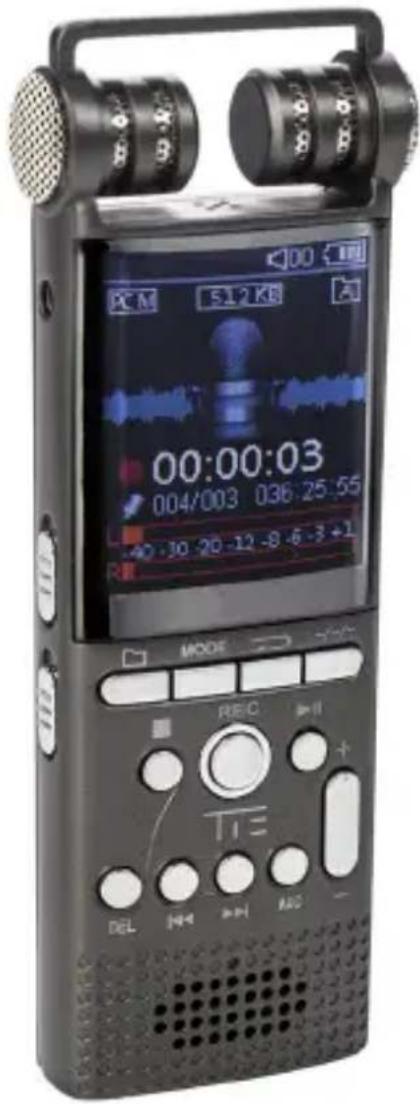
USER MANUAL Mobile Digital Recorder TIE Audio
natural_image
Symbol of a pair of scissors inside a circle (no text or numbers present)Ti=MOBILE DIGITAL RECORDER
QUICKSTART-GUIDE | BENUTZERHANDBUCH | GUIDE DE DÉMARRAGE RAPIDE
Article TX26: 19-90030
TIE MOBILE DIGITAL RECORDER | INTRODUCTION
Thank you for choosing the TIE Mobile Digital Recorder. We sincerely hope it lifts up your enjoyment in today's digital era to a new level.
In this quickstart guide, we present you the basic operations with your new voice recorder. Please refer to the comprehensive user manual for further instructions, precautions, FAQs and technical specifications:
www.tie-products.com/support/

KEY FEATURES
- One-key functions for recording, playback, noise-canceling, sound split
• AGC (Auto-Gain Control) function
• 3 record folders (A, B, C) - Recording timestamp
• VOR, Monitoring, Timing recording
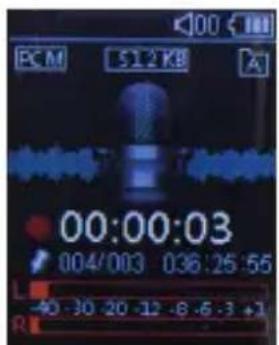
• Music/Recordings/Set: 3 modes for switches, 8 choices for recording quality: from 32Kbps to 1536Kbps (default is 512Kbps) - 8 sound effect modes: Off NOR, Rock ROCK, Funk FUNK, Hip Hop POP, Jazz JAZZ, Classic CLASS, Techno DBB, Custom USER
- Timing Switch-Off Function
• Different record formats
• Supports LINE-IN recording - Dual-track stereo recording
• Supports recording with the built-in or an external microphone (condenser microphone) - File management with built-in file deleting function
- A-B repeat
• Supports micro SD cards - Driver-free operation, USB 2.0 universal port, high-speed data transfer
-
Built-in speaker
-
USB port can also be used as power supply for the normal use of this device
- Rechargeable, built-in polymer lithium battery (10 hours recording/playback)
• Support file encryption - Precise alarm clock, stopwatch, calendar function
APPEARANCE & DESCRIPTION OF THE OPERATING ELEMENTS
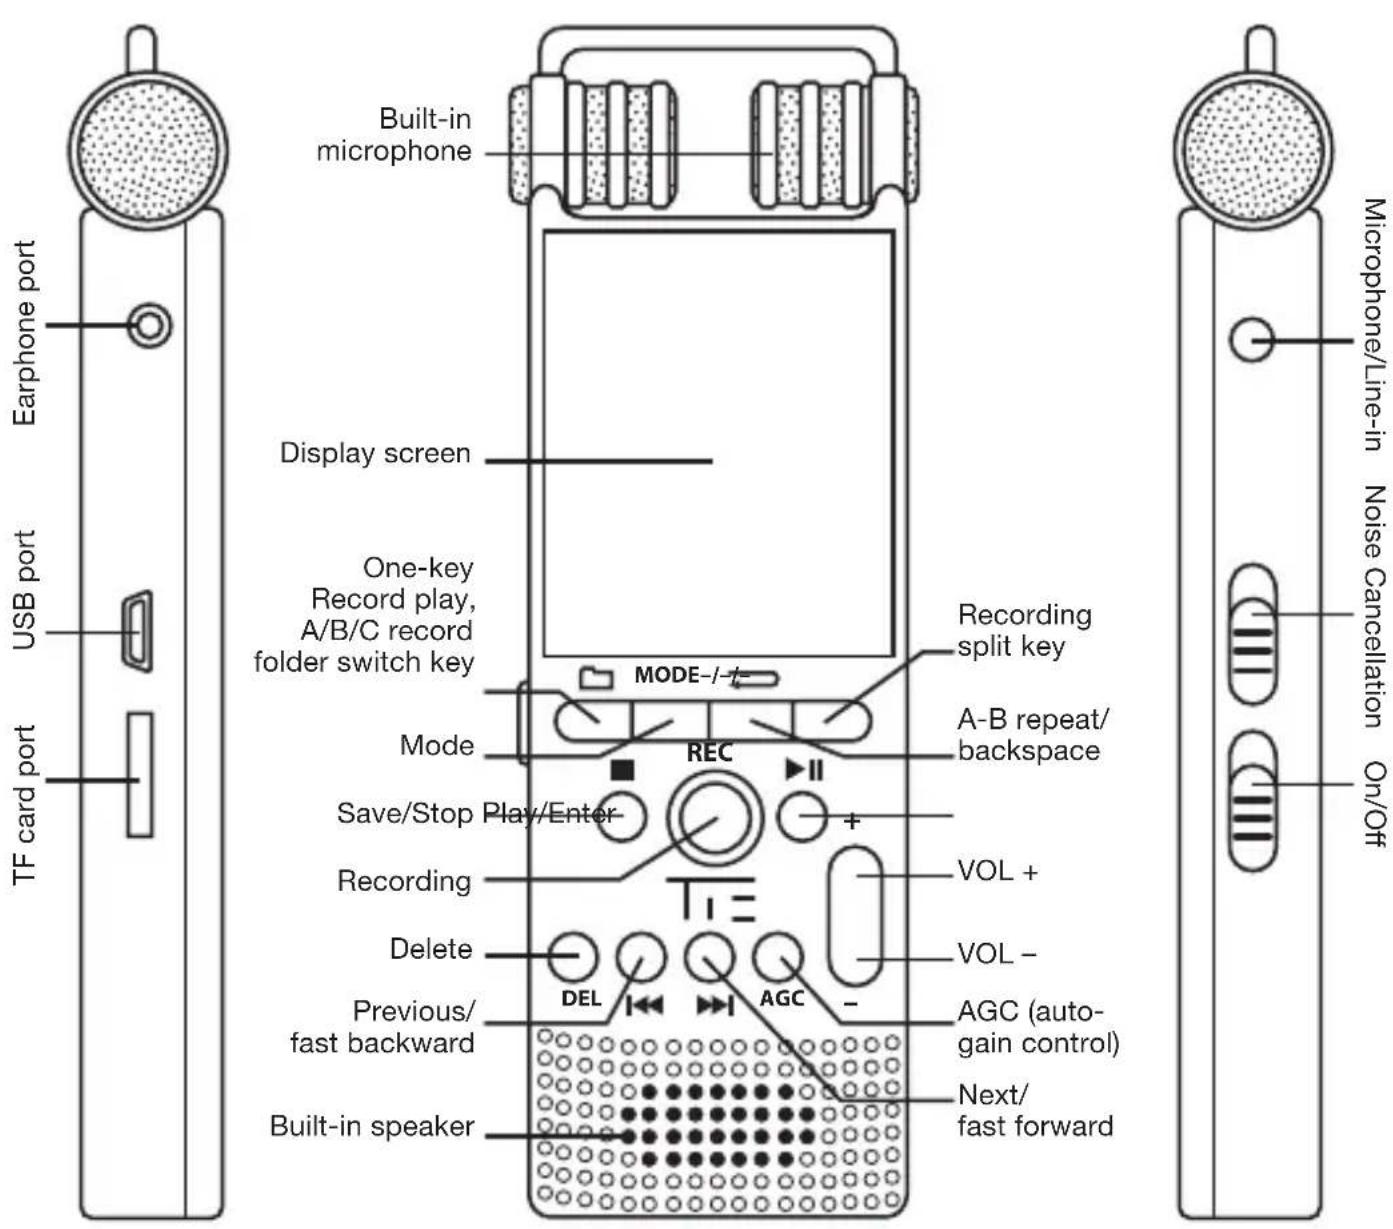
POWER ON/OFF
Power On
To turn the device on you have to switch the power key to ON.
natural_image
Four icons representing recording devices: microphone, CD/DVD, radio, and gears (no text or symbols)
natural_image
Three glowing blue circular spots on a dark background, no text or symbols visible
Power Off
Press and hold the key ▶II longer, 1,2,3 will appear with color changed to solid blue. The recorder will enter sleep status or switch the power key to OFF to turn it off.
SHORTCUT KEYS & GENERAL OPERATION
Shortcut Keys
These are smart function keys to enter a certain submenu directly. Just press one of the shortcut keys – the according function will work immediately.
- Press REC to start recording at any menu status immediately
- NOISE C.: activates/deactivates the noise-cancelling function (push upward to activate noise-cancellation, and downward to switch it off)
- ▪: shortcut key to save your recordings (press ■ and records can be saved.)
- A-B repeat shortcut key (press to activate the A-B repeat function when playing back recorded files or music)
- -/-: Record split shortcut key (30-300 min adjustable, press on VOL + or VOL - for setting the time, 30 minutes intervals per press)
- DEL: DELETE shortcut key (choose the file to be deleted, then press DEL)
- AGC: shortcut key for the Automatic Gain Control (Press on AGC, adjust the microphone sensitivity via the key + / - )
• One-key record play – A/B/C record folder switch key: in the main interface recorded files can be played directly with a single press on this shortcut key. A/B/C record folders (if all have files) can also be switched by pressing the shortcut key at Play/Pause status of any recorded files. - Navigating in the main menu: in main interface and standby status, press [◀] / [▶] or [+] / [−] to switch between Recordings / Music / Set.
The following are general operations for the TX26.
- Press ▶ to confirm values or enter a menu (submenu).
- Press / to navigate in menus.
- Press → to exit a menu or return to the previous level
For charging the recorder please connect the included USB cable between the USB port on the recorder with your PC or any other active USB charger. The power switch must be set to ON.
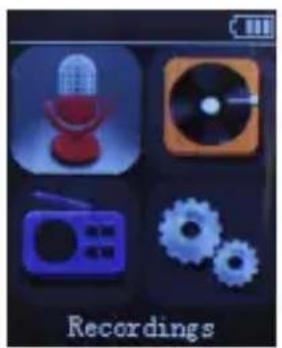
RECORDING MODES
natural_image
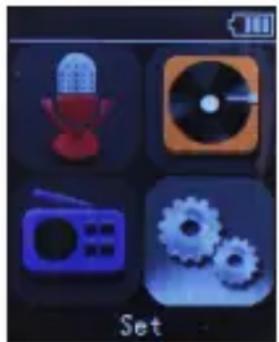
Four icon buttons for recording: microphone, CD/DVD, radio, and gears (no text or symbols on icons)Choose “Recordings” in the main interface and press ▶II to enter the menu. Navigate with ◀◀/▶◀ or + / - to choose the desired submenu and press ▶II again to confirm your setting. Press the ← button to return to last step (operation applies in the following).
Note: Please set the saving location before recording any files – navigate as follows:
Set->Save position->Flash (or Card)->Record folder->A, B or C – press ▶II to confirm at each step and then return to last step to finish the settings.
Start recording: Choose the submenu "Start voice recording" in the "Recordings" menu and press ▶II to start recording or press the shortcut key REC in any interface status to start recording.
Pause recording: Press ▶II in recording status to pause.
Stop/Save recordings: Press in recording status to stop the recording. The recorded file can be saved automatically.
RECORDING FOLDER
The device offers the three predefined recording folders A/B/C. Choose the submenu “Record folder” from the “Recordings” menu, press ▶II to enter the menu with the 3 options A, B, C. Choose A, press ▶II to save the file into folder A and return to the last step. Choose the folders B or C accordingly. Press → to cancel and return to the last step.
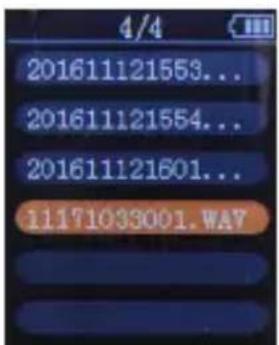
RECORDINGS LIBRARY
Choose “Recordings library” from the Recordings menu, press to enter A, B, C. Choose A an press then to play the file(s) in folder A. The same applies for folders B and C.
RECORDING FORMAT
Choose one of the two available recording formats MP3 and WAV. Choose the MP3 or WAV format with Vol+, Vol-, Rewind or Forward and press ▶ to confirm. The recording format is then set for as long as you don't change the setting. Press ← to cancel and return to the last step.
RECORDING SETTINGS
Recording bitrate (quality) – Please choose the most suitable recording quality from 32Kbps up to 1536Kbps:
Recordings ->Record settings -> set record bit rate
Press ▶II then choose the desired value. Press ← to cancel and to return to the last step.
VOR tracking mode:
Recordings->record settings>Track VOR mode
Choose "VOR mode" and press ▶II to confirm the Voice Control Recording mode. Press ← to cancel and return to the last step.

Sound source:
Recordings->Record Settings->Record from
- choose "Microphone" or "Line In" mode.
Line In recording: Here you can connect an external audio device with the audio cable between the Mic port and the external audio device for recording.
(Note: Please adjust (test) the level of the external device to realize the ideal output signal and therefore the maximum recording quality.)
Monitoring setting On/Off: With Monitoring set to “on”, you get real-time monitoring via earphones while recording.
MUSIC PLAYBACK AND DELETING FILES

natural_image
Game interface icons including microphone, CD, radio, gears, and music button (no text or symbols on icons)Choose “Music” from the main interface and press ▶II to enter Music playback settings. Press / 📌I or + / - to navigate to the submenu and press ▶II to confirm your choice. Press ←to return to the last step.
MUSIC PLAYBACK
Download MP3 music song(s): Connect the USB cable between the USB port of the recorder and the USB port of your computer and download the MP3 music file(s) or MP3 music folder(s) directly to the device's root directory or to any created folder(s) (unplug the USB cable when finished).
Play/Pause/Stop music: In MUSIC mode, press ▶II to “All songs”. Press ▶II again to choose the music you’d like to play or choose “Shuffle all” for random playback. Press ▶II to play the music, press ■ to stop the playback.
Previous/Next, Fast forward/Fast backward: In Play or Stop status, press 🏠️ / 🏠️ to choose the previous or next song(s). Press the 🏠️ / 🏠️ buttons longer while the playback to realize Fast forward/Fast backward.
VOL+/VOL-: Adjust the volume by pressing on the + / - buttons.
PLAY MODES
When you are playing “Music/Recordings” files or the playback is currently stopped, press MODE to enter the submenu – choose “Play mode” then press ▶II. Press and choose between “Repeat off”, “Repeat 1”, “Repeat all”, “View Playing”. Press ▶II to confirm and quit, press on ← to cancel and return to last step.
REPEAT SETTINGS
A-B repeat play: Press on A-B Shortcut key ( ⇌ ) during play-back (or choose “play mode” then press ▶ to enter, choose “Repeat Settings”, press ▶ to choose “Repeat mode”), press once to choose Point A, press ⇌ to choose point B, then it will loop the playback between A and B. Press ⇌ to quit during Repeat Play.
Repeat times: The repeat times can be set to 1-10. Press + / - to choose repeat times, default is 5 times.
Repeat Interval: Repeat interval can be set between 1-10 seconds. Press + / - to choose the repeat interval seconds. Default value is 1 second.
SOUND SETTINGS
Choose different recording settings: Equalizer, Variable Speed Play-back, Volume limit. Press MODE in play or stop status to choose "Sound settings". Press ▶II to enter the desired setting.
Equalizer offers “Off (default)”, “Rock”, “Funk”, “Hip Hop”, “Jazz”, “Classical”, “Techno”, “Custom” presets. Press ▶II to confirm and quit. The relevant icon will be displayed in the music playing interface. Press ➕ to cancel and return to last step.
Variable Speed Playback: There are 16 steps of playback speed (-8\~+8) - 0\~-8 slows down the playback more and more, 0\~+8 speeds up the playback more and more, 0 for normal playback speed. Press + / - to adjust to the desired speed. Press ▶II to confirm and quit. Press ⇔ to cancel and return to last step (i.e. invalid operations).
(Note: This function is not used for the lossless music files in APE format.)
Volume limit:
Play mode->Sound settings->Volume limit
You can level the signal volume from 0 to 30 as demanded by pressing the + / - buttons. Press to confirm and quit, or press → to cancel and return to the last step.
BOOKMARKS
During the playback/pause of the Record/Music file, select and set bookmarks with MODE and .Files can be opened directly from this point and the playback continues there the next time. One file can contain up to 10 bookmarks. You can navigate to bookmarks or delete them.
DELETE FILES
At play/stop/pause status (same for deleting music files), press on shortcut key DEL, choose "Yes" and press the button to delete the file. Choose "No" to cancel and return to the last step.
SYSTEM SETTINGS
natural_image
Four-panel icon set showing a microphone, CD, radio, and gears (no text or symbols)Enter system setting mode (SET mode): In the main interface choose “SET”, press then ▶II to enter “SET”. Press ◀◀ / ▶▶ or + / - to choose your submenu, press then ▶II to confirm it. Press ← to return to the last step. The same method applies to confirm other submenus.
Here you can set the saving directory, sleep timer, display settings, date and time, language and different kind of other tools, including auto record, password settings, calendar or a stopwatch.
HAUPTMERKMALE
natural_image
Four icon set with music and gear symbols, labeled 'Recordings' at bottom (no readable text or numbers)

Ausschalten
Set->Save position->Flash (or Card)->Record folder->A, B or C
natural_image
Four-panel icon set with music-related symbols: microphone, CD, radio, and gears (no text or labels)natural_image
Four-panel icon set showing a microphone, CD, radio, and gears (no text or symbols)HAUPTMERKMALE
natural_image
Four icons representing recording devices: microphone, CD/DVD, radio, and gears (no text or symbols)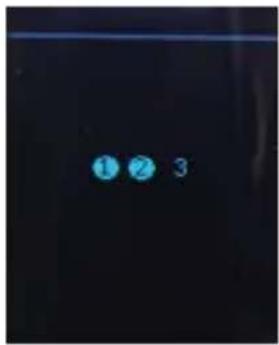
natural_image
Three blue circular spots on a dark background, no text or symbols visible
Éteindre
natural_image
Four icons representing recording devices: microphone, CD/DVD, radio, and gears (no text or symbols on icons)natural_image
Four app icons including a microphone, CD, radio, and gears, labeled 'Music' at bottom (no readable text or symbols on icons)natural_image
Four-panel icon set showing a microphone, CD, radio, and gears (no text or symbols)▶ www.tie-products.com
Brand: TIE ^® is a registered trademark of sonic sales GmbH.
General Importeur worldwide: sonic sales GmbH, Rembrandtstr. 1-3, 33649 Bielefeld, Germany
Electronic waste: This product underlies the guidelines of WEEE authority.
Declaration of conformity: This product has been approved for getting the CE symbol.
Articlenumber: The article TX26 is specified by the articlenumber: 19-90030
After sales support: support@tie-products.com
Designed and engineered in Germany. Made in China.
- Ti=MOBILE DIGITAL RECORDER
- TIE MOBILE DIGITAL RECORDER | INTRODUCTION
- KEY FEATURES
- APPEARANCE & DESCRIPTION OF THE OPERATING ELEMENTS
- POWER ON/OFF
- Power On
- Power Off
- SHORTCUT KEYS & GENERAL OPERATION
- Shortcut Keys
- RECORDING MODES
- RECORDING FOLDER
- RECORDINGS LIBRARY
- RECORDING FORMAT
- RECORDING SETTINGS
- MUSIC PLAYBACK AND DELETING FILES
- MUSIC PLAYBACK
- PLAY MODES
- REPEAT SETTINGS
- SOUND SETTINGS
- Play mode->Sound settings->Volume limit
- BOOKMARKS
- DELETE FILES
- SYSTEM SETTINGS
- HAUPTMERKMALE
- Ausschalten
- Éteindre
- ▶ www.tie-products.com
Brand : TIE Audio
Model : Mobile Digital Recorder
Category : Audio recorder