
TX-182 - Video Converter TECHNAXX - Free user manual and instructions
Find the device manual for free TX-182 TECHNAXX in PDF.
| Product type | Retro video converter (video digitizer) |
| Brand | Technaxx |
| Model | TX-182 |
| Dimensions | 10.5 x 7.5 x 2.5 cm |
| Weight | 114 g |
| Power supply | USB 5V/1A adapter (AC input 100-240V 50/60Hz); rechargeable lithium polymer battery 3.7V 1500mAh |
| Main functions | Digitization of analog videos (Video 8, Hi8, SVHS, VHS, VCD, DVD, VCR, DV); direct recording to MicroSD card up to 32 GB; playback on 2.4" LCD screen; HDMI and AV outputs; VGA (640x480) and QVGA (320x240) resolutions; built-in speaker; screenshot capture |
| Video/photo formats | AVI / JPG |
| Memory card | MicroSDHC up to 32 GB, class 10 recommended, FAT32 format |
| Battery life | Up to 4 hours of recording |
| Charging time | Approximately 2.5 hours (first charge: 5 hours) |
| Screen | 2.4 inch (6 cm) color TFT |
| Video outputs | HDMI, composite AV (3.5 mm) |
| Video inputs | Composite/RCA (video input + audio L/R) |
| Connectors | Mini USB, MicroSD slot, RCA input, AV/HDMI outputs |
| Included software | ArcSoft ShowBiz (Windows only) |
| Box contents | TX-182, USB adapter, RCA cable, AV cable, HDMI cable, MiniUSB cable, Scart-RCA adapter, 4 GB MicroSD card, CD, manual |
| Maintenance and cleaning | Clean with a dry or slightly damp lint-free cloth; do not use abrasive products; protect from moisture and extreme temperatures |
| Safety | Do not open, do not expose to water, do not overload sockets, unplug during storms, use only the specified voltage, keep out of reach of children |
| Spare parts and repairability | No spare parts available; opening the device voids warranty; contact technical support for any repairs |
| General information | Made in China; distributed by Technaxx Germany GmbH & Co. KG; telephone and email support available |
Frequently Asked Questions - TX-182 TECHNAXX
User questions about TX-182 TECHNAXX
0 question about this device. Answer the ones you know or ask your own.
Ask a new question about this device
Download the instructions for your Video Converter in PDF format for free! Find your manual TX-182 - TECHNAXX and take your electronic device back in hand. On this page are published all the documents necessary for the use of your device. TX-182 by TECHNAXX.
USER MANUAL TX-182 TECHNAXX
natural_image
Black Technax XX Germany digital camera with a black screen displaying a photo of two people on a beach, no visible text or symbols on the device body.natural_image
Illustration of hands holding a handheld device with a card partially visible (no text or symbols)text_image
Video Size VGA Time Stamp Date & Time Auto Off Off Language English Date Input Enter Sound On 1/2 M Exit OK Set
text_image
Handheld device screen displaying a control interface with buttons and a plus button, showing text 'PIL' and 'OK'.text_image
Diagram showing hand operating a game controller with control buttons and display screen, labeled 'TOL-1'text_image
Video Size VGA Time VGA Auto QVGA Date Sound On 1/2 ① M Exit ② OK Set
text_image
Hand holding a game controller interface with a screen displaying 'VGA' and control buttonstext_image
Video Size VGA Time Stamp Date & Time Auto Off Off Language English Date Input Enter Sound On 1/2 M Exit OK Set
text_image
Diagram showing a hand interacting with a device displaying a screen with Chinese text and control buttonstext_image
Video Size VGA Time Stamp Date & Time Auto Off Off Language English Date Input Enter Sound On 1 / 2 M Exit OK Set
text_image
Video Size VGA Time Stamp Date & Time Auto Off Lanc Set Date Input Enter Sound On 1/2 M Exit OK Set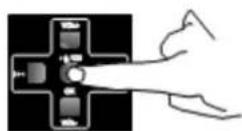
natural_image
Two schematic diagrams of electrical connectors with wires, no text or symbols present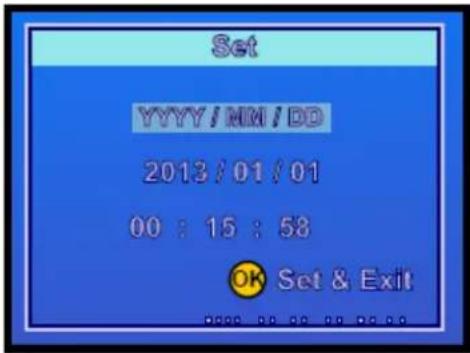
text_image
Set YYYY/MM/DD 2013/01/01 00:15:58 OK Set & Exitnatural_image
Two identical diagrams showing a cross-shaped component with internal components and branching lines, no text or symbols present.text_image
VOL 1 VOL 2text_image
Diagram showing a device with a screen displaying a landscape image and a hand pointing to it, connected by wires.text_image
Diagram of a handheld device displaying a screen with text and control buttons, showing a hand interacting with the screen.text_image
Play Delete Enter Protect Enter Format Enter Slide Show 3 Sec. Volume 4 Version BR120v01 1/1 ⑧ Exit ⑨ Set
text_image
Diagram showing two hand gestures interacting with a game controller, one displaying a screen and the other displaying a button.text_image
Play Delete Enter Prote 4 Form 5 Slide 6 Volume 1 1 3 Version BK120v01 1/1 ① Exit ② OK Set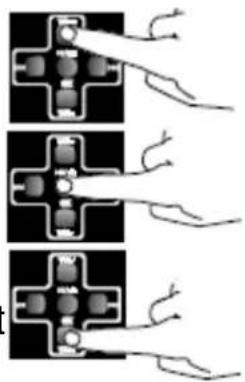
natural_image
Three-panel diagram showing electrical connector connections with wires and contacts (no text or symbols)text_image
Diagram showing a hand interacting with a digital camera interface displaying a landscape image and control buttons.natural_image
Illustration of a medical device connected to a cable with a mounted device, showing internal components (no text or symbols)Retro Video Digitizer TX-182
Before using the appliance for the first time, please read the instructions for use and safety information carefully.
natural_image
Black Technaxxx Germany digital camera with a screen displaying a landscape photo and control buttons (no readable text beyond branding)This appliance is not intended for use by persons (including children) with reduced physical, sensory or mental capacities, or by persons lacking in experience or knowledge, unless they are supervised or instructed on the use of this device by a person responsible for their safety. Children should be supervised to ensure they do not play with this device.
Keep this user manual for future reference or product sharing carefully. Do the same with the original accessories for this product. In case of warranty, please contact the dealer or the store where you bought this product.
Enjoy your product. *Share your experience and opinion on one of the well-known internet portals.
Table of Contents
Hints 2
Safety instructions.... 3
Warnings 3
Features 4
Quick start guide 5
Product overview & functions ..... 6
Display symbols 7
Before the start.... 7
Charging the battery 7
Installing the Memory card ..... 8
Connecting a video source ..... 9
First start 10
Recording mode settings ...... 10
Set resolution ...... 10
Setting Date and Time...... 11
Settings 13
Recording 14
Play mode settings.... 15
How to set 15
Settings 16
Playback.... 16
Show recordings on TV ...... 17
Copy recordings to PC 18
Troubleshooting.... 18
Edit/Convert recordings...... 19
Technical specifications ...... 20
Support.... 20
Care and maintenance ...... 20
Declaration of Conformity...... 21
Disposal.... 21
Hints
- Do not use the TX-182 to capture, reproduce or copy copyrighted works, whether video or audio. The unauthorized reproduction or distribution of copyrighted work is illegal! Make sure that the work to be digitized does not have a copyright disclaimer, if this is the case do not use the TX-182 to digitize the work. ● Never hold or carry the device by the power cable. ● Do not clamp or damage the power cable. ● Ensure that the power adapter do not come into contact with water, steam or other liquids. ● Only use the product for purposes due to its intended function & only for household use. ● Do not damage the product. Following cases may damage the product: Incorrect voltage, accidents (including liquid or moisture), misuse or abuse of the product, faulty or improper installation, mains supply problems including power spikes or lightning damage, infestation by insects, tampering or modification of the product by persons other than authorized service personnel, exposure to abnormally corrosive materials, insertion of foreign objects into the unit, used with accessories not preapproved. ● Refer to and heed all warnings and precautions in the user manual. ● The user alone bears the risk.
Safety instructions
● Never touch the device with wet or damp hands.
● The device can only be operated with the voltage described on the rear panel and on the power supply unit.
- Do not position this device near moisture or water.
- Do not place the device on an unstable surface. The unit could be damaged or persons could be injured. Any attachments should be made only in accordance with the manufacturer's instructions or obtained from the manufacturer.
● The cable is sheathed and insulates the current. Do not place any objects on the cable, as this could cause the protective function to be lost. Avoid placing excessive stress on the cable, especially at sockets and plugs.
- If you want to pull the plug out of the socket, always pull on the plug and not on the cable. The cable could otherwise break.
- To protect the unit during a lightning storm or when it is left unattended for long periods of time: unplug it from the wall outlet This will prevent damage due to lightning strikes.
- Do not overload wall outlets, extension cords, or other wiring as this may result in fire or electric shock.
- Do not insert any objects into the openings of the unit, as current flows in some places and contact may cause fire or electric shock.
● Unplug the power cord from the wall outlet for cleaning.
- Do not use liquid cleaners or cleaning sprays. The device may only be cleaned with a damp cloth.
- Do not connect any additional devices that are not recommended by the manufacturer.
- Do not connect the audio output from a high-power amplifier to the product's audio input.
- We accept no liability for damage to property or personal injury caused by improper handling or failure to observe the safety instructions and the operating instructions. In such cases any warranty claim expires! We accept no liability for consequential damage.
- Do not open the device, do not attempt to repair it, do not carry out any conversions or modifications - this will result in the loss of the warranty claim. We accept no liability for consequential damage.
Warnings
- Do not disassemble the TX-182, it may result in short-circuit or damage.
● Battery warning: Improper use of the battery may cause fire or chemical burns. The battery may explode in case of damage. ● Do not modify, repair
or remove without professional guidance. ● Do not use corrosive or volatile liquid for cleaning. ● Do not drop or shake the TX-182, it may break internal circuit boards or mechanics. ● Keep the TX-182 in dry and ventilated environment. Avoid high humidity and high temperature. ● This TX-182 is not water-resistant; keep it away from moisture. ● Keep the device away from little children.
Features
- Digitize analog videos from Video8, Hi8, SVHS, VHS, VCD, DVD, VCR or DV
- 2.4" (6cm) display to watch your recordings on the video digitizer
- Save videos directly to MicroSD card up to 32GB
• Built in rechargeable battery (recordings up to 4 hours)
• Capture video material max. file size 90 minutes - Restore and share your family memories from old times
- Share your digitalized videos on your PC or your TV (HDMI or AV)
• Supports recording quality VGA or QVGA
• Built in loudspeaker (mono)
Quick start guide
-
Insert microSD card (max. 32GB) and connect the device to the "MiniUSB" power port via MiniUSB data/power cable. Insert Composite/RCA signal source into Composite/RCA input port of TX-182. Long press the On/Off Menu button for 3 seconds to turn on the power and enter the recording mode. (See chapter "Recording mode settings" for details.)
-
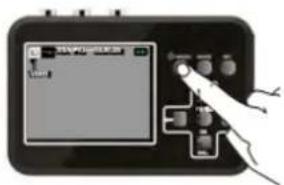
After turning on the power short press the REC button to start recording. To stop recording, short press the REC button again. (See chapter "Recording" for details.)
-
To play recorded video, short press the MODE button to switch to the play mode. Then short press the OK button to start playing video. Short press OK button to suspend play again. If there are multiple videos recorded, short press the button to switch to last video. Short press the button to switch to the next video. If want go back to the recording mode, short press the MODE button again. (See chapter "Playback" for details.)
-
To adjust the volume, short press the VOL+ Button to increase the volume and short press the VOL- Button to decrease the volume.
-
To output images to a large-screen display, just plug the HDMI cable into the HDMI OUT port or use the AV cable to plug in the AV OUT port. (See chapter “Show recordings on TV” for details.)
-
If want to view recorded videos on the computer. Connect the TX-182 to the computer via the USB data/power cable. (See chapter “Copy recordings to PC” for details.)
Product overview & functions
Top and Side view
| 1 | Outputs | 6 | Left audio input |
| 2 | Input (Composite; RCA) | 7 | Video input |
| 3 | 3.5mm AV video output | 8 | MicroSD card slot |
| 4 | HDMI output | 9 | Mini USB connector |
| 5 | Right audio input |
Front view
| 10 | On/Off Menu | 15 | Go back in the file list |
| 11 | Mode - Select mode | 16 | Go forward in the file list |
| 12 | REC - Start/Stop recording | 17 | OK ▶Start Stop playing |
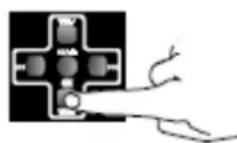
| 13 | The buttons within the cross perform different functions depending on the mode selected | 18 | VOL- - Lower the volume |
| 13.1 | Play mode | 19 | Record without sound |
| 13.2 | Recording mode | 20 | OK ▶Snapshot mode |
| 14 | VOL+ - Increase the volume |
Display symbols
| TF | MicroSD card | Recording mode | Battery indicator |
 |  Available button alternatives Available button alternatives | ||
 | Exit – Press the On/Off Menu button to leave the setting mode | ||
 | Set – Press OK to select and save the selected setting | ||
Before the start
Charge at least 5 hours before using it for the first time!
Note: When the battery is completely depleted, it will need approximately 5 hours for a full charge!
The TX-182 allows you to record video materials from a range of video sources, such as Video8, Hi8, SVHS, VHS, VCD, DVD, VCR or DV. You can also take snapshots of the video material.
The MicroSD card saves your recording in AVI format. File size is 13-15MB per minute.
Any segment you record that is more than 90minutes long is divided into parts.
The file name is automatically created in order (0001, 0002, etc.). The files can then be transferred to a PC and be renamed.
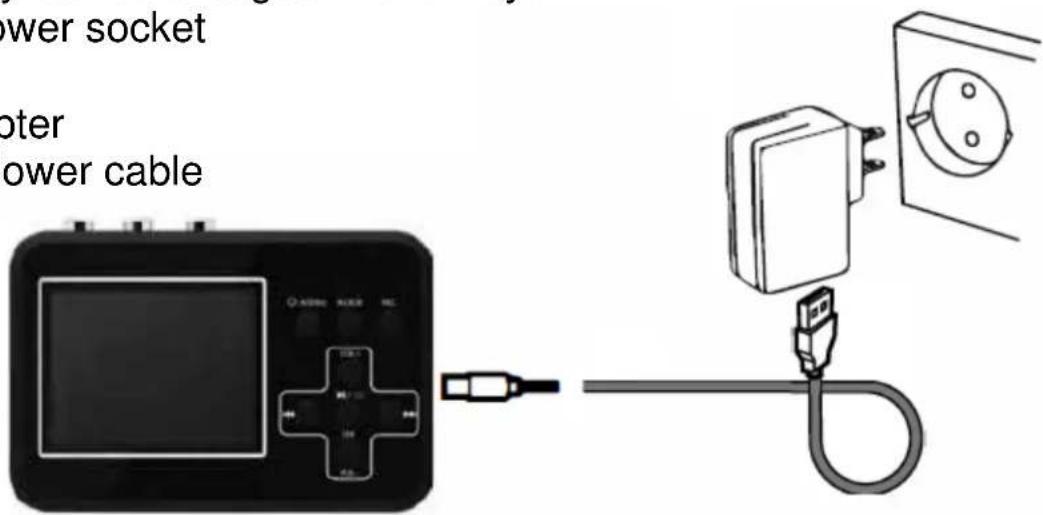
Charging the battery
Charge the TX-182 for at least 1 hour before turning it on. Note: The device has no LED indicator to show whether the device is charging or is fully charged. Only way to see the battery status is to turn on the device.
The built-in battery can be charged in two ways:
A Via the main power socket
Use:
- USB power adapter
- MiniUSB Data/Power cable
text_image
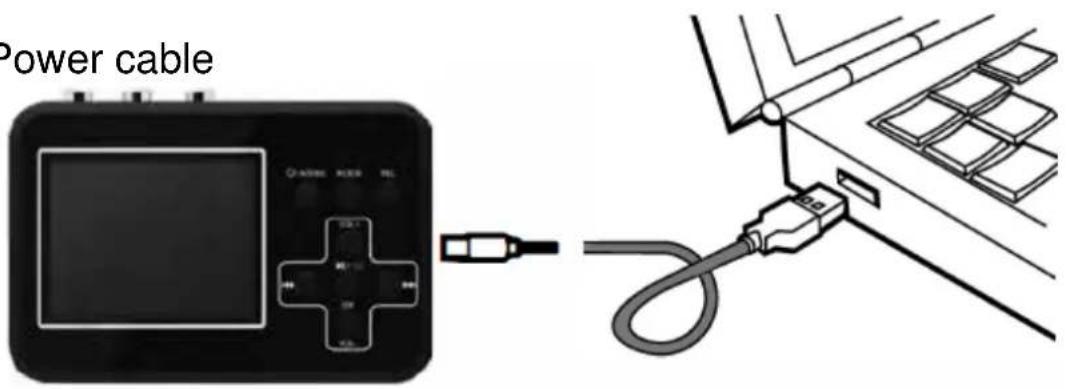
power socket oter power cableB Via the PC's USB port
Use:
- MiniUSB Data/Power cable
text_image
Power cableNote:
- After the product is connected to PC, the display turns black and it charges. Only further action that can be done in this state is transferring data form the MicroSD card to PC.
- When the battery is completely depleted, it will need approximately 5 hours for a full charge!
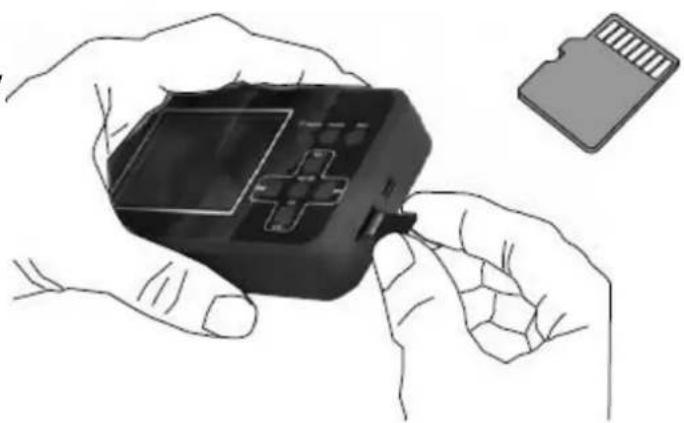
Installing the Memory card
Use a MicroSD card with max.
32GB. For optimal results, a memory card with speed class 10 is recommended.
Note: Format FAT32 required.
natural_image
Illustration of hands holding a black handheld device with a card partially inserted (no text or symbols visible)Connecting a video source
Connect the TX-182 to a video source like shown in one of the following ways:
| 1 | Yellow (video) | 4 | RCA-cable |
| 2 | White (audio L) | 5 | Source (Video8, Hi8, SVHS, VHS, VCD, DVD, VCR, DV, camera) |
| 3 | Red (audio R) | 6 | AV-cable |
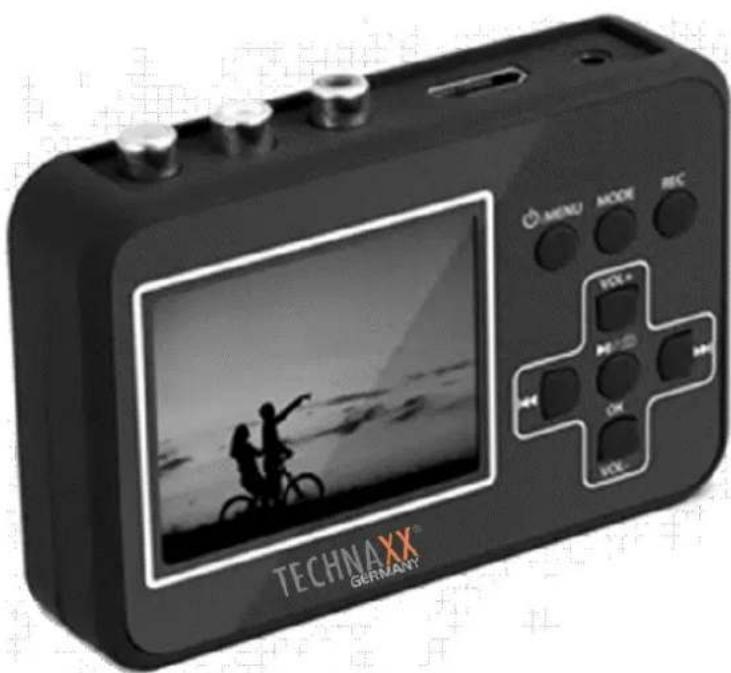
First start
Make sure the TX-182 is connected to the power supply or that the battery is charged and that the memory card is inserted. Press the On/Off Menu button for approx. 3 seconds to turn the TX-182 On or Off.
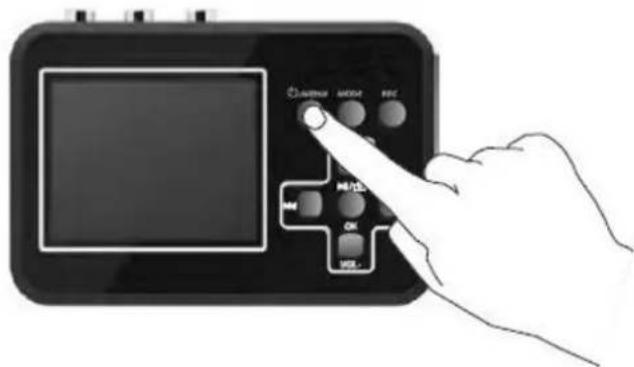
text_image
AVENUE MODE FISC HOLD OK OKUpon being powered up, the TX-182 starts in recording mode and the following information is shown on the display:
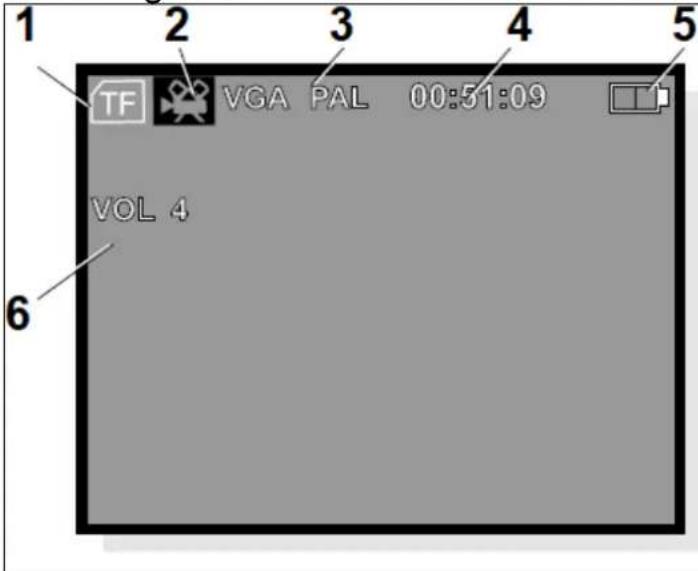
text_image
1 2 3 4 5 TF VGA PAL 00:51:09 VOL 4 6| 1 | MicroSD card inserted |
| 2 | Recording mode |
| 3 | Recording resolution / Color encoding standard |
| 4 | Recording time to MicroSD card |
| 5 | Battery status |
| 6 | Volume level of speaker (no influence to recording) |
Note: If no memory card (MicroSD) is inserted, the message "No Card" appears on the display.
Recording mode settings
Set resolution
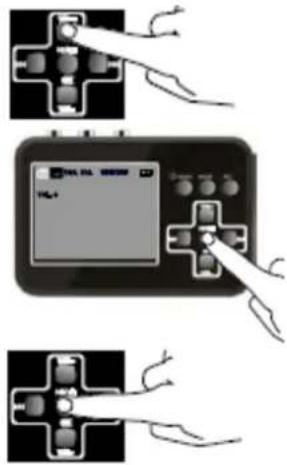
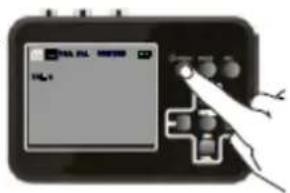
Press the On/Off Menu button briefly once more to access the settings.
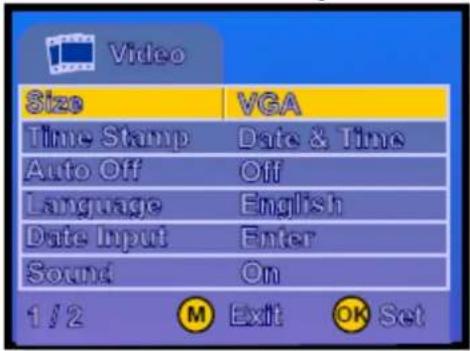
text_image
Video Size VGA Time Stamp Date & Time Auto Off Off Language English Date Input Enter Sound On 1/2 M Exit OK Set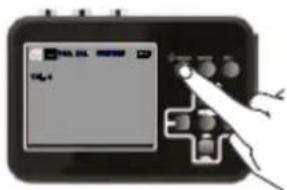
text_image
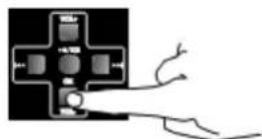
Digital device screen displaying 'Digital' with control buttons and a hand interacting with the screenScroll between the various menu alternatives by using the VOL+ and VOL- buttons.
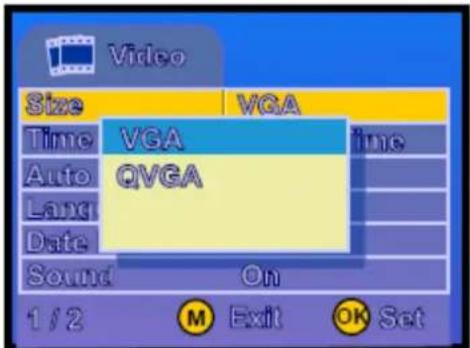
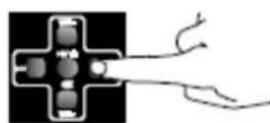
Press OK to access to the sub menu.
text_image
TOL-1 TOL-1Press OK to save the selected alternative.
text_image
Video Size VGA Time VGA Auto QVGA Lang Date Sound On 1/2 ① M Exit ② OK SetNote: The selected alternative is shown in yellow in the main menus; however, it appears in blue in the sub menus. VGA is better quality then QVGA.
Press the On/Off Menu button to leave the settings mode.
text_image
VISA FIL 80000 VISASetting Date and Time
You can use this setting to show the date and time in the recording. You can set it according to the time when your video was recorded. It does not need to be the current date and time. Note: You also can turn of the time stamp.
Press the On/Off Menu button briefly to access the settings.
text_image
Diagram of a handheld electronic device with a screen displaying 'Digital Display' and control buttons, showing a hand interacting with the screen.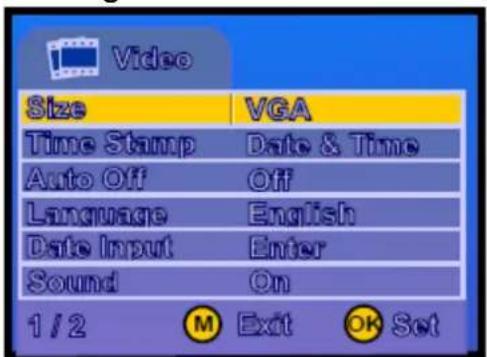
text_image
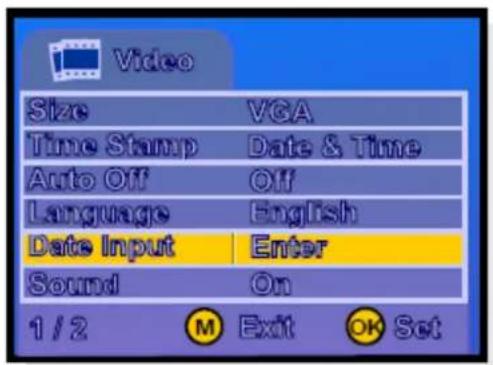
Video Size VGA Time Stamp Date & Time Auto Off Off Language English Date Input Enter Sound On 1 / 2 M Exit OK SetUsing the VOL- button, scroll down to: Date input - Enter
text_image
Video Size VGA Time Stamp Date & Time Auto Off Off Language English Date Input Enter Sound On 1/2 M Exit OK SetPress OK to reveal an sub menu.
text_image
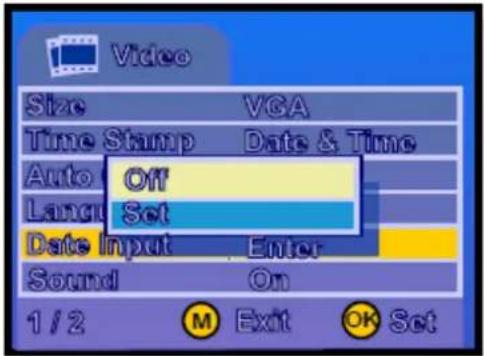
Video Size VGA Time Stamp Data & Time Auto Off Language Set Date Input Enter Sound On 1 / 2 M Exit OK Set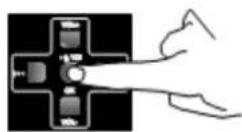
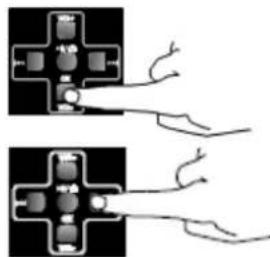
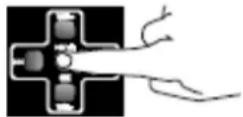
Using the VOL- button, scroll down to: Set and press OK to enter. Note: The blue field is now highlighted.
Use the VOL-/VOL+ button to change the date format. Use the ▶button, to scroll down to the year.
natural_image
Two identical diagrams showing electrical connections with wires, no text or symbols present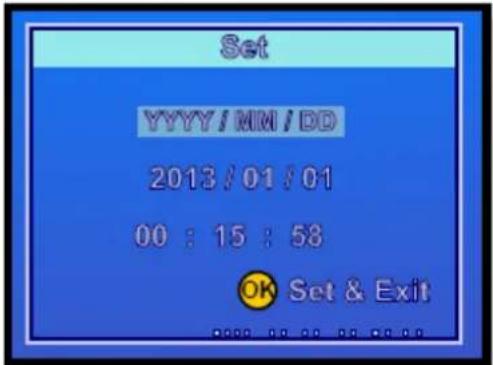
text_image
Set YYYY/MM/DD 2013/01/01 00 : 15 : 58 OK Set & ExitSet the correct year by using the VOL- and VOL+ buttons.

text_image
Set YYYY/MM/DD 2013/01/01 00:15:58 OK Set & Exit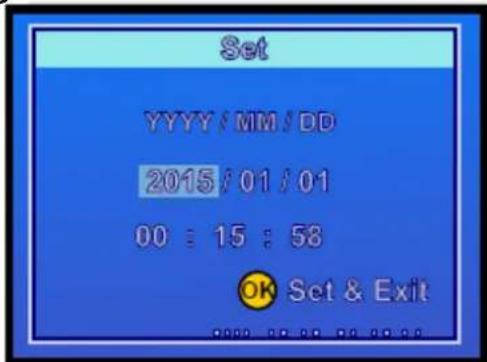
text_image
Set YYYY/MM/DD 2015/01/01 00:15:58 OK Set & Exit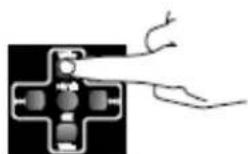
Then use the ▶button to scroll further to the month etc.
Press OK to save the settings and return to the settings menu.
Once all the settings are made, return to the recording mode by pressing the On/Off Menu button. The selected settings remain saved even if the device is switched off.
Settings
The other settings in the video recording menu are made in the same way as you set the date and time.
The available settings are:
| Menu | Options |
| Size | VGA (640x480) or QVGA (320x240) recording resolution |
| Time Stamp | Off, Date or Date and time visible on the recording. |
| Auto off | Automatic shut-off set to OFF, 15, 30 or 45 minutes.Automatic shut-off can only work when it is not recording. |
| Language | Choose several languages to operate the device in.Supported: EN, FR, DE, IT, SP, PO, PL, NL, CZ |
| Date input | Set the date and time, refer to the chapter “Setting date and time”Set independently the time in the TX-182. For instance, if the video was recorded in the summer of 2007, the date can be inserted here. |
| Sound | On or Off, Off mutes the recording. |
| Sys. Reset | Set the device back to factory settings. |
| Software version | Shows installed firmware version. |
Recording
Note: ● The max file length of a recording is 90 minutes. After that a new file is created automatically. ● It could also be possible that bottom and top be cut off while recording.
- Connect your TX-182 to a video source.
- Turn on the video source.
- Turn on the TX-182.
-
Press the REC button to begin recording. The counter in the top right corner of the display turns red
-
Make sure the video source image is shown on the TX-182 display.

text_image
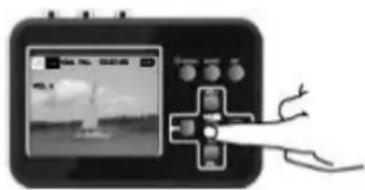
WAL 100%- Press PLAY on the video source to begin playing your video. The movie is now also visible on the display of the TX-182.
While your movie is being recorded, you can do the following:
A Record the movie without sound Press ▶ button once to turn off the sound (Just mutes recording not the device). Press button once more and the sound is on again.
Note: The loudspeaker of the TX-182 playbacks the audio even when you mute the recording.
natural_image
Illustration of a handheld device with a screen displaying a landscape image and a plus button, connected to a hand holding a tool (no text or symbols visible)B Take snapshots
Press the ▶ button it will stop and save the recording and change to Snapshot mode. Press ▶/□ button again will take a snapshot and save the snapshot.
Note: The video material is playing along even you press the ▶///☐ on the TX-182. The play/pause needs to be coordinated by the video source.
text_image
Diagram showing a handheld device with a screen displaying a weather image and a hand interacting with it, likely illustrating a weather monitoring or control interface.- Press the REC button to stop and save the recording.
Note: You also can record video material while the device is connected with the USB power adapter.
Play mode settings
How to set
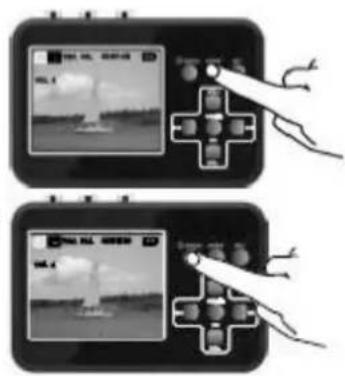
Press the Mode button to select the play mode.
The TX-182 is now in play mode.
text_image
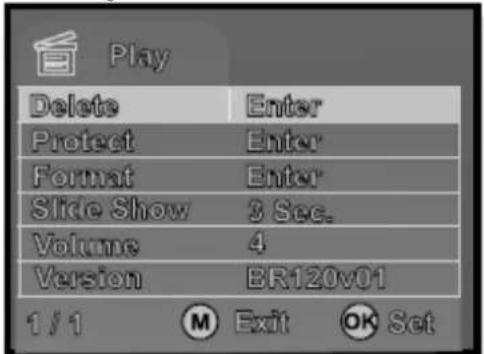
Two-panel image showing a hand holding a game controller with UI elements, one displaying a video player interface and the other displaying a game controller.Press the On/Off Menu button briefly to get to the settings.
text_image
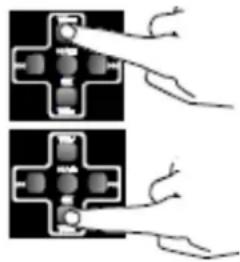
Play Delete Enter Protect Enter Format Enter Slide Show 3 Sec. Volume 4 Version ER120v01 1/1 ① Exit ② SetScroll between the various menu alternatives by using the VOL+ and VOL- buttons.
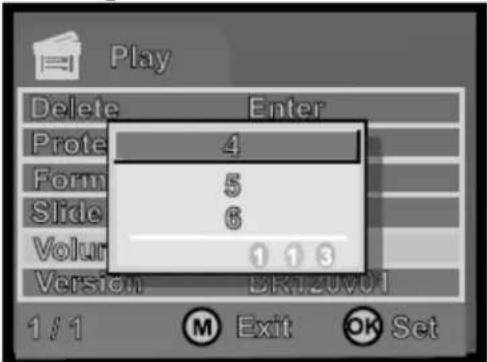
Press OK to access to the sub menu.
Using the VOL- button to scroll down to the desired setting. Note: The blue field is now highlighted.
text_image
Play Delete Enter Prote 4 Form 5 Slide 6 Volume 1 1 3 Version BK120001 1/1 ⑧ Exit ⑨ SetPress OK to save the setting and return to the settings menu.

natural_image
Three-panel diagram showing hand placement on a black cross-shaped component, no text or symbols present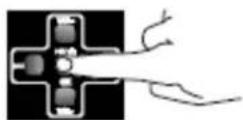
Settings
The following settings can be done in play mode:
| Delete | Delete recordings or snapshots. Choose: Single, All or Select At Select choose the file from the miniatures that are displayed. |
| Protect | Prevents the recordings from being deleted. Choose: Single, All or Select. At Select choose the file from the miniatures that are displayed. Protected files are indicated with a padlock. |
| Format | Formats the memory card and deletes all the files, even those that are protected. |
| Slide | Presents the snapshots in the form of a slide show. |
| Volume | Set the volume level between 1 and 8. |
| Version | Shows installed firmware version. |
Playback
- Turn on your TX-182.
-
Use the Mode button to select the play mode.
The TX-182 is now in play mode. -
Select the desired recording using 1 of buttons.
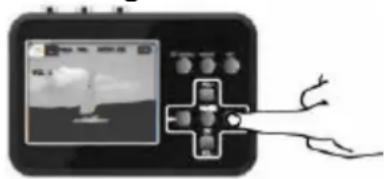
- Press OK to playback the recording.
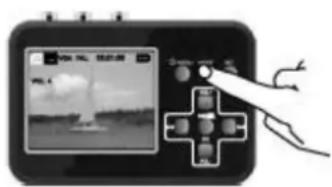
text_image
Diagram showing a handheld device with a screen displaying a photo and a hand interacting with it, labeled in Chinese.
- While playback, long press button to fast forward. The max. speed of fast forward is 8x. While fast forward press button to resume to normal playback speed.
You can zoom in and out on snapshots in several steps by pressing the OK or Vol+ button.
Pressing the Vol- button will zoom back and ultimately data about the image file are shown.
Note: Zoom In and Zoom Out is only useable for photos.
natural_image
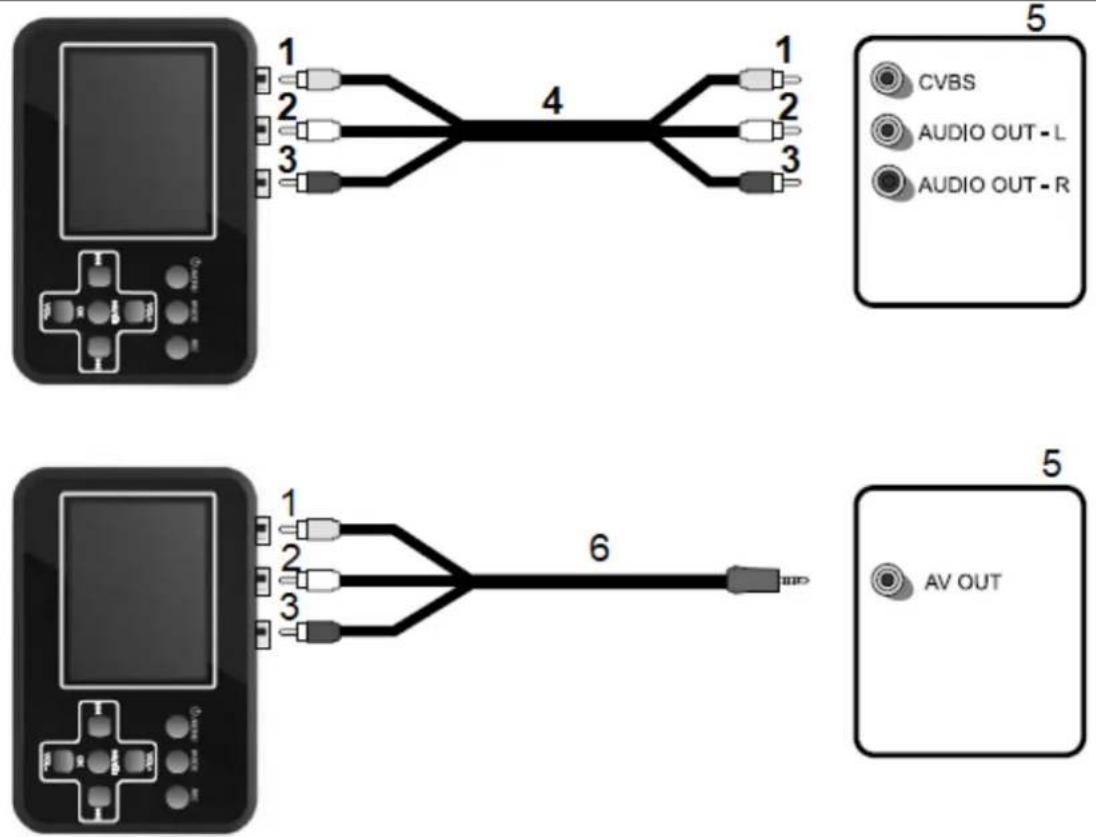
Diagram showing two hand positions interacting with a mechanical component (no text or symbols)Show recordings on TV
You can connect your TX-182 to a monitor (TV) via AV-cable or by using HDMI-cable. After connecting the TX-182 with either an AV-cable or a HDMI-cable the display turns black. You can see the recordings now on the monitor (TV).
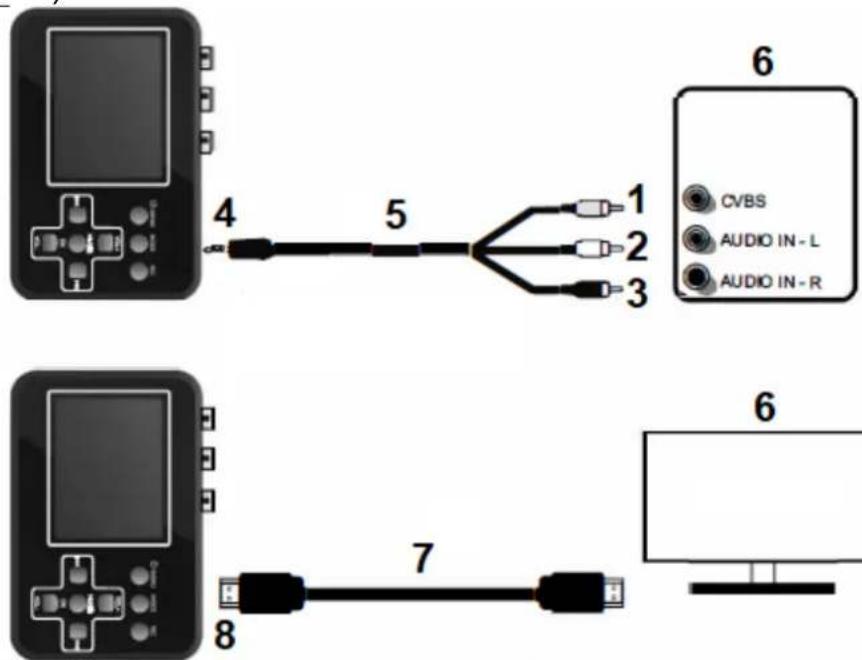
text_image
4 5 1 CVBS AUDIO IN - L 2 AUDIO IN - R 3 7 8 6| 1 | Yellow (video) | 5 | AV-cable |
| 2 | White (audio L) | 6 | Monitor (TV) |
| 3 | Red (audio R) | 7 | HDMI-cable |
| 4 | AV-output | 8 | HDMI output |
Copy recordings to PC
By connecting the TX-182 to a PC, you can process your recordings and snapshots on the PC itself. A drive routine will automatically be installed onto your PC the first time you connect the TX-182 to your PC. The TX-182 then appears as a removable disc drive on the PC, so you can copy, rename or delete your recordings.
- Start the PC.
- Connect the TX-182 to the PC using the MiniUSB Data/Power cable.
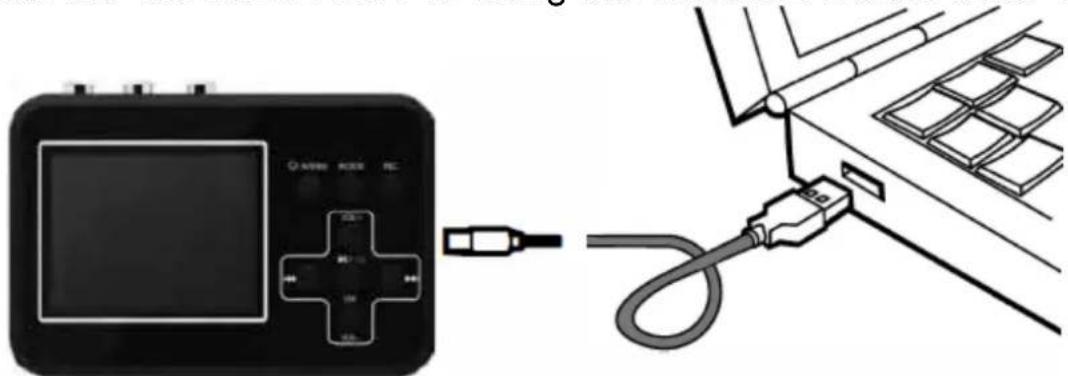
text_image
Diagram showing a device connected to a cable with labeled ports and connectors, illustrating electrical or diagnostic setup.- Press and hold the On/Off Menu button up to 5 seconds.
- The TX-182 now appears as a removable disc drive on the PC.
- Open the folder and copy & paste the files to your PC.
Note: It is not possible to playback recordings on the TX-182 while the TX-182 is connected to the PC.
Troubleshooting
| Problem | Solution |
| No video or audio | Before using the REC button of the TX-182, make sure the input source (DV, DVD player, VHS) is turned on and can provide audio and/or video signal to the TX-182. |
| Make sure that the AV- or RCA-cable is securely connected to both the input source and TX-182. | |
| Scart adapter is set to IN. Set it to OUT. | |
| Video hangs or flickers | Use a MicroSD card whose transfer speed i class 10 or above. |
| No recordings saved | |
| Software crash | Use a needle to push the mini hole at the back of the TX-182 to reset it. |
| Hardware crash | |
| Display remains black | The battery may be dead. Connect the charger and try again. |
| On/Off Menu button does not work | |
| No recordings saved | The cables may be incorrectly connected or be connected to loosely. |
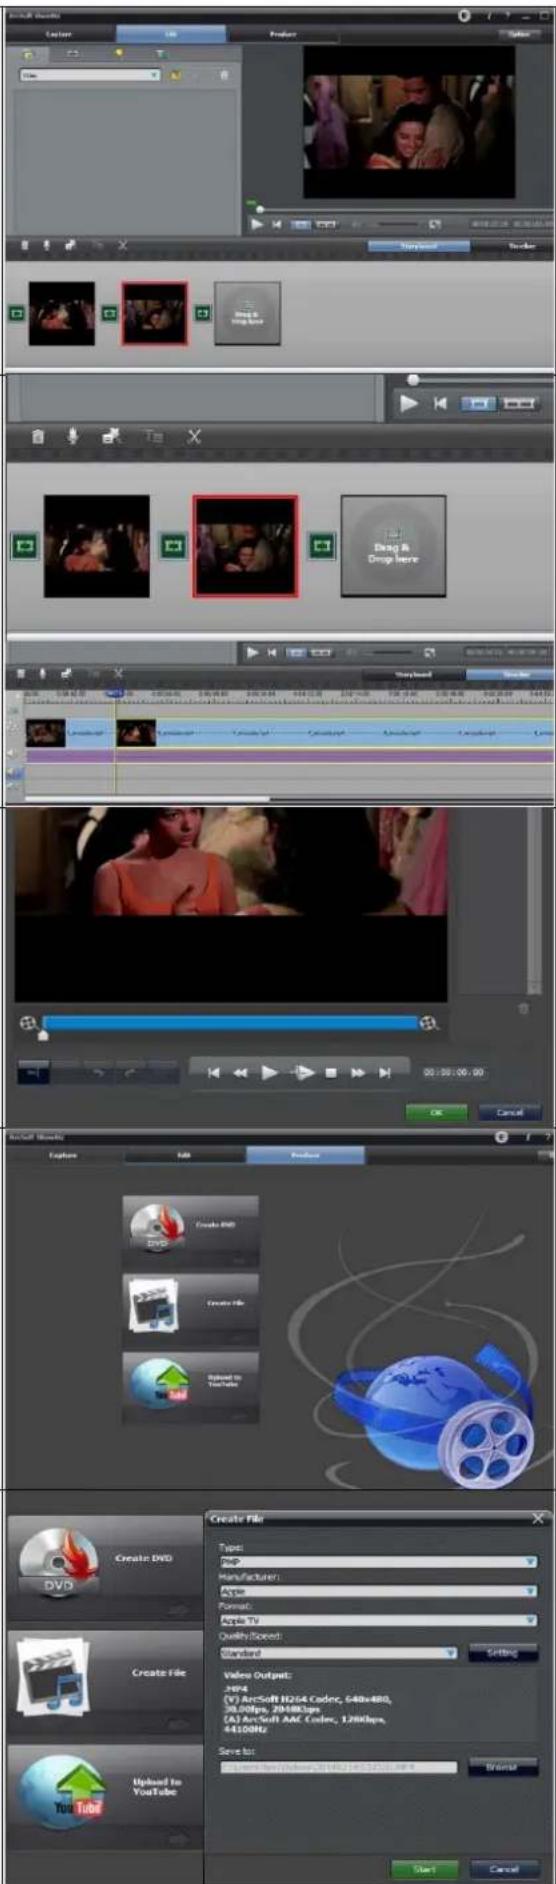
Edit/Convert recordings
The TX-182 comes with a video edit software Arcsoft ShowBiz (Windows only), you can edit your recordings with it. Install it from CD (or download the software under www.technaxx.de/support) on PC and open it.
-
You can combine two or more video in one, just drag them into Arcsoft Showbiz.
-
You can cut a video to two or more
-
Click "Produce" after editing, you can create DVD or upload video to YouTube.
-
Click "Create file" to create multiple files for different devices.
Note: Click the “?” key on the software panel to get more information and help
text_image
Create DVD Create File Upload In YouTube Create PDF Create PDF Import to YouTube Video Output: 20Hz (V) ArcSoft H264 Coder, 648x480, 38.00fps, 2048Kbps, CA) ArcSoft AAC Coder, 128Kbps, 64100Hz/ Save to: Browse Web: Windows, 301482.149.53103.4MP Start Cancel OK Cancel Show Book Show Book Show Book Show Book Show Book Show Book Show Book Show Book Show Book Show Book Show Book Show Book Show Book Show Book Show Book Show Book Show Book Show Book Show Book Show Book Show Book Show Book Show Book Show Book Show Book Show Book Show Book Show Book Show Book Show Book Show Book Show Book Show Book Show Book
text_image
Create DVD Create File Upload In YouTube Create PDF Create PDF Import to YouTube Video Output: 20Hz (V) ArcSoft H264 Coder, 648x480, 38.00fps, 2048Kbps, CA) ArcSoft AAC Coder, 128Kbps, 64100Hz/ Save to: Browse Web: Windows, 301482.149.53103.4MP Start Cancel OK Cancel Show Book Show Book Show Book Show Book Show Book Show Book Show Book Show Book Show Book Show Book Show Book Show Book Show Book Show Book Show Book Show Book Show Book Show Book Show Book Show Book Show Book Show Book Show Book Show Book Show Book Show Book Show Book Show Book Show Book Show Book Show Book Show Book Show Book Show BookTechnical specifications
| Recording resolution | VGA (640x480), QVGA (320x240) |
| Video / Photo format | AVI / JPG |
| File size recordings | 13-15MB per minute; 4GB equal approx. 4h of recordings |
| File length recording | Max. 90minutes, after that a new file is created |
| Working time | Up to 4h |
| Charging time | Up to 2.5h |
| Battery | Rechargeable lithium polymer battery 3.7V, 1500mAh |
| Memory card | MicroSDHC max. 32GB, class 10 or above |
| Power adapter | Input: AC 100-240V 50/60Hz max. 0.4A; Output: DC 5V / 1A |
| Display | 2.4" (6cm) colored TFT |
| Controls | 8 buttons |
| Languages | EN, FR, DE, IT, SP, PO, PL, NL, CZ |
| Software | Windows only; English |
| Power consumption | Max. 5W |
| Operating temperature | 0°C up to +40°C / 32°F up to 104°F |
| Material | ABS |
| Weight / Dimensions | 114g / (L) 10.5 x (W) 7.5 x (H) 2.5cm4oz / (L) 4.13 x (W) 2.95 x (H) 0.98 inch |
| Package content | Technaxx® Retro Video Digitizer TX-182, USB power adapter, RCA-cable, AV-cable, HDMI-cable, MiniUSB Data/Power cable, Scart to RCA adapter, 4GB MicroSD card, CD, user manual |
Support
Service phone No. for technical support: 01805 012643 (14 cent/minute from German fixed-line and 42 cent/minute from mobile networks). Free
Email: support@technaxx.de
The support hotline is available Mon-Fri from 9am to 1pm & 2pm to 5pm
Care and maintenance
Clean the device only with a dry or slightly damp, lint-free cloth.
Do not use abrasive cleaners to clean the device.
This device is a high-precision optical instrument, so in order to avoid damage, please avoid the following practice:
- Use the device in ultra-high or ultra-low temperature.
- Keep it or use it in moist environment for long.
- Use it in rainfalls or in water.
- Deliver or use it in strongly shocking environment.
Declaration of Conformity

The EU Declaration of Conformity can be requested at the following address: www.technaxx.de/ (in the lower bar "Declaration of Conformity").
Disposal

Disposal of the packaging. Sort packaging materials by type upon disposal.
Dispose of cardboard and paperboard in the waste paper. Foils should be submitted for recyclables collection.
Disposing of old equipment (Applies in the European Union and other European countries with separate collection (collection of recyclable materials) Old equipment must not be disposed of with household waste! Every consumer is required by law to dispose of old devices that can no longer be used separately from household waste, e.g. at a collection point in his or her municipality or district. This ensures that the old devices are properly recycled and that negative effects on the environment are avoided. For this reason, electrical devices are marked with the symbol shown here.

Batteries and rechargeable batteries must not be disposed of in household waste! As a consumer, you are required by law to dispose of all batteries and rechargeable batteries, whether they contain harmful substances* or not, at a collection point in your community/city or with a retailer, to ensure that the batteries can be disposed of in an environmentally friendly manner. * marked with: Cd = cadmium, Hg = mercury, Pb = lead. Return your product to your collection point with the fully discharged battery installed inside!
Made in China
Distributed by: Technaxx Germany GmbH & Co. KG Konrad-Zuse-Ring 16-18, 61137 Schöneck, Germany
Retro Video Digitizer TX-182
FCC Statement
This device complies with part 15 of the FCC Rules. Operation is subject to the following two conditions:
(1) This device may not cause harmful interference, and
(2) this device must accept any interference received, including interference that may cause undesired operation.
Any changes or modifications not expressly approved by the party responsible for compliance could void the user's authority to operate the equipment.
NOTE: This equipment has been tested and found to comply with the limits for a Class B digital device, pursuant to Part 15 of the FCC Rules. These limits are designed to provide reasonable protection against harmful interference in a residential installation. This equipment generates, uses and can radiate radio frequency energy and, if not installed and used in accordance with the instructions, may cause harmful interference to radio communications. However, there is no guarantee that interference will not occur in a particular installation.
If this equipment does cause harmful interference to radio or television reception, which can be determined by turning the equipment off and on, the user is encouraged to try to correct the interference by one or more of the following measures:
-- Reorient or relocate the receiving antenna.
-- Increase the separation between the equipment and receiver.
-- Connect the equipment into an outlet on a circuit different from that to which the receiver is connected.
-- Consult the dealer or an experienced radio/TV technician for help.
The device has been evaluated to meet general RF exposure requirement. The device can be used in portable exposure condition without restriction.
US Warranty
Thank you for your interest in the products and services of Technaxx Deutschland GmbH & Co.KG. This Limited Warranty applies to physical goods, and only for physical goods, purchased from Technaxx Deutschland GmbH & Co.KG.
This Limited Warranty covers any defects in material or workmanship under normal use during the Warranty Period. During the Warranty Period, Technaxx Deutschland GmbH & Co.KG will repair or replace, products or parts of a product that proves defective because of improper material or workmanship, under normal use and maintenance.
The Warranty Period for Physical Goods purchased from Technaxx Deutschland GmbH & Co.KG is 1 year from the date of purchase. A replacement Physical Good or part assumes the remaining warranty of the original Physical Good or 1 year from the date of replacement or repair, whichever is longer.
This Limited Warranty does not cover any problem that is caused by:
- conditions, malfunctions or damage not resulting from defects in material or workmanship
To obtain warranty service, you must first contact us to determine the problem and the most appropriate solution for you.
natural_image
Black Technax XX Germany digital camera with a black screen displaying a landscape photo (no visible text or symbols on the device body)natural_image
Illustration of hands holding a handheld device with a card partially inserted (no text or symbols visible)text_image
Video Size VGA Time Stamp Date & Time Auto Off Off Language English Date Input Enter Sound On 1/2 M Exit OK Set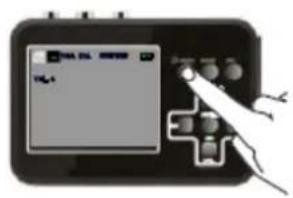
text_image
Diagram of a handheld device with a screen displaying 'VGA' and control buttons, connected to a plus button.text_image
Diagram showing hand positioning a game controller with control buttons and display screen, labeled 'T4.1' and 'T4.2'text_image
Video Size VGA Time VGA Time Auto QVGA Lang Date Sound On 1/2 M Exit OK Settext_image
Digital device screen displaying 'FIL4' with a hand pointing to it, likely indicating a function or control interface.text_image
Diagram of a handheld electronic device with a screen displaying '100%' and a hand pressing a button, indicating action or status.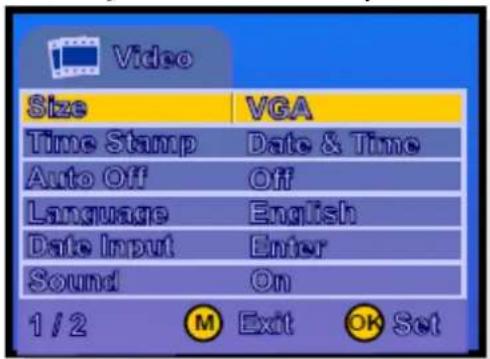
text_image
Video Size VGA Time Stamp Date & Time Auto Off Off Language English Date Input Enter Sound On 1 / 2 M Exit OK Settext_image
Video Size VGA Time Stamp Date & Time Auto Off Off Language English Date Input Enter Sound On 1 / 2 M Exit OK Setnatural_image
Two schematic diagrams of electrical connectors with wires, no text or symbols present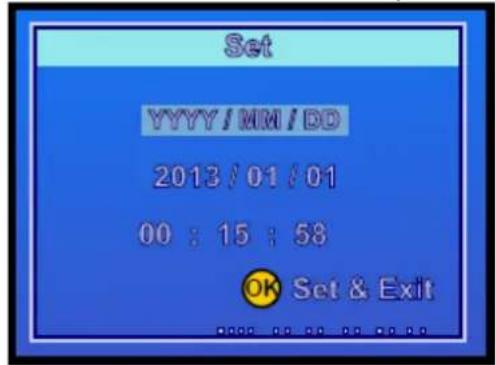
text_image
Set YYYY/MM/DD 2013/01/01 00:15:58 OK Set & Exitnatural_image
Simple line drawing of a hand pressing a button into a cross-shaped device (no text or symbols)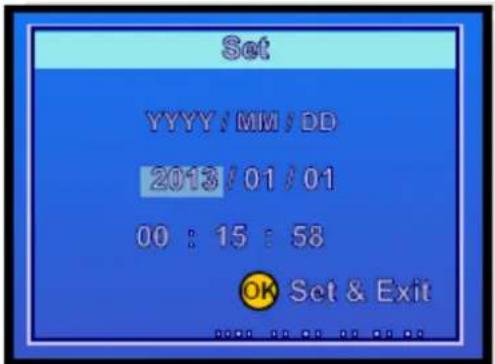
text_image
Set YYYY/MM/DD 2013/01/01 00 : 15 : 58 OK Set & Exit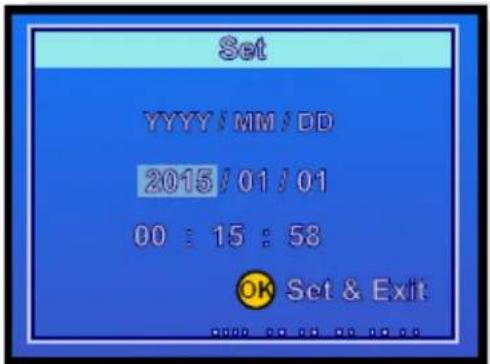
text_image
Set YYYY/MM/DD 2015/01/01 00:15:58 OK Set & Exitnatural_image
Two identical diagrams showing a mechanical or electrical component with internal connections and external wires (no text or symbols)natural_image
Illustration of a medical or scientific device with a central cross and connected tubing (no visible text or symbols)B Tomar capturas
text_image
Diagram showing a handheld device with a screen displaying a landscape image and a hand interacting with it, possibly indicating a control or interface.text_image
Two-panel image showing a game controller with hand buttons and UI elements, one displaying a video thumbnail and the other displaying a game controller.text_image
Play Delete Enter Protect Enter Format Enter Slide Show 3 Sec. Volume 4 Version ER120v01 1/1 ⑧ Exit ⑨ Settext_image
Play Delete Enter Prote 4 Form 5 Slide 6 Volume 1 1 3 Version BK120V01 1/1 ③ Exit ④ OK Setnatural_image
Three-panel diagram showing hand tool application on a circuit board with no visible text or symbols
Configuración
text_image
Diagram showing a hand interacting with a digital camera interface, labeled with 'VIR. 100' and control buttons.natural_image
Diagram showing two identical electrical components with hand connections, no text or symbols presentnatural_image
Diagram showing a device connected to a cable with a plug, next to a grid of modules (no text or symbols present)text_image
Audio Effects Capture Add Product Select Video Scene Preview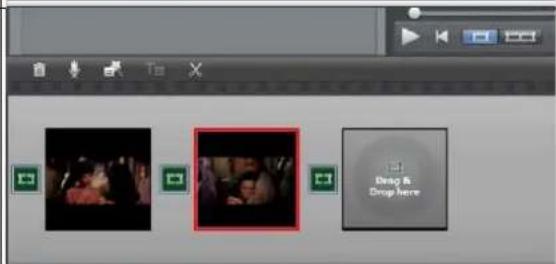
text_image
Drop & Drop Here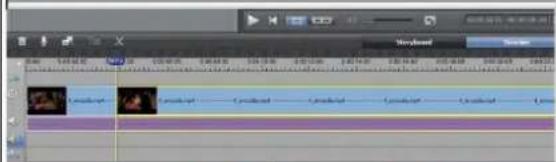
text_image
Screenshot of video editing software interface showing timeline with multiple tracks and clips labeled in Chinese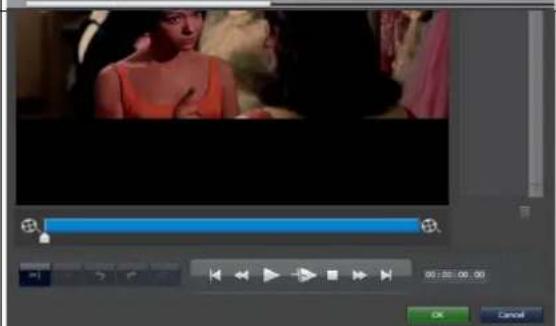
text_image
Video editing software interface showing timeline controls and preview window with a woman in the background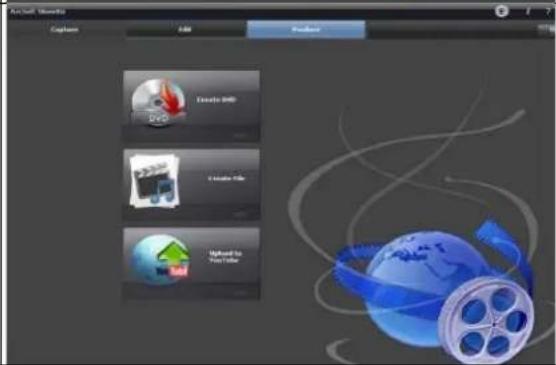
text_image
Aircraft Version Capture Add Remove Davio DVD Create File Import To Your Text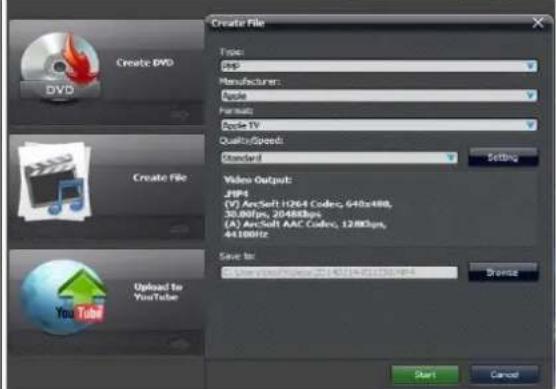
text_image
Create DVD DVD Create File Upload to YouTube Create File Type: Sep Manufacturer: Apple Format: Apple TV QualitySpeed: Standard Video Output: JIP4 (V) ArcSoft 1264 Codec, 640x480, 30.80fps, 20488fps (A) ArcSoft AAC Codec, 1288fps, 44.100fps Save to: Enter video/Video: 25140714-811230-99-4 Start CancelThis device complies with part 15 of the FCC Rules. Operation is subject to the following two conditions:
(1) This device may not cause harmful interference, and
(2) this device must accept any interference received, including interference that may cause undesired operation.
Any changes or modifications not expressly approved by the party responsible for compliance could void the user's authority to operate the equipment.
NOTE: This equipment has been tested and found to comply with the limits for a Class B digital device, pursuant to Part 15 of the FCC Rules. These limits are designed to provide reasonable protection against harmful interference in a residential installation. This equipment generates, uses and can radiate radio frequency energy and, if not installed and used in accordance with the instructions, may cause harmful interference to radio communications. However, there is no guarantee that interference will not occur in a particular installation.
If this equipment does cause harmful interference to radio or television reception, which can be determined by turning the equipment off and on, the user is encouraged to try to correct the interference by one or more of the following measures:
-- Reorient or relocate the receiving antenna.
-- Increase the separation between the equipment and receiver.
-- Connect the equipment into an outlet on a circuit different from that to which the receiver is connected.
-- Consult the dealer or an experienced radio/TV technician for help.
The device has been evaluated to meet general RF exposure requirement. The device can be used in portable exposure condition without restriction.
US Warranty
Thank you for your interest in the products and services of Technaxx Deutschland GmbH & Co.KG. This Limited Warranty applies to physical goods, and only for physical goods, purchased from Technaxx Deutschland GmbH & Co.KG.
This Limited Warranty covers any defects in material or workmanship under normal use during the Warranty Period. During the Warranty Period, Technaxx Deutschland GmbH & Co.KG will repair or replace, products or parts of a product that proves defective because of improper material or workmanship, under normal use and maintenance.
The Warranty Period for Physical Goods purchased from Technaxx Deutschland GmbH & Co.KG is 1 year from the date of purchase. A replacement Physical Good or part assumes the remaining warranty of the original Physical Good or 1 year from the date of replacement or repair, whichever is longer.
This Limited Warranty does not cover any problem that is caused by:
- conditions, malfunctions or damage not resulting from defects in material or workmanship
To obtain warranty service, you must first contact us to determine the problem and the most appropriate solution for you.
natural_image
Black Technax XX Germany digital camera with a screen displaying a black-and-white photo of two people cycling on a beach (no visible text or symbols on device body)text_image
Diagram showing a device connected to a cable with labeled ports and connectors, likely illustrating a cable or cable connection.Remarque :
natural_image
Illustration of hands holding a handheld device with a card partially inserted (no text or symbols visible)text_image
Video Size VGA Time Stamp Date & Time Auto Off Off Language English Date Input Enter Sound On 1/2 M Exit OK Set
text_image
TAL-01 TAL-01text_image
Diagram showing three hand gestures interacting with a device labeled 'TIG-1' and connected to control buttons.text_image
Video Size VGA Time VGA Auto QVGA Lang Date Sound On 1/2 M Exit OK Settext_image
Scanned image of a device control panel with a hand pointing to a screen displaying 'FIL' and buttonstext_image
Diagram of a device with a screen displaying 'SARV-0013' and a hand pointing to it, likely indicating a control or interface.
text_image
Video Size VGA Time Stamp Date & Time Auto Off Off Language English Date Input Enter Sound On 1 / 2 M Exit OK Settext_image
Video Size VCA Time Stamp Date & Time Auto Off Off Language English Date Input Enter Sound On 1/2 ① Exit ② OK Settext_image
Video Size VGA Time Stamp Date & Time Auto Off Lancel Set Date Input Enter Sound On 1 / 2 M Exit OK Set
natural_image
Two identical electrical circuit diagrams showing connections between components (no text or symbols)
text_image
Set YYYY/MM/DD 2013/01/01 00:15:58 OK Set & Exitnatural_image
Two identical diagrams showing a cross-shaped component with internal connections and curved lines, no text or symbols present.text_image
Diagram showing a device with a screen displaying a landscape image and a plus button connected to a hand holding a tool, likely illustrating a camera or navigation system.natural_image
Illustration of a handheld electronic device with a screen displaying a grayscale image and a hand interacting with it (no visible text or symbols)text_image
Play Delete Enter Protect Enter Format Enter Slide Show 3 Sec. Volume 4 Version BR120v01 1/1 ⑧ Exit ⑨ Set
text_image
Diagram showing two identical game controller setups with hand buttons and a central play button, one displaying a video interface.text_image
Play Delete Enter Prote 4 Form 5 Slide 6 Volume 1 1 3 Version BK120v01 1/1 ① Exit ② OK Set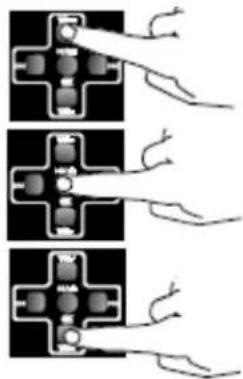
natural_image
Three-panel diagram showing electrical connections with wires and components (no text or symbols)text_image
Digital camera interface showing a screen with 'PUL' text and a hand interacting with the right buttonnatural_image
Illustration of a medical device connected to a cable with a mounted connector, next to a grid of rectangular objects (no text or symbols visible)This device complies with part 15 of the FCC Rules. Operation is subject to the following two conditions:
(1) This device may not cause harmful interference, and
(2) this device must accept any interference received, including interference that may cause undesired operation.
Any changes or modifications not expressly approved by the party responsible for compliance could void the user's authority to operate the equipment.
NOTE: This equipment has been tested and found to comply with the limits for a Class B digital device, pursuant to Part 15 of the FCC Rules. These limits are designed to provide reasonable protection against harmful interference in a residential installation. This equipment generates, uses and can radiate radio frequency energy and, if not installed and used in accordance with the instructions, may cause harmful interference to radio communications. However, there is no guarantee that interference will not occur in a particular installation.
If this equipment does cause harmful interference to radio or television reception, which can be determined by turning the equipment off and on, the user is encouraged to try to correct the interference by one or more of the following measures:
-- Reorient or relocate the receiving antenna.
-- Increase the separation between the equipment and receiver.
-- Connect the equipment into an outlet on a circuit different from that to which the receiver is connected.
-- Consult the dealer or an experienced radio/TV technician for help.
The device has been evaluated to meet general RF exposure requirement. The device can be used in portable exposure condition without restriction.
US Warranty
Thank you for your interest in the products and services of Technaxx Deutschland GmbH & Co.KG. This Limited Warranty applies to physical goods, and only for physical goods, purchased from Technaxx Deutschland GmbH & Co.KG.
This Limited Warranty covers any defects in material or workmanship under normal use during the Warranty Period. During the Warranty Period, Technaxx Deutschland GmbH & Co.KG will repair or replace, products or parts of a product that proves defective because of improper material or workmanship, under normal use and maintenance.
The Warranty Period for Physical Goods purchased from Technaxx Deutschland GmbH & Co.KG is 1 year from the date of purchase. A replacement Physical Good or part assumes the remaining warranty of the original Physical Good or 1 year from the date of replacement or repair, whichever is longer.
This Limited Warranty does not cover any problem that is caused by:
- conditions, malfunctions or damage not resulting from defects in material or workmanship
To obtain warranty service, you must first contact us to determine the problem and the most appropriate solution for you.
natural_image
Black Technax XX Germany digital camera with a screen displaying a black-and-white photo of two people cycling on a beach (no visible text or symbols on device body)natural_image
Illustration of hands holding a handheld device with a card partially inserted (no text or symbols visible)text_image
Digital device screen displaying a control interface with Chinese text and a hand interacting with it.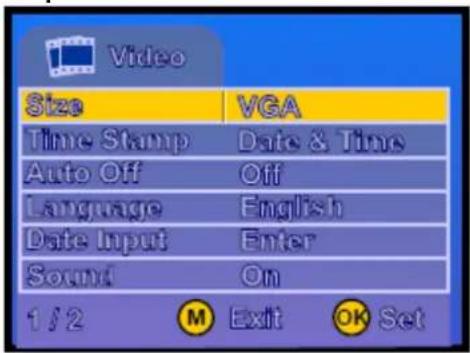
text_image
Video Size VGA Time Stamp Date & Time Auto Off Off Language English Date Input Enter Sound On 1/2 M Exit OK Settext_image
Diagram showing three hand gestures interacting with a device, one displaying a screen with text 'TAL-1' and control buttons.text_image
Video Size VGA Time VGA Time Auto QVGA Lang Date Sound On 1/2 M Exit OK Settext_image
Hand holding a digital device with a screen displaying 'HUA JIA' and control buttons, likely from an electronic device interface.text_image
Diagram of a handheld electronic device with a screen displaying 'Digital Device' and control buttons, showing a hand interacting with the screen.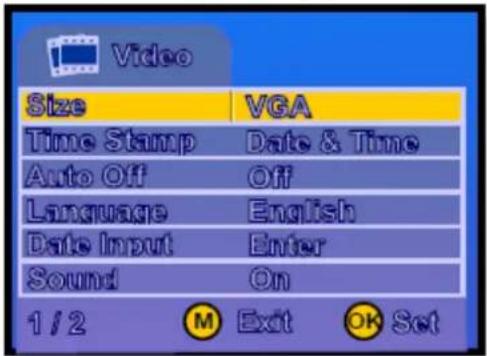
text_image
Video Size VGA Time Stamp Date & Time Auto Off Off Language English Date Input Enter Sound On 1 / 2 M Exit OK Settext_image
Video Size VGA Time Stamp Date & Time Auto Off Off Language English Date Input Enter Sound On 1 / 2 M Exit OK Settext_image
Video Size VGA Time Stamp Date & Time Auto Off Lanc Set Date Input Enter Sound On 1 / 2 M Exit OK Set
natural_image
Two identical electrical connector diagrams with wires, no text or symbols present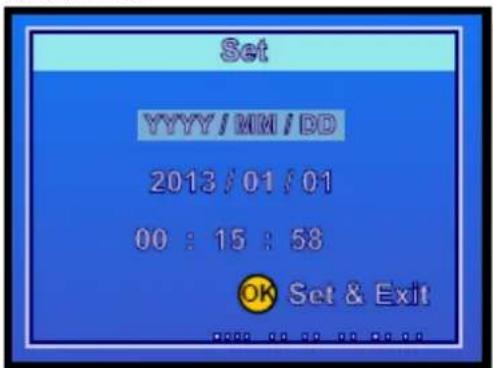
text_image
Set YYYY/MM/DD 2013/01/01 00 : 15 : 58 OK Set & Exitnatural_image
Two identical diagrams showing a cross-shaped component with internal connections and curved lines, no text or symbols present.text_image
Diagram showing a device with a screen displaying a water droplet and control buttons, connected to a hand holding a plug.natural_image
Illustration of a handheld electronic device with a screen displaying a landscape image and a hand interacting with it (no visible text or symbols)text_image
Play Delete Enter Protect Enter Format Enter Slide Show 3 Sec. Volume 4 Version BR120v01 1/1 ⑧ Exit ⑨ Set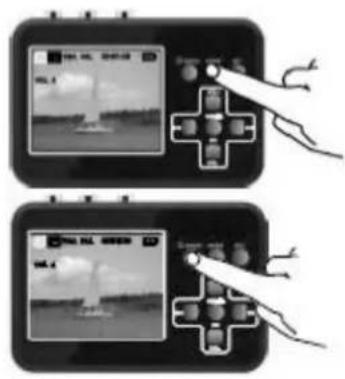
text_image
Diagram showing two identical devices with a hand interacting, one displaying a landscape image and the other displaying a camera with a grid of objects.natural_image
Three-panel diagram showing three different electrical or mechanical configurations with no visible text or symbols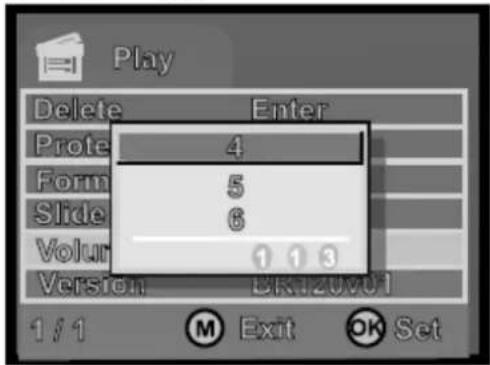
text_image
Play Delete Enter Prote 4 Form 5 Slide 6 Volume 1 1 3 Version BK120v01 1/1 ① Exit ② OK Settext_image
Diagram showing a hand interacting with a device displaying a video call interface and control buttons, likely illustrating a game or navigation system.
text_image
ulsanti o .
natural_image
Illustration of a medical device connected to a cable with a mounted probe inserted, showing internal components (no text or symbols)text_image
Dy600 Create DVD DVD Create File Upload to YouTube Create File Type: mp Manufacturer: Apple Format: Apple TV Quality/Speed: Standard Video Output: 24Hz (V) ArcSoft H2/64 Codec, 640bit/80, 35.00fps, 204MHz (A) ArcSoft AAC Codec, 128Kbps, 64.00Hz Save to: 1000000000000000000000000000000000000000000000000000000000000000000000000000 Start Cancel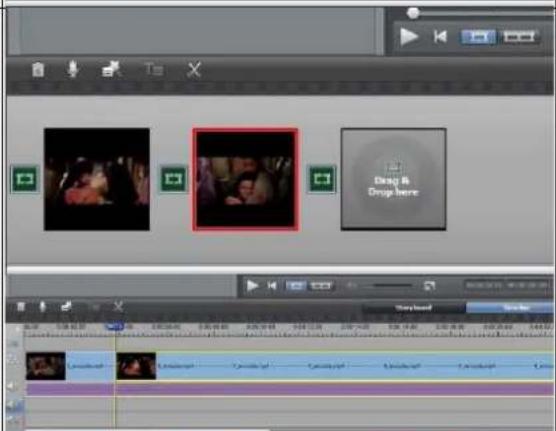
text_image
Drag & Drop here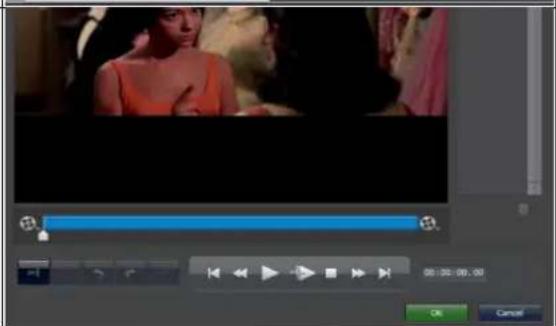
text_image
Video editing software interface showing timeline controls and playback buttons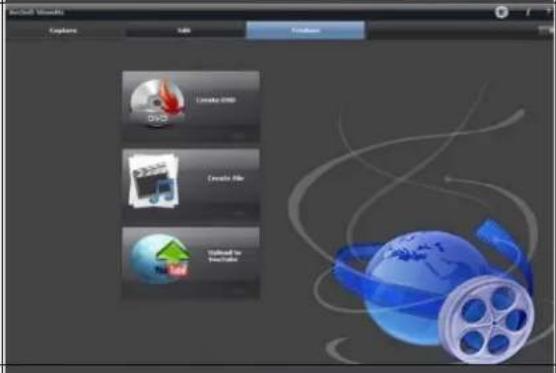
text_image
EnSoft Visuals Explore OK Finish Open Create File Save As Possible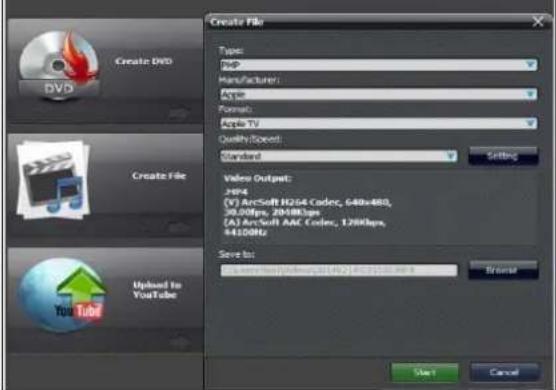
text_image
Create DVD Type: Jsp Manufacturer: Apple Format: Apple TV Quality Scope: Standard Video Output: H94 (V) ArcSoft H234 Codec, 648x480, 50.00fps 2000fps (A) ArcSoft AAC Codec, 1280fps, 44.00Hz Save to: Current: 1000000000000000000000000000000000000000000000000000000000000000000000000000000000000 Options: Start CancelScheda tecnica
Retro Video Digitizer TX-182
Retro Video Digitizer TX-182
natural_image
Black Technax XX Germany digital camera with a screen showing a child riding on a beach, no visible text or symbols on the device itself.Opmerking: FAT32 is vereist.

natural_image
Illustration of hands holding a handheld device with a card partially inserted (no text or symbols visible)text_image
START ADD REC OK OK RECtext_image
Video Size VGA Time Stamp Date & Time Auto Off Off Language English Date Input Enter Sound On 1/2 M Exit OK Set
text_image
Hand holding a device with a screen displaying 'P4.1' and control buttons, likely from an older software interface.text_image
Diagram showing three hand gestures interacting with a game controller, one displaying 'TCL-1' and the other with broken hands.text_image
Video Size VGA Time VGA Time Auto QVGA Lang Date Sound On 1/2 M Exit OK Settext_image
Digital device screen displaying a control interface with Chinese text and a hand interacting with it.text_image
Diagram showing a hand interacting with a device displaying a screen with 'V10' and control buttons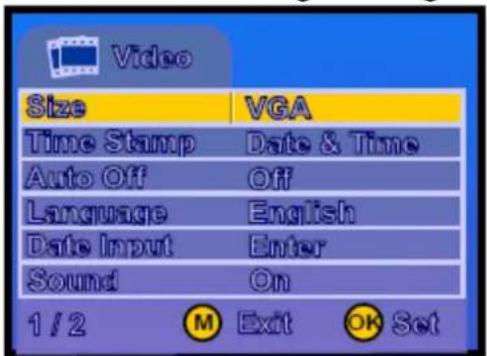
text_image
Video Size VGA Time Stamp Date & Time Auto Off Off Language English Date Input Enter Sound On 1 / 2 M Exit OK Settext_image
Video Size VGA Time Stamp Date & Time Auto Off Off Language English Date Input Enter Sound On 1 / 2 M Exit OK Settext_image
Video Size VGA Time Stamp Date & Time Auto Off Lanc Set Date Input Enter Sound On 1 / 2 M Exit OK Set
natural_image
Two diagrams showing electrical connections with wires, no text or symbols present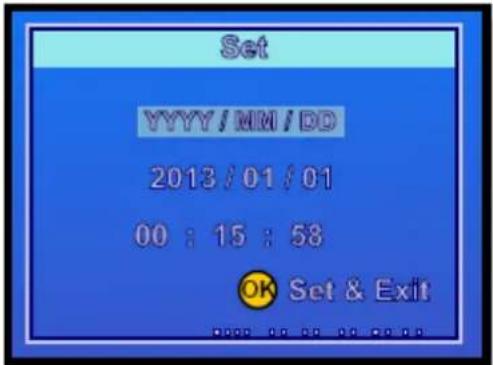
text_image
Set YYYY/MM/DD 2013/01/01 00:15:58 OK Set & Exitnatural_image
Two schematic diagrams of electrical connectors with wires, no text or symbols presenttext_image
Diagram showing a device with a screen displaying a landscape image and connected to a control panel with arrows indicating input/output.B Snapshots maken
natural_image
Illustration of a handheld electronic device with a screen displaying a landscape image and a hand interacting with it (no visible text or symbols)text_image
Two-panel image showing a game controller with action buttons and a screen displaying a landscape image, likely illustrating a game or simulation setup.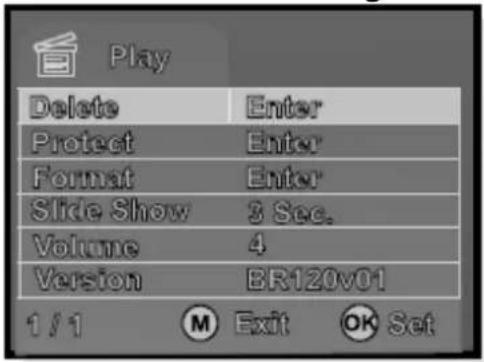
text_image
Play Delete Enter Protect Enter Format Enter Slide Show 3 Sec. Volume 4 Version BR120v01 1/1 ① Exit ② OK Settext_image
Play Delete Enter Prote 4 Form 5 Slide 6 Volume 1 1 3 Version BK120v01 1/1 ① Exit ② OK Setnatural_image
Three-panel diagram showing electrical connector connections with wires and contacts (no text or symbols)
Instellingen
text_image
Device screen displaying a photo editing interface with control buttons and a hand interacting with the screen
natural_image
Diagram showing two electrical connector components with hands pointing to their pins (no text or symbols present)natural_image
Diagram showing a device connected to a cable with a plug, next to a grid of modules (no text or symbols present)text_image
Capture Video Share Drop & Drop here Drag & Drop here Playhead Search Action Animation Animation Animation Animation Action Action Action Action Action Action Action Action Action Action Action Action Action Action Action Action Action Action Action Action Action Action Action Action Action Action Action Action Action Action Action Action Action Action Action Action Action Action Action Action Action Action Action Action Action Action Action Action Action Action Reaction Edit Cancel On/Off Documents Capture Add Delete Create DVD Create PDFs Create PDFs Create PDFs Create PDFs Create PDFs Create PDFs Create PDFs Create PDFs Create PDFs Create PDFs Create PDFs Create PDFs Create PDFs Create PDFs Create PDFs Create PDFs Create PDFs Create PDFs Create PDFs Create PDFs Create PDFs Create PDFs Create PDFs Create PDFs Create PDFs Create PDF s Create PDFs Create PDFs Create PDFs Create PDFs Create PDFs Create PDFs Create PDFs Create PDFs Create PDFs Create PDFs Create PDFs Create PDFs Create PDFs Create PDFs Create PDFs Create PDFs Create PDFs Create PDFs19 Model: TX-182 Artikelnr. 4980, 01/2022
Technische specificaties
Retro Video Digitizer TX-182