
CM3-1-3ST - Coffee machine AEG - Free user manual and instructions
Find the device manual for free CM3-1-3ST AEG in PDF.

| Product type | Filter coffee machine |
| Brand | AEG |
| Model | CM3-1-3ST |
| Power supply | 220-240 V ~, 10 A (max) |
| Water tank capacity | Approximately 1.25 L (level indicator) |
| Number of cups | Up to 12 cups |
| Materials | Recyclable plastic, metal warming plate |
| Automatic shut-off function | Yes, after 40 minutes |
| Drip-stop system | Yes, valve in the filter holder |
| Warming plate | Keeps coffee warm |
| Optional water filter | Electrolux PureAdvantage (sold separately) |
| Coffee filter type | Paper filter size 1x4 |
| Cleaning and maintenance | Carafe and filter holder dishwasher safe |
| Recommended descaling | Every 3 months with descaling agent or vinegar |
| Child safety | Use by children from 8 years under supervision |
| Overheat protection | Automatic safety shut-off |
| Dimensions (approx.) | W x D x H: 30 x 20 x 35 cm |
| Weight (approx.) | 2.5 kg |
| Included accessories | Glass carafe with lid, filter holder, measuring spoon (not mentioned, but typical) |
| Repairability | Spare parts available from Electrolux |
Frequently Asked Questions - CM3-1-3ST AEG
User questions about CM3-1-3ST AEG
0 question about this device. Answer the ones you know or ask your own.
Ask a new question about this device
Download the instructions for your Coffee machine in PDF format for free! Find your manual CM3-1-3ST - AEG and take your electronic device back in hand. On this page are published all the documents necessary for the use of your device. CM3-1-3ST by AEG.
USER MANUAL CM3-1-3ST AEG
natural_image
Line drawing of a coffee maker with lid and control panel (no text or symbols)GB INSTRUCTION BOOK
natural_image
Technical line drawing of a conical funnel with internal blades and a handle (no text or symbols)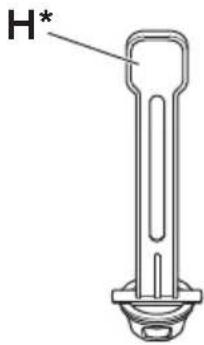

natural_image
Line drawing of a coffee maker with lid and handle, labeled 'J' (no text or symbols on the diagram itself)
* Optional filter to be purchased separately.


aeg.com/shop

Premium Coffee Descaler
Ref : ECF-4-2 PNC : 900167954

Premium Coffee Tablets
Pure Advantage™ water filter
Ref : APAF3 PNC : 9001672881

Pure Advantage™ water filter
Ref: APAF6 PNC: 9001672899
CONTENTS
ENGLISH 5
DEUTSCH 8

ESPAÑOL 14
БЪЛГАРСКИ
FRANÇAIS 20
ΕΛΛΗΝΙΚΑ 23
ITALIANO 26
18
NEDERLANDS 29
PORTUGUÊS 32
FOR PERFECT RESULTS
Thank you for choosing this AEG product. We have created it to give you impeccable performance for many years, with innovative technologies that help make life simpler features you might not find on ordinary appliances. Please spend a few minutes reading to get the very best from it.
Visit our website to:

Get usage advice, brochures, trouble shooter, service information: www.aeg.com/webselfservice

Register your product for better service: www.registeraeg.com

Buy accessories and consumables for your appliance: www.aeg.com/shop
CUSTOMER CARE AND SERVICE
When contacting Service, ensure that you have the following data available:
- Model Number
- PNC number
- Serial number
The information can be found on the rating plate.
ENGLISH
Thank you for choosing an AEG product. In order to ensure the best results, always use original AEG accessories and spare parts. They have been designed especially for your product. This product is designed with the environment in mind. All plastic parts are marked for recycling purposes.
COMPONENTS (Picture page 2)
A. Hinged lid
B. Shower head
C. Water tank
D. Water level indicator
E. ON/OFF switch
F. Warming plate
G. Power cord and plug
H. Electrolux PureAdvantageTM water filter*
I. Filter holder
J. Coffee jug and jug lid
* Optional filter to be purchased separately.
SAFETY ADVICE
Read the following instructions carefully before using the appliance for the first time.
- This appliance can be used by children aged from 8 years and above if they have been given supervision or instruction concerning use of the appliance in a safe way and if they understand the hazards involved. Cleaning and user maintenance shall not be made by children unless they are older than 8 and supervised. Keep the appliance and its cord out of reach of children aged less than 8 years.
• Children shall not play with the appliance. - The appliance may only be connected to a power supply whose voltage and frequency comply with the specifications on the rating plate!
• Never use or pick up the appliance if
– the supply cord is damaged,
– the housing is damaged.
- The appliance must only be connected to an earthed socket. If necessary, an extension cable suitable for 10 A can be used.
- If the appliance or the supply cord is damaged, it must be replaced by the manufacturer, its service agent or similarly qualified person, in order to avoid hazard.
• This appliance shall not be placed in a cabinet when in use.
• Always place the appliance on a flat, level surface. - Never leave the appliance unattended while connected to the supply mains.
- The appliance must be switched off and the mains plug withdrawn each time after use, before cleaning and maintenance.
- The appliance and accessories become hot during operation. Use only designated handles and knobs. Allow to cool down before cleaning or storage.
- Do not immerse the appliance in water or any other liquid.
- Do not use or place the appliance on a hot surface or near source of heat.
- Warning: Avoid spillage on the connector.
- Attention: The heating element surface is subject to residual heat after use.
- The mains cable must not come into contact with any hot parts of the appliance.
-
This appliance is intended for domestic use only. The manufacturer cannot accept any liability for possible damage caused by improper or incorrect use.
-
Do not exceed the maximum filling volume as indicated on the appliance, as there is risk of water tank water overflow from the back hole.
- Never operate appliance with open lid.
This appliance is intended to be used in household and similar applications such as:
— staff kitchen areas in shops, offices and other working environments;
– farm houses;
— by clients in hotels, motels and other residential type environments;
– bed and breakfast type environments.
- Not suitable for contact with high acidic and/or high salty food
The surface with symbol ⚠️ Caution, hot surface are liable to get hot during use.
GETTING STARTED (PICTURE PAGE 3)
1 Place the machine on a flat surface. When starting the machine for the first time, fill the tank with cold water. Start the machine with the ON/OFF switch. Let a full tank of water pass through the machine once or twice to clean it, without using paper filter or coffee.
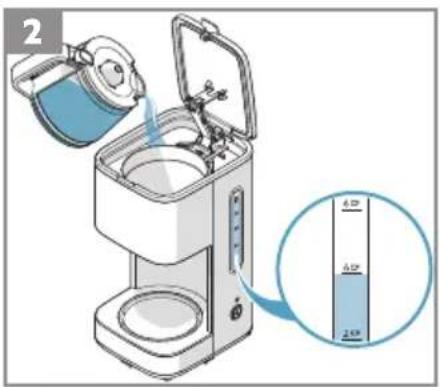
2 Making coffee: open the lid and fill the water tank with fresh cold water up to the desired level. There is a water level indicator on the water tank and on the coffee jug.
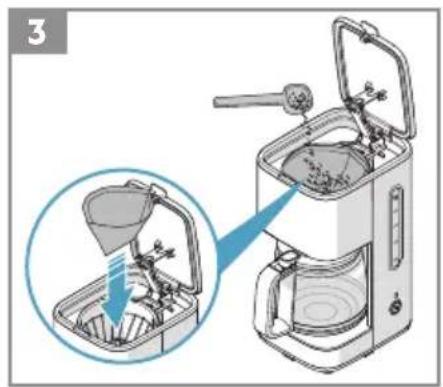
3 Insert a size 1x4 paper filter in the filter holder and fill it with ground coffee. For average strong coffee 6-7 g coffee powder per cup is sufficient. Close the water tank lid and place the jug back (complete with lid).
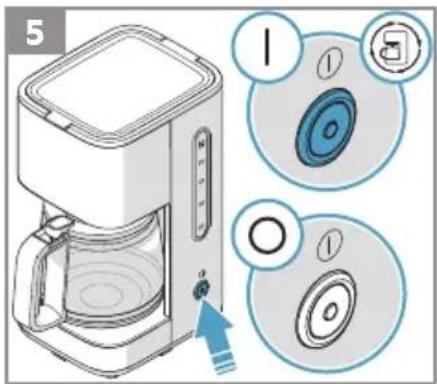
4 Start the machine with the ON/OFF switch. The ON/OFF indicator light will come on and hot water will flow into the filter. If the machine is not turned off manually, the Safety Auto-Off function turns it off after 40 minutes.
5 The brewing process can be interrupted by pressing the ON/OFF switch at any time. The turned off ON/OFF indicator light means that your coffee maker is shut off. Press the ON/OFF switch again, the appliance will start the complete brewing cycle all over again
6 If the jug is removed, the filter valve prevents coffee from dripping onto the warming plate. (While preparing coffee, the jug must not be removed for longer than 30 seconds or the filter will overflow.)
7 The machine is compatible with Electrolux PureAdvantage ^TM water filter. If you choose to use the water filter, it's recommended to change filter after 60 brew cycles. Before using the new filter, place the new filter into a container of clean cool water, and let soak for 10 minutes. Then rinse the filter for 10 to 15 seconds under the running tap water.
CLEANING AND CARE
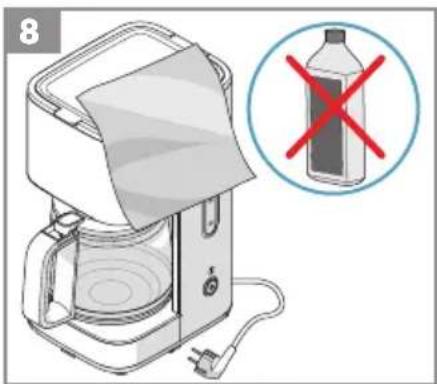
8 Turn the machine off and unplug the power cord. Wipe all outer surfaces with a damp cloth. Coffee jug and jug lid are dishwasher proof. Never use caustic or abrasive cleaners, and never immerse the machine in liquid!
9 To clean the filter holder, lift it up by the handgrip and remove the filter holder. To clean the filter valve thoroughly, push it several times while it is being rinsed. The filter holder can also be washed in the dishwasher.
DESCALING
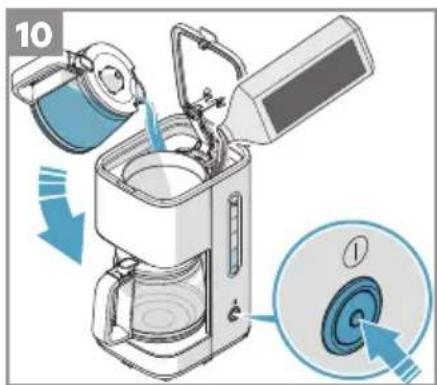
10 We recommend descaling every 3 months. Use only an environmentally friendly descaling agent and always follow the manufacturer's instructions.
a. First fill the water tank with water and then add the descaling agent (or fill in water and vinegar 1:1).
b. Place the coffee jug with the lid on the warming plate.
c. Press ON/OFF switch to start descaling process.
d. When it completes one-cup volume solution liquid, switch it off manually.
e. Leave the remaining solution liquid rest for 15 mins in the appliance.
f. Repeat Step c to e 3-5 times.
g. Run the brewing process until the solution liquid runs out.
h. Brew clean water 2-3 times before brewing coffee
11 Rinse the coffee jug, jug lid and filter insert thoroughly under running water. Activate the anti-drip valve several times as it is rinsed.
Enjoy your new AEG product!
DISPOSAL
Recycle the materials with the symbol. Put the packaging in applicable containers to recycle it. Help protect the environment and human health and to recycle waste of electrical and electronic appliances..
Do not dispose appliances marked with the symbol with the household waste. Return the product to your local recycling facility or contact your municipal office.
AEG reserves the right to change products, information and specifications without notice.

DEUTSCH
PRIMEROS PASOS (IMAGEN PÁGINA 3)
PRISE EN MAIN (IMAGE PAGE 3)
ΕΛΛΗΝΙΚΑ
AVVIO (IMMAGINE A PAGINA 3)
COMPONENT (AFBEELDING PAGINA 2)
A. Klapdeksel
B. Warmhoudplaat
C. Waterreservoir
D. Waterniveau-indicator
E. AAN/UIT-schakelaar
F. Borden warmen
COMPONENTE (IMAGEM DA PÁGINA 2)
A. Tampa articulada
E. Interruptor ON/OFF
INTRODUÇÃO (IMAGEM DA PÁGINA 3)
3480-A-CM3-1-3ST-02-01-1022

- aeg.com/shop
- CONTENTS
- FOR PERFECT RESULTS
- CUSTOMER CARE AND SERVICE
- ENGLISH
- COMPONENTS (Picture page 2)
- SAFETY ADVICE
- Read the following instructions carefully before using the appliance for the first time.
- This appliance is intended to be used in household and similar applications such as:
- The surface with symbol ⚠️ Caution, hot surface are liable to get hot during use.
- GETTING STARTED (PICTURE PAGE 3)
- CLEANING AND CARE
- DESCALING
- Enjoy your new AEG product!
- DISPOSAL
- DEUTSCH
- PRIMEROS PASOS (IMAGEN PÁGINA 3)
- PRISE EN MAIN (IMAGE PAGE 3)
- ΕΛΛΗΝΙΚΑ
- AVVIO (IMMAGINE A PAGINA 3)
- COMPONENT (AFBEELDING PAGINA 2)
- COMPONENTE (IMAGEM DA PÁGINA 2)
- INTRODUÇÃO (IMAGEM DA PÁGINA 3)
Brand : AEG
Model : CM3-1-3ST
Category : Coffee machine