
Valera - Irrigation timer Brendz - Free user manual and instructions
Find the device manual for free Valera Brendz in PDF.
User questions about Valera Brendz
0 question about this device. Answer the ones you know or ask your own.
Ask a new question about this device
Download the instructions for your Irrigation timer in PDF format for free! Find your manual Valera - Brendz and take your electronic device back in hand. On this page are published all the documents necessary for the use of your device. Valera by Brendz.
USER MANUAL Valera Brendz
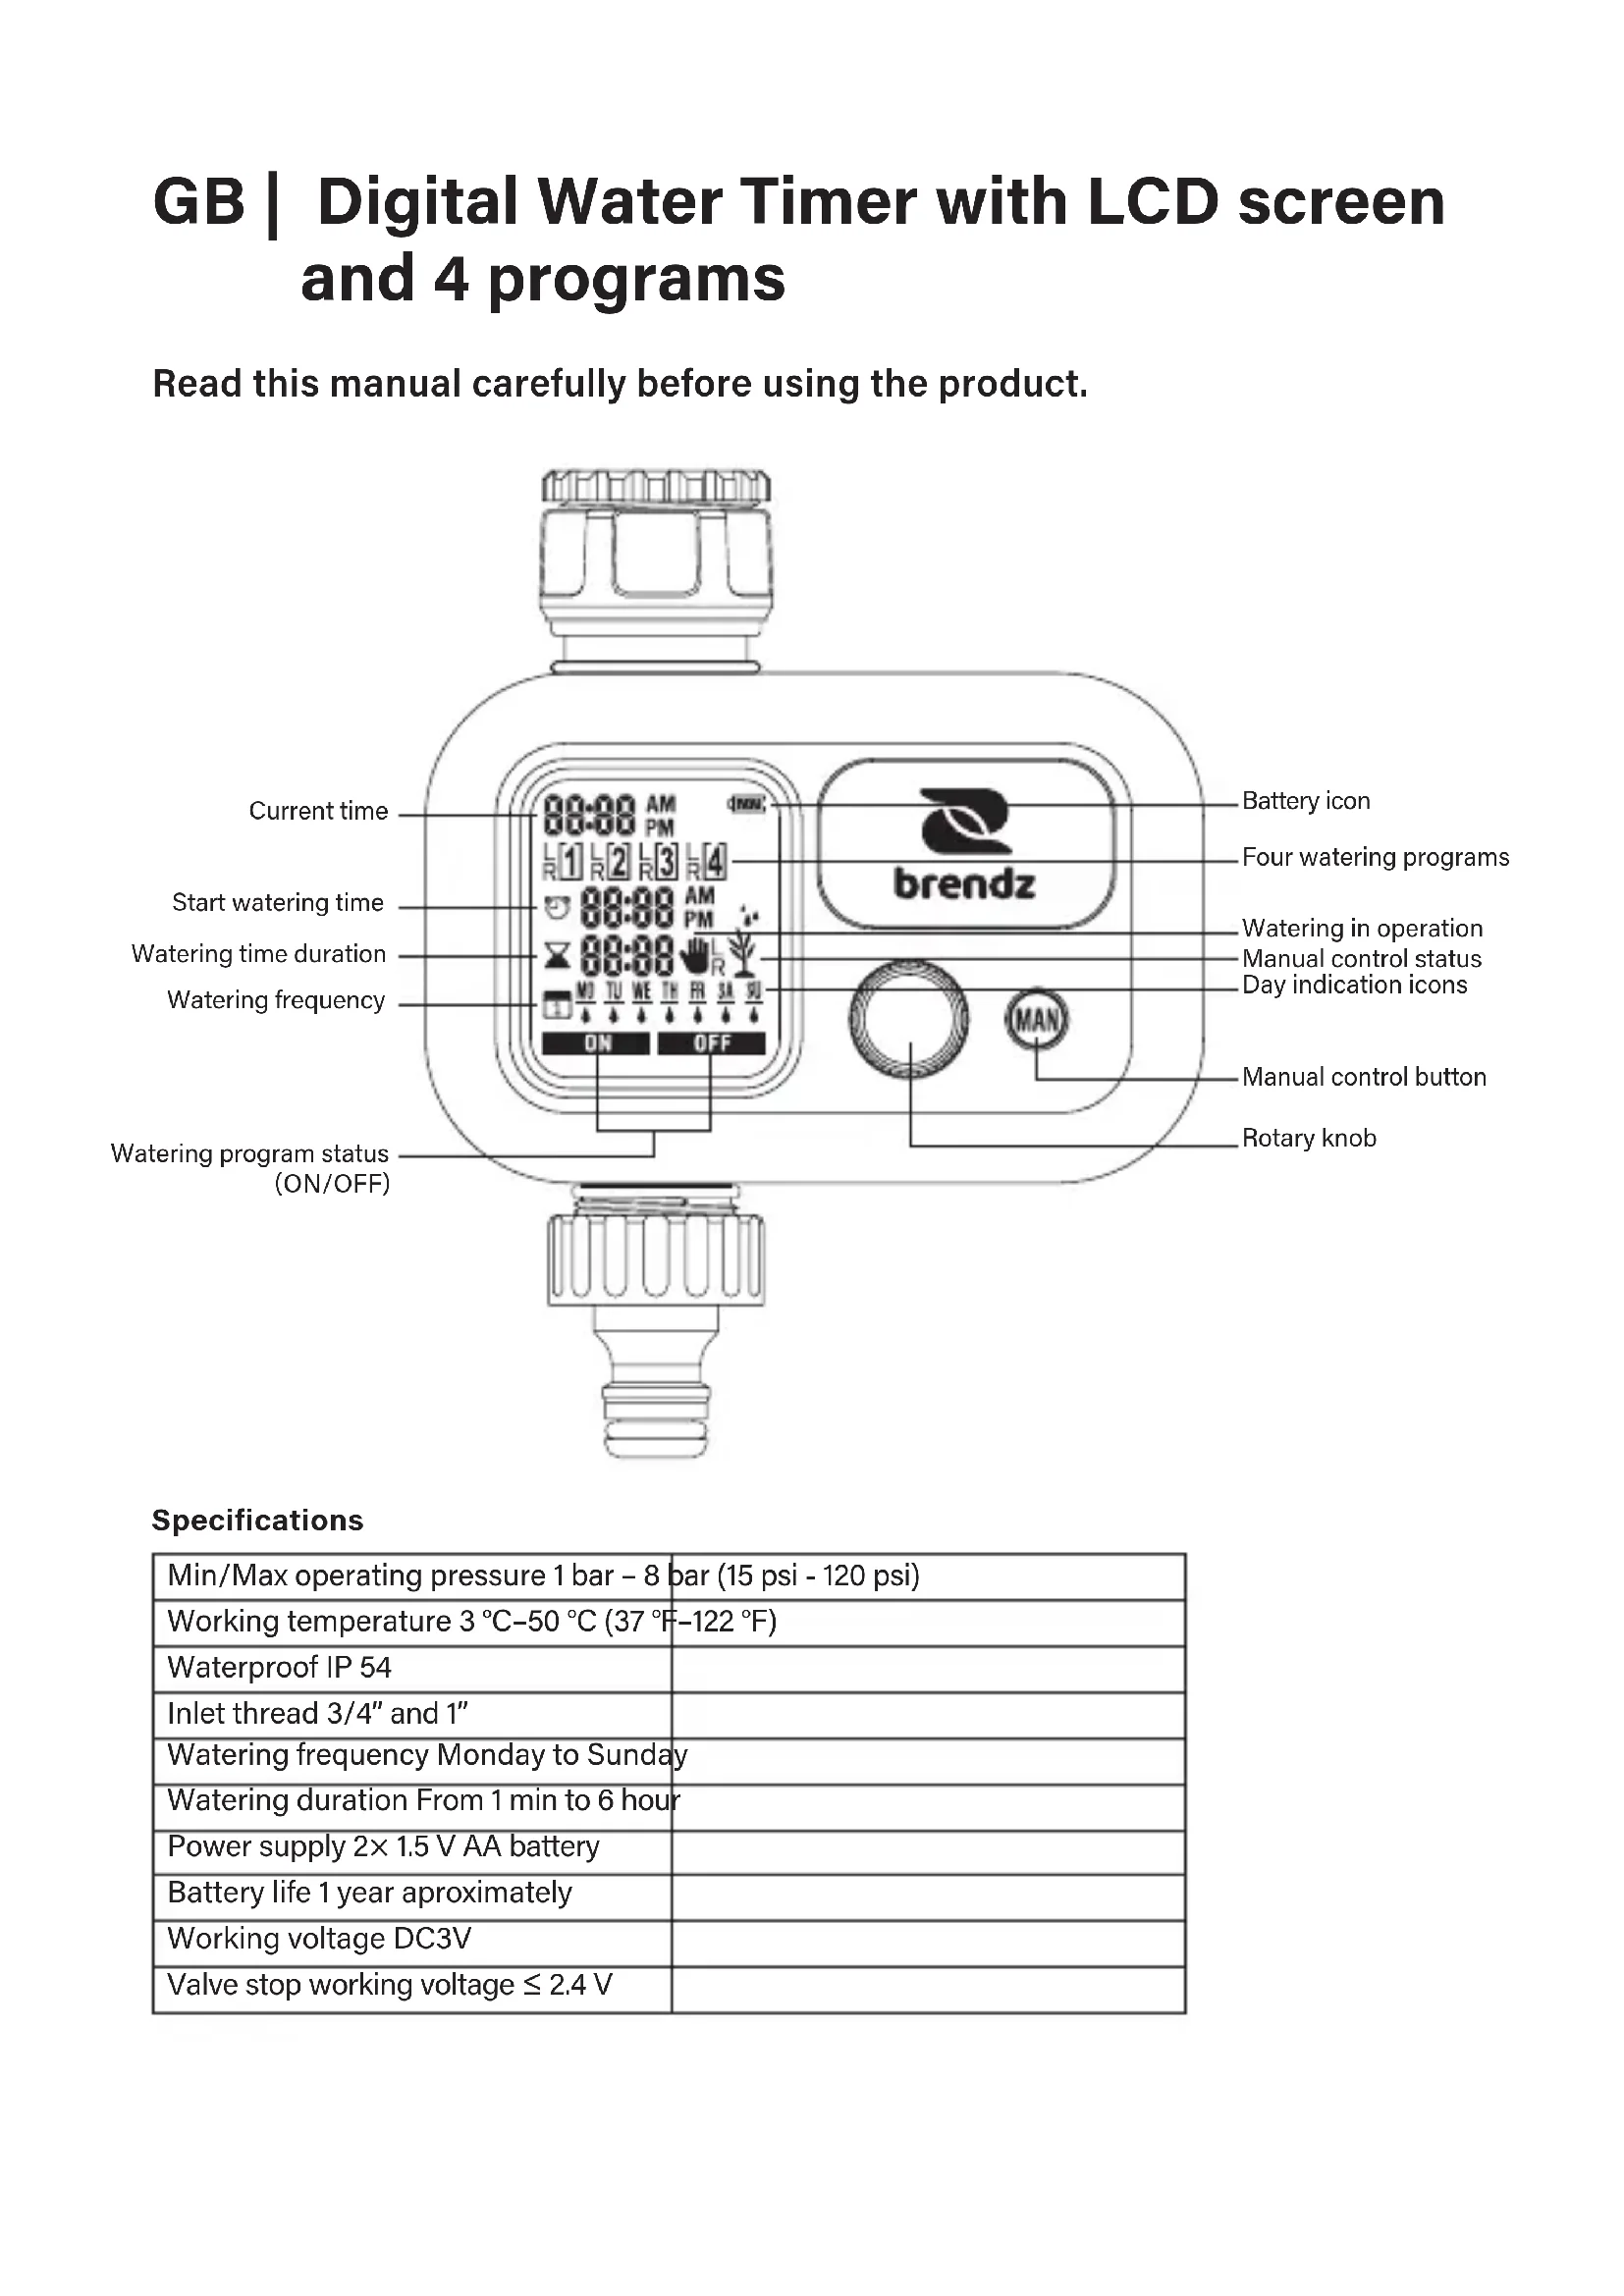
Digital Water Timer with LCD screen and 4 programs
Model VALERA
Fig. 1 (Battery placement)
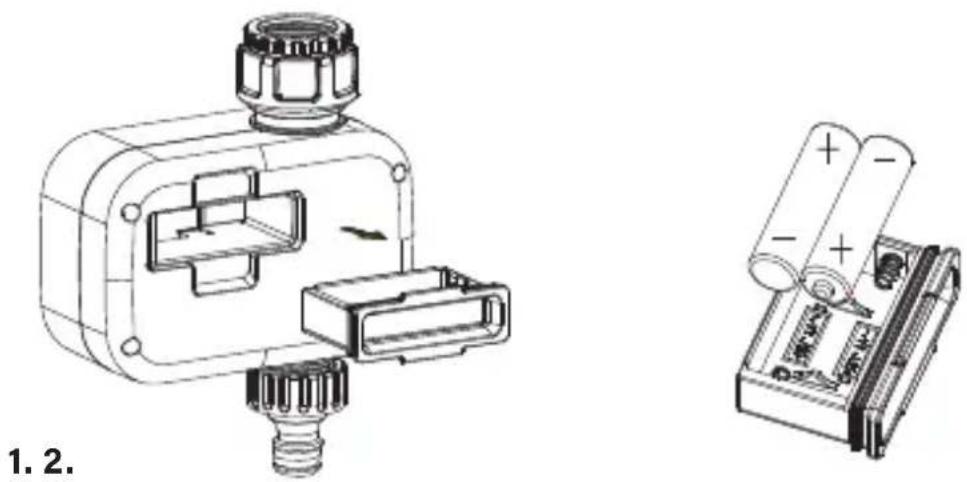
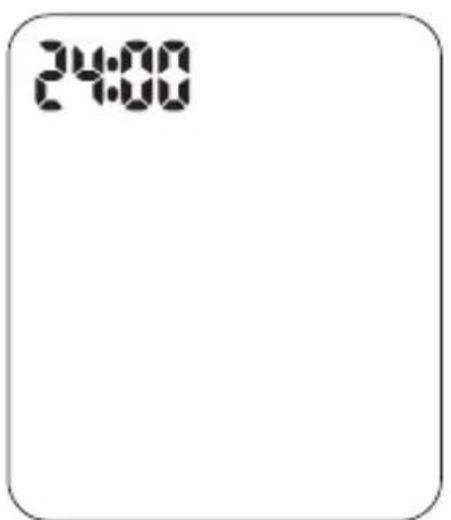
Fig. 2 (Clock display mode setting)
Pic. 1 Pic. 2
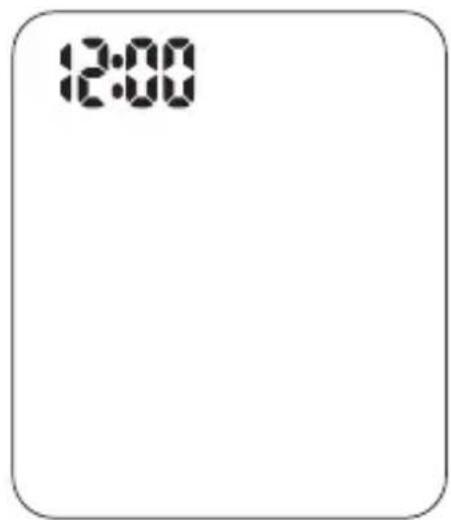
Fig. 4 (setting the program)
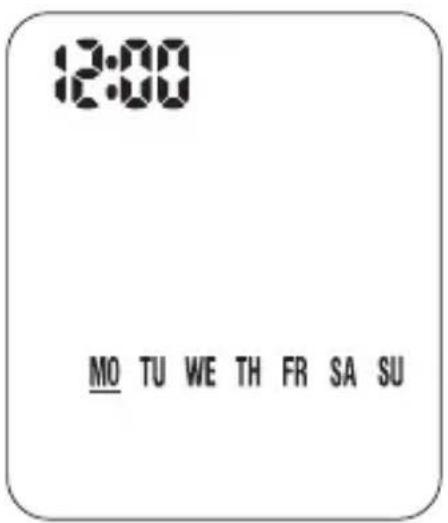
Fig. 3 (Time and weekday settings)
![12:00 [1] 2 3 4 8:00 0:30 MO TU WE TH FR SA SU 1 ON OFF](/content/2026/04/637646/images/8bc1692e235a849de526734ef9b0deb74c3329b90401fc299111d149d21b18ce.jpg)
Fig. 5 (Save the program)
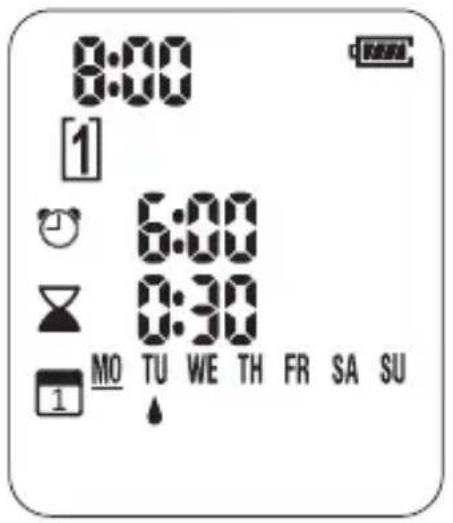
Fig. 6 (Automatic operation display)
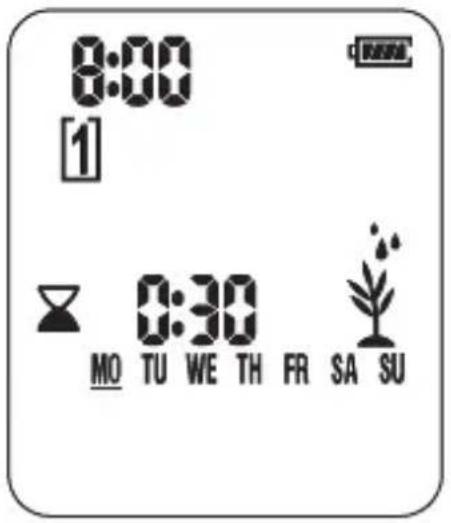
Fig. 7 (Manual watering setting)
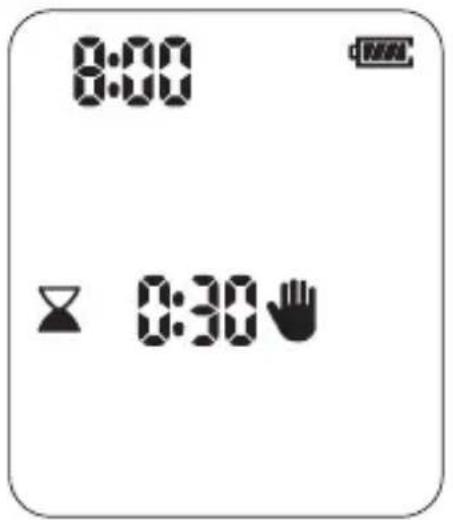
Fig. 8 (Manual operation display)
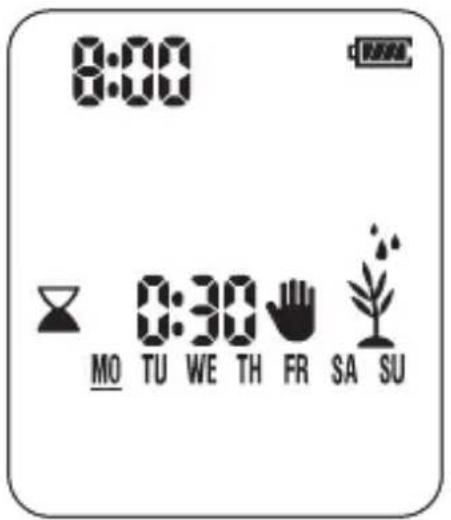
Fig. 9
GB | Digital Water Timer with LCD screen and 4 programs
Read this manual carefully before using the product.

Specifications
| Min/Max operating pressure 1 bar - 8 bar (15 psi - 120 psi) |
| Working temperature 3 °C-50 °C (37 °F-122 °F) |
| Waterproof IP 54 |
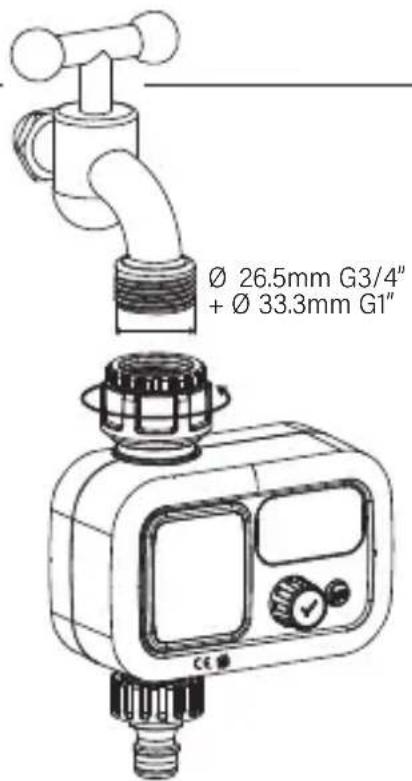
| Inlet thread 3/4" and 1" |
| Watering frequency Monday to Sunday |
| Watering duration From 1 min to 6 hour |
| Power supply 2× 1.5 V AA battery |
| Battery life 1 year approximately |
| Working voltage DC3V |
| Valve stop working voltage ≤ 2.4 V |
Battery icon
Maximum working time: One year
Minimum working time: Four weeks
Maximum working time: Four weeks
Low power: replace batteries
Note: When the battery is at low voltage (battery voltage ≤2.4V ) the timer is forced to close the solenoid valve. Both manual and automatic functions are cancelled.
Battery placement (Fig. 1)
- Take out the battery box
- Insert 2 AA batteries in the battery slot
- Put the battery slot in the irrigation timer.
WARNING: Make sure the batteries are facing up when inserting the battery slot.
Clock display mode setting (Fig. 2)
To switch between 24-hour and 12-hour mode (The default time setting is a 24-hour mode)
- Press the "MAN" button and rotary knob at the same time and install the battery. The icon as in Pic.1 or Pic.2 will be shown.
- Press the "MAN" button to switch between the 24-hour display mode (Pic.1) and the 12-hour display mode (Pic.2).
- Press rotary knob after selecting, the time will be displayed in accordance with the selection method.
Time and weekday settings (Fig. 3)
- Twist the rotary knob counterclockwise to enter the parameter setting mode.
- Press the rotary knob and "hour" will start to flash.
- Twist the rotary knob to adjust parameter and press the rotary knob to confirm after selecting, "minute" will start flashing.
- Twist the rotary knob to adjust parameter and press the rotary knob to confirm after selecting, the horizontal line under "weekday" will start flashing.
- Twist the rotary knob to adjust parameter and press the rotary knob to confirm after selecting.
- Press MAN button to exit the setting mode.
Setting the programs (Fig. 4)
Four programs can be set.
A program is a combination of starting time, duration, and day of the week.
- Select one of the 4 programs you want to set by rotating the rotary knob. ([1] / [2] / [3] / [4] will start flashing).
- When the desired program is shown e.g. [1]. Press the rotary knob. The start time icon ( ) is flashing.
- Press the rotary knob to enter the start time setting, and "hour" position is flashing; Twist the rotary knob clockwise or counterclockwise to adjust the parameters.
- Press the rotary knob to confirm after selecting, the "minute" is flashing; Twist the rotary knob clockwise or counterclockwise to adjust the parameters.
-
Press the rotary knob to confirm after setting and return to the starting time icon (☐) flashing state.
-
Twist the rotary knob clockwise to the watering time icon ( flashing state.
-
Press the rotary knob to enter the watering duration time setting, and "hour" position is flashing; Twist the rotary knob clockwise or counterclockwise to adjust the parameters. Note: The maximum automatic watering time is 6 hours.
-
Press the rotary knob to confirm after setting, the "minute" is flashing. Twist the rotary knob clockwise or counterclockwise to adjust the parameters.
-
Press the rotary knob to confirm after selecting and return to the watering time icon (✗) flashing state.
-
Twist the rotary knob clockwise to the interval icon (flashing state.
-
Press the rotary knob to enter the interval time setting, and "MO" is flashing. Twist the rotary knob between MO\~SU to set the days you want to run the selected program. When one of the days is flashing, press the "MAN" key. A raindrop will appear under the selected days you want the program to run.
- Press the rotary knob to confirm after setting and return to the interval icon (1) flashing state.
- Twist the rotary knob clockwise to the ON icon (ON) or OFF icon (OFF) flashing interface, and then press the rotary knob to confirm. When the program is set on OFF, it is not activated.
- Repeat for programs [2] - [3] - [4].
- After setting the desired programming wait for \~ 30 seconds (or press the "MAN" button). The timer will save the settings and show the next program that is set to start. (Fig. 5)
Automatic operation display (Fig. 6)
The display shows the countdown of the watering time in the automatic watering mode.
Three water droplets are displayed in turn above the watering icon (plant).
To stop the automatic watering before the set time is over, press the "MAN" button. The timer will return to the set programming.
Manual watering setting (Fig. 7)
- Press the "MAN" button to enter manual setting mode, and "hour" position is flashing.
- Set the desired hours by rotating the rotary knob and pressing the rotary knob to confirm.
- Set the desired minutes by rotating the rotary knob and pressing the rotary knob to confirm. Note: The maximum manual watering time is 6 hours.
- Press the rotary knob to confirm, the timer will start watering.
Manual operation display (Fig. 8)
The display shows the countdown of the watering time in the manual watering setting.
Three water droplets are displayed in turn above the watering icon (plant).
To stop the manual watering before the set time is over, press the "MAN" button. The timer will return to the set programming.
After all settings are made, connect the timer to the tap.
Fault resolvent:
| Display off Insert new batteries | |
| Watering is not functional Check if:The faucet is on.Timer is set to ONClock is set correctly | |
| Water flow is weak Clean the filter | |
natural_image
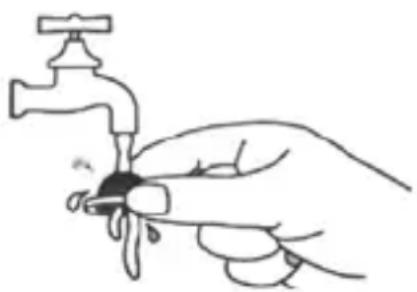
Line drawing of a hand using a faucet to lift water (no text or symbols)Care and Maintenance
The product is designed to provide trouble-free service for many years if used appropriately.
Some advice for proper operation:
- Do not place the product in locations prone to vibration and shocks – these may cause damage.
- Do not place any open flame sources on the product, e.g., a lit candle, etc.
- Do not place the product to places with inadequate air flow.
- Do not tamper with the internal electric circuits of the product – doing so may damage the product, which will automatically void the warranty. The product should only be repaired by a qualified professional.
- When expecting freezing temperatures, timer should be removed from the hose faucet and stored indoors to avoid potential freeze damage.
- Filter traps dirt particles, prolonging life of timer. Clean filter regularly and replace if worn.
- To clean the product, use a slightly moistened soft cloth. Do not use solvents or cleaning agents - they could scratch the plastic parts and cause corrosion of the electric circuits.
- Do not immerse the product in water or other liquids.
- In the event of damage or defect of the product, do not perform any repairs by yourself. Have it repaired where you purchased the product.
- This device is not intended for use by persons (including children) whose physical, sensory, or mental disability or lack of experience and expertise prevents them from safe use of the device if they are not supervised or if they have not been instructed regarding the use of this appliance by a person responsible for their safety. It is necessary to supervise children to ensure they do not play with the device.
CE is the abbreviation for Conformité européenne - And means Conforms to the European guidelines. With the CE-mark, the manufacturer confirms that this product complies with the current European guidelines. The Declaration of Conformity can be requested from customercare@brandsgroup.com.
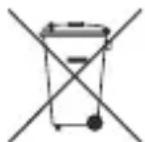
Old appliances marked with the pictured symbol must not be disposed of with the trash. You must return them to a waste collection center (inquire at your local community) or the retailer where they were purchased.
natural_image
Line drawing of a hand using a faucet to lift water (no text or symbols)natural_image
Line drawing of a hand using a faucet to lift water (no text or symbols)natural_image
Line drawing of a hand using a faucet to lift water (no text or symbols)natural_image
Line drawing of a hand using a faucet to lift water (no text or symbols)Cura e manutenzione
natural_image
Line drawing of a hand using a faucet to lift water (no text or symbols)Available in Dutch, English and German

more info about the product
scan the QR-Code
www.brendz.com