
WSP1500BK - Weather Station Nasa - Free user manual and instructions
Find the device manual for free WSP1500BK Nasa in PDF.
| Product type | Weather station with FM radio, alarm and Bluetooth |
| Brand | Nasa |
| Model | WSP1500BK |
| Station power supply | AC adapter 100-240 V~, 50/60 Hz, DC 5V output |
| Clock backup battery | 1 CR2025 battery (included) |
| Outdoor sensors power supply | 2 LR03 (AAA) 1.5 V batteries (not included) |
| Display | LCD display with adjustable backlight |
| Clock | 12H/24H, day/month/year calendar, day of week |
| FM Radio | 88.8 - 108 MHz, 10 presettable stations |
| Bluetooth | Version not specified, max range 10 m, profile SW274 |
| Speaker | 1 x 3W + 1 passive radiator, response 165 Hz - 14.0 kHz |
| Weather functions | Indoor/outdoor temperature, humidity, weather icons (sunny, partly cloudy, cloudy, rainy) |
| Alarms | 2 independent alarms with choice of beep or radio, snooze function (9 min) |
| Sleep function | Adjustable timer from 5 to 120 minutes |
| Wireless sensor range | Up to 10 meters in open space |
| Maintenance | Clean with a soft cloth; do not use abrasive products or alcohol; do not immerse |
| Safety | Do not open the device; use only the supplied adapter; keep batteries out of reach of children |
| Replaceable batteries | CR2025 (station) and LR03/AAA (sensors) |
| After-sales service | aftersaleservice@gtcompany.fr, Tel. +33 (0)1.85.49.10.26 |
Frequently Asked Questions - WSP1500BK Nasa
User questions about WSP1500BK Nasa
0 question about this device. Answer the ones you know or ask your own.
Ask a new question about this device
Download the instructions for your Weather Station in PDF format for free! Find your manual WSP1500BK - Nasa and take your electronic device back in hand. On this page are published all the documents necessary for the use of your device. WSP1500BK by Nasa.
USER MANUAL WSP1500BK Nasa
natural_image
Black spherical digital alarm clock with digital displays and a small orange object, no visible text or symbols on the device itself.SONDES SANS FIL (piles non fournies)
text_image
rAd 11:11:17 = 98.7 sPLEASE READ ALL THE DIRECTIONS IN THIS MANUAL CAREFULLY AND FOLLOW THE OPERATING AND SAFETY INSTRUCTIONS. KEEP THIS MANUAL FOR FUTURE REFERENCE AND SHOW IT TO POTENTIAL USERS.
SAFETY INSTRUCTIONS
- This unit has been designed for domestic use only. The manufacturer cannot be held responsible, and the guarantee will not apply, for any professional use that is not appropriate or does not comply with the instructions.
- Place the unit on a flat, rigid and stable surface.
- Do not use the unit outdoors.
- Keep at least 10 cm of free space around the unit for adequate ventilation.
- Do not install the unit on a soft surface, such as a carpet or blanket, which may block the vents.
- Do not place the unit in direct sunlight, near a heater or any heat source, or in a location with excessive dust or where it is likely to get bumped.
- This unit may be used by children aged 8 years and over and by anyone with reduced physical, sensory or mental capabilities or a lack of experience and knowledge, provided that they have been given supervision or instructions about how to use the unit safely and that they understand the hazards involved.
- Children should be supervised to make sure that they do not play with the unit.
- This appliance is not a toy, do not leave it unattended near children.
- Never allow children to insert foreign objects into the unit.
- Unplug the unit from the power supply:
- if it remains unused for a long period of time,
- if there is a storm,
- if it is not working properly.
- If there are passing electrical or electrostatic surges, then the device may malfunction and need the user to reset it.
- To reduce the risk of electric shock, do not open the unit, there are no user-serviceable parts inside. Only allow repairs to be carried out by a qualified person.
- All maintenance, apart from the usual cleaning and servicing by the user, must be carried out by an authorised service centre.
USE WITH ADAPTER
- This unit is designed to work with the local power supply.
- This unit is designed to work with the adapter it comes with. If you need to replace it, use another safety adapter with the same rated characteristics.
- The transformer's external flexible cable cannot be replaced. If the cord is damaged, the transformer must be disposed of.
- If an extension cord is required, take all necessary precautions to avoid the risk of a fall.
- Do not connect or disconnect the adapter with wet hands.
- The adapter should not be exposed to dripping water or splashing and no liquids should be placed on the unit.
- To completely disconnect the unit from the power supply, the adapter must be completely unplugged from the wall socket.
- The adapter must not be blocked and must be easily accessible during use.
BATTERY INFORMATION (BATTERIES NOT SUPPLIED)
- To function properly, the sensor must have the appropriate batteries inserted.
- Only the recommended type of batteries should be used.
- The batteries must be inserted the right way round.
- The battery terminals must not be short-circuited.
- Do not mix new and used batteries.
- Do not mix alkaline, standard (carbon-zinc) and rechargeable (nickel - cadmium) batteries.
- Do not recharge the batteries or attempt to open them.
- Do not dispose of batteries in fire.
- Replace all batteries at the same time with new, identical batteries.
- If the liquid from a battery comes into contact with your eyes or skin, wash the affected area immediately and thoroughly with clean water and seek medical attention.
- Do not expose batteries to excessive heat such as sunlight, fire or similar.

CAUTION: RISK OF ELECTRIC SHOCK DO NOT OPEN
CAUTION: To reduce the risk of electric shock, do not open the unit, there are no user-serviceable parts inside. All repairs should be carried out by a qualified person.
DESCRIPTION
BACK FRONTTOP
text_image
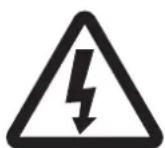
1 2 3 4
text_image
TOP 5 6 7 8 9 10 11 12 13 AL1 AL2 SLEEP
text_image
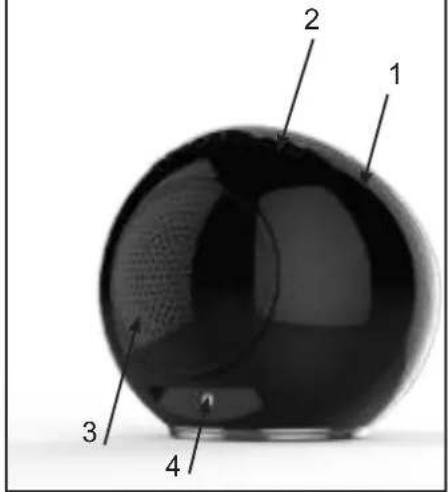
18 17 20 19 20:35 15 14 16 25 10 20 : 103.5 21 24 68° 22 23 25 38° 26 24 21BOTTOM 2 SENSORS
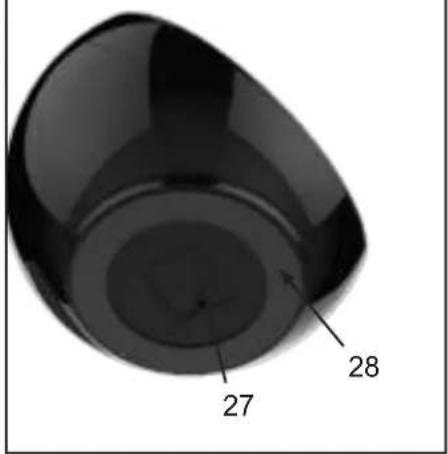
text_image
27 28
text_image
SORS 29 30 3111: Volume down button
12: Volume up button
13:Setting/radio button
14:Alarm 1/Alarm 2 indicator
15: Snooze indicator
16 : Sleep function indicator
17:Clock (hours, minutes)
18: Day of the week
19: Bluetooth indicator
20: Radio indicator
21: Date / Month / Year
22:Weather indicator
23 : Humidity rate
24: Outdoor temperature
25: Sensor signal indicator
26 : Indoor temperature
27: Battery compartment
28:Base
29:LED
30:Batteries compartment
31: Wall mounting hole
1: Weather station
2 : Buttons
3:Speaker
4 : AC adapter socket
9: Previous track button
10: Next track button
TECHNICAL CHARACTERISTICS AND MAIN FUNCTIONS
- Time display: 12H / 24H
- Calendar: DD / MM / YY, Day of the week
- FM radio: 88.8 to 108MHz (10 station memory)
- Alarm clock function (2 alarms)
- Weather display: sunny, sunny spells, cloudy, rainy
- Indoor and outdoor temperature display
- Humidity rate display
-
Speaker: 1x3W + 1 passive membrane
-
Speaker frequency: 165Hz-14.0KHz
- Maximum range of the wireless sensors: 10 metres
- Bluetooth connection: maximum distance 10 metres
- Weather station power supply: 100-240V\~, 50/60Hz, DC 5V
- Clock backup: 1 x CR2025 battery (supplied)
- Outdoor sensors power supply: 2 x LR03 (AAA) 1,5V batteries (not supplied)
POWER SUPPLY
AC ADAPTOR OF THE WHEATHER STATION
- Use the adapter indoors only, in rooms protected from moisture.
- Connect the AC adapter to the AC adapter terminal (4) on the back of the unit.
- Then connect the adapter to the mains.
INSTALLING THE BATTERY (CLOCK BACKUP)
Remove the clear tab on the bottom of the battery compartment (27) to activate the battery.
To replace the battery:
- Remove the battery compartment cover (27).
- Insert a CR2025 battery, respecting the polarity indicated.
- Replace the cover.
NOTE: Use only the battery type specified in this manual.
WIRELESS SENSORS (batteries not included)
- Open the batteries compartment cover (30) on the back of each sensor.
- Insert 2 x 1,5V LR03 (AAA) batteries, respecting the polarity indicated.
- Close the batteries compartment cover.
INSTALLATION / UTILISATION
1 - USE OF THE WHEATHER STATION
WEATHER STATION
Place the weather station on a flat horizontal surface.
SENSORS
The sensors can be installed:
- either on the wall using a screw (not included). Hang the sensor through the hole (31) on the back.
- or horizontally
For best results: - Do not expose the sensors to direct sunlight or moisture.
- Do not place the sensors more than 10 metres away from the weather station.
- Minimize obstacles (doors, walls and furniture) between the sensors and the weather station.
- Keep the sensors away from metal or electronic objects.
TEMPERATURES AND HUMIDITY
The weather station displays the following information:
- Indoor temperature (26) measured by the weather station
- Outdoor temperature (24) and humidity rate (23) from the sensors
CHOICE OF TEMPERATURE UNIT
- Press button (6) to select the temperature unit:
°C (Celsius) or °F (Fahrenheit).
WEATHER INDICATOR
When the unit is turned on, the weather station will show the weather conditions in the form of icons:
| DESCRIPTIONICON | |
| Sunny | |
| Sunny spells | |
| Cloudy | |
| Rainy |
CONNECTION OF THE OUTDOOR SENSORS WITH THE WEATHER STATION
The outdoor sensors connect automatically after 1 minute. Otherwise, you can connect the devices manually:
- Press button (5) for 3 seconds, the indicator (25) flashes.
- When the weather station detects the sensors, the outdoor temperature will be displayed (24).
- The sensors data are sent automatically about every 3 minutes.
CHOICE OF SENSOR DISPLAY
To toggle between the data from the sensors:
- Use button (5) for selection (CH1 / CH2).
2 - SETTING THE TIME AND DATE
- Press button (13) for 3 seconds to enter the time and date setting mode.
- Use buttons (9) and (10) to adjust the values. Hold the buttons down to speed up scrolling.
- Press button (13) to validate the selected digit.
- The day of the week is displayed automatically (18).
- If the buttons are not pressed, the unit returns to the normal display after 15 seconds.
3 - SETTING THE ALARM
SETTING AND ACTIVATING THE ALARM
- Press button (7) for 3 seconds. The symbol «AL1» appears on the screen.
- Use buttons (9) and (10) to set the alarm hour. Press button (7) to confirm. The minute digit flashes.
- Use buttons (9) and (10) to set the alarm minutes. Press button (7) to confirm.
-
Select the alarm mode (Beep / Radio) using buttons (9) and (10).
-
Beep alarm: the symbol «bb» appears on the screen.
- Radio alarm: the symbol «rAd» appears on the screen.
The alarm will activate the last station listened to.

text_image
bb DO HOTN VBR ADC 1 1 1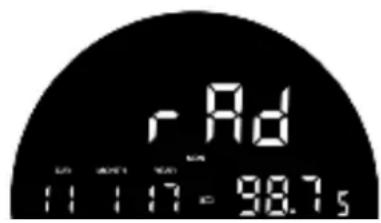
text_image
rAd 11:11:17 = 98.7s- Press button (7) to confirm.
- The «AL2» symbol appears on the screen and flashes.
- Proceed in the same way as for alarm 1.
- To select one of the two alarms, press button (7).
- The screen will display consecutively the symbols «AL1», «AL2» then the 2.
- Press button (7) again to deactivate the alarms (no symbol is displayed).
SWITCHING OFF THE ALARM
The alarm will go off at the programmed time. To stop the alarm, press button (7). It will sound again the next day at the same time.
SNOOZE FUNCTION
- When the alarm sounds, press SNOOZE (5): the symbol Z^z flashes and the alarm stops.
- The alarm will sound again after 9 minutes.
- The snooze function is active as long as the symbol flashes on the display.
- To cancel the snooze function, press button (7) or (13).
4 - RADIO MODE
STATIONS SELECTION
- Extend the antenna wire for better reception of FM stations.
- Press button (13) successively to switch on the device and (7) to select the Radio function.
- The Radio indicator (20) is displayed along with the frequency.
- To manually select a radio station, press button (9) or (10) until the station's frequency is displayed.
- To initiate an automatic station search, press and hold button (9) or (10) until the frequency starts to scroll. The search stops when a radio station is found. The automatic search can be interrupted by pressing button (9) or (10).
- Adjust the sound volume to a correct listening level. Then adjust the sound volume with buttons (11) and (12).
STATION SAVING
- To select a radio station, press button (9) or (10) until the station frequency is displayed.
- Keep button (6) pressed. P01 will be displayed.
- To select a saved station, press button (9) or (10).
- Press button (6) again to confirm the setting, the saving number stops flashing.
- Proceed as above to save other radio stations. You can set up to 10 radio stations.
LISTENING TO A SAVED STATION
- Press button (13), the last radio frequency appears.
- Press button (6) and then button (9) or (10) to select a saving (P01 to P10).
5 - BLUETOOTH MODE
INFORMATIONS
- The operational range between this device and a Bluetooth device is approximately 10 metres.
- Before connecting a Bluetooth device to this unit, familiarize yourself with the Bluetooth features of that device.
- Compatibility with all Bluetooth devices is not guaranteed.
- Any obstruction between this device and a Bluetooth device may reduce the operational range.
- Keep this device away from other electronic devices to avoid interference.
BLUETOOTH ACTIVATION
- Press button (13) successively to switch on the device and (17) select the Bluetooth function, the (bt) symbol will flash (10).
- Start the Bluetooth profile search from the source audio device.
- Select the SW274 profile to synchronize the two devices (the Bluetooth (19) no longer flashes).
- Playback music from the source audio device.
- Press button (5) to pause.
- Press again to resume playback.
- Press button (9) to move to the next track.
- Press button (10) to return to the previous track.
- Adjust the sound volume to a correct listening level.
Then adjust the sound volume with buttons (11) and (12).
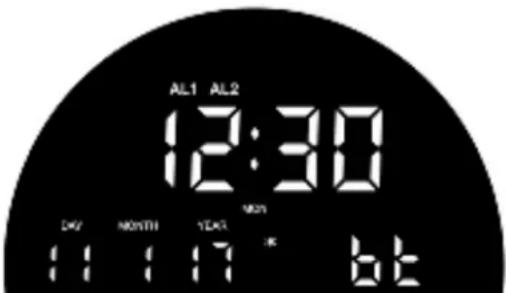
text_image
AL1 AL2 12:30 DAY MONTH YEAR MON 11:17 K bEDISCONNECTING THE BLUETOOTH
- Press button (13) to turn off the unit and disconnect the Bluetooth device.
NOTE:
The device cannot receive music from two Bluetooth audio devices simultaneously. You must first disconnect the Bluetooth function from the associated device and then search again for the Bluetooth device to be synchronized. Validate the SW274 Bluetooth profile found from the source audio device.
6 - ADVANCED USE
SLEEP FUNCTION
- Select a radio station or a Bluetooth peripheral.
- Press button (8) for 3 seconds to activate the sleep function.
- Successively press button (8) to select an automatic sleep time
120min → 90min → 60min → 30min → 15min → 10min → 05min → OFF. - To cancel the automatic sleep and turn off the radio/Bluetooth peripheral, press button (13), and the "SLEEP" indicator disappears.
LIGHT INTENSITY ADJUSTMENT
- By default, the intensity of the weather station display is set to high.
- To decrease the light intensity, press button (8).
- Press a second time to turn off the display.
7 - MAINTENANCE AND CLEANING
- Remove the batteries when left unused for a long period.
- Unplug the unit before cleaning.
- If necessary, clean the exterior of the unit with a soft cloth.
- Do not use harsh cleaning agents or abrasive sponges.
- Never use alcohol to clean the unit.
CAUTION: Never immerse the unit in water or any other liquid.
NASA
WETTERSTATION / BLUETOOTH-LAUTSPRECHER REF : WSP1500BK
VERSION : DE
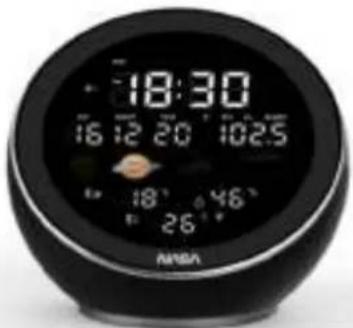
text_image
18:30 16:20 20 10:25 18° 46° 26° ANISOtext_image
rAd 11:11:17 - 98.7stext_image
AL1 AL2 12:30 MON DAY HOURS YEAR 11:17 K 6tNotice of compliance for the European Union : products bearing the CE mark comply with the applicable European directives and associated harmonised European standards.


Disposal of waste equipment by users in the European Union : this symbol means that according to local laws and regulations, it is prohibited to dispose of this product with household waste. Instead, it is your responsibility to protect the environment and human health by handing over your used device to a designated collection point for the recycling of waste electrical and electronic equipment. For more information about where you can drop off your waste equipment for recycling, please contact your local city office, your household waste disposal service or the shop where you purchased the product.

The “Triman” logo indicates that the product or packaging should not be thrown in the household waste bin; instead they should be separated for recycling or taken to a collection point (bins in stores, recycling centre, etc.) to be recycled.
Product manufactured for and distributed by :
GT COMPANY - 5 rue de la Galmy - 77700 Chessy - France
+33 (0) 1.61.10.09.25 - www.gtcompany.fr
NASA space program imagery: Source - International Space Archives LLC. NASA does not design, manufacture, distribute or endorse GT Company weather stations nor provide warranty support of GT Company weather stations. For service, support and warranty information on this product, contact the distributor or GT Company.