
UI 760 - Audio Interface SENNHEISER - Free user manual and instructions
Find the device manual for free UI 760 SENNHEISER in PDF.
| Product type | Audio interface |
| Brand | Sennheiser |
| Model | UI 760 |
| Dimensions (mm) | 91 x 32 x 101 |
| Weight without battery | 137 g |
| Weight with battery | 205 g |
| Power supply | C battery 1.5 V (IEC LR 14) |
| Main functions | Headset/handset switching; sound quality adjustment (background noise filter); microphone mute; PC/telephone source selection; earpiece volume adjustment with Dynamic Volume Control; volume limiter at 85 dB(A) per directive 2003/10/EC |
| Cleaning | Soft, slightly damp cloth. Do not use solvents or cleaning agents. |
| Safety instructions | Keep out of reach of children (strangulation risk); do not use in damp or dusty environments; use only 1.5 V C alkaline batteries |
| Spare parts available | Adapter cable connector (ref. 05372); Easy-disconnect cable connector (ref. 05362) |
| Warranty | 24 months from date of purchase (excluding accessories and batteries) |
| Recycling | Batteries: special waste or return to retailer; end-of-life device: local collection point or WEEE recycling center |
| Optional accessories | 3-in-1 headset stand (ref. 502392); 3.5 mm jack cable to PC (ref. 05373); USB cable (ref. 502394) |
Frequently Asked Questions - UI 760 SENNHEISER
User questions about UI 760 SENNHEISER
0 question about this device. Answer the ones you know or ask your own.
Ask a new question about this device
Download the instructions for your Audio Interface in PDF format for free! Find your manual UI 760 - SENNHEISER and take your electronic device back in hand. On this page are published all the documents necessary for the use of your device. UI 760 by SENNHEISER.
USER MANUAL UI 760 SENNHEISER
natural_image
3D rendered image of a gray rectangular electronic device casing with circular top and side ports (no text or symbols visible)Instruction manual
Bedienungsanleitung
Notice d'emploi
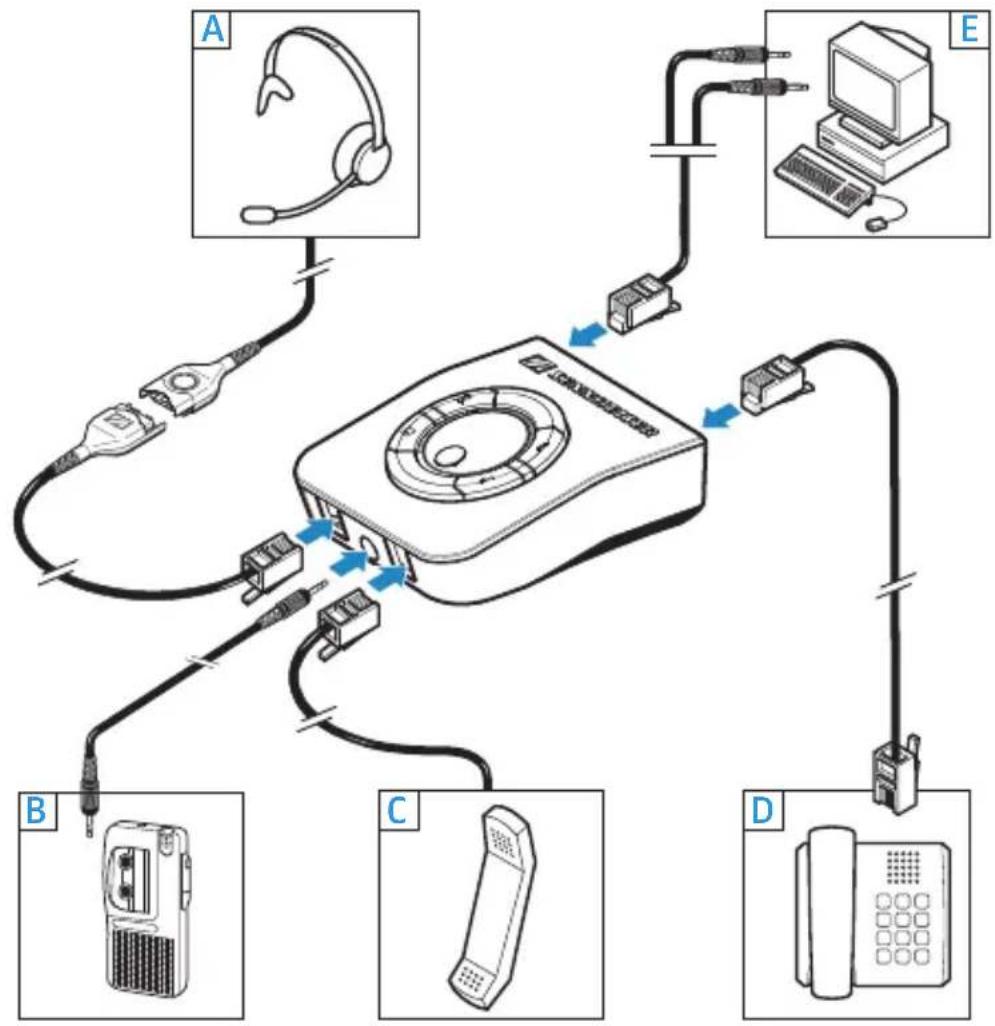
The UI 760 allows you to connect:
• a standard telephone
- a h a n d s e t
• a headset of the Sennheiser Office or Call Center series
- a PC with sound card or USB port (enabling you to use the headset for VoIP and multimedia applications)
• a dictaphone for voice recording
With the UI 760, you can switch between the headset, handset and PC, set the volume of the headset speaker and microphone and mute the headset microphone.

Delivery includes
- UI 760
• 1.5 V C-size battery (IEC LR 14) - Telephone connecting cable
- Modular to Easy Disconnect cable
- Instruction Manual


Safety instructions
- Keep children away from the UI 760. When playing, children can be strangled by the cables.
- Do not use the UI 760 in a damp or dusty environment.
- Only use 1.5 V alkaline C-size (IEC LR 14) batteries for powering the UI 760.
Putting the UI 760 into operation
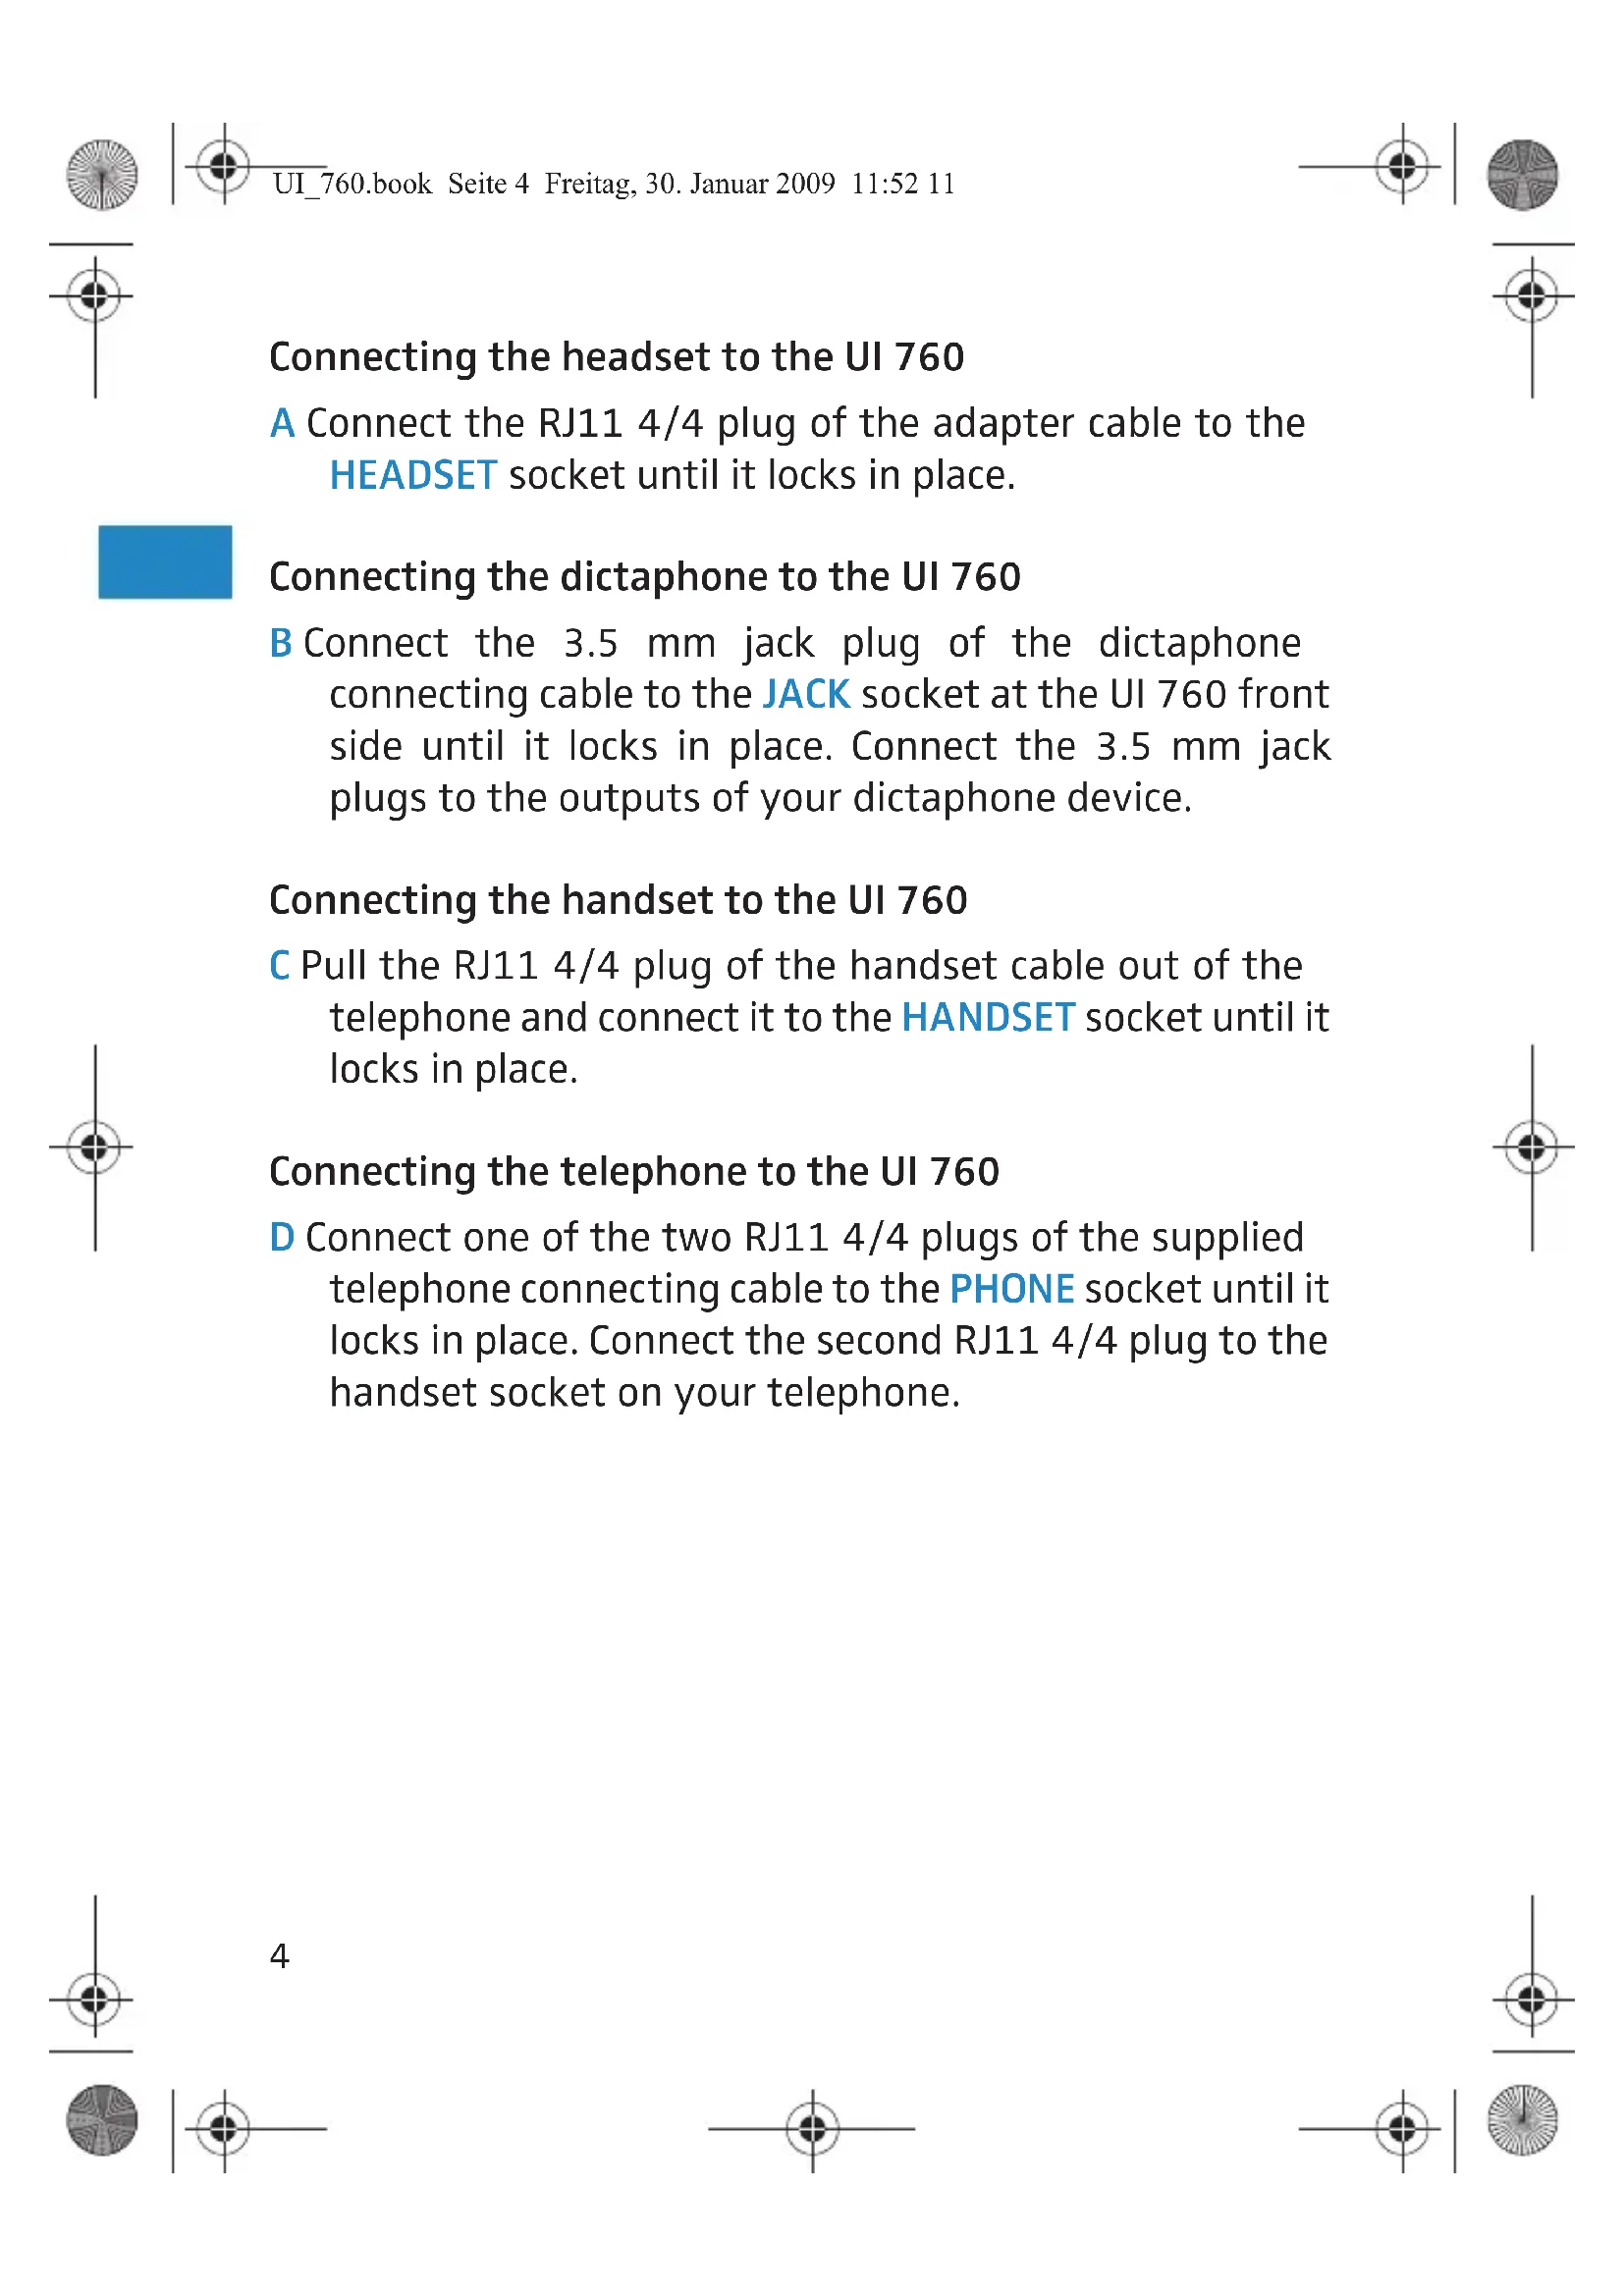
Connection sockets
The connection sockets are located at the box front and back side.
At the front:
• HEADSET socket 1 for the headset adapter cable
• DICTAPHONE socket ② for voice recording
• HANDSET socket ③ for the handset
At the back:
• PHONE socket 4 for the telephone connecting cable
• AUX socket 5 for the PC connecting cable
text_image
1 2 3 4 52


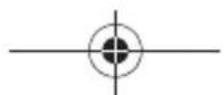


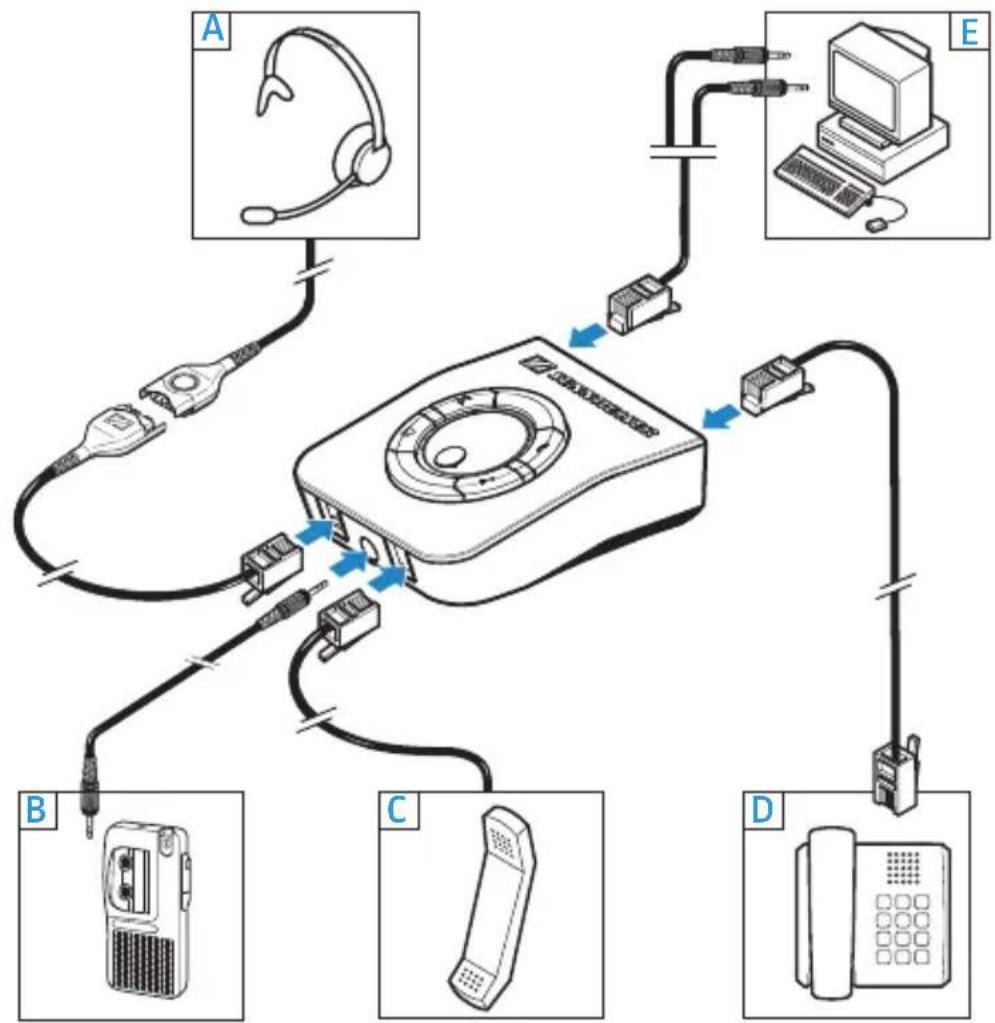
Connections
flowchart
graph TD
    A["Device A"] -->|A/2| Device1["Central Device"]
    B["Device B"] -->|B/4| Device2["Device 1"]
    C["Device C"] -->|C/4| Device3["Device 2"]
    D["Device D"] -->|D/4| Device4["Device 1"]
    E["Device E"] -->|E/4| Device5["Device 2"]
    Device1 -->|Blue Arrow| Device6["Device 1"]
    Device2 -->|Blue Arrow| Device7["Device 2"]
    Device3 -->|Blue Arrow| Device8["Device 3"]
    Device4 -->|Blue Arrow| Device9["Device 4"]
| Box connection Peripheral devices | |||
| A | Headset RJ1 | 11 Secom Quick disconnect | |
| B | Dictaphone | Jack 3.5 mm“Color Black” | Jack 3.5 mm“Color Black” |
| C | Handset RJ1 | 11 RJ11 | |
| D | Phone | RJ11 | Depending on phone |
| E | Aux/PC RJ1 | 1 Jack (2x) 3.5 mm/USB | |


Connecting the headset to the UI 760
A Connect the RJ11 4/4 plug of the adapter cable to the HEADSET socket until it locks in place.
Connecting the dictaphone to the UI 760
B Connect the 3.5 mm jack plug of the dictaphone connecting cable to the JACK socket at the UI 760 front side until it locks in place. Connect the 3.5 mm jack plugs to the outputs of your dictaphone device.
Connecting the handset to the UI 760
C Pull the RJ11 4/4 plug of the handset cable out of the telephone and connect it to the HANDSET socket until it locks in place.
Connecting the telephone to the UI 760
D Connect one of the two RJ11 4/4 plugs of the supplied telephone connecting cable to the PHONE socket until it locks in place. Connect the second RJ11 4/4 plug to the handset socket on your telephone.


Connecting the PC to the UI 760
E Connect the RJ11 4/4 plug of the PC connecting cable to the AUX socket on the UI 760 until it locks in place.
natural_image
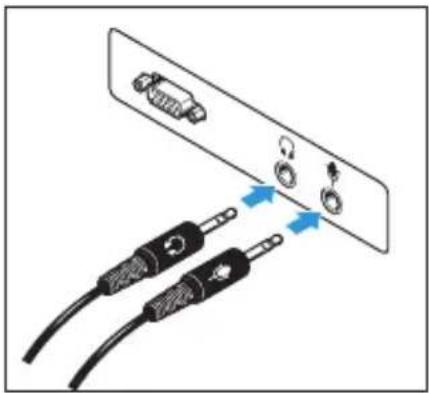
Diagram showing two connected cables with connectors and a panel, no text or symbols presentConnect the two jack plugs to the outputs of your PC sound card as shown or the USB plug to the PC USB port.

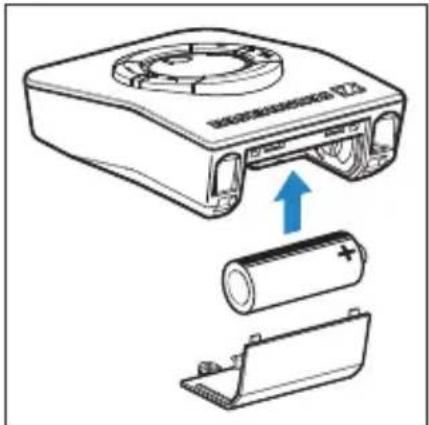
Inserting the battery
When inserted into the UI 760, the battery has a service life of approx. two years.
natural_image
Diagram of a device with battery, battery pack, and housing (no text or symbols)Remove the lower rear part of the housing. Use included screw to tamper-proof the battery cover-mandatory in some countries. Insert the battery as shown and replace the lower rear part of the housing.
Low battery warning
Reduced output volume and a hum noise are heard in the headset speaker to indicate that the battery is low. Insert a new battery.


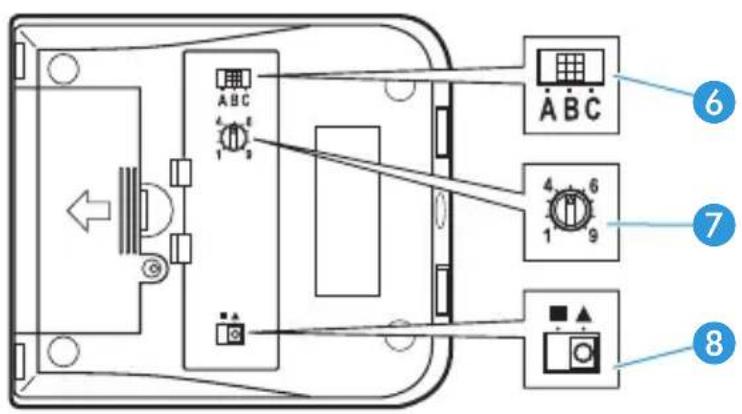
Adjusting the UI 760 to your telephone
Use the switch 6 at the bottom of the housing to adjust the UI 760 to your telephone.
First make sure that the handset and the headset are connected correctly. The handset must be activated, i.e. the Headset/Handset button 11 must be in "down" position. Check if you can hear a dial tone in the handset. Press the Headset/Handset button 11 to activate the headset. Check if you can hear a dial tone. Otherwise, please proceed as follows:
Set the ABC switch 6 to the positions "A", "B" and "C" one after the other. In each position, check if you can hear a dial tone. The switch is located at the box bottom side.
text_image
A B C 6 4 6 7 1 9 8| UI 760 Technical | |
| ABC switch 6 | Clear dial tone adjustment (wiring) |
| Microphone VC 7 | Adjust microphone sensitivity Position 0-9 |
| EU Switch 8 | 85 dB output limit |


When is the UI 760 ready for operation?
The UI 760 is ready for operation as soon as:
- it is connected to your telephone
• the battery is inserted - it is adjusted to your telephone
If you disconnect the UI 760 from the telephone, it is immediately put out of operation.

Setting the volume of the headset microphone
With the UI 760, you can set the volume of the headset microphone: a soft voice is slightly amplified and a loud voice is attenuated. The trimmer ⑦ is located at the box bottom side.
Turn the trimmer 7 to the position marked "1".
Make a call and speak into the microphone with a normal voice. Slowly turn the trimmer until the other party can hear you loudly and clearly.
Adjusting the speaker volume output to comply with the EU Directive 2003/10/EC
The UI 760 allows you to limit the speaker volume output in the headset to comply with EU Directive 2003/10/EC.
Move the switch ⑧ from position “square” to “triangle” to reduce the speaker volume output according to EU Directive 2003/10/EC noise at work.
Note:
The Universal Interface UI 760 is a special version featuring a reduced output level. Even with the volume


of the Interface set to the maximum value, the signal transmitted by the connected Sennheiser Communications headset will never exceed the maximum of 85 dB (A) per day as a time-weighted average* value, which is in compliance with the EU Noise Directive**
* The time-weighted average value is based on a breakdown of a typical working day and measured as the sound pressure level with a B&K HATS (Head And Torso Simulator)
** EU Directive 2003/10/EC on the minimum health and safety requirements regarding the exposure of workers to the risks arising from physical agents (noise)


natural_image
Simple crosshair symbol with concentric circles and intersecting lines (no text or labels)
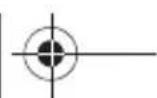
Using the UI 760

flowchart
graph TD
    A["Mute"] --> B["Mute/Active"]
    B --> C["Not Active/default"]
    D["Headset/Handset"] --> E["Handset/Active"]
    E --> F["Headset/default"]
    G["PC interface"] --> H["Communication through PC/Active"]
    I["Sound clarity"] --> J["Sound clarity/Active"]
    K["Not Active/default"] --> L["Not Active/default"]
9 PC/telephone button
10 Mute button
11 Headset/Handset button
12 Sound clarity button
13 Volume control


Switching between the headset and the handset
Press the button 11 to switch between the headset and the handset. Button down: handset is activated Button up: headset is activated
Muting the headset microphone
Press the button 10 to mute the headset microphone. Button down: microphone is muted Button up: microphone is activated
Adjusting the sound clarity of the headset speaker
With the UI 760, you can adjust the sound clarity of the headset speaker. Annoying background noise coming through the headset speaker is filtered out and speech intelligibility is thus enhanced.
Press the button 12 to filter out annoying background noise. Button down: speech intelligibility enhancement system is activated Button up: speech intelligibility enhancement system is deactivated
Selecting the source — PC or telephone
Press the button ⑨ to select the source — PC or telephone. Button down: PC is selected as the source Button up: telephone is selected as the source


natural_image
Pure geometric diagram with crosshair and circular pattern (no text or symbols)Note:
If the PC is selected as the source, the button 10 and volume control 13 are deactivated. Consequently, you cannot mute the headset microphone or set the volume of the headset speaker using the UI 760 but you have to set the volume via your PC.

Setting the volume of the headset speaker
Use the volume control 13 to continuously set the volume of the headset speaker.
"Dynamic Volume Control" ensures that the volume set via volume control is kept constant, even if the other party speaks with varying volumes.
The functions of your telephone
Even with the UI 760 connected, you can use all functions of your telephone as usual. To make a call, lift the handset and dial a phone number. To end a call, replace the handset. The "hands-free conversation" function can also be used as usual.

Using the dictaphone output
The output can be used to record a conversation in both directions.


Cleaning the UI 760
Only use a soft – and, if necessary, slightly damp – cloth for cleaning the UI 760. Do not use any solvents or cleansing agents as these can damage the varnish of the UI 760.
If problems occur...
| Problem What to do | |
| No dial tone • Make sure that the button is in “up” position. • Make sure that the handset is lifted. • Make sure that the cables are connected correctly. • Make sure that the UI 760 is correctly adjusted to your telephone. | 11 |
| Adjustment to your telephone is not possible | • Your telephone does not meet standard requirements. Please contact your dealer. |
| The other party cannot hear you | • Make sure that button mic. mute 10 is in “up” position. |


| Problem What to do | |
| No connection to the PC • Make sure that the cables are connected correctly.Increase the volume on your PC.Your PC and the UI 760 are not compatibel.Please contact your dealer. | |
| Your voice can hardly be heard | Make sure that the headset microphone is positioned at the corner of your mouth.Make sure that the volume of the headset microphone is sufficient.Make sure that the UI 760 is correctly adjusted to your telephone. |
| The speaker volume varies • | Your telephone does not meet standard requirements. Please contact your dealer.The battery may be low.Replace the battery. |


If the problem persists, please contact your local Sennheiser Communications agent for assistance. Never repair or attempt to repair the units as this will invalidate the warranty.


Accessories
| Article number | |
| Headset holder 3 in 1 (Headset holder - Desktop mounting plate - Desktop lock plate) | 502392 |
| Modular to 2 X 3.5 mm jack plugs cable - for connection of UI box to PC via standard sound card - existing CUIPC 1 | 05373 |
| Modular to USB plug cable - for connection of UI box to PC directly via USB port | 502394 |
| 3.5 mm jack plug to 3.5 mm jack plug cable - for connection of UI box to “Dicta- phone device” (PC, PDA, tape recorder etc.) | 502391 |
Spare parts
| Article number | |
| Modular to Modular cable - for connection of UI box to desk phone CPHUI 1 | 05372 |
| Modular to Easy Disconnect cable - for connection of UI box to headset - CSTD 01 standard bottom cable | 05362 |
Specifications
Dimensions [mm]: 91 x 32 x 101
Weight: approx. 137 g
approx. 205 g with battery
Battery: 1.5 V C-size battery (IEC LR 14)
14


Manufacturer declarations
Warranty regulations
The guarantee period for this Sennheiser product is 24 months from the date of purchase. Excluded are accessory items, rechargeable or disposable batteries that are delivered with the product; due to their characteristics these products have a shorter service life that is principally dependent on the individual frequency of use. The guarantee period starts from the date of original purchase. For this reason, we recommend that the sales receipt be retained as proof of purchase. Without this proof (which is checked by the responsible Sennheiser service partner) you will not be reimbursed for any repairs that are carried out.
Depending on our choice, guarantee service comprises, free of charge, the removal of material and manufacturing defects through repair or replacement of either individual parts or the entire device. Inappropriate usage (e.g. operating faults, mechanical damages, incorrect operating voltage), wear and tear, force majeure and defects which were known at the time of purchase are guarantee claims. The guarantee is void if the product is manipulated by non-authorised persons or repair stations. In the case of a claim under the terms of this guarantee, send the device, including accessories and sales receipt, to the responsible service partner. To minimise the risk of transport damage, we recommend that the original packaging is used. Your legal rights against the seller, resulting from the contract of sale, are not affected by this guarantee.
exclude

The guarantee can be claimed in all countries outside the U.S. provided that no national law limits our terms of guarantee.
Batteries
The supplied batteries or rechargeable batteries can be recycled. Please dispose of them as special waste or return them to your specialist dealer. In order to protect the environment, only dispose of exhausted batteries.
WEEE Declaration
Your Sennheiser product was developed and manufactured with high quality materials and components which can be recycled and/or reused. This symbol indicates that electrical and electronic equipment must be disposed of separately from normal waste at the end of its operational lifetime. Please dispose of this product by bringing it to your local collection point or recycling centre for such equipment. This will help to protect the environment in which we all live.
Further information
Frequently asked questions
For possible solutions to problems, please refer to the FAQ on our web page:
www.senncom.com and see under "Products", "Universal Interface".
Universal Interface UI 760
natural_image
Diagram showing two connected cables with connectors and a panel, no text or symbols presentnatural_image
Diagram of a battery pack with an open lid and internal components, showing upward arrow indicating flow (no text or symbols present)text_image
ABC ABC 4 6 1 9 7 8natural_image
Simple crosshair symbol with concentric circles and intersecting lines (no text or labels)

natural_image
Diagram showing two connected cables with connectors and a panel, no text or symbols presentnatural_image
Diagram of a battery pack with an open rear panel and internal components, showing battery, battery, and casing (no text or symbols)natural_image
Simple crosshair symbol with concentric circles and intersecting lines (no text or labels)
natural_image
Simple geometric diagram with a blue rectangle and a black crosshair (no text or symbols)flowchart
graph TD
    A["Device A"] -->|Wireless cable to the main device| B["Central Device"]
    B -->|Wireless cable to the main device via cable to PC| C["Device B"]
    B -->|Wireless cable to the main device via cable to PC| D["Device C"]
    B -->|Wireless cable to the main device via cable to PC| E["Device D"]
    C --> F["Device E"]
    D --> G["Device F"]
    style A fill:#f9f,stroke:#333
    style B fill:#ccf,stroke:#333
    style C fill:#cfc,stroke:#333
    style D fill:#fcc,stroke:#333
    style E fill:#cff,stroke:#333
| Collegamento apparecchio | Periferiche | ||
| A | Cuffia RJ11 | disconnessione Secom Quick | |
| B | Dittafono Jack 3,5 mm “Color Black” | Jack 3,5 mm “Color Black” | |
| C | Ricevitore RJ11 RJ11 | ||
| D | Telefono | RJ11 | In base al telefono |
| E | Aux/PC RJ11 | Jack (2x) 3,5 mm/USB | |


natural_image
Simple geometric diagram with a blue rectangle and a black crosshair (no text or symbols)natural_image
Diagram showing two cables connected to a panel with connectors and ports (no text or symbols)natural_image
Diagram of a battery pack with an open rear panel and internal components, showing battery casing and battery stack (no text or symbols)natural_image
Simple geometric diagram with a blue rectangle and a black crosshair (no text or symbols)


natural_image
Simple geometric diagram with a blue rectangle and a black crosshair (no text or symbols)


natural_image
Pure geometric diagram with concentric circles and crosshairs, no text or symbols present

Nota:
natural_image
Simple geometric diagram with a blue rectangle and a black crosshair (no text or symbols)


natural_image
Simple geometric diagram with a central crosshair and concentric circles (no text or symbols)
Uso dell'UI 760
flowchart
graph TD
    A["Outer Ring"] --> B["Muto"]
    A --> C["Cuffia/Ricevitore"]
    A --> D["Interfaccia PC Qualità"]
    A --> E["Suono"]
    B --> F["Muto/Attivo"]
    C --> G["Ricevitore/Attivo"]
    D --> H["Comunicazione mediante PC/Attivo"]
    E --> I["Qualità del suono/Attivo"]
    F --> J["Non attivo/Default"]
    G --> K["Cuffia/Default"]
    H --> L["Non attivo/Default"]
    I --> M["Non attivo/Default"]
    style A fill:#f9f,stroke:#333
    style B fill:#ccf,stroke:#333
    style C fill:#ccf,stroke:#333
    style D fill:#cfc,stroke:#333
    style E fill:#cfc,stroke:#333
    style F fill:#ffc,stroke:#333
    style G fill:#ffc,stroke:#333
    style H fill:#ffc,stroke:#333
    style I fill:#ffc,stroke:#333
    style J fill:#fcc,stroke:#333
    style K fill:#fcc,stroke:#333
    style L fill:#fcc,stroke:#333
natural_image
Simple geometric diagram with a blue rectangle and a black crosshair (no text or symbols)natural_image
Simple geometric diagram with a blue rectangle and a black crosshair (no text or symbols)

natural_image
Simple geometric diagram with a blue rectangle and a black crosshair (no text or symbols)natural_image
Simple geometric diagram with a blue rectangle and a black crosshair (no text or symbols)Parti di ricambio
natural_image
Simple geometric diagram with a blue rectangle and a crosshair (no text or symbols)


Universal Interface UI 760
El UI 760 le permite conectar:
natural_image
Simple geometric diagram with a blue rectangle, crosshair, and concentric circles (no text or symbols)


natural_image
Simple geometric diagram with a blue rectangle, intersecting lines, and a central black circle (no text or symbols)


Conexiones
flowchart
graph TD
    A["Device A"] -->|Wireless cable to the main device| B["Central Device"]
    B -->|Wireless cable to the main device| C["Device B"]
    B -->|Wireless cable to the main device| D["Device C"]
    B -->|Wireless cable to the main device| E["Device D"]
    B -->|Wireless cable to the main device| F["Device E"]
    style A fill:#f9f,stroke:#333
    style B fill:#ccf,stroke:#333
    style C fill:#cfc,stroke:#333
    style D fill:#fcc,stroke:#333
    style E fill:#cff,stroke:#333
    style F fill:#ffc,stroke:#333
natural_image
Simple geometric diagram with a blue rectangle, intersecting lines, and a central circle (no text or symbols)


natural_image
Diagram showing two USB cable connectors connected to a panel with ports and connectors (no text or symbols)natural_image
Diagram of a battery pack with an open rear panel and internal components, showing battery, battery, and casing (no text or symbols)text_image
Technical diagram of a device panel with labeled ports and indicator lights, showing connections between components.natural_image
Simple geometric diagram with a blue rectangle, crosshair, and concentric circles (no text or symbols)


natural_image
Simple geometric diagram with a blue rectangle, crosshair, and concentric circles (no text or symbols)


Nota:
natural_image
Simple geometric diagram with a blue rectangle, crosshair, and concentric circles (no text or symbols)
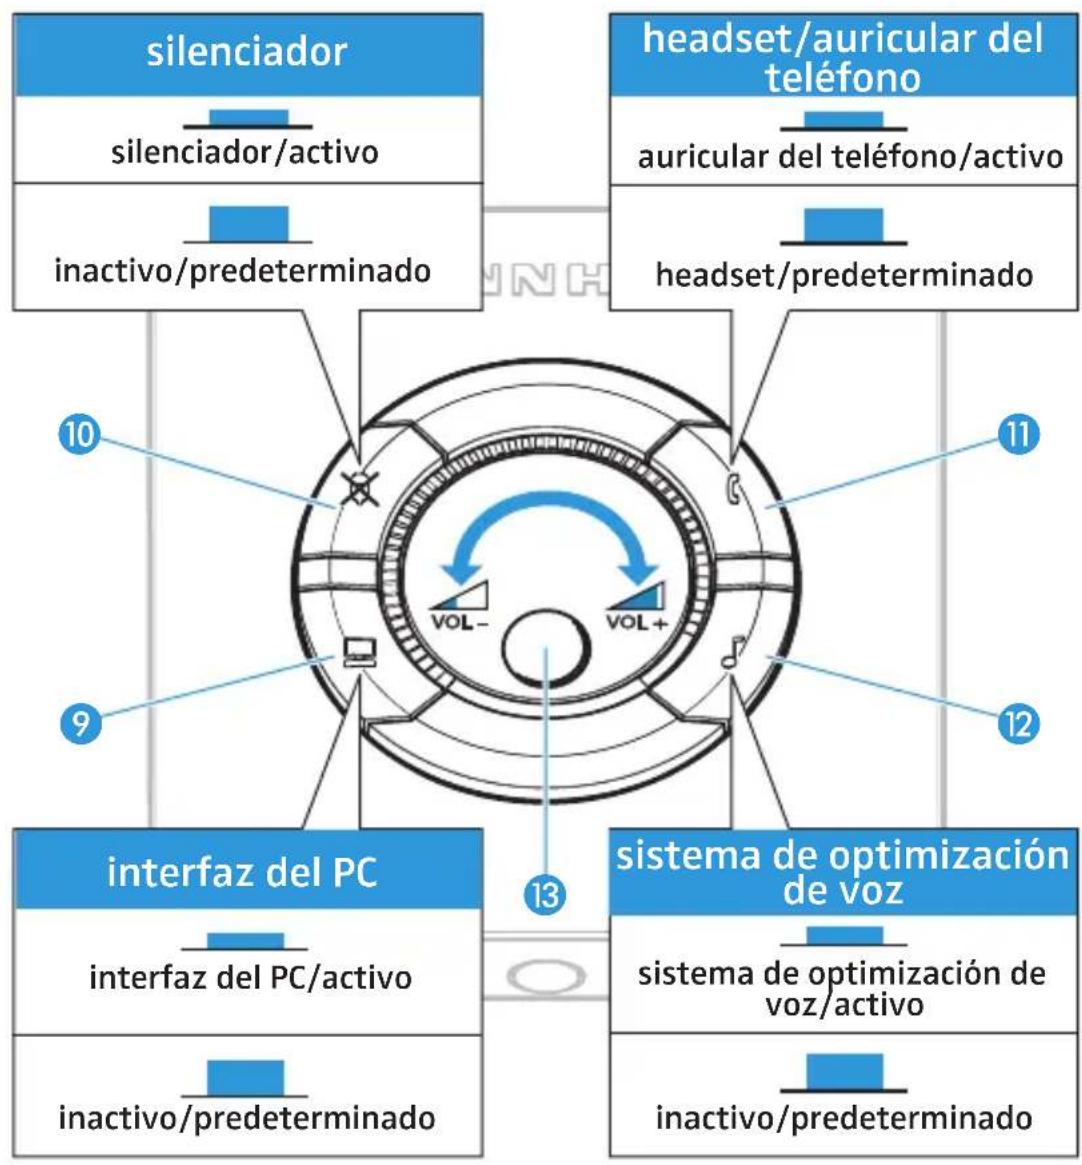
Uso del UI 760
flowchart
graph TD
    A["silenciador"] --> B["silenciador/activo"]
    B --> C["inactivo/predeterminado"]
    D["headset/auricular del teléfono"] --> E["auricular del teléfono/activo"]
    E --> F["headset/predeterminado"]
    G["interfaz del PC"] --> H["interfaz del PC/activo"]
    H --> I["inactivo/predeterminado"]
    J["sistema de optimización de voz"] --> K["sistema de optimización de voz/activo"]
    K --> L["inactivo/predeterminado"]
    style A fill:#333,stroke:#fff,color:#fff
    style D fill:#333,stroke:#fff,color:#fff
    style G fill:#333,stroke:#fff,color:#fff
    style J fill:#333,stroke:#fff,color:#fff
    style K fill:#333,stroke:#fff,color:#fff
    style L fill:#333,stroke:#fff,color:#fff
natural_image
Simple geometric diagram with a blue rectangle, intersecting lines, and a central circle (no text or symbols)

10


natural_image
Pure geometric diagram with crosshair and circular pattern (no text or symbols)Nota:
natural_image
Simple geometric diagram with a blue rectangle, crosshair, and concentric circles (no text or symbols)

12


natural_image
Simple geometric diagram with a blue rectangle, crosshair, and concentric circles (no text or symbols)natural_image
Simple geometric diagram with a blue rectangle, crosshair, and concentric circles (no text or symbols)Piezas de recambio
natural_image
Simple geometric diagram with a blue rectangle, intersecting lines, and a central circle (no text or symbols)


Universele Interface UI 760
natural_image
Simple geometric diagram with a black crosshair and a blue rectangle (no text or symbols)Wordt geleverd met
natural_image
Simple geometric diagram with a crosshair and a blue rectangle (no text or symbols)


Aansluitingen
flowchart
graph TD
    A["Device A"] -->|A USB cable routing| Device1["Mobile Phone"]
    A -->|B USB cable routing| Device2["Mobile Phone"]
    A -->|C USB cable routing| Device3["Mobile Phone"]
    A -->|D USB cable routing| Device4["Mobile Phone"]
    A -->|E USB cable routing| Device5["Computer"]
| Boxverbinding Randapparatuur | |||
| A | Hoofdset RJ11 Secom Quick-ontkoppeling | ||
| B | Dictafoon jackplug 3,5 mm „Color Black“ | jackplug 3,5 mm „Color Black“ | |
| C | Handset RJ11 RJ11 | ||
| D | Telefoon | RJ11 | Afhankelijk van merk en type telefoon |
| E | Aux/PC RJ11 | jackplug (2x) 3,5 mm | /USB |


natural_image
Simple geometric diagram with a crosshair and a blue rectangle (no text or symbols)

natural_image
Diagram showing two connected cables with connectors and a panel, no text or symbols presentnatural_image
Diagram of a battery pack with an open rear panel and internal components, showing battery casing and battery stack (no text or symbols)natural_image
Simple geometric diagram with a blue rectangle and a crosshair (no text or symbols)natural_image
Simple geometric diagram with a crosshair and a blue rectangle (no text or symbols)


natural_image
Simple geometric diagram with a crosshair and a blue rectangle (no text or symbols)Opmerking:
natural_image
Simple geometric diagram with a crosshair and a blue rectangle (no text or symbols)


natural_image
Simple geometric diagram with a crosshair and a blue rectangle (no text or symbols)
12


natural_image
Simple crosshair target symbol with concentric circles and intersecting lines (no text or labels)

natural_image
Simple geometric diagram with a blue rectangle and a crosshair (no text or symbols)


natural_image
Simple geometric diagram with a crosshair and a blue rectangle (no text or symbols)


Sennheiser Communications A/S
6 Langager
2680 Solrød Strand
Denmark
www.senncom.com
Printed in China
Publ. 03/09
525109/A02