LI 16ITUR - Heat pump DIMPLEX - Free user manual and instructions
Find the device manual for free LI 16ITUR DIMPLEX in PDF.


| Product Type | Air-to-water heat pump for indoor installation |
| Brand | Dimplex |
| Model | LI 16ITUR |
| Dimensions (H x W x D) | 1560 x 960 x 760 mm |
| Weight (transport unit, including packaging) | 275 kg |
| Electrical supply - power | 3~/N/PE 400 V, 50 Hz, fuse C10A, type RCD B |
| Electrical supply - control | 1~/N/PE 230 V, 50 Hz, fuse C13A, type RCD A |
| Refrigerant | R410A, 4.78 kg, GWP 2088, CO₂ equivalent 9.9 t |
| Seasonal coefficient of performance (average climate 35 °C / 55 °C) | 4.77 / 3.71 |
| Nominal heating capacity | 10 kW |
| Operating temperature heating (air) | -22 °C to +35 °C |
| Operating temperature cooling (air) | +15 °C to +40 °C |
| Nominal heating water flow rate (A7/W35) | 1.2 m³/h |
| Sound power level (indoor/outdoor) | 50 / 53 dB(A) in normal operation |
| Condensate drainage | Pipe diameter ≥ 50 mm, frost protected |
| Main functions | Heating, cooling, domestic hot water production, electronic control with heat pump manager |
| Maintenance and cleaning | Clean air ducts and evaporator before heating season; clean heating side filter regularly; use 5% phosphoric acid for the condenser |
| Safety | Frost protection, emergency stop, lockout contactor, starting current limitation by inverter technology |
| Spare parts and repairability | Access to internal components by qualified personnel; hermetic refrigerant circuit |
| General information | Warranty under conditions; commissioning by authorized after-sales service recommended |
Frequently Asked Questions - LI 16ITUR DIMPLEX
User questions about LI 16ITUR DIMPLEX
0 question about this device. Answer the ones you know or ask your own.
Ask a new question about this device
Download the instructions for your Heat pump in PDF format for free! Find your manual LI 16ITUR - DIMPLEX and take your electronic device back in hand. On this page are published all the documents necessary for the use of your device. LI 16ITUR by DIMPLEX.
USER MANUAL LI 16ITUR DIMPLEX
natural_image
Line drawing of a three-tiered industrial machine with control panel and door (no text or symbols)Installation and Operating Instruction
Air-to-Water Heat Pump for Indoor Installation
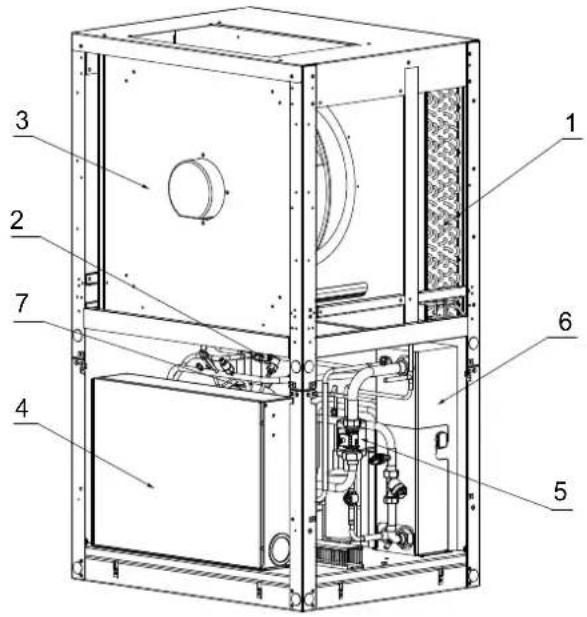
1) Verdampfer
2) Expansionsventil
3) Ventilator
4) Schaltkasten
5) Filtertrockner
6) Verflüssiger
7) Verdichter
3.2 Schaltkasten
natural_image
Line drawing of a mechanical device with a lever and base (no text or symbols)6 Aufstellu
6.1 Allgemein
natural_image
Technical line drawing of a door frame with open door and slotted panel (no text or symbols)natural_image
Technical line drawing of a rectangular industrial machine with mounting brackets and a side-view detail view (no text or symbols)natural_image
Line drawing of a cabinet or enclosure with multiple windows and doors, no text or symbols presentnatural_image
Pure electrical circuit lines without any symbols7.4 Temperaturfühler
natural_image
Empty white rectangle with black border (no text or symbols)Table of contents
1 Safety notes......EN-2
1.1 Symbols and markings......EN-2
1.2 Intended use......EN-2
1.3 Legal regulations and directives....EN-2
1.4 Energy-efficient use of the heat pump......EN-2
2 Purpose of the heat pump ......EN-3
2.1 Application ......EN-3
2.2 Operating principle......EN-3
2.3 Functional description for integrated thermal energy metering....EN-3
3 Scope of supply......EN-4
3.1 Basic device....EN-4
3.2 Switch box......EN-5
3.3 Accessories pack....EN-6
4 Accessories......EN-6
4.1 Room climate station....EN-6
4.2 Building management technology......EN-6
5 Transport......EN-6
6 Set-UP......EN-8
6.1 General Information......EN-8
6.2 Condensed Water Pipe....EN-8
6.3 Sound......EN-8
7 Installation....EN-8
7.1 General Information......EN-8
7.2 Air Connection....EN-9
7.3 Heating System Connection....EN-10
7.4 Temperature sensor......EN-10
7.5 Electrical connection....EN-12
8 Start-UP......EN-14
8.1 General Information......EN-14
8.2 Preparation......EN-14
8.3 Procedure......EN-14
9 Maintenance / Cleaning ...... EN-15
9.1 Maintenance....EN-15
9.2 Cleaning the Heating System......EN-15
9.3 Cleaning the Air System ...... EN-15
10 Faults / Trouble-Shooting......EN-15
11 Decommissioning/Disposal......EN-15
12 Device information ...... EN-16
13 Product information as per Regulation (EU) No 813/2013, Annex II, Table 2......EN-18
Anhang / Appendix / Annexes ...... A-I
Maßbilder / Dimension Drawings / Schémas cotés.... A-II
Diagramme / Diagrams / Diagrammes....A-III
Einbindungsschemen / Integration diagram / Schéma d'intégration....A-VII
Konformitätserklärung / Declaration of Conformity / Déclaration de conformité ...... A-X
1 Safety not
1.1 Symbols and markings
Particularly important information in these instructions is marked with CAUTION! and NOTE.
CAUTION!
Immediate danger to life or danger of severe personal injury or significant damage to property.
NOTE
Risk of damage to property or minor personal injury or important information with no further risk of personal injury or damage to property.
1.2 Intended use
This device is only intended for use as specified by the manufacturer. Any other use beyond that intended by the manufacturer is prohibited. This requires the user to abide by the relevant project planning documents. Please refrain from tampering with or altering the device.
1.3 Legal regulations and directives
This heat pump is designed for use in a domestic environment according to Article 1, Paragraph 2 k) of EU directive 2006/42/EC (machinery directive) and is thus subject to the requirements of EU directive 2014/35/EU (low-voltage directive). It is thus also intended for use by non-professionals for heating shops, offices and other similar working environments, in agricultural establishments and in hotels, guest houses and similar / other residential buildings.
The construction and design of the heat pump complies with all relevant EU directives, DIN/VDE regulations (see CE declaration of conformity).
When connecting the heat pump to the power supply, the relevant VDE, EN and IEC standards are to be adhered to. Any further connection requirements stipulated by the network operator must also be observed.
When connecting the heating system, all applicable regulations must also be adhered to.
This unit can be used by children aged 8 and over and by persons with limited physical, sensory or mental aptitude or lack of experience and/or knowledge, providing they are supervised or have been instructed in the safe use of the unit and understand the associated potential dangers.
Children must not play with the device. Cleaning and user maintenance must not be carried out by children without supervision.
CAUTION!
When operating or maintaining a heat pump, the legal requirements of the country where the heat pump is operated apply. Depending on the refrigerant quantity, the heat pump must be inspected for leaks at regular intervals by a certified technician, and these inspections must be recorded.
More information can be found in the accompanying log book.
1.4 Energy-efficient use of the heat pump
By operating this heat pump, you are helping to protect the environment. A prerequisite for energy-efficient operation is the correct design of the heat source system and heating system.
It is particularly important for the efficiency of a heat pump to keep the temperature difference between heating water and heat source as small as possible. For this reason, it is advisable to design the heat source and heating system very carefully. A temperature difference of approx. one Kelvin (one °C) increases the power consumption by around 2.5 %. When designing the heating system, it should be borne in mind that special consumers such as e.g. domestic hot water preparation should also be taken into consideration and dimensioned for low temperatures. Underfloor heating systems (panel heating) are optimally suited for heat pump use on account of the low flow temperatures (30 °C to 40 °C).
It is important to ensure that the heat exchangers are not contaminated during operation because this increases the temperature difference, in turn reducing the COP.
Correct adjustment of the heat pump manager is also important for energy-efficient use of the heat pump. Further information can be found in the operating instructions of the heat pump manager.
2 Purpose of the heat pump
2.1 Application
The air-to-water heat pump is to be used exclusively for the heating and cooling of heating water. It can be used in new or existing heating systems.
The heat pump is suitable for mono-energy and bivalent operation down to an external temperature of -22^ .
Proper defrosting of the evaporator is guaranteed by maintaining a heating water return temperature of more than 22 °C (+2 °C/-0 °C) during continuous operation.
The heat pump is not designed for the increased heat consumption required when a building is being dried out. For this reason, the additional heat consumption should be met using special devices provided by the customer. For drying out buildings in autumn or winter, we recommend installing a suitable 2nd heat generator (e.g. electric heating element available as an accessory).
In cooling operation, the heat pump is suitable for air temperatures ranging from +15 °C to +40 °C. It can be used for silent and dynamic cooling. The minimum cooling water inlet temperature is +7 °C.
NOTE
The device is not suitable for operation with a frequency converter.
2.2 Operating principle
Heating
Surrounding air is drawn in by the fan and fed through the evaporator (heat exchanger). The evaporator cools the air, i.e. it extracts heat from it. This extracted heat is then transferred to the working medium (refrigerant) in the evaporator.
The heat is brought to a higher temperature level by increasing its pressure with the aid of the electrically driven compressor. It is then transferred to the heating water via the liquefier (heat exchanger).
Electrical energy is used to raise the temperature of the heat in the environment to a higher level. As the energy extracted from the air is transferred to the heating water, this type of device is called an air-to-water heat pump.
The air-to-water heat pump consists of the main components: evaporator, ventilator and expansion valve, as well as the low-noise compressors, the liquefier and the electrical control system.
At low ambient temperatures, humidity accumulates on the evaporator in the form of frost, reducing the transfer of heat. Uneven accumulation during this process does not indicate a fault. The evaporator is defrosted automatically by the heat pump as required. Steam may be emitted from the air outlet depending on the atmospheric conditions.
Cooling
The functions of the evaporator and the liquefier are reversed in the "Cooling" operating mode.
The heating water transfers its heat to the refrigerant via the liquefier, which is now functioning as an evaporator. The refrigerant is brought to a higher temperature level using the compressor. Heat is transferred to the surrounding air via the liquefier (which, in heating operation, functions as an evaporator).
2.3 Functional description for integrated thermal energy metering
The compressor manufacturer's performance specifications for different pressure levels are stored in the heat pump software. Two additional pressure sensors for determining the current pressure level are installed in the refrigerating circuit, one before and one after the compressor. The current heat output can be calculated from the compressor data stored in the software and the current pressure level. The integral for the heat output over the runtime gives the quantity of thermal energy supplied by the heat pump, which is displayed separately for heating, domestic hot water preparation and swimming pool water preparation on the heat pump manager's display.
The integrated thermal energy metering must not be used for heating cost billing purposes. EN 1434 is not applicable.
3 Scope of supply
3.1 Basic device
The heat pump contains the components listed below.
The refrigeration circuit is "hermetically sealed" and contains the fluorinated refrigerant R407C included in the Kyoto protocol. Information on the GWP value and CO_2 equivalent of the refrigerant can be found in the chapter Device information. The refrigerant is CFC-free, non-ozone depleting and non-combustible.
The switch box is located in the heat pump. The switch box cover can be removed once the lower front cover has been removed and the two screws on the side have been unfastened.
(Mains)connecting terminals, power electronics for the compressor, refrigeration circuit controller and heat pump manager are located in the switch box
The heat pump manager is a convenient electronic regulation and control device. It controls and monitors the entire heating system based on the outside temperature, as well as domestic hot water preparation and safety systems.
The external temperature sensor to be mounted on-site is included in the heat pump scope of supply together with the necessary fixing accessories.
The enclosed operating instructions describe the function and use of the heat pump manager.
In order to simplify service work on the refrigeration circuit, it is possible to remove the switch box and position it next to the device. For this, the cover must be removed and the switch box disconnected from the cooling.
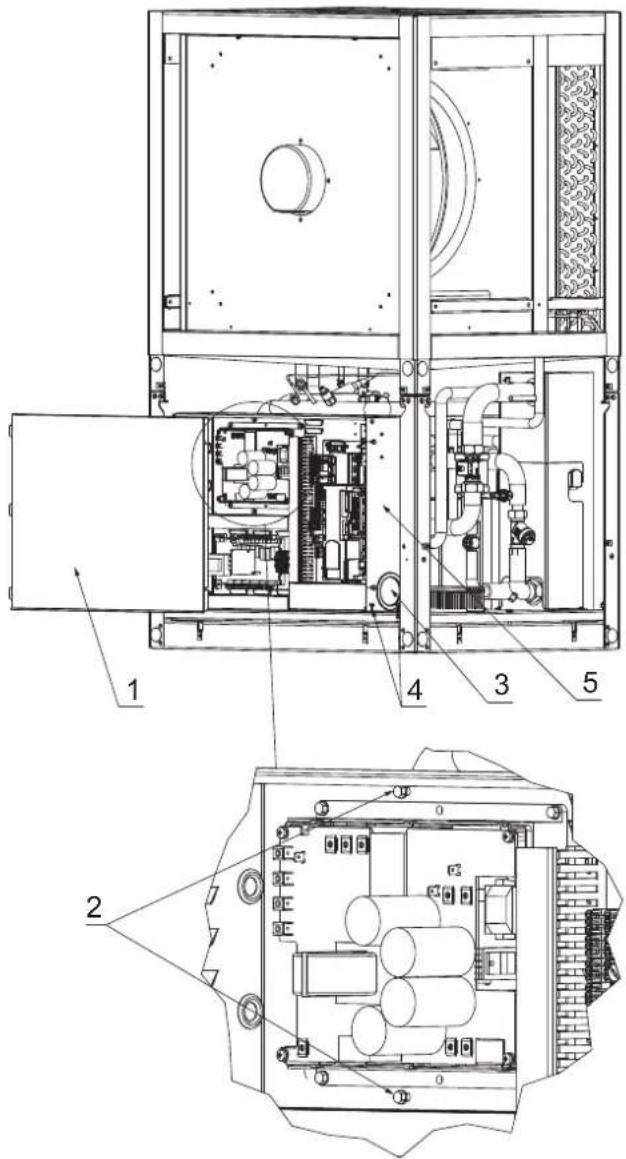
1) Remove switch box cover
2) Unfasten 2x screws for cooling
3) Disconnect supply lines at the controller and guide through grommet
4) Unfasten 2x screws for switch box
5) Push the switch box slightly to the right and lift it out to the front
3.3 Accessories pack
On top of the heat pump:
1 x insulating mat, duct connection
1 x small sealing ring, air intake
1 x large sealing ring, air outlet
In the condensate tray:
1 x external sensor with mounting material
Under fan:
8 x vent plugs ø 30 - black
Outside the packaging:
Documentation
4 Accessories
4.1 Room climate station
With cooling using panel heating/cooling systems, regulation is carried out according to the room temperature and air humidity measured by the room climate station.
This is done by setting the desired room temperature on the heat pump manager. The minimum possible cooling water temperature is calculated from the room temperature and air humidity measured in the reference room. The control response of the cooling system is influenced by the currently measured room temperature and the set room set temperature.
4.2 Building management technology
The heat pump manager can be connected to a building management system network via supplementation of the relevant interface plug-in card. The supplementary installation instructions of the interface card must be consulted regarding the exact connection and parameterisation of the interface.
The following network connections can be made on the heat pump manager:
Modbus
EIB, KNX
Ethernet
5 Transport
CAUTION!
When transporting the heat pump, ensure that it is not tilted more than 45^ (in any direction).
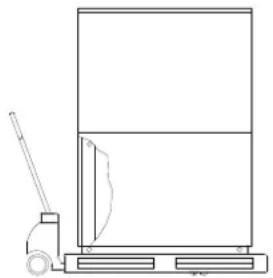
Use a pallet for transporting the heat pump to the final installation location. The basic device can be transported with a lift truck, hand truck or by means of 3/4" pipes fed through the holes in the base plate or frame.
natural_image
Line drawing of a mechanical device with a lever and base (no text or symbols)The heat pump and the transport pallet are joined by four transit bolts. These must be removed.
Before using the transport holes in the frame, it is necessary to remove the lower side panel assemblies. This is done by loosening each of the two screws at the base and then withdrawing the panels by unhooking them from above. Rehang the panels by gently pushing them in an upwards direction.
Be careful not to damage any components when inserting the pipes through the frame.
At the installation location, 8 black dust caps, which are included in the packaging of the device, must be snapped into the transport holes.
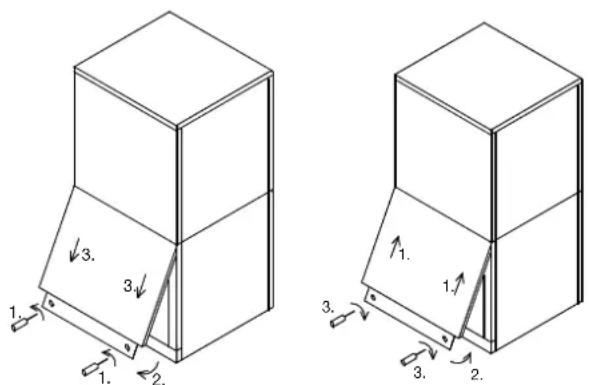
Opening the cover Closing the cover
After the transport, the transport securing device is to be removed on either side at the bottom of the unit.
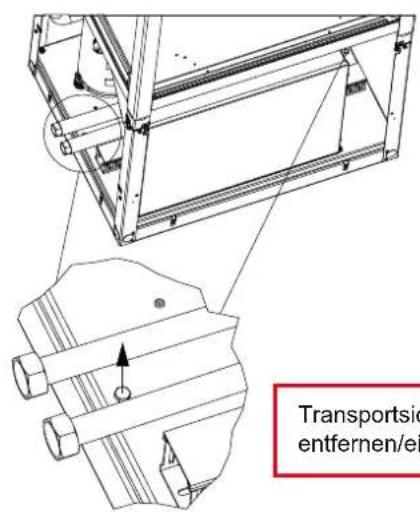
The transport securing device is to be removed prior to commissioning.
For easier transportation into existing homes/buildings, it is possible to separate the basic device into two parts.
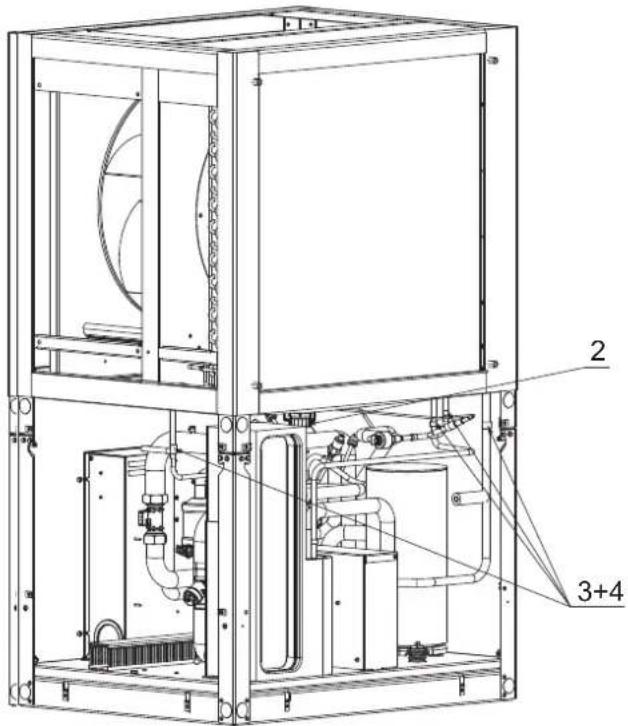
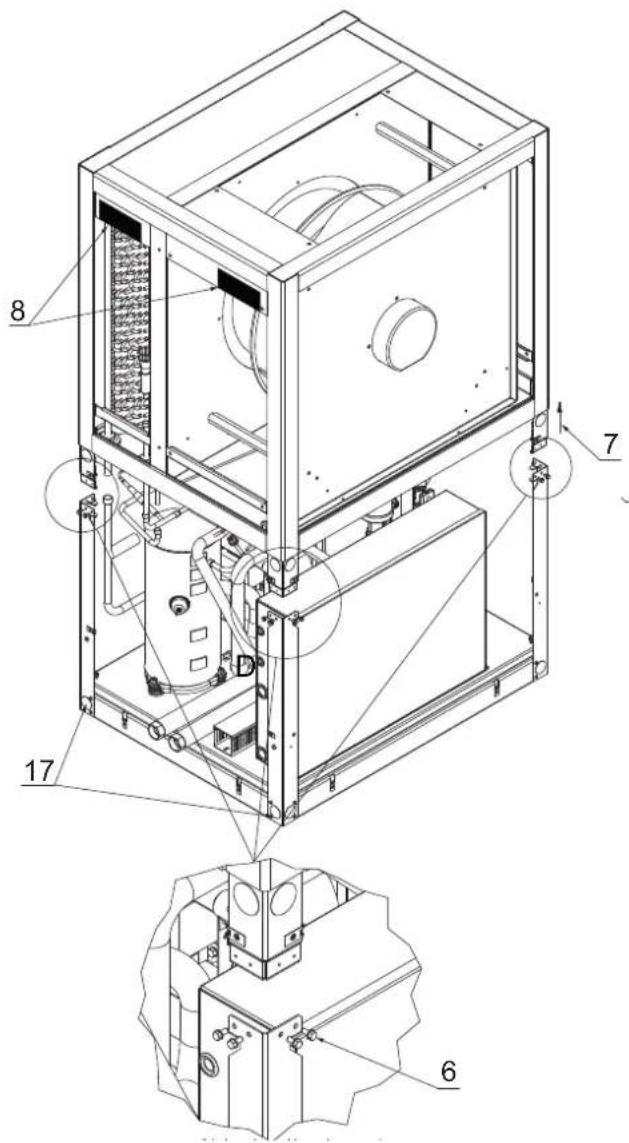
Once the covering panels have been removed, please proceed as follows:
1) Drain refrigerant
2) Remove condensate hose
3) Remove the pipe insulation above the soldering points
4) Separate 4x soldering points chip-free.
5) Disconnect cables at the fan and pull through the cable glands in the condensate tray.
6) Unfasten 4x screws in the corners in each case
7) Lift down the top part of the heat pump
8) Areas for lifting on the frame
9) Transport heat pump to the installation location
10) Join the parts
11) Re-solder the separation points again (with inert gas flushing)
12) Evacuate the refrigeration circuit
13) Add refrigerant
14) Perform leakage tightness test
15) Re-attach pipe insulation
16) Re-connect fan
17) Bores for attaching a transport aid (e.g. lifting straps etc.)
CAUTION!
Do not lift by the condensate tray. This cannot withstand any forces.
CAUTION!
Work on the refrigeration circuit and electrics may only be performed by competent experts.
CAUTION!
The condensate hose must be removed before the upper part is put down.
6 Set - UP
6.1 General Information
The device is designed to enable several connection options. The position of the air outlet opening can be moved from right (factory default) to left or top by turning over one of the two screwed on covers.
By replacing the bottom side cladding sections, it is also possible to move the hydraulic connection from left (factory default) to right. The different connection options are shown in the dimension drawing(see cap. 1 on page II).
The air-to-water heat pump must be installed in a frost-free, dry room on an even, smooth and horizontal surface. The entire frame should lie directly on the floor to ensure an adequate soundproof seal. If supporting feet are used, the heat pump must be installed horizontally. In this case, the specified sound level can be up to 3 dB(A) higher, and additional sound insulation measures may be necessary.
The heat pump must be installed so that maintenance work can be carried out without being hindered. This can be ensured by maintaining a clearance of 1m in front of the heat pump and to the side on which the heating water connections are located.
The side panel assemblies must not be covered by connecting pipes.
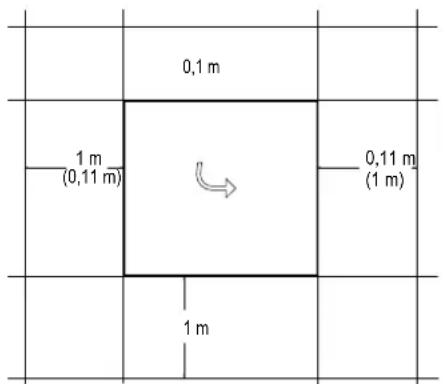
Neither frost nor temperatures higher than 35 °C must occur in the installation location at any time of the year.
Never install the device in rooms subject to high humidity. Condensation can form on the heat pump and air circuit if the humidity exceeds 50 % and the external temperature is below 0 °C.
If the heat pump is installed on an upper storey, the load-bearing capacity of the ceiling should be checked. On account of the acoustics, measures for isolating possible vibrations should also be very carefully planned in advance as well. Installation on a wooden floor is not recommended.
6.2 Condensed Water Pipe
Condensed water that forms during operation must be drained off frost-free. To ensure proper drainage, the heat pump must be mounted horizontally. The condensate pipe must have a minimum diameter of 50 mm and must be fed into a sewer in such a way that it is safe from frost. Do not discharge the condensate directly into clearing tanks or cesspits, as aggressive vapours or a condensed water pipe which has not been laid in a frost-free manner could destroy the evaporator.
6.3 Sound
We recommend connecting the heat pump to the heating system using a flexible hose to prevent solid-borne noise transmission to the heating system if requirements regarding noise are high.
- Installed air ducts should be sound-isolated from the heat pump to prevent the transmission of solid-borne sound to the ducts.
If the transport restraint screws are not removed from the compressor, acoustic emissions from the device are significantly louder!
7 Installation
7.1 General Information
The following connections need to be established on the heat pump:
- Fresh and exhaust air
- Flow and return flow of the heating system
- Condensate outflow
- Voltage supply
- Temperature sensor
7.2 Air Connection
CAUTION!
Do not restrict or block the area around the air intake or outlet.
CAUTION!
Only operate the heat pump with the air ducts connected.
The glass fibre reinforced concrete air ducts offered as accessories are moisture-resistant and diffusion-free (exhaust air duct 600 x 600 and inlet duct 750 x 750). When using the air duct for the air outlet side (600 x 600), the "insulating mat duct connection" (in the accessory pack) is to be adhered to the air outlet on the desired connection side.
natural_image
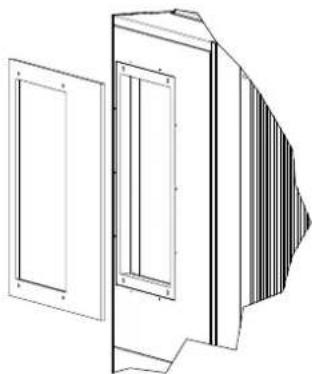
Technical line drawing of a door frame with open door and slotted panel (no text or symbols)The sealing collar is used to seal the air ducts on the heat pump. The air ducts are not screwed directly onto the heat pump. Only the rubber seal comes into direct contact with the heat pump when the system is installed correctly. This guarantees easy assembly and disassembly of the heat pump and also ensures that solid-borne sound is well insulated.
natural_image
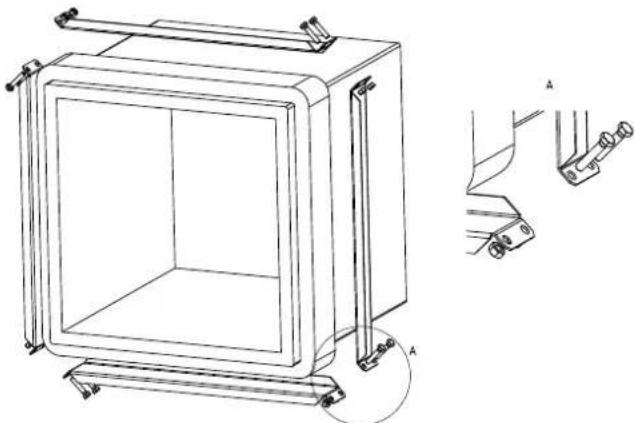
Technical line drawing of a rectangular mechanical component with mounting brackets and a separate detail view showing a bracket detail (no text or symbols present)If an alternative air duct is being used to that which has been supplied as an accessory, care must be taken to ensure that it does not reduce the cross sectional area of the air intake and air outlet sides. The "small and large sealing rings" included in the scope of supply can be used for sealing the heat pump connection. They also function as vibration isolators.
natural_image
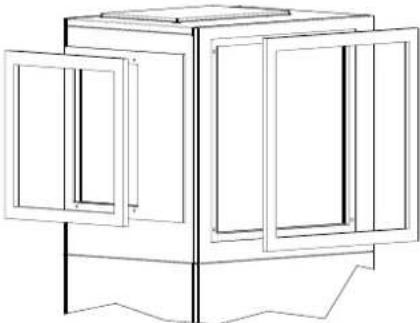
Line drawing of a cabinet or enclosure with multiple doors and windows (no text or symbols)The large sealing ring can be used to position the air intake opening of the heat pump directly onto an appropriately constructed wall opening.
It must be ensured that the interior side of the wall opening is lined with thermal insulation to prevent the wall from becoming cold and to prevent moisture from penetrating the wall.
When very short air ducts are used on the air outlet, the exterior side of the wall opening must be fitted with a safety guard or an air deflector grille suitable for preventing body parts (fingers or arms, especially those of children) coming into contact with the ventilator in the heat pump.
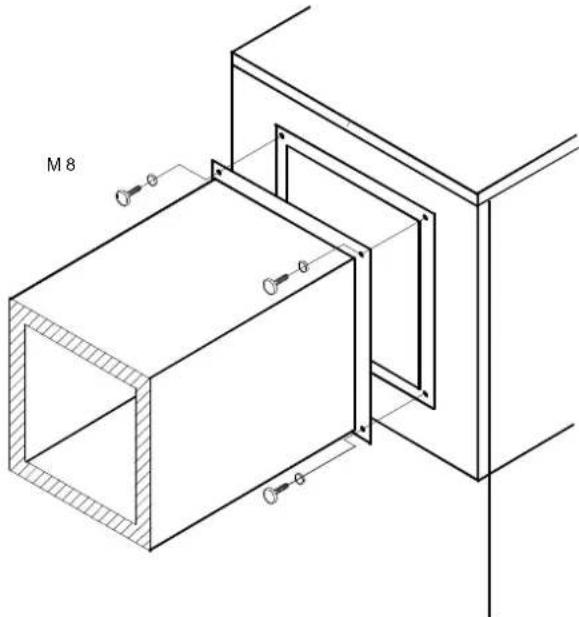
If flange-mounted air ducts are used, connecting stubs are secured on the air inlet and air outlet sides with 4 M8 hexagon bolts in the threaded holes provided (the hexagonal long nuts). When doing this, ensure that both air duct stubs only touch the insulation. There should be no contact with the external sheeting.
Care must also be taken to ensure that suitable vibration isolation and duct insulation are provided.
natural_image
Technical line drawing of a mechanical assembly with labeled section M8 (no text or symbols beyond label)7.3 Heating System Connection
The heating system connections on the heat pump have a 1" internal thread. Use a spanner to firmly grip the transitions when connecting the heat pump.
The connection on the heating side can also be made towards the right. To do this, the left and right bottom front panels must be removed. The two connecting pipes, including pipe supports, must be moved from the left to the right side of the device. The front panels must then be re-mounted the opposite way around.
Before connecting the heating water system to the heat pump, the heating system must be flushed to remove any impurities, residue from sealants, etc. Any accumulation of deposits in the liquifier could cause the heat pump to completely break down. For systems in which the heating water flow can be shut off via the radiator or thermostat valves, an overflow valve must be installed in a heating bypass behind the heat pump by the customer. This ensures a minimum heating water flow rate through the heat pump and helps to avoid faults.
Once the heating system has been installed, it must be filled, de-aerated and pressure-tested.
Consideration must be given to the following when filling the system:
■ Untreated filling water and make-up water must be of drinking water quality (colourless, clear, free from sediments)
- Filling water and make-up water must be pre-filtered (pore size max. 5 µm).
Scale formation in domestic hot water heating systems cannot be avoided, but in systems with flow temperatures below 60 °C, the problem can be disregarded. With high-temperature heat pumps and in particular with bivalent systems in the higher performance range (heat pump + boiler combination), flow temperatures of 60 °C and more can be achieved. The following standard values should therefore be adhered to with regard to the filling and make-up water according to VDI 2035, sheet 1: The total hardness values can be found in the table.
| Total heat output in kW | Total alkaline earths in mol/m^3 and/or mmol/l | Specific system volume (VDI 2035) in I/kW | ||
| < 20 | ≥20 < 50 | ≥50 | ||
| Total hardness in °dH | ||||
| < 50 | ≤ 2.0 | ≤ 16.8 | ≤ 11.2 | < 0.11^1 |
| 50 - 200 ≤ 2.0 | ≤ 11.2 ≤ 8 | 4 | ||
| 200 - 600 ≤ 1.5 | ≤ 8.4 | < 0.11^1 | ||
| >600 | < 0.02 | < 0.11^1 | ||
- This value lies outside the permissible value for heat exchangers in heat pumps.
Fig. 7.1: Guideline values for filling and make-up water in accordance with VDI 2035
For systems with an above-average specific system volume of 50 l/kW, VDI 2035 recommends using fully demineralized water and a pH stabiliser to minimize the risk of corrosion in the heat pump and the heating system.
CAUTION!
With fully demineralized water, it is important to ensure that the minimum permissible pH value of 7.5 (minimum permissible value for copper) is complied with. Failure to comply with this value can result in the heat pump being destroyed.
Minimum heating water flow rate
The minimum heating water flow rate through the heat pump must be assured in all operating states of the heating system. This can be accomplished, for example, by installing either a dual differential pressureless manifold or an overflow valve. The procedure for setting an overflow valve is described in the chapter "Start-up". When the minimum heating water flow rate is undershot, the plate heat exchanger in the refrigeration circuit can freeze, which can lead to total loss of the heat pump.
The nominal flow rate is specified depending on the max. flow temperature in the device information and must be taken into account during planning. With design temperatures below 30 C in the flow, the design must be based on the max. volume flow with 5 K spread for A7/W35.
The specified nominal flow rate (See “Device information” on page 16.) must be guaranteed in every operating status. An installed flow rate switch is used only for switching off the heat pump in the event of an unusual and abrupt drop in the heating water flow rate and not to monitor and safeguard the nominal flow rate.
NOTE
The use of an overflow valve is only recommended for panel heating and a max. heating water flow of 1.3 m^3/h . System faults may result if this is not observed.
Antifreeze
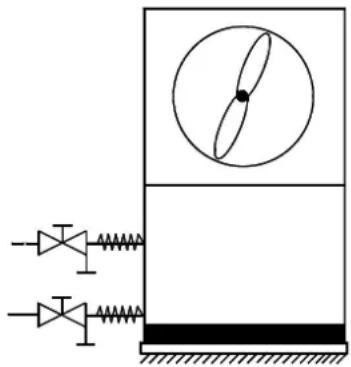
A method of manual drainage (see illustration) should be provided for heat pumps which are exposed to frost. The antifreeze function of the heat pump manager is active whenever the heat pump manager and the heat circulating pump are ready for operation. If the heat pump is taken out of service or in the event of a power failure, the system has to be drained. The heating circuit should be operated with a suitable antifreeze if heat pump systems are implemented in buildings where a power failure can not be detected (holiday home).
natural_image
Pure electrical circuit lines without any symbols7.4 Temperature sensor
Depending on the heat pump type used, the following temperature sensors are already installed or must be additionally mounted:
■ Outside temperature (R1)
■ Temperature 1st, 2nd and 3rd heating circuit (R2, R5 and R13)
■ Flow temperature (R9), as a frost protection sensor in the case of air-to-water heat pumps
■ Outlet temperature of the heat source in the case of brine-to-water and water-to-water heat pumps
■ Domestic hot water temperature (R3)
■ Temperature of renewable thermal storage (R13)
7.4.1 Sensor characteristic curves
| Temperature in °C | -20 | -15 | -10 | -50 | 510 | |||||
| NTC-2 in kΩ 14.6 11.4 | 8.97.1 | 5.6 | 4.5 | 3.7 | ||||||
| NTC-10 in kΩ | 67.7 | 53.4 | 42.3 | 33.9 | 27.3 | 22.1 | 18.0 | |||
| 15 | 20 | 25 | 30 | 35 | 40 | 45 | 50 | 55 | 60 | |
| 2.92 | 42.01 | 71.41.1 | 1.00.8 | 0.7 | 0.6 | |||||
| 14.9 | 12.1 | 10.0 | 8.4 | 7.0 | 5.9 | 5.0 | 4.2 | 3.6 | 3.1 | |
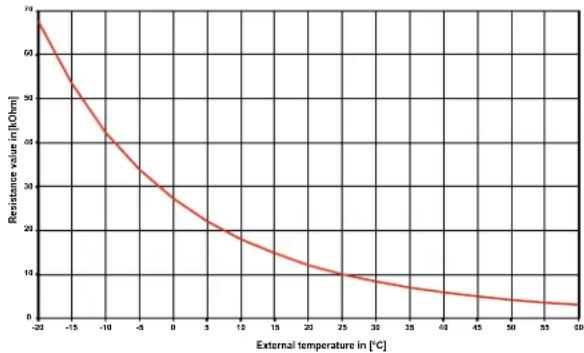
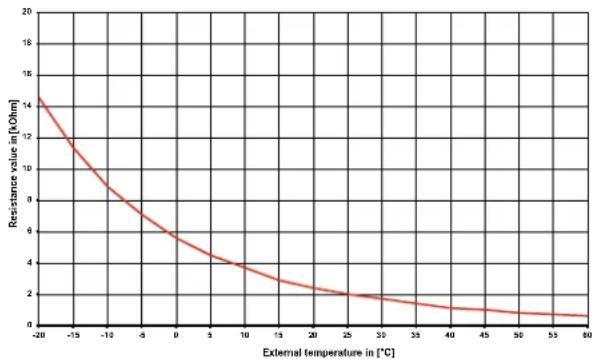
The temperature sensors to be connected to the heat pump manager must correspond to the sensor characteristic curve illustrated in Fig.7.2 on pag. 11. The only exception is the external temperature sensor included in the scope of supply of the heat pump (see Fig.7.3 on pag. 11)
line
| External temperature in [°C] | Resistance value in [kOhm] | |---|---| | -23 | 70 | | -15 | 55 | | -10 | 45 | | -8 | 38 | | -6 | 32 | | 0 | 28 | | 5 | 22 | | 10 | 19 | | 15 | 16 | | 20 | 14 | | 25 | 12 | | 30 | 10 | | 35 | 9 | | 40 | 8 | | 45 | 7 | | 50 | 6 | | 55 | 5 | | 60 | 4 |Fig. 7.2: Sensor characteristic curve NTC-10
line
| External temperature in [°C] | Resistance value in [kΩm] | | ---------------------------- | ------------------------- | | -20 | 14.0 | | -15 | 12.0 | | -10 | 10.0 | | -5 | 8.0 | | 0 | 6.0 | | 5 | 4.0 | | 10 | 3.0 | | 15 | 2.5 | | 20 | 2.0 | | 25 | 1.8 | | 30 | 1.6 | | 35 | 1.4 | | 40 | 1.2 | | 45 | 1.0 | | 50 | 0.8 | | 55 | 0.6 | | 60 | 0.4 |Fig. 7.3: Sensor characteristic curve, NTC-2 according to DIN 44574 External temperature sensor
7.4.2 Mounting the external temperature sensor
The temperature sensor must be mounted in such a way that all weather conditions are taken into consideration and the measured value is not falsified.
- mount on the external wall on the north or north-west side where possible
- Do not install in a “sheltered position” (e.g. in a wall niche or under a balcony)
■ Not in the vicinity of windows, doors, exhaust air vents, external lighting or heat pumps
■ Not to be exposed to direct sunlight at any time of year
| Dimensioning parameter sensor lead | |
| Conductor material | Cu |
| Cable-length | 50 m |
| Ambient temperature | 35 °C |
| Laying system | B2 (DIN VDE 0298-4 / IEC 60364-5-52) |
| External diameter | 4-8 mm |
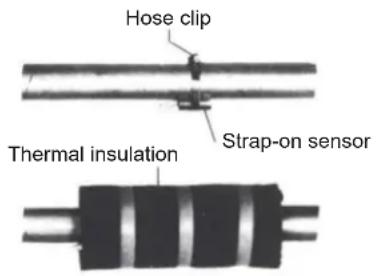
7.4.3 Installing the strap-on sensor
It is only necessary to mount the strap-on sensors if they are included in the scope of supply of the heat pump but have not yet been installed.
The strap-on sensors can be fitted as pipe-mounted sensors or installed in the immersion sleeve of the compact manifold.
Mounting as a pipe-mounted sensor
■ Remove paint, rust and scale from heating pipe.
- Coat the cleaned surface with heat transfer compound (apply sparingly).
- Attach the sensor with a hose clip (tighten firmly, as loose sensors can cause malfunctions) and thermally insulate.
7.4.4 Hydraulic distribution system
The compact manifold and the dual differential pressureless manifold function as an interface between the heat pump, the heating distribution system, the buffer tank and, in some cases, even the hot water cylinder. A compact system is used to simplify the installation process, so that a lot of different components do not have to be installed individually. Further information can be found in the relevant installation instructions.
Compact manifold
The return sensor can remain in the heat pump, or should be installed in the immersion sleeve. The remaining empty space between the sensor and the immersion sleeve must be filled completely with heat transfer compound.
Dual differential pressureless manifold
In order for the heating circuit pumps of the generator and consumer circuits to supply the flow to the return sensor, this must be installed in the immersion sleeve of the dual differential pressureless manifold.
7.5 Electrical connection
7.5.1 General
All electrical installation work must be carried out by a trained electrician or a specialist for the specified tasks in accordance with the
■ installation and operating instructions,
■ country-specific installation regulations (e.g. VDE 0100),
■ technical connection conditions of the energy suppliers and supply grid operators (e.g. TAB) and
■ local conditions
To ensure that the frost protection function of the heat pump works properly, the heat pump manager must remain connected to the power supply and the flow must be maintained through the heat pump at all times.
The switching contacts of the output relay are interference-suppressed. Therefore, depending on the internal resistance of the measuring instrument, a voltage can also be measured when the contacts are open. However, this will be much lower than the line voltage.
7.5.2 Electrical installation work
1) The 4-core electrical supply cable for the output section of the heat pump is fed from the heat pump meter via the utility company blocking contactor (if required) into the heat pump.
The mains cable is connected at the heat pump switch box using terminals X1: L1/L2/L3/PE
An all-pole disconnecting device with a contact gap of at least 3 mm (e.g. utility company blocking contactor or power contactor) and an all-pole circuit breaker with common tripping for all external conductors must be installed in the power supply for the heat pump (tripping current and characteristic in compliance with the device information).
2) The three-core supply cable for the heat pump manager (heating controller N1) is fed into the heat pump.
Connection of the control cable to pin X1.1 "230 V-IN" (white): L/PE/N.
Details on the power consumption of the heat pump are listed on both the product information sheet and the type plate.
The supply cable (L/N/PE\~230 V, 50 Hz) for the heat pump manager must have a continuous voltage. For this reason, it should be tapped upstream from the utility company blocking contactor or be connected to the household current, because otherwise important protection functions could be lost during a utility block.
3) The utility company blocking contactor (K22) with 3 main contacts (1/3/5 // 2/4/6) and an auxiliary contact (NO contact e.g. 13/14) should be dimensioned according to the heat pump output and must be supplied on-site. The NO contact of the
utility company blocking contactor (13/14) is connected to pin (1) (=DI1) of function block 0 (grey). CAUTION! Extra-low voltage!
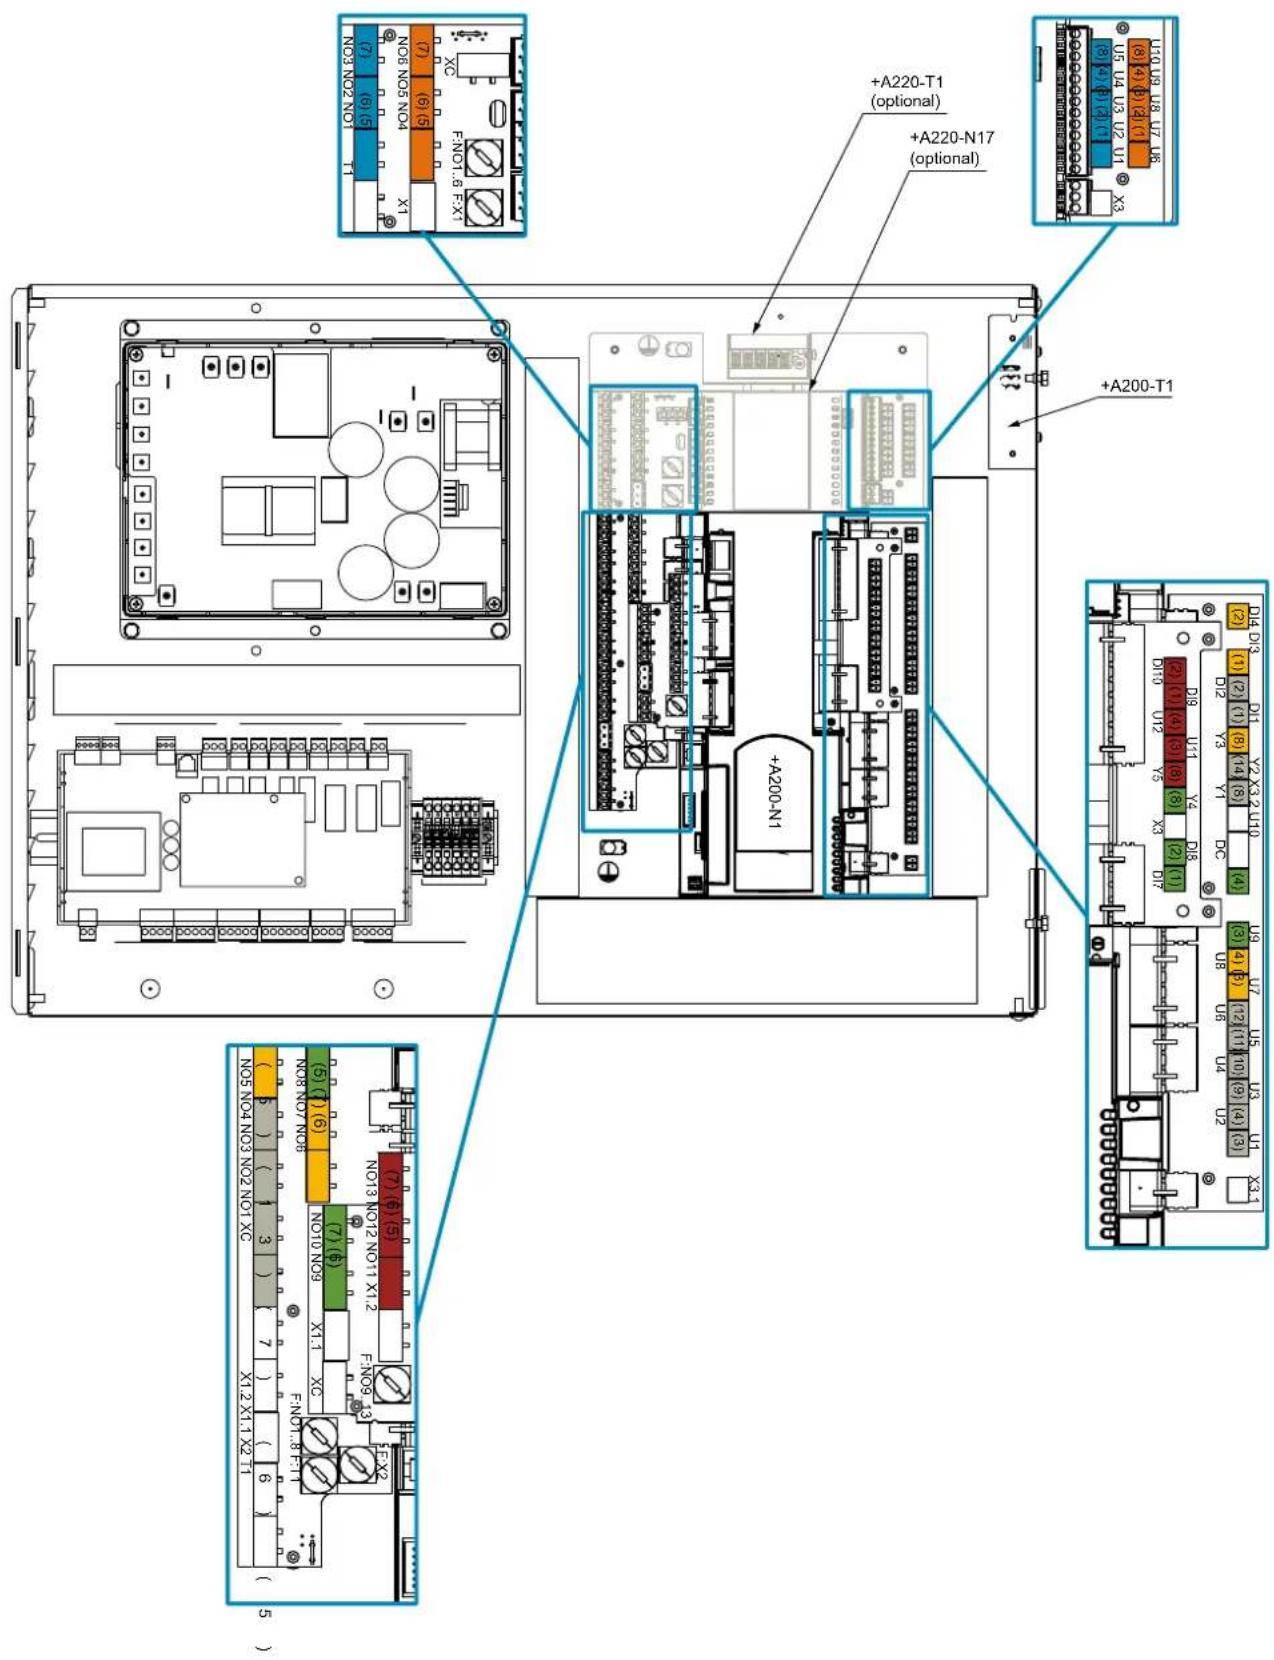
4) The contactor (K20) for the immersion heater (E10) of mono energy systems (HG 2) should be dimensioned according to the radiator output and must be provided on-site. The control (230 V AC) is performed from the heat pump manager, with the function applied via pin (7) (=NO3) of function block 0 (grey).
5) The contactor (K21) for the flange heater (E9) in the domestic hot water cylinder should be dimensioned according to the radiator output and must be provided on-site. The control (230 V AC) is performed from the heat pump manager via pin (7) of the defined function block.
6) The contactors mentioned above in points 3, 4 and 5 are installed in the electrical distribution system. The mains cables for the radiators should be dimensioned and protected according to DIN VDE 0100.
7) The heat circulating pump (M13) is connected to pin (5) (230V) and (8) (control signal) of function block 0 (grey).
8) The domestic hot water circulating pump (M18) is connected to pin (5) of the defined function block.
9) The external sensor (R1) is connected to pin (3) (=U1) of function block 0 (grey).
10) The domestic hot water sensor (R3) is installed in the domestic hot water cylinder and is connected to pin (3) of the defined function block
NOTE
If three-phase pumps are implemented, a power contactor can be controlled via the 230 V output signal of the heat pump manager.
Sensor cables can be extended up to 40 m with 2 x 0.75 mm cables.
NOTE
Further information on the wiring of the heat pump manager is available in the electrical documentation.
7.5.3 Connecting an electronically regulated circulating pump
Electronically regulated circulating pumps may have high starting currents, which may shorten the service life of the heat pump manager. A coupling relay must therefore be installed between the output of the heat pump manager and the electronically regulated circulating pump. This is not necessary if the permissible operating current of 2 A and a maximum starting current of 12 A of the electronically controlled circulating pump is not exceeded or an explicit release is in place from the pump manufacturer. Further details can be taken from the electrical documentation.
CAUTION!
It is not permitted to connect more than one electronically regulated circulating pump via a relay output.
8 S t a r t - U P
8.1 General Information
To ensure that start-up is performed correctly, it should only be carried out by an after-sales service technician authorised by the manufacturer. These measures can also include an additional warranty under certain conditions (see Warranty).
8.2 Preparation
The following items need to be checked prior to start-up:
All of the heat pump connections must be established as described in Chapter 6.
All valves that could impair the proper flow of the heating water in the heating circuit must be open.
■ The air intake and air outlet paths must be clear.
■ The ventilator must turn in the direction indicated by the arrow.
The settings of the Heat pump manager must be adapted to the heating system in accordance with the controller's operating instructions.
■ Ensure the condensate outflow functions.
- Both the accessories pack in the switch box and that which is located under the ventilator must be removed.
8.3 Procedure
The heat pump is started up via the heat pump manager. Adjustments should be made in compliance with the instructions.
If an overflow valve is fitted to maintain the minimum heating water flow rate, the valve must be adapted to the requirements of the heating system. Incorrect adjustment can lead to faulty operation and increased energy consumption. We recommend carrying out the following procedure to correctly adjust the overflow valve:
Close all of the heating circuits that may also be closed during operation (depending on the type of heat pump usage) so that the most unfavorable operating state - with respect to the water flow rate - is achieved. This normally means the heating circuits of the rooms on the south and west sides of the building. At least one heating circuit must remain open (e.g. bathroom).
The overflow valve should be opened far enough to produce the maximum temperature spread between the heating flow and return flow listed in the following table for the current heat source temperature. The temperature spread should be measured as close as possible to the heat pump. The heating element of mono energy systems should be disconnected during start up.
| Heat source temperature | Max. temperature spread between heating flow and return flow | |
| From To | ||
| -20 °C -15 | °C 4 K | |
| -14 °C -10 | °C 5 K | |
| -9 °C | -5 °C | 6 K |
| -4 °C | 0 °C | 7 K |
| 1 °C | 5 °C | 8 K |
| 6 °C | 10 °C | 9 K |
| 11 °C | 15 °C | 10 K |
| 16 °C | 20 °C | 11 K |
| 21 °C | 25 °C | 12 K |
| 26 °C | 30 °C | 13 K |
| 31 °C | 35 °C | 14 K |
At hot water temperatures under 7 °C, start-up is not possible. The water in the buffer tank must be heated to a minimum of 18 °C with the second heat generator.
To ensure a problem-free start-up, the following procedure is to be implemented:
1) Close all consumer circuits.
2) Ensure that the heat pump has the correct water flow.
3) Use the manager to select the automatic operating mode.
4) In the special functions menu, start the "Start-up" program.
5) Wait until a return temperature of at least 25 °C has been reached.
6) Now slowly reopen the heating circuit valves in succession so that the heating water flow is constantly raised by slightly opening the respective heating circuit. The heating water temperature in the buffer tank must not be allowed to drop below 20 °C during this process. This ensures that the heat pump can be defrosted at any time.
7) When all heat circuits are fully open and a return temperature of at least 18 °C is maintained, the heat pump start-up is complete.
CAUTION!
Operating the heat pump at low system temperatures may cause the heat pump to break down completely.
9 Maintenance / Cleaning
9.1 Maintenance
To protect the paintwork, avoid leaning or putting objects on the device. External heat pump parts can be wiped with a damp cloth and domestic cleaner.
NOTE
Never use cleaning agents containing sand, soda, acid or chloride as these can damage the surfaces.
To prevent faults due to sediment in the heat exchanger of the heat pump, ensure that the heat exchanger in the heating system can not be contaminated. We recommend protecting the evaporator by installing a bird guard in the inlet duct. At least 80 % of the cross section of the grating should be open. In the event that operating malfunctions due to contamination still occur, the system should be cleaned as described below.
9.2 Cleaning the Heating System
CAUTION!
The integrated dirt trap must be cleaned at regular intervals.
The maintenance intervals should be defined according to the degree of soiling in the system. The filter insert should also be cleaned.
For cleaning, the heating circuit must be made pressureless in the vicinity of the dirt trap, the filter compartment unscrewed, and the filter insert removed and cleaned. Assembly carried out in reverse order requires attention to correct assembly of the screen inserts and tightness of the screw joints.
The ingress of oxygen into the heating water circuit may result in the formation of oxidation products (rust), particularly if steel components are used. These products enter the heating system via the valves, the circulating pumps and/or plastic pipes. It is therefore essential - in particular with respect to the piping of underfloor heating systems - that only diffusion-proof materials are used.
NOTE
We recommend the installation of a suitable corrosion protection system to prevent the formation of deposits (e.g. rust) in the condenser of the heat pump.
Residue from lubricants and sealants may also contaminate the heating water.
In the case of severe contamination leading to a reduction in the performance of the liquifier in the heat pump, the system must be cleaned by a heating technician.
Based on current information, we recommend using a 5 % phosphoric acid solution for cleaning purposes. However, if cleaning needs to be performed more frequently, a 5 % formic acid solution should be used.
In either case, the cleaning fluid should be at room temperature. We recommend flushing the heat exchanger in the direction opposite to the normal flow direction.
To prevent acidic cleaning agents from entering the heating system circuit, we recommend connecting the flushing device directly to the flow and return flow of the liquifier of the heat pump.
It is important that the system be thoroughly flushed using appropriate neutralising agents to prevent any damage from being caused by cleaning agent residue remaining in the system.
Acids must be used with great care and all relevant regulations of the employers' liability insurance associations must be adhered to.
The manufacturer's instructions regarding cleaning agent must be complied with at all times.
9.3 Cleaning the Air System
Air ducts, evaporator, ventilator and condensate outflow should be cleaned of contamination (leaves, twigs, etc.) before the heating period. Do this by opening the front of the heat pump. To do this, the heat pump must be opened at the side. The bottom section should be opened first, followed by the top section.
CAUTION!
Before opening the device, ensure that all circuits are isolated from the power supply.
Remove and rehang the side panel assemblies as described in Chapter 4.
To prevent the evaporator and the condensate tray from being damaged, do not use hard or sharp objects for cleaning.
10 Faults / Trouble-Shooting
This heat pump is a quality product and is designed for trouble-free operation. In the event that a fault should occur, it will be shown on the heat pump manager display. Simply consult the Faults and Trouble-shooting page in the operating instructions of the heat pump manager. If you cannot correct the fault yourself, please contact your after-sales service technician.
CAUTION!
Any work on the heat pump may only be performed by authorised and qualified after-sales service technicians.
11 Decommissioning/Disposal
Before removing the heat pump, disconnect it from the power source and close all valves. The deinstallation of the heat pump must be performed by technical personnel. Observe all environmentally-relevant requirements regarding the recovery, recycling and disposal of materials and components in accordance with all applicable standards. Particular attention should be paid to the proper disposal of refrigerants and refrigeration oils.
12 Device information
| 1 Type and order code | LI 16I-TUR | ||
| 2 Design | |||
| 2.1 Heat source Air | |||
| 2.2 Seasonal coefficient of performance (COP) average climate 35 °C / 55 °C | 4.77 / 3.71 | ||
| 2.3 Controller Integrated | |||
| 2.4 Heat generator installation location Indoors | |||
| 2.5 Heat source installation location Indoors | |||
| 2.6 Thermal energy metering Integrated | |||
| 2.7 Performance levels Variable | |||
| 3 Operating limits | |||
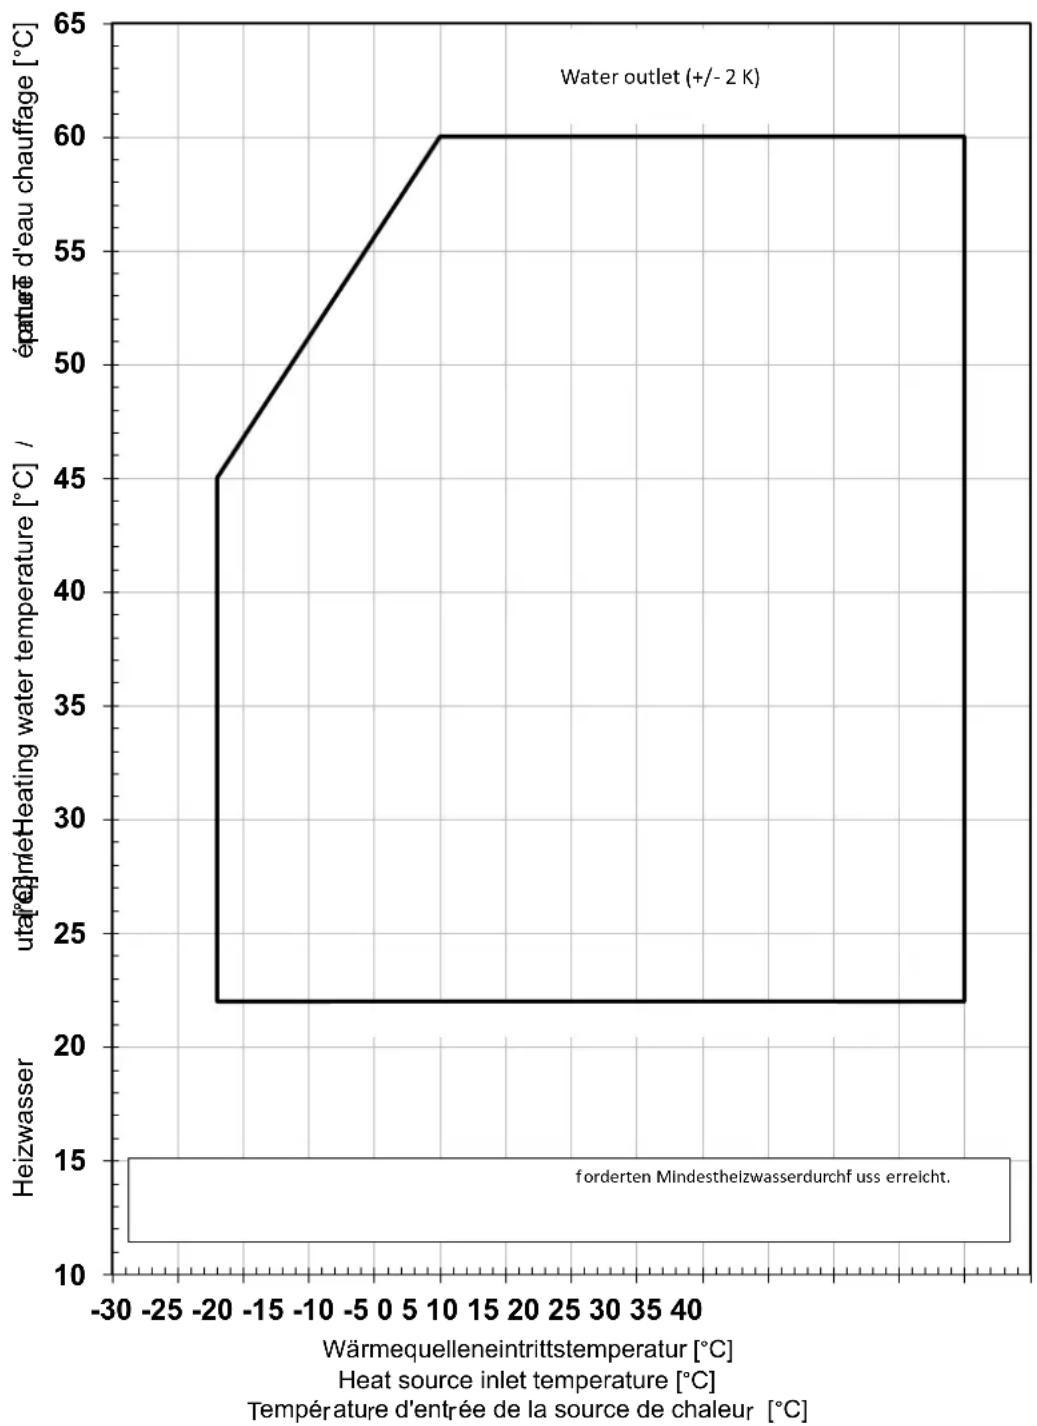
| 3.1 Heating water flow / return ^1 | °C | up to 60 ± 2K / from 22 | |
| 3.2 Air (heating) ^1 | °C | -22 to +35 | |
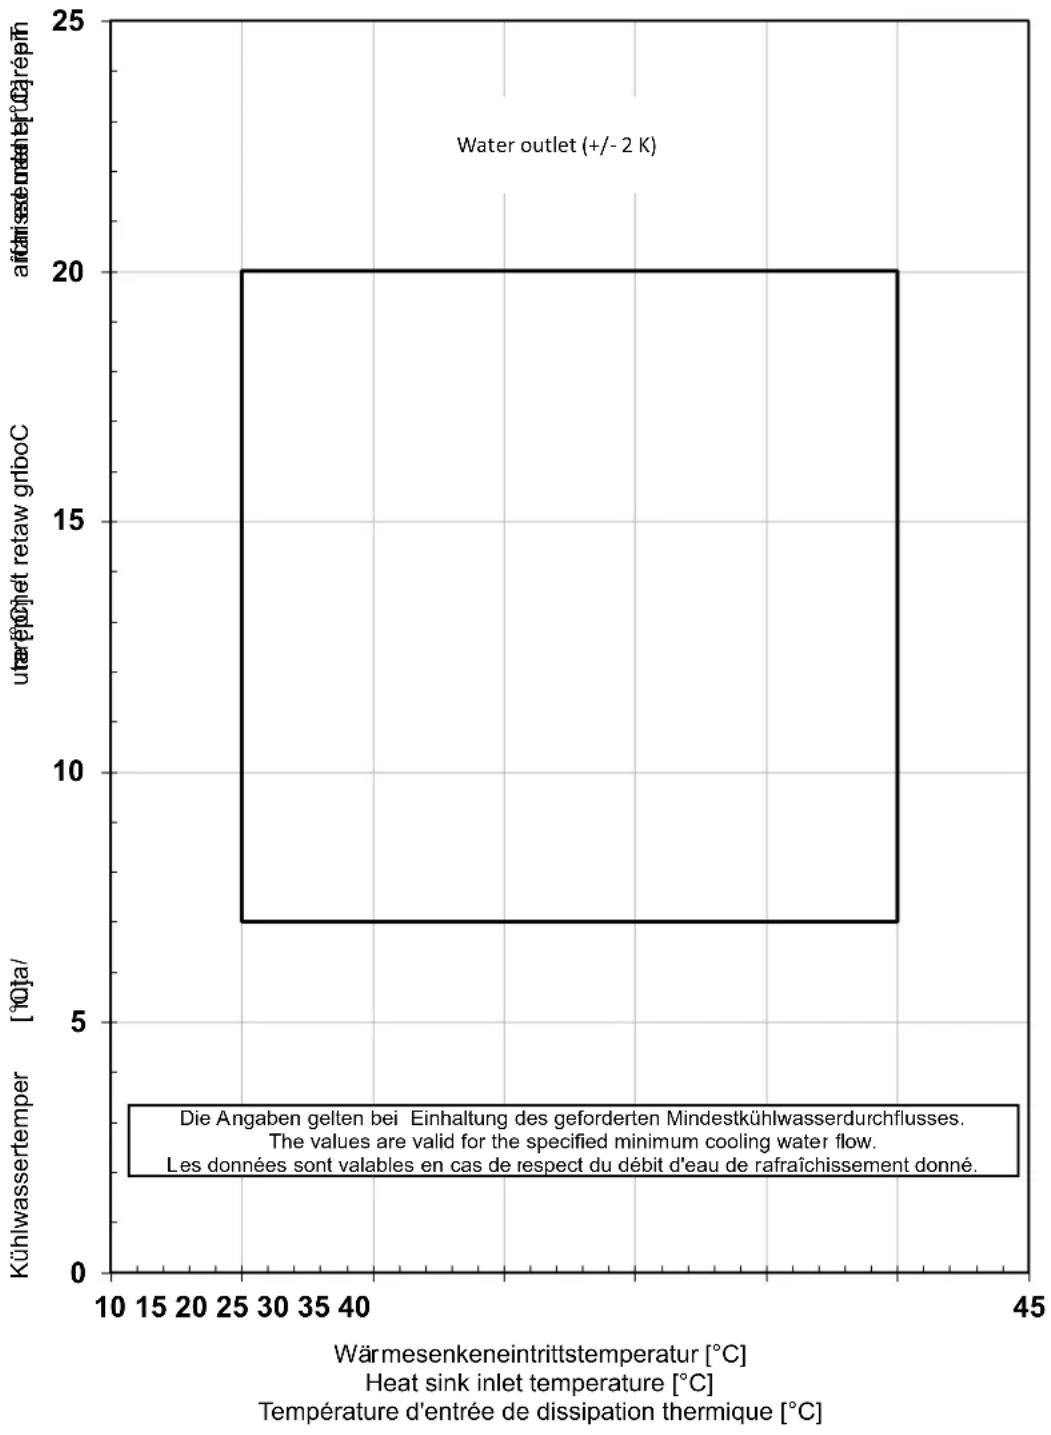
| 3.3 Cooling water flow | °C | +7 to +20 | |
| 3.4 Air (cooling) | °C | +15 to +40 | |
| 4 Flow ^2 / sound | |||
| 5 Heating water flow rate internal pressure differential | |||
| Nominal flow rate in accordance with 14511 | |||
| A7 / W35 ... 30 | m ^3 /h / Pa | 1.2 / 15600 | |
| A7 / W45 ... 40 | m ^3 /h / Pa | 1.2 / 15600 | |
| A7 / W55 ... 47 | m ^3 /h / Pa | 0.8 / 6100 | |
| Minimum heating water flow | m ^3 /h / Pa | 0.8 / 6100 | |
| 5.1 Cooling water flow rate / internal pressure differential | |||
| Nominal flow rate in accordance with EN14511 | |||
| 35 / W18 ... 23 | m ^3 /h / Pa | 1.6 / 26000 | |
| Minimum cooling water flow | m ^3 /h / Pa | 1.2 / 15600 | |
| 5.2 Sound power level according to EN12102 with A7 / W55 | |||
| Device/outside ^3 4 | Normal operation | dB(A) | 50 / 53 |
| 5.3 Sound power level according to EN12102 with A7 / W55 | |||
| Device/outside ^3 4 | Lower operation ^5 | dB(A) | 50 / 51 |
| 5.4 Sound pressure level at a distance of 1 m indoors ^4 6 | dB(A) | 43 | |
| 5.5 Air flow with an external static pressure differential | m ^3 /h /Pa | 4000 / 0 | |
| m ^3 /h /Pa | 3800 / 25 | ||
| 6 Dimensions, weight and filling quantities | |||
| 6.1 Device dimensions ^7 | H x W x D mm | 1560 x 960 x 760 | |
| 6.2 Device connections for heating | Inches | G 1 | |
| 6.3 Weight of the transportable unit(s) incl. packaging | kg | 275 | |
| 6.4 Refrigerant / total filling weight | Type / kg | R410A / 4.78 | |
| 6.5 GWP value / CO _2 equivalent | --- / t | 2088 / 9.9 | |
| 6.6 Refrigeration circuit hermetically sealed | yes | ||
| 6.7 Lubricant / total filling quantity | Type / litres | Polyolester (POE)/1.24 | |
| 6.8 Volume of heating water in the indoor component | litres | 5 | |
| 7 Electrical connection | |||
| 7.1 Supply voltage / fusing / RCD type | 3-/PE 400V (50Hz) / C10A / B | ||
| 7.2 Control voltage / fusing / RCD type | 1-/N/PE 230V (50Hz) / C13A / A | ||
| 7.3 Degree of protection according to EN 60 529 | IP 21 | ||
| 7.4 Starting current limiter | Inverter | ||
| 7.5 Starting current | A | Inverter | |
| 7.6 Nominal power consumption A2 W35/ max. power consumption ^2 | kW | 1.43 / 4.9 | |
| 7.7 Nominal current A2 / W35 / cos φ | A / --- | 2.3 / 0.99 | |
| 7.8 Power consumption of fan | W | up to 250 | |
| 8 Complies with the European safety regulations | 8 | |
| 9 Additional model features | ||
| 9.1 Type of defrosting Reverse cycle | ||
| 9.2 Condensate tray frost protection / Water in device is protected from freezing 9 | Yes | |
| 9.3 Max. operating overpressure (heat sink) bar 3.0 | ||
| 10 Heat output / COP 2 | ||
| 10.1 Heat output / COP EN 14511 | ||
| with A-7 / W35 kW / --- 10.7 / 3.1 | ||
| with A2 / W35 kW / --- | 6.0 / 4.2 | |
| with A7 / W35 kW / --- | 7.1 / 5.1 | |
| 11 Cooling capacity / coefficient of performance (COP) 2 3 | ||
| 11.1 Cooling capacity / coefficient of performance (COP) | EN 14511 | |
| with A27 / W18 | kW / --- | 8.6 / 3.9 |
| with A27 / W7 | kW / --- | 8.0 / 3.0 |
| with A35 / W18 | kW / --- | 9.8 / 3.6 |
| with A35 / W7 | kW / --- | 7.1 / 2.4 |
-
For air temperatures between -22^ and -5^ , flow temperature increasing from 45^ to 60^ .
-
This data indicates the size and capacity of the system according to EN 14511. For an analysis of the economic and energy efficiency of the system, the bivalence point and the regulation should be taken into consideration. These figures are only achieved with clean heat exchangers. Instructions for care, commissioning and operation can be found in the relevant sections of the installation and operation instructions. The specified values have the following meaning, e.g. A2/W35: Heat source temperature 2^ and heating water flow temperature 35^ .
-
The maximum sound power level under full load can increase by up to 5 dB(A).
-
The specified sound levels apply if the supporting feet (available as an option) are not used. If the supporting feet are used, the level can increase by up to 3 db(A).
-
The heat output and COP is reduced by approx. 5% in lower operation
-
The specified sound pressure level represents the free sound area level. The measured value can vary by up to 16 dB(A), depending on the installation location.
-
Note that additional space is required for pipe connections, operation and maintenance.
-
see CE declaration of conformity
-
The heat circulating pump and the heat pump manager must always be ready for operation.
13 Product information as per
Regulation (EU) No 813/
2013, Annex II, Table 2
| Information requirements for heat pump space heaters and heat pump combination heaters |  | [TC4] | Dimplex | ||||
| Model | LI 16I-TUR | ||||||
| Air-to-water heat pump | yes | ||||||
| Water-to-water heat pump | no | ||||||
| Brine-to-water heat pump | no | ||||||
| Low-temperature heat pump | no | ||||||
| Equipped with a supplementary heater | no | ||||||
| Heat pump combination heater | no | ||||||
| Parameters shall be declared for medium-temperature application, except for low-temperature heat pumps. For low- temperature heat pumps, parameters shall be declared for low-temperature application. | |||||||
| Parameters shall be declared for average climate conditions: | |||||||
| Item Symbol Value Unit Item Symbol Value | Unit | ||||||
| Rated heat output (*) | Prated | 10 kW | Seasonal space heating energy efficiency | ηs | 145 | % | |
| Declared capacity for heating foer part load at indoor temperature 20°C and outdoor temperature Tj | Declared coefficient of performance or primary energy ratio for part load at indoor temperature 20 °C and outdoor temperature Tj | ||||||
| Tj = -7°C | Pdh | 9,0 kW | Tj = -7°C | COPd | 2,42 - | ||
| Tj = +2°C | Pdh | 5,9 kW | Tj = +2°C | COPd | 3,68 - | ||
| Tj = +7°C | Pdh | 6,9 kW | Tj = +7°C | COPd | 4,67 - | ||
| Tj = +12°C | Pdh | 8,0 kW | Tj = +12°C | COPd | 5,84 - | ||
| Tj = bivalent temperature | Pdh | 9,6 kW | Tj = bivalent temperature | COPd | 2,17 - | ||
| Tj = operation limit temperature | Pdh | 9,6 kW | Tj = operation limit temperature | COPd | 2,17 - | ||
| For air-to-water heat pumps | For air-to-water heat pumps: | ||||||
| Tj = -15°C (if TOL < -20°C) | Pdh | 0,0 kW | Tj = -15°C (if TOL < -20°C) | COPd | 0,00 - | ||
| Bivalent temperature | Tbiv | -10 °C | For air-to-water heat pumps:Operation limit temperature | TOL | -10 | °C | |
| Cycling interval capacity for heating | Pcych | - | kW | Cycling interval efficiency | COPcyc | - | - |
| Degradation co-efficient (**) | Cdh | 0,90 | - | Heating water operating limit temperature | WTOL 60 | °C | |
| Power consumption in modes other than active mode | Supplementary heater | ||||||
| Off mode | POFF | 0,019 | kW Rated | heat output (*) | Psup | 0 | kW |
| Thermostat-off mode | PTO | 0,021 | kW | Type of energy input | eletrical | ||
| Standby mode | PSB | 0,019 | kW | ||||
| Crankcase heater mode | PCK | 0,000 | kW | ||||
| Other items | |||||||
| Capacity control | variable | For air-to-water heat pumps: Rated air flow rate, outdoors | - | 3800 | m3/h | ||
| Sound power level, indoors/outdoors | LWA | 50/53 | dB | For water-/brine-to-water heat pumps: Rated brine or water flow rate, outdoor heat exchanger | - | -- | m3/h |
| Emissions of nitrogen oxides | NOx | - | mg/kWh | ||||
| For heat pump combination heater: | |||||||
| Declared load profile | - | Water heating energy efficiency | ηwn | - | % | ||
| Daily electricity consumption | Qelec | - | kWh | Daily fuel consumption | Qfuel | - | kWh |
| Contact details | Glen Dimplex Deutschland GmbH, Am Goldenen Feld 18, 95326 Kulmbach | ||||||
| (*) For heat pump space heaters and heat pump combination heaters, the rated output Prated is equal to the design load for heating Pdesignh, and the rated heat output of a supplementary capacity for heating sup(Tj). | |||||||
| (**) If Cdh is not determined by measurement nthen the default degradation is Cdh = 0,9(--) not applicable | |||||||
Table des matières
natural_image
Line drawing of a mechanical device with a lever and base platform (no text or symbols)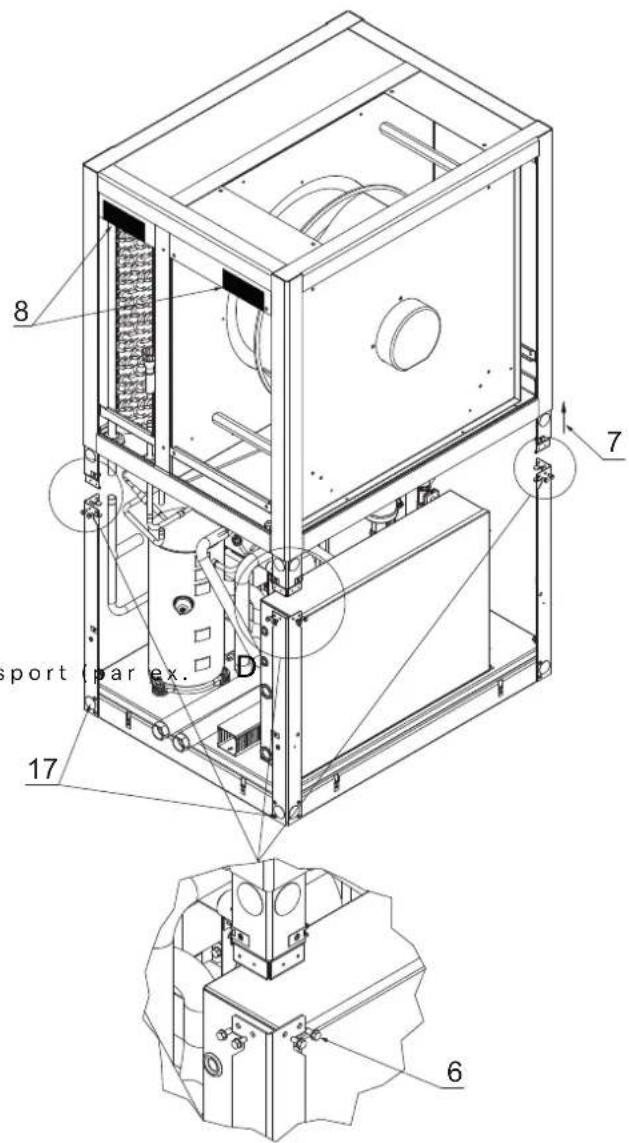
natural_image
Technical line drawing of a door frame with open door and slanted panel (no text or symbols)natural_image
Technical line drawing of a rectangular frame with mounting brackets and a separate detail view labeled A (no text or symbols present)natural_image
Line drawing of a cabinet with multiple doors open, no text or symbols presentnatural_image
Pure electrical circuit lines without any symbolsnatural_image
Line drawing of a three-tiered industrial machine with control panel and mounting base (no text or symbols)2 Diagramme / Diagrams / Diagrammes
2.1 Kennlinien Heizen / Characteristic curves for heating operation / Courbes caractéristiques mode chauffage
line
| Lufteintrittstemperatur in [°C] / Air inlet temperature in [°C] / Température d'entrée d'air en [°C] | max. | min. | | --- | --- | --- | | -20 | 5 | 4 | | -15 | 6 | 4 | | -10 | 7 | 4 | | -5 | 8 | 5 | | 0 | 9 | 5 | | 5 | 10 | 5.5 | | 10 | 10.5 | 5.5 | | 15 | 11 | 5.5 | | 20 | 11.5 | 5.5 | | 25 | 12 | 5.5 | | 30 | 12.5 | 5.5 | | 35 | 13 | 6 | | 40 | 13.5 | 7 | | 45 | 13.5 | 7.5 | | 50 | 13.5 | 7.5 | | 55 | 13.5 | 7 | | 60 | 13 | 6.5 | The chart includes a legend for 'Heizwasseraustritt / water outlet / sortie del'eau 45°C'. The x-axis represents temperature in °C and air inlet temperature in °C.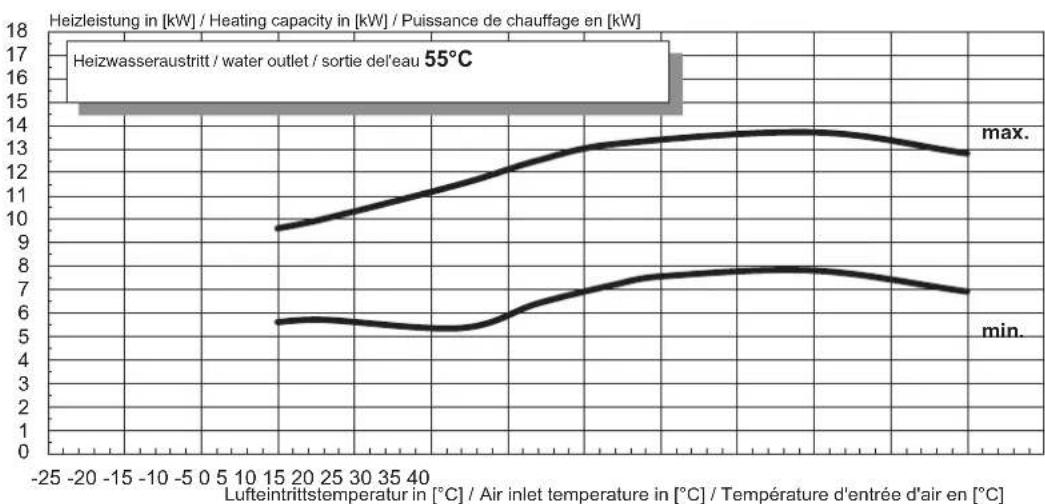
line
| Lufteintrittstemperatur in [°C] / Air inlet temperature in [°C] / Température d'entrée d'air en [°C] | max. | min. | | --- | --- | --- | | -25 | 9.5 | 5.5 | | -20 | 10.0 | 5.5 | | -15 | 10.5 | 5.5 | | -10 | 11.0 | 5.5 | | -5 | 11.5 | 5.5 | | 0 | 12.0 | 5.5 | | 5 | 12.5 | 5.5 | | 10 | 13.0 | 6.0 | | 15 | 13.5 | 7.0 | | 20 | 13.8 | 7.5 | | 25 | 13.9 | 7.8 | | 30 | 13.8 | 7.7 | | 35 | 13.7 | 7.5 | | 40 | 13.5 | 7.0 | | 45 | 13.2 | 6.5 | | 50 | 12.8 | 6.0 | | 55 | 12.5 | 5.5 | | 60 | 12.2 | 5.0 | | 65 | 12.0 | 4.5 | | 70 | 11.8 | 4.0 | | 75 | 11.5 | 3.5 | | 80 | 11.2 | 3.0 | | 85 | 11.0 | 2.5 | | 90 | 10.8 | 2.0 | | 95 | 10.5 | 1.5 | | 100 | 10.2 | 1.0 | | 105 | 10.0 | 0.5 | | 110 | 9.8 | 0.0 | | 115 | 9.5 | -0.5 | | 120 | 9.2 | -1.0 | | 125 | 9.0 | -1.5 | | 130 | 8.8 | -2.0 | | 135 | 8.5 | -2.5 | | 140 | 8.2 | -3.0 | | 145 | 8.0 | -3.5 | | 150 | 7.8 | -4.0 | | 155 | 7.5 | -4.5 | | 160 | 7.2 | -5.0 | | 165 | 7.0 | -5.5 | | 170 | 6.8 | -6.0 | | 175 | 6.5 | -6.5 | | 180 | 6.2 | -7.0 | | 185 | 6.0 | -7.5 | | 190 | 5.8 | -8.0 | | 195 | 5.5 | -8.5 | | 200 | 5.2 | -9.0 | | 205 | 5.0 | -9.5 | | 210 | 4.8 | -10.0 | | 215 | 4.5 | -10.5 | | 220 | 4.2 | -11.0 | | 225 | 4.0 | -11.5 | | 230 | 3.8 | -12.0 | | 235 | 3.5 | -12.5 | | 240 | 3.2 | -13.0 | | 245 | 3.0 | -13.5 | | 250 | 2.8 | -14.0 | | 255 | 2.5 | -14.5 | | 260 | 2.2 | -15.0 | | 265 | 2.0 | -15.5 | | 270 | 1.8 | -16.0 | | 275 | 1.5 | -16.5 | | 280 | 1.2 | -17.0 | | 285 | 1.0 | -17.5 | | 290 | 0.8 | -18.0 | | 295 | 0.6 | -18.5 | | 300 | 0.4 | -19.0 | | 305 | 0.2 | -19.5 | | 310 | 0.0 | -20.0 | The chart displays a line graph with two distinct curves: one for maximum heat transfer capacity (max.) and one for minimum capacity (min.), both plotted against temperature in °C on the x-axis and heat transfer capacity (in kW) on the y-axis.2.2 Einsatzgrenzendiagramm Heizen / Operating limits diagram heating / Diagramme des seuils d'utilisation chauffage
line
| Wärmequelleneintrittstemperatur [°C] | Heat source inlet temperature [°C] | Temperature d'entrée de la source de chaleur [°C] | | ------------------------------------ | ------------------------------------- | ------------------------------------------------- | | -20 | 45 | 22 | | 10 | 60 | 22 | | 40 | 60 | 22 |*Bei Luft, Wasser-Wärmepumpen stellt die minimale Heizwassertemperatur die Mindest-Rücklauftemperatur dar
*For air-to-water heat pumps the minimum heating water temperature is the minimum return temperature
* Sur les pompes à chaleur air / eau, la température minimale d'eau de chauffage correspond à la température retour minimale
2.3 Einsatzgrenzendiagramm Kühlen / Operating limits diagram cooling / Diagramme des seuils d'utilisation rafraîchissement
line
| Water outlet (+/- 2 K) | Wärmesenkeneintrittstemperatur [°C] | Heat sink inlet temperature [°C] | Kühlwassertemper [°O] | | ---------------------- | ---------------------------------- | --------------------------------- | --------------------- | | 20 | 30 | 30 | 7 | | 20 | 45 | 45 | 7 |- Installation and Operating Instruction
- Schaltkasten
- Aufstellu
- Allgemein
- Temperaturfühler
- Table of contents
- Safety notes......EN-2
- Purpose of the heat pump ......EN-3
- Scope of supply......EN-4
- Accessories......EN-6
- Transport......EN-6
- Set-UP......EN-8
- Installation....EN-8
- Start-UP......EN-14
- Maintenance / Cleaning ...... EN-15
- Faults / Trouble-Shooting......EN-15
- Decommissioning/Disposal......EN-15
- Device information ...... EN-16
- Product information as per Regulation (EU) No 813/2013, Annex II, Table 2......EN-18
- Anhang / Appendix / Annexes ...... A-I
- Safety not
- Symbols and markings
- CAUTION!
- NOTE
- Intended use
- Legal regulations and directives
- Energy-efficient use of the heat pump
- Purpose of the heat pump
- Application
- Operating principle
- Heating
- Cooling
- Functional description for integrated thermal energy metering
- Scope of supply
- Basic device
- Accessories pack
- On top of the heat pump:
- In the condensate tray:
- Under fan:
- Outside the packaging:
- Accessories
- Room climate station
- Building management technology
- Transport
- Set - UP
- General Information
- Condensed Water Pipe
- Sound
- Installation
- General Information
- Air Connection
- Heating System Connection
- Minimum heating water flow rate
- Antifreeze
- Temperature sensor
- Sensor characteristic curves
- Mounting the external temperature sensor
- Installing the strap-on sensor
- Mounting as a pipe-mounted sensor
- Hydraulic distribution system
- Compact manifold
- Dual differential pressureless manifold
- Electrical connection
- General
- Electrical installation work
- Connecting an electronically regulated circulating pump
- S t a r t - U P
- General Information
- Preparation
- Procedure
- Maintenance / Cleaning
- Maintenance
- Cleaning the Heating System
- Cleaning the Air System
- Faults / Trouble-Shooting
- Decommissioning/Disposal
- Product information as per
- Regulation (EU) No 813/
- 2013, Annex II, Table 2
- Table des matières
- Diagramme / Diagrams / Diagrammes
- Kennlinien Heizen / Characteristic curves for heating operation / Courbes caractéristiques mode chauffage
- Einsatzgrenzendiagramm Heizen / Operating limits diagram heating / Diagramme des seuils d'utilisation chauffage
- Einsatzgrenzendiagramm Kühlen / Operating limits diagram cooling / Diagramme des seuils d'utilisation rafraîchissement
Brand : DIMPLEX
Model : LI 16ITUR
Category : Heat pump