
BBox T9 - Video camera BRAUN - Free user manual and instructions
Find the device manual for free BBox T9 BRAUN in PDF.
| Product Type | In-dash camera (Dashcam) |
| Brand | Braun |
| Model | BBox T9 |
| Maximum video resolution | 4K (3840x2160) |
| Maximum photo resolution | 12 M (4000x3000) |
| Viewing angle | 170° |
| Image sensor | 300W (3 megapixels) |
| Video compression | H.264 |
| Video format | MP4 |
| Photo format | JPEG |
| Storage | TF card (microSD) up to 32 GB (class 10) |
| Connectivity | Wi-Fi, USB, HDMI |
| Power supply | 5 V DC (via cigarette lighter) |
| Operating temperature | -10°C to 65°C |
| Storage temperature | -30°C to 70°C |
| Operating humidity | 15 to 65% RH |
| Special features | Motion detection, parking surveillance, G sensor (collision), quick lock, automatic recording, mute |
| Rear camera | Yes (included) |
| Mounting | On front windshield (mount supplied) |
| Dimensions (estimated) | 10 x 5 x 3 cm |
| Weight (estimated) | 100 g |
Frequently Asked Questions - BBox T9 BRAUN
User questions about BBox T9 BRAUN
0 question about this device. Answer the ones you know or ask your own.
Ask a new question about this device
Download the instructions for your Video camera in PDF format for free! Find your manual BBox T9 - BRAUN and take your electronic device back in hand. On this page are published all the documents necessary for the use of your device. BBox T9 by BRAUN.
USER MANUAL BBox T9 BRAUN
With high-performance chip, this product provides high-definition video and seamless dynamic picture, and it supports 9K full-high-definition camera. Before using this product, you are kindly required to read and properly keep this Manual, and we hope that our product can satisfy your demands and serve you for a long time!
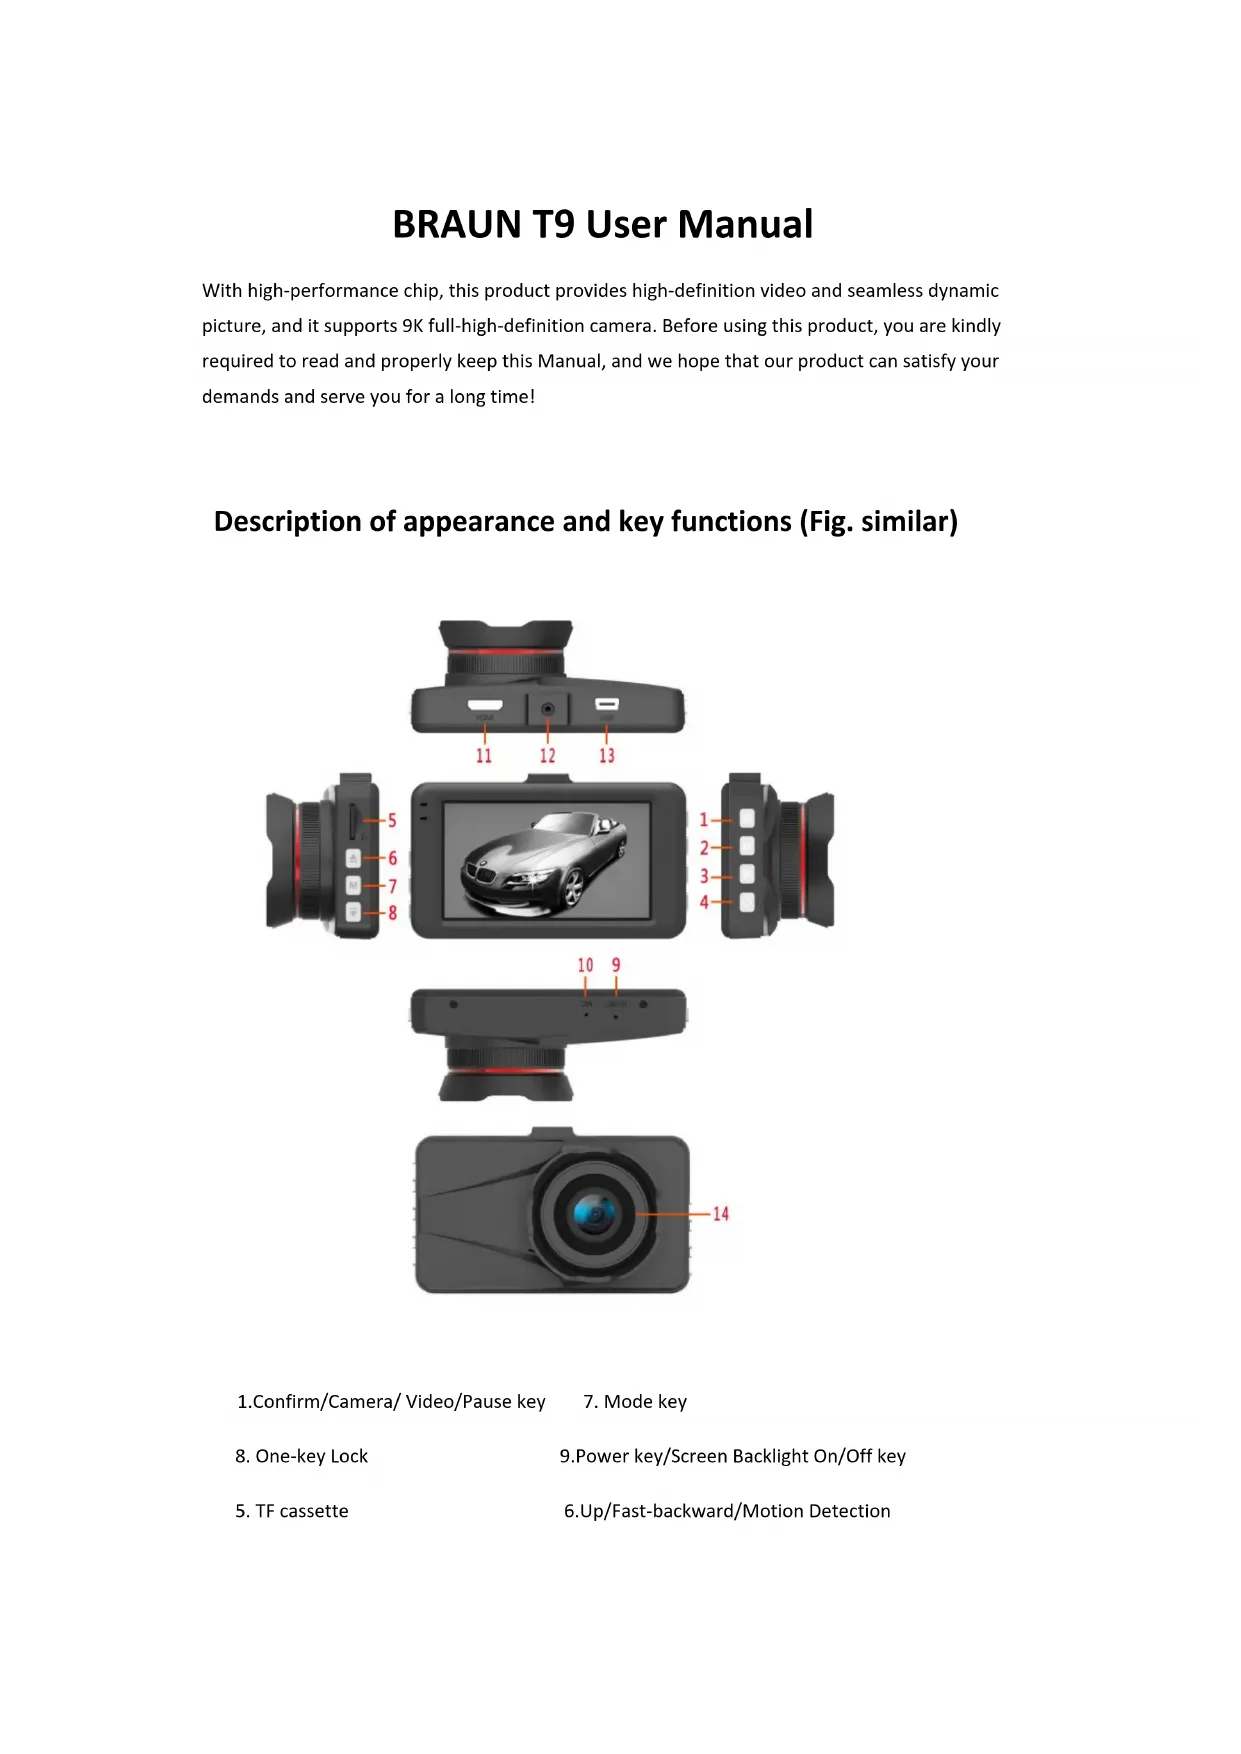
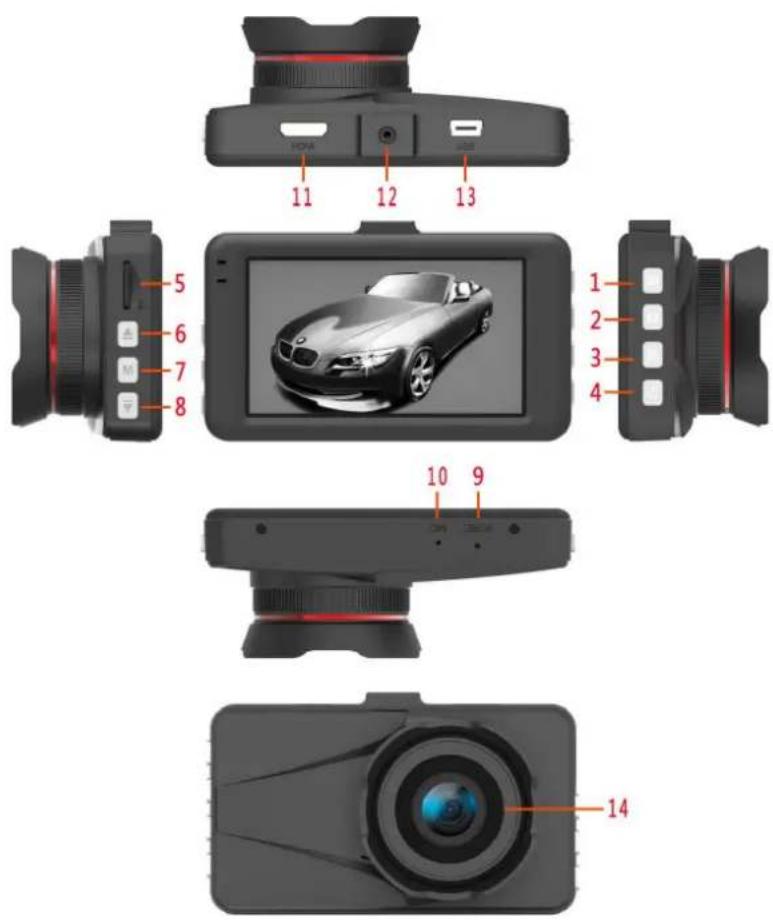
Description of appearance and key functions (Fig. similar)
-
Confirm/Camera/ Video/Pause key
-
Mode key
-
One-key Lock
-
Power key/Screen Backlight On/Off key
-
TF cassette
6.Up/Fast-backward/Motion Detection
-
Menu key
-
Down/Mute/Fast-forward/Parking Monitor
-
Reset key
10.MIC port
11.%DMI interface
- Support interface
13.USB
interface
- Lens
5. Confirm/Camera/Video/Pause key
Function I: Confirm
In standby video mode/camera mode/playback mode, short press 【Menu】 to enter into the menu mode, short press 【Up/Down】 to browse, and press 【Confirm】 to confirm.
Function II: Start/close the video
In video mode, short press【Confirm】to start taking video, and short press【Confirm】again to stop taking video.
Function III: Camera
In camera mode, short press【Confirm】to take a picture.
Function IV: Pause
In playback mode, short press【Confirm】to suspend the shooting for playback, and short press【Confirm】 again to continue the play.
6. Mode key
Function: Mode switch function
In standby mode, short press 【Menu】to switch between different modes (video/camera/playback).
3. One-shot Lock key
In video mode, short press【Menu】to lock the current file.
7. Power key/Screen Backlight On/Off key
Function I: On/Off
In On state, long press【Power】and hold for 8s to power this machine on, and the machine will start working automatically6
In long press【Power】and hold for 8s, and this machine will automatically save the video file as well as user setting and shut down6
Function II: Screen backlight on/off
In On state, short press 【Power】 to operate the On/Off of screen backlight6
5. TF cassette
6.Up/Fast-backward/Motion Detection
Function I: Page up
In menu setting or playback mode, short press 【Up】 to realize page up6
Function II: Fast-backward
In playback mode, short press 【Up】 to fast backward6
Function III: Open/close motion detection
In video interface, long press 【Up】 to switch to motion detection mode, and long press it again to exit this mode6 Default of this mode: On; mode switch function: not available6
7. Menu key
In standby state, short press 【Menu】 to enter into menu setting list; short press 【Up】 or 【Down】, to select the option needing setting; and short press 【Confirm】 to confirm6 After completion of setting, short press 【Menu】 again to exit the menu setting page6 (Menu setting method is same in the video mode, camera mode and playback mode)6
8. Down/Mute/Fast-forward/Parking Monitor
Function I: Page down
In menu setting or playback mode, it functions to realize page down6
Function II: Record function closing
In video interface, short press 【Down】 to close the record function, and at this time, the microphone in the right lower part of screen becomes into a ban icon, indicating that the record function is closed. Short press this key again to start the record function, and the icon indicated is in On state.
Function III: Fast forward
In playback mode, short press 【Down】 to fast forward.
Function IV: Open/close the parking monitor
In the video interface, long press 【Down】 to enable the parking monitor function, and long press it again to exit this mode.
9. Reset key
Function: Reset
Short press Reset key, to restart the automobile data recorder.
II. Installation guide
-
Close the automobile engine.
-
Insert TF card into the slot of recorder.
【Note】Please use high-speed TF card (above Class10), and TF card supports 32GB at maximum.
-
Fix the recorder on the front windshield of car.
-
Insert the car charger into car cigarette lighter.
-
Connect the USB interface and car charger with charger extension wire.
【Note】Lay the charger extension wire along the edge of windscreen while wiring.
-
Install the rear camera in the rear part of car, and pay attention to direction during installation. Wiring may be conducted along the car roof. After completion of installation, connect the rear plug into the rear camera interface.
-
Adjust the lens position, to guarantee the lens to be level as the ground surface.
-
Start the engine, to check whether the machine is installed correctly.
【Note】When the machine is installed correctly, the system operating indicator lamp will be on; and the machine will be started to enter into the Record state, and video indicator lamp will flicker6 Please pay attention to checking whether the picture on the display screen is normal6 If the picture is an inverted image, please contact us timely6
III. Brief introduction to functions
5. WiFi link
This machine can be linked to mobile phone with Android or iPhone operating system, and the specific operating steps are shown as below:
a6 Install DrivertLook software on mobile phone or tablet personal computer: this software may be searched and downloaded from Google Play or Pea Pod (Android operating system), and from APP Store (iPhone operating system);
b6 Start the machine: The default setting of this machine is: WiFi will be enabled automatically once this machine is started, and WiFi name and password will be displayed on the desktop, and the customer may quit WiFi information display interface (WiFi is in On state, and WiFi icon in the upper part of main interface is displayed as yellow) according to the keys hindered on the interface;
c6 Turn on WiFi from the mobile terminal, search WiFi name of this machine, and the input the password for link;
d6 Operate DriverLook APP in the mobile terminal, and after entry, the picture shot by camera will be displayed on APP timely; if the prototype settings and parameters need modification, an adjustment may be conducted in APP setting menu6
6. Use of automatic recording function
Start the automobile engine, and the recorder will be started automatically and its record function will be enabled, the charge indicator lamp will be on, and the video indicator lamp will flicker6. Close the automobile engine, the recorder will automatically keep the record content and be closed6. The recorded image will be kept on TF card by sections; when memory of TF card is full, the recorder will cover the early recorded images6. The record time quantum may be set in the menu, and it is 1min/7min/5min/close, four levels6
【Note】
a6 If any one of levels "1/7/5" is selected, when capacity of TF card is full, the recorder will
cover the earlier recorded images; when Close is selected, the default is: the recorder will vide by 10 minutes, and not record when the card is full;
b6 What recorded by front and rear cameras are saved in VIDEO folder of TF card6
c6 Photo files will be saved in P%OTO folder of TF card6
3. Use of manual record function
Long press 【Power】 of recorder for 8 seconds, the recorder will be enabled and start automatic recording, and the video indicator lamp will be on and flicker6 Long press
【Power】for 8 seconds again to close this machine, and the recorder will automatically keep the record and close down6
7. Use of camera function
In On state, short press 【Mode】 to enter into camera mode, and the icon on the upper left corner is changed to camera from vidicon; and short press 【Confirm】 to take a picture6 Short press 【Mode】 to switch back to video mode6
8. Use of motion detection function
In standby mode, long press 【Up】to enter into motion detection mode6 When a moving object is sensed by lens, this machine will enter into camera state; when the lens fails to sense the object movement, the system will stop video 5 seconds later6 When it is needed to quit the motion detection mode, long press 【Up】for 8 seconds when no video is conducted, to exit6
6. Collision response function
This machine is built with G-sensor6 In case of serious vehicle collision, the recorder will lock the image under recording upon occurrence of accident and save it as a special image, and also the Lock icon will be displayed on the top of display screen6 The locked image will not be covered cyclically6
【Prompt】
a6 The locked video file is provided with SOS sign in its name, while ordinary record files are not provided with such sign6
b6 G-sensor supports sensitivity control, and its settings may be changed in the setup menu
according to the actual needs6
7. One-shot lock function
This machine is provided with One-shot lock function, which can lock the images needing to keep and prevent them from covering by cyclically6 In video mode, short press 【Lock】, and recorder will lock the image under recording6
8. Setting of date and time
In standby state, short press 【Menu】 to enter into system setup menu) short press 【Up】 /【Down】 to move the cursor to the option of date setting6 short press 【Confirm】 to enter into the menu for setting6
【Note】To record the evidence date and time of traffic safety effectively, please set correct date and time before use of this machine6
9. One-shot silent function
In operating mode, short press 【Down】, the microphone in the left lower part of screen becomes into a ban icon, indicating that the video function is closed6 At this time, recorder only records image rather than sound6 Short press 【Down】 again, the microphone in the lower part of screen turns into a record icon, indicating the recovery of record function6
【Prompt】Settings will be saved automatically, and silent function may be not set when this machine is turned on again6
10. USB flash disk mode
Link the recorder with USB interface of computer via USB cable, and the screen will display two optional patterns( disk and charge6 Short press 【Up】/【Down】, select the option of disk, and then short press 【Confirm】 to enter into USB disk mode6
11. Photograph file playback
In On state, short press 【Mode】 for two times, to switch to playback mode6 Short press 【Up】/【Down】, to switch file, and short press 【Confirm】 to play6 If it is needed to quit this mode, short press 【Mode】 to exit6
56. Parking monitor
When parking monitor function is enabled, in Off state, if the vehicle vibrates slightly, the recorder will be turned on automatically for video recording, at this time, the recorder will record for 15s if in the flameout state and then be closed, and the image recorded at this time is a special image which will be not covered cyclically.
【Note】Such function needs the hardware support.
IV. Product specifications
| Built-in image sensor | 300W |
| Lens angle | 170 degrees |
| Video resolution | 4K(FHD3840x2160),1080P(FHD1920x1080),720P(HD1280x720) |
| Photographic resolution | 2M(1600x1200),5M(3200x1800),8M(3840x2160),12M(4000x3000), |
| Memory compression mode | H.264 |
| Video format | MP4 |
| Picture format | JPEG |
| Storage temperature | -30°C~70°C |
| Operating temperature | -10°C~65°C |
| Operating humidity | 15-65%RH |
| Capacity of memory card | 32GB supported at maximum |
| Standard voltage | DC5V |
BRAUN P%OTO TEC%NIK GmbH%
Merkurstrasse 8
72189 Eutingen
Germany

BRAUN®
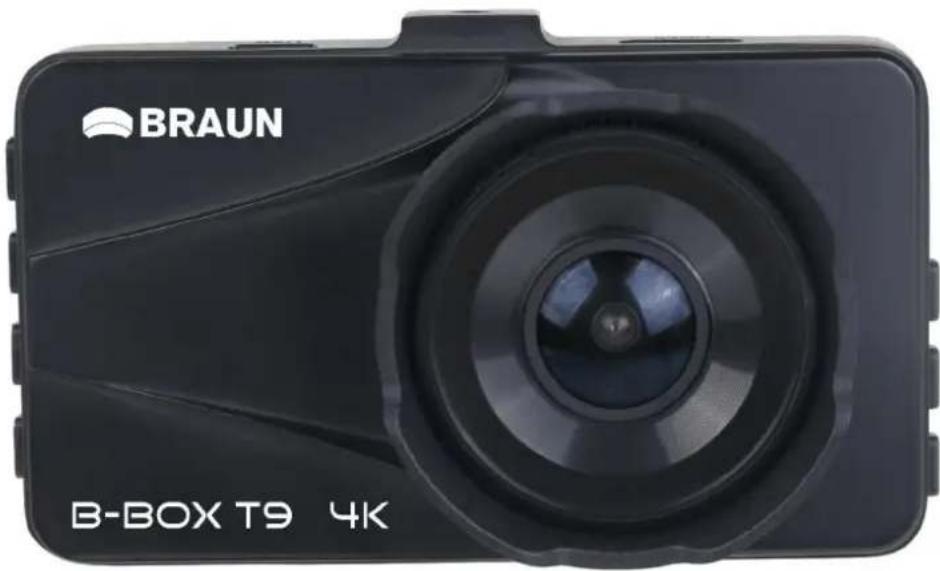
B-BOX T9
MANUEL D'UTILISATION