
CMEPW1800 - Pressure washer Craftsman - Free user manual and instructions
Find the device manual for free CMEPW1800 Craftsman in PDF.
| Product Type | Electric Pressure Washer |
| Brand | Craftsman |
| Model | CMEPW1800 |
| Maximum Pressure | 1800 PSI (124 bar) |
| Nominal Water Flow | 1.2 GPM (4.5 L/min) |
| Power Supply | 120 V ~ 60 Hz, 13 A |
| Power Cord Length | 10.6 m (35 ft) |
| High Pressure Hose Length | 6.1 m (20 ft) |
| Required Water Inlet Pressure | 20 to 100 PSI (1.4 to 6.9 bar) |
| Water Inlet Type | Cold Tap Water |
| Detergent Tank Capacity | Removable Foam Cannon (built-in container) |
| Included Nozzles | White 40° nozzle (soft large area) and black turbo nozzle (abrasive cleaning) |
| Safety Features | Built-in Ground Fault Circuit Interrupter (GFCI), trigger lock, double insulation |
| Minimum Storage Temperature | 4 °C (do not expose to freezing) |
| Maintenance | Regular nozzle cleaning, complete drainage after use, indoor storage |
| Recommended Accessories | Original CRAFTSMAN parts and accessories |
| Repairability | CRAFTSMAN authorized repair center (warranty repairs) |
| Warranty | 3-year limited warranty |
| Customer Service | 1-888-331-4569 |
| Weight | Approximately 10 kg (estimate) |
| Dimensions (L × W × H) | Approximately 60 × 40 × 80 cm (estimate) |
Frequently Asked Questions - CMEPW1800 Craftsman
User questions about CMEPW1800 Craftsman
0 question about this device. Answer the ones you know or ask your own.
Ask a new question about this device
Download the instructions for your Pressure washer in PDF format for free! Find your manual CMEPW1800 - Craftsman and take your electronic device back in hand. On this page are published all the documents necessary for the use of your device. CMEPW1800 by Craftsman.
USER MANUAL CMEPW1800 Craftsman
English (original instructions) 1
Definitions: Safety Alert Symbols and Words
This instruction manual uses the following safety alert symbols and words to alert you to hazardous situations and your risk of personal injury or property damage.

IGER: Indicates an imminently hazardous situation which, if not avoided, will result in death or serious injury.

WARNING: Indicates a potentially hazardous situation which, if not avoided, could result in death or serious injury.

TION: Indicates a potentially hazardous situation which, if not avoided, may result in minor or moderate injury.

(without word) Indicates a safety related message.
NOTICE: Indicates a practice not related to personal injury which, if not avoided, may result in property damage.
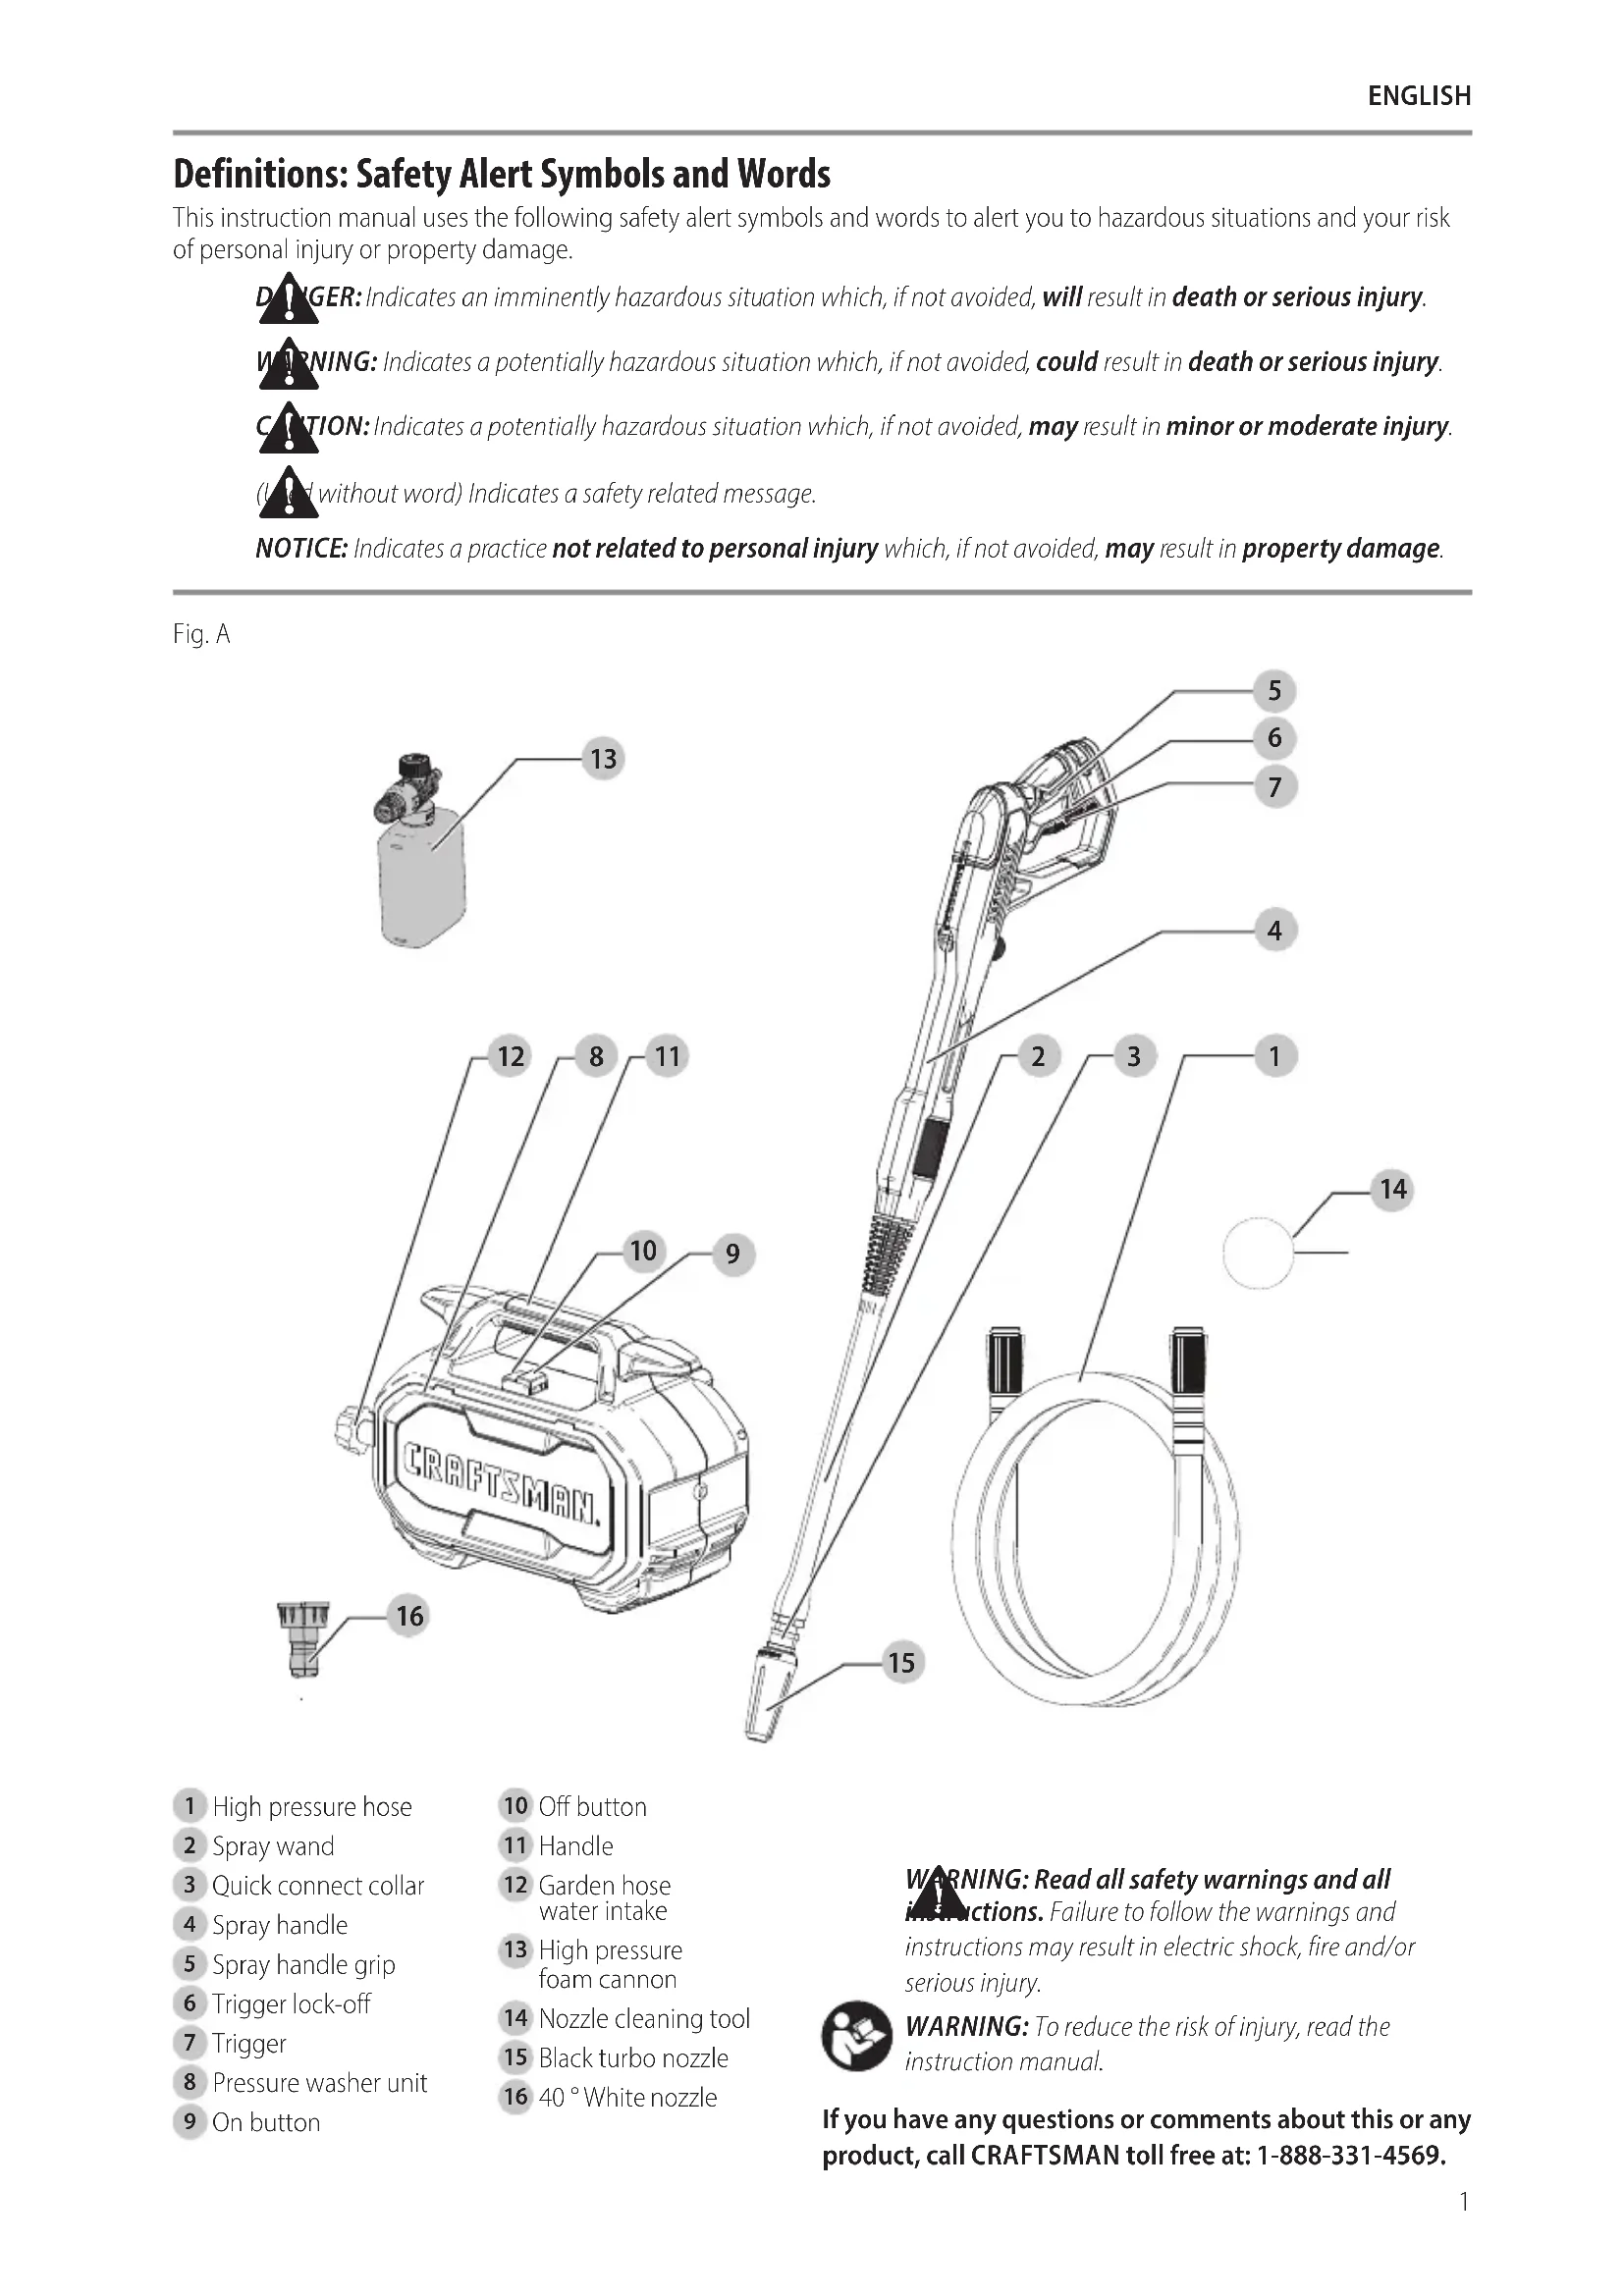
Fig. A
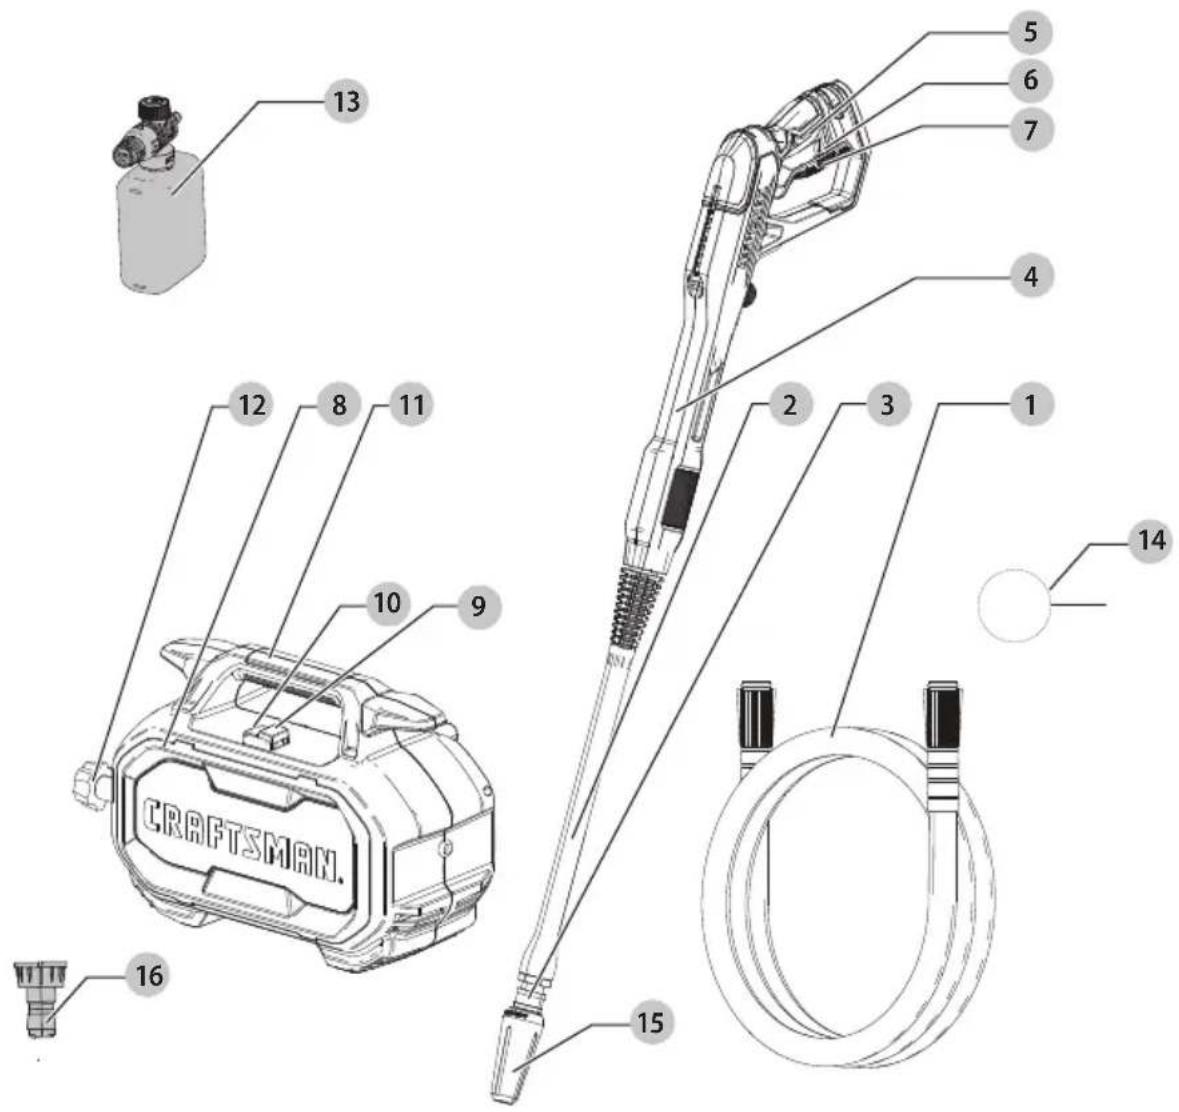
1 High pressure hose
2 Spray wand
3 Quick connect collar
4 Spray handle
5 Spray handle grip
6 Trigger lock-off
7 Trigger
8 Pressure washer unit
9 On button
10 Off button
11 Handle
12 Garden hose water intake
13 High pressure foam cannon
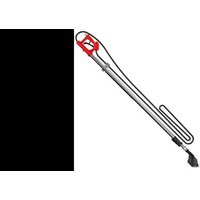
14 Nozzle cleaning tool
15 Black turbo nozzle
16 40° White nozzle
WARNING: Read all safety warnings and all instructions. Failure to follow the warnings and instructions may result in electric shock, fire and/or serious injury.

WARNING: To reduce the risk of injury, read the instruction manual.
If you have any questions or comments about this or any product, call CRAFTSMAN toll free at: 1-888-331-4569.
Electric Pressure Washer CMEPW1800
IMPORTANT SAFETY INSTRUCTIONS
WARNING: When using this appliance, basic safety precautions should always be followed including the following:
- Read all the instructions before using the product.
• To reduce the risk of injury, close supervision is necessary when a product is used near children.
- Know how to stop the product and bleed pressures quickly. Be thoroughly familiar with the controls.
- Stay alert – watch what you are doing.
- Do not operate the product when fatigued or under the influence of alcohol or drugs.
- Keep operating area clear of all persons.
- Do not overreach or stand on unstable support. Keep good footing and balance at all times.
- Follow the maintenance instructions specified in the manual.
- This product is provided with a ground fault circuit interrupter built into the power cord plug. If replacement of the plug or cord is needed, use only identical replacement parts.
CAUTION: risk of injection or injury – do not direct discharge stream at persons."
SAVE THESE INSTRUCTIONS
WARNING: Please read this entire manual before attempting to assemble, operate or install the product.
WARNING: This unit was designed for specific applications. It should not be modified and/or used for any application other than that which it was designed.
NOTICE: Always store your pressure washer in a location where the temperature will not fall below 4 °C. freeze damage is not covered by the warranty.
WARNING: This product and its exhaust can expose you to chemicals including lead and lead compounds, and carbon monoxide, which are known to the State of California to cause cancer and birth defects or other reproductive harm. For more information go to www.P65Warnings.ca.gov.
- Do not touch plug or outlet with wet hands.
- Avoid accidental starts. Move switch on unit to OFF position before connecting or disconnecting cord to electrical outlets.
- Water spray must never be directed towards any electric wiring or directly towards the pressure washer machine itself or fatal electric shock may occur.
-
Never carry your pressure washer by the cord. Do not pull on the cord to disconnect from the outlet.
-
To prevent damage, the cord should not be crushed, placed next to sharp objects or near a heat source.
- Check power cords before using. Damaged cords can reduce performance of pressure washer or cause a fatal electrical shock
- The narrow pin point stream is very powerful. It is not recommended for use on painted surfaces, wood surfaces or items attached with an adhesive backing.
- Keep operating area clear of all persons and animals.
- Always use both hands when operating pressure washer to maintain complete control of the wand.
- Do not touch nozzle or water spray while operating. Never place hands in front of nozzle.
- Wear safety goggles while operating. Wear protective clothing and footwear to protect against accidental spraying.
- Disconnect power plug from the outlet when not in use and prior to the detaching of the high pressure hose.
- Never tie knots or kink the high pressure hose as damage could result. Inspect the high-pressure hose regularly. Replace the hose immediately if it is damaged, worn or shows any signs of cracks, bubbles, pinholes, or other leakage. Never grasp a high-pressure hose that is leaking or damaged.
- Do not operate or store this product in temperatures below 4 °C. Freeze damage is not covered by the warranty.
- Carefully observe all chemical instructions and warnings before using. Use only approved pressure washer cleaners. Do not use bleach, chlorine, or any cleaners containing acids. Always follow manufacturer's label recommendations for proper use of cleaners. Always protect eyes, skin and respiratory system from cleaners.
- The pressure washer should not be used in areas where gas vapors may be present. An electric spark could cause an explosion or fire.
- To minimize the amount of water getting into the pressure washer, the unit should be placed as far as possible from the cleaning site during operation.
- To prevent accidental discharge, the spray gun should be secured by locking the trigger when not in use.
- To allow free air circulation, the pressure washer should NOT be covered during operation.
- Never touch, grasp or attempt to cover a pinhole or similar water leak on the high-pressure hose. The stream of water IS under high pressure and WILL penetrate skin.
- Use only hoses and accessories rated for pressure higher than your pressure washer's psi. Never use with any other manufacturer's accessories or components.
-
Never defeat the safety features of this product.
-
Do not operate machine with missing, broken or unauthorised parts.
- Never spray flammable liquids or use pressure washer in areas containing combustible dust, liquid, or vapors.
GROUND FAULT CIRCUIT INTERRUPTER PROTECTION
This pressure washer is provided with a ground-fault circuit-interrupter (GFCI) built into the plug of the power-supply cord. This device provides additional protection from the risk of electric shock. Should replacement of the plug or cord become necessary, use only identical replacement parts that include GFCI protection.
EXTENSION CORDS
Use only extension cords that are intended for outdoor use. These extension cords are identified by a marking "Acceptable for use with outdoor appliances; store indoors while not in use." Use only extension cords having an electrical rating not less than the rating of the product. Do not use damaged extension cords. Examine extension cord before using and replace if damaged. Do not abuse extension cord and do not yank on any cord to disconnect. Keep cord away from heat and sharp edges. Always disconnect the extension cord from the receptacle before disconnecting the product from the extension cord.
WARNING: To reduce the risk of electrocution, keep all connections dry and OFF the ground. Do not touch plug with wet hands.
SERVICING OF A DOUBLE-INSULATED APPLIANCE
In a double-insulated product, two systems of insulation are provided instead of grounding. No grounding means is provided on a double-insulated product, nor should a means for grounding be added to the product. Servicing a double-insulated product requires extreme care and knowledge of the system, and should be done only by qualified service personnel. Replacement parts for a double-insulated product must be identical to the parts they replace. A double-insulated product is marked with the words "DOUBLE INSULATION" or "DOUBLE INSULATED." The
symbol may also be marked on the product.

Additional Safety Information
WARNING: Never modify the power tool or any part of damage or personal injury could result.
WARNING: ALWAYS use safety glasses. Everyday eyeglasses are NOT safety glasses. Also use face or dust mask if operation is dusty. ALWAYS WEAR CERTIFIED SAFETY EQUIPMENT:
• ANSI Z87.1 eye protection (CAN/CSA Z94.3),
• ANSI S12.6 (S3.19) hearing protection,
• NIOSH/OSHA/MSHA respiratory protection.
WARNING: Some dust contains chemicals known to State of California to cause cancer, birth defects
or other reproductive harm. Some examples of these chemicals are:
• compounds in fertilizers,
• compounds in insecticides, herbicides and pesticides,
• arsenic and chromium from chemically treated lumber.
To reduce your exposure to these chemicals, wear approved safety equipment such as dust masks that are specially designed to filter out microscopic particles.
WARNING: Use of this tool can generate and/or disperse dust, which may cause serious and permanent respiratory or other injury. Always use NIOSH/OSHA approved respiratory protection appropriate for the dust exposure. Direct particles away from face and body.
- Air vents often cover moving parts and should be avoided. Loose clothes, jewelry or long hair can be caught in moving parts.
- An extension cord must have adequate wire size (AWG or American Wire Gauge) for safety. The smaller the gauge number of the wire, the greater the capacity of the cable, that is, 16 gauge has more capacity than 18 gauge. An undersized cord will cause a drop in line voltage resulting in loss of power and overheating. When using more than one extension to make up the total length, be sure each individual extension contains at least the minimum wire size. The following table shows the correct size to use depending on cord length and nameplate ampere rating. If in doubt, use the next heavier gauge. The lower the gauge number, the heavier the cord.
Minimum Gauge for Cord Sets
| Volts | Total Length of Cord in Feet (meters) | ||||
| 120 V 25 (7.6) | 50 (15.2) | 100 (30.5) | 150 (45.7) | ||
| 240 V 50 (15.2) | 100 (30.5) | 200 (61.0) | 300 (91.4) | ||
| Ampere Rating | American Wire Gauge | ||||
| More Than | Not More Than | ||||
| 0 6 18 | 16 16 14 | ||||
| 6 10 | 18 16 14 12 | ||||
| 10 12 | 16 16 14 12 | ||||
| 12 16 | 14 12 Not Recommended | ||||
The label on your tool may include the following symbols. The symbols and their definitions are as follows:
V....volts IPM....impacts per minute
Hz....hertz RPM....revolutions per
min ...... minutes
= - = or DC.....direct current
Class I Construction (grounded)
.../min.....per minute
BPM.....beats per minute
sfpm ....surface feet per minute
SPM ...... strokes per minute
OPM....oscillations per minute
A.....amperes
English
W.....watts
\~ or AC......alternating current
or AC/DC....alternatingor direct current
ClassII Construction (double insulated)
n_0 ...... no load speed
n......rated speed
earthing terminal
⚠️ ......safety alert symbol
△......visible radiation
...... avoid staring at light
......wearrespiratory protection
weareye protection
O....wearhearing protection
readall documentation
IPXX......IPsymbol
Motor
Be sure your power supply agrees with the nameplate marking. Voltage decrease of more than 10% will cause loss of power and overheating. These tools are factory tested; if this tool does not operate, check power supply.
Intended Use
This pressure washer is intended for cleaning boats, cars, decks, driveways, grills, house siding, motorcycles, patios, and outdoor furniture.
DO nOT let children come into contact with the tool.
Supervision is required when inexperienced operators use this tool.
ASSEMBLY AND ADJUSTMENTS
WARNING: To reduce the risk of serious personal injury, turn unit off and disconnect it from power source before making any adjustments or removing/installing attachments or accessories.
An accidental start-up can cause injury.
| Specifications | |
| Maximum Pounds per Square Inch 1,800 | |
| Rated Gallons per Minute* 1.2 | |
| Electrical Requirements 120V | AC ~60Hz, 13A |
| Electrical Cord 35 ft. (10.6 m) | |
| High Pressure Hose 20 ft. (6.1 m) | |
| Minimum Amp Source 15A | |
| Pressure of Inlet Water* 20-100 PSI | |
| Inlet Water Cold Tap | |
| Soap Consumption Rate | 10% MAX |
*Water flow and maximum pressure ratings determined in accordance with CETA CPC-100.
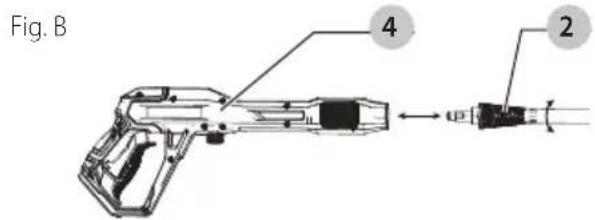
Attaching Spray Wand (Fig. B)
To connect the spray wand 2 to the spray handle 4, insert the end of the spray wand inside the spray handle and turn the spray wand counterclockwise to lock it into position.
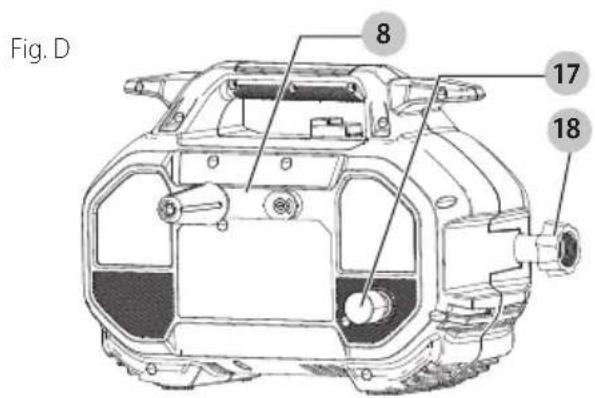
Attaching High Pressure Hose (Fig. C, D)
NOTICE: Never pull high pressure hose to move pressure washer. This could damage hose and/or pump outlet.
To connect the high pressure hose 1 to the spray handle 4, screw the hose collar 15 onto the spray handle inlet coupler 16.
To connect the high pressure hose to the pressure washer unit 8, screw the hose collar 14 onto the high pressure water outlet 17.

Attaching Garden Hose (Fig. A, D)
To connect a garden hose to the pressure washer unit 8, place the end of the garden hose inside the water intake 18. Tighten the garden hose by hand.
Always disconnect the garden hose after usage.
NOTE: Before connecting the garden hose to the pressure washer unit, run water through the garden hose for thirty seconds to clear any debris from the mouth of the garden hose.
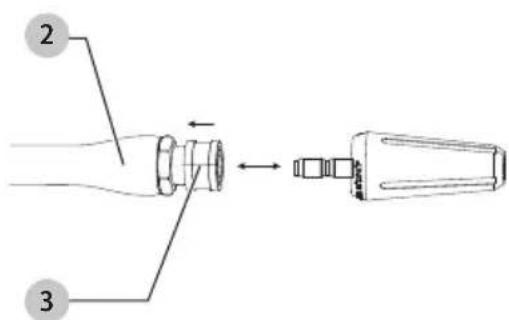
Attaching Nozzles (Fig. E)
DANGER: Risk of fluid injection. Do not direct discharge stream toward persons, unprotected skin, eyes or any pets or animals. Serious injury will occur.
WARNING: Flying objects could cause risk of serious injury. DO NOT attempt to change nozzles while pressure washer is running. Turn pressure washer unit OFF before changing nozzles.
To connect the 40° white nozzle 16 or the black turbo nozzle 15 to the spray wand 2, pull the quick connect collar 3 toward the spray wand and insert the appropriate nozzle. Release the quick connect collar to lock the nozzle in place.
To ensure nozzle is locked into place, give the nozzle a firm tug after the quick connect collar has locked into place.
Spray Tip Application
40° White Nozzle
For gentle wide area cleaning.
Black Turbo Nozzle For abrasive cleaning.
Fig. E
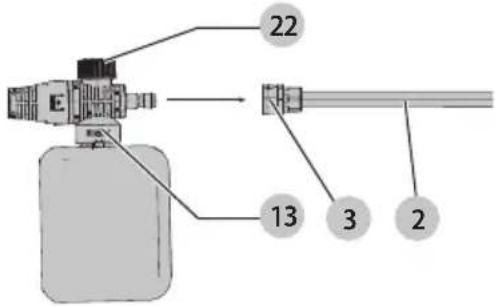
Attaching High Pressure Foam Cannon (Fig. F)
- To connect the high pressure foam cannon 13 to the spray wand 2, pull the quick connect collar 3 toward the spray wand and insert the soap bottle.
- Release the quick connect collar 3 to lock the high pressure foam cannon 13 in place.
- Give the high pressure foam cannon 13 a firm tug after the quick connect collar has locked into place to ensure the high pressure foam cannon 13 is locked into place.
- To adjust the rate of foam, rotate the pressure control knob 22 on the top of the high pressure foam cannon 13 counterclockwise for less or clockwise for more foam.
NOTE: The soap bottle should be positioned underneath the spray wand. Do not position the high pressure foam cannon above the spray wand as this will lead to soap dripping on the spray wand. The spray tip on the high pressure foam cannon 13 rotates for vertical or horizontal application.
Fig. F
OPERATION
WARNING: To reduce the risk of serious personal injury, turn unit off and disconnect it from power source before making any adjustments or removing/installing attachments or accessories.
An accidental start-up can cause injury.
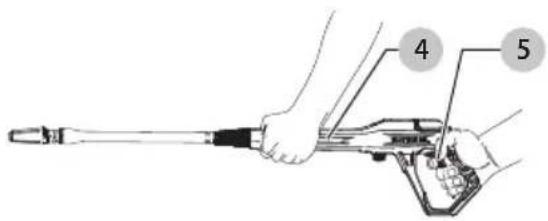
Proper Hand Position (Fig. G)
WARNING: To reduce the risk of serious personal injuries, ALWAYS use proper hand position as shown.
WARNING: To reduce the risk of serious personal injury, ALWAYS hold securely in anticipation of a sudden reaction.
Proper hand position requires one hand on the spray handle grip 5. Hold the spray wand 4 securely with other hand.
Fig. G
Test Ground-Fault Circuit-Interrupter (GFCI) Before Each Use
This pressure washer is provided with a ground-fault circuit-interrupter (GFCI) built into the plug of the power-supply cord. This device provides additional protection from the risk of electric shock.
- Plug the Ground Fault Circuit Interrupter (GFCI) into a working grounded outlet.
- The indicator at the top of the GFCI should turn green when product is ready to use.
- Press the "TEST" button (bottom). The green indicator should disappear.
- Press "RESET" button for use. Do not use if the above test fails.
ENGLISH
Pressure Washing
Preparing Surface for Cleaning
- Remove objects from the area which could create a hazard such as children's toys or outdoor furniture.
- Ensure that all doors and windows are closed tight. Protect all plants and trees in the adjacent area with a drop cloth ensuring that they will not be harmed by any overspray.
• Pre-rinse cleaning area with fresh water. - Use only detergents formulated for pressure washers.
• Always test detergent in an inconspicuous area before use.
Preparing Pressure Washer Unit for Use (Fig. A)
DANGER: Risk of fluid injection and laceration. Using the high-pressure setting, DO NOT allow the high-pressure spray to come in contact with unprotected skin, eyes, or with any pets or animals. Serious injury will occur.
CAUTION: Before operation:
- Connect the water supply to the pressure washer. For instructions on connecting the water supply to the pressure washer, please refer to Attaching Garden Hose under Assembly and Adjustments.
- Connect the high pressure hose to the pressure washer and the pressure wand. For instructions on connecting the high pressure hose to the pressure washer and pressure wand, please refer to Attaching High Pressure Hose under Assembly and Adjustments.
Preparing Spray Handle
IMPORTANT: Before turning on the pressure washer unit, disengage the trigger lock-off 6 and squeeze the trigger 7. Hold the trigger for 30 seconds to purge the system of air. If air is still found in the water stream, continue to run water through the spray handle.
-
Disengage the trigger lock-off 6.
-
Squeeze the trigger 7.
Cleaning a Surface
• To start the pressure washer, press the ON button 9.
- The best angle for spraying water against a cleaning surface is 45^ . Spraying head on tends to cause dirt particles to imbed in the surface. When working on vertical surfaces, it is best to apply detergent starting at the bottom and working upwards which will prevent the detergent from sliding down and causing streaks.
To disengage the spray handle, release the trigger.
NOTE: Excessive pump pressure may be the result of a clogged nozzle or brass coupling. Always turn OFF the pressure washer unit and unplug the unit before attempting to unclog a nozzle or brass coupler.
Moving the Pressure Washer (Fig. A)
- Shut OFF the pressure washer unit 8 and turn OFF the water supply.
-
Point the spray wand 2 in a safe direction and pull the trigger 7 to release remaining water pressure.
-
When the spray wand is completely empty, carry the pressure washer by the handle 11.
Shutdown (Fig. A)
- To stop the pressure washer, press the OFF button 10 and unplug the cord from the outlet.
- Turn OFF water at the faucet.
- Discharge residual pressure by squeezing the trigger 7 until no more water comes out of the spray wand 2.
- Engage the spray handle lock-off 6.
- Disconnect the garden hose from the water intake 18.
- Disconnect the high pressure hose 1 from the high pressure water outlet 17 and drain hose.
MAINTENANCE
WARNING: To reduce the risk of serious personal injury, turn unit off and disconnect it from power source before making any adjustments or removing/installing attachments or accessories.
An accidental start-up can cause injury.
Cleaning
WARNING: Blow dirt and dust out of all air vents with clean, dry air at least once a week. To minimize the risk of eye injury, always wear ANSI Z87.1 approved eye protection when performing this procedure.
WARNING: Never use solvents or other harsh chemicals for cleaning the non-metallic parts of the tool. These chemicals may weaken the plastic materials used in these parts. Use a cloth dampened only with water and mild soap. Never let any liquid get inside the tool; never immerse any part of the tool into a liquid.
Nozzle (Fig. A)
If the nozzle becomes clogged with foreign materials, such as dirt, excessive pressure may develop. If the nozzle becomes partially clogged or restricted, the pump pressure will pulsate. Clean the nozzle immediately using the nozzle cleaner.
- Shut OFF the pressure washer unit 8 and turn OFF the water supply.
- Pull trigger 7 on spray handle 4 to relieve any water pressure.
- Remove the nozzle from the spray wand 2 by pulling the quick connect collar 3 toward the spray wand.
- Using the spray tip cleaning tool, unclog any debris from the nozzle.
- Run water from a faucet or garden hose through the nozzle.
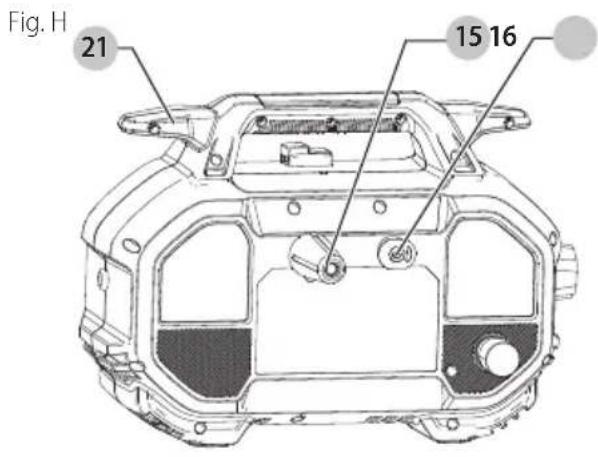
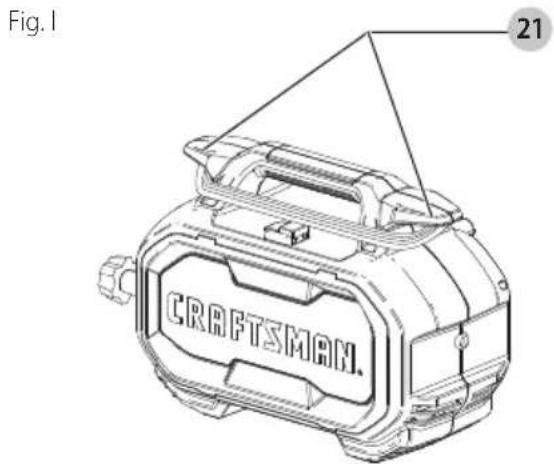
Storage (Fig. H, I)
- Before moving the pressure washer for storage, refer to Moving the Pressure Washer under Operations.
- Store in a dry, covered location above freezing temperature. STORE INDOORS.
• Always completely empty water from high pressure hose, pressure washer unit, spray wand, nozzles, soap bottle, and pressure wand handle. - 40^ white nozzle 16 and turbo nozzle 15 can be stored on the back of the pressure washer unit 8.
- Wrap up the cord around the power cord storage 21.
Accessories
WARNING: Since accessories, other than those carried by CRAFTSMAN, have not been tested with this product, use of such accessories with this tool could be hazardous. To reduce the risk of injury, only CRAFTSMAN recommended accessories should be used with this product.
Recommended accessories for use with your tool are available at extra cost from your local dealer or authorized service center. If you need assistance in locating any accessory, please contact CRAFTSMAN call 1-888-331-4569.
Repairs
WARNING: To assure product SAFETY and POCABILITY, repairs, maintenance and adjustment (including power cord repairs, and brush inspection and replacement, when applicable) should be performed by a CRAFTSMAN factory service center or a CRAFTSMAN authorized service center. Always use identical replacement parts.
Register Online
Thank you for your purchase. Register your product now for:
- WARRANTY SERVICE: Registering your product will help you obtain more efficient warranty service in case there is a problem with your product.
- CONFIRMATION OF OWNERSHIP: In case of an insurance loss, such as fire, flood or theft, your registration of ownership will serve as your proof of purchase.
• FOR YOUR SAFETY: Registering your product will allow us to contact you in the unlikely event a safety notification is required under the Federal Consumer Safety Act.
• Register online at www.craftsman.com/registration
Three Year Limited Warranty
For warranty terms, go to https://www.blackanddecker.com/support/warranty-policy.
To request a written copy of the warranty terms, contact: Customer Service at Black & Decker, 701 East Joppa Road, Towson, MD 21286 or call 1-800-544-6986.
LATIN AMERICA: This warranty does not apply to products sold in Latin America. For products sold in Latin America, check country specific warranty information contained in the packaging, call the local company or see the website for such information.
Imported by. Black & Decker (U.S.) Inc.,
701 E. Joppa Rd.
Towson, MD 21286

BlackandDecker.com
(1-800-544-6986)
TROUBLESHOOTING
WARNING: Risk of Unsafe Operation. Before servicing unit unplug or disconnect electrical supply, turn water supply off, discharge residual pressure, and engage spray handle lock-off.
PROBLEM CAUsE CORRECTiOn
| Motor does not start. Unit not plugged in. Plug in power cord. | ||
| ON/OFF switch is in the OFF position. Turn switch to the "ON" position. | ||
| Wand trigger not being squeezed. Squeeze trigger with switch in "ON" position. | ||
| GFCI tripped. Press reset button at GFCI on plug end of cord. | ||
| Check if breaker is tripped in house. Plug cord into a different outlet on its own breaker. | ||
| Unit does not reach high pressure. Water faucet not fully turned on. Open water valve fully. | ||
| Water inlet filter clogged. Remove filter and rinse to clean. | ||
| Nozzle worn. Contact CRAFTSMAN customer service representative at 1-888-331-4569. | ||
| Pump is sucking air. Check that hoses and fittings are air tight. Turn OFF machine and purge pump by squeezing trigger gun until a steady flow of water emerges from the nozzle. | ||
| Water supply restricted. Check water hose for kinks, leaks and blockage. | ||
| Output pressure varies high/low. | Not enough inlet water supply. | Turn water on full force - check hose for leaks and kinks. |
| Pump is sucking air. | Check that hoses and fittings are air tight. Turn OFF machine and purge pump by squeezing trigger gun until a steady flow of water emerges from the nozzle. | |
| Water inlet screen clogged. | To unclog, rinse OFF with water. | |
| Discharge nozzle is obstructed. | Blow out or remove debris. | |
| No detergent. | Detergent container is empty. | Add more detergent. |
| Detergent bottle or suction tube not properly connected. | Check connections. | |
| Detergent is too thick. | Use detergent recommended for use in pressure washers only. | |
| Filter on detergent suction tube is clogged. | Run warm water through filter to remove debris. | |
| Damaged or clogged detergent suction tube. | Remove obstruction or replace detergent suction tube. | |
| Discharge nozzle is obstructed. | Blow out or remove debris. | |
| Flow control knob closed. Adjust the flow control knob on the top of the high pressure foam cannon. | ||
| Garden hose connection leaks. | Loose fittings. | Tighten fittings. |
| Missing/worn rubber washer. | Replace washer in hose adapter. | |
| Spray wand or extension leaks. | Spray wand not properly attached. | Insert the spray wand into the wand extension. Push in and turn to lock spray wand into place. |
| Broken O-ring. | Contact CRAFTSMAN customer service representative at 1-888-331-4569. | |
| Pump is excessively noisy. | Pump is sucking air. | Check that hoses and fittings are air tight. Turn OFF machine and purge pump by squeezing trigger gun until a steady flow of water emerges from the nozzle. |
| Water leaks from pump. | Loose fittings. | Check that all fittings are tight. |
| Water seals are damaged or worn. | Contact CRAFTSMAN customer service representative at 1-888-331-4569. | |
| Oil leaks. | Oil seals are damaged or worn. | Contact CRAFTSMAN customer service representative at 1-888-331-4569. |
| Motor buzzes but fails to run. | Supply voltage below minimum. | Verify that only the pressure washer is running on this circuit. |
| System has residual pressure. | Turn unit off, squeeze trigger on spray wand to release pressure, then turn unit on. | |
| Voltage loss due to extension cord. | Do not use extension cord with this unit - plug directly into outlet. | |
| Cleaner not used for long periods. | Contact CRAFTSMAN customer service representative at 1-888-331-4569. | |
fabrication classe II (double isolation)
Importé par.Black & Decker (U.S.) Inc.,
701 E. Joppa Rd.
Towson, MD 21286

DÉPANNAGE
Eje Central Lázaro Cárdenas No. 18 - Local (55) 5588 9377 D, Col. Obrera
MERIDA, YUC
Calle 63 #459-A - Col. Centro (999) 928 5038
MONTERREY, N.L.
Av. Francisco I. Madero 831 Poniente - Col. (818) 375 23 13 Centro
PUEBLA, PUE
17 Norte #205 - Col. Centro (222) 246 3714
QUERETARO, QRO
Av. San Roque 274 - Col. San Gregorio (442) 2 17 63 14
SAN LUIS POTOSI, SLP
blackanddecker.com/support/warranty-policy.
- Definitions: Safety Alert Symbols and Words
- Electric Pressure Washer CMEPW1800
- IMPORTANT SAFETY INSTRUCTIONS
- SAVE THESE INSTRUCTIONS
- GROUND FAULT CIRCUIT INTERRUPTER PROTECTION
- EXTENSION CORDS
- SERVICING OF A DOUBLE-INSULATED APPLIANCE
- Additional Safety Information
- English
- Motor
- Intended Use
- ASSEMBLY AND ADJUSTMENTS
- Attaching Spray Wand (Fig. B)
- Attaching High Pressure Hose (Fig. C, D)
- Attaching Garden Hose (Fig. A, D)
- Attaching Nozzles (Fig. E)
- Attaching High Pressure Foam Cannon (Fig. F)
- OPERATION
- Proper Hand Position (Fig. G)
- Test Ground-Fault Circuit-Interrupter (GFCI) Before Each Use
- Pressure Washing
- Preparing Surface for Cleaning
- Preparing Pressure Washer Unit for Use (Fig. A)
- Preparing Spray Handle
- Cleaning a Surface
- Moving the Pressure Washer (Fig. A)
- Shutdown (Fig. A)
- MAINTENANCE
- Cleaning
- Nozzle (Fig. A)
- Storage (Fig. H, I)
- Accessories
- Repairs
- Register Online
- Three Year Limited Warranty
- TROUBLESHOOTING
- DÉPANNAGE
- MERIDA, YUC
- MONTERREY, N.L.
- PUEBLA, PUE
- QUERETARO, QRO
- SAN LUIS POTOSI, SLP
Brand : Craftsman
Model : CMEPW1800
Category : Pressure washer