
OVATIO 3 DUO PRESS - Pressure Cooker MOULINEX - Free user manual and instructions
Find the device manual for free OVATIO 3 DUO PRESS MOULINEX in PDF.

| Brand | Moulinex |
| Model | Ovatio 3 Duo Press |
| Product type | Multi-function food processor with accessories |
| Main functions | Mix, chop, knead, blend, slice, grate, beat, whisk, emulsify, juice citrus, juice, mini-chopper, grinder |
| Speeds | 2 speeds (1 and 2) + Pulse function |
| Main bowl capacity | Up to 1.5 kg of dough, 1 liter of liquid |
| Included accessories | Main bowl, metal blade, plastic kneading hook, vegetable cutter (4 discs), beater, emulsifier, citrus press, juicer, blender bowl, mini-chopper, grinder, spatula, storage accessory |
| Safety | Accessory locking, secure high-speed outlet cover, very sharp blades (handle with care), protection against running empty |
| Maintenance and cleaning | Accessories dishwasher-safe (except beater drive housing), motor unit wipe with damp sponge |
| Power supply | 230 V ~ 50 Hz, power not specified (estimated ~800 W) |
| Dimensions (approx.) | Not specified (estimated ~40 x 30 x 30 cm) |
| Weight (approx.) | Approximately 5 kg |
| Storage | Cable winder under motor unit, blade storage accessory |
| Warranty | Manufacturer's warranty, repair by Moulinex approved service center |
Frequently Asked Questions - OVATIO 3 DUO PRESS MOULINEX
User questions about OVATIO 3 DUO PRESS MOULINEX
0 question about this device. Answer the ones you know or ask your own.
Ask a new question about this device
Download the instructions for your Pressure Cooker in PDF format for free! Find your manual OVATIO 3 DUO PRESS - MOULINEX and take your electronic device back in hand. On this page are published all the documents necessary for the use of your device. OVATIO 3 DUO PRESS by MOULINEX.
USER MANUAL OVATIO 3 DUO PRESS MOULINEX
natural_image
Line drawing of a kitchen appliance with blender, spatula, and side bowl (no text or symbols)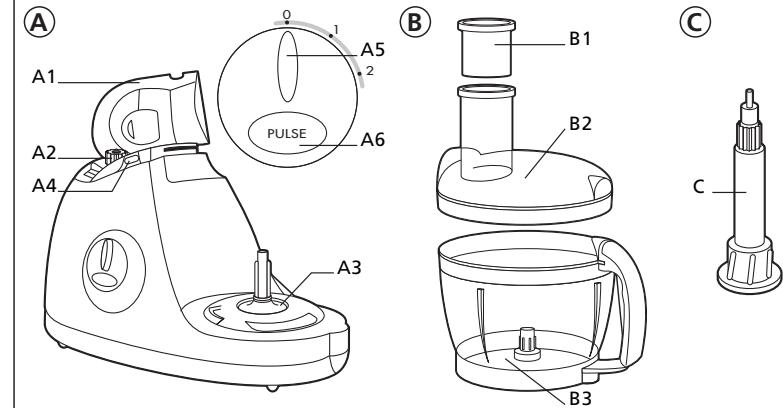
| D | D1 | I | L | L1 | ||
| D2 | L2 | |||||
| E | E1 | J | J1 | M | ||
| E2 | J2 | N | ||||
| F | F1 | J3 | 1 | |||
| F2 | J4 | |||||
| G | K | K1 | ||||
| H | H1 | K2 | ||||
| H2 |


natural_image
Pure horizontal black line on white background (no text or symbols)
natural_image
Completely blank white image with no visible content, text, or symbols.
natural_image
Blank white image with no visible content, text, or symbols.| Suomi | s. 53 | Français | p. 6 |
| Русский | c . 58 | English | p. 11 |
| Українська | c . 63 | Deutsch | S. 15 |
| Latviešu | l. 68 | Nederlands | p. 21 |
| Letuviu | p. 73 | Español | p. 26 |
| Eesti | l. 78 | Português | p. 30 |
| عربي | ص 87 | Italiano | p. 35 |
| Ελληνικά | σ . 88 | Dansk | s. 40 |
| 中文(繁體) | 94頁 | Norsk | s. 44 |
| Svenska | s. 49 |
Thank you for choosing a product from the Moulinex range. This product is intended exclusively for preparing food.
Description
A Motor unit
A1 Liquidiser drive cover
A2 Liquidiser cover
A3 Bowl and accessory drive
A4 Cover release button (A1)
A5 0 - 1 - 2 speed selector
A6 Pulse button (intermittent speed)
B Bowl assembly
B1 Pusher with measuring section
B2 Lid with feeder tube
B3 bowl
B3a drive
B3b nut
C Spindle
ACCESSORIES DEPENDING ON MODEL:
D Blades
D1 Metal blade
D2 Plastic kneading blade
E Grating/Slicing discs
E1 Disc holder
E2 4 discs:
. coarse grating (C) / coarse slicing (H)
. fine grating (A) / fine slicing (D)
F Whisk
F1 Whisk drive
F2 Whisk
G Emulsifying disc
H Citrus press
H1 Cone
H2 Filter basket
H3 Drive
I Liquidiser
I1 Measuring cup
l2 lid
13 bowl
14 locking lid slot
J Juice extractor
J1 pusher
J2 lid
J3 lid seal
J4 filter band
J5 filter holder
K Mini chopper
K1 lid
K2 bowl
L Grinder
L1 lid
L2 bowl
M Spatula
N Storage cage for accessories
Safety recommendations
- Always read the instructions for use carefully before using your appliance for the first time: any use which does not conform to these instructions will absolve Moulinex from any liability.
- Do not leave the appliance within reach of children without supervision. The use of this appliance by young children or by disabled persons must always be supervised.
- Check that the voltage rating of your appliance corresponds to that of your household electrical wiring system.
This appliance complies with the requirements of the EEC Directive (89/336/EEC).
Any connection error will render the guarantee null and void.
- Your appliance is intended solely for domestic use and within the home.
- Unplug your appliance as soon as you have finished using it and when you are cleaning it.
- Never use your appliance if it is not working correctly or if it has been damaged. If this happens, contact an approved Moulinex service centre (see list in service booklet).
- Any intervention other than cleaning and normal maintenance by the customer must be carried out by an approved Moulinex approved service centre (see list in service booklet).
- Do not place the appliance, the power cord or the plug under running water or in any other liquid.
- Do not allow the power cord to hang down within reach of children.
- The power cord must never be close to a heat source or resting on sharp edges.
- If the power cord or the plug are damaged, do not use the appliance. To avoid any risk, these must be replaced by an approved Moulinex service centre (see list in service booklet).
- Do not use the appliance if the filter holder on the juice extractor is damaged.
- For your own safety, use only Moulinex accessories and spare parts which are suitable for your appliance.
- Always use the pushers to guide the food in the feeder tubes, never use your fingers, nor a fork, a spoon, a knife or any utensil.
- Only remove the accessories when the appliance has come to a complete stop.
- Do not introduce any utensil (spoon, spatula...) by the feeder tube.
- Do not place any ustensil which contains metal in a microwave oven.
- Use the accessories one at a time.
- Handle the metal blade and discs with great care: they are extremely sharp.
- You must remove the blades (D) and spindle (C) before emptying the bowl of its content.
- Never touch the parts when they are moving.
- Do not run your appliance empty.
Using your appliance
- Before using for the first time, wash all accessory parts in warm, soapy water. Rinse and dry.
- Place the motor unit on a flat, clean and dry surface.
- Plug the appliance in.
- Pulse (intermittent operation): press the button (A6) using successive pulses to give you better control when preparing certain foods.
- Continuous operation: turn the speed selector (A5) to the required position «1» or «2».
- Stop: turn the speed selector (A5) to position «0».
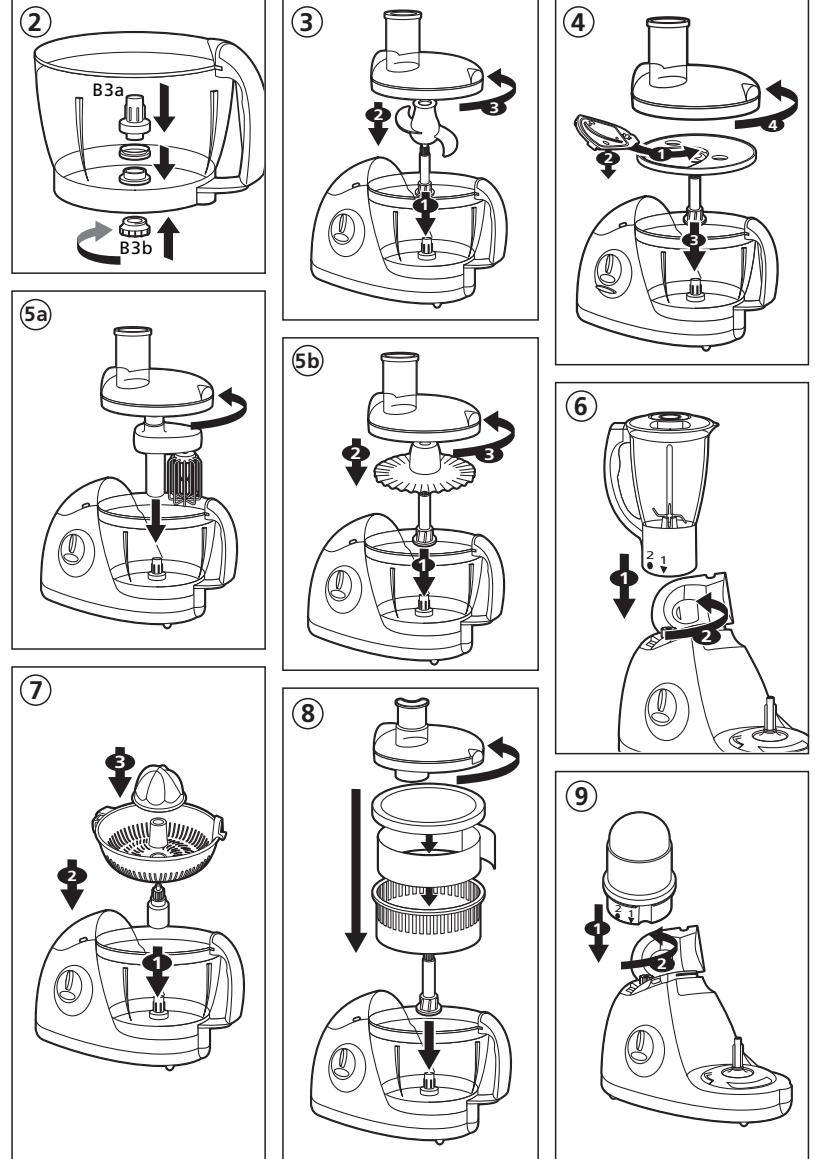
①- Using the chopping bowl drive: the liquidiser drive cover (A1) must be locked.
- Using the liquidiser drive: make sure that no accessories are locked on the bowl and accessory drive.
Functions of your food processor
②. ASSEMBLING / DISMANTLING THE BOWL (B3)
The bowl is used with the following accessories (depending on model):
. blades (D), discs (E), whisk (F), emulsifying disc (G), citrus press (H), juice extractor (J).
- Place the drive (B3a) on the bowl.
- Lock the drive (B3a) with the nut (B3b) as far as it will go.
- Dismantle the bowl assembly and clean it after each use.
③ MIXING/BLENDING/CHOPPING/KNEADING
ACCESSORIES USED (DEPENDING ON MODEL)
- Bowl assembly (B), spindle (C), and blades (D):
. metal blade (D1) for mixing, chopping, kneading or blending.
. plastic kneading blade (D2) for kneading or blending.
FITTING THE ACCESSORIES
- Check that the liquidiser drive cover is closed (A1).
- Place the bowl (B3) on the bowl and accessory drive (A3). Lock it into place using the handle.
- Place the spindle (C) on to the bowl drive.
- Slide the metal blade (D1) or the plastic kneading blade (D2) on to the spindle (C), down to the bottom of the bowl.
- Place the ingredients in the bowl.
- Place the lid(B2) on the bowl and lock it into place until it clicks.
Please note: To unlock the blades (D) from the spindle (C):
- Place the assembly bowl on a stable worktop.
- Turn the spindle (C) clockwise, holding the blade (D) by its upper section.
USAGE AND PRACTICAL TIPS
Blending
- Turn the speed selector (A5) to position «2» to start the appliance.
You can blend up to 1 litre of soup or stewed fruits in 20 sec.
Chopping
- Turn the speed selector (A5) to position «2» to start the appliance or for better control over the chopping use the Pulse button (A6).
In 15 to 30 sec., you can chop up to 600g of food:
. hard produce: cheese, dried fruits, certain vegetables (carrots, celery...).
. soft produce: certain vegetables (onions, spinach...).
. raw or cooked meat (boned, sinew removed and diced).
. raw or cooked fish...
Kneading/Mixing
- Turn the speed selector (A5) to position «2» to start the appliance.
- When kneading, stop the appliance as soon as the pastry starts to form a ball.
You can:
. knead up to 1.2 kg of pastry/dough (biscuit, shortcrust, and bread) in approximately 40 sec.
. mixing up to 1 litre of pancake, waffle batter, etc. in 1min to 1 min 30.
. mixing up to 1.5 kg of light cake mixture (biscuit, sponge) in 1 min 30 to 3 min 30.
④ SLICING/GRATING
ACCESSORIES USED
- Bowl assembly(B), spindle(C), and grating/slicing discs (E)
FITTING THE ACCESSORIES
- Check that the liquidiser drive cover is locked (A1).
- Place the bowl (B3) on the bowl and accessory drive (A3). Lock it into place using the handle.
- Fit the required disc (E2) on to the disc holder (E1).
- Place the spindle (C) on the drive, then the disc holder (E1) on to the spindle (C).
- Place the lid (B2) on the bowl, then lock it into place until it clicks.
USAGE AND PRACTICAL TIPS
- Put the food through the feeder tube using the pusher (B1).
- Turn the speed selector (A5) to position «1» to slice or «2» to grate and start the appliance.
The slicing/grating discs can (depending on model):
. slice thickly (H) / slice finely (D): potatoes, onions, cucumbers, beetroot, apples, carrots, and cabbage...
. coarsely grate (C) / finely grate (A): celery, potatoes, carrots, cheeses...
BEATING/WHISKING/EMULSIFYING
ACCESSORIES USED (DEPENDING ON MODEL)
- Bowl assembly (B) and balloon whisk (F) or
- Bowl assembly (B), emulsifying disc (G) and spindle (C).
FITTING THE ACCESSORIES
- Check that the liquidiser drive cover is locked (A1).
- Place the bowl (B3) on the bowl and accessory drive (A3). Lock it into place using the handle.
⑤aWith the balloon whisk (F):
- Place it on to the bowl drive.
⑤bWith the emulsifying disc (G):
- Place the spindle (C) on the bowl drive.
-
Slide the emulsifying disc on to the spindle. Then:
-
Place the ingredients in the bowl.
- Place the lid (B2) on the bowl, then lock it into place until it clicks.
USAGE AND PRACTICAL TIPS
- Turn the speed selector (A5) to position «1» or «2» to start the appliance.
- Do not use the balloon whisk or the emulsifying disc to knead dough or to mix cake mixtures.
You can prepare: mayonnaise, aioli, sauces, egg whites (1 to 7), whipped cream (up to 0.5 litre).
⑥BLENDING/MIXING FINELY
ACCESSORY USED
- Liquidiser bowl (I)
FITTING THE ACCESSORY
- Press the cover release button (A4) and lift the liquidiser drive cover (A1).
- Place the ingredients in the liquidiser jug (I3), and lock the lid (I2) on the jug.
- Place the liquidiser jug (I) on the liquidiser drive (A2) (mark "1" aligned with . on the motor unit) and lock it into place using the handle (mark "2" aligned with . on the motor unit).
USAGE AND PRACTICAL TIPS
- Turn the speed selector (A5) to position «1» or «2» to start blending or for better control over the blending, use the Pulse button (A6).
You can add ingredients during blending through the hole of the measuring cup (I1). - Do not fill the liquidiser jug with boiling liquid. You can:
- prepare up to 1.5 litre of extra smooth soup, sauces, cream, stewed fruits, milk shakes and cocktails.
- blend all types of batter (pancake, fritters, waffles, custard flan).
⑦SQUEEZING CITRUS FRUITS (depending on model)
ACCESSORIES USED
- Bowl (B3) and citrus press (H)
FITTING THE ACCESSORIES
- Check that the liquidiser drive cover is locked (A1).
- Place the bowl (B3) the bowl and accessory drive (A3). Lock it into place using the handle.
- Place the citrus press drive (H3) on to the bowl drive.
- Fit the filter basket (H2) by turning it until it locks into place.
- Fit the cone (H1) into the hole of the filter basket.
USAGE AND PRACTICAL TIPS
- Place half a citrus fruit on to the cone (H1).
- Turn the speed selector (A5) to position «1» to start the appliance.
You can squeeze up to 1 litre of juice without emptying the bowl.
⑧ EXTRACTING JUICE FROM FRUITS AND VEGETABLES (depending on model)
ACCESSORIES USED
- Bowl (B3), spindle (C) and juice extractor (J)
FITTING THE ACCESSORIES
- Check that the liquidiser drive cover is locked (A1).
- Place the bowl assembly (B3) on the chopping bowl drive (A3). Lock it into place using the handle.
- Place the spindle (C) on to the bowl drive.
- Slide the filter holder assembly (J3+J4+J5) on to the spindle (C).
- Place the lid (J2) and lock it into place.
USAGE AND PRACTICAL TIPS
- Turn the speed selector (A5) to position «2» to start the appliance.
- Insert the ingredients through the feeder tube and gently press with the pusher (J1).
- Remove the pulp regularly from the filter holder and clean the filter band. Do not use more than 250 g of ingredients at a time.
⑨FINELY CHOPPING SMALL QUANTITIES (depending on model)
ACCESSORY USED
- Mini chopper (K) or Grinder (L)
FITTING THE ACCESSORY
- Press the lid release button (A4) and lift the cover (A1).
- Put the ingredients in the bowl, and lock the lid onto the bowl.
- Place the accessory on the liquidiser drive (A2) (mark "1" aligned with the . of the motor unit) and lock it into position (mark "2" aligned with the . of the motor unit).
If the lid is not locked or is badly positioned the mini chopper or grinder cannot be locked into place and will not work.
USAGE AND PRACTICAL TIPS
- Turn the speed selector (A5) to position «2» to start chopping, or for greater control over the chopping use the Pulse button (A6).
You can with the mini chopper:
. chop in seconds: garlic cloves, herbs, parsley, dried fruits, bread, ham,...
. Maximum quantity of dried fruits (hazelnuts, almonds...): 80 g.
. prepare baby foods.
This mini chopper is not designed to take hard ingredients such as coffee beans.
You can with the grinder:
. grind in seconds, pepper, Cayenne pepper, dried apricots...
. Quantity / Maximum time for dried apricots: 100 g / 4 sec.
Cleaning
- Unplug the appliance.
- To make cleaning easier, rinse the accessories straight after use.
- Wash and dry the accessories (they are all dishwasher safe except for the whisk drive (F1)).
- Pour some hot water containing a few drops of liquid soap into the mixer bowl. Close the lid. Operate in short bursts by pressing the pulse key several times. Unplug the appliance. Rinse the bowl under running water and leave to dry.
- The bowl drive (B3a) is equipped with a joint which must not be removed. For cleaning, you can place the bowl drive in the dishwasher or wash it in hot water.
- If the accessories have become discoloured by food (carrots, oranges...), rub them gently with a cloth dipped in cooking oil, and then wash as normal.
- The inside of the bowls may become scratched or slightly dulled over time depending on the type of food processed.
- Do not place the motor unit (A), nor the whisk drive (F1) in water or near running water. Wipe them with a damp cloth.
- The blades on the accessories are very sharp. Always handle with care.
Storage
Your Ovatio food processor has:
- a storage cage for accessories (N), which fits inside the bowl (B). You can store the grating/slicing discs (E2), the disc holder (E1), the metal blade (D1) as well as the spindle (C).
- a cord storage facility under the motor unit to store the mains lead and to adjust its length.
What to do if your appliance does not work?
- Check:
. the connection and fuse.
. that the accessories are properly locked on to the motor unit.
. that the lids are properly locked.
. when using the bowl assembly (B), that the upper power outlet hood (A1) is locked.
Your appliance still does not work? Contact an approved Moulinex centre (see list in "Moulinex Service" booklet).
HELPLINE
If you have any product problems or queries, please contact our Customer Relations team first for expert help and advice :
0845 602 14 54 - UK
(01) 47 51 947 - Ireland
or consult our website
www.moulinex.co.uk
Accessories
You can buy the following accessories or replacements mail order though our approved Moulinex Service Centre or via our website:
| Accessories | Approved Moulinex Centre |
| Chipping disc | 5 980 678 |
| Grating disc for, coconut & parmesan | 5 980 679 |
| Fine grating disc | 5 980 676 |
| Fine slicing disc | 5 980 677 |
| Grinder | 5 966 866 |
| Mini chopper | 5 980 651 |
| Whisk | 5 980 652 |
| Plastic kneading blade | 5 980 640 |
| Citrus press | 5 980 646 |
| Juice extractor | 0 697 185 |