
AFM443 - Microwave MOULINEX - Free user manual and instructions
Find the device manual for free AFM443 MOULINEX in PDF.


| Product Type | Microwave Oven |
| Brand | Moulinex |
| Model | AFM443 |
| Capacity | 20 L |
| Power Output | 700 W |
| Power Consumption | 1050 W |
| Dimensions (W x D x H) | 451 x 263 x 345 mm |
| Weight | 10.5 kg |
| Voltage | 230 V, 50 Hz |
| Functions | Defrost, Auto Cook, 5 Power Levels, Timer |
| Door Type | Side opening with safety interlock |
| Turntable | Glass turntable, 245 mm diameter |
| Control Type | Rotary knobs |
| Interior Light | Yes |
| Child Lock | Yes |
| Material | Stainless steel exterior, enamel interior |
| Cleaning | Easy-clean interior with damp cloth |
| Safety | Overheat protection, door safety switch |
| Spare Parts | Turntable, fuse, glass tray available from Moulinex |
| Repairability | Repair service via authorized service centers |
| Certification | CE, RoHS |
Frequently Asked Questions - AFM443 MOULINEX
User questions about AFM443 MOULINEX
0 question about this device. Answer the ones you know or ask your own.
Ask a new question about this device
Download the instructions for your Microwave in PDF format for free! Find your manual AFM443 - MOULINEX and take your electronic device back in hand. On this page are published all the documents necessary for the use of your device. AFM443 by MOULINEX.
USER MANUAL AFM443 MOULINEX
Contents
Appliance description 19
Display 19
Control panel 20
Accessories 20
Installing the appliance 21
Preparation 21
Connecting 21
Position 21
Safety instructions 21
Instructions for use 22
Foods 22
Containers and materials 22
Cooking time 23
Resting time 23
Setting the time 23
Adjusting the independent timer 24
Using the automatic programmes....24
Auto Cook 24
Auto Defrost 25
Auto Crousty 25
Using the manual functions 26
"micro" mode 26
"grill" mode 27
"micro grill" mode 27
"Crousty" mode 28
Using the DUO function 29
Using the quick reheat function 30
Adjusting the cooking time 30
Stopping the oven 30
Activating the Child Safety feature
Cooking guide
Microwave cooking
Reheating
Defrosting
"Grill" and "Micro Grill" modes
"Crousty" mode
Cleaning
Technical problems
Waste disposal requirements
Performance testing data
Technical characteristics
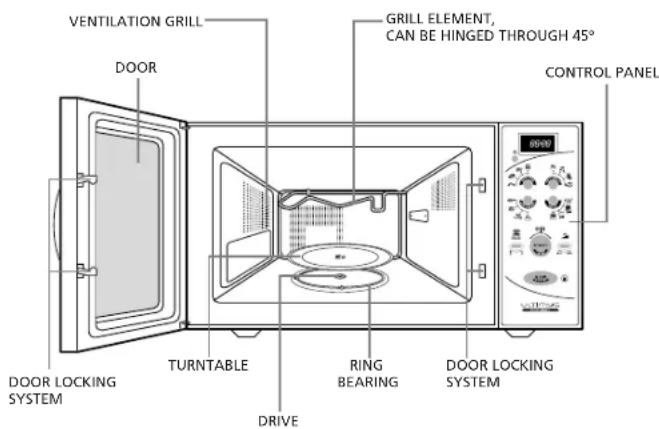
Appliance description
Display
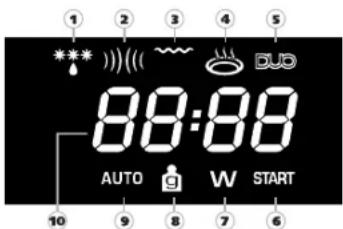
① Symbol for Defrost mode ② Symbol for microwave mode ③ Symbol for grill mode ④ Symbol for Crousty mode ⑤ Symbol for DUO ⑥ Symbol for Start
⑦ Symbol for power (watts) ⑧ Symbol for weight (grams) ⑨ Symbol for Automatic programme ⑩Clock - Time - Weight - Power display
Control panel

1- Display 2- Clock & independent Timer button 3- Auto Cook button Automated cooking programme 4- Auto Crousty button Automated Crispy cooking programme 5- DUO button: Reheating on two levels 6- Start and Quick reheat (+30 seconds) button 7- Stop/Cancel + Child Safety control button
8- Auto Defrost button Automated defrosting programme 9- Select button Selection of manual cooking modes : micro, grill, micro grill, Crousty 10- Rotary knob for setting weight and cooking time 11- Power setting button
Accessories
Drive
This fixture is located in the middle of the oven, beneath the turntable. It is connected with the motor and drives the turntable round.

Ring bearing
This component is placed in the middle of the oven, beneath the turntable. It has rollers to support the turntable while leaving it free to rotate.

Turntable
This glass plate is placed on the ring bearing in the middle of the oven and must be engaged with the drive. It can be used for all types of cooking. Containers containing food to be cooked or to collect particles and juices produced by food during cooking are placed on the turntable. It is easily removed for cleaning.

DUO rack
- The DUO function rack can be used to reheat two plates at the same time. Place the first plate under the rack and the second on top.

- In grill mode, this accessory can be used for browning "flat" dishes. It must be carefully centred on the turntable.
Crousty dish
This dish has a non-stick coating and absorbs microwaves from below. This enables it to heat food from beneath to brown and crisp the bottom while the grill does the same from above.

For an even better effect, the dish can be pre-heated.

Feeding bottle holder
Certain feeding bottles are too tall to be stood upright on the turntable. The feeding bottle holder can be used to warm feeding bottles of any size without problems.
Installation
Preparation
Unpack the accessories, wash them and wipe them off carefully.
Position the ring bearing and then the turntable in the centre of the oven.
The turntable must be properly engaged with the drive.
Connecting
Check that the supply voltage marked on the type label glued on the rear of the appliance matches the voltage of your supply. The label indicates the nominal supply voltage of the appliance, e.g. 220-230 V.
Ensure that the current marked on your electricity meter and circuit breaker / fuse is at least 16 Amperes.
Finally, for proper safety, it is essential to connect your appliance to an outlet socket with an earth connection in accordance with electrical installation regulations and standards.
Position the appliance in such a way that the supply socket is readily accessible so that it can be easily disconnected.
You should also ensure that you can gain access to your circuit breaker / fuse.
It is imperative to comply with the above instructions regarding the electrical supply.
Position
Your appliance can be installed in one of two ways.
- On a worktop: position the appliance on a flat and stable surface, capable of supporting the oven and its contents. The oven must be handled with care, remembering that the control panel side is the heavier.
- In a niche: The niche must be at least 85 cm above floor-level. Centre the appliance in the niche so that it does not touch the side-walls.
Adequate ventilation is essential: the minimum clearances are 20 cm above the oven and 10 cm at the sides and rear.
Install the appliance away from any source of heat such as a traditional oven or radiator. It has been designed and tested for use in ambient temperatures up to 35 °C.
Ensure that the ventilation holes of the appliance are not obstructed.
Important safety instructions
Read carefully and keep for future reference.
- Your appliance is for domestic use. It is intended only for cooking, heating and defrosting foods and drinks. Use it only for these purposes.
- Do not allow children to use the appliance without supervision in particular in the combination mode due to the temperatures generated.
Beware of the risk of burns.
- Avoid touching any surfaces that may have become hot during operation of your oven: the door, the grill element, the inner (cavity) walls, the top surface.
① In order to avoid burns when removing containers and accessories from the oven, always use oven gloves.
- Do not operate your appliance when empty. This can cause damage. To try out programming the appliance, place a glass of water in the oven. This will absorb the microwaves and protect your oven against damage.
- The door must be free to close properly:
Do not obstruct the door in any way (with oven cloths, oven gloves, over-size dishes etc.). If the door of your appliance is not properly closed, a safety mechanism will prevent its being turned on.
- When cooking in grill mode, any fat splashing the grill element may catch fire. These flames will extinguish themselves and will not have any adverse effect on your appliance if it is regularly maintained.
To avoid fat spitting during cooking, especially when cooking meats and poultry, use dishes in glazed earthenware. Always maintain a minimum gap of 2 cm between the food and the grill element.
- Never obstruct the ventilation holes. This can cause the oven to overheat. If this happens, your appliance will stop automatically and will not start again until it has cooled sufficiently.
- Precautions against exposure to microwaves:
- Never attempt to operate your appliance with the door open, to interfere with the safety door-locking mechanism or to insert anything in this mechanism.
- Never place anything in the way of opening and closing the door.
- Never allow food or cleaning product residues to accumulate on the door seals. Ensure that the door and its seals remain clean. After use, wipe them with a damp cloth and dry them carefully.
- It is particularly important that the oven door should close correctly and that there is no defect in :
- the door, the seals, the hinges,
- the supply cable.
Never use your oven if it is damaged.
In no case should your oven be adjusted or repaired by anyone other than a qualified microwave appliance repair technician, trained by the manufacturer.
Instructions for use
The following recommendations will help you get the greatest benefit from using your oven. Please read them carefully.
Your appliance can be used to defrost, reheat and cook foods much faster than is possible with traditional cooking methods.
Foods
Forbidden foods
If you choose a cooking method using microwaves, you should never :
- Attempt to fry food – it is impossible to control the temperature of the oil and other fats – fire-risk,
- Attempt to cook or warm up eggs in their shells, hard-boiled eggs or snails – they may explode,
- Attempt to cook food in an intact shell (e.g. chestnuts) or hard skin (tomatoes, potatoes, sausages) – always make a slit.
Food temperatures
The action of microwaves is such that only the food is heated. The container may, therefore, remain cold or cool while the food that it contains is burning hot.
To avoid any risk of burning, always stir and check the temperature carefully before serving – especially to children.
Shake feeding bottles well and try a few drops on the back of your wrist to check the temperature.
Before warming feeding bottles and small pots, remove teats and covers.
Remember to cover the food in order to :
- Avoid any splashing of the oven cavity,
- Retain sufficient moisture for cooking.
Heating liquids
When heating liquids, a sudden overflow may occur when you take the container to remove it from the appliance. In fact, when the temperature reaches boiling point, steam tends to remain trapped in the liquid until it is disturbed.
To avoid this superheating effect and the consequent risk of scalding, always place a plastic spoon in the liquid to be heated
Containers and materials
Below, you will find details of the various types of containers, which can be used or must not be used for the chosen cooking method.
"micro" mode (microwaves)
Use containers suitable for microwave cooking.
A container can easily be tested for microwave "transparency".
Place the empty container on the turntable together with a glass of water and run the oven for one minute at maximum power.
After one minute:
- If the container is cold, it is "transparent" and can be used for microwave cooking.
- If the container is warm or hot, it is absorbent and must not be used for microwave cooking.
Never use hermetically sealed containers.
Remember to remove covers and stoppers from feeding bottles, jars, bottles and plastic containers.
Disposable containers
Never leave the appliance to run unsupervised when using disposable containers in plastic, paper or other inflammable materials.
If you see smoke appear, keep the oven door closed and disconnect your appliance.
Metal containers
Never use metallic materials and containers for microwave cooking. You can, however, use your appliance to heat or defrost certain preparations in metallic trays, provided the height of the tray does not exceed 4 cm, not including the cover.
With regard to the cover, follow the instructions on the package. It will have to be removed or left in place, as the case may be. If not indicated otherwise, play safe and remove it.
Centre the tray(s) on the turntable, leaving at least 1 cm clearance from the oven walls. If there are several trays, space them at least 2 cm apart.
"grill" mode
This cooking mode does not require the use of special containers. Use the same kind of heatproof containers as you would use in a conventional oven.
Never use plastic containers (they may melt) or containers in paper or cardboard (fire-risk). ① Maintain a minimum clearance of 2 cm between the food and the grill element.
"micro grill" mode
Containers not permitted in "micro" mode are also not permitted in "micro grill" mode.
Containers not permitted in "grill" mode are also not permitted in "micro grill" mode.
Use only containers that can withstand both microwaves and high temperatures.
Summary of containers and materials permitted and not permitted in "micro" mode
| Materials Containers | Suitable for micro-waves | Remarks |
| METAL | ||
| Aluminium foil In certain cases May be used in small quantities to protect certain parts of the food from overcooking. Risk of electric arcing if the foil is too close to the oven walls or you have used too much. | ||
| Aluminium tray In certain cases See “Metal containers”, above. | ||
| Metal sheet No Risk of electric arcing and fire. | ||
| Freezer bag ties No Risk of electric arcing and fire. | ||
| GLASS | ||
| Heat-resistant glass Yes Perfectly suitable. | ||
| Glass with metal-based decoration (gold, lead etc.) | No Risk of electric arcing. | |
| Fine glassware No May break or crack if heated suddenly. | ||
| PLASTIC | ||
| Plastic containers Yes Perfectly suitable if the plastic is heat-resistant.Certain plastics may be prone to deformation or discoloration after repeated use.Do not seal closed. | ||
| Plastic film Yes Can be used to retain moisture and prevent spitting. The plastic must not touch the food during cooking.Puncture the plastic to allow excess vapour to escape.Use oven gloves to remove the plastic film after cooking (risk of burns from hot vapour escaping from the container). | ||
| DISPOSABLE CONTAINER MATERIALS FORBIDDEN IN GRILL | ||
| Polystyrene cups or packaging | Yes | Can be used for heating liquids and foods for a short time. Overheating could melt the polystyrene, which would then become mixed with the food. |
| Paper bag | No Fire-risk. | |
| Paper plates, cups, napkins or absorbent paper. | Yes May be used for heating and brief cooking. | |
| Grease-proof paper | Yes | Can be used to retain moisture and prevent spitting. Short cooking times. |
| Recycled paper | No Risk of electric arcing. | |
| PORCELAIN | ||
| Porcelain containers | Yes | Perfectly suitable except with metal-based decoration (gold, lead etc.). |
Cooking time
To determine the right cooking time for your foods, follow the instructions on the packaging of ready-made dishes and deep-frozen products.
In the absence of any precise indication, divide the cooking or reheating time given for a conventional oven by at least three. In any case, refer to the cooking guide included in these instructions.
Do not programme a cooking time longer than necessary. You will then avoid any risk of overcooking or setting fire to your food.
Resting time
Microwaves act close to the surface and penetrate food to a depth of 2 to 3 cm. Once the surface layers are hot, heat penetrates to the centre of the food by conduction, i.e. the hot parts heat the cold parts. This makes it a good idea to allow the food to rest after removing it from the microwave so that the heat can penetrate to the centre.
Setting the time
You must set the clock after connecting your appliance or after a break in supply.
The display will show :
88:88
Keep the "clock" button pressed for 3 seconds.
- The "0" indication for the hours will blink.

Adjust the hours by turning the rotary knob.

Press the "clock" button to enter the hours setting.
- The "00" indication for the minutes will blink.
Adjust the minutes by turning the rotary knob.
Press the "clock" button to enter the minutes setting.
• The clock is now set.
Adjusting the independent timer
The timer is completely independent of all the other functions. It can only be used while the oven is stopped.
The display will be showing the clock time.
Press the "clock" button once, briefly.
- The display will show ".0".

Adjust to the desired time by turning the rotary knob.

Press the "START" button.
• The countdown will start.

When it reaches ".0":
• the oven will beep 4 times, - the display will again show the clock time.
Using the automatic programmes


With the automatic programmes, everything is calculated automatically. You simply have to specify the type of food and its weight and the oven will automatically select the cooking mode, the power and the appropriate cooking time.
Your oven has 3 types of programme, depending on the desired action :
• AUTO COOK for cooking • AUTO DEFROST for defrosting • AUTO CROUSTY for crispy cooking
If you use an automatic programme, you cannot change the power or the cooking time.
- At the end of cooking, the oven will beep 4 times and “: 0” will blink 4 times on the display. The clock time will then reappear on the display.
- If you do not open the oven at the end of cooking, it will sound a reminder every minute.
AUTO COOK
Automatic cooking programme
4 programmes are available:

- Fish - 300g to 600g Cooking mode, "micro grill"
- Red meat (beef, lamb) - 700g to 1000g Cooking mode, "micro grill"
- Fresh vegetables - 100g to 450g Cooking mode, microwave
- Frozen meal - 300g Cooking mode, microwave
① The oven must know the type of food and its exact weight. Check that the grill element is in the horizontal position (hinged up against the roof of the oven) before using an automatic programme.
Use
Place the food at the centre of the turntable and close the door.
Select the type of food by pressing the AUTO COOK button until the number corresponding to the food to be cooked is displayed.
- The number of the programme will be shown on the display, together with the "AUTO" symbol and the symbol(s) corresponding to the cooking mode for the programme selected.

If you do nothing for 3 seconds, the "g" symbol on the display will blink to indicate that the oven is waiting for you to enter the weight.
Select the weight, using the rotary knob.
- The weight will be shown on the display, together with the "g" symbol.

If you do nothing for 3 seconds, the "START" symbol on the display will blink to indicate that the oven is waiting for you to start cooking.
Press the "START" button.

- The oven will start cooking for a time selected to suit your food perfectly.
AUTO DEFROST
Automatic defrost programme
4 programmes are available:

- Poultry - 200g to 1500g
- Red meat (beef, lamb) - 200g to 1500g
- Fish - 200g to 1500g
- Bread - 125g to 625g
The oven must know the type of food and its exact weight.
Check that the grill element is in the horizontal position (hinged up against the roof of the oven) before using an automatic programme.
Use
Place the food at the centre of the turntable and close the door.
Select the type of food by pressing the AUTO DEFROST button until the number corresponding to the food to be defrosted is displayed.
- The number of the programme will be shown on the display, together with the "AUTO" symbol and the Defrost symbol.
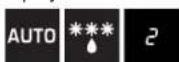
If you do nothing for 3 seconds, the "g" symbol on the display will blink to indicate that the oven is waiting for you to enter the weight.
Select the weight, using the rotary knob.
- The weight will be shown on the display, together with the "g" symbol.

If you do nothing for 3 seconds, the "START" symbol on the display will blink to indicate that the oven is waiting for you to start defrosting.
Press the "START" button.

- The oven will start cooking for a time selected to suit your food perfectly.
① Halfway through the process, the oven will beep and pause to allow you to turn the food for perfectly even defrosting. Turn the food and press "START" to restart the defrost cycle.
AUTO CROUSTY
Automatic crisp cooking programme
① For use only with the Crousty dish (see details of accessories, p. 20)
4 programmes are available:

- Pre-cooked pizza - 200g to 400g
- Deep-frozen pizza - 200g to 400g
- Chicken nuggets ** - 125g to 250g
- Bread ** - 125g to 375g
The oven must know the type of food and its exact weight.
Check that the grill element is in the horizontal position (hinged up against the roof of the oven) before using an automatic programme.
Use
Before using the Crousty function, the Crousty dish must be preheated.
1st step: preheating the Crousty dish
Place the empty Crousty dish at the centre of the turntable and close the door.
The Crousty dish can be placed directly on the turntable or on the DUO rack. Never place the Crousty dish in the oven without the turntable. Never place containers or packages on the Crousty dish.
Select the "Crousty" mode by pressing the "SELECT" button 4 times

and set the preheat time to 3 minutes by means of the rotary knob.

For preheating, do not change the power from its default value of 600 W.
Press the "START" button to start preheating.

• After the preset time of 3 minutes, the oven will stop.
2nd step: automatic cooking
As the Crousty dish has a non-stick coating, it does not need to be oiled before placing food on it.
① Always use oven gloves to handle the Crousty dish, it can be very hot.
Open the oven door and place the food in the Crousty dish.
Select the type of food by pressing the AUTO CROUSTY button until the number corresponding to the food to be cooked is displayed.
The number of the programme will be shown on the display, together
with the "AUTO" symbol and the Crousty symbol.

If you do nothing for 3 seconds, the "g" symbol on the display will blink to indicate that the oven is waiting for you to enter the weight.
Select the weight, using the rotary knob.
- The weight will be shown on the display, together with the "g" symbol.

If you do nothing for 3 seconds, the "START" symbol on the display will blink to indicate that the oven is waiting for you to start cooking.
Press the "START" button.
- The oven will start cooking for a time selected to suit your food perfectly.
The Crousty dish must not be put through the dishwasher. Wash it in warm water with washing-up liquid. Do not use abrasive cleaners.
Using the manual functions
Using the manual functions, you can cook, reheat or defrost all kinds of food. Here, in contrast to the automatic programmes, you must make your own selection of cooking mode, cooking time and power. If you do not know these details, see the cooking guide, page 31.
4 cooking modes are available. To select the desired cooking mode, use the "SELECT" button.

micro ....Cooking with microwaves
grill ....Cooking with the grill element in its upper position
Micro grill: Cooking with combined microwaves and grill.
Crousty: Crispy cooking with the Crousty dish.
The cooking mode cannot be changed during cooking.
At the end of cooking, the oven will beep 4 times and ":0" will blink 4 times on the display. The clock time will then reappear on the display.
If you do not open the oven at the end of cooking, it will sound a reminder every minute.
MICRO MODE (microwaves only)

Use this mode for manual cooking, heating, or defrosting of your food.
This is the default cooking mode of your oven. It does not need to be selected by means of the "SELECT" button.
Check that the grill element is in the horizontal position (hinged up against the roof of the oven) before using the "micro" mode.
Use
Place the food at the centre of the turntable and close the door.
The power and cooking time can be set in any order. The settings can be changed in any order and at any time, even during cooking.
Setting the power
By default, the oven runs at maximum power. If you wish to use maximum power, there is no need to make a power setting.
If, on the other hand, you wish to use a reduced power setting, select it by
pressing the "W" button the required number of times.

850W 600W 450W 300W 180W (defrosting) 100W
The power will be shown on the display, together with the "W" symbol and the symbol for the microwave cooking mode.
If you do nothing for 3 seconds, the power will disappear from the display and " :0" will appear to indicate that the oven is waiting for you to set the cooking time.
Setting the cooking time
Select the cooking time, using the rotary knob.
• The cooking time will be shown on the display.

The maximum timer setting in microwave mode is 99 minutes.
If you do nothing for 3 seconds, the "START" symbol on the display will blink to indicate that the oven is waiting for you to start cooking.
Starting
Press the "START" button.

The oven will start cooking for the selected time.
Defrosting
If you wish to defrost food without using the Auto Defrost programme, set the power to 180 W (see method above).
• In this case, the display will show the defrost symbol in addition to the
Microwave cooking mode symbol.

GRILL MODE

① Preferably for use with the DUO rack (see details of accessories, p. 20)
Use this mode to brown food such as gratins or meat by means of your oven's grill element.
① Only use heat-resistant containers.
Check that the grill element is in the horizontal position (hinged up against the roof of the oven) before using the "grill" mode.
Use
1st step: preheating the grill
Select "grill" mode by pressing the "SELECT" button twice.

- The "grill" symbol will appear on the display, together with ":0".

Select the preheat time using the rotary knob (about 3 to 4 minutes).

• The preheat time will be shown on the display.
If you do nothing for 3 seconds, the "START" symbol on the display will blink to indicate that the oven is waiting for you to start preheating.
Press the "START" button.

- The oven will start preheating for the selected time.
2nd step: cooking in grill mode
Place the food on the top of the DUO rack and place the rack in the centre of the turntable.
① Always use oven gloves to handle dishes and accessories in "grill" mode. Risk of burns.
Use the "SELECT" button to select "grill" again, then set the cooking time and press "START" to start grilling.
The maximum timer setting in "grill" mode is 60 minutes.
The grill element may well turn on and off during cooking. This is quite normal and prevents overheating.
MICRO + GRILL MODE (microwaves + grill)

i Preferably for use with the DUO rack (see details of accessories, p. 20)
Use this mode for rapidly microwave cooking or reheating food, while it is browned by the grill.
Use only containers that can withstand both microwaves and high temperatures.
① Check that the grill element is in the horizontal position (hinged up against the roof of the oven) before using the "micro grill" mode.
Use
It is advised to preheat the grill in "micro grill" mode.
Place the food on the top of the DUO rack and place this in the centre of the turntable.
Always use oven gloves to handle dishes and accessories in "micro grill" mode. Risk of burns.
Select "micro grill" mode by pressing the "SELECT" button three times.

The "micro grill" symbol will appear on the display, together with ":0".

The power and cooking time can be set in any order. The settings can be changed in any order and at any time, even during cooking.
Setting the power

By default, the oven runs at maximum power. If you wish to use maximum power, there is no need to make a power setting. If, on the other hand, you wish to use a reduced power setting, select it by pressing the "W" button the required number of times.
600W
450W
300W
① In "micro grill" mode, the maximum permitted power is 600 W.
- The power will be shown on the display, together with the "W" symbol.

If you do nothing for 3 seconds, the power will disappear from the display and ":0" will appear to indicate that the oven is waiting for you to set the cooking time.
Setting the cooking time
Select the cooking time, using the rotary knob.

• The cooking time will be shown on the display.
The maximum timer setting in "micro grill" mode is 60 minutes.
If you do nothing for 3 seconds, the "START" symbol on the display will blink to indicate that the oven is waiting for you to start cooking.
Starting
Press the "START" button.

• The oven will start cooking for the selected time.
The grill element may well turn on and off during cooking. This is quite normal and prevents overheating.
CROUSTY MODE
For use only with the Crousty dish (see details of accessories, p. 20)

This manual mode is recommended for heating or cooking food requiring a browned, crispy result. The top part of the food will be browned by the grill element while the bottom is crisped by the Crousty dish.
Check that the grill element is in the horizontal position (hinged up against the roof of the oven) before using the "Crousty" mode.
Use
Before using the Crousty function, the Crousty dish must be preheated.
1st step: preheating the Crousty dish
Place the empty Crousty dish at the centre of the turntable and close the door.
The Crousty dish can be placed directly on the turntable or on the DUO rack.
Never place the Crousty dish in the oven without the turntable. Never place containers or packages on the Crousty dish.
Select "Crousty" mode by pressing the "SELECT" button 4 times.

- The "Crousty" symbol will appear on the display, together with ":0".

Setting the power
Do not change the power from its default setting of 600 W.
Setting the cooking time
Set the preheat time to 3 minutes, using the rotary knob (unless the cooking guide specifically recommends otherwise).

• The preheat time will be shown on the display.
If you do nothing for 3 seconds, the "START" symbol on the display will blink to indicate that the oven is waiting for you to start preheating.
Starting
Press the "START" button.

- The oven will start preheating for the selected time. • After the preheat time of 3 minutes, the oven will stop.
2nd step: Crispy cooking
① As the Crousty dish has a non-stick coating, it does not need to be oiled before placing food on it. ① Always use oven gloves to handle the Crousty dish, it can be very hot.
Open the oven door and place the food in the Crousty dish.
Select "Crousty" mode by pressing the "SELECT" button 4 times.

- The "Crousty" symbol will appear on the display, together with ":0".

Setting the cooking time
Select the cooking time, using the rotary knob.

The maximum timer setting in "Crousty" mode is 60 minutes.
Setting the power

By default, the oven runs at maximum power. If you wish to use maximum power, there is no need to make a power setting. If, on the other hand, you wish to use a reduced power setting, select it by pressing the "W" button the required number of times.
600W
450W
300W
In "Crousty" mode, the maximum permitted power is 600 W.
Press the "START" button to start cooking.

The grill element may well turn on and off during cooking. This is quite normal and prevents overheating. The Crousty dish must not be put through the dishwasher. Wash it in warm water with washing-up liquid. Do not use abrasive cleaners.
Using the DUO function
DUO

Reheating on two levels
For use only with the DUO rack (see details of accessories, p. 20)
This function can be used to heat two plates at the same time (using microwave mode).
2 programmes are available, according to the desired result:
- Hot 2. Very hot

There is no need to enter the type of food or its weight.
The automatic time calculation is based on 2 plates of about 300 g.
Check that the grill element is in the horizontal position (hinged up against the roof of the oven) before using the "DUO" mode.
Use
Place the first plate in the centre of the turntable. Place the DUO rack over this plate and place the second plate on the rack.
Select the programme number by pressing the DUO button once or twice, depending on the degree of heating required.
- The number of the programme will be shown on the display, together with the "DUO" symbol.

If you do nothing for 3 seconds, the "START" symbol on the display will blink to indicate that the oven is waiting for you to start heating.
Press the "START" button.
- The oven will start and run for exactly the time required to warm/heat your two plates.
- At the end of cooking, the oven will beep 4 times and " : 0" will blink 4 times on the display. The clock time will then reappear on the display.
- If you do not open the oven at the end of cooking, it will sound a reminder every minute.
Using the quick reheat function
If you wish to warm a dish or liquid very briefly, use the "Start +30 sec" button.
① Check that the grill element is in the horizontal position (hinged up against the roof of the oven).
Use
Place the food at the centre of the turntable and close the door.
Press the "START" button.

- The oven will start automatically for 30 seconds at maximum power.
The power can be changed at any time by pressing the "W" button.

Each time that the "START" button is pressed, the cooking time will be increased by 30 seconds.

Adjusting the cooking time
As when using a conventional oven, you may need to make slight adjustments to the cooking, heating or defrosting times indicated in the cooking guide (p. 31) or on the food packaging.
This can be done in two ways :
Using the rotary knob

Turn the knob clockwise or anticlockwise
to increase or reduce the cooking time.
• The time shown on the display will change. - Changing the setting does not stop the oven.
Using the "START + 30 s" button

Press the "START + 30 s" button one or more times.
• Each time you press the button, the time shown on the display will increase by 30 seconds. - Changing the setting does not stop the oven.
Stopping the oven
Pause
You can interrupt the operation of the oven at any time to :
- check the progress of cooking,
- turn or stir the food,
- allow the food to rest.
To do this, you can simply open the oven door or press once on the "STOP/CANCEL" button.

- The oven will stop and hold the cooking status in memory.
- No change in the display will occur during the pause. The "Start" symbol on the display will blink until you restart cooking.
To restart cooking, press the "START" button.

To cancel the cooking, press the "STOP/CANCEL" button again.
- The clock time will then reappear on the display.
Cancel
The "STOP/CANCEL" button can also be used to cancel entirely the current cooking or programme.
If you are currently cooking :
press the "STOP/CANCEL" button twice.
- At the first press, the oven will pause; at the second press, the cooking will be cancelled and the display will show the clock time again.
If you are currently setting the oven:
press the "STOP/CANCEL" button once.
- The current settings will be cancelled and the display will show the clock time again.
Activating the Child Safety feature
Your oven is equipped with a control locking system, which prevents its being started unintentionally or by unsupervised children.
To lock :
Keep the "STOP/CANCEL" button pressed for 3 seconds.

- The oven will beep to indicate that the controls are locked.
- The display will show "SEC" in place of the time.

The buttons are locked.
- Any attempt at starting will cause the oven to beep.
To unlock :
Keep the "STOP/CANCEL" button pressed for 3 seconds.
- The oven will beep to indicate that the controls are unlocked.
- The display will revert from "SEC" to the time.
This function is only available when the oven is stopped. ① After an interruption of supply, the Child Safety will be unlocked.
Cooking guide
The times indicated in the cooking tables are given for guidance only. The correct cooking time can vary with the shape, thickness and temperature of the food.
The resting times are for use after cooking, heating or defrosting.
Microwave-cooking
"micro" mode
• Cooking guide for frozen vegetables
Use a Pyrex container, suitable for microwaves. Cover. Start the oven and stir twice during cooking. At the end of cooking, stir thoroughly, add salt, herbs or butter and cover while resting.
| Food Quantity Power | Cooking time(minutes) | Resting time(minutes) | Instructions | ||
| Spinach | 150 g | 600 W | 41/2 - 51/2 | 2 - 3 | Add a tablespoon of cold water |
| Broccoli 300 g | 600 W 9 - 10 | 2 - 3 | Add 2 tablespoons of cold water | ||
| Peas | 300 g | 600 W | 71/2 - 81/2 | 2 - 3 | Add a tablespoon of cold water |
| Green beans 300 g | 600 W 8 | - 9 2 - 3 | Add 2 tablespoons of cold water | ||
• Cooking guide for rice and pasta
Rice: Use a large Pyrex container, suitable for microwaves. Pour in the rice and cold water, cover and start the oven.
① Rice doubles in volume during cooking
At the end of cooking, stir thoroughly, add salt, herbs or butter and leave to rest for the time indicated.
The rice may not have absorbed all the water during cooking. Drain if necessary.
Pasta: Use a large Pyrex container, suitable for microwaves. Pour in the boiling water, a pinch of salt, the pasta and mix. Do not cover. Start the oven.
Stir once during cooking. At the end of cooking, leave to rest for the time indicated. Drain.
| Food Quantity Power | Cooking time (minutes) | Resting time (minutes) | Instructions | ||
| White rice | 250 g | 850 W | 15 - 17 | 5 | Add 500 ml of cold water |
| Pasta | 250 g | 850 W | 11 - 12 | 5 | Add 1 litre of boiling water |
• Cooking guide for fresh vegetables
Use a Pyrex container, suitable for microwaves. Pour in 2 to 3 tablespoons of cold water for every 250 g of vegetables (unless otherwise indicated in the table below). Add the vegetables and cover.
Start the oven and stir once during cooking. At the end of cooking, stir thoroughly, add salt, herbs or butter and cover while resting.
For best results, chop the fresh vegetables. The smaller the pieces, the faster they will cook.
| Food Quantity Power | Cooking time (minutes) | Resting time (minutes) | Instructions | ||
| Broccolis | 250 g500 g | 850 W | 4 1/2 - 58 - 9 | 3 | Place the green stalks towards outside. |
| Carrots | 250 g | 850 W | 4 1/2 | 3 | Cut the carrots evenly into slices. |
| Cauliflower | 250 g500 g | 850 W | 5 - 5 1/27 1/2 | 3 | Cut the largest flower heads in 2. Place the stalks towards outside. |
| Courgettes | 250 g | 850 W | 3 1/2 - 4 | 3 | Cut the courgettes into slices.Add 2 tablespoons of water or a knob of butter. Cook until tender. |
| Potatoes | 250 g500 g | 850 W | 4 - 57 1/2 - 8 1/2 | 3 | Peel the potatoes and cut them into 2 or 3 equal pieces. |
Reheating – "micro" mode
After heating liquids, it is advisable to leave the container to stand in the oven for at least 20 seconds. This allows the heat to spread through the liquid and minimises any risk of overflow and scalding. Stir the liquid during and after heating.
• Warming guide for baby food.
| Food Quantity Power | Cooking time (minutes) | Resting time (minutes) | Instructions | ||
| Baby food (vegetables and meats) | 190 g 600 | W 30 s 2 - 3 | Place the food in a ceramic bowl. Cover.After cooking, cover and leave to rest.Before serving, carefully check the temperature of the food. | ||
① It is possible to heat baby bottles in the microwave, taking care to respect the instructions given on the milk cartons.
• Heating guide for foods and liquids
| Food Quantity Power | Cooking time (minutes) | Resting time (minutes) | Instructions | ||
| Drinks (coffee, tea, water) | 150 ml (1 cup)250 ml (1 mug) | 850 W 45 s 1 | Do not cover. Place a single cup in the centre, 2 cups on either side and 3 or 4 cups in a circle around the edge of the turntable. Leave the cups in the oven during the resting time and then stir. | ||
| Soup (refrigerated) | 250 g | 850 W | 11/2 - 2 | 2 - 3 | Pour into a ceramic bowl or soup plate. Cover. Stir after cooking and again before serving. |
| Ready-made meal (refrigerated) | 350 g | 850 W | 2 - 21/2 | 3 | Place on a ceramic plate. Cover. |
Defrosting - "micro" mode - power at 180 W
Place the frozen food in a dish. Do not cover.
At regular intervals during defrosting, turn the food and pour off any water.
Ensure that the food does not start to cook during defrosting. If any part of the food should begin to cook, cover it with a small piece of aluminium foil to screen it from the microwaves.
If the surface of poultry becomes warm, stop defrosting, leave to stand for 20 minutes before recommencing.
Leave to stand for the full resting time to be sure that defrosting is complete.
The thicker the food, the longer the defrosting time required.
The table below applies for frozen food at a temperature between -18 °C and -20 °C.
Defrosting must be carried out at a power setting of 180 W.
| Food Quantity | Cooking time (minutes) | Resting time (minutes) | Instructions | |
| Meat : minced beef pork steak | 250 g 500 g 250 g | 7 - 8 13 - 14 71/2 - 81/2 | 5 - 10 | Place the food on a flat ceramic plate. Protect thin slices with aluminium foil. Turn halfway through defrosting. |
| Poultry : chicken pieces whole chicken | 500 g (2 pieces) 900 g | 141/2 - 151/2 25 - 28 | 5 | Place on a plate (pieces skin down, whole chicken breast down). Protect thin and fragile parts with aluminium foil.Turn halfway through defrosting. |
| Fish : fillet whole fish | 200 g 400 g | 7 - 8 12 - 13 | 5 | Place the fish in the middle of a ceramic plate. Place the more fragile pieces under the thicker pieces. Cover the ends with aluminium foil. Turn halfway through defrosting. |
| Fruit : Small fruit | 250 g | 6 - 7 | 5 | Spread the fruit out on a large glass plate. |
| Bread: Bread rolls (50 g each) Sandwich loaf | 2 rolls 4 rolls 250 g | 30s - 1 min. 2 - 21/2 51/2 - 6 | 5 - 10 | Arrange the rolls in a circle on grease-proof paper in the centre of the turntable.Turn halfway through defrosting. |
"grill"/ "micro grill" modes
Cooking with grill alone or with combined microwaves + grill
Before use, the grill must be preheated for 3 minutes.
Follow the recommendations given in the following tables.
- Cooking guide for "grill" / "micro grill" mode: fresh food
| Food Quantity | Mode + power | Side 1 Time (minutes) | Side 2 Time (minutes) | Instructions | |
| Chicken 1 kg 100 | "micro grill" mode 450 W | 22 12 | Brush with oil and sprinkle with spices. Place the chicken in a dish on the turntable. Leave to stand for 2-3 minutes. | ||
| Chicken pieces 500 g | "micro grill" mode 300 W | 12 9 - 10 | Brush with oil and sprinkle with spices. Place the pieces in a dish on the DUO rack. Leave to stand for 2-3 minutes. | ||
| Lamb chops 400 g | "grill" mode | 13 - 14 10 - 12 | Brush with oil and sprinkle with spices. Place the chops in a dish on the DUO rack. Leave to stand for 2-3 minutes. | ||
| Pork steaks 250 g | "micro grill" mode 300 W | 7 - 8 | grill only 6 - 7 | Brush with oil and sprinkle with spices. Place the steaks in a dish on the DUO rack. Leave to stand for 2-3 minutes. |
- Cooking guide for "micro grill" mode: frozen food
| Food Quantity Power | Cooking Time (minutes) | Instructions | |
| Vegetable or potato gratin | 400 g 450 W 14 - 15 | Place the frozen gratin in a round Pyrex dish. Place the dish on the DUO rack. Leave to stand for 2-3 minutes. | |
| Pasta (lasagne / cannelloni / macaroni) | 400 g 600 W 15 - 20 | Place the food in a Pyrex dish. Place the dish directly on the turntable. Leave to stand for 2-3 minutes. |
"Crousty" mode
We advise that your Crousty dish should be preheated directly on the turntable.
Preheat it at a power of 600 W and observe the times indicated in the table below.
| Food Q | Quantity Power | Preheat time (minutes) | Cooking time (minutes) | Instructions | |
| Bacon | 4 rashers | 600 W | 2 | 2 | Preheat the Crousty dish. Place the rashers side-by-side in the dish and place it on the DUO rack. |
| Frozen burgers | 2 burgers (125 g) | 600 W | 4 | 7 | Preheat the Crousty dish. Arrange the burgers in the Crousty dish and place it on the DUO rack. Turn the burgers after 4-5 min cooking. |
| Frozen baguette | 250 g | 450 W | 2 | 3 | Preheat the Crousty dish. Place the baguette in the Crousty dish and place it on the DUO rack. |
| Cooked pizza, refrigerated | 300 g | 450 W | 5 | 7 | Preheat the Crousty dish. Place the pizza in the dish and place the dish on the DUO rack. |
| Frozen pizza | 350 g 600 W | 4 | 8 | Preheat the Crousty dish. Place the frozen pizza in the dish and place the dish on the DUO rack. | |
| Chicken nuggets | 200 g 600 W | 4 | 9 | Preheat the Crousty dish. Oil it and arrange the nuggets in a circle. Turn them. | |
Cleaning
Cleaning the oven
The following parts of your microwave must be cleaned regularly to avoid any accumulation of food particles and grease:
• The inner and outer surfaces of your appliance, • The door and its seals, • The drive, the ring bearing and the turntable.
① Failure to maintain the oven in a clean condition could lead to deterioration of the surface that could adversely affect the life of the appliance and possibly result in a hazardous situation.
① Make sure that the door closes correctly.
Clean the outer surfaces with a soft cloth and soapy water. Rinse and dry carefully. Remove any particles or stains inside your appliance or on the ring bearing with a soapy cloth. Rinse and dry carefully. The grill element hinges down to make it easier to clean the roof of the oven.
To help dislodge food particles and eliminate bad smells, put a glass of lemon juice diluted in water on the turntable and run your appliance for 2 minutes at maximum power. The steam will soften the dirty marks. Rinse and dry.
Take care not to allow water to run into the ventilation holes.
Never use abrasive or solvent cleaners.
Clean the door seals carefully, making sure that:
• There is no accumulation of particles, - Nothing prevents the door from closing properly. - Clean the inside of your appliance after every use with a suitable detergent.
Always allow your oven to cool down before cleaning it.
Cleaning the accessories
- glass turntable
- DUO rack
can be cleaned in the dishwasher.
- crousty dish
- feeding bottle
cannot be put through the dishwasher.
Wash it with soapy water. Rinse and dry them carefully.
Technical problems
Your appliance must not be used if the door or door seals are damaged, for example :
- broken hinges
- damaged seals
- internal deformation
Please contact the after-sales service for any repairs (cf: attached list).
It always takes time to become familiar with a new appliance. If you have one of the problems listed below, try the solutions suggested.
- The following occurrences are perfectly normal and should give no cause for alarm:
- condensation inside the oven,
- the escape of air around the door and the outer walls,
- light reflections around the door and on the outer walls,
- steam escaping from the door or the ventilation holes.
- If you find that the food is not cooked at all:
- make sure that you have programmed the timer correctly and have pressed the "Start + 30 s" button,
- make sure that the door closes correctly,
- make sure that the circuit breaker is not tripped or the fuse blown.
• The food is overcooked or undercooked:
- make sure that the programmed cooking time is correct for the food you are cooking,
- make sure that you have chosen the right power level,
- make sure that you have not forgotten to remove the aluminium foil covering the food tray,
- make sure that you are not using an "absorbent" container,
- make sure that the rear ventilation holes of the appliance are not obstructed.
- Cracks can be heard or sparks can be seen inside the oven :
- make sure that you have not used containers with metallic decoration,
- make sure that you have not left a metal utensil (fork etc.) inside the oven,
- make sure that you have not positioned aluminium foil too close to the oven walls, positioned a metal tray badly or too close to another metal tray or forgotten to remove the metal fastener from a freezer bag.
- A beep sounds if you press any button on the control panel:
- make sure that the Child Safety feature is not activated, if it is, deactivate it.
- The interior lighting does not work, although your oven works normally :
- the bulb is probably blown, your appliance nevertheless remains usable.
- In the event of overheating or prolonged use with a small quantity of food:
- the thermal safety device fitted in your appliance may operate, turning it off. Wait for 15 minutes for the safety device to deactivate. If your appliance still does not work after this 15-minute period, unplug it and do not use it.
If these suggestions do not solve your problem, collect the following information: - the model and serial number printed on the rear of the oven, - your guarantee, - a clear description of your problem. You should then contact your local dealer or the after-sales service.
Waste disposal requirements
Moulinex endeavours to respect the environment as far as is possible in the manufacture of its packaging. The package is made of 100% recyclable corrugated cardboard.
The plastic parts of the appliance have a marking that indicates the type of material. This enables the parts to be recycled.
You can obtain more detailed information on the disposal of each material from your local authority department with responsibility for waste disposal. This department can also advise you on the disposal of any waste, including used appliances.
Your questions regarding disposal can be addressed to your local waste disposal service or to your Moulinex approved service centre.
Performance testing data
According to standard IEC 705
The sub-committee of the International Electrotechnical Commission, SC 59H, has developed a standard for comparative heating performance testing of various microwave ovens.
We recommend the following for the model in your possession.
| Test Load | Approximative time (minutes) | Power level Container | ||
| Egg custard 1000 g | 12 - 15 850 W | IEC 705 Recommended Container | ||
| Sponge Cake 475 g | 7 - 9 600 W | |||
| Meatloaf 900 g 17 | 19 850 W | |||
| Defrost 500 g 10 | 2 180 W | |||
These data are given for an appliance with a nominal power rating of 850 W.
Technical characteristics
| Model AFM4 | |
| Supply rating 230V ~ 50 Hz AC | |
| Power consumption :Maximum powerMicrowavesGrill | 2400 W1300 W1100 W |
| Output power 850 W | |
| Frequency 2450 MHz | |
| Dimensions (L x P x H) mmOutsideInside | 489 X 275 X 389330 X 211 X 320 |
| WeightGrossNet | 16,5 kg15 kg |
- CONTENTS
- APPLIANCE DESCRIPTION
- DISPLAY
- CONTROL PANEL
- ACCESSORIES
- DRIVE
- RING BEARING
- TURNTABLE
- DUO RACK
- CROUSTY DISH
- FEEDING BOTTLE HOLDER
- INSTALLATION
- PREPARATION
- CONNECTING
- POSITION
- IMPORTANT SAFETY INSTRUCTIONS
- INSTRUCTIONS FOR USE
- FOODS
- CONTAINERS AND MATERIALS
- COOKING TIME
- RESTING TIME
- SETTING THE TIME
- ADJUSTING THE INDEPENDENT TIMER
- USING THE AUTOMATIC PROGRAMMES
- AUTO COOK
- AUTO DEFROST
- AUTO CROUSTY
- USING THE MANUAL FUNCTIONS
- MICRO MODE (MICROWAVES ONLY)
- GRILL MODE
- USING THE DUO FUNCTION
- USING THE QUICK REHEAT FUNCTION
- ADJUSTING THE COOKING TIME
- USING THE ROTARY KNOB
- STOPPING THE OVEN
- PAUSE
- CANCEL
- ACTIVATING THE CHILD SAFETY FEATURE
- TO LOCK
- TO UNLOCK
- COOKING GUIDE
- MICROWAVE-COOKING
- REHEATING – "MICRO" MODE
- DEFROSTING - "MICRO" MODE - POWER AT 180 W
- CLEANING
- CLEANING THE OVEN
- CLEANING THE ACCESSORIES
- TECHNICAL PROBLEMS
- WASTE DISPOSAL REQUIREMENTS
- PERFORMANCE TESTING DATA
Brand : MOULINEX
Model : AFM443
Category : Microwave