
Artisan Series 1HP 7 Speed Blender - Blender CRUX - Free user manual and instructions
Find the device manual for free Artisan Series 1HP 7 Speed Blender CRUX in PDF.


User questions about Artisan Series 1HP 7 Speed Blender CRUX
0 question about this device. Answer the ones you know or ask your own.
Ask a new question about this device
Download the instructions for your Blender in PDF format for free! Find your manual Artisan Series 1HP 7 Speed Blender - CRUX and take your electronic device back in hand. On this page are published all the documents necessary for the use of your device. Artisan Series 1HP 7 Speed Blender by CRUX.
USER MANUAL Artisan Series 1HP 7 Speed Blender CRUX
natural_image
Exterior view of a CRUX Artisan Series blender with visible branding and control buttons (no text-heavy elements)1HP 7 SPEED BLENDER
natural_image
Abstract black X-shaped symbol with a white circular 'C' at center, no text or symbols presentContents
Índice
Table des matières
Table of Contents
Important Safeguards....4
Additional Important Safeguards....5
Notes on the Plug....6
Notes on the Cord 6
Plasticizer Warning 6
Electric Power 6
Getting To Know Your 1HP 7 Speed Blender....7
Control Panel 7-8
Before Using For The First Time....8
Operating Instructions....8
Jar Assembly 9
Operation....9
Function Selection Guide....10
User Maintenance Instructions 10
Care and Cleaning Instructions....10
Storing Instructions....11
Troubleshooting....11
Recipes 12-15
Warranty....16
Índice
MEDIDAS DE SEGURIDAD IMPORTANTES....17-18
OTRAS MEDIDAS DE SEGURIDAD IMPORTANTES....18
When using electrical appliances, basic safety precautions should always be followed including the following:
1. READ ALL INSTRUCTIONS.
- To protect against risk of electrical shock do not put cord, plugs, or appliance in water or other liquid.
- This appliance is not intended for use by persons (including children) with reduced physical, sensory or mental capabilities, or lack of experience and knowledge, unless they have been given supervision or instruction concerning use of the appliances by a person responsible for their safety.
- Close supervision is necessary when any appliance is used by or near children.
- This 1HP 7 Speed Blender is not a toy. Children should be supervised to ensure they do not play with the appliance.
- Turn the appliance OFF, then unplug from outlet when not in use, before putting on or taking off attachments and before cleaning. To unplug, grasp the plug and pull from the outlet. Never pull from the power cord. CAUTION: FLASHING LIGHT INDICATES READY TO OPERATE. AVOID CONTACT WITH MOVING PARTS.
- Do not operate any appliance with a damaged cord or plug or after the appliance malfunctions, or it is dropped, or has been damaged in any manner. Contact Consumer Service for examination, repair or adjustment.
- The use of attachments, including canning jars, not recommended by the manufacturer may cause a risk of injury to persons.
- Do not use outdoors.
- Do not let cord hang over edge of table or counter.
- Do not let cord contact hot surfaces, including the stove.
- Blades are sharp. Handle carefully.
- Do not blend hot liquids.
- Never use the 1HP 7 Speed Blender jar to process food without the lid and lid cap properly locked in place.
- Never place any 1HP 7 Speed Blender attachments into a microwave oven.
- Keep hands and utensils out of the jar while blending to reduce the risk of severe injury to persons or damage to the unit.
- Always operate the blender with its cover in place. A scraper may be used but must be used only when the blender is not running.
- Never add ingredients to the jar while the appliance is operating.
- The jar must be properly assembled and in place before operating the appliance. To reduce the risk of injury, never place cutter-assembly blades on base without jar properly attached.
FOR HOUSEHOLD USE ONLY SAVE THESE INSTRUCTIONS
ADDITIONAL IMPORTANT SAFEGUARDS
- All users of this appliance must read and understand this instruction manual before operating or cleaning this appliance.
- The cord to this appliance should be plugged into a 120V AC electrical outlet only.
- If this appliance begins to malfunction during use, immediately press the ON/OFF function or the function actively in use (with illuminated indicator light) and unplug the cord. Do not use or attempt to repair the malfunctioning appliance.
- If this appliance falls or accidentally becomes immersed in water, unplug it immediately. Do not reach into the water!
- Do not use this appliance after it has fallen into or becomes immersed in water.
- To reduce the risk of injury to persons or property, never use this appliance in an unstable position
- Do not use this appliance for other than its intended use.
- Do not use if the jar is cracked or chipped.
IMPORTANT: Do not overfill. Never fill ingredients beyond the jar's max line.
WARNING: Failure to add enough liquid before processing may cause the jar to break or chip.
WARNING: To avoid spills, make sure the lid is properly locked in place on the jar with the lid cap in position before pressing any SPEED or selecting one of the blending functions
Notes on the Plug
This appliance has a polarized plug (one blade is wider than the other). To reduce the risk of electric shock, this plug will fit in a polarized outlet only one way. If the plug does not fit fully into the outlet, reverse the plug. If it still does not fit, contact a qualified electrician. Do not modify the plug in any way.
Notes on the Cord
A. A short power-supply cord (or detachable power-supply cord) is to be provided to reduce risks resulting from becoming entangled in or tripping over a longer cord.
B. Longer detachable power-supply cords or extension cords are available and may be used if care is exercised in their use.
C. If a long detachable power-supply cord or extension cord is used:
1) The marked electrical rating of the detachable power-supply cord or extension cord should be at least as great as the electrical rating of the appliance;
2) If the appliance is of the grounded type, the extension cord should be a grounding-type 3-wire cord; and
3) The longer cord should be arranged so that it will not drape over the counter top or table top where it can be pulled on by children or tripped over.
Plasticizer Warning
CAUTION: To prevent Plasticizers from migrating to the finish of the counter top or table top or other furniture, place NON-PLASTIC coasters or place mats between the appliance and the finish of the counter top or table top. Failure to do so may cause the finish to darken; permanent blemishes may occur or stains can appear.
Electric Power
If the electrical circuit is overloaded with other appliances, your appliance may not operate properly. It should be operated on a separate electrical circuit from other appliances.
GETTING TO KNOW YOUR 1HP 7 SPEED BLENDER
Product may vary slightly from illustration
Figure 1
- 2 oz Measuring Cap
- Jar Cover
- 50 oz Tritan Jar
- Stainless Steel Blades
- Motor Base
- Control Panel
- Non-Skid Feet
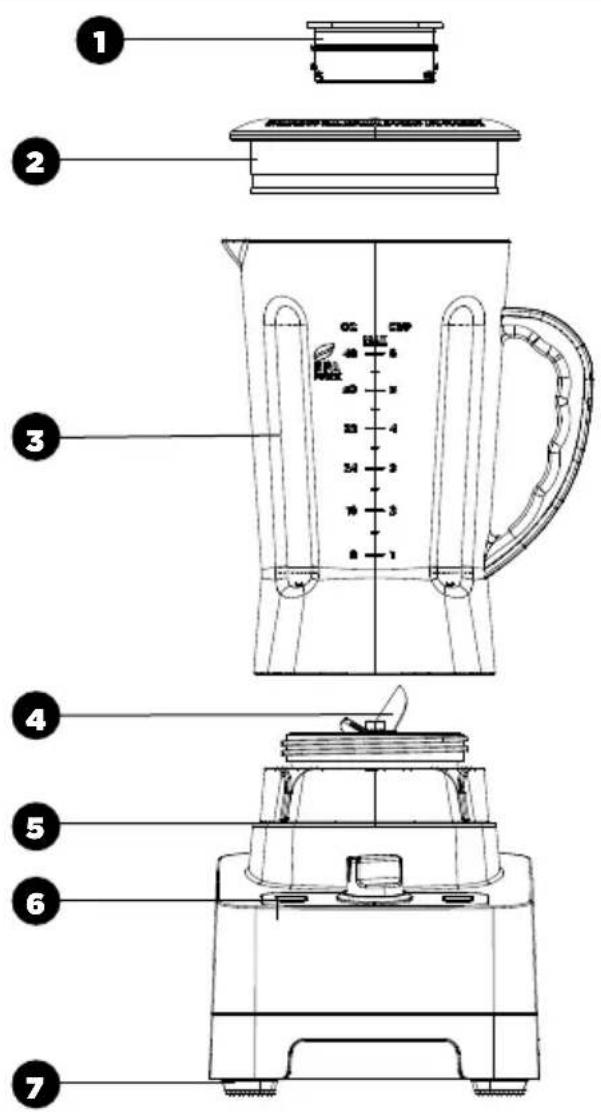
text_image
Technical diagram of a blender with numbered parts for identification and assembly reference.CONTROL PANEL
The control panel consists of the ON/OFF button and PULSE button along with a control dial knob with the following blending functions: LOW, HIGH, PUREE, LIQUIFY, ICE CRUSH, SMOOTHIE/AUTO CLEAN. There are 2 indicator lights on the control panel; one for POWER ON/OFF and the other for the PULSE function.
- On/Off
- Low
- High
-
Puree
-
Liquify
- Ice Crush
- Smoothie/Auto Clean
- Pulse
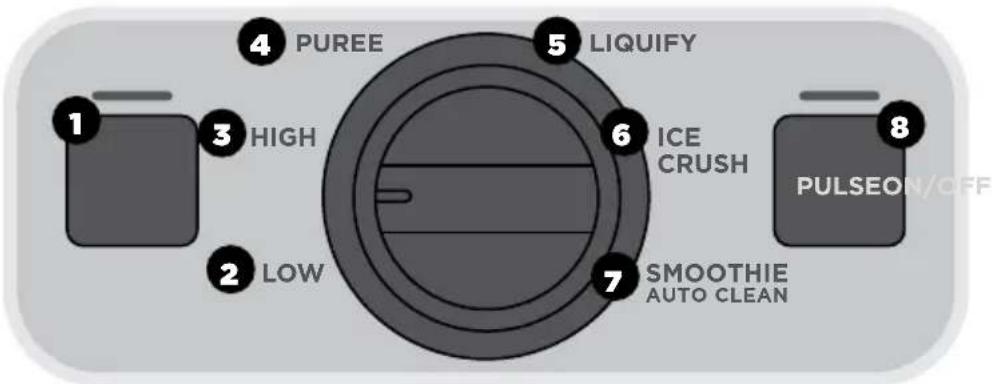
text_image
1 2 HIGH 3 LOW 4 PUREE 5 LIQUIFY 6 ICE CRUSH 7 SMOOTHIE AUTO CLEAN 8 PULSEON/OFFON/OFF
- Press to turn the unit ON or OFF.
- Press this button before starting any of the 7 functions as well as to stop any operation.
LOW
- Select the low setting to blend ingredients to the desired consistency when low speeds are required. Once blending has commenced, press the ON/OFF button again to stop operation.
HIGH
- Select the high setting to blend ingredients to the desired consistency when faster speeds are required. Once blending has commenced, press the ON/OFF button again to stop operation.
PULSE
- This function blends ingredients through controlled pulses. This setting helps dislodge ingredients clumped around the blade and at the bottom of the jar.
- Press this button to initiate the pulse blending function, for short bursts of power. Pulse is activated as long as the button is pressed and will cease once the button is released.
- For best results, time the pulses to ensure that blades come to a complete stop before beginning the next pulse.
PUREE
- This setting allows you to puree fruits and vegetables and prepare smooth soups and spreads. All ingredients should be blended cold or at room temperature.
- When processing food, ensure that sufficient liquid is added to create a smooth and even consistency. Add small amounts of stock, yogurt, milk or water until the desired consistency is achieved.
- When desired consistency has been reached, press the ON/OFF button to STOP operation.
LIQUIFY
- Ideal for blending soups and thicker ingredients. When the liquify button is pressed, the unit will begin to blend at a lower speed, then progressively increase to blend at a higher speed.
- Ideal setting for preparing soups and blending thicker or denser foods.
- When desired consistency has been reached, press the ON/OFF button to STOP operation.
ICE CRUSH
- Quickly crushes up to 10 ice cubes and is perfect for preparing frozen drink recipes such as margaritas and daiquiris.
- When desired consistency has been reached, press the ON/OFF button to STOP operation.
SMOOTHIE/AUTO CLEAN
- Blends fruits and vegetables into a perfect smoothie. Refer to the recipe section for suggested smoothie recipes.
- In order to clean the jar, fill with water to the max line and add a small amount of liquid dish soap. Press the function and let operation continue until it automatically stops. Rinse out the contents with warm water and add room temperature water until the max line and run once again. Place upside down on rack to dry.
• Always clean immediately after use to prevent food from hardening. - When desired consistency has been reached, press the ON/OFF button to STOP operation.
• DO NOT PLACE THE JAR IN THE DISHWASHER.
BEFORE USING FOR THE FIRST TIME
Carefully unpack the 1HP 7 Speed Blender and remove all packaging materials.
Check the contents to ensure that all attachments (50 oz. jar, lid and measuring cap) are present (see Figure 1), and have been received in good condition.
- Wash the jar, lid, measuring cap in warm, soapy water before first use. Rinse thoroughly.
WARNING: Do not touch blades. Blending blades are very sharp. Use extreme care when handling. Failure to do so can result in personal injury.
- Wipe the motor base with a damp cloth.
WARNING: DO NOT IMMERSE THE MOTOR BASE IN WATER.
OPERATING INSTRUCTIONS
Place the motor base on a flat, clean, dry counter top or table. Make sure the unit is unplugged.
JAR ASSEMBLY
- Always check to be sure the blade collar is properly fitted into the jar before use.
- To avoid spills, ensure that the lid is firmly secured to the jar. Press the lid down on the top portion of the jar until it rests firmly in place. Place the measuring cap into the center of the lid and twist clockwise to secure it safely in place. Use the measure cap to measure and add ingredients prior to commencing any operation.
- Add ingredients into the jar.
NOTE: When blending, foods or liquids tend to expand as they rise up the side of the jar. Do not fill jar past its max line.
WARNING: Pay close attention while processing. Never operate the blender when the jar is empty.
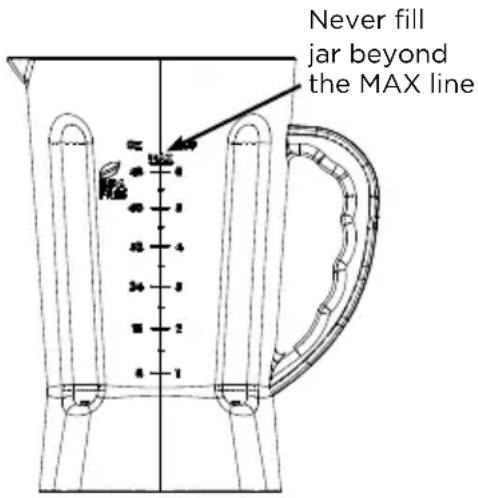
text_image
Never fill jar beyond the MAX lineOPERATION
WARNING: Never overfill the jar. To avoid personal injury, leakage or damage to the blender, make sure that ingredients do not surpass the max line.
- Make sure the lid cap is in position in the lid.
- Add the lid onto the jar. Press to seal. Check before blending.
WARNING: To avoid spills, make sure the lid is locked securely before pressing any SPEED or or selecting one of the blending functions.
WARNING: Do not blend hot liquids.
- After adding ingredients to the jar. Plug in the blender, the ON/OFF indicator will flash.
- Turn the control dial knob to the desired blending functions and then press the ON/OFF button to begin processing. The ON/OFF indicator will stop flashing and keep solid light.
- When using the PULSE function, the indicator light will illuminate when pressed. The blender will STOP operating and the light will turn off when the button is released.
- When blending HIGH or LOW SPEED, press the ON/OFF button to STOP blending when desired consistency is reached.
- When blending: Puree, LIQUIFY, ICE CRUSH, SMOOTHIE/AUTO CLEAN, press the ON/OFF button to STOP blending when the desired consistency has been reached. Check results and if necessary, stir in liquid, water, juice or stock to thin pureed food until the desired consistency is reached.
WARNING: Do not operate the motor continuously for more than 1 minute at a time.
- After processing food in the jar, pull the lid up and off jar to remove. The spouted jar makes pouring easy.
HINT! A small spatula is helpful for removing thicker processed foods.
- Unplug the blender when not in use and before cleaning.
FUNCTION SELECTION GUIDE
| INGREDIENT/RECIPE FUNCTION | DESCRIPTION | |
| Pudding, Pie Filling, Custard PULSE | SE or LOW Thick and creamy | |
| Bread, Stale Bread, Crackers, Cookies (1/2 inch pcs, 1 cup batches) | PULSE or LOW Coarse to fine crumbs | |
| Nuts (shelled, 1/2 cup or less at a time) | PULSE or LOW Coarse to fine chopped nuts, chopped nuts for baking | |
| Nuts (shelled, 1/2 cup or less at a time)Homemade Nut Flours, Meals, Nut Butter | ICE CRUSH Fine ground nut flours,nut meals.Fresh preservative-free nut butters | |
| Mayonnaise, Salad Dressings, Salsas | LOW Thick and creamy,blended and emulsified | |
| Pancake/Waffle Batter, Omelets | LOW Light and fluffy | |
| Cream, Egg Whites HIGH Thick and frothy | ||
| Milk Shakes HIGH Smooth and creamy | ||
| Smoothies, Drinks SMOOTHIE Smooth, thick & creamyand health drinks | ||
| Vegetable Puree Puree Smooth and creamy | ||
| Crush Ice (up to 10 cubes) ICE CRUSH Coarse crush to snowy | ||
| Frozen Cocktails ICE CRUSH Thick and slushy | ||
| Dips, Appetizers ICE CRUSH Auto program is perfectfor leafy recipes | ||
| Almond Milk, Coconut Milk, Soy Milk | LIQUIFY | Unfiltered for cooking.Filter for drinking. |
| Fresh Fruit Drinks LIQUIFY | Thick and pulpy |
BLENDER NOTES:
- When using the PULSE function, the operation will STOP when the button is released.
- When blending HIGH or LOW SPEED, press ON/OFF button to stop blending.
- When blending Puree, LIQUIFY, ICE CRUSH, SMOOTHIE/AUTO CLEAN the blender will automatically stop when their cycle is complete. To interrupt function at any time during the blending cycle, press ON/OFF button to STOP operation.
USER MAINTENANCE INSTRUCTIONS
This appliance requires little maintenance. It contains no user serviceable parts.
Do not try to repair it yourself. Contact the customer service department for any unusual issues you may experience.
CARE & CLEANING INSTRUCTIONS
CAUTION: Never immerse the motor base, plug or cord in water or any other liquid.
- Always unplug the blender before cleaning.
- Rinse jar, lid and measuring cap immediately after processing to make cleanup easier. It is not recommended to remove the blade from the jar.
- For quick clean-ups in between batches, fill the jar until the max line with clean, warm water. Select the AUTO CLEAN function. When the function is complete, press ON/OFF to STOP operation. Rinse jar and blade. Rinse lid and measuring cap separately.
- The motor base may be wiped with a damp cloth or sponge. Dry thoroughly.
WARNING: DO NOT IMMERSE THE MOTOR BASE IN WATER.
STORING INSTRUCTIONS
- Unplug and clean unit.
- Store in original box or in a clean, dry place.
- Never store the 1HP 7 Speed Blender while it is hot or plugged in.
- Never wrap cord tightly around the appliance. Never place any stress on cord, especially where the cord enters the motor base, as this could cause the cord to fray and break.
- There is a cord storage area in the back of the unit's base. Push the cord gently in that area for storage.
TROUBLESHOOTING
| PROBLEM CAUSE SOLUTION | ||
| The blender motor rotates very slowly. | Jar is overloaded. • Remove some food from the jar and continue blending. Ensure that ingredients do not surpass the max line.• Add liquid to the jar and continue blending. | |
| Ingredients are not mixing together well. | Heavier ingredients have fallen to the bottom. | • If necessary, remove jar and shake ingredients to re-distribute. Continue blending.• If the puree is still not blended smooth, it may be necessary to add liquid to the jar and continue blending. |
| The blender has stopped operating. | The motor is overloaded and stopped functioning to prevent damage. | • The blender has a resettable thermal protection. Unplug the unit and let it cool for 25 minutes. Reduce the load of the jar and clear any jams. Commence operation again as indicated in the operation section. |
| The jar is leaking from the blade area. | The blade base is loose. • Turn the blade base located below the jar clockwise to tighten. | |
Recipes
Kale & Black Bean Dip
Makes 3 cups
- 1-1/2 cups fresh kale, stemmed, cut into 1" ribbons
- 1/2 cup fresh cilantro (may substitute flat leaf parsley)
• 1/4 red or white onion, chopped - 1/2 cup salsa
• 1 (15.5 oz) can low-sodium black beans, drained & rinsed
• 1 large garlic cloves, coarsely chopped
• 1 tablespoon fresh lime juice
• 2 teaspoons ground cumin
• 1 teaspoon red chili powder
- salt and freshly ground black pepper to taste
• 1 cup chopped fresh tomatoes, to serve
- Add the kale and cilantro to the jar first.
- Select PULSE and release 2 or 3 times until the leaves are chopped into small pieces.
- Add the remaining ingredients to the jar.
- Place 1/2 can black beans into the jar and reserve the rest in a medium mixing bowl.
- Add the remaining ingredients to the jar.
- Press the ICE CRUSH button to begin processing. Once the desired consistency has been reached, press the ON/OFF button to STOP operation.
- In a medium bowl, use a potato masher to crush the reserved beans. Do not over-mash. The chunkiness of the hand-mashed beans will thicken and add texture to the rest of the dip. Add the dip from the blender and mix well.
- Serve topped with fresh chopped tomatoes. Great for serving with nachos.
White Bean & Spinach Avocado Dip
Makes: 2 cups
• 1-1/2 cups fresh spinach leaves
- 1/3 cup fresh cilantro (may substitute flat-leaf parsley)
• 1 (15-oz.) can cannellini beans, rinsed and drained
• 1 large avocado, seeded, peeled
• 1/2 lemon, peeled and zested
-
1/4 cup water
• 2 tablespoons extra-virgin olive oil
• 1 clove garlic, minced
• 1/2 teaspoon salt, plus extra, to taste
• 2 teaspoons ground cumin
• 8 dashes Tabasco sauce -
Add the spinach and cilantro to the jar first.
- Press PULSE and release 2 or 3 times until the leaves are chopped into small pieces.
- Add the remaining ingredients to the jar.
- Press the ICE CRUSH button to begin processing. Once the desired consistency has been reached, press the ON/OFF button to STOP operation.
- Season with salt and pepper.
Recipes
Sunflower Kale Pesto
Makes: 3 cups
• 2 cups fresh kale, stems removed
• 1/2 cup fresh basil
• 2 large garlic cloves, chopped
• 1/4 cup unsalted roasted sunflower seeds
- 1/2 cup grated Parmesan or Pecorino cheese
• 1 lemon, juiced and zested
• 1/2 teaspoon Kosher salt,
- to taste
• 2 tablespoons water
- 1/2 cup extra-virgin olive oil, plus more if needed
- Add the kale and basil in small handful portions into the jar.
- Press PULSE and release 2 or 3 times until the leaves are chopped into small pieces. Keep adding a handful of kale and basil until they are roughly chopped.
- Add the remaining ingredients to the jar in the order listed.
- Select the SMOOTHIE button to begin processing. Once the desired consistency has been reached, press the ON/OFF button to STOP operation.
NOTE: If pesto is too thick, add water or olive oil and mix well.
Antioxidant-Rich Super Blue Juice
Makes 3 cups
- 2 ice cubes, if a thicker smoothie is desired
• 1 cup frozen blueberries
• 1 fresh pear, quartered
• 1 orange, peeled and quartered
• 1 lime, juiced and zested
• 1/2-inch piece of ginger, peeled
• 1 tablespoon organic chia seeds
- 1/2 cup water
- Add the ingredients to the jar in the order listed.
- Select the SMOOTHIE button to begin processing. Once the desired consistency has been reached, press the ON/OFF button to STOP operation.
Ginger Carrot Salad Dressing
Makes: 1-1/2 cups
• 3 medium carrots, cut into chunks
• 1 shallot, peeled, cut in half
• 2-inch piece ginger root, peeled
• 2 tablespoons red balsamic vinegar
• 1 tablespoon roasted sesame seed oil
• 4 tablespoons extra-virgin olive oil
- 6 tablespoons water
- Add the ingredients to the jar in the order listed.
- Select the ICE CRUSH button to begin processing. Once the desired consistency has seen reached, press the ON/OFF button to STOP operation.
Recipes
Quick Recovery: Spinach Detox
An after-workout drink
Makes: 3-1/2 - 4 cups
• 1-inch ginger, peeled, quartered
- 1-1/2 crisp apples, cut into eighths (unpeeled, uncored)
• 1 cup red grapes, seedless
• 2 tablespoons blue agave syrup
-
1 lemon, peeled
• 1 cup fresh spinach
• 1/2 cup pineapple juice, cold
• 1/2 cup water, cold -
Add the ingredients to the jar in the order listed.
- Select the HIGH button to begin processing.
- Blend until smooth. Once the desired consistency has been reached, press the ON/OFF button to STOP operation.
Energy Revival
Servings: 2 - 3
- 3 to 4 ice cubes
- 2 ripe bananas
• 2 cups fresh pineapple
• 1 small cucumber, cut in half
• 1-1/2 cups coconut water
• 1 lime, juiced and zested
• 1 scoop vanilla protein powder
• 2 tablespoons vanilla yogurt
- Add all ingredients to the jar.
- Select the LIQUIFY button to begin processing. Once the desired consistency has been reached, press the ON/OFF button to STOP operation.
Creamy Green Empress Salad Dressing
Makes: 3 cups
- 1 cup (large handful) fresh kale, stems removed.
• 1/2 cup flat-leaf parsley
• 3 garlic cloves, peeled
• 3 tablespoons brown mustard
• 4 tablespoons capers
• 2 tablespoons caper brine, more to taste
• 1/2 teaspoon salt, more to taste
• 1/4 teaspoon ground black pepper
• 1/4 cup Greek yogurt, may substitute nonfat
- 1/2 cup cottage cheese, may substitute low-fat
• 1 ripe avocado, cut into chunks
• 1/4 cup fresh tarragon
• 1/4 cup fresh dill
• 2 scallions, chopped
• 1/2 cup extra virgin olive oil
• 1/4 cup water, more to thin
- Add the kale and parsley to the jar first.
- Select PULSE and release 2 or 3 times until the leaves are chopped into small pieces.
- Add the remaining ingredients to the jar in the order listed.
- Select the LOW button to begin processing.
- Blend for 20 seconds or until smooth. Once the desired consistency has been reached, press the ON/OFF button to STOP operation. More water can be added slowly if mixture needs to be thinner.
Recipes
Energy Booster Chocolate Banana Chia Pudding
Serves 2 - 3
• 1 cup coconut or almond milk
• 2 tablespoons cocoa powder
• 2 tablespoons organic blue agave, optional
- 6 dried dates,
pitted
- 1 banana
- 1/2 teaspoon
instant coffee crystals
• 4 tablespoons chia seeds
- Add all ingredients except chia seeds to the jar.
- Select the LIQUIFY button to begin processing. Once the desired consistency has been reached, press the ON/OFF button to STOP operation.
- Pour blended mixture into a covered storage bowl and add chia seeds.
- Stir well every 5 minutes for 20 minutes.
- Add the cover to the bowl and refrigerate 2 hours to overnight.
Variation: substitute instant coffee with 1/2 fresh vanilla bean, cut into pieces.
Limited TWO-YEAR Warranty
SENSIO Inc. hereby warrants that for a period of TWO YEARS from the date of purchase, this product will be free from mechanical defects in material and workmanship, and for 90 days in respect to non-mechanical parts. At its sole discretion, SENSIO Inc. will either repair or replace the product found to be defective, or issue a refund on the product during the warranty period.
The warranty is only valid for the original retail purchaser from the date of initial retail purchase and is not transferable. Keep the original sales receipt, as proof of purchase is required to obtain warranty validation. Retail stores selling this product do not have the right to alter, modify, or in any way revise the terms and conditions of the warranty.
EXCLUSIONS:
The warranty does not cover normal wear of parts or damage resulting from any of the following: negligent use of the product, use of improper voltage or current, improper routine maintenance, use contrary to the operating instructions, disassembly, repair, or alteration by anyone other than qualified SENSIO Inc. personnel. Also, the warranty does not cover Acts of God such as fire, floods, hurricanes, or tornadoes.
SENSIO Inc. shall not be liable for any incidental or consequential damages caused by the breach of any express or implied warranty. Apart from the extent prohibited by applicable law, any implied warranty of merchantability or fitness for a particular purpose is limited in time to the duration of the warranty. Some states, provinces or jurisdictions do not allow the exclusion or limitation of incidental or consequential damages, or limitations on how long an implied warranty lasts, and therefore, the above exclusions or limitations may not apply to you. The warranty covers specific legal rights which may vary by state, province and/or jurisdiction.
HOW TO OBTAIN WARRANTY SERVICE:
You must contact Customer Service at our toll-free number: 1-866-832-4843. A Customer Service Representative will attempt to resolve warranty issues over the phone. If the Customer Service Representative is unable to resolve the problem, you will be provided with a case number and asked to return the product to SENSIO Inc. Attach a tag to the product that includes: your name, address, daytime contact telephone number, case number, and description of the problem. Also, include a copy of the original sales receipt. Carefully package the tagged product with the sales receipt, and send it (with shipping and insurance prepaid) to SENSIO Inc.'s address. SENSIO Inc. shall bear no responsibility or liability for the returned product while in transit to SENSIO Inc.'s Customer Service Center.
text_image
Technical diagram of a blender with numbered parts for identification and assembly reference.PANEL DE CONTROL
text_image
Technical diagram of a blender with numbered parts for identification and assembly reference.PANNEAU DE COMMANDE
For customer service questions or comments: 1-866-832-4843
For Recipes and Cooking tips cruxkitchen.com
Sensio Inc.
New York, NY 10016/USA
All rights reserved
14929 Rev. 11