42435 - Alarm clock radio Mebus - Free user manual and instructions
Find the device manual for free 42435 Mebus in PDF.
| Product type | Clock radio |
| Brand | Mebus |
| Model | 42435 |
| Power supply | 3 AAA batteries 1.5 V (included) |
| Display | Time, date, indoor temperature |
| Alarm functions | Alarm with snooze (5 min), complete stop for the day |
| Alarm programming | Day selection: MO-FR (Mon-Fri), MO-SU (every day), OFF (disabled) |
| Backlight | Manual activation via LIGHT/SNOOZE button, turns off after 5 s |
| Light sensor | Automatic backlight adjustment to ambient light (ON/OFF) |
| Temperature display | Switchable between °C and °F |
| Time format | 12h or 24h |
| Settings | Function switch: LOCK, ALARM, DATE, TIME |
| Maintenance and cleaning | Do not use abrasive or corrosive cleaners, do not immerse in water |
| Safety | Do not open the case; use only batteries of the same type; observe polarity |
| Recycling | Batteries and device must not be disposed of with household waste |
Frequently Asked Questions - 42435 Mebus
User questions about 42435 Mebus
0 question about this device. Answer the ones you know or ask your own.
Ask a new question about this device
Download the instructions for your Alarm clock radio in PDF format for free! Find your manual 42435 - Mebus and take your electronic device back in hand. On this page are published all the documents necessary for the use of your device. 42435 by Mebus.
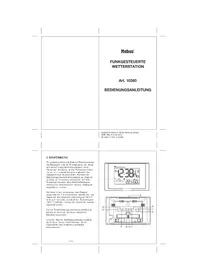
USER MANUAL 42435 Mebus
B4:...Taste HOUR/MONTH
64.210.16.02968.01 Rev.00 / 68.164.16.0342.01A
Thank you for purchasing this alarm clock. Designed and equipped with innovative components and technology it will always display the exact time and indoor temperature.
Please read this operating instruction carefully before using the device in order to get familiar with its properties and features. Keep the instructions safe for future reference.
To operate the device you will need:
3 × 1.5 V batteries,type: AAA
included
CONTENTS
Safety instructions. 16-17
Battery safety instructions 17-18
Disposal instructions 19-20
Product overview 21
Starting operation 22
Time setting 22
Date setting 23
Alarm settings 23-24
Additional functions 25
Technical data 25
EU declaration of conformity 26
SAFETYINSTRUCTIONS
The device is intended for use in the European Economic Area and in Switzerland.
The device has been designed and manufactured to provide you with many years of satisfactory operation when used correctly. To ensure this, please heed the following instructions.
- Do not expose the device to extreme stress such as impacts, extremely high temperatures or extremely high humidity. Such conditions can cause damage to electronic parts or single components.
- Never let the device drop into water as this could result in a complete malfunctioning of the product.
- Never use sharp cleaning or abrasive agents or acidic substances as these may cause irreparable damage to the device. Doing so may result in the corrosion of plastic parts or circuits.
- Never open the housing. This voids the warranty.
- Only use new batteries according to the instructions in this manual. Never mix old and new batteries. Old batteries could leak and damage the device.
SAFETY INSTRUCTIONS
- The device must only be used as intended.
- Have repairs done by authorized personnel only.
- Only use the device after you have carefully read this user manual. Keep the manual safe for future reference. When giving away or selling the device, make sure to also hand over this user manual.
BATTERY SAFETY INSTRUCTIONS
- Do not expose batteries to extreme temperatures such as direct sunlight or fire. Do not place the device on heating appliances. Leaking battery acid can cause damage.
- Always insert the batteries heeding correct polarity (+ and -) as indicated in the battery compartment.
Caution! Inserting the batteries incorrectly poses an explosion hazard.
- Only replace with batteries of same type and suitable specifications.
-
Do not mix old and new batteries or batteries of different types or manufacturers.
-
Should a battery leak, use a cloth to remove it from the battery compartment. Dispose of batteries in accordance with regulations. In case of leaking batteries, avoid contact with skin, eyes and mucous membranes. In case of acid contact with skin, rinse the affected areas thoroughly with clear water and immediately seek medical attention.
- Batteries can be fatal if swallowed. Keep batteries out of reach of children and pets. In case batteries have been swallowed, seek medical advice immediately.
- Do not allow children to replace batteries without adult supervision.
- Store batteries at a well-ventilated, dry location.
- Remove the batteries when not using the device for a longer period of time.
Rechargeable batteries
- Risk of explosion! Do not dismantle batteries, throw them into fire or short-circuit them.
Non rechargeable batteries
- Risk of explosion! Do not charge or use any tools to reactivate batteries. Do not dismantle, throw into fire or short-circuit.
- Remove exhausted batteries immediately and dispose of accordingly.
DISPOSAL INSTRUCTIONS
Dispose of batteries and the device in accordance with all relevant regulations and in an environmentally friendly fashion.
The end user is obliged by law to return old batteries. Disposing of old batteries through unsorted municipal waste is prohibited. The symbol of the crossed-out trash bin on the battery represents this. Old batteries contain substances that are harmful to the environment and human health. Such substances include cadmium (Cd), mercury (Hg) and lead (Pb). These substances are specified beneath the symbol of the crossed-out trash bin.
You can return old batteries free of charge to shops or public collection facilities and any place that sells batteries of the respective kind.
Please note that electronic devices must not be disposed of through normal household waste. Dispose of them at collection facilities or local disposal centers, or return them to the manufacturer/retailer. This also applies to our devices, which you should return to public/local collection facilities free of charge. For this reason, our devices bear underlined crossed-out trash bin to indicate the appropriate means of disposal.
By contributing to the proper disposal of this product you help to protect the environment and health of your fellow human beings. Incorrect disposal endangers the environment and health.
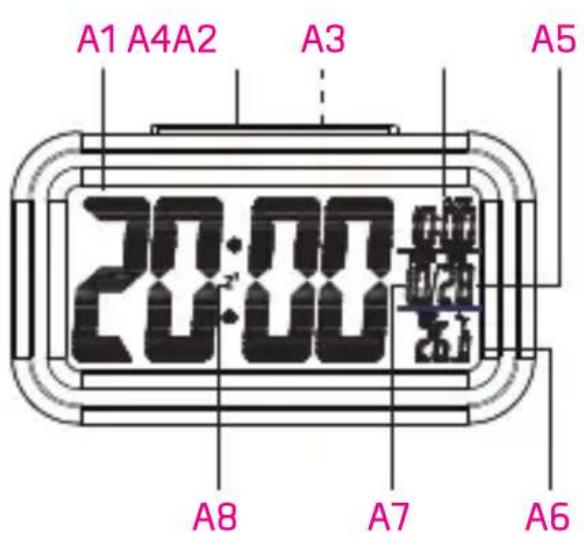
A1:....Time
A2:...LIGHT/SNOOZE
button
A3....Light sensor
A4: ...Alarm
A5:...Day
A6:...Temperature display
A7:...Month
A8:...Snoopze display
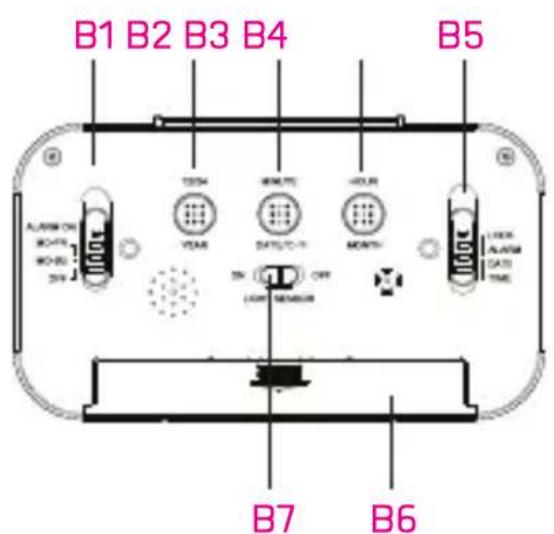
B1: ...Alarm switch
(MO-FR/MO-SU/OFF)
B2:...12/24 / YEAR button
B3:...MINUTE button
DATE/°C-°F
B4:...HOUR/MONTH
button
B5:...Function switch
(LOCK / ALARM /
DATE / TIME
B6:...Battery compartment
B7:...LIGHT/
SENSOR (ON / OFF)
switch
STARTING OPERATION
- Remove the battery compartment cover from the device. Insert 3 new batteries (type: 1.5 V, AAA) heeding correct polarity.
- Replace the batteries when the display quality weakens.
TIME SETTING
- Set the function switch (B5) to TIME to set the time.
- Press the 12/24 button (B2) to select between the 12- or 24-hour clock for display.
- Press the MINUTE button (B3) to increase the minutes.
- Press the HOUR button (B4) to increase the hour.
- Press and hold the MINUTE (B3) or HOUR (B4) buttons for about 2 seconds to adjust settings in fast forward.
- Set the function switch (B5) to LOCK to confirm the time setting.
DATE SETTING
- Set the function switch (B5) to DATE to set the date.
- Press the YEAR button (B2) to increase the year.
- Press the DATE button (B3) to increase the day.
- Press the MONTH button (B4) to increase the month.
- Press and hold the YEAR (B2), DATE (B3) or MONTH (B4) buttons for about 2 seconds to adjust settings in fast forward.
- Set the function switch (B5) to LOCK to confirm the date setting.
ALARM SETTINGS
- Set the function switch (B5) to ALARM to set the alarm time.
- Press the 12/24 button (B2) to select between the 12- or 24-hour clock for display.
- Press the MINUTE button (B3) to increase the minutes.
-
Press the HOUR button (B4) to increase the hour.
-
Press and hold the MINUTE (B3) or HOUR (B4) buttons for about 2 seconds to adjust settings in fast forward.
- Set the function switch (B5) to LOCK to confirm the alarm time setting.
- Set the alarm switch (B1) to the desired weekdays:
| Alarm switch Weekdays | |
| MO-FR Monday | to Friday |
| MO-SU The whole week | |
| OFF Turn off a alarm | |
Interrupting the alarm (SNOOZE), switching off the alarm clock for the current day.
- You can interrupt the alarm by pressing the LIGHT/ SNOOZE button (A2) while the alarm is sounding. Snooze is preset to 5 minutes. The alarm sounds again after 5 minutes.
- Press any button to turn off the alarm for the current day. The alarm sounds again at the set time of the next programmed day.
ADDITIONAL FUNCTIONS
Temperature display
To switch between temperature display in Celsius or Fahrenheit, press the DATE/°C-°F button (B3).
Backlight
- Press the LIGHT/SNOOZE button [A2] to turn on the backlight.
- The backlight turns off again automatically after approx. 5 seconds.
Light sensor
- Set the LIGHT/SENSOR switch [B7] to ON or OFF to turn the light sensor on and off.
- When the light sensor is activated, the alarm clock automatically adjusts the backlight to the surrounding light.
TECHNICAL DATA
Batteries: 3 × 1.5 ~V batteries, type: AAA
Service address
For any additional questions regarding the device, please call us from Monday to Friday between 10 am and 3 pm at our hotline under 02129/344664 or
service@weinberger-group.de. When calling, please have the article number of your device and the date of purchase ready.
EU DECLARATION OF CONFORMITY
according to directives 2014/30/EU, 2011/65/EU
Document no.: 1804175
Month/year: Apr-17
Manufacturer/
Product description: Projection alarm clock
Article no. 42435
Model no.: E0318S-2:
The designated product complies with the provisions of the following European standards.
Applied standard(s)
EN 301-489-1 V1.9.2
EN301-489-3V1.61
EN 301-489-17 V2.21
EN 55015:2013
EN 55014-1:2006+A1:2009
EN 55013:2013
EN 61000-6-3:2007+A1:2011
EN 60950-1:2006 + A11:2009 + A1:2010
- A12:2011 + A2:2013
EN 62321:2009
Test reports: TÜV-SÜD : 64.910.16.02942.01E
64.210.16.02968.01 Rev.00 / 68.164.16.0342.01A
Issued by: Weinberger GmbH & Co. KG
Place, date:
Haan, 18.04.2017
Legally binding
signature:


Thomas Fink
General manager
Piles non rechargeables
64.210.16.02968.01 Rev.00 / 68.164.16.0342.01A
Thomas Fink
Director
64.210.16.02968.01 Rev.00 / 68.164.16.0342.01A
Emittente: Weinberger GmbH & Co. KG