
7.0AE - Elliptical bike Horizon Fitness - Free user manual and instructions
Find the device manual for free 7.0AE Horizon Fitness in PDF.

User questions about 7.0AE Horizon Fitness
0 question about this device. Answer the ones you know or ask your own.
Ask a new question about this device
Download the instructions for your Elliptical bike in PDF format for free! Find your manual 7.0AE - Horizon Fitness and take your electronic device back in hand. On this page are published all the documents necessary for the use of your device. 7.0AE by Horizon Fitness.
USER MANUAL 7.0AE Horizon Fitness
Read the ELLIPTICAL GUIDE before using this OWNER'S MANUAL.
SAVE THESE INSTRUCTIONS
When using an electrical product, basic precautions should always be followed, including the following: Read all instructions before using this elliptical. It is the responsibility of the owner to ensure that all users of this incline trainer are adequately informed of all warnings and precautions. If you have any questions after reading this manual, contact Customer Tech Support at the number listed on the back panel.
This elliptical is intended for in-home use only. Do not use this elliptical in any commercial, rental, school or institutional setting. Failure to comply will void the warranty.


DANGER
TO REDUCE THE RISK OF ELECTRICAL SHOCK:
Always unplug the elliptical from the electrical outlet immediately after using, before cleaning, performing maintenance and putting on or taking off parts.

WARNING
TO REDUCE THE RISK OF BURNS, FIRE, ELECTRICAL SHOCK OR INJURY TO PERSONS:
- If you experience any kind of pain, including but not limited to chest pains, nausea, dizziness, or shortness of breath, stop exercising immediately and consult your physician before continuing.
- When exercising, always maintain a comfortable pace. Do not sprint above 80 RPMs on this machine.
- To maintain balance, it is recommended to keep a grip on the handlebars while exercising, mounting or dismounting the machine.
- Do not turn pedal arms by hand.
- Make sure handlebars are secure before each use.
- Keep the topside of the foot support clean and dry.
- Care should be taken when mounting or dismounting the equipment. Before mounting or dismounting, move the pedal on the mounting or dismounting side to its lowest position and bring the machine to a complete stop.
- Do not wear clothes that might catch on any part of the elliptical.
▪ Always wear athletic shoes while using this equipment. - Do not jump on the elliptical.
- At no time should more than one person be on the elliptical while in operation.
- This elliptical should not be used by persons weighing more than the specified user capacity in the OWNER'S MANUAL WARRANTY SECTION. Failure to comply will void the warranty.
- This elliptical is intended for in-home use only. Do not use this elliptical in any commercial, rental, school or institutional setting. Failure to comply will void the warranty.
- Do not use elliptical in any location that is not temperature controlled, such as but not limited to garages, porches, pool rooms, bathrooms, car ports or outdoors. Failure to comply will void the warranty.
- To prevent electrical shock, never drop or insert any object into any opening.
- Connect this exercise product to a properly grounded outlet only.

WARNING
TO REDUCE THE RISK OF BURNS, FIRE, ELECTRICAL SHOCK OR INJURY TO PERSONS:
- Keep power cord away from heated surfaces. Do not carry this unit by its supply cord or use the cord as a handle.
- Do not use other attachments that are not recommended by the manufacturer. Attachments may cause injury.
- Do not operate where aerosol (spray) products are being used or when oxygen is being administered.
- Use the elliptical only as described in the owner's manual.
- Disconnect all power before servicing or moving the equipment. To clean, wipe surfaces down with soap and slightly damp cloth only; never use solvents. (See MAINTENANCE)
- The elliptical should never be left unattended when plugged in. Unplug from outlet when not in use, and before putting on or taking off parts.
- Do not operate under blanket or pillow. Excessive heating can occur and cause fire, electric shock, or injury to persons.
- At NO time should pets or children under the age of 13 be closer to the elliptical than 10 feet.
- At NO time should children under the age of 13 use the incline trainer.
- Children over the age of 13 or disabled persons should not use the elliptical without adult supervision.
- Never operate the elliptical if it has a damaged cord or plug, if it is not working properly, if it has been dropped or damaged, or immersed in water. Return the elliptical to a service center for examination and repair.
- To disconnect, turn all controls to the off position, then remove plug from outlet.
- Do not remove the console covers unless instructed by Customer Tech Support. Service should only be done by an authorized service technician.
It is essential that your elliptical is used only indoors, in a climate controlled room. If your elliptical has been exposed to colder temperatures or high moisture climates, it is strongly recommended that the elliptical is warmed up to room temperature before first time use. Failure to do so may cause premature electronic failure.


GROUNDING INSTRUCTIONS
If your elliptical has power incline with a 3-prong plug, you must follow these grounding instructions.
This product must be grounded. If a elliptical should malfunction or break down, grounding provides a path of least resistance for electrical current to reduce the risk of electrical shock. This product is equipped with a cord having an equipment-grounding conductor and a grounding plug. The plug must be plugged into an appropriate outlet that is properly installed and grounded in accordance with local codes and ordinances.

DANGER
Improper connection of the equipment-grounding conductor can result in a risk of electric shock. Check with a qualified electrician or serviceman if you are in doubt as to whether the product is properly grounded. Do not modify the plug provided with the product. If it will not fit the outlet, have a proper outlet installed by a qualified electrician.
This product is for use on a nominal 110-120 Volt circuit and has a grounding plug that looks like the plug in the illustration. Make sure that the product is connected to an outlet having the same configuration as the plug. No adapter should be used with this product.
This product must be used on a dedicated circuit. To determine if you are on a dedicated circuit, shut off the power to that circuit and observe if any other devices lose power. If so, move devices to a different circuit. Note: There are usually multiple outlets on one circuit. This elliptical should be used with a minimum 15-amp circuit.
3-POLE GROUNDED OUTLET

text_image
GROUNDING PIN
WARNING
Connect this exercise product to a properly grounded outlet only.
Never operate product with a damaged cord or plug even if it is working properly. Never operate any product if it appears damaged, or has been immersed in water. Contact Customer Tech Support for replacement or repair.
ASSEMBLY

WARNING
There are several areas during the assembly process that special attention must be paid. It is very important to follow the assembly instructions correctly and to make sure all parts are firmly tightened. If the assembly instructions are not followed correctly, the incline trainer could have frame parts that are not tightened and will seem loose and may cause irritating noises. To prevent damage to the elliptical, the assembly instructions must be reviewed and corrective actions should be taken.
Before proceeding, find your elliptical's serial number located on a white barcode sticker on the front stabilizer tube and enter it in the space provided below.
ENTER YOUR SERIAL NUMBER IN THE BOX BELOW:
SERIAL NUMBER:
EP
MODEL NAME: HORIZON 7.0AE ELLIPTICAL
SERIAL NUMBER LOCATION

natural_image
Technical line drawing of a mechanical component with no visible text or symbols» Refer to the SERIAL NUMBER and MODEL NAME when calling for service.

text_image
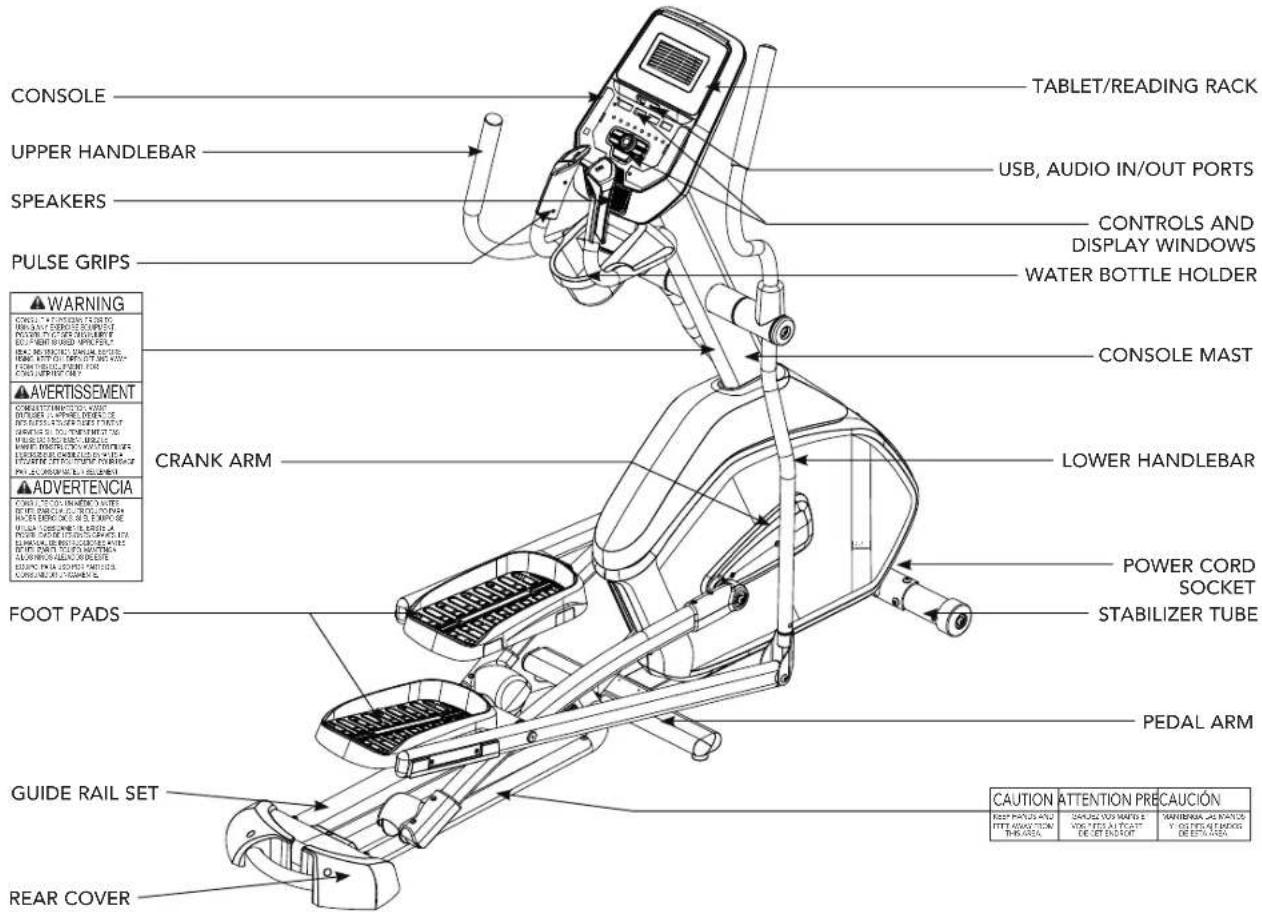
CONSOLE UPPER HANDLEBAR SPEAKERS PULSE GRIPS WARNING CONSOLE MAST ADVERTISSEMENT CRANK ARM COOPERATING STOPS WITH OUTRUST 12 WIRE DESPRING FOR FLOOR 45, FOR FLOOR 30, FOR FLOOR 10, FOR FLOOR 15, FOR FLOOR 20, FOR FLOOR 25, FOR FLOOR 30, FOR FLOOR 35, FOR FLOOR 40, FOR FLOOR 45, FOR FLOOR 50, FOR FLOOR 55, FOR FLOOR 60, FOR FLOOR 65, FOR FLOOR 70, FOR FLOOR 75, FOR FLOOR 80, FOR FLOOR 85, FOR FLOOR 90, FOR FLOOR 95, FOR FLOOR 100, FOR FLOOR 105, FOR FLOOR 110, FOR FLOOR 115, FOR FLOOR 120, FOR FLOOR 125, FOR FLOOR 130, FOR FLOOR 135, FOR FLOOR 140, FOR FLOOR 145, FOR FLOOR 150, FOR FLOOR 155, FOR FLOOR 160, FOR FLOOR 165, FOR FLOOR 170, FOR FLOOR 175, FOR FLOOR 180, FOR FLOOR 185, FOR FLOOR 190, FOR FLOOR 195, FOR FLOOR 200, FOR FLOOR 205, FOR FLOOR 210, FOR FLOOR 215, FOR FLOOR 220, FOR FLOOR 225, FOR FLOOR 230, FOR FLOOR 235, FOR FLOOR 240, FOR FLOOR 245, FOR FLOOR 250, FOR FLOOR 255, FOR FLOOR 260, FOR FLOOR 265, FOR FLOOR 270, FOR FLOOR 275, FOR FLOOR 280, FOR FLOOR 285, FOR FLOOR 290, FOR FLOOR 295, FOR FLOOR 300, FOR FLOOR 305, FOR FLOOR 310, FOR FLOOR 315, FOR FLOOR 320, FOR FLOOR 325, FOR FLOOR 330, FOR FLOOR 335, FOR FLOOR 340, FOR FLOOR 345, FOR FLOOR 350, FOR FLOOR 355, FOR FLOOR 360, FOR FLOOR 365, FOR FLOOR 370, FOR FLOOR 375, FOR FLOOR 380, FOR FLOOR 385, FOR FLOOR 390, FOR FLOOR 395, FOR FLOOR 400, FOR FLOOR 405, FOR FLOOR 410, FOR FLOOR 415, FOR FLOOR 420, FOR FLOOR 425, FOR FLOOR 430, FOR FLOOR 435, FOR FLOOR 440, FOR FLOOR 445, FOR FLOOR 450, FOR FLOOR 455, FOR FLOOR 460, FOR FLOOR 465, FOR FLOOR 470, FOR FLOOR 475, FOR FLOOR 480, FOR FLOOR 485, FOR FLOOR 490, FOR FLOOR 495, FOR FLOOR 500, FOR FLOOR 505, FOR FLOOR 510, FOR FLOOR 515, FOR FLOOR 520, FOR FLOOR 525, FOR FLOOR 530, FOR FLOOR 535, FOR FLOOR 540, FOR FLOOR 545, FOR FLOOR 550, FOR FLOOR 555, FOR FLOOR 560, FOR FLOOR 565, FOR FLOOR 570, FOR FLOOR 575, FOR FLOOR 580, FOR FLOOR 585, FOR FLOOR 590, FOR FLOOR 595, FOR FLOOR 600, FOR FLOOR 605, FOR FLOOR 610, FOR FLOOR 615, FOR FLOOR 620, FOR FLOOR 625, FOR FLOOR 630, FOR FLOOR 635, FOR FLOOR 640, FOR FLOOR 645, FOR FLOOR 650, FOR FLOOR 655, FOR FLOOR 660, FOR FLOOR 665, FOR FLOOR 670, FOR FLOOR 675, FOR FLOOR 680, FOR FLOOR 685, FOR FLOOR 690, FOR FLOOR 695, FOR FLOOR 700, COOPERATING STOPS WITH OUTRUST 12 WIRE DESPRING FOR FOUNTER PULSE GRIPS CRANK ARM POWER CORD SOCKET STABILIZER TUBE PEDAL ARM GUIDE RAIL SET REAR COVER CAUTION ATTENTION PRECAUCIÓN KEEP PAVUS AND FITTEN AVANCE ON THIS AREA CANCEL YOUR MATORY IS YOU SEE A FOAT DE GET STOP MANHOMA OR MATORY IS YOU SEE THE ENDING DE GET AREATOOLS INCLUDED:
5mm L Wrench
8mm L Wrench
□ 13/15mm Flat Wrench
PARTS INCLUDED:
□ 1 Console
1 Console Mast
□ 1 Water Bottle Holder
1 Main Frame
□ 1 Audio Adaptor Cable
□ 2 Handlebar Caps
□ 2 Upper Handlebars
□ 2 Lower Handlebars
2 Link Arms
2 Pedal Arms
1 Power Cord
□ 1 Stabilizer Tube
□ 1 Guide Rail Set
1 Rear Cover
□ 1 Top Cap of Frame
□ 1 Rear Top Cap of Frame
□ 1 Hardware Kit
PRE ASSEMBLY
UNPACKING
Unpack the product where you will be using it. Place the incline trainer carton on a level flat surface. It is recommended that you place a protective covering on your floor. Never open box when it is on its side.
NOTE: During each assembly step, ensure that ALL nuts and bolts are in place and partially threaded in before completely tightening any ONE bolt.
NOTE: A light application of grease may aid in the installation of hardware. Any grease, such as lithium bike grease is recommended.

NEED HELP?
If you have questions or if there are any missing
parts, contact Customer
Tech Support. Contact
information is located on the back panel of this manual.


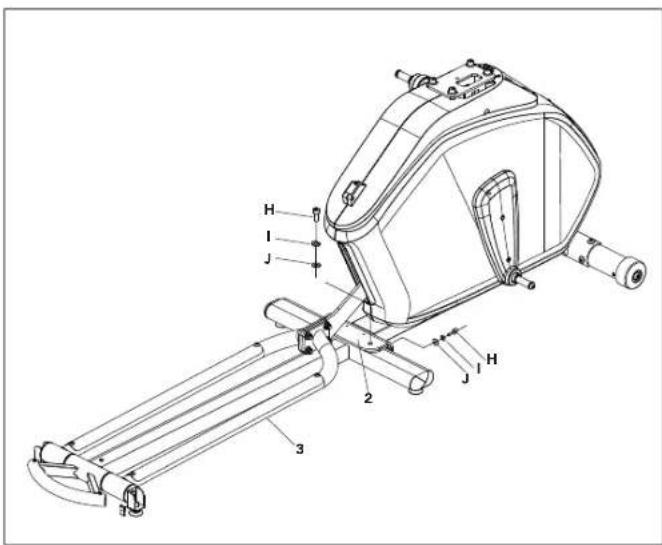
ASSEMBLY STEP 1
HARDWARE FOR STEP 1
| PART | TYPE | DESCRIPTION QTY | |
| M8X1.25PX30L 4A BOLT | |||
| 8.2X15.4X2.0T | 4B SP | ||
| 8.4X17X1T | 4C A |
A Open HARDWARE FOR STEP 1.
B Attach the STABILIZER TUBE (1) to the MAIN FRAME (2) using 2 BOLTS (A), 2 SPRING WASHERS (B) and 2 ARC WASHERS (C) on each side.

text_image
Technical diagram of a mechanical component with labeled parts A, B, C and numbered annotations 1, 2, 2', including a magnified view of the part.
text_image
A B C C OASSEMBLY STEP 2
HARDWARE FOR STEP 2
| PART | TYPE | DESCRIPTION QTY | |
| 8.2X15.4X2T 4D SPRING WASHER | |||
| M8X1.25PX35L-20L 4E BOLT | |||
| 8.2X16X2T 4F FLAT WASHER | |||
| M8X1.25P 4G | NUT | ||

text_image
Technical diagram of a mechanical device with labeled components including lever, frame, and guide railsA Open HARDWARE FOR STEP 2.
B Align GUIDE RAIL SET (3) with MAIN FRAME (2) as shown.
C Attach the GUIDE RAIL SET (3) to the INCLINE BRACKET (4) using 4 BOLTS (E), 4 FLAT WASHERS (F), 4 SPRING WASHERS (D) and 4 NUTS (D).

text_image
E G F C D

ASSEMBLY STEP 3
HARDWARE FOR STEP 3
| PART | TYPE | DESCRIPTION QTY | |
| M10X1.5PX20L 4H BOLT | |||
| 10.2X18.4X2.5T | 4I SP | ||
| 10.2.X20X1.5T | 4J FL |
A Open HARDWARE FOR STEP 3.
B Attach the GUIDE RAIL SET (3) to the MAIN FRAME (2) using 4 BOLTS (H), 4 SPRING WASHERS (I) and 4 FLAT WASHERS (J).
text_image
Technical diagram of a mechanical device with labeled components and directional indicators
natural_image
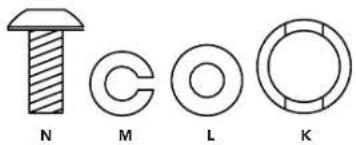
Three mechanical parts labeled H, J, and I: a striped bolt, a circular end with 'O', and a circular letter 'C' (no text or symbols beyond labels)ASSEMBLY STEP 4
| HARDWARE FOR STEP 4 | |||
| PART TYPE DESCRIPTION QTY | |||
| K WAVY WASHER | 17.2X22.5X.5T 2 | ||
| L | FLAT WASHER | 8.2X20.0X1.5T 2 | |
| 8.2X15.4X2.0T 2M | SPRING WAS | ||
| N | BOLT | M8X1.25PX20T | 2 |
text_image
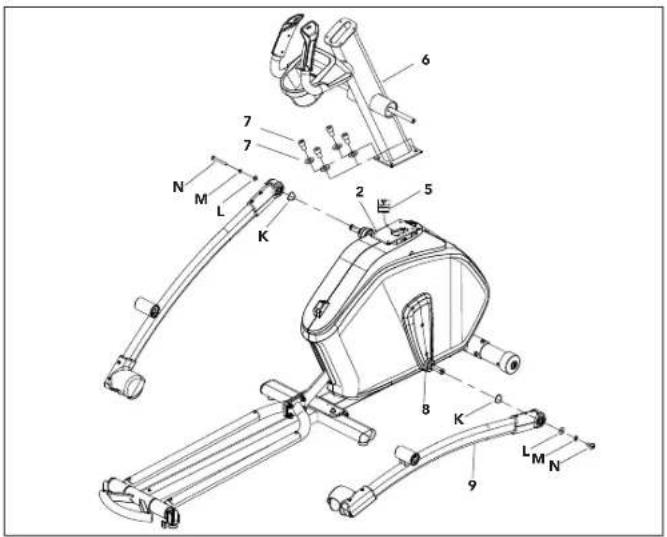
Technical diagram of a stationary exercise machine with labeled components and partsA Open HARDWARE FOR STEP 4.
B Carefully pull the CONSOLE CABLE (5) through the CONSOLE MAST (6) using the twist tie located inside the CONSOLE MAST (6).
C Attach CONSOLE MAST (6) to MAIN FRAME (2) using PRE-INSTALLED BOLTS AND WASHERS (7).
D Slide WAVY WASHER (K) over CRANK (8) followed by LOWER LINK ARM (9) as shown. Rest pedal arm wheel on guide rail.
E Attach the LOWER LINK ARM (9) to the CRANK (8) using 1 FLAT WASHER (L), 1 SPRING WASHER (M) and 1 BOLT (N).
F Repeat steps D–E on the opposite side of the elliptical.
natural_image
Four technical diagrams of mechanical parts labeled N, M, L, K, showing different types of fasteners or fasteners (no text or symbols beyond labels)

ASSEMBLY STEP 5
| HARDWARE FOR STEP 5 | |||
| PART TYPE DESCRIPTION QTY | |||
| M8X1.25PX20L 2O BOLT | |||
| P | SPRING WASHER | 8.2X15.4X2T 2 | |
| 8.2X20X1.5L 2Q FLAT WASHER | |||
| R | WAVY WASHER | 20.7X29.1X0.5T | 2 |
| S | FLAT WASHER | 20.2X27.2X1.5T | 4 |

text_image
Technical diagram of a stationary exercise machine with labeled components and motion indicatorsA Open HARDWARE FOR STEP 5.
B Slide 1 FLAT WASHER (S), 1 WAVY WASHER (R) and another FLAT WASHER (S) onto the pivot shaft of the PEDAL ARM (10).
C Slide the pivot shaft of the PEDAL ARM (10) into the LOWER LINK ARM (9).
D Attach the LOWER LINK ARM (9) to the PEDAL ARM (10) using 1 FLAT WASHER (Q), 1 SPRING WASHER (P) and 1 BOLT (O).
E Repeat steps B-D opposite side.

text_image
O S P Q RASSEMBLY STEP 6
| HARDWARE FOR STEP 6 | |||
| PART TYPE DESCRIPTION QTY | |||
| M8X1.25PX20L 2T BOLT | |||
| U | FLAT WASHER | 8.6X26X2T 4 | |
| 16X25X1.5L 4V FLAT WASHER | |||
| W | RUBBER WASHER | 16.2X26.2X11.5T | 2 |
| X | SPRING WASHER | 8.2X15.4X2T | 2 |
text_image
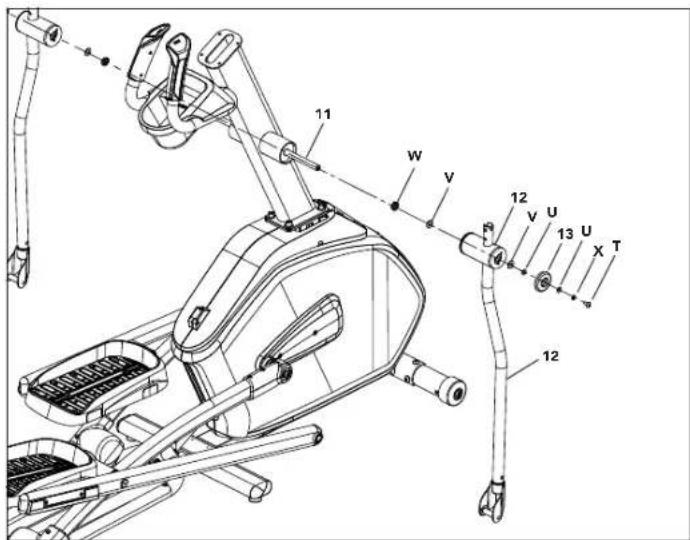
11 W V 12 v U 13 U X T 12A Open HARDWARE FOR STEP 6.
B Slide 1 RUBBER WASHER (W) and 1 FLAT WASHER (V) onto the CONSOLE MAST PIVOT SHAFT (11).
C Slide LOWER HANDLEBAR (12) onto CONSOLE MAST PIVOT SHAFT (11) and attach using 1 FLAT WASHER (V), 1 FLAT WASHER (U) 1 HANDLEBAR CAP (13), 1 FLAT WASHER (U), 1 SPRING WASHER (X) and 1 BOLT (T).
D Repeat step A on the opposite side.


ASSEMBLY STEP 7
| HARDWARE FOR STEP 7 | |||
| PART TYPE DESCRIPTION QTY | |||
| Z BOLT | M8X1.25PX70L-12L 2 | ||
| AA | SPRING WASHER | 8.2X15.4X2T 2 | |
| 8.2X20X1.5T 2BB FLAT WASHER | |||
| CC | NUT | M8X1.25P | 2 |
text_image
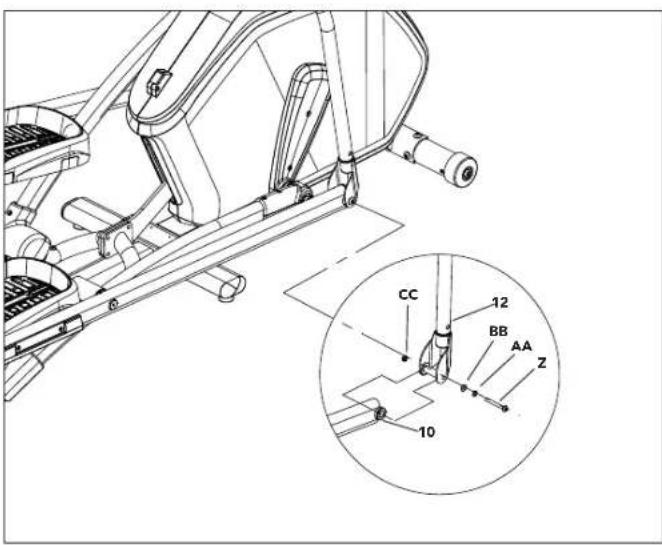
CC 12 BB AA Z 10A Open HARDWARE FOR STEP 7.
B Slide PEDAL ARM (10) into bottom end of LOWER HANDLEBAR (12).
C Secure the joint with 1 BOLT (Z), 1 SPRING WASHER (AA), 1 FLAT WASHER (BB) and 1 NUT (CC)
D Repeat steps B–C on the other side.

z

cc

BB

AA
NOTE: At this time please tighten all bolts and screws.
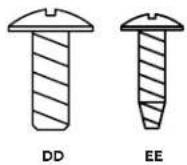
ASSEMBLY STEP 8
HARDWARE FOR STEP 8
| PART | TYPE | DESCRIPTION QTY | |
| DD SCREW | M5X0.8PX12L | 2 | |
| EE SCREW | 4X15L | 3 | |

text_image
Technical diagram of a stationary exercise machine with labeled components and safety tagsA Open HARDWARE FOR STEP 8.
B Slide TOP CAP REAR COVER (14) around CONSOLE MAST (6) and on top of side coversand attach using 2 SCREWS (DD).
C Snap TOP CAP FRONT COVER (15) in the front of TOP CAP REAR COVER (14).
D Slide REAR CAP (16) over REAR STABILIZER (17) and attach using 3 SCREWS (EE).


ASSEMBLY STEP 9
HARDWARE FOR STEP 9
| PART | TYPE | DESCRIPTION QTY | |
| SCREWS | M5X0.8PX12L 4FF |

text_image
Technical diagram of an exercise machine with numbered components and labeled partsNOTE: All hardware for this step is pre-installed.
A Slide the RIGHT UPPER HANDLEBAR (17) onto the RIGHT LOWER HANDLEBAR (12). Using pre-attached 1 BOLT and 1 SET SCREW (18) connect the UPPER AND LOWER HANDLEBARS (17&12) as shown in the diagram. Do not tighten set screw until the bolt is installed
B Repeat step A on the opposite side.
C Connect the 3 CONSOLE CABLES (5).
D Carefully tuck the CONSOLE CABLES (5) into the CONSOLE MAST (6) before attaching the CONSOLE (19). Attach CONSOLE (19) to CONSOLE MAST (6) using 4 SCREWS (FF).

ASSEMBLY STEP 10
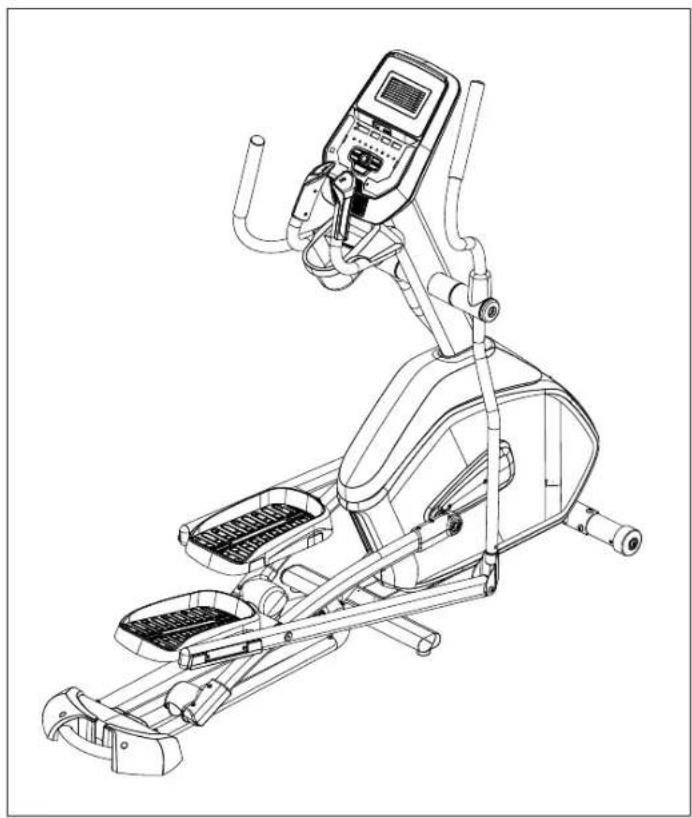
natural_image
Line drawing of an outdoor fitness equipment with a mounted stationary platform and levers (no text or symbols)CONGRATULATIONS. ASSEMBLY COMPLETE!

This section explains how to use your elliptical's console and programming.
The BASIC OPERATION section in the ELLIPTICAL GUIDE has instructions for the following:
• LOCATION OF THE ELLIPTICAL
• POWER/GROUNDING INSTRUCTIONS
- FOOT POSITIONING
• MOVING THE ELLIPTICAL
• LEVELING THE ELLIPTICAL
• POWER/MANUAL INCLINE OPERATION
• USING THE HEART RATE FUNCTION

A
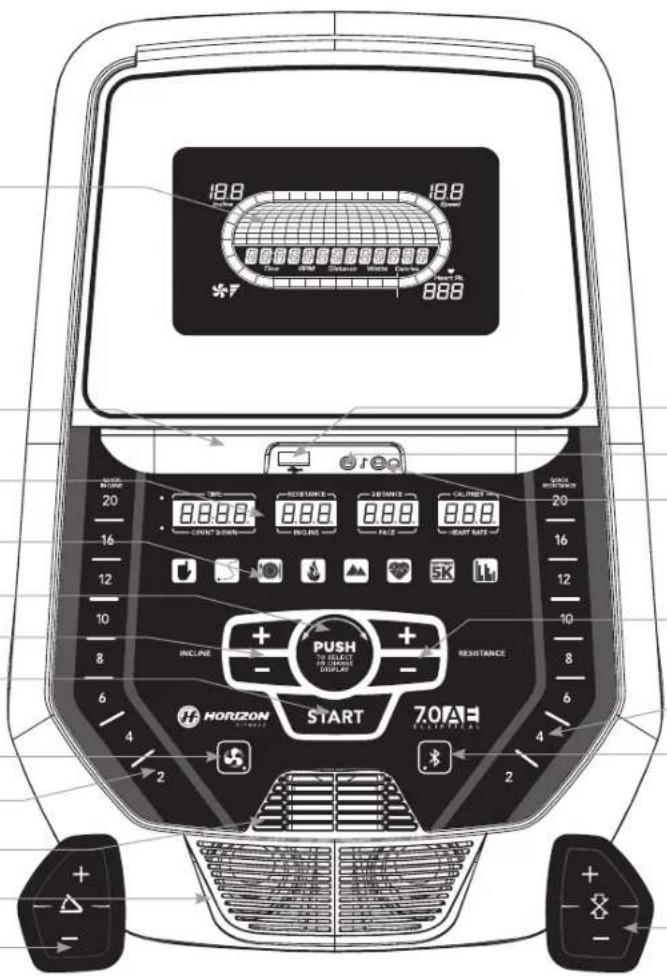
text_image
18.0 18.0 18.0 888 20 888 888 888 888 20 16 12 10 8 6 4 2 HORIZON START 70°A HORIZON SPACE SPACE SPACE SPACE SPACE SPACE SPACE SPACE SPACE SPACE SPACE SPACE SPACE SPACE SPACE SPACE SPACE SPACE SPACE SPACE SPACE SPACE SPACE SPACE SPACE SPACE SPACE SPACE SPACE SPACE SPACE SPACE SPACE SPACE SPACE SPACE SPACE SPACE SPACE SPACE SPACE SPACE SPACE SPACE SPACE SPACE SPACE SPACE SPACE SPACE Space©
M
N
G
I
Q
S
CONSOLE OPERATION
Note: There is a thin protective sheet of clear plastic on the overlay of the console that should be removed before use.
A) LCD DISPLAY WINDOWS: Incline, Speed, RPM, Watts, Heart Rate, Fan.
B) LED DISPLAY: Time, Resistance, Distance, Calories, Count Down, Incline, Pace, Heart Rate.
C) WORKOUT LED INDICATORS: indicate what workout is set for the current program.
D) SELECT TARGET/WORKOUT KNOB: rotate/press to select your desired workout/target
E) START: press to begin exercising, start your workout, or resume exercising after pause.
F) INCLINE +/- KEYS: used to adjust incline in small increments.
G) RESISTANCE +/- KEYS: used to adjust resistance in small increments.
H) INCLINE QUICK KEYS: used to reach desired incline more quickly.
I) RESISTANCE QUICK KEYS: used to reach desired resistance more quickly.
J) FAN KEY: press to turn fan on and off.
K) FAN: personal workout fan.
L) SPEAKERS: music plays through speakers when your CD / MP3 player is connected to the console.
M) AUDIO IN JACK: plug your CD / MP3 player into the console using the included audio adaptor cable.
N) AUDIO OUT / HEADPHONE JACK: plug your headphones into this jack to listen to your music through the headphones.
Note: when headphones are plugged into the headphone jack the sound will no longer come out through the speakers. Make sure to unplug input jacks when using Bluetooth.
O) USB INPUT: 1A/5V USB output power.
P) TABLET/READING RACK: holds tablet or reading material.
Q) BLUETOOTH INDICATOR LIGHT: display when machine is paired with a Bluetooth compatible device.
R) INCLINE +/- KEYS: used to adjust incline in small increments (0.5% increments).
S) RESISTANCE +/- KEYS: used to adjust resistance in small increments (0.5% increments).


text_image
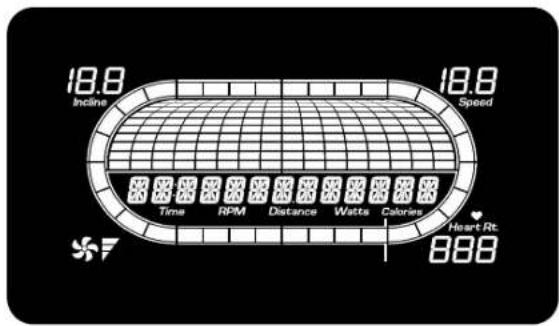
18.8 Incline 18.8 Speed Time RPM Distance Watts Calories Heart Rt 888
text_image
TIME 30.00. COUNT DOWN RESISTANCE 10.0 INCLINE DISTANCE 12.0 PACE CALORIES 99.9 HEART RATEDISPLAY WINDOWS
• TIME: Shown as minutes: seconds. View the time remaining or the time elapsed in your workout.
• DISTANCE: Shown as miles. Indicates distance traveled.
- SPEED: Shown as MPH. Indicates how fast the foot pads are moving.
• INCLINE: Indicates the incline level of the power ramp.
• CALORIES: Total calories burned.
- HEART RATE: Shown as BPM (beats per minute). Used to monitor your heart rate (displayed when contact is made with both pulse grips).
• RESISTANCE: Shows the current level of resistance.
- PACE: Indicates how many minutes it takes to complete a mile while at your current speed.
• RPM: Rotations Per Minute.
• WATTS: Displays current user power output
GETTING STARTED
1) Check to make sure no objects are placed on the pedals that will hinder the movement of the incline elliptical.
2) Plug in the power cord and turn the incline elliptical ON. (The ON/OFF switch is next to the power cord.)
3) You have two options to start your workout:
A) QUICK START UP
Simply press the START key to begin working out.
Time, distance, and calories will all count up from zero. OR...
B) SELECT A WORKOUT OR TARGET
1) Select your USER by turning the workout knob and then pressing when your desired USER is displayed.
2) Select your WEIGHT by turning the workout knob and then pressing when your desired WEIGHT is displayed.
3) Select your PROGRAM by turning the workout knob and then pressing when your desired PROGRAM is displayed.
4) Adjust the SETTING by turning the workout knob and then pressing when your desired SETTING is displayed.
5) Press START to begin.


WORKOUT PROFILES
1) MANUAL: Control everything about your workout – from start to finish. This program is a basic workout with no pre-defined settings, allowing you to manually adjust the machine at any time. It begins with a resistance at 1.
2) HILL CLIMB: Simulates a hill ascent and descent. This program helps tone muscle and improve cardiovascular ability. Incline and resistance change and segments repeat every 60 seconds.
Incline and resistance change every 60 seconds
| Warm up | Program segements - Repeat | |||||||||||
| Seconds 60 60 60 60 60 60 60 60 60 60 | ||||||||||||
| Level | Segment | 1234 | 5678910 | |||||||||
| 1 | Inc 0 2 | 2 4 4 4 6 | 6 6 6 6 | |||||||||
| Res 1 | 2 2 3 2 3 | 4 5 4 3 | ||||||||||
| 2 | Inc 0 2 | 2 4 6 6 6 | 6 6 8 8 | |||||||||
| Res 1 | 2 2 3 4 5 | 6 7 6 5 | ||||||||||
| 3 | Inc 0 2 | 2 6 6 6 8 | 8 10 10 | |||||||||
| Res 1 | 2 2 4 6 7 | 8 9 8 7 | ||||||||||
| 4 | Inc 0 2 | 2 6 8 8 | 10 10 10 | 10 | ||||||||
| Res 1 | 2 2 5 8 9 | 10 11 10 | 9 | |||||||||
| 5 | Inc 2 4 | 6 8 10 | 10 10 10 | 12 12 | ||||||||
| Res 2 | 8 5 6 10 | 11 12 13 | 12 11 | |||||||||
| 6 | Inc 2 4 | 6 10 10 | 10 12 12 | 14 14 | ||||||||
| Res 2 | 8 5 7 12 | 13 14 15 | 14 13 | |||||||||
| 7 | Inc 2 4 | 6 10 12 | 12 14 14 | 16 16 | ||||||||
| Res 2 | 8 5 8 14 | 15 16 17 | 16 15 | |||||||||
| 8 | Inc 2 4 | 6 12 14 | 14 16 16 | 16 16 | ||||||||
| Res 2 | 8 5 9 15 | 16 17 18 | 17 16 | |||||||||
| 9 | Inc 4 6 | 6 14 16 | 16 16 16 | 18 18 | ||||||||
| Res 3 | 4 5 10 16 | 17 18 19 | 18 17 | |||||||||
| 10 | Inc 4 6 | 10 16 16 | 16 18 18 | 18 18 | ||||||||
| Res 3 | 4 8 11 17 | 18 19 20 | 19 18 | |||||||||
3) MY FIRST 5K: This 9-week program is intended for inexperienced runners looking to run their first 5k or simply begin an exercise routine. It is designed specifically to keep you motivated and engaged, gradually building your strength, increasing your stamina and giving you the confidence it takes to complete your first 5k.
Week Workout #1 Workout #2 Workout #3
1 5 minute warmup 5 minute warmup 5 minute warmup
1 min jog 1 min jog 1 min jog
1.5 min walk 1.5 min walk 1.5 min walk
1 min jog 1 min jog 1 min jog
1.5 min walk 1.5 min walk 1.5 min walk
1 min jog 1 min jog 1 min jog
1.5 min walk 1.5 min walk 1.5 min walk
1 min log 1 min log 1 min log
1.5 min walk 1.5 min walk 1.5 min walk
1 min jog 1 min jog 1 min jog
1.5 min walk 1.5 min walk 1.5 min walk
1 min jog 1 min jog 1 min jog
1.5 min walk 1.5 min walk 1.5 min walk
1 min Jog 1 min Jog 1 min Jog
1.5 min walk 1.5 min walk 1.5 min walk
1 min jog 1 min jog 1 min jog
1.5 min walk 1.5 min walk 1.5 min walk
5 minute cooldown 5 minute cooldown 5 minute cooldown
2 5 minute warmup 5 minute warmup 5 minute warmup
1.5 minute jog 1.5 minute jog 1.5 minute jog
2 minute walk 2 minute walk 2 minute walk
1.5 minute jog 1.5 minute jog 1.5 minute jog
2 minute walk 2 minute walk 2 minute walk
1.5 minute jog 1.5 minute jog 1.5 minute jog
2 minute walk 2 minute walk 2 minute walk
1.5 minute jog 1.5 minute jog 1.5 minute jog
2 minute walk 2 minute walk 2 minute walk
1.5 minute jog 1.5 minute jog 1.5 minute jog
2 minute walk 2 minute walk 2 minute walk
1.5 minute joe 1.5 minute joe 1.5 minute joe
2 minute walk 2 minute walk 2 minute walk
5 minute cooldown 5 minute cooldown 5 minute cooldown
3 5 minute warmup 5 minute warmup 5 minute warmup
1.5 minute jog 1.5 minute jog 1.5 minute jog
1.5 minute walk 1.5 minute walk 1.5 minute walk
3 minute log 3 minute log 3 minute log
3 minute walk 3 minute walk 3 minute walk
1.5 minute jog 1.5 minute jog 1.5 minute jog
1.5 minute jog 1.5 minute jog 1.5 minute jog
3 minute igs 3 minute igs 3 minute igs
3 minute walk 3 minute walk 3 minute walk
5 minute cooldown 5 minute cooldown 5 minute cooldown
Week Workout #1 Workout #2 Workout #3
4 5 minute warmup 5 minute warmup 5 minute warmup
3 minute jog 3 minute jog 3 minute jog
1.5 minute walk 1.5 minute walk 1.5 minute walk
5 minute jog 5 minute jog 5 minute jog
2.5 minute walk 2.5 minute walk 2.5 minute walk
3 minute jog 3 minute jog 3 minute jog
1.5 minute walk 1.5 minute walk 1.5 minute walk
5 minute log 5 minute log 5 minute log
5 minute cooldown 5 minute cooldown 5 minute cooldown
5 5 minute warmup 5 minute warmup 5 minute warmup
5 minute Jog 10 minute Jog 25 minute Jog
3 minute walk 3 minute walk 5 minute cooldown
Warmup and cooldown speeds 1.0 mph or 75% of walk speed, whichever is greater


4) FAT BURN: Relatively slow and steady is the name of the game to maximize your weight-loss goals. Promotes weight loss by increasing and decreasing the resistance, while keeping you in your fat burning zone. Resistance changes, segments repeat every 60 seconds.
Resistance changes every 60 seconds
| Warm Up | Program Segments - Repeat | ||||||||||||||||
| Seconds 60 | 60 | 60 | 60 | 60 | 60 | 60 | 60 | 60 | 60 | 60 | 60 | 60 | |||||
| Segment | 1 | 2 | 3 | 4 | 5 | 6 | 7 | 8 | 9 | 10 | 11 | 12 | 13 | 14 | 15 | 16 | |
| Level 1 1 | 2 | 2 | 3 | 4 | 3 | 4 | 5 | 5 | 3 | 4 | 6 | 6 | 5 | 4 | 3 | ||
| Level 2 2 | 3 | 3 | 3 | 5 | 4 | 5 | 6 | 6 | 4 | 5 | 7 | 7 | 6 | 5 | 4 | ||
| Level 3 2 | 4 | 4 | 5 | 7 | 6 | 7 | 8 | 8 | 6 | 7 | 9 | 9 | 8 | 7 | 6 | ||
| Level 4 3 | 4 | 5 | 6 | 8 | 7 | 8 | 9 | 9 | 7 | 8 | 10 | 10 | 9 | 8 | 7 | ||
| Level 5 4 | 5 | 6 | 7 | 10 | 9 | 10 | 11 | 11 | 9 | 10 | 12 | 12 | 11 | 10 | 9 | ||
| Level 6 4 | 6 | 7 | 8 | 11 | 10 | 11 | 12 | 12 | 10 | 11 | 13 | 13 | 12 | 11 | 10 | ||
| Level 7 5 | 7 | 9 | 9 | 13 | 12 | 13 | 14 | 14 | 12 | 13 | 15 | 15 | 14 | 13 | 12 | ||
| Level 8 5 | 8 | 9 | 10 | 14 | 13 | 14 | 15 | 15 | 13 | 14 | 16 | 16 | 15 | 14 | 13 | ||
| Level 9 6 | 9 | 11 | 12 | 16 | 15 | 16 | 17 | 17 | 15 | 16 | 18 | 18 | 17 | 16 | 15 | ||
| Level 10 | 7 | 10 | 12 | 13 | 18 | 17 | 18 | 19 | 19 | 17 | 18 | ||||||
5) CUSTOM: Allows you to create and reuse your perfect workout with a combination of a specific resistance, incline and time or distance. The ultimate in personal programming. This is a time or distance based goal program.
TARGET PROFILES
1) DISTANCE: Push yourself and go further during your workout with 13 distance workouts. Choose from 1 mile, 2 miles, 5k, 5 miles, 10k, 8 miles, 15k, 10 miles, 20k, half marathon, 15 miles, 20 miles, and marathon goals. You set your level.
Resistance changes and all segments are .016km and repeat. (Warm up does not repeat)
| Warm Up | Program segments | ||||||||||||||
| Seconds 0 | 16km 0.1 | 16km 0.16 | 16km 0.16k | m 0.16km | 0.16km 0.16km 0.16km 0.16km 0.16km 0.16km 0.16km 0.16km | ||||||||||
| Segment | 1 | 2 3 4 | 5 6 7 8 9 | 10 11 12 | 13 14 | ||||||||||
| Level 1 1 | 1 1 1 1 | 1 1 1 1 | 1 1 1 | ||||||||||||
| Level 2 1 | 2 2 3 3 5 | 7 4 6 7 4 | 5 6 3 | ||||||||||||
| Level 3 2 | 2 3 3 4 6 | 3 5 7 8 5 | 6 7 4 | ||||||||||||
| Level 4 2 | 3 3 4 6 8 | 10 7 9 10 | 7 8 9 6 | ||||||||||||
| Level 5 3 | 4 4 4 8 10 | 12 9 11 | 12 9 10 1 | 1 8 | |||||||||||
| Level 6 3 | 5 4 5 10 | 12 14 11 | 13 14 11 | 2 13 10 | |||||||||||
| Level 7 4 | 5 5 5 11 | 13 15 12 | 14 15 12 | 13 14 11 | |||||||||||
| Level 8 | 4 5 5 | 5 13 15 | 17 14 16 | 17 14 15 | 16 13 | ||||||||||
| Level 9 4 | 5 5 5 15 | 17 19 16 | 18 19 16 | 17 18 15 | |||||||||||
| Level 10 4 | 5 6 6 16 | 18 20 17 | 19 20 17 | 18 19 16 | |||||||||||
2) CALORIES: Set goals for burning calories from 20 to 980 calories in 20 calorie increments. You set your level to keep you in your fat burning zone.
Resistance changes and all segments are 20 calories and repeat. (Warm up does not repeat)
| Warm Up | Program segments | ||||||||||||||
| Seconds 20 | cal 20 | cal 20 | cal 20 | cal 20 | cal 20 | cal 20 | cal 20 | cal 20 | cal 20 | cal 20 | cal 20 | cal 20 | cal 20 | cal 20 | cal 20 |
| Segment | 1 | 2 | 3 | 4 | 5 | 6 | 7 | 8 | 9 | 10 | 11 | 12 | 13 | 14 | |
| Level 1 1 | 1 | 1 | 1 | 1 | 1 | 1 | 1 | 1 | |||||||
| Level 2 1 | 2 | 2 | 3 | 3 | 5 | 7 | 4 | 6 | 7 | 4 | 5 | 6 | 3 | ||
| Level 3 2 | 2 | 3 | 3 | 4 | 6 | 8 | 5 | 7 | 8 | 5 | 6 | 7 | 4 | ||
| Level 4 2 | 3 | 3 | 4 | 6 | 8 | 10 | 7 | 9 | 10 | 7 | 8 | 9 | 6 | ||
| Level 5 3 | 4 | 4 | 4 | 8 | 10 | 12 | 9 | 11 | 12 | 9 | 10 | 11 | 8 | ||
| Level 6 3 | 5 | 4 | 5 | 10 | 12 | 14 | 11 | 13 | 14 | 11 | 12 | 13 | 10 | ||
| Level 7 4 | 5 | 5 | 5 | 11 | 13 | 15 | 12 | 14 | 15 | 12 | 13 | 14 | 11 | ||
| Level 8 4 | 5 | 5 | 5 | 13 | 15 | 17 | 14 | 16 | 17 | 14 | 15 | 16 | 13 | ||
| Level 9 4 | 5 | 5 | 5 | 15 | 17 | 19 | 16 | 18 | 19 | 16 | 17 | 18 | 15 | ||
| Level 10 4 | 5 | 6 | 6 | 16 | 18 | 20 | 17 | 19 | 20 | 17 | 18 | 19 | 16 | ||


TARGET HEART RATE: This program is designed for you to improve your overall cardiovascular fitness levels. You simply set your target heart rate. The program will then monitor and adjust the intensity level to maintain your heart rate within your targeted range while you exercise – a proven method to maximize your weight loss and fitness goals. A chest strap is required and must be worn during the duration of this program. See below for calculating your target heart rate.
Calculating Your Target Heart Rate
The first step in knowing the right intensity for your training is to find out your maximum heart rate (max HR = 220 – your age). The age-based method provides an average statistical prediction of your max HR and is a good method for the majority of people, especially those new to heart rate training.
The most precise and accurate way of determining your individual max HR is to have it clinically tested by a cardiologist or exercise physiologist through the use of a maximal stress test. If you are over the age of 40, overweight, have been sedentary for several years, or have a history of heart disease in your family, clinical testing is recommended.
This chart gives examples of the heart rate range for a 30 year old exercising at 5 different heart rate zones. For example, a 30-year-old's max HR is 220 - 30 = 190 bpm and 90% max HR is 190 × 0.9 = 171 bpm.
| Target Heart Rate Zone | Workout Duration | Example THR (age 30) | Your THR Recommend For | |
| VERY HARD 90 - 100% | < 5 min | 171-190 BPM | Fit persons for athletic training | |
| HARD 80 - 90% | 2-10 min | 52-171 BPM Shorter Workouts | ||
| MODERATE 70 - 80% | 10-40 min | 133-152 BPM | Moderately long Workouts | |
| LIGHT 60 - 70% | 40-80 min | 114-133 BPM | Longer and frequently repeated shorter exercises | |
| VERY LIGHT 50 - 60% | 20-40 min | 104-114BPM | Weight management and active recovery | |
Additional target heart rate notes:
1). The incline elliptical resistance will automatically adjust to bring you near your specified heart rate.
2). If there is no heart rate detected, the unit will not change the incline.
3). If your heart rate is 25 beats over your target zone the program will shut down.
TO RESET THE CONSOLE
Hold STOP key for 3 seconds.

When your workout is complete, the unit will beep. Your workout information will stay displayed on the console for 30 seconds and then reset.
BLUETOOTH HEART RATE MONITORING
The 7.0AE is equipped with multi-channel Bluetooth which enables you to wirelessly connect compatible Bluetooth heart rate monitoring devices to this incline elliptical. You will need to ensure that your wireless heart rate monitoring device is Bluetooth 4.0 compatible and is also "open" to sharing data. Non-"open" or "closed" devices typically only share data with their proprietary apps. The 7.0AE needs an "open" device to receive data from the device. You may need to consult with your device's owner's manual or the manufacturer to confirm if it is an open device.
Turn on the Bluetooth 4.0 HR strap and make sure it is transmitting and correctly worn. Pair the receiver to the app and the console will receive the information from the tablet. To use the Bluetooth chest strap without a tablet, press and hold the Bluetooth button to enable the console to communicate with the receiver. When paired with the chest strap the console will not pair with a tablet. To enable tablet communication press and hold the Bluetooth button for 5 seconds or reset power.
The 7.0AE Elliptical will connect and stream music form your compatible music device. This includes many smart phones and traditional mp3 players.
Your 7.0AE Elliptical comes equipped with Bluetooth speakers. Bluetooth compatible devices can stream music wirelessly from your device to the speakers. You can also connect your music device via an audio cable and stream music through the speakers. Instructions for both types of audio connection are detailed below.

CONNECTING VIA BLUETOOTH 4.0LE
1) Check to ensure that your music device is Bluetooth 4.0 compatible
2) Go into your device's Bluetooth settings and scan for devices.
3) On your music device, locate the Bluetooth device list. Select your treadmill or elliptical unit that appears on this list.
Wait for your music device to finish pairing with the unit.
4) You will know when pairing is successful when your music device shows the treadmill or elliptical unit as now being a paired device.
WHEN UNIT IS POWERED OFF THEN BACK ON
If you turn your treadmill or elliptical unit off, or if it goes into sleep mode, the next time it is powered on the unit will look to pair with the last music device with which it was paired. It will automatically pair at this time.
RE-PAIRING MUSIC DEVICES
In the event that the unit cannot find the last paired music device (for example, the music device is off or not being used) then the unit will stop looking to pair with the music device. If this happens, and if you wish to use your music device again, then you will need to go through the pairing process listed above and re-pair through your music device's settings.
USING MULTIPLE MUSIC DEVICES
If multiple devices are being paired with the unit (i.e.: multiple users are using the treadmill or elliptical unit and pairing their music devices with it) then the unit will look to pair with the last device used and "forget" other devices. If you wish to re-pair a "forgotten" music device, then you will need to un-pair the current paired device and then re-pair your device through the pairing procedure noted above.
CONNECTING VIA AN AUDIO CABLE
1) Connect the included AUDIO ADAPTOR CABLE to the AUDIO IN JACK on the top right of the console and the headphone jack on your music device.
2) Use your CD / MP3 player buttons to adjust song settings.
3) Remove the AUDIO ADAPTOR CABLE when not in use.
4) If you don't want to use the SPEAKERS, you can plug your headphones into the AUDIO OUT JACK at the bottom of the console. This ensures that if you accidentally catch the headphone line while moving, you won't drop your device to the ground.
AFG CONNECTED FITNESS SYSTEM
Your Horizon machine is Bluetooth ready, allowing you to use Bluetooth 4.0 technology to wirelessly connect your device to your Horizon Elliptical. Using the free downloadable AFG Fitness app will enable you to control your elliptical's operating functions via your device. The app will also allow you to monitor your workout, track your progress and view your workout history. The AFG Fitness app can be downloaded from either the iTunes store for iOS devices or from the Google store for Android devices.
For information about connecting your device to your Horizon elliptical, setting up the AFG Fitness App and controlling and monitoring your workout with your device, see the AFG Connected Fitness Manual included with your elliptical.
LIMITED HOME-USE WARRANTY


WEIGHT CAPACITY = 325 lbs (147.4 kilograms)
FRAME • LIFETIME
Horizon Fitness warrants the frame against defects in workmanship and materials for the lifetime of the original owner, so long as the device remains in the possession of the original owner. (The frame is defined as the welded metal base of the unit and does not include any parts that can be removed.)
BRAKE • LIFETIME
Horizon Fitness warrants the brake against defects in workmanship and materials for the lifetime of the original owner, so long as the device remains in the possession of the original owner. Labor or installation of brake is not covered under the brake warranty.
ELECTRONICS & PARTS • 3 YEARS
Horizon Fitness warrants the electronic components, finish and all original parts for a period of three years from the date of original purchase, so long as the device remains in the possession of the original owner.
LABOR • 1 YEAR
Horizon Fitness shall cover the labor cost for the repair of the device for a period of one year from the date of the original purchase, so long as the device remains in the possession of the original owner.
INCLINE MOTOR • 1 YEAR
Horizon Fitness warrants the incline motor mechanism and parts against defects in workmanship and materials for a period of one year from the date of original purchase, so long as the device remains in the possession of the original owner.
EXCLUSIONS AND LIMITATIONS
Who IS covered:
- The original owner and is not transferable.
What IS covered:
- Repair or replacement of a defective motor, electronic component, or defective part and is the sole remedy of the warranty.
What IS NOT covered:
- Normal wear and tear, improper assembly or maintenance, or installation of parts or accessories not originally intended or compatible with the equipment as sold.
- Damage or failure due to accident, abuse, corrosion, discoloration of paint or plastic, neglect, theft, vandalism, fire, flood, wind, lightning, freezing, or other natural disasters of any kind, power reduction, fluctuation or failure from whatever cause, unusual atmospheric conditions, collision, introduction of foreign objects into the covered unit, or modifications that are unauthorized or not recommended by Horizon Fitness.
- Incidental or consequential damages. Horizon Fitness is not responsible or liable for indirect, special or consequential damages, economic loss, loss of property, or profits, loss of enjoyment or use, or other consequential damages of whatsoever nature in connection with the purchase, use, repair or maintenance of the equipment. Horizon Fitness does not provide monetary or other compensation for any such repairs or replacement parts costs, including but not limited to gym membership fees, work time lost, diagnostic visits, maintenance visits or transportation.
- Equipment used for commercial purposes or any use other than a single family or Household, unless endorsed by Horizon Fitness for coverage.
• Equipment owned or operated outside the US and Canada. - Delivery, assembly, installation, setup for original or replacement units or labor or other costs associated with removal or replacement of the covered unit.
- Any attempt to repair this equipment creates a risk of injury. Horizon Fitness is not responsible or liable for any damage, loss or liability arising from any personal injury incurred during the course of, or as a result of any repair or attempted repair of your fitness equipment by other than an authorized service technician. All repairs attempted by you on your fitness equipment are undertaken AT YOUR OWN RISK and Horizon Fitness shall have no liability for any injury to the person or property arising from such repairs.
- If you are out of the manufacturer's warranty but have an extended warranty, refer to your extended warranty contract for contact information regarding requests for extended warranty service or repair.
SERVICE/RETURNS
- In-home service is available within 150 miles of the nearest authorized Service Provider (Mileage beyond 150 miles from an authorized service center is the responsibility of the consumer).
- All returns must be pre-authorized.
- The warranty is limited to replacing or repairing, at the servicer's and/or manufacturer's option, the same or comparable model.
- Defective components may be requested to be returned to the manufacturer upon completion of warranty service using a prepaid return shipping label. If you have been advised to return parts and did not receive a label, please contact Customer Tech Support.
- Replacement units, parts and electronic components reconditioned to as-new condition by the manufacturer or its vendors may sometimes be supplied as warranty replacement and constitute fulfillment of warranty terms.
- This warranty gives you specific legal rights, and your rights may vary from states to state.

FRANÇAIS
PRÉCAUTIONS IMPORTANTES
CONSERVEZ CES INSTRUCTIONS
natural_image
Technical line drawing of a mechanical component with no visible text or symbolstext_image
Technical diagram of a mechanical component with labeled parts A, B, C and numbered annotations 1, 2, 3
text_image
A B C C OASSEMBLAGE ÉTAPE 2
QUINCAILLERIE POUR L'ÉTAPE 2
| PIÈCE | TYPE | DESCRIPTION QTÉ | |
| 8,2X15,4X2T 4D RONDELLE | ÉLASTIQUE | ||
| M8X1,25PX35L-20L 4E BOULON | |||
| 8,2X16X2T 4F RONDELLE | PLATE | ||
| M8X1,25P 4G ÉCROU |

text_image
Technical diagram of a mechanical device with labeled components including lever, shafts, and parts 2 through 8.text_image
Technical diagram of a mechanical device with labeled components and directional indicators
text_image
H J C IASSEMBLAGE ÉTAPE 4
| QUINCAILLERIE POUR L'ÉTAPE 4 | |||
| PIÈCE TYPE DESCRIPTION QTÉ | |||
| K RONDELLE ONDULÉE | 17,2X22,5X5T 2 | ||
| L | RONDELLE PLATE | 8,2X20,0X1,5T 2 | |
| 8,2X15,4X2,0T 2M RONDELLE ÉLASTIC | |||
| M8X1,25PX20T 2N BOULON | |||

text_image
Technical diagram of a stationary exercise machine with labeled components and assembly partsnatural_image
Four technical diagrams of mechanical parts labeled N, M, L, K, showing different types of fasteners or fasteners (no text or symbols beyond labels)

ASSEMBLAGE ÉTAPE 5
| QUINCAILLERIE POUR L'ÉTAPE 5 | |||
| PIÈCE TYPE DESCRIPTION QTÉ | |||
| M8X1,25PX20L 2O BOULON | |||
| 8,2X15,4X2T 2P RONDELLE À RESSORT | |||
| Q | RONDELLE PLATE | 8,2X20X1,5L 2 | |
| 20,7X29,1X0,5T 2R RONDEL LE ONDULÉ | |||
| 20,2X27,2X1,5T 4S RONDELLE F | |||
text_image
Technical diagram of a stationary exercise machine with labeled components and numbered partstext_image
O S P Q RASSEMBLAGE ÉTAPE 6
| QUINCAILLERIE POUR L'ÉTAPE 6 | |||
| PIÈCE TYPE DESCRIPTION QTÉ | |||
| M8X1,25PX20L 2T BOULON | |||
| 8,6X26X2T 4U RONDELLE PLATE | |||
| 16X25X1,5L 4V RONDELLE PLATE | |||
| 16,2X26,2X11,5T 2W | RONDELLE | ||
| 8,2X15,4X2T | 2X | ||

text_image
Technical diagram of an exercise machine with labeled components and motion indicatorsA Ouvrez le SACHET CONTENANT LA QUINCAILLERIE À UTILISER LORS DE L'ÉTAPE 6.
B Enfilez 1 RONDELLE EN CAOUTCHOUC (W) et 1 RONDELLE PLATE (V) sur l'ARBRE-PIVOT DU MONTANT DE CONSOLE (11).
CAOUTCHOUCC Enfilez la POIGNÉE DE GUIDON INFÉRIEURE (12)
RONDELLE PLATE (11) ET L'ARBRE PIVOT DU MONTANT DE CONSOLE 1 RONDELLE PLATE (V), 1 RONDELLE PLATE (U), 1 CAPUCHON DU GUIDON (13), 1 RONDELLE PLATE (U), 1 RONDELLE ÉLASTIQUE (X) et 1 BOULON (T).
text_image
Technical diagram of an stationary exercise machine with numbered components and labeled partsREMARQUE :
natural_image
Line drawing of an outdoor fitness equipment with a mounted stationary platform and two side-mounted legs (no text or symbols)FÉLICITATIONS. ASSEMBLAGE TERMINÉ!

FONCTIONNEMENT DE L'EXERCISEUR ELLIPTIQUE
natural_image
Technical line drawing of a mechanical component with no visible text or symbolstext_image
Technical diagram of a mechanical component with labeled parts A, B, C and numbered annotations 1, 2, 3
text_image
A B C C OPASO 2 DE MONTAJE
TORNILLERÍA PARA EL PASO 2
text_image
Technical diagram of a mechanical device with labeled components including lever, frame, and guide railstext_image
Technical diagram of a mechanical device with labeled components and directional indicators
text_image
H J C IPASO 4 DE MONTAJE
| TORNILLERÍA PARA EL PASO 4 | |||
| PIEZA TIPO DESCRIPCIÓN CANT. | |||
| K ARANDELA ONDULADA | 17,2X22,5X5T 2 | ||
| L | ARANDELA PLANA | 8,2X20,0X1,5T 2 | |
| 8,2X15,4X2,0T 2M ARANDELA ELÁSTIC | |||
| M8X1,25PX20T 2N PERNO | |||
text_image
Technical diagram of a stationary exercise machine with labeled components and partsnatural_image
Four technical diagrams of mechanical parts labeled N, M, L, K, showing different line styles (solid, dashed, etc.) without any text or symbols.

PASO 5 DE MONTAJE
| TORNILLERÍA PARA EL PASO 5 | |||
| PIEZA TIPO DESCRIPCIÓN CANT. | |||
| M8X1,25PX20L 2O PERNO | |||
| 8,2X15,4X2T 2P ARANDELA | ELÁSTICA | ||
| Q | ARANDELA PLANA | 8,2X20X1,5L 2 | |
| 20,7X29,1X0,5T 2R ARANDELA | ONDUL | ||
| 20,2X27,2X1,5T | 4S | ||
text_image
Technical diagram of a stationary exercise machine with labeled components and motion indicatorstext_image
O S P Q RPASO 6 DE MONTAJE
w
ARAN
| TORNILLERÍA PARA EL PASO 6 | |||
| PIEZA TIPO DESCRIPCIÓN CANT. | |||
| M8X1,25PX20L 2T PERNO | |||
| 8,6X26X2T 4U ARANDELA | PLANA | ||
| 16X25X1,5L 4V ARANDELA | PLANA | ||
| NDELA DE CAUCHO | 16,2X26,2X11,5T 2 | ||
| 8,2X15,4X2T | 2X | ||

text_image
11 W V 12 v U 13 U X T 12text_image
Technical diagram of an exercise machine with numbered components and labeled partsNOTA:
natural_image
Line drawing of an outdoor fitness equipment with a mounted stationary platform and two side-mounted legs (no text or symbols)DO NOT RETURN TO THE RETAILER if you have any problems during assembly or if parts are missing.
For fast and friendly service, please contact one of our trained customer technicians via phone, email or our website.
We want to know if you have a problem and we want to have an opportunity to correct it for you.
NOTE: Please read the TROUBLESHOOTING section in the ELLIPTICAL GUIDE before contacting Customer Tech Support. Additional product information is available on our website.
ARRÊTER
ASSISTANCE TECHNIQUE
techsupport@horizonfitness.com
www.horizonfitness.com
Horizon Fitness
1600 Landmark Drive,
Cottage Grove WI, 53527
Horizon 7.0AE 02112020 © 2019 Horizon Fitness