
BRLY07R00 - Blender OSTER - Free user manual and instructions
Find the device manual for free BRLY07R00 OSTER in PDF.

| Product type | Blender (reversible motor blender) |
| Brand | Oster |
| Model | BRLY07R00 |
| Container capacity | 1.5 L (durable glass) |
| Container material | Glass |
| Number of speeds | 3 manual speeds (low, medium, high) + 2 pulse settings (min and max) |
| Automatic programs | Smoothies/milkshakes and Chop (automatic stop at end of cycle) |
| Motor technology | Reversible motor (reverse direction) with variable speed |
| Drive type | All-Metal Drive |
| Estimated power | 600 W |
| Voltage/Frequency | 220-240 V / 50-60 Hz |
| Additional functions | Lid hopper for ingredient addition, automatic stop if idle, auto standby, operation indicator light |
| Safety | Automatic stop at end of cycle, stop button (Off), automatic stop if idle |
| Cleaning | Parts (lid, hopper, blade) dishwasher safe (top rack); seal in bottom rack; motor base cleaned with a damp cloth |
| Package contents | Motor base, glass container, multi-function blade, sealing ring, lid with hopper |
| Warranty | 2 years |
| Repairability | Parts available through authorized after-sales service (repairs by authorized personnel only) |
Frequently Asked Questions - BRLY07R00 OSTER
User questions about BRLY07R00 OSTER
0 question about this device. Answer the ones you know or ask your own.
Ask a new question about this device
Download the instructions for your Blender in PDF format for free! Find your manual BRLY07R00 - OSTER and take your electronic device back in hand. On this page are published all the documents necessary for the use of your device. BRLY07R00 by OSTER.
USER MANUAL BRLY07R00 OSTER
natural_image
Illustration of two colorful blender machines with control knobs and a side view showing the blade (no text or symbols)MODEL
MODÈLE
MODELO
MODELO
BRLY07-Z00 &
BRLY07-R00
INSTRUCTION MANUAL
BLENDER WITH REVERSIBLE MOTOR TECHNOLOGY
READ ALL INSTRUCTIONS BEFORE USING THIS APPLIANCE
MANUEL D'INSTRUCTIONS
MANUAL DE INSTRUÇÕES
LIQUIDIFICADORA COM TECNOLOGIA DE MOTOR REVERSÍVEL
LEIA TODAS AS INSTRUÇÕES ANTES DE USAR ESTE APARELHO
IMPORTANT SAFEGUARDS
When using electrical appliances, basic safety precautions should be followed, including the following:
READ ALL INSTRUCTIONS BEFORE USING YOUR OSTER® BLENDER WITH REVERSIBLE MOTOR TECHNOLOGY.
- Unplug cord from outlet when not in use or before cleaning.
- To protect against risk of electrical shock, do not immerse the cord, plug or motor base in water or other liquids.
-
DO NOT let cord hang over edge of table or counter or touch hot surfaces.
-
Never leave appliance unattended when in use.
-
Children should be supervised to ensure that they do not play with the appliance.
-
The blinking on light indicates the blender is ready to operate. Always avoid any contact with blades or moveable parts. Keep hands and utensils out of jar while blending to prevent personal injury or damage to the blender. A rubber spatula may be used only when the blender is not running.
-
The blade is sharp. Handle with care. Care shall be taken when handling the sharp cutting blades, emptying the bowl and during cleaning.
-
Always put the lid on the jar before operating the blender.
-
DO NOT operate any appliance with a damaged cord or plug or after the appliance malfunctions or is dropped or damaged in any manner. Return the appliance to the nearest Authorised Appliance Service Centre for examination, repair or electrical or mechanical adjustment.
-
DO NOT use outdoors or for commercial purposes; this appliance is for household use only.
-
Use this appliance for its intended use as described in this manual.
-
Hot Foods: Open feeder cap to vent steam. Make sure to tilt feeder cap away from you when opening it. Keep hands away from the lid opening to prevent possible burns. When working with hot liquids, remove feeder cap and start blending at a low speed then move to a faster speed.
-
To reduce the risk of injury, never place cutter-assembly blades on base without jar properly attached.
-
Always operate on a flat surface.
-
Always press OFF button and disconnect the blender from the supply mains if it is left unattended and before assembling, disassembling or cleaning.
-
The use of attachments, not made by manufacturer, including canning or ordinary jar and processing assembly parts, is not recommended by Sunbeam Products, Inc., doing business as Jarden Consumer Solutions, and may cause risk of injury to persons.
-
DO NOT operate blender continuously for more than 3 minutes.
-
This appliance is not intended for use by persons (including children) with reduced physical, sensory or mental capabilities, or lack of experience and knowledge, unless they have been given supervision or instruction concerning use of the appliance by a person responsible for their safety.
THIS PRODUCT IS FOR HOUSEHOLD USE ONLY.
The maximum rating marked on the product is based on the attachment that draws the greatest load. Other attachments may draw less power.
POWER CORD INSTRUCTIONS
Please follow the instructions below to ensure the safe use of the power cord
• DO NOT use an extension cord with this product.
• DO NOT pull, twist or otherwise abuse the power cord.
- If the supply cord is damaged, it must be replaced by the manufacturer, its service agent or similarly qualified persons in order to avoid a hazard.
SAVE THESE INSTRUCTIONS
FITTING A REPLACEMENT PLUG FOR U.K. AND IRELAND ONLY
If the plug is not suitable for the socket outlets in your home, it can be removed and replaced by a plug of the correct type. Please refer to "Installation of a plug" below.
Installation of a plug Applicable to U.K. and Ireland.
WARNING - THIS APPLIANCE MUST BE EARTHED.
NOTE: If the terminals in the plug are not marked or if you are unsure or in doubt about the installation of the plug please contact a qualified electrician. If a 5A 3-pin plug is fitted, it must be an ASTA approved plug, conforming to BS1363 standard. Replacement 5A fuses must be BSI or ASTA BS1362 approved.
The wires in the mains lead are coloured as such:
Please note that the colour of these mains wires may not correspond with the colour markings that identify the terminals in your plug.

Please proceed as follows:
The wire which is coloured GREEN AND YELLOW must be connected to the terminal which is marked with the letter "E" or by the earth symbol ⏻ or coloured GREEN or GREEN AND YELLOW.
The BROWN coloured wire must be connected to the terminal, which is marked with the letter "L" or is coloured RED.
The BLUE coloured wire must be connected to the terminal, which is marked with the letter "N" or is coloured BLACK.
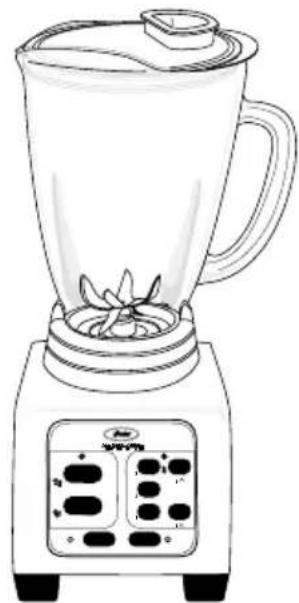
DESCRIPTION OF THE APPLIANCE
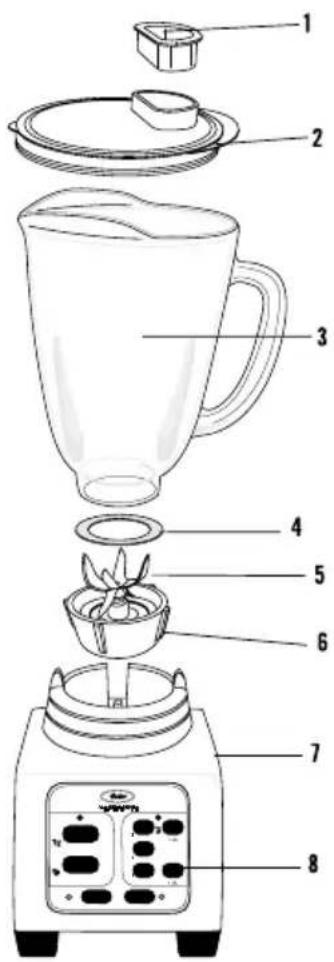
- Filter Cap – Allows you to add ingredients during use. Also, allows you to open to allow steam to escape when blending hot foods.
- Jar lid – Seals the blender jar.
- Jar - Made from heavy-duty glass. Has a maximum capacity of 1.5 litres.
- Sealing Ring – Seals the jar to the multi-functional blade for leak-proof operation.
- Six Point Blade – Creates a forward and reverse action when the Pre-Programmed settings are in use.
- Threaded Jar Bottom
- Sturdy Stylish Base – Holds the jar securely. Contains a powerful, reversible, variable speed motor. It uses Pre-Programmed logic that takes the guesswork out of creating foods and drinks.
- Control Panel – (More detail instructions in the next page)
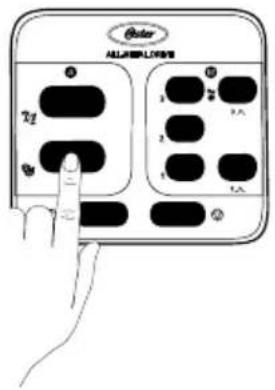
CONTROL PANEL
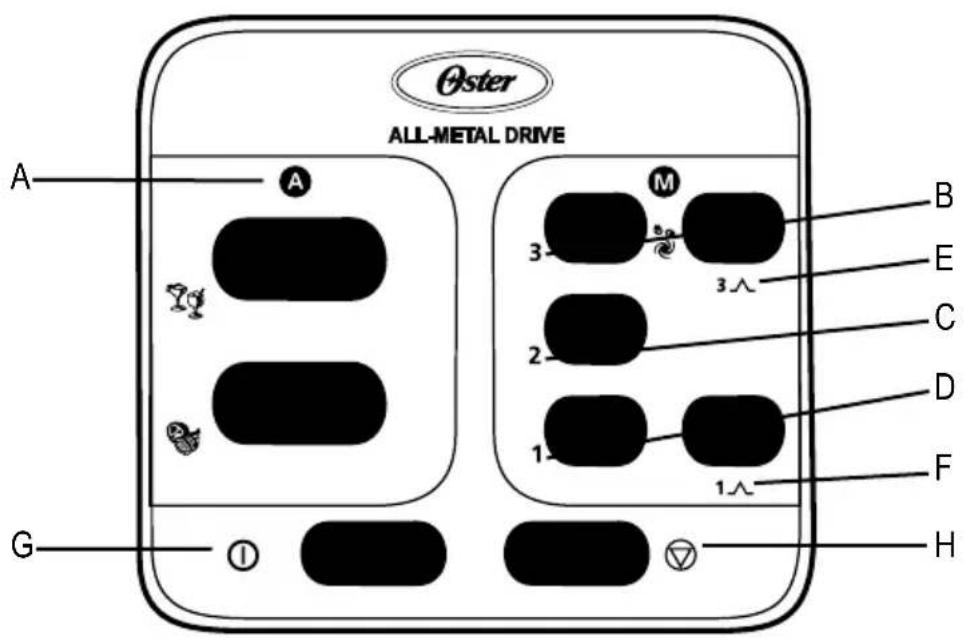
A. (A) Pre-Programmed Settings – Use to select Frozen Drinks & Shakes Button (☐) or Food Processor Button (☐). Blender automatically shuts off when cycle is finished
B. (M) Speed 3 – Use for max speed or ice crushing
C. (M) Speed 2 – Use for medium speed
D. (M) Speed 1 – Use for low speed
E. (3 ∧) Max Pulse Button – Press and hold to Pulse, release the button to stop. Recommended for ice crushing
F. (i^) Low Pulse Button – Press and hold to Pulse, release the button to stop. Recommended for preparing sauces and dips
G. (①) Power Button – Turns the product On and Off
H. (☑) Stop Button – Use to Stop the product
USING YOUR OSTER® BLENDER WITH REVERSIBLE MOTOR TECHNOLOGY
Your product includes the following technology and features:
- A user-friendly touchpad design gives you the option of Pre-Programmed Settings or Manual Controls.
• A multi-functional blade optimises Pre-Programmed food and drink preparation. - A powerful reversible motor keeps the ingredients near the blade by spinning at very low speeds and gradually speeding up to the Pre-Programmed level, ensuring optimum results from smooth to chunky.
• Manual Controls give you the flexibility to operate the blender for personal recipes.
• The Jar lid food chute lets you add ingredients without removing the jar lid.
Before you use the product for the first time, separate the lid, jar lid food chute, and blade from the jar. Wash in warm, soapy water, or top rack in the dishwasher. Rinse and dry well.
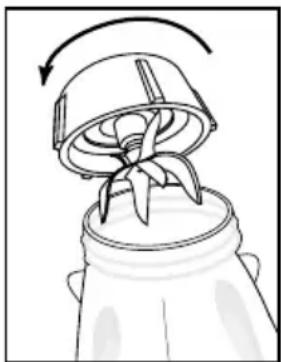
ASSEMBLY
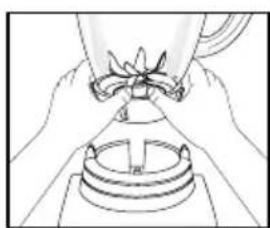
- Install the sealing ring over the multi-functional blade. Blade is sharp. Handle with care.
- Turn the jar upside down so the small opening is at the top.
- Turn the multi-functional blade with sealing ring upside down and place into the bottom of the jar.
- Position the open end of the threaded jar bottom over the jar and sealing ring. Turn clockwise to tighten. Be sure the threaded jar bottom is locked securely to the jar before using.
- Slide the jar onto the base.
- Plug the power cord into a standard household outlet of the same voltage as the one indicated in the rating plate of your blender. You are now ready to start.
natural_image
Diagram of a mechanical device with a rotating blade and handle, showing no text or symbols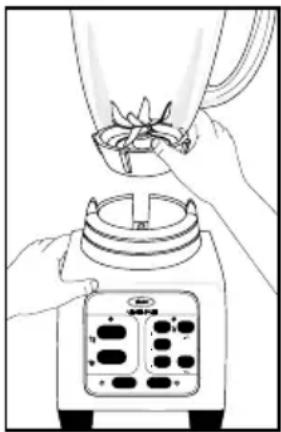
natural_image
Line drawing of hands using a blender to lift a flower (no text or symbols)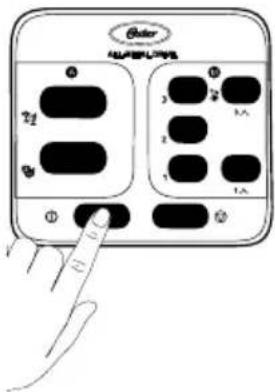

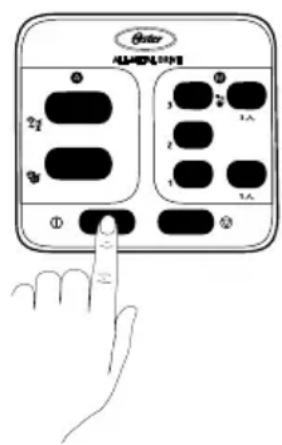
USING THE PRE-PROGRAMMED SETTINGS (A)
- Press (①) button to turn the product on. The power light will blink, meaning the product is active and ready to use. Avoid contact with moving parts
- Choose a recipe.
- Put the ingredients into the jar.
- Secure the lid and jar lid food chute.
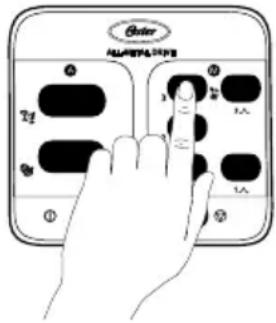
- Press one of the two Pre-Programmed Setting buttons appropriate for your recipe. Frozen Drinks & Shakes Button (💡) or Food Processor Button (💡).
- To change your selection, press (☑) button followed by another Pre-Programmed Setting button: Frozen Drinks & Shakes (☑) or Food Processor (☑).
- Once the program is finished the product automatically stops. Please note: You may press the (☑) button to cancel the program at any time. The blinking red light indicates that the blender is ready.
- Press (①) button to turn the product off.
This product is pre-programmed to turn off automatically if not used for a period of several minutes. All lights will turn off when the unit automatically powers down.

USING THE MANUAL CONTROLS (M)
The Manual Controls include:
• Speed 3 - Max/Ice Crush (High speed)
• Speed 2 -Medium/Blend (Medium speed)
• Speed 1 -Low/Stir (Low speed)
- Max Pulse - ^3
- Low Pulse - 1^
Use these buttons for personal recipes or to continue mixing after a Pre-Programmed Setting is finished.
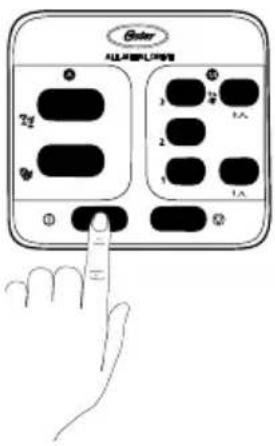
- Press (①) button to turn the product on. The power light will blink, meaning the product is active and ready to use.
- Choose a recipe from the recipe section of this manual or use one of your own.
- Put the ingredients into the jar.
- Secure the lid and the jar filler cap.
USING THE SPEED 3 BUTTON
- Press the Speed 3 button to run the product at a high speed.
- Press ( ☑ ) button to cancel the operation at any time.
- Press (①) button to turn the product off.
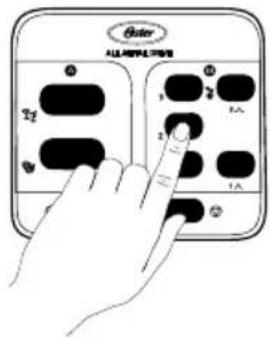
USING THE SPEED 2 BUTTON
- Press the speed 2 button to run the product at a medium speed.
- Press (☑) button to cancel the program at any time.
- Press ( Ⓞ ) button to turn the product off.
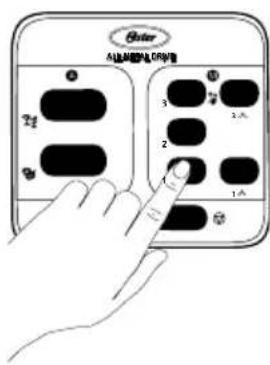
USING THE SPEED 1 BUTTON
- Press the speed 1 button to run the product at a low speed.
- Press (☑) button to cancel the program at any time.
- Press (①) button to turn the product off.
USING THE MAX PULSE (3 ∧)
- Press and hold (3^) button.
- Release (3^) button to stop. Recommended for Ice crushing.
- Press (①) button to turn the product off.
USING THE LOW PULSE (1^)
- Press and hold (1^) button.
- Release(1^) button to stop. Recommended for salsa.
- Press (①) button to turn the product off.
Use lower pulse settings for food and higher pulse settings for drinks.
CARING AND MAINTAINING YOUR OSTER® BLENDER WITH REVERSIBLE MOTOR
After Use:
- Lift the jar straight up from the base, remove the lid and empty the jar.
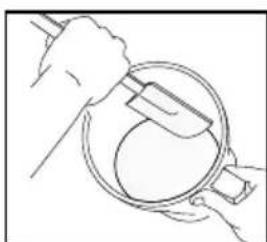
- If necessary, use a rubber spatula to scrape foods away from the sides of the jar.
natural_image
Line drawing of hands performing a top-down view of a lamp on a stand (no text or symbols)CLEANING
Always press off buton and unplug appliance before cleaning. Do not immerse blender in liquids.
Release the multi-functional blade from the bottom of the jar by turning the jar bottom cover anticlockwise.
The jar lid, jar lid food chute and blade are dishwasher safe. Use the top rack of the dishwasher for the jar lid, jar lid food chute, and blade.
Place sealing ring into bottom basket of dishwasher.
natural_image
Line drawing of hands holding a magnifying glass over a circular object (no text or symbols)You can also wash the parts in warm, soapy water. Rinse well and dry. Wipe the base with a soft, damp cloth to clean. Never submerge the low profile base in a liquid. Check the parts as you put them back together.
STORING
Reassemble the blender for storage. Leave the lid open a gap so no odours are retained.
WARNING: Never put the jar, or any other parts, in a microwave oven. Never store foods or drinks in the jar.
BLENDING TIPS
Liquids
Put liquids into the jar first, unless the recipe says otherwise.
Using the jar lid food chute
Do not remove the lid while in use. Food may splatter if you do. Instead, open the jar lid food chute to add smaller ingredients.
Working with Hot Foods or Liquids
WARNING: When you work with HOT FOODS, remove the jar lid food chute to vent steam. Tilt the lid away from you partially covering the opening. Keep hands and other exposed skin away from the lid opening to prevent possible burns.
natural_image
Line drawing of a blender with a side panel showing four blades (no text or symbols)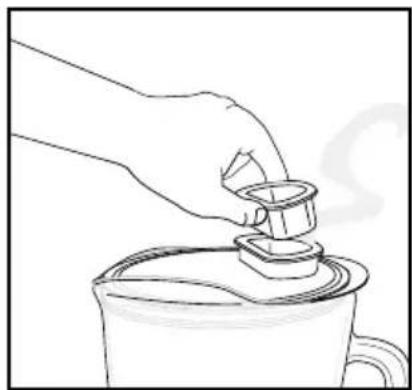
natural_image
Line drawing of a hand pouring liquid into a cup (no text or symbols)When you work with HOT LIQUIDS, remove the jar lid food chute and start at a low speed, and then gradually increase to a faster speed. Do not add liquid over the 4 cup (1L) level. Always keep hands away from steam.
Ingredients Quantities
Use only the amount of food suggested in the recipe. If you want greater amounts, prepare in batches. Using larger amounts may overload and strain the motor. You might also get different results from those described.
Frequently Asked Questions
Why doesn't the blender/food processor turn on?
- Make sure the base is plugged in an active power receptacle.
- Verify blinking red light is active after pushing Power button (①).
How can I prevent liquids from leaking out?
Check to see that the sealing ring is correctly assembled in between the multi-functional blade and the jar.
RECIPES
Note: These recipes have been optimised with the Pre-Programmed Settings. When experimenting with your own recipes you may choose to stop the Pre-Programmed Setting at any time by hitting the (①) button or you may run the cycle more than once if a smoother result is desired.
FROZEN DRINKS:
FROZEN MARGARITA Makes 4 servings
4 oz. gold tequila
2 Tbsp. fresh lime juice
40g sugar
300g ice
Garnish: Extra lime juice and salt for coating glass rims
- In jar, place ingredients in order given above.
- Cover jar with lid. Press (①) button, then press (㉚) button.
- Dip rim of stemmed glasses in lime juice then in salt; pour drink into glasses.
Creative Cook's Note: If desired, granulated sugar can be used in place of salt.
Note: For a smoother finish, use the (3) button 3 to 4 times after the frozen drink cycle is complete.
STRAWBERRY DAIQUIRI Makes 4 servings
1 can (6 oz.) frozen limeade concentrate
5 oz. rum
100g whole strawberries with stems removed
1 Tbsp. sugar
350g ice
Garnish: Small whole strawberries and lime slices
- In jar, place ingredients in order given above.
- Cover jar with lid. Press (①) button, then press (②) button.
- Pour into stemmed glasses.
- Garnish, if desired, with strawberry and lime slice.
Creative Cook's Note: For variety, substitute fresh raspberries, blackberries or cubed mango in equal amounts for the strawberries.
Note: For a smoother finish, use the (^3) button 3 to 4 times after the frozen drink cycle is complete.
PIÑA COLADA Makes 4 servings
230ml pineapple juice
6 oz. golden rum
575ml cream of coconut
1 tsp. lemon juice
200g ice
Garnish: Pineapple slices, maraschino cherries
- In jar, place ingredients in order given above.
- Cover jar with lid. Press (①) button, then press (㉒) button.
- Pour into tall glasses.
- Garnish, if desired, with pineapple slice and cherry.
Note: For a smoother finish, use the (3) button 3 to 4 times after the frozen drink cycle is complete.
SMOOTHIES AND SHAKES
STRAWBERRY SHAKE Makes 2 servings
230ml fresh, ripe strawberries with stems removed (8 to 10 medium berries)
230ml milk
475ml strawberry ice cream
- In jar, place ingredients in order given above. Put berries in first!
- Cover jar with lid. Press (①) button, then press (♀) button.
- Pour into tall glasses.
CHOCO-PEANUT BUTTER SHAKE Makes 2 servings
230ml milk
475ml chocolate ice cream
40g peanut butter
14 tsp. vanilla
- In jar, place ingredients in order given above.
- Cover jar with lid. Press (①) button, then press (㉒) button.
- Pour into tall glasses.
BRANDY ALEXANDER Makes 4 servings
3 Tbsp. milk
4 oz. crème de cacao
2 oz. brandy
475ml vanilla ice cream
- In jar, place ingredients in order given above.
- Cover jar with lid. Press (①) button, then press (㉒) button.
- Pour into stemmed glasses.
HONEY-VANILLA BLAST Makes 1 serving
230ml fat free milk
230ml (8 oz.) fat free vanilla yogurt
3 chunks frozen banana, about 1 medium
40g protein powder
2 Tbsp. honey
- In jar, place ingredients in order given above.
- Cover jar with lid. Press (①) button, then press (㉒) button.
- Pour into tall glass to serve.
MORNING MOCHA SMOOTHIE Makes 1 serving
120ml fat-free milk
230ml (8 oz.) low-fat coffee yogurt
2 Tbsp. chocolate syrup
6 ice cubes
- In jar, place ingredients in order given above.
- Cover jar with lid. Press (①) button, then press (㉒) button.
- Pour into tall glass to serve.
VERY BERRY SMOOTHIE Makes 1 serving
230ml orange juice
120ml vanilla low-fat yogurt
100g frozen mixed berries
2 frozen banana chunks, about 1 small
2 Tbsp. honey
- In jar, place ingredients in order given above.
- Cover jar with lid. Press (①) button, then press (㉑) button.
- Pour into tall glass to serve.
TROPICAL POWER PUNCH SMOOTHIE Makes 2 servings
1 can (6 oz.) pineapple juice
1 can (8 oz.) crushed pineapple
100g mango sorbet
12 tsp. coconut extract
100g ice
- In jar, place ingredients in order given above.
- Cover jar with lid. Press (①) button, then press (㉒) button.
- Pour into tall glasses to serve.
SALSAS:
GARDEN FRESH SALSA Makes 2 cups
12 small onion, cut into 4 pieces
14 green pepper, cut into 4 pieces
12 cucumber, cut into quarters
1 large garlic clove
12 oz. (4-5) plum tomatoes, cut each into eighths
3 Tbsp. red wine vinegar
1 tsp. Worcestershire sauce
1/8 tsp. hot pepper sauce
Salt and Pepper to taste
Tortilla chips for serving
-
In jar, place ingredients, except tortilla chips, in order given above.
-
Cover jar with lid. Press (①) button, then press (💡) button.
-
Pour into bowl; serve with tortilla chips.
FIERY RED SALSA Makes 3 cups
2 large garlic cloves
1 can (15 oz.) whole tomatoes, drained
1 medium onion, cut into quarters
12 cup cilantro leaves
1-4 jalapeno peppers, quartered
12 -1 tsp. sugar
Salt to taste
1 Tbsp. lime juice
1 can (15 oz each) whole tomatoes, drained
Tortilla chips for serving
-
In jar, place ingredients, except tortilla chips, in order given above. (Note: Place one can of tomatoes in after garlic cloves and second can after rest of ingredients are added. Also, place onion in middle of jar to avoid blockage.)
-
Cover jar with lid. Press (①) button, then press (💡) button.
-
Pour into bowl; serve with tortilla chips.
Creative Cook's Note: When handling hot peppers, such as jalapeños, use rubber gloves and keep hands away from your eyes.
SALSA VERDE Makes 1½ cups
12 small onion, cut into 4 pieces
12 small green pepper, cut into 4 pieces
2 garlic cloves
40g cilantro leaves
12 tsp. ground cumin
14 tsp. green hot pepper sauce
1/8 tsp. salt
12 oz. (8-9) tomatillos, roasted, husks removed
Tortilla chips for serving
-
In jar, place ingredients, except tortilla chips, in order given above.
-
Cover jar with lid. Press (①) button, then press (💡) button.
-
Pour into bowl; serve with tortilla chips.
Notes: Worked fine on chop cycle.12 oz. of tomatillos is about 8 or 9.
SOUPS AND FOODS:
CREAM OF TOMATO SOUP Makes 4 servings
4-5 medium ripe tomatoes, cut in quarters
1 small onion, cut in quarters
3-4 fresh basil leaves
2 Tbsp. butter
12 tsp. salt
230ml half-and-half or milk
-
Place tomatoes, onion and basil in the jar.
-
Cover jar with lid. Press ( Ⓞ ) button, then press ( 🍴 ) button.
-
Pour processed mixture into 3 qt. saucepan. Add butter, salt and half-and-half.
-
Stir while gently heating to 145^ F; do not let soup boil.
PEACHY APPLESAUCE Makes 1 ¼ cups
1 large apple, pared, cored and quartered
1 large peach, pitted, peeled and quartered (If out of season, use 2 canned peach halves.)
2 Tbsp. water
-
In small saucepan, cook fruits in water 5-8 minutes or until very tender.
-
In jar, place fruits and liquid.
-
Cover jar with lid. Press (①) button, then press (1 ∧) button 3 or 4 times, then High Pulse button (3 ∧) until smooth.
-
Remove from jar; place in covered containers.
-
Chill or freeze at once.
GREEN PEA BABY FOOD Makes 1½ cups
1 pkg. (10 oz.) frozen baby green peas
170ml cup water
- In small saucepan, cook peas in water 10-15 minutes or until very tender.
- In jar, place peas and liquid.
- Cover jar with lid. Press (①) button, then press (♀) button.
- Remove from jar. Place in covered containers.
- Chill or freeze at once.
HONEY-WHEAT PANCAKES Makes 12 pancakes
300ml cups low fat buttermilk
2 eggs
2 Tbsp. honey
350ml cups reduced-fat buttermilk baking mix
50g whole-wheat flour
25g honey-crunch wheat germ
1 tsp. baking powder
Butter and syrup for serving
- In jar, place ingredients in order given above.
- Cover jar with lid. Press (①) button, then press (3^) button 8-10 times. When done, scrape jar and stir in the batter lightly.
- For each pancake, pour about 14 cup batter onto preheated griddle; cook until tops begin to bubble; turn over and continue to cook until golden.
- Serve hot with butter and syrup.
EUROPE GUARANTEE
Please keep your receipt as this will be required for any claims under this guarantee.
This appliance is guaranteed for 2 years after your purchase as described in this document.
During this guaranteed period, if in the unlikely event the appliance no longer functions due to a design or manufacturing fault, please take it back to the place of purchase, with your till receipt and a copy of this guarantee.
The rights and benefits under this guarantee are additional to your statutory rights, which are not affected by this guarantee. Only Holmes Products (Europe) Ltd. (“Holmes”) has the right to change these terms.
Holmes undertakes within the guarantee period to repair or replace the appliance, or any part of appliance found to be not working properly free of charge provided that:
• you promptly notify the place of purchase or Holmes of the problem; and
• the appliance has not been altered in any way or subjected to damage, misuse, abuse, repairor alteration by a person other than a person authorised by Holmes.
Faults that occur through, improper use, damage, abuse, use with incorrect voltage, acts of nature, events beyond the control of Holmes, repair or alteration by a person other than a person authorised by Holmes or failure to follow instructions for use are not covered by this guarantee. Additionally, normal wear and tear, including, but not limited to, minor discoloration and scratches are not covered by this guarantee.
The rights under this guarantee shall only apply to the original purchaser and shall not extend to commercial or communal use.
If your appliance includes a country-specific guarantee or warranty insert please refer to the terms and conditions of such guarantee or warranty in place of this guarantee or contact your local authorised dealer for more information.

This marking indicates that this product should not be disposed with other household wastes and should be disposed separately throughout the EU. To prevent possible harm to the environment or human health from uncontrolled waste disposal due to the presence of hazardous substances within the product, recycle it responsibly to promote the sustainable reuse of materials
and resources. To return your used device, please use the return and collection systems available to you or contact the retailer where the product was purchased. They can take this product for environmentally safe recycling.
Holmes Products (Europe) Limited
1 Francis Grove
London
SW19 4DT
UK
IMPORTANTES MESURES DE SÉCURITÉ
natural_image
Diagram of a mechanical device with a rotating component and blades, no text or symbols present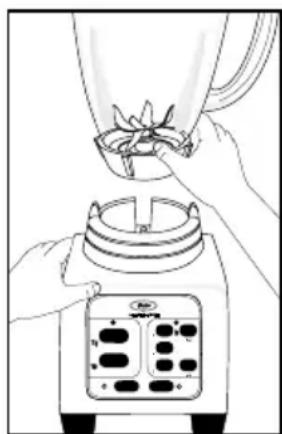
natural_image
Line drawing of hands using a blender to generate a flower (no text or symbols)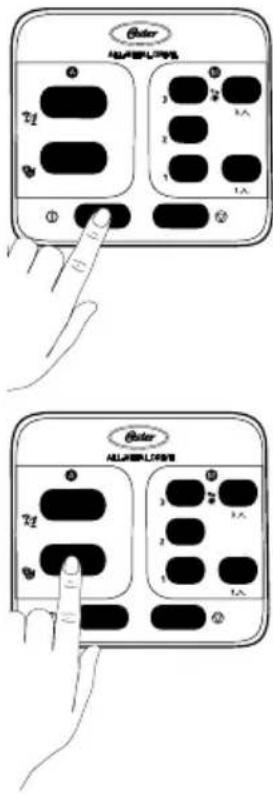
UTILISATION DES RÉGLAGES PROGRAMMÉS (A)
BOUTON 2 (VITESSE MOYENNE/MÉLANGE)
natural_image
Line drawing of hands holding a glass with a cloth, no text or symbols presentSOIN ET ENTRETIEN DE VÔTRE MÉLANGEUR OSTER® A MOTEUR REVERSIBLE
Après l'utilisation
natural_image
Line drawing of hands using a spatula to handle a bowl (no text or symbols)NETTOYAGE
natural_image
Line drawing of a blender with a handle and side panel (no text or symbols)
natural_image
Line drawing of a hand pouring liquid into a cup (no text or symbols)Holmes Products (Europe) Limited
1 Francis Grove
London
SW19 4DT
UK
PRECAUCIONES IMPORTANTES
natural_image
Diagram of a mechanical device with a rotating component and a curved arrow indicating rotation (no text or symbols)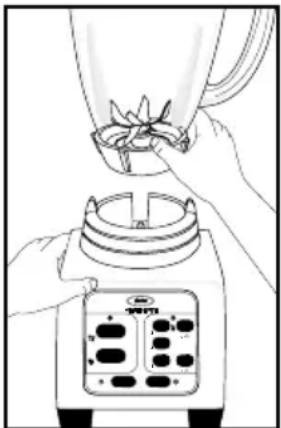
natural_image
Line drawing of a blender being placed into a small container with control buttons (no text or symbols)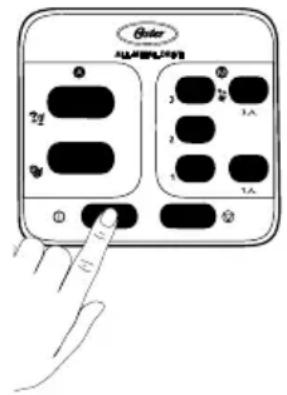

natural_image
Line drawing of hands holding a small object with a bow, above a circular base (no text or symbols)CUIDANDO Y MANTENIENDO SU BATIDORA OSTER® CON MOTOR REVERSIBLE
natural_image
Line drawing of hands using a magnifying glass to interact with a circular object (no text or symbols)LIMPIEZA
natural_image
Line drawing of a blender with a side panel and fan (no text or symbols)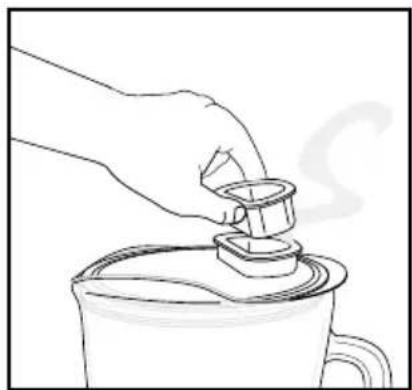
natural_image
Line drawing of a hand pouring liquid into a steaming cup (no text or symbols)Holmes Products (Europe) Limited
1 Francis Grove
London
SW19 4DT
Reino Unido
PRECAUÇÕES IMPORTANTES
natural_image
Diagram of a mechanical device with a rotating blade and a flat blade, showing motion direction (no text or symbols)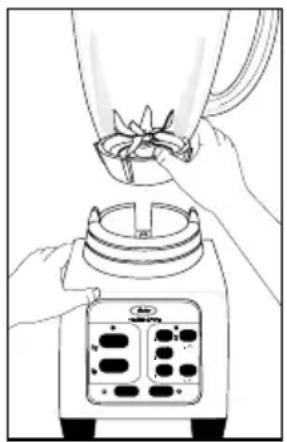
natural_image
Illustration of hands using a blender to generate a flower (no text or symbols present)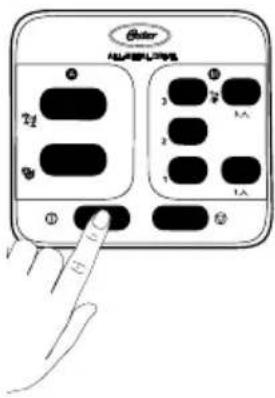
UTILIZAÇÃO DAS FUNÇÕES PRÉ-PROGRAMADAS (A)
natural_image
Line drawing of hands holding a small object with a bow, placed on a circular base (no text or symbols)Após a utilização:
natural_image
Line drawing of hands holding a circular object with a handle, no text or symbols presentnatural_image
Line drawing of a blender with a side panel showing four panes (no text or symbols)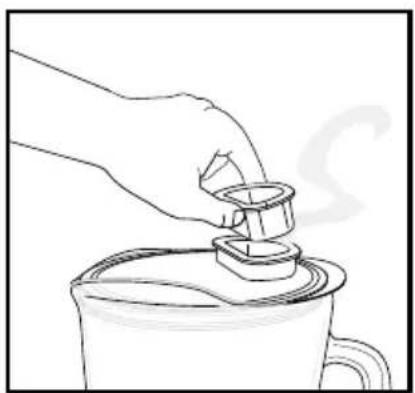
natural_image
Line drawing of a hand pouring liquid into a container with a steaming cup (no text or symbols)Holmes Products (Europe) Limited
1 Francis Grove
London
SW19 4DT
UK
Oster®
© 2012 Sunbeam Products, Inc. doing business as Jarden Consumer Solutions. All rights reserved. Distributed by Holmes Products (Europe) Ltd., 1 Francis Grove, London SW19 4DT, United Kingdom.
- IMPORTANT SAFEGUARDS
- READ ALL INSTRUCTIONS BEFORE USING YOUR OSTER® BLENDER WITH REVERSIBLE MOTOR TECHNOLOGY.
- THIS PRODUCT IS FOR HOUSEHOLD USE ONLY.
- POWER CORD INSTRUCTIONS
- FITTING A REPLACEMENT PLUG FOR U.K. AND IRELAND ONLY
- WARNING - THIS APPLIANCE MUST BE EARTHED.
- DESCRIPTION OF THE APPLIANCE
- CONTROL PANEL
- USING YOUR OSTER® BLENDER WITH REVERSIBLE MOTOR TECHNOLOGY
- Your product includes the following technology and features:
- ASSEMBLY
- USING THE PRE-PROGRAMMED SETTINGS (A)
- USING THE MANUAL CONTROLS (M)
- USING THE SPEED 3 BUTTON
- USING THE SPEED 2 BUTTON
- USING THE SPEED 1 BUTTON
- USING THE MAX PULSE (3 ∧)
- USING THE LOW PULSE (1^)
- CARING AND MAINTAINING YOUR OSTER® BLENDER WITH REVERSIBLE MOTOR
- After Use:
- CLEANING
- STORING
- BLENDING TIPS
- Liquids
- Using the jar lid food chute
- Working with Hot Foods or Liquids
- Ingredients Quantities
- Frequently Asked Questions
- How can I prevent liquids from leaking out?
- RECIPES
- FROZEN DRINKS:
- FROZEN MARGARITA Makes 4 servings
- STRAWBERRY DAIQUIRI Makes 4 servings
- PIÑA COLADA Makes 4 servings
- SMOOTHIES AND SHAKES
- STRAWBERRY SHAKE Makes 2 servings
- CHOCO-PEANUT BUTTER SHAKE Makes 2 servings
- BRANDY ALEXANDER Makes 4 servings
- HONEY-VANILLA BLAST Makes 1 serving
- MORNING MOCHA SMOOTHIE Makes 1 serving
- VERY BERRY SMOOTHIE Makes 1 serving
- TROPICAL POWER PUNCH SMOOTHIE Makes 2 servings
- SALSAS:
- GARDEN FRESH SALSA Makes 2 cups
- FIERY RED SALSA Makes 3 cups
- SALSA VERDE Makes 1½ cups
- SOUPS AND FOODS:
- CREAM OF TOMATO SOUP Makes 4 servings
- PEACHY APPLESAUCE Makes 1 ¼ cups
- GREEN PEA BABY FOOD Makes 1½ cups
- HONEY-WHEAT PANCAKES Makes 12 pancakes
- EUROPE GUARANTEE
- IMPORTANTES MESURES DE SÉCURITÉ
- UTILISATION DES RÉGLAGES PROGRAMMÉS (A)
- BOUTON 2 (VITESSE MOYENNE/MÉLANGE)
- SOIN ET ENTRETIEN DE VÔTRE MÉLANGEUR OSTER® A MOTEUR REVERSIBLE
- Après l'utilisation
- NETTOYAGE
- PRECAUCIONES IMPORTANTES
- CUIDANDO Y MANTENIENDO SU BATIDORA OSTER® CON MOTOR REVERSIBLE
- LIMPIEZA
- PRECAUÇÕES IMPORTANTES
- UTILIZAÇÃO DAS FUNÇÕES PRÉ-PROGRAMADAS (A)
- Após a utilização:
- Oster®
Brand : OSTER
Model : BRLY07R00
Category : Blender