
CC2700 - Camcorder AGFAPHOTO - Free user manual and instructions
Find the device manual for free CC2700 AGFAPHOTO in PDF.
| Product Type | Digital Camcorder |
| Brand | AgfaPhoto |
| Model | CC2700 |
| Dimensions | 126 x 59 x 57 mm |
| Power Supply | Lithium rechargeable battery NP-40 |
| Sensor | CMOS sensor, max. 30 MP (software interpolation) |
| Max. Video Resolution | 2.7K (2688 x 1520) |
| Max. Photo Resolution | 48 MP (interpolation) |
| Digital Zoom | 18x |
| Display | 3.0" IPS |
| Storage | SD card up to 128 GB (class 10 or higher) |
| Connection | USB 2.0, external microphone jack |
| White Balance | Auto, Sunny, Cloudy, Fluorescent, Tungsten |
| Exposure Compensation | -3.0 EV to +3.0 EV |
| Self-timer | Off, 2s, 5s, 10s |
| Image Stabilization | Yes |
| Face Detection | Yes |
| LED Light | Yes (range < 1.0 m) |
| Auto Power Off | 1, 3, 5 minutes or disabled |
| Voice Prompts | Enable/disable |
| Available Languages | 14 languages (including French) |
| Webcam Function | Yes |
| After-sales Service | +33 (0) 1.85.49.10.26 |
Frequently Asked Questions - CC2700 AGFAPHOTO
User questions about CC2700 AGFAPHOTO
0 question about this device. Answer the ones you know or ask your own.
Ask a new question about this device
Download the instructions for your Camcorder in PDF format for free! Find your manual CC2700 - AGFAPHOTO and take your electronic device back in hand. On this page are published all the documents necessary for the use of your device. CC2700 by AGFAPHOTO.
USER MANUAL CC2700 AGFAPHOTO
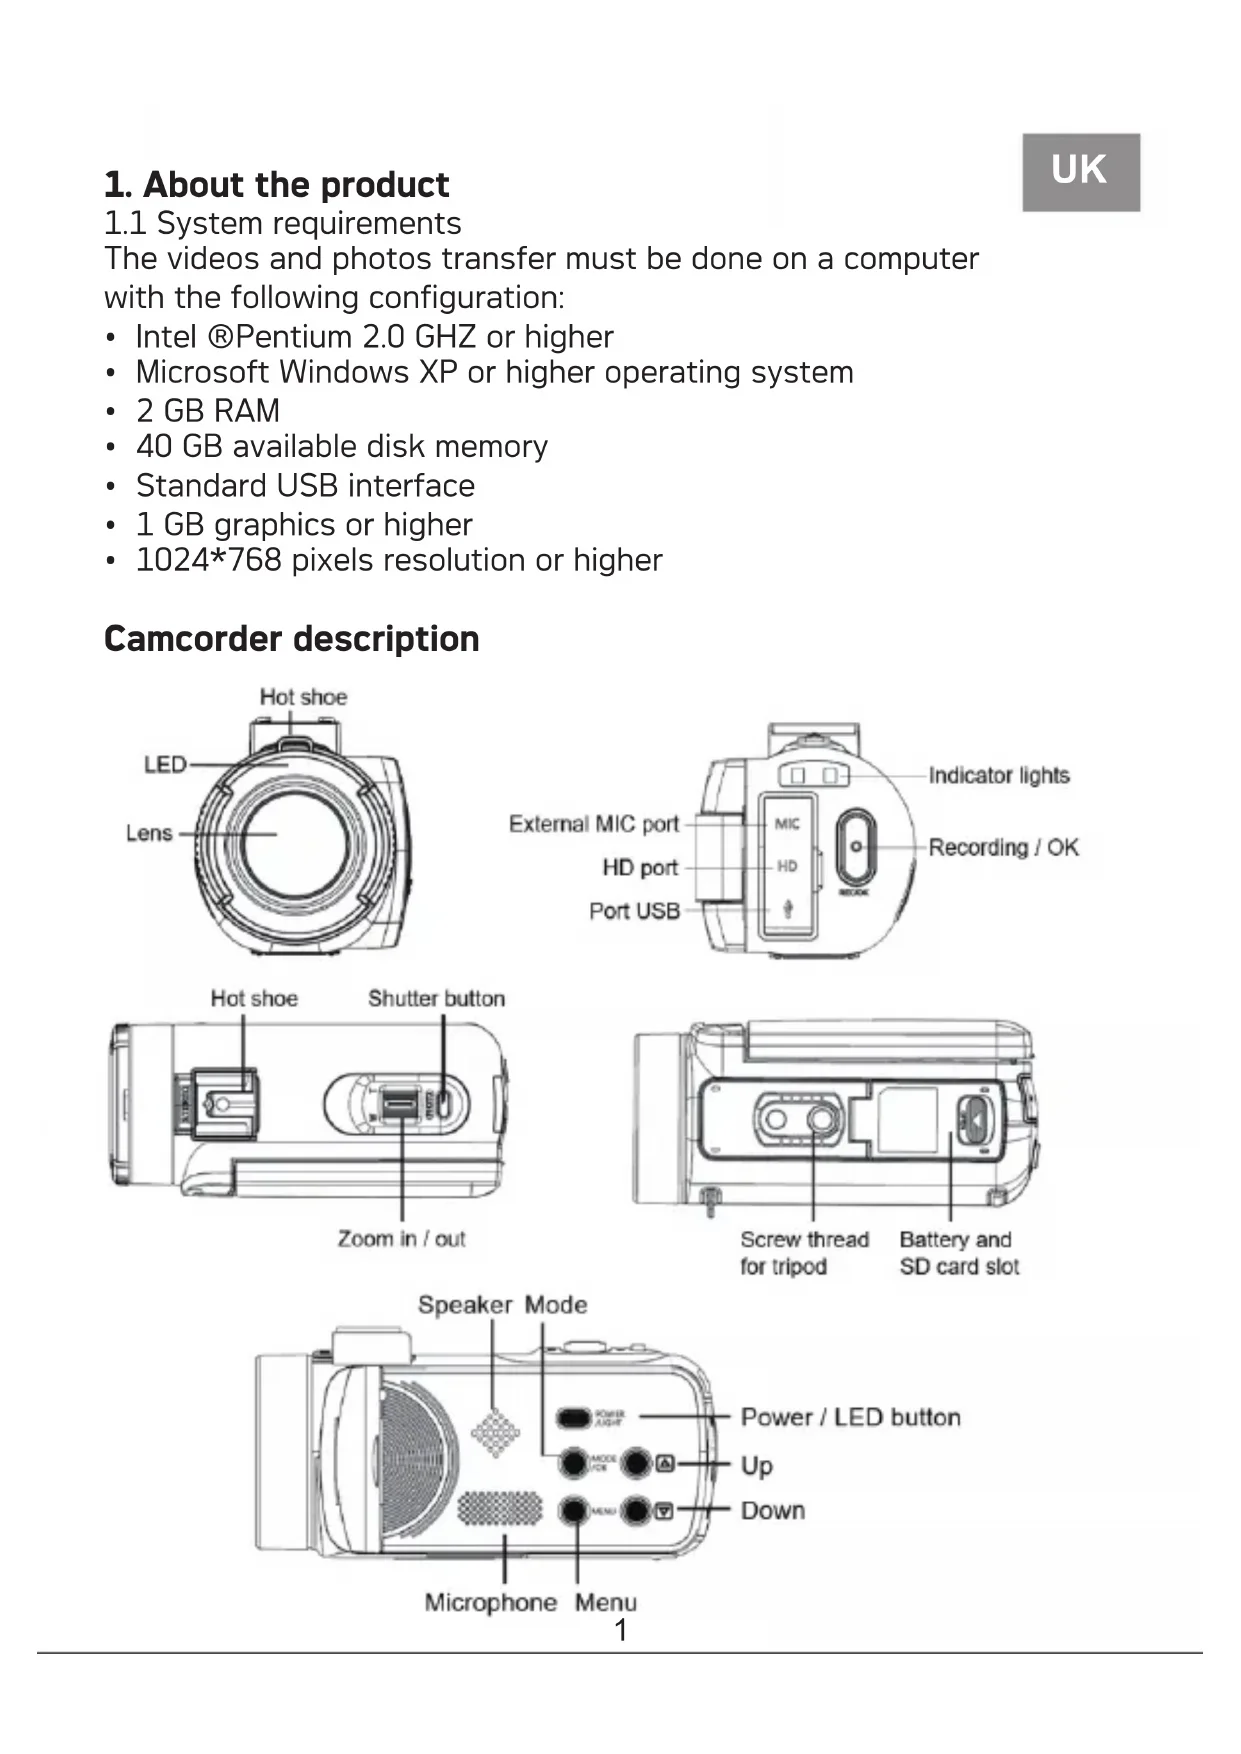
1. About the product
1.1 System requirements
The videos and photos transfer must be done on a computer with the following configuration:
- Intel ® Pentium 2.0 GHZ or higher
- Microsoft Windows XP or higher operating system
- 2 GB RAM
• 40 GB available disk memory
• Standard USB interface
• 1 GB graphics or higher
• 1024*768 pixels resolution or higher
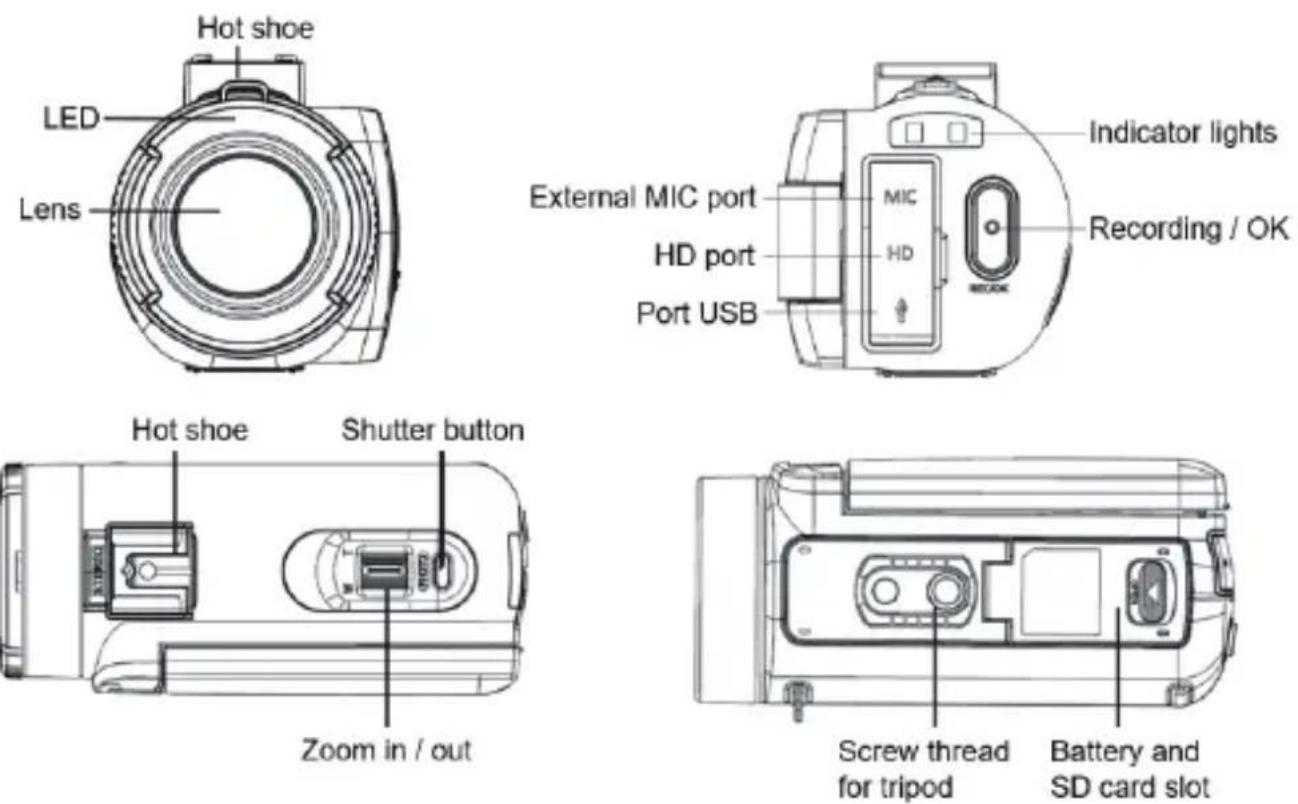
Camcorder description
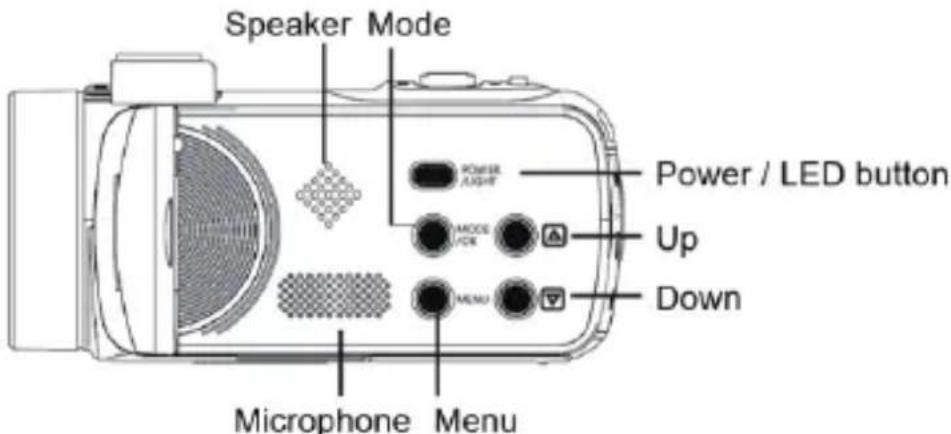
Buttons fonctions
| Icon Button name | Function description | |
 | Power button | Turn on/off the camcorder or LED light. |
 | Menu button | Dis play the setup menu of the different modes. |
 | Mode button | Press this button to switch to the modes: PhotoVidéoPlaybackSetup PhotoVidéoPlaybackSetup |
 | Up button | In playback mode, press this button to scroll through the photo or video files. |
 | Down button | In playback mode, press this button to scroll through the photo or video files. |
 | Shutter button | In to mode, s this button to take photos. |
 | Record /OK button | In video mode, press this button to start or st op video recording.In setting mode, press this button to confirm a selection. |
 | Zoom button | In photo / video mode, the button to the left or right to zoom in or out.In playback mode, set this button to reduce / magnify / move a photo. |
2. Start using
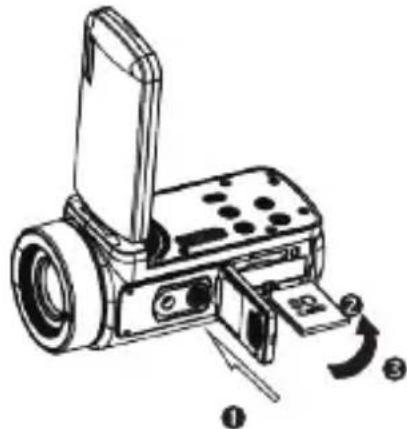
2.1 Inserting the memory card
The camcorder supports SD memory card up to 128 GB. It is necessary to insert a memory card before using it to store more photos or videos. When the battery is low or replaced, the media files stored on the memory card would not be lost.
Please follow the instructions below to insert it properly:
- Open the battery compartment by sliding its locking button.
- As shown below, insert the memory card into the dedicated slot with the side of the metallic contact facing up and then push it in until hearing a click indicating that it has been well installed.
- Close the battery compartment cover until you hear a click again indicating that it is securely closed.
Warning!
Please format the memory card before using the camcorder. Do not remove or replace the memory card when recording, otherwise you could damage it or lose the files stored on it! Some memory cards may also cause the camcorder crash or malfunction. It is recommended to use a memory card with C10 or higher transfer speed as storage medium.
2.2 Installing the lithium battery
Install the lithium battery s upplied with the camcorder in the battery compartment following the instructions below:
- Open the battery compartment by sliding its locking button.
- As shown below, insert the battery into the dedicated slot in the correct polarity direction.
- Close the battery compartment cover until you hear a click again indicating that it is securely closed.

Warning!
Please install the battery correctly, otherwise you may not be able to turn on the camcorder or damage it. Use a standard charger with adapter to connect it to an outlet with power supply of 100V-240V / 50-60HZ.
2.3 Charging the lithium battery
To recharge the lithium battery of the camcorder, simply connect it to your computer with the USB cable provided in the box (without removing the battery). The red indicator light on the back of the camcorder will light up to indicate that the battery is being charged, and will turn off when fully charged. You can also charge the battery by connecting the camcorder to AC power if you have an adapter to which you can connect the USB cable.
2.4 Powering on / off the camcorder
Press the Power button to turn on the camcorder. To turn it off, simply press it again for 3 seconds. If the battery is discharged, the message "Low power" will appear on the screen indicating that the camcorder will automatically turn off in a few seconds.
2.5 Mode switching
Press the Mode button to switch between photo, video, playback and setup modes. The selected mode will appear in the upper left corner of the screen as an icon.
2.6 Connecting to a computer
By connecting the camcorder to your computer, you can either transfer the files stored on the memory card (MSDC) or use it as a PC camera.

Plug the USB cable into the third interface on the back of the camcorder to connect it to your computer.
2.6.1 PC camera mode
Connect the camcorder to your PC as above.
The screen will then dis play:
Mode Switch
MSDC
PC Camera
Press Up/ Down button to choose "PC Camera" and press OK button to switch to PC camera mode.
2.6.2 Connecting an external mic rophone
To get a better audio, you can connect an external microphone via the MIC port and fix it to the hot shoe if it has an adapter.
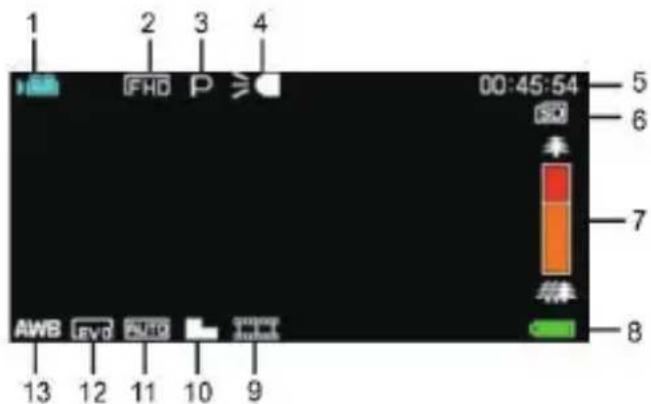
2.7 Video mode
In video mode, you can shoot video clips and store them only on the memory card.
Here is the signification of each icon appearing on the screen in video mode:
| 1. Video mode | 6.Memory card indicator | 11. ISO |
| 2. Video resolution | 7.Zoom | 12. Exposure |
| 3. Scene | 8. Battery charge | 13. White balance |
| 4.Indicator light | 9.Recording effect | 14. Setting menu |
| 5.Elapsed recording time | 10. Video quality |
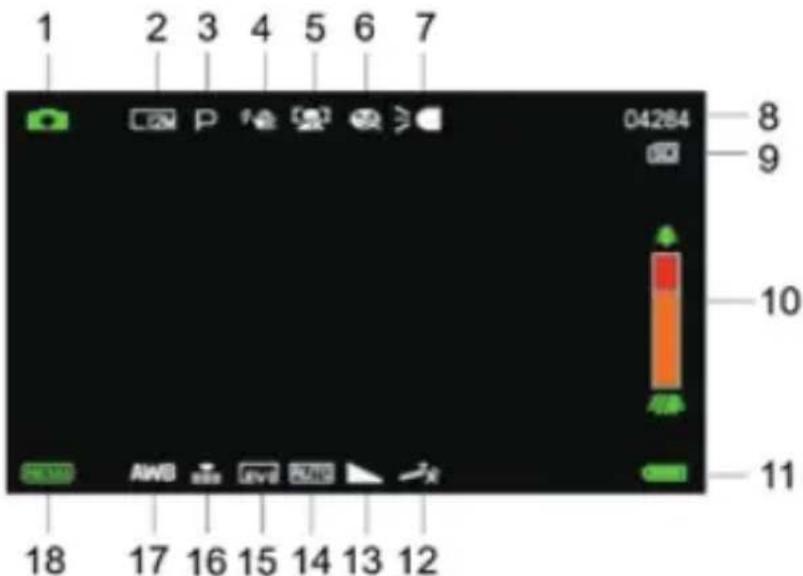
2.8 Photo mode
In photo mode, you can take pictures and store them in the internal memory of the camcorder or on the memory card.
Here is the signification of each icon appearing on the screen in video mode:
| 1.Photo mode | 7. Indicator light | 13.Sharpness |
| 2. Photo resolution | 8. Remaining number of photos | 14. ISO |
| 3. Scene | 9. Memory card indicator | 15. Exposure |
| 4.Anti-shake | 10. Zoom | 16. Photoquality |
| 5. Face detection | 11. Battery charge | 17. White balance |
| 6.Smile capture | 12. Photo shooting effect | 18. Setting configuration |
2.9 Zoom
The camcorder has a digital zoom function allowing you to enlarge your shot up to 18 times. Slide the Zoom button to the right (T) to zoom in, then slide it to the left (W) to zoom out.
2.10 Using the LED supplementary lighting
In low light conditions, it is better to use the LED light built into the front of the camcorder above the lens. Press the LED button (or Power button) to turn on the LED lighting, an icon will then appear on the screen to indicate that it is well on.
Note: you can turn the LED lighting on and off when photo shooting or video recording.
3. Using the camcorder
This section helps you understand how to enjoy all the features of the camcorder.
To record videos, first press the Mode button to switch to video mode. The corresponding icon will then appear in the upper left corner of the screen.
- According to the image displayed on the screen, first adjust the shot focus and then press the Record / OK button to start a video recording. A red dot icon will then blink at the top of the screen indicating that video recording is in progress.
- To pause it, press the shutter button once and then press it again to resume recording. To stop recording definitively, press the Record/OK button only once.
- Video files are automatically saved to the memory card once their recording is finished. It is better to set the video mode settings up before recording, the following paragraphs give explanations about the various settings for the video mode.
3.1 Scene
The camcorder has a multiple choice of preset scenes for you to adapt the shooting to the environment in which you find yourself.
- In video mode, press the Menu button to display its configuration menu.
- Then press the Up / Down buttons to select this setting.
- Press the OK button to enter the submenu.
- Press the Up / Down Button to select a scene from the following options: Auto / Night / Portrait / Landscape / Backlight / Sport / Party / Beach / High Sensitivity / Cancel.
- Finally press the OK button to save and return to the previous menu.
3.2 Resolution
The camcorder has a multiple choice of video resolution. The higher the resolution, the sharper the video and the larger the document, the more space it occurs in the memory card.
- In video mode, press the Menu button to display its configuration menu.
-
Then press the Up / Down buttons to select this setting.
-
Press the OK button to enter the submenu.
- Press the Up / Down buttons to select a resolution from the following options: 2.7K / FHD / HD / VGA / Cancel.
- Finally press the OK button to save and return to the previous menu.
3.3 Face beauty
This function allows you to optimize images automatically and brighten teeth whitening.
- In video mode, press the Menu button to display its configuration menu.
- Then press the Up / Down buttons to select this setting.
- Press the OK button to enter the submenu.
- Press the Up / Down buttons to select from the following options: On / Off / Cancel.
- Finally press the OK button to save and return to the previous menu.
3.4 Exposure
This setting allows you to adjust the brightness of a video according to the brightness of the environment in which you shoot it.
- In video mode, press the Menu button to display its configuration menu.
- Then press the Up / Down buttons to select this setting.
- Press the OK button to enter the submenu.
- Press the Up / Down buttons to select an exposure value from the following exposure options: +3 / +2 / + 1 / 0 / - 1 / -2 / -3.
- Finally press the OK button to save and return to the previous menu.
3.5 White balance
This function allows you to adjust the color deviation of a video according to the light source.
- In video mode, press the Menu button to display its configuration menu.
- Then press the Up / Down buttons to select this setting.
- Press the OK button to enter the submenu.
- Press the Up / Down buttons to select from the following options: Auto / Daylight / Cloudy / Fluorescent / Tungsten / Cancel.
- Finally press the OK button to save and return to the previous menu.
3.6 ISO
This function allows you to adjust the video sensitivity if the shooting brightness is low. It is recommended to set it up to Automatic.
- In video mode, press the Menu button to display its configuration menu.
- Then press the Up / Down buttons to select this setting.
- Press the OK button to enter the submenu.
- Press the Up / Down buttons to select from the following options: Auto / 100 / 200 / 400 / Cancel.
- Finally press the OK button to save and return to the previous menu.
3.7 Effect
This setting allows you to give a fancy effect to a video by adding a filter.
- In video mode, press the Menu button to display its configuration menu.
- Then press the Up / Down buttons to select this setting.
- Press the OK button to enter the submenu.
- Press the Up / Down buttons to select from the following effect options: Normal / B & W / Sepia / Red / Green / Blue / Sunset / Warm / Cool / Over Exposed / IR / Binary / Vivid / Undertone / Dog Eye / Aibao / Gothic / Japan style / LOMO / Negative / Cancel.
- Finally press the OK button to save and return to the previous menu.
3.8 Sharpness
This setting allows you to adjust the sharpness of a video so that the edges of the image are clearer and more precise.
- In video mode, press the Menu button to display its configuration menu.
- Then press the Up / Down buttons to select this setting.
- Press the OK button to enter the submenu.
- Press the Up / Down Buttons to select from the following sharpness options: Soft / Normal / Sharp.
- Finally press the OK button to save and return to the previous menu.
4. Photo shooting
This section explains how to use the photo mode of the camcorder. To take photos, first press the Mode button to switch to photo mode. The corresponding icon will then appear in the upper left corner of the screen.
-
According to the image displayed on the screen, first adjust the shot focus and then press the Shutter button to take a picture. The number of photos taken in each resolution ratio will be displayed in the upper right corner of the screen.
-
When the message "Memory full" appears on the screen, it means that the SD memory card is full and you need to replace it to continue taking pictures. The number of pictures taken depends on the size of the memory card and the selected resolution, the higher the resolution, the more memory is occupied. It is better to set the photo mode settings up before taking photos, the following paragraphs give explanations about the various settings for the photo mode.
4.1 Scene
The camcorder has a multiple choice of preset scenes for you to adapt the shooting to the environment in which you find yourself.
-
In photo mode, press the Menu button to display its configuration menu.
-
Then press the Up / Down buttons to select this setting.
-
Press the OK button to enter the submenu.
-
Press the Up / Down Button to select a scene from the following options: Auto / Night / Portrait / Landscape / Backlight / Sport / Party / Beach / High Sensitivity / Cancel.
-
Finally press the OK button to save and return to the previous menu.
4.2 Resolution
The camcorder has a multiple choice of photo resolution. The higher the resolution, the better the quality of the photo and the larger the size of the photo.
-
In photo mode, press the Menu button to display its configuration menu.
-
Then press the Up / Down buttons to select this setting.
-
Press the OK button to enter the submenu.
-
Press the Up / Down buttons to select a resolution from the following options: 2MHD / 5M / 7MHD / 8M / 12M / 16M / 20M / 24M / 30M.
-
Finally press the OK button to save and return to the previous menu.
4.3 Face beauty
This function allows you to optimize images automatically and brighten teeth whitening.
-
In photo mode, press the Menu button to display its configuration menu.
-
Then press the Up / Down buttons to select this setting.
-
Press the OK button to enter the submenu.
-
Press the Up / Down buttons to select from the following options: On / Off / Cancel.
-
Finally press the OK button to save and return to the previous menu.
4.4 Continuous shooting
This function allows you to take up to 3 pictures in quick succession after only pressing the Shutter button once.
- In photo mode, press the Menu button to display its configuration menu.
- Then press the Up / Down buttons to select this setting.
- Press the OK button to enter the submenu.
- Press the Up / Down buttons to select from the following options:
Single / Continuous. - Finally press the OK button to save and return to the previous menu.
4.5 Self-timer
When the self-timer is on, the picture is taken a few seconds after the shutter button is pressed.
- In photo mode, press the Menu button to display its configuration menu.
- Then press the Up / Down buttons to select this setting.
- Press the OK button to enter the submenu.
- Press the Up / Down buttons to select from the following options: 2 sec. / 5 sec. / 10 sec. / Cancel.
- Finally press the OK button to save and return to the previous menu.
4.6 Exposure
This setting allows you to adjust the brightness of a video according to the brightness of the environment in which you shoot it. In very low light conditions, the function setting is not possible.
- In photo mode, press the Menu button to display its configuration menu.
- Then press the Up / Down buttons to select this setting.
- Press the OK button to enter the submenu.
- Press the Up / Down buttons to select an exposure value from the following exposure options: +3 / +2 / +1 / 0 / -1 / -2 / -3.
- Finally press the OK button to save and return to the previous menu.
4.7 White balance
This function allows you to adjust the color deviation of a photo according to the light source.
- In photo mode, press the Menu button to display its configuration menu.
- Then press the Up / Down buttons to select this setting.
-
Press the OK button to enter the submenu.
-
Press the Up / Down buttons to select from the following options: Auto / Daylight / Cloudy / Fluorescent / Tungsten / Cancel.
- Finally press the OK button to save and return to the previous menu.
4.8 Quality
This function allows you to define the quality of a photo.
- In photo mode, press the Menu button to display its configuration menu.
- Then press the Up / Down buttons to select this setting.
- Press the OK button to enter the submenu.
- Press the Up / Down buttons to select from the following quality options: Super Fine / Fine / Normal.
- Finally press the OK button to save and return to the previous menu.
4.9 Sharpness
This setting allows you to adjust the sharpness of a video so that the edges of the image are clearer and more precise.
- In photo mode, press the Menu button to display its configuration menu.
- Then press the Up / Down buttons to select this setting.
- Press the OK button to enter the submenu.
- Press the Up / Down Buttons to select from the following sharpness options: Soft / Normal / Sharp.
- Finally press the OK button to save and return to the previous menu.
4.10 Effect
This setting allows you to give a fancy effect to a photo by adding a filter.
- In photo mode, press the Menu button to display its configuration menu.
- Then press the Up / Down buttons to select this setting.
- Press the OK button to enter the submenu.
- Press the Up / Down buttons to select from the following effect options: Normal / B & W / Sepia / Red / Green / Blue / Sunset / Warm / Cool / Over Exposed / IR / Binary / Vivid / Undertone / Dog Eye / Aibao / Gothic / Japan style / LOMO / Negative / Cancel.
- Finally press the OK button to save and return to the previous menu.
4.11 ISO
This function allows you to adjust the video sensitivity if the shooting brightness is low. It is recommended to set it up to Automatic.
- In photo mode, press the Menu button to display its configuration menu.
- Then press the Up / Down buttons to select this setting.
- Press the OK button to enter the submenu.
- Press the Up / Down buttons to select from the following options: Auto / 100 / 200 / 400 / Cancel.
- Finally press the OK button to save and return to the previous menu.
4.12 Anti-shake
This fonction allows you to stabilize shooting to avoid taking blurry photos.
1. In photo mode, press the Menu button to display its configuration menu.
2. Then press the Up / Down buttons to select this setting.
3. Press the OK button to enter the submenu.
4. Press the Up / Down buttons to select from the following options: On / Off / Cancel.
5. Finally press the OK button to save and return to the previous menu.
4.13 Face detection
With this function, the camcorder automatically detects the faces of people in the viewfinder to better adjust the shot.
- In photo mode, press the Menu button to display its configuration menu.
- Then press the Up / Down buttons to select this setting.
- Press the OK button to enter the submenu.
- Press the Up / Down buttons to select from the following options: Off / On.
- Finally press the OK button to save and return to the previous menu.
5. Files playback
This section explains how to view your photo and video files via the playback mode of the camcorder.
After taking pictures and recording videos, press the Mode button to enter playback mode.
5.1 Photo playback and related tipasa
Besides browsing the photos stored on the memory card, it is also possible to zoom in / out on a photo and view the photos in thumbnails.
- Browse through the photo files: press the Up / Down buttons to move from one photo to another.
- Zoom in / out on the photo: push the Zoom button to the right to zoom in on the selected photo.
- Enter / Exit thumbnail display: push the Zoom button to the left to activate thumbnail display. Then press the Up / Down buttons to move left or right and select the photo or video file you want to view. Finally, press the OK button to display it in full screen.
The playback mode not only allows you to view photos stored on the memory card of the camcorder, but also to rotate, protect, delete and view them as a slide show.
5.1.1 Delete
This function allows you to delete unwanted photos to free up more memory. You can do this file by file or delete all the unprotected images stored on the memory card at once.
- In playback mode, press the Menu button to display its configuration menu.
- Then press the Up / Down buttons to select this setting.
- Press the OK button to enter the submenu.
- Press the Up / Down buttons to select from the following deletion options: This image / All / Cancel.
- Press the OK button to confirm operation and choose whether you want to delete the photo (s) again: Yes / No.
- Finally press the OK button to confirm execution and return to the previous menu.
5.1.2 Protect
This function allows you to protect a photo from any accidental deletion. To delete a locked photo, remember to deactivate its protection before.
- In playback mode, press the Menu button to display its configuration menu.
- Then press the Up / Down buttons to select this setting.
- Press the OK button to enter the submenu.
-
Press the Up / Down buttons to select from the following protection options: Lock this/ Unlock this/ Lock all / Unlock all.
-
Finally press the OK button to confirm execution and return to the previous menu.
5.1.3 Rotate
This function allows you to rotate a photo.
- In playback mode, press the Menu button to display its configuration menu.
- Then press the Up / Down buttons to select this setting.
- Press the OK button to enter the submenu.
- Press the Up / Down buttons to select from the following rotation angles: 90^ / 180^ / 270^ .
- Finally press the OK button to confirm execution and return to the previous menu.
5.1.4 Slide show
This function allows you to view your photos in a slideshow.
- In playback mode, press the Menu button to display its configuration menu.
- Then press the Up / Down buttons to select this setting.
- Press the OK button to enter the submenu.
- Press the Up / Down Buttons to select the viewing time for each photo: 3 sec. / 5 sec. / 10 sec.
- Finally press the OK button to confirm execution and return to the previous menu.
5.2 Video playback and related topsa
The playback mode not only allows you to play back videos stored on the memory card of the camcorder, but also to protect and delete them.
- In playback mode, press the Up / Down buttons to select the video file to be viewed.
- Then press the Record / OK button to play the selected file.
- Press again this button to pause or resume video yback.
5.2.1 Delete
This function allows you to delete unwanted videos to free up more memory. You can do this file by file or delete all the unprotected videos stored on the memory card at once.
- In photo mode, press the Menu button to display its configuration menu.
- Then press the Up / Down buttons to select this setting.
- Press the OK button to enter the submenu.
- Press the Up / Down buttons to select from the following deletion options: This video / All / Cancel.
- Press the OK button to confirm operation and choose whether you want to delete the video (s) again: Yes / No.
- Finally press the OK button to confirm execution and return to the previous menu.
5.2.2 Protect
This function allows you to protect a video from any accidental deletion. To delete a locked video, remember to deactivate its protection before.
- In playback mode, press the Menu button to display its configuration menu.
- Then press the Up / Down buttons to select this setting.
- Press the OK button to enter the submenu.
- Press the Up / Down buttons to select from the following protection options: Lock this / Unlock this / Lock all / Unlock all.
- Finally press the OK button to confirm execution and return to the previous menu.
6. Setup
The setup mode allows you to define basic settings such as language, date, time, sound, frequency, as well as power saving, formatting and restoring the default settings of the camcorder. The handlings are the same as those done for playback mode setting.
6.1 Language
The software of this camcorder has several translations so you can set it up to your language.
- Press the Mode button to enter the setup mode and access the settings menu.
- Then press the Up / Down buttons to select this setting.
-
Press the OK button to enter the submenu.
-
Press the Up / Down buttons to select the desired language from the following options: English / French / German / Spanish / Italian / Portuguese / Dutch / Polish / Hungarian / Czech / Russian / Simplified Chinese / Traditional Chinese / Japanese.
-
Finally press the OK button to save and return to the previous menu.
6.2 Date and time setting
This setting allows you to set the date and time of the camcorder.
- Press the Mode button to enter the set up mode and access the settings menu.
- Then press the Up / Down buttons to select this setting.
- Press the OK button to enter the submenu.
- Press the Up / Down buttons again to select "Date Setting" on the right.
- Press the Up / Down buttons again to scroll through the data and then press the OK button to switch between "YY / MM / DD / h / min / sec".
- Finally press the OK button to save and return to the previous menu. Note: it is also possible to activate or deactivate the display of the date and time in the submenu of this setting.
6.3 Power save
This setting allows you to automatically turn off the camcorder after a few moments if you do not use it anymore to save battery charge.
- Press the Mode button to enter the set up mode and access the settings menu.
- Then press the Up / Down buttons to select this setting.
- Press the OK button to enter the submenu.
- Press the Up / Down buttons to select from the following options:
1 min. / 3 min. / 5 min. / Off. - Finally press the OK button to save and return to the previous menu.
6.4 Sound
This setting allows you to turn on / off the voice instructions of the camcorder.
- Press the Mode button to enter the setup mode and access the settings menu.
- Then press the Up / Down buttons to select this setting.
- Press the OK button to enter the submenu.
-
Press the Up / Down buttons to select from the following options: On / Off / Cancel.
-
Finally press the OK button to save and return to the previous menu.
6.5 Frequency
This setting allows you to prevent the image from blinking when the lighting conditions for shooting are low.
-
Press the Mode button to enter the setup mode and access the settings menu.
-
Then press the Up / Down buttons to select this setting.
-
Press the OK button to enter the submenu.
-
Press the Up / Down buttons to select from the following frequency options: 60Hz / 50Hz / Cancel.
-
Finally press the OK button to save and return to the previous menu.
6.6 Formatting
This function allows you to format the camcorder and the memory card by deleting all the files stored on them. Since deleted files cannot be restored, please use this function with caution.
-
Press the Mode button to enter the setup mode and access the settings menu.
-
Then press the Up / Down buttons to select this setting.
-
Press the OK button to enter the submenu.
-
Press the Up / Down buttons to choose to launch formatting: Yes / No.
-
Confirm execution again: Yes / No.
-
Finally press the OK button to save and return to the previous menu.
6.7 Default settings
If the setup of the camcorder become too complex and the camcorder no longer works properly, use this function to restore the factory default settings. The date will not be deleted from the camcorder or memory card.
-
Press the Mode button to enter the setup mode and access the settings menu.
-
Then press the Up / Down buttons to select this setting.
-
Press the OK button to enter the submenu.
-
Press the Up / Down buttons to choose to restore the default settings: Yes / No.
-
Confirm execution again: Yes / No.
-
Finally press the OK button to validate and return to the previous menu.
6.8 Screen touch correction
The touch correction of this camcorder was initially set in the factory. If you notice a loss of touch control or other disordered reactions, please perform a touch correction to solve the problem.
- Press the Mode button to enter the set up mode and access the settings menu.
- Then press the Up / Down buttons to select this setting.
- The "+" sign will appear successively in all the corners of the screen and in the centre of the screen.
- Press each "+" sign to correct the touch screen.
- When the operation is completed, "Save" will appear on the screen, indicating that the touch screen is saving the latest touch correction data.
-
You can now control the camcorder directly from the screen.
-
Technical specifications
| Sensor | COMS Sensor, max. 30 MP (software interpolation) |
| Sensitivity | Auto, ISO100, ISO200, ISO400 |
| Storage medium | Supports C10 SD card (or higher), max. 128 GB |
| Lens | Fixed Lens, F / 2.6, f=7.0mm |
| Focus range | Normal: 1m~infinity |
| Photo File format: JPEG | |
| Video | Resolution: 2MHD / 5M / 7MHD / 8M / 12M / 16M / 20M / 24M / 30M / 48M |
| Zoom 18X digital zoom | |
| Anti-shake File format: AVI | |
| Face detection | Resolution: 2.7K (2688x1520) / FHD (1920x1080) / HD (1280x720) / VGA (640x480) |
| Video sound 18X digital zoom | |
| Screen YES | |
| LED light range Sensor | |
| White balance YES | |
| Exposure compensation | 3.0" IPS |
| Self-timer <1.0m | |
| PC interface | Auto / Sunlight / Cloudy / Fluorescent / Tungsten |
| External microphone | -3.0EV~+3.0EV |
| Auto power off Off, 2s, 5s, 10s | |
| Power USB 2.0 | |
| Dimension | YES |
8. Common problems and solutions
| Problem | Possible cause | Solutions |
| Device does not power on | Battery not properly installed | Correctly install the battery according to the manual instructions or fully charge it |
| Sudden shutdown | Battery discharged | Switch the device on and off several times or fully charge the battery |
| Photos or videos can not be saved | Power saving function activated | When the battery indicator becomes red, charge immediately the battery or replace it by a new one |
| Ambiguous focus | Battery discharged | Immediately charge the battery or replace it by a new one |
| Memory card can not be used | Power has been interrupted before saving | Shooting in focus range |
| Inaction all buttons | Shooting out of focus range | Remove the protection from the memory card or format it |
1. À propos
FR
Attention!
Attention!
6.8 Correction tactile
Beachtung!
Beachtung!
natural_image
Line drawing of a digital camera with an attached tower and cable, showing internal components (no text or symbols)8.Common problems and solutions
Notice of compliance for the European Union:
products bearing the CE mark comply with the applicable European directives and associated harmonised European standards.
Disposal of waste equipment by users in the European Union:
this symbol means that according to local laws and regulations, it is prohibited to dispose of this product with household waste. Instead, it is your responsibility to protect the environment and human health by handing over your used device to a designated collection point for the recycling of waste electrical and electronic equipment. For more information about where you can drop off your waste equipment for recycling, please contact your local city office, your household waste disposal service or the shop where you purchased the product.
After sales service / service après vente / Kundendienst / servicio postventa / serviço pós venda / servizio post vendita / serviço pósvenda / serwis posprzedażowy / poprodejní servis / értékesítés utáni szolgáltatás / dienst na verkoop / послепродажное обслуживание :
@ : aftersaleservice@gtcompany.fr
Product manufactured for and distributed by:
GT COMPANY - 5 rue de la Galmy - 77700 Chessy - France - +33 (0) 1.61.10.09.25 - www.gtcompany.fr
AgfaPhoto is used under license of Agfa-Gevaert NV. For this product a sublicense has been granted by AgfaPhoto Holding GmbH (www.agfaphoto.com). Neither Agfa-Gevaert NV nor AgfaPhoto Holding GmbH manufacture this product or provide any product warranty or support. For service, support and warranty information, contact the distributor or manufacturer.

natural_image
Solid red background with a diagonal gradient edge (no text or symbols)


- About the product
- System requirements
- Buttons fonctions
- Start using
- Inserting the memory card
- Warning!
- Installing the lithium battery
- Charging the lithium battery
- Powering on / off the camcorder
- Mode switching
- Connecting to a computer
- PC camera mode
- Connecting an external mic rophone
- Video mode
- Photo mode
- Zoom
- Using the LED supplementary lighting
- Using the camcorder
- Scene
- Resolution
- Face beauty
- Exposure
- White balance
- ISO
- Effect
- Sharpness
- Photo shooting
- Scene
- Resolution
- Face beauty
- Continuous shooting
- Self-timer
- Exposure
- White balance
- Quality
- Sharpness
- Effect
- ISO
- Anti-shake
- Face detection
- Files playback
- Photo playback and related tipasa
- Delete
- Protect
- Rotate
- Slide show
- Video playback and related topsa
- Delete
- Protect
- Setup
- Language
- Date and time setting
- Power save
- Sound
- Frequency
- Formatting
- Default settings
- Screen touch correction
- Common problems and solutions
- À propos
- Attention!
- Correction tactile
- Beachtung!
- Product manufactured for and distributed by:
Brand : AGFAPHOTO
Model : CC2700
Category : Camcorder