
186442 - Radio HAMA - Free user manual and instructions
Find the device manual for free 186442 HAMA in PDF.

User questions about 186442 HAMA
0 question about this device. Answer the ones you know or ask your own.
Ask a new question about this device
Download the instructions for your Radio in PDF format for free! Find your manual 186442 - HAMA and take your electronic device back in hand. On this page are published all the documents necessary for the use of your device. 186442 by HAMA.
USER MANUAL 186442 HAMA
OperatingInstructions
Bedienungsanleitung
Moded'emploi
Instruccionesdeuso
Gebruiksaanwijzing
Istruzioniperl'uso
Instrukcja o bsługi
Használatiútmutató
Manualdeutilizare
Návodk p oužití
Návodnapoužitie
Manualdeinstruções
Bruksanvisning
natural_image
Simple line drawing of an analog alarm clock with hour and minute hands (no numbers or text)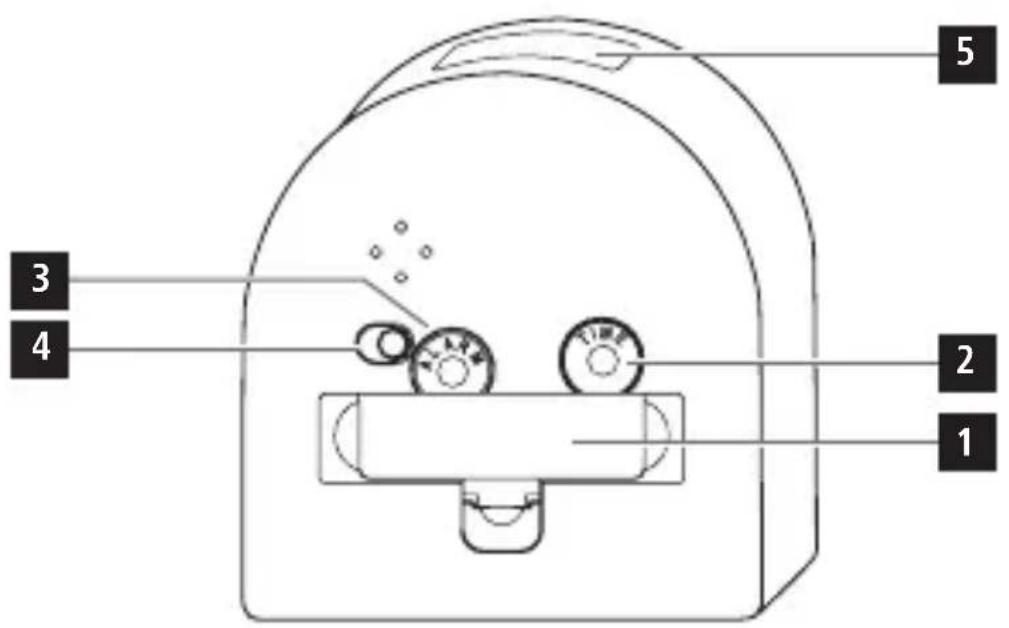
natural_image
Simple analog clock face showing 12:00 with hour and minute hands (no text or symbols beyond numerals)GB Operatinginstruction
Controlsanddisplays
- Batterycompartmentcover
- Timesettingwheel
- Alarmtimesettingwheel
-
Sliderswitch(foractivation/deactivation of the alarm function)
-
Lightbutton
1. Explanationofwarningsymbols and notes
Warning
This symbol is used to indicate safety instructions to draw your attention to specific hazards and risks.

Note
This symbol is used to indicate additional information or important notes.

2.Packagecontents
• „ Classico" alarmclock
- 1 x A A battery
• Theseoperatinginstructions
3. Safetyinstructions
- P rotectheproductfromdirt,moisture and overheatinganduseitindryenvironments only.
- Do notusetheproductinareasinwhich electronicproductsare notpermitted.
-
D o n otdroptheproductanddonotexpose ittoanymajorshocks.
-
Do not modify the product in any way. Doing so void the warranty.
- Keep the packaging material out of thereof child renduet other risk of suffocation.
- D isposeofpackagingmaterialimmediately inaccordancewiththelocallyapplicable regulations.
- T hisproductisintendedforprivate,non-commercialuseonly.
- U setheproductonlyfortheintended purpose.
- D o n otusetheproductintheimmediate vicinityofheaters,otherheatsourcesorindirectsunlight.
- D o n otoperatetheproductoutsidethe powerlimitsspecifiedinthetechnicaldata.
- D o n otopenthedeviceorcontinueto operateitifitbecomesdamaged.
- D o n otattempttoserviceorrepairthe productyourself. L eaveanyandallservice worktoqualifiedexperts.
- A s w ithallelectricalproducts, thisdevice shouldbekeptoutofthereachofchildren.
- O nlyusethearticleundermoderate climaticconditions.
Warning- Batteries

- W heninsertingbatteries, notethe correctpolarity(+and- m arkings) and insertthebatteries accordingly. Failure todos could result in the batteries leakingorexploding.
Warning-Batteries

- O nlyusebatteries(orrechargeable batteries)thatmatchthespecifiedtype.
- B efore youinsertthebatteries, clean thebatterycontactsandthepolarity contacts.
• D o n otallowchildrentochange batterieswithoutsupervision. - D o n otmixoldandnewbatteries,or batteriesofdifferenttypesorfrom differentmanufacturers.
- R emovebatteriesfromproductsthatare notgoingtobeusedfora prolonged periodoftime (unlesstheyare b eingkeptonstandby readyforanemergency).
• D o n otshort-circuitbatteries.
• D o n otchargebatteries.
• D o n otburnbatteries. - K eepbatteriesoutofthereachof children.
- N everopen,damageorswallow batteriesorallowthemtoenterthe environment.Theycancontaintoxic,environmentallyharmfulheavymetals.
- R emovespentbatteriesfromtheproduct and disposeofthemwithoutdelay.
- A voidstoring, charging and using in extreme temperatures and at extremely low atmospheric pressures (such as at high altitudes).
4. Gettingstarted
Removethebatteryalreadyinserted and remove the safety foil if necessary, along with thecontactinterrupter, a ndinsertthebattery payingattentiontomatchthepolarities correctly.
5.Operation
PresstheLIGHTbutton(5)toswitchthe displayon.
5.1 Settingthetime
• T urnthesettingwheel(2)onthebackto setthecurrenttime(hours/minutes).
- To set these seconds, remove the battery to stop these seconds. Insert the battery againtorent start these second hand at the correct second.
5.2Settingthealarm
- T urnthesettingwheel(3)ontheback ofthealarmclocktosetthedesired alarmtime.
- M ovethesliderswitch(4)totheON orOFFpositiontoactivate/deactivate thealarm.
6. Careandmaintenance
Onlycleanthisproductwitha s lightlydamp, lint-freeclothanddonotuseaggressive cleaningagents.Ensure t hatnowaterisable toentertheproduct.
7.Warrantydisclaimer
HamaGmbH& C o KGassumesnoliabilityand providesnowarrantyfordamageresulting fromimproperinstallation/mounting, improper useoftheproductorfromfailure t o o s v e theoperatinginstructionsand/orsafetynotes.
8.Technicaldata

Powersupply
9. Recycling information Noteon environmental protection:
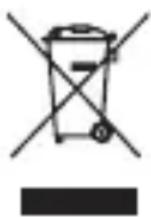
Following the implementation of European Directive 2012/19/EU and 2006/66/EU into the national legal systems, the following applies: Electrical and electronic devices
aswellasbatteriesmustnotbedisposed ofwithhouseholdwaste. Consumers are obliged by law to return electrical and electronic devices as well as batteriesto the designated public collection points to the point of sale at the end of their servicelives. Detailed information on thistopic is defined in thenation allaw so ftherespective country. This presence of the abovesymbol on the product, operating instructions or package indicates that the product is subject to these regulations. By recycling, reusing thematerials or other forms of utilising old devices/batteries, you are m aking an important contribution to protecting ourenvironment.
86652Monheim/Germany
Service& Support
www.hama.com
+499091502-0
D | GB
All listed brands are trademarks of the corresponding companies. Errors and omissions excepted, and subject to technical changes. Our general terms of delivery and payment are applied.

- GB Operatinginstruction
- Controlsanddisplays
- Explanationofwarningsymbols and notes
- Warning
- Note
- 2.Packagecontents
- Safetyinstructions
- Warning- Batteries
- Warning-Batteries
- Gettingstarted
- 5.Operation
- Settingthetime
- 5.2Settingthealarm
- Careandmaintenance
- 7.Warrantydisclaimer
- 8.Technicaldata
- Recycling information Noteon environmental protection:
Brand : HAMA
Model : 186442
Category : Radio