Regent i351S - Radio Ferguson - Free user manual and instructions
Find the device manual for free Regent i351S Ferguson in PDF.

User questions about Regent i351S Ferguson
0 question about this device. Answer the ones you know or ask your own.
Ask a new question about this device
Download the instructions for your Radio in PDF format for free! Find your manual Regent i351S - Ferguson and take your electronic device back in hand. On this page are published all the documents necessary for the use of your device. Regent i351S by Ferguson.
USER MANUAL Regent i351S Ferguson
natural_image
Profile view of a person with a glowing blue spiral in space, surrounded by starry background (no text or symbols)Please read this manual fully before using the device.
$$ 5. 5 J K L j k I $$
$$ 6. 6 \mathrm{MNOmno} $$
$$ 7. 7 P Q R S p q r s $$
$$ 8. 8 T U V t u v $$
$$ 9. 9 W X Y Z w x y z $$
Network Requirements
Before use, please check that the following requirements are met:
- Broadband Internet Access - using a wireless access point, router or similar network device.
- A computer or smartphone capable of connecting to the local network. Devices should be on the same network as the receiver.
Security measures
- Please read the user manual and its recommendations carefully.
- Please read the manual carefully before starting the equipment for the first time.
• To avoid electric shock, never open the housing. Damage to the warranty seal will void the warranty. - Disconnect the device from the mains during lightning storms or when it is not going to be used for a long time. Remember that the warranty does not cover damage to the device caused by a lightning strike.
- Do not expose the device to direct sunlight. Keep away from heat sources and from humid environments. Do not block the ventilation openings to ensure proper air circulation.
- Place the device in a horizontal position on a flat, even and stable surface.
- If you move the device from a warm to a cold room and vice versa, wait at least 1 hour before powering up. Failure to do so may cause problems.
- Keep the device away from vases, bottles, aquariums and other water sources in order to avoid damaging the device. Do not touch the power plug with bare hands.
- Do not place any objects on the housing of the device. Before starting any maintenance or installation work, disconnect the device from the power supply.
- Do not use alcohol or liquids containing ammonia to clean the device. If necessary, clean it with a soft, lint-free cloth moistened with a mild soap and water solution.
- Do not connect any cables when the power plug is in the socket.
- Check if you have working cables. Damaged cables can cause a fire.
- Please disconnect the device from the power supply while making the connections.
The description of buttons/functions
Front panel
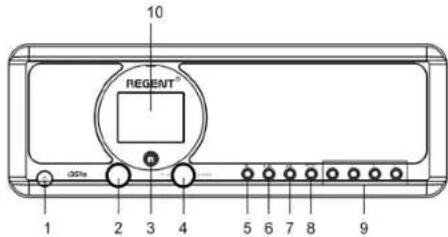
- POWER ON/STANDBY button
- Volume knob - turn to adjust the volume level; press to mute
- Infrared sensor
- UP/DOWN knob and OK button - turn to navigate or rewind the track; press to confirm the selection
-
HOME button - press to return to the main menu
-
PREVIOUS ◀ button - left/ previous track
- NEXT button ▶ - right/next track
- PRESET button - short press to recall the stored station; press and hold this button to enter the station memorization mode
- PRESET 1, 2, 3, 4 buttons
- Color display
Rear panel
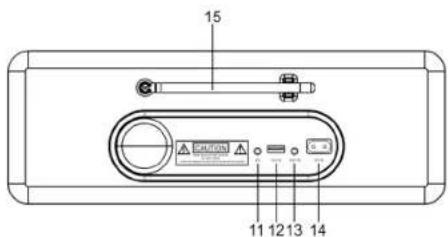
- 3.5mm headphone jack
- USB port (Output: 5V, 1A)
-
3.5mm Aux-in Jack
-
Power socket
- Telescopic antenna
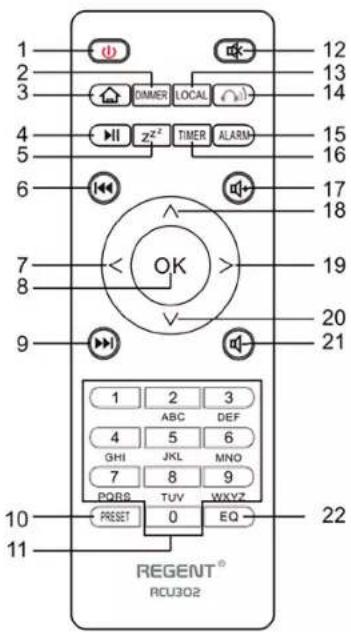
Remote control First steps
-
POWER ON/STANDBY button - turning on/off the pickup
-
DIMMER button - dimmer
-
HOME button - press to return to the main menu
-
PLAY/PAUSE button - press to pause/resume transmission
-
SLEEP button - puts the receiver in the snooze mode
-
PREVIOUS button - press to go back track
-
<Button - moves the cursor to the left
-
OK button - confirmation of the selection
-
NEXT button - press to skip a track
-
PRESET button
-
0-9 buttons - selection of favorite preset station, entering characters
-
MUTE button - mute
-
LOCAL button - press to access local internet stations
-
BT button - press to enable/disable transmission to headphones function
-
ALARM button
-
TIMER button
-
VOLUME + button - Increase the volume
-
A button - move the cursor up
-
button - moves the cursor to the right
-
v button - downward movement of the cursor
-
VOLUME - button - decrease the volume
-
EQ button - equalizer settings
Connect the power cord to the device and to the wall socket. The radio will ask if you want to activate network checking when switching on
Connecting to your Wi-Fi network
When the network configuration screen appears, you can select
Follow the steps below to enter your Wi-Fi password:
- turn the UP/DOWN knob to select a character,
- press the NEXT button or the right cursor button to go to the next entry,
- after completing the input, press the UP/DOWN OK dial to confirm.
Entering the Wi-Fi password using the remote control. Remember: the cursor shows where you enter the character. Press the following numbers on the remote control several times to get the correct characters:
1.1 (space) @! # \$ % & () + - . / :; < = > ? [ \ ] ^ { | } \~
2.2 ABCabc
3.3DEFdef
4.4GHIghi
5.5JKLjkl
6.6MNOmno
7.7PQRSpqrs
8.8TUVtuv
9.9WXYZwxyz
Alternatively, use the cursor keys to enter the appropriate characters:
- < - go to the previous field, the field may be overwritten
•> - go to the next field, the last entry is kept.
• A/v - character selection
- OK - click twice to confirm the entered password
The device will try to connect to the wireless network. It may take a few seconds to connect to the network. After the connection is established, the main menu will be displayed. You can now start enjoying your internet radio.
EN EN
Internet radio
Select
My favorite
A list of your favorite radio stations is displayed.
To program a station:
While playing your favorite station, long press the PRESET button will bring up the
You can edit your favorite station list at any time. Go to
Delete - to delete the selected station
Up - to move the selected station one level up in the ranking
Down - to move the selected station one level down in the ranking
Rename - to rename the selected station
Play - to play the selected station
Select the required action with the cursor and confirm with the OK button.
To recall a preset station:
Press the PRESET button briefly and select the station you want.
Radio station/Music
Select this option to select the desired radio station by category, genre, location etc.
Local radio
If you want to quickly access a radio station in your area over the Internet, select this option and a list of stations available in your region will be displayed.
History
The radio will remember the last 10 stations listened to.
Search for a station
You can find the radio station you want by entering the station name.
Add a new radio station
If you cannot find the station you want in the list of radio stations and you know its URL, you can enter a link here and add the station to your favorites list. Note: The link must be an audio streaming URL in order to play the station on the receiver. While the radio station is playing, the display will show a color picture sent from the radio station (if the station provides such information).
Bluetooth/Media Center
Bluetooth
The radio receives and plays music streamed by another Bluetooth device. Select
- Turn on Bluetooth on the Bluetooth device and search for the device named „REGENT i351s" from the list. Select to start pairing.
- If the connection is successful you will hear a beep and meanwhile the LCD will show "Bluetooth connected".
- You can now start playing music from your Bluetooth device.
A short press of the PAUSE button pauses or resumes playback. Turn the UP/DOWN dial or hold the PREVIOUS/NEXT buttons on the main unit or press the PREVIUS/NEXT button on the remote control to skip to the previous/next track.
Media Center
USB playback
- Connect the USB storage device directly to the USB port on the back of the device.
- Press the HOME button and use the UP/DOWN + OK buttons to select Media Center from the main menu.
- Select USB to access USB mode, then use the UP/DOWN + OK dial on the unit or A/v + OK buttons on the remote control to select a folder/music and start playing.
Briefly press the PLAY/PAUSE button to pause or resume playback. Turn the UP/DOWN dial or press and hold the PREVIUS/NEXT buttons on the main unit or press the PREVIOUS/NEXT buttons on the remote control to skip to the previous/next track.
Streaming music
After configuring the UPnP/DLNA compatible server to share media files with your radio, you can start streaming music.
- Select
from the main menu and select . - It may take a few seconds for the device to finish scanning the available UPnP servers. If no UPnP servers are found,
will be displayed. - After successful scanning, please select the UPnP server.
- The radio will show the media categories available from the UPnP server, e.g. "Music", "Playlists" etc.
- Select the media files you want to play.
- The play mode can be set in
.
Note: If you have DLNA compatible servers available, follow the steps above to browse and play audio files from a DLNA compatible device.
BT Tx and DLNA
BT Tx (Bluetooth transmitter)
This internet radio offers you the option of wireless listening with Bluetooth enabled headphones or TWS earbuds via the built-in Bluetooth transmitter.
- Press the BT button on the remote control while listening to the media, the display will show three options for BT Tx mode as follows:
- Enable (speaker on) - to enable the BT Tx function, and the sound will still come from the radio speaker at the same time.
- On (speaker off) - to enable the BT Tx function and turn off the sound from the radio speaker.
- Disable - to disable the BT Tx function.
- Select one of the Enable options to enable BT Tx function, then turn on the Bluetooth enabled headphones or TWS earbuds. It will take about 30 seconds to search for and automatically connect the earphones or TWS earbuds. Once connected, you can listen to the radio with headphones or earbuds.
Note: The range of the Bluetooth transmitter is limited to approx. 140 meters (open area) depending on the surroundings and the device used.
DLNA
Besides UPnP, this device can also support DLNA function. Internet radio can play a music stream from a DLNA-compatible device as long as the Internet radio and other DLNA devices are on the same Wi-Fi network. The radio will be detected as „Regent i351s“ when you try to search for it on other devices.
Note: The DLNA function is compatible and works with the corresponding third party applications on the Android platform. Apple devices are not supported.
FM mode
Extend the telescopic antenna and adjust its layout to optimize the reception level. Select FM from the main menu to enter FM mode. To automatically scan the next/available FM station, press and hold the PREVIOUS or NEXT button for 2 seconds, the radio will automatically search for an available station. If you want to fine tune the frequency, turn the UP/DOWN dial on the unit or press the A/v buttons on the remote control.
Automatic scanning of presets
You can automatically preset FM stations. Press the UP/DOWN + OK dial (or the A/v + OK buttons on the remote control), you will be asked whether to perform auto scan or not. Select "Yes" and press OK to confirm and the scanning and presetting of the stations will start. When finished, short press the PRESET button, the first preset station will be displayed.
Station tracking
This is a feature that helps you find the same station on the Internet, provided the radio station has an Internet stream available and is suitable for playing on the radio. Listening to Internet radio allows you to free yourself from noise which is usually caused by interference or poor FM reception. After scanning the FM band, select the channel to be played. If the same channel is available on the Internet, an icon will appear in the lower right corner of the screen. Press and hold the UP/DOWN + OK knob (or /v + OK buttons on the remote
control), the receiver will switch to internet radio mode to play the corresponding channel.
DAB mode
You can listen to regular DAB channels without internet connection. Extend the telescopic antenna and adjust its layout to optimize the reception level. Select DAB from the main menu to enter DAB mode. If you use DAB mode for the first time, the receiver will automatically scan for DAB radio stations. After scanning, the receiver will display a list of found DAB stations.
Select the station you want to listen to and press the UP/DOWN + OK dial (or the ^/v + OK button on the remote control) to confirm playback. Press the PREVIOUS button (or < on the remote control) to return to the station list. Pressing the PREVIOUS button (or < on the remote control) again will display a warning that the station list is being deleted. It also allows you to rescan DAB stations. Select
To stop playing a station, press the PLAY/PAUSE button. Each time you want to resume the game, press the same button again.
Configuration
Time display
You can choose to display the time in analogue or digital mode.
Network
Wireless network configuration
Press the UP/DOWN + OK dial (or / + OK button on the remote control) to scan for available wireless networks.
Wireless network (WPS PBC)
WPS allows the radio to connect to the router by pressing one key on the receiver and the WPS key on the router for Wi-Fi connection, provided that the router has WPS function.
Manual configuration
You can enable or disable DHCP and enter the network name (SSID) or delete the connected network (SSID).
Check network after turning on
Enable or disable checking and network connection when turning on the receiver.
Date and time
The time is automatically set and adapted to the geographic location of the receiver. This setting allows you to manually modify the date and time.
Set the time format
Time format setting: 12/24 hours.
Set the date format
Date format: YYYY/MM/DD, DD/MM/YYYY and MM/DD/YYYY. If manual configuration is selected, the Summer Time Setting (DST) option will also appear in the list.
EN EN
Alarm
Dual alarm clock
There are 2 alarm clocks and the following settings:
- Alarm Scheduling: You can schedule an alarm to repeat for each day, specific day of the week, or select only a single alarm.
- Alarm tone: Wake up to radio (this must be a preset station), Wake up to melody and Wake up to sound.
- Alarm Volume: Select this option to adjust the desired volume level.
Snooze alarm
If you want to take a nap or need an alarm clock in a short time, you can use this feature. You can choose a time from 5 to 120 minutes. The snooze function is not available for the NAP alarm. Note: The NAP alarm will only beep.
Snooze
When the alarm sounds, pressing any key except the STANDBY button will take you to
Timer
Press ^/v/</> on the remote control to set the timer, then press OK to confirm.
Dimmer
You can adjust the backlight of the LCD display with the following settings:
- Power Saving - You can set the backlight to dim when there is no operation for a certain period of time.
- Enable - You can adjust the backlight level for the working mode.
- Display - You can choose between color and monochrome style display.
Energy management
This feature allows the receiver to go into standby mode to save energy when no internet signal is received. The default setting is 15 minutes. When the receiver receives no internet signal, it will go into standby mode after 15 minutes. Other timeframes are available: 5 minutes and 30 minutes. The setting can also be turned off.
Sleep timer
You can set a sleep timer to put the radio into standby mode after a certain period of time. The available time frames are from 15 minutes to 180 minutes in steps of 15 minutes. You can also make settings with the SLEEP button on the remote control: after pressing the SLEEP button, you will see the sleep timer in the top right corner of the display.
Weather
You can set to display weather information in standby mode by selecting different regions and temperature unit. To turn off the weather display, go to Setup> Weather> Show in Standby> select Off.
Local radio configuration
The radio will automatically detect local stations - just press LOCAL on the remote to access radio stations in your area. You can also find this setting in
to change local stations to other countries, you can select „Manual Setup“ to make the change.
Playback configuration
UPnP playback preference settings. You can set the playback to Off, Repeat One, Repeat All, Shuffle Songs.
Equalizer
Choose your preferred equalizer to suit your preferences.
BTTx
Select to enable or disable the BT Tx function.
Resume after power on
If turned ON, the receiver will resume playing the last station listened to when turned on again. The ON setting is enabled by default.
Device
Change the name of the device
The receiver can play music from DLNA-compatible devices that are connected to the same Wi-Fi network. The receiver will be detected by DLNA devices under the name „REGENT i351s”. This is the default name. You can use this setting to rename the receiver to anything else.
Remote application - AirMusic control
You can use the free AirMusic Control application to manage the receiver using your phone or tablet. The application is available in Android Google Play and Apple App Store. Both the receiver and the device with the application installed must be in the same network.
Software update
Information about updating the receiver's software will appear on the display when the manufacturer releases the update. Download update is from the internet and requires internet connection for it to take effect. Note: This option is for manufacturer use only.
With this option you can restore the receiver settings to the original state. Note: All your settings will be lost when you restore default settings.
Use your phone, tablet or computer as a remote control for Spotify. Go to spotify.com/connect to learn how.
Troubleshooting
| Error Solution | |
| There is no display, the radio does not respond to operation | Set up the power supply according to the operating instructions and using the measures provided in the package. |
| Cannot be operated with the remote control | Batteries discharged or inserted incorrectly. Check that the batteries are installed in the correct direction. |
| DAB + reception is poor | Antenna not fully extended. Change the location of the radio (e.g. closer to the window). Repeat station scan. |
| FM reception is poor | Antenna not fully extended. Change the location of the radio (e.g. closer to the window). Repeat station scan. |
| Poor sound quality while playing music | Low bit rate file. Check the audio file. Tip: For MP3 files, the bit rate should be 192 Kbps or more. |
| The device does not turn on | 1. Check that the power adapter is connected properly.2. The device may malfunction when used in areas with strong radio Interference. Correct the cause of the interference or relocate the device. |
| No sound | 1. Turn on the sound as it can be muted.2. Increase the volume. |
| Unable to establish network connection | 1. Check the WLAN function.2. Try to set the IP address on the device.3. Activate the DHCP function on the router and re-establish the connection with the device.4. A firewall is activated in the network - set the appropriate program in such a way that the device can access the network.5. Restart the device to force the connection to the network. |
| A WLAN connection cannot be established | 1. Check the availability of WLAN on the access point.2. Move the device closer to the router.3. Make sure the WEP / WPA password is correct. |
| Station not found | 1. Check the network as well as the access point and firewall.2. The station may not be available at the moment, try again later or select another station.3. The station link has been changed or the station is not transmitting - ask your provider.4. Link to manually added station is incorrect, make sure it is correct and re-enter. |
| The alarm is not working | 1. Turn on the alarm.2. Due to the volume setting, see „No Sound" solutions.3. The alarm source is set as a station, but no network connection. Change the alarm source or reconfigure the connection. |
| DLNA streaming cannot be performed | 1. Check the connection to the network. REGENT i351s and your device must be on the same network. Check that the network status is good.2. Make sure the settings on your device are correct. |
| Electromagnetic interference | The normal functioning of the product may be disturbed by strong electromagnetic fields. Reset the product to its original state according to the user manual to resume normal operation. If problems persist, relocate the receiver. |
| The system suddenly freezes | REGENT i351s is overloaded, please restart the machine. |
Technical Specifications
| Model name REGENT i351s | |
| Display 2.4" TFT color display | |
| Supported networks | OPEN, WEPWPA PSK AESWPA PSK AES/TKIPWPA PSK TKIPWPA 2 PSK AESWPA 2 PSK AES/TKIPWPA 2 PSK TKIP |
| Streaming UPnP, DLNA | |
| Supported Playback Formats (UPnP) | MP3, WMA, AAC, FLAC, WAV |
| Supported playback formats (USB) | MP3, WMA, WAV |
| Output power (RMS) 15W x 2 | |
| Power | Input: AC 100-240V ~ 50/60Hz |
| USB output: DC 5V1A (only for charging Android phone) | |
| FM and DAB frequency | FM: 87.5-108MHz |
| DAB: 174.928-239.2MHz | |
| Energy consumption 30W | |
| Standby power consumption < 2W | |
| Bluetooth support V5.0 | |
| Bluetooth operating range up to 140 meters (open area) | |
| Transmission frequency 2.4 GHz | |
| Protocols A2DP 1.2 | |
| Working temperature 0°C~35°C | |
| Working humidity | 20%~80% |
SIMPLIFIED DECLARATION OF CONFORMITY
Producer: Ferguson Sp. z o.o., ul. Dworska 1, 61-619 Poznań
Name: Regent i351s
Device type: Radio receiver
The above-mentioned product complies with Directive 2014/53/EU of the European Parliament and of the Council of 16 April 2014 on the harmonization of the laws of the Member States relating to the making available on the market of radio equipment and repealing Directive 1999/5/EC. Full Declaration of Conformity for download at: https://ferguson-digital.eu/deklaracje-zgodnosci/
Einführung
Rete Wireless (WPS PBC)
Remote App – AirMusic Control
Configuration radio locale
DÉCLARATION DE CONFORMITÉ SIMPLIFIÉE
Producteur: Ferguson Sp. z o.o., ul. Dworska 1, 61-619 Poznan
Nom: Regent i351s