
FFS017X - Vacuum packaging machines FOODSAVER - Free user manual and instructions
Find the device manual for free FFS017X FOODSAVER in PDF.

| Product type | Vacuum sealer |
| Brand | FoodSaver |
| Model | FFS017X |
| Power supply | 220-240 V, 50/60 Hz |
| Power | 120 W |
| Dimensions | 41.9 x 22.9 x 13.3 cm |
| Weight | 2.5 kg |
| Main functions | Vacuum sealing, sealing, marinating, use with accessories |
| Preservation capacity | Up to 5 times longer than conventional storage |
| Seal type | Heat seal |
| Included accessories | Suction hose with handheld and retractable nozzle, built-in cutter, removable drip tray |
| Compatibility | FoodSaver™ bags and rolls, jars, freshness boxes, stoppers, quick marinating container |
| Main material | ABS plastic, silicone gaskets |
| Maintenance and cleaning | Drip tray is dishwasher safe (top rack) or hand-washable; gaskets can be wiped with a damp cloth |
| Safety | Do not immerse the appliance; household use only; supervise children; do not use an extension cord |
| Warranty | 2 years |
| Repairability | Repair by the manufacturer or authorized after-sales service; spare parts available via customer service |
| General information | Device designed to extend food freshness by removing air; ideal for preserving, marinating, and preparing meals in advance |
Frequently Asked Questions - FFS017X FOODSAVER
User questions about FFS017X FOODSAVER
0 question about this device. Answer the ones you know or ask your own.
Ask a new question about this device
Download the instructions for your Vacuum packaging machines in PDF format for free! Find your manual FFS017X - FOODSAVER and take your electronic device back in hand. On this page are published all the documents necessary for the use of your device. FFS017X by FOODSAVER.
USER MANUAL FFS017X FOODSAVER
natural_image
Exterior view of a modern food processor with control buttons (Power, Cool, Hot/Soft, Merge) and brand logo (no readable text beyond branding)EN USER INSTRUCTIONS
FR NOTICE D'UTILISATION
DE BEDIENUNGSANLEITUNG
ES INSTRUCCIONES PARA EL USUARIO
PT INSTRUÇÕES DE UTILIZAÇÃO
IT ISTRUZIONI PER L'USO
NL GEBRUIKSAANWIJZING
SE BRUKSANVISNING
FI KÄYTTÖOHJEET
DK BRUGERVEJLEDNING
NO BRUKSANVISNING
PL INSTRUKCJA OBSŁUGI
CZ NÁVOD K POUŽITÍ
SK POKYNY PRE POUŽÍVATEL'A
RO INSTRUCTIUNI DE UTILIZARE
BG ИНСТРУКЦИИ ЗА ПОТРЕБИТЕЛЯ
GK OΔΗΓΙΕΣ ΧΡΗΣΤΗ

natural_image
Shield-shaped emblem with abstract arrow-like design (no text or symbols)www.foodsavereurope.com
English 6
Français/French 13
Deutsch/German 20
Español/Spanish 28
flowchart
graph TD
    O["O"] --> A["Arrow"]
    P["P"] --> B["Arrow"]
    Q["Q"] --> C["Arrow"]
    R["R"] --> D["Arrow"]
    A --> E["Arrow"]
    B --> F["Arrow"]
    C --> G["Arrow"]
    D --> H["Arrow"]
    E --> I["Arrow"]
    F --> J["Arrow"]
    G --> K["Arrow"]
    H --> L["Arrow"]
    I --> M["Arrow"]
    J --> N["Arrow"]
    K --> O["Arrow"]
    L --> P["Arrow"]
    M --> Q["Arrow"]
    N --> R["Arrow"]
FIG. 2 FIG. 3
1
natural_image
Illustration of hands holding a device with arrows indicating process flow (no text or symbols)2
natural_image
Illustration of a computer mouse with a lock icon and directional arrow, no text or symbols present3
Important Safeguards
This appliance can be used by children aged from 8 years and above and persons with reduced physical, sensory or mental capabilities or lack of experience and knowledge if they have been given supervision or instruction concerning use of the appliance in a safe way and understand the hazards involved. Children shall not play with the appliance. Cleaning and user maintenance shall not be made by children without supervision.
If the supply cord is damaged, it must be replaced by the manufacturer, or its service agent or a similarly qualified person in order to avoid a hazard.
- Always use the appliance on a stable, secure, dry and level surface.
- CAUTION: THIS SEALER IS NOT FOR COMMERCIAL USE. Never use this appliance for anything other than its intended use. This appliance is for household use only. Do not use this appliance outdoors.
- Never immerse the appliance or power cord and plug in water or any other liquid.
- Do not use the appliance if it has been dropped or if there are any visible signs of damage.
- Ensure the appliance is switched off and unplugged from the supply socket after use, before cleaning.
- To disconnect, unplug the power cord from the electrical outlet. Do not disconnect by pulling on the cord.
- Do not use an extension cord with the appliance.
- Use only accessories or attachments recommended by the manufacturer.
- When reheating foods in FoodSaver™ bags make sure to place them in water at a low simmering temperature below 75°C (170°F).
- FOODS INSIDE BAG CAN BE DEFROSTED BUT NOT REHEATED IN A MICROWAVE OVEN. When defrosting foods in the microwave in FoodSaver™ bags make sure not to exceed maximum power of 180 watts (defrost setting), maximum time of 2 minutes and maximum temperature of 70°C (158°F).
FoodSaver™ Vacuum Sealing System
Why Vacuum Package?
Exposure to air causes food to lose nutrition and flavour, and also enables many types of bacteria, mould and yeast to grow. The FoodSaver™ vacuum packaging system removes air and seals in flavour and quality. With a full line of FoodSaver™ bags, and canisters to expand your options, you can now enjoy the benefits of a scientifically proven food storage method that keeps food fresh up to five times longer.
The FoodSaver™ System Saves Time and Money
- Spend less money. With the FoodSaver™ system, you can buy in bulk or buy on sale and vacuum package your food in desired portions without wasting food.
- Save more time. Cook ahead for the week, preparing meals and saving them in FoodSaver™ bags.
- Marinate in minutes. Vacuum packaging opens up the pores of food so you can get that great marinated flavour in just 20 minutes instead of overnight.
- Make entertaining easy. Make your signature dish in advance so you can spend quality time with your guests.
- Enjoy seasonal or specialty foods. Keep highly perishable or infrequently used items fresh longer.
- Control portions for dieting. Vacuum package sensible portions and write the calories and fat content on the bag.
- Protect non-food items. Keep camping and boating supplies dry and organised for outings. Protect polished silver from tarnishing by minimizing exposure to air.
FoodSaver™ Accessories
Get the most out of your FoodSaver ^™ appliance with easy-to-use FoodSaver ^™ bags, canisters and accessories.
FoodSaver™ Bags and Rolls
FoodSaver ^™ bags and rolls feature special channels that enable the efficient removal of air. The multiply construction makes them an especially effective barrier to oxygen and moisture and helps to prevent freezer burn. FoodSaver ^™ bags and rolls come in a variety of sizes.
SAVE THESE INSTRUCTIONS
FoodSaver™ Canisters
FoodSaver™ canisters are simple to use and ideal for vacuum packaging delicate items such as muffins and other baked goods, liquids and dry goods.
FoodSaver™ Fresh Zipper Bags
FoodSaver™ Zipper Bags feature special channels that enable the efficient removal of air. The multiply construction makes them an especially effective barrier to oxygen and moisture.
FoodSaver™ Fresh Containers
FoodSaver™ Fresh Containers are simple to use and ideal for vacuum packaging delicate items such as muffins and other baked goods, liquids and dry goods.
FoodSaver™ Bottle Stopper
Use FoodSaver™ bottle stoppers to vacuum package wine, non-carbonated liquids and oils. This will extend the life of the liquid and preserve the flavour. Don't use the bottle stopper on plastic bottles.
FoodSaver™ Quick Marinator
The quick marinator infuses food with flavour in minutes instead of hours using vacuum power to penetrate marinades deep into the food.
Ordering
To order FoodSaver™ bags, rolls and accessories please visit www.foodsaver.co.uk.
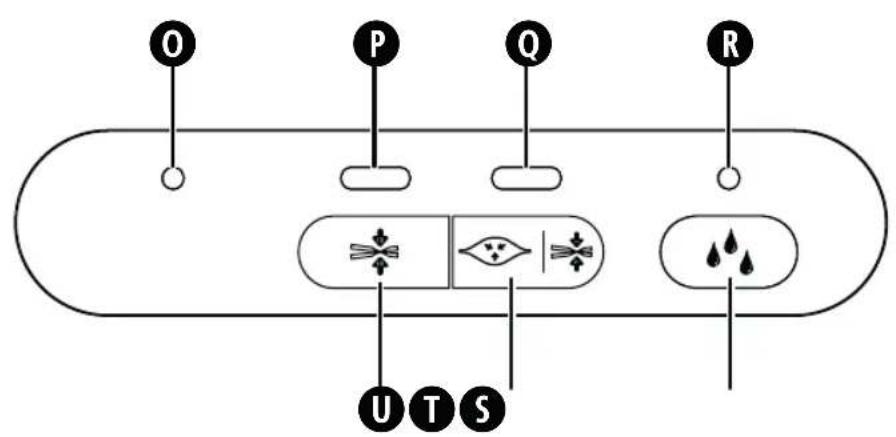
Parts
Referring to Fig. 1:
A Control panel
B Appliance lid
C Retractable handheld sealer
D Latch
E Roll cutter
F Upper sealing strip
G Upper gasket
H Accessory button
I Marinate button
J Removable drip tray
K Lower sealing strip
L Cutter bar
M Lower gasket
N Roll storage area
Power light
P Seal light
Q Vacuum & Seal light
R Moist food light
S Moist food button
T Vacuum & Seal button
U Seal button
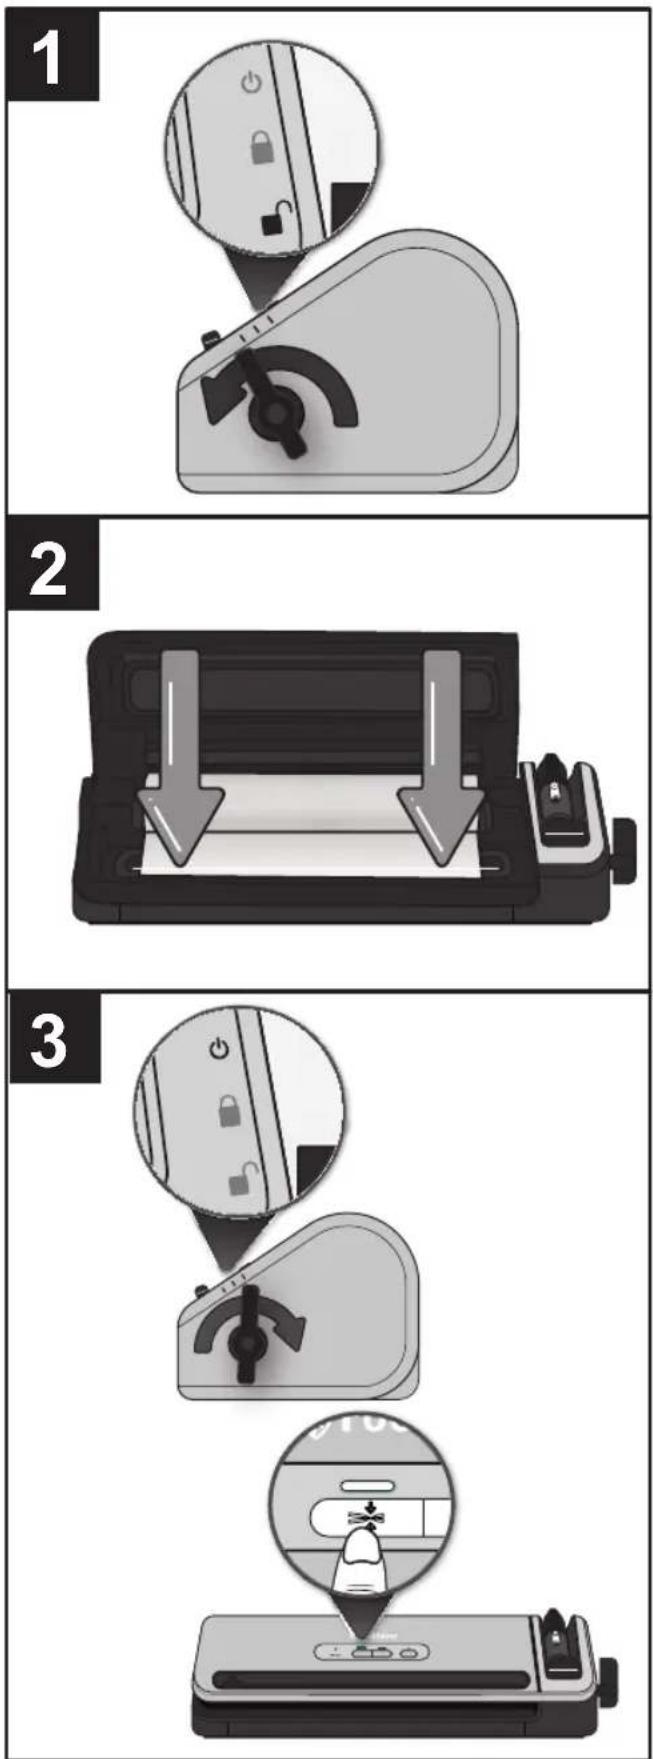
Making a bag from a FoodSaver™ Roll
You can make your own custom sized bags from a FoodSaver ^™ roll. Referring to Fig. 2:
- Plug your food preservation system into the mains supply socket. Move the latch D to the unlock position (☐)
- If you haven't already done so, open the lid and insert a FoodSaver™ roll into the storage area. Pull the roll end out until about 10mm of the roll overlaps the sealing strip Ⓚ.
Note: The visible FoodSaver ^™ roll allows you to see how much bag material you have left, so you can quickly see when you will need to replace a roll or purchase more.
-
Close the lid all the way and move the latch to the on position (⏻). The power light comes on to indicate that the appliance is ready to use. Press the Seal button ⏻ to create the first seal. When the seal light goes out, the end of the roll will now have been sealed.
-
Move the latch to the unlock position (☐). Pull the roll out to the required length for the item being packaged. Add an extra 75mm to allow the bag to be sealed then slide the roll cutter E across to cut the roll.
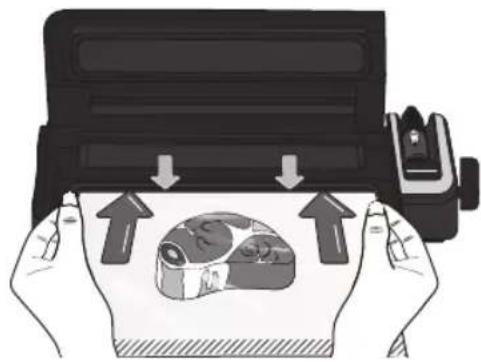
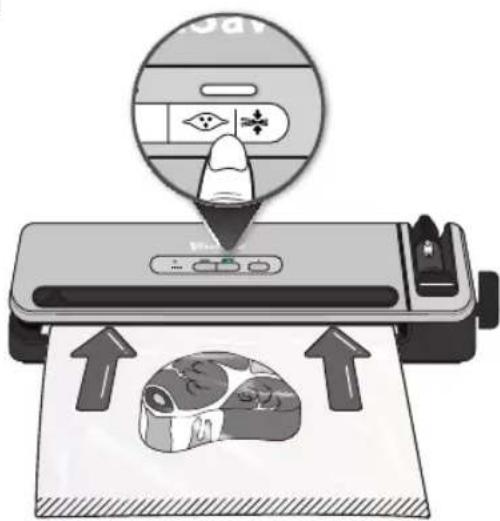
Using your Food Preservation System
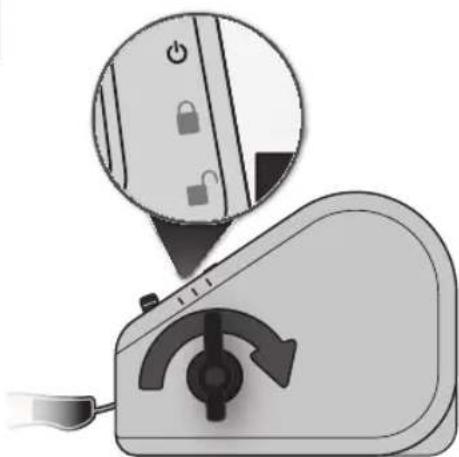
Referring to Fig. 3:
- Place the item to be packaged into the bag. You can use a ready made FoodSaver™ bag or make your own from a FoodSaver™ roll.
- Move the latch D to the unlock position ( ) and open the lid. Place the open end of the bag into the slot of the drip tray.
- Close the lid and move the latch to the on position (☐).
- Press the Vacuum and Seal button T. Your FoodSaver™ appliance will start to remove the air from the bag (the vacuum and seal light comes on). When fully vacuumed, the bag starts to seal.
Note: Press the Vacuum and Seal button at any time to pause the process. Or, press the Seal button to immediately stop the vacuum process and start sealing the bag.
- The process is complete when the vacuum and seal light goes out.
Packaging moist foods
If you are packaging foods that are moist or very juicy, press the Moist Food button BEFORE pressing the Vacuum and Seal button.
Sealing a bag without removing any air
To seal a bag without extracting the air from it, press the Seal button Ⓤ. The process is complete when the seal light goes out. You can seal the types of bag that are used to package snacks such as potato crisps, tortilla chips, etc.
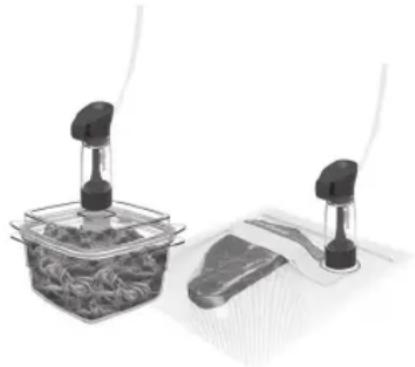
Using FoodSaver ^® accessories
To vacuum seal a Fresh Zipper Bag or Fresh Container:
- Pull the retractable hand-held ⬤ sealer away from the appliance.
- Fit the end of the hand-held sealer over the valve on the accessory and make sure that it is connected firmly. Follow any specific instructions that come with the FoodSaver™ accessory.
Note: To vacuum seal a FoodSaver ^™ Canister, remove the reservoir (clear bottom section) of the sealer by pulling it down and off the top section. Insert the tip of the sealer into the port on the canister.
-
Press the Accessory button Ⓣ to start the vacuum process. The appliance will stop automatically when the accessory is fully vacuum sealed.
-
Press the Accessory button again, or the Cancel button ⓦ to stop the vacuum sealing process.
natural_image
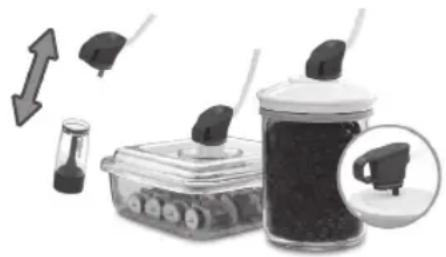
Illustration of two laboratory apparatuses with pipettes and a container, no visible text or symbolsTo marinate in a FoodSaver™ Quick Marinator:
- Pull the retractable hand-held sealer ⬆ away from the appliance. Remove the reservoir (clear bottom section) of the sealer by pulling it down and off the top section.
- Insert the tip of the hand-held sealer into the port on the marinator and make sure that it is
connected firmly. Follow any specific instructions that come with the FoodSaver ^™ accessory.
-
Press the Marinate button Ⓥ to start the vacuum process. During this process the appliance will automatically vacuum and release three times to obtain optimum flavour infusion.
-
Press the Marinate button again, or the Cancel button ⓦ to stop the vacuum sealing process.
natural_image
Illustration of a food drink with a side dish, a small container, and a pencil holder (no text or symbols)Care and Cleaning
Never immerse the appliance or power cord and plug in water or any other liquid. Always unplug the appliance before cleaning.
Wipe over the body of the appliance with a soft, dry cloth.
Remove and empty the drip tray ⏻ after each use. Wash it in warm soapy water or place it in the top rack of the dishwasher. Dry thoroughly before refitting.
Check the upper gasket G, lower gasket M and around the drip tray to make sure that they are free from food debris. Wipe the gaskets with a warm soapy cloth if needed.
Remove the reservoir of the retractable handheld sealer after each use. Wash it in warm soapy water and air dry thoroughly before replacing.
Storage
Close the lid and move the latch Ⓓ to the locked position (☐). This is enough to secure the lid but avoids compressing the gaskets (which may cause incorrect functioning of the appliance).
Make sure that the appliance is clean and store upright, on a flat, level surface, away from the edge and where it cannot be easily knocked over.
Storage Guide, Hints and Tips
Vacuum Packaging and Food Safety
The vacuum packaging process extends the life of foods by removing most of the air from the sealed container, thereby reducing oxidation, which affects nutritional value, flavour and overall quality. Removing air can also inhibit growth of microorganisms, which can cause problems under certain conditions:
To preserve foods safely, it is critical that you maintain low temperatures. You can significantly reduce the growth of microorganisms at temperatures of 4^ C or below.
Freezing at -17^ C does not kill microorganisms, but stops them from growing. For long-term storage, always freeze perishable foods that have been vacuum packaged, and keep refrigerated after thawing.
It is important to note that vacuum packaging is NOT a substitute for canning and it cannot reverse the deterioration of foods. It can only slow down the changes in quality. It is difficult to predict how long foods will retain their top-quality flavour, appearance or texture because it depends on age and condition of the food on the day it was vacuum packaged.
Important: Vacuum packaging is NOT a substitute for refrigeration or freezing. Any perishable foods that require refrigeration must still be refrigerated or frozen after vacuum packaging. To avoid possible illness, do not reuse bags after storing raw meats, raw fish or greasy foods. Do not reuse bags that have been microwaved or simmered.
Thawing and Reheating Vacuum Packaged Foods

Always thaw foods in a refrigerator or a microwave oven – do not thaw perishable foods at room temperature.
Foods inside bag can be defrosted but not reheated in a microwave oven. When defrosting foods in the microwave in FoodSaver™ bags make sure not to exceed maximum power of 180 watts (defrost setting), maximum time of 2 minutes and maximum temperature of 70°C (158°F). You can also reheat foods in FoodSaver™ bags by placing them in water at a low simmer below 75°C (170°F). Follow any specific instructions that come with the FoodSaver™ specialty bags.
Preparation Guidelines
Meat and Fish


For best results, pre-freeze meat and fish for 1-2 hours before vacuum sealing in a FoodSaver™ Bag. This helps retain the juice and shape, and guarantees a better seal. If it's not possible to pre-freeze, place a folded paper towel between meat or fish and top of bag, but below seal area.
Leave a paper towel in bag to absorb excess moisture and juices during the vacuum sealing process.
Note: Beef may appear darker after vacuum sealing due to the removal of oxygen. This is not an indication of spoilage.
Hard Cheeses

To keep cheese fresh, vacuum seal it after each use. Make your FoodSaver™ Bag extra long, allowing 25mm of bag material for each time you plan to open and reseal, in addition to the 75mm room you normally leave between contents and seal.
Simply cut sealed edge and remove cheese. When you're ready to reseal the cheese, just drop it in bag and reseal.
Important: Due to the risk of anaerobic bacteria, soft cheeses should never be vacuum sealed.
Vegetables

Vegetables need to be blanched before vacuum sealing. This process stops the enzyme action that could lead to loss of flavour, colour and texture.
To blanch vegetables, place them in boiling water or in the microwave until they are cooked, but still crisp. Blanching times range from 1 to 2 minutes for leafy greens and peas; 3 to 4 minutes for snap peas, sliced courgette or broccoli; 5 minutes for carrots; and 7 to 11 minutes for corn on the cob. After blanching, immerse vegetables in cold water to stop the cooking process. Finally, dry vegetables on a towel before vacuum sealing.
Note: All vegetables (including broccoli, Brussels sprouts, cabbage, cauliflower, kale, turnips) naturally emit gases during storage. Therefore, after blanching, they must be stored in freezer only.
When freezing vegetables, it is best to pre-freeze them for 1-2 hours or until solidly frozen. To freeze vegetables in individual servings, first place on a baking sheet and spread them out so they are not touching. This prevents them from freezing together in a block. Once they are frozen, remove from baking sheet and vacuum seal vegetables in a FoodSaver™ Bag. After they have been vacuum sealed, return them to the freezer.
Important: Due to the risk of anaerobic bacteria, fresh mushrooms, onions and garlic should never be vacuum sealed.
Leafy Vegetables

For best results, use a canister to store leafy vegetables. First wash the vegetables, and then dry with a towel or salad spinner. After they are dried, put them in a canister and vacuum seal as normal. Store in the refrigerator.
Fruits

When freezing soft fruits or berries, it is best to pre-freeze them for 1-2 hours or until solidly frozen. To freeze fruit in individual servings, first place on a baking sheet and spread them out so they are not touching. This prevents them from freezing together in a block. Once they are frozen, remove from baking sheet and vacuum in a FoodSaver™ Bag.
After they have been vacuum sealed, return them to the freezer. You can vacuum seal portions for baking or in your favourite combinations for easy fruit salad all year round. If storing in the refrigerator, we recommend using a FoodSaver™ Canister.
Baked Goods

To vacuum seal soft or airy baked goods, we recommend using a FoodSaver™ Canister so they will hold their shape. If using a bag, pre-freeze for 1-2 hours or until solidly frozen. To save time, make cookie dough, pie shells, whole pies, or mix dry ingredients in advance and vacuum seal for later use.
Coffee and Powdery Foods

To prevent food particles from being drawn into vacuum pump, place a coffee filter or paper towel at top of bag or canister before vacuum sealing. You can also place the food in its original bag inside a FoodSaver™ Bag, or use a FoodSaver™ Universal Lid with the original container to vacuum seal.
Liquids

Before you vacuum seal liquids such as soup stock, pre-freeze in a casserole dish, loaf pan or ice cube tray until solid. Remove frozen liquid from pan and vacuum seal in a FoodSaver™ Bag. You can stack these 'frozen bricks' in your freezer.
When you're ready to use, just cut corner of bag and place in a dish in microwave or drop into water at a low simmer, below 75^ (170°F).
To vacuum seal non-carbonated bottled liquids, you can use a FoodSaver™ Bottle Stopper with the original container.
Remember to leave at least 25mm of room between contents and the bottom of the Bottle Stopper. You can reseal bottles after each use.
Pre-Made Meals, Leftovers and Sandwiches

Efficiently store your pre-made meals, leftovers and sandwiches in the stackable, lightweight FoodSaver™ Containers. They are microwaveable, top rack dishwasher safe and come with a custom adaptor.
The lightweight containers will be ready to head off to the office, to school or the great outdoors whenever you are!
Snack Foods

Your snack foods will maintain their freshness longer when you vacuum seal them. For best results, use a FoodSaver™ Canister for crushable items like crackers.
Troubleshooting
| Problem Solution | |
| Seal light is flashing. | The appliance is overheated. Always allow 20 seconds between seals. Under heavy usage, the appliance will shut off automatically and the seal light will flash.Wait several minutes for the appliance to cool down.The vacuum pump has been running for more than 120 seconds. Under heavy usage the appliance will shut off automatically and the seal light will flash. |
| Vacuum pump is running,but the appliance is notvacuuming air from the bag. | If making a bag from a roll, make sure that one end of the bag is sealed. Adjust the bag and try again. Make sure that the open end of the bag is down inside the drip tray.Check for wrinkles in the bag along the sealing strip. To prevent wrinkles in the seal, gently stretch the bag flat while inserting bag into the drip tray.Open the appliance and make sure that there are no foreign objects, dirt or debris on the upper gasket. |
| Bag is not sealing properly. Make sure that the appliance is turned on.There is too much liquid in the bag, freeze before vacuuming.Check for food debris around the seal areas. If present, clean the gaskets.The bag has wrinkles - to prevent wrinkles in the seal, gently stretch the bag flat while inserting bag into the drip tray.The appliance has overheated. Wait several minutes for it to cool down. | |
| No lights on the control panel. | Make sure that the appliance is plugged into the mains supply socket and turned on. |
| Cannot insert a bag into the vacuum sealer. | Make sure that there is enough bag material to reach the centre of the drip tray.Always allow about 75mm extra space to allow the bag to seal tightly around the food contents.Gently stretch the bag flat while inserting into the drip tray. Make sure that the end of the bag curls down into the drip tray. |
| Air was removed from the bag,but now air has re-entered. | Examine the seal. A wrinkle along the seal may cause air to re-enter the bag. To prevent wrinkles in the seal, gently stretch the bag flat while inserting bag into the drip tray.Moisture or food material (such as juices, grease, crumbs, powders) along the seal prevents the bag from sealing properly. Cut the bag open, wipe the top inside of the bag and reseal.Sharp food items may have punctured the bag. Use a new bag if there is a hole. Cover sharp food items with a soft cushioning material, such as a paper towel, and reseal.Fermentation or the release of natural gases from inside the foods may have occurred. When this happens, food may have begun to spoil and should be discarded. |
| The bag has melted. | The sealing strip may have become too hot. Always wait at least 20 seconds for the appliance to cool down before you vacuum seal another item.Use FoodSaver® brand bags. FoodSaver® Bags and Rolls are specially designed for FoodSaver® appliances. |
| FoodSaver® Container does not vacuum. | The lid of the container must be correctly placed on and aligned to the container.Make sure you press the Accessory button. |
| FoodSaver® Roll not dispensing. | Pull roll firmly from the bag dispenser. |
| If you need further assistance: | Please visit www.foodsavereurope.com. |
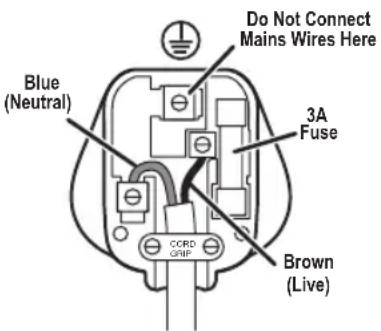
Fitting a Plug (UK/Ireland only)
If the plug is not suitable for the socket outlets in your home, it can be removed and replaced by a plug of the correct type. If you remove the plug it must not be connected to a 13 amp socket and the plug must be disposed of immediately.
NOTE: If the terminals in the plug are not marked or if you are unsure or in doubt about the installation of the plug please contact a qualified electrician.
If a 13A 3-pin plug is fitted, it must be an ASTA approved plug, conforming to BS1363 standard. Replacement fuses must be BSI or ASTA BS1362 approved.
The wires in the mains lead are coloured as such:
Please note that the colour of these mains wires may not correspond with the colour markings that identify the terminals in your plug.
The BROWN coloured wire must be connected to the terminal, which is marked with the letter "L" or is coloured RED.
The BLUE coloured wire must be connected to the terminal, which is marked with the letter "N" or is coloured BLACK.
DO NOT CONNECT either of these wires to the earth terminal in the plug. The earth terminal plug is marked with the letter "E", or with the earth symbol⊕, or coloured GREEN, or GREEN and YELLOW.
Guarantee
Please keep your receipt as this will be required for any claims under this guarantee.
This appliance is guaranteed for 2 years after your purchase as described in this document.
During this guaranteed period, if in the unlikely event the appliance no longer functions due to a design or manufacturing fault, please take it back to the place of purchase, with your till receipt and a copy of this guarantee.
The rights and benefits under this guarantee are additional to your statutory rights, which are not affected by this guarantee. Only Jarden Consumer Solutions (Europe) Limited ("JCS (Europe)") has the right to change these terms.
JCS (Europe) undertakes within the guarantee period to repair or replace the appliance, or any part of appliance found to be not working properly free of charge provided that:
- you promptly notify the place of purchase or JCS (Europe) of the problem; and
- the appliance has not been altered in any way or subjected to damage, misuse, abuse, repair or alteration by a person other than a person authorised by JCS (Europe).
Faults that occur through, improper use, damage, abuse, use with incorrect voltage, acts of nature, events beyond the control of JCS (Europe), repair or alteration by a person other than a person authorised by JCS (Europe) or failure to follow instructions for use are not covered by this guarantee. Additionally, normal wear and tear, including, but not limited to, minor discoloration and scratches are not covered by this guarantee.
The rights under this guarantee shall only apply to the original purchaser and shall not extend to commercial or communal use.
If your appliance includes a country-specific guarantee or warranty insert please refer to the terms and conditions of such guarantee or warranty in place of this guarantee or contact your local authorized dealer for more information.
Waste electrical products should not be disposed of with Household waste. Please recycle where facilities exist. E-mail us at enquiriesEurope@jardencs.com for further recycling and WEEE information.
Jarden Consumer Solutions (Europe) Limited
5400 Lakeside
Cheadle Royal Business Park
Cheadle
SK8 3GQ
United Kingdom
Consignes importantes
natural_image
Two laboratory apparatus setups: a container with liquid and two connected containers with black caps (no visible text or symbols)natural_image
Illustration of a food storage setup with a container, brush holder, and soda jar (no text or symbols)Jarden Consumer Solutions (Europe) Limited 5400 Lakeside
Cheadle Royal Business Park
Cheadle
SK8 3GQ
United Kingdom

natural_image
Two laboratory glassware setups with black components, one containing a container of food and the other holding a test tube (no visible text or symbols)natural_image
Illustration of a beverage setup with a glass mug, a tray, and a pen holder, accompanied by an upward arrow and a magnified inset showing the brush (no text or symbols)Jarden Consumer Solutions (Europe) Limited
5400 Lakeside
Cheadle Royal Business Park Cheadle
SK8 3GQ
United Kingdom
natural_image
Two laboratory apparatus setups: a beaker with contents and a tool, and a flat plate with a lid (no visible text or symbols)natural_image
Illustration of a tank with sensors and a glass of dark liquid, accompanied by an upward arrow and a magnified inset showing a device (no text or symbols)Jarden Consumer Solutions (Europe) Limited
Edif. Vázquez Krasnow
natural_image
Two laboratory apparatus setups: a beaker with liquid and a gas collection device, both connected by tubing (no visible text or symbols)Para marinar no Marinador Rápido FoodSaver™:
natural_image
Illustration of a beverage drink with a glass and straw, accompanied by a small container and directional arrows (no text or symbols)Jarden Consumer Solutions (Europe) Limited
Edif. Vázquez Krasnow
natural_image
Two laboratory apparatus setups with pipettes and a mesh sample (no visible text or symbols)natural_image
Illustration of a food processor with a slide and a brush, accompanied by a small container and directional arrows (no text or symbols)Jarden Consumer Solutions (Europe) Limited
5400 Lakeside
Cheadle Royal Business Park
Cheadle
SK8 3GQ
United Kingdom
natural_image
Laboratory setup with two glassware units containing food items, one with a lid and the other with a lid, against a plain background (no text or symbols visible)natural_image
Illustration of a coffee maker with a glass bowl and a milk mug, accompanied by a small container and directional arrows (no text or symbols)Jarden Consumer Solutions (Europe) Limited 5400 Lakeside
Cheadle Royal Business Park
Cheadle
SK8 3GQ
United Kingdom

Viktiga Säkerhetsanvisningar
FoodSaver™ Fresh-burkar
natural_image
Two laboratory glassware items: a container with food and a tool, and a plate with liquid (no visible text or symbols)natural_image
Illustration of a food drink with a glass container, a small refrigerator, and a brush holder (no text or symbols)Jarden Consumer Solutions (Europe) Limited
5400 Lakeside
Cheadle Royal Business Park
Cheadle
SK8 3GQ
United Kingdom
Tärkeitä varotoimia
natural_image
Two laboratory glassware setups with pipettes and a container, no visible text or symbolsnatural_image
Illustration of a portable coffee maker with a glass container and a small container, accompanied by an upward arrow and a magnified view of the lid (no text or symbols present)Jarden Consumer Solutions (Europe) Limited 5400 Lakeside
Cheadle Royal Business Park
Cheadle
SK8 3GQ
United Kingdom
natural_image
Two laboratory apparatus setups: a container with food and a rack with a tool, both without any visible text or symbols.natural_image
Illustration of a beverage container with a glass and a small container, accompanied by a magnified view of its lid (no text or symbols)Jarden Consumer Solutions (Europe) Limited
5400 Lakeside
Cheadle Royal Business Park
Cheadle
SK8 3GQ
United Kingdom
J Uttagbar drypprist
Forseglingsknapp
natural_image
Two laboratory apparatus setups with pipettes and a container, no visible text or symbolsSlik marinerer du i en FoodSaver™-hurtigmarinerer:
natural_image
Illustration of a food storage setup with a container, brush holder, and coffee cup (no text or symbols)Jarden Consumer Solutions (Europe) Limited 5400 Lakeside
Cheadle Royal Business Park
Cheadle
SK8 3GQ
United Kingdom

WAŻNE ZAŚADY BEZPIECZEŃSTWA
natural_image
Two laboratory apparatus setups: a beaker with granular material and two connected pipettes (no visible text or symbols)natural_image
Illustration of food preparation tools including a blender, a tray with food, and a glass with a straw (no text or symbols)Jarden Consumer Solutions (Europe) Limited
5400 Lakeside
Cheadle Royal Business Park
Cheadle
SK8 3GQ
United Kingdom
natural_image
Two laboratory glassware setups with black components, one containing a container of fibrous material and the other with a lid and mesh substrate (no text or symbols visible)natural_image
Illustration of food preparation tools including a blender, coffee maker, and instant drink (no text or symbols)Údržba a čištění
Jarden Consumer Solutions (Europe) Limited
5400 Lakeside
Cheadle Royal Business Park
Cheadle
SK8 3GQ
United Kingdom
natural_image
Two laboratory glassware setups: one with a container filled with fibrous material, the other with a pipette and slide (no visible text or symbols)natural_image
Illustration of a beverage container with a glass lid and a small container, accompanied by directional arrows and a magnified inset showing the lid (no text or symbols present)Starostlivost' a čistenie
Jarden Consumer Solutions (Europe) Limited
5400 Lakeside
Cheadle Royal Business Park
Cheadle
SK8 3GQ
United Kingdom
natural_image
Two laboratory glassware setups: one with a container filled with fibrous material, the other with a brush-like device (no visible text or symbols)natural_image
Illustration of a tank with mechanical sensors and a glass of dark liquid, accompanied by an upward arrow and magnified inset (no text or symbols)Jarden Consumer Solutions (Europe) Limited
5400 Lakeside
Cheadle Royal Business Park
Cheadle
SK8 3GQ
United Kingdom
natural_image
Two laboratory apparatus setups: a container with granular material and two connected pipettes (no visible text or symbols)natural_image
Illustration of a coffee maker with a glass container and a small stand, accompanied by an upward arrow and magnified view of the cup (no text or symbols)Jarden Consumer Solutions (Europe) Limited 5400 Lakeside
Cheadle Royal Business Park
Cheadle
SK8 3GQ
United Kingdom
natural_image
Two laboratory apparatus setups: a beaker with granular material and a side view of a textured sample (no visible text or symbols)natural_image
Illustration of food preparation tools including a blender, a jar with contents, and a small container with a pencil (no text or symbols)Jarden Consumer Solutions (Europe) Limited 5400 Lakeside
Cheadle Royal Business Park
Cheadle
SK8 3GQ
United Kingdom

FoodSaver™
UK: Jarden Consumer Solutions (Europe) Limited
5400 Lakeside, Cheadle Royal Business Park,
Cheadle, SK8 3GQ, United Kingdom
e-mail: enquiriesEurope@jardencs.com
Tel: +44 (0)161 621 6900
FR: Jarden Consumer Solutions (Europe) Limited
92705 Colombes, France
e-mail: serviceinfoFrance@jardencs.com
Tel: +33 1 49 64 20 60
ES/PT: Jarden Consumer Solutions (Europe) Limited
Edif. Vázquez Krasnow
For Customer Service details, please see the website.
© 2017 Jarden Consumer Solutions (Europe) Limited.
All rights reserved. Imported and distributed by Jarden Consumer Solutions (Europe) Limited,
5400 Lakeside, Cheadle Royal Business Park, Cheadle, SK8 3GQ, United Kingdom.
Jarden Consumer Solutions (Europe) Limited is a subsidiary of Newell Brands Inc. (NYSE: NWL).
The product supplied may differ slightly from the one illustrated due to continuing product development.
Printed In China
5400 Lakeside, Cheadle Royal Business Park, Cheadle, SK8 3GQ, United Kingdom.