
VF200JU1 - Dishwasher BRANDT - Free user manual and instructions
Find the device manual for free VF200JU1 BRANDT in PDF.
| Product type | Built-in dishwasher |
| Brand | BRANDT |
| Model | VF200JU1 |
| Capacity | 12 place settings (140 pieces according to DIN 44990) |
| Wash programs | Normal (heavily soiled), Eco (normally soiled), Delicate (lightly soiled or fragile) |
| Power consumption | 1.65 kWh (Normal program), 1.24 kWh (Eco program) |
| Water consumption | 18 L (Normal and Eco programs) |
| Program duration | 100 min (Normal program) |
| Power supply | 230 V, 50 Hz |
| Water pressure | 0.04 - 1.0 MPa |
| Dimensions (W x H x D) | 600 x 850 x 600 mm (standard built-in) |
| Weight | Approximately 50 kg |
| Safety | Anti-overflow (automatic drain pump), Anti-leak (water supply cut-off) |
| Water softener | Adjustable according to water hardness (from 0 to >70°F), with regenerating salt reservoir |
| Rinse aid dispenser | Yes, adjustable (positions 1 to 3) |
| Detergent dispenser | For tablet, powder or liquid, located on the front of the upper basket |
| Baskets | 2 baskets (upper height-adjustable, lower with sliding cutlery basket) |
| Spray arms | 2 (lower and upper) |
| Filtration system | Self-cleaning pulsed microfilter with main filter and waste trap |
| Indicator lights | On, Wash in progress, End, Salt, Rinse aid |
| Cleaning and maintenance | Regular cleaning of waste trap and drain sump (3-4 times/year), intensive empty program 1-2 times/year |
| Spare parts and repairability | Use only original parts, repairs by qualified personnel, manufacturer's after-sales service |
Frequently Asked Questions - VF200JU1 BRANDT
User questions about VF200JU1 BRANDT
0 question about this device. Answer the ones you know or ask your own.
Ask a new question about this device
Download the instructions for your Dishwasher in PDF format for free! Find your manual VF200JU1 - BRANDT and take your electronic device back in hand. On this page are published all the documents necessary for the use of your device. VF200JU1 by BRANDT.
USER MANUAL VF200JU1 BRANDT
GB Dishwasher OPERATING INSTRUCTIONS
F Lave-Vaisselle NOTICE D'UTILISATION
D GeschirrspulergEBRAUCHSANWEISUNG
Opvaskemaskine BRUGSANVISNING
P Maquina de lavar MANUAL DE INSTRUÇÉS
NL Afwasmaschine GEBRUIKSAANWIJZING
GR OAHIEXPHSEΩ
Contents list
| Safety precautions | Page 3 |
| Softening the water | 4 |
| Adding the rinse aid | 5 |
| Adding the detergent | 5 |
| Loading the dishwasher | 6-7 |
| Choice of programmes | 7 |
| Operation | 8 |
| Cleaning and maintenance instructions | 9 |
| Information for test laboratories | 9 |
| Troubleshooting | 10 |
AFTER SALES SERVICE
In the unlikely event of there being a problem please call the number below quoting the model number of your appliance – this can be found on its rating plate. Our trained staff are available to advise or book a service call to one of our authorised service agents.
For any information on our products please contact us at:
Brandt UK Ltd
Intec 4
Wade Road
Basingstoke
RG24 8NE
Tel: 01256 308000
Fax: 01256 346377
Safety precautions
Please read the information in this instruction leaflet carefully. It gives all the information you need for safety, installation, use and guarantees for the appliance. We advise you to keep this leaflet and to pass it on to the new owner if you sell the machine.
Please be sure to comply with the information below, so that we can fulfil our responsibilities :
- Dispose of the packaging in a suitable manner and comply with legal standards regarding protection of the environment.
- If there is any visible damage to the machine, do not connect it to the mains power supply, but contact your supplier.
- The machine must be located in a frost-free environment. In the event of frost, the hydraulic components may be damaged.
- The inlet and outlet pipes must be connected in accordance with the leaflet. Incorrect connections can lead to damage.
- In order to ensure good stability, flush-fitting machines must be installed under a continuous work top fixed to the adjoining cabinets.
- Do not climb or lean on the door of the dishwasher when it is open. The machine can overbalance or be damaged.
- The machine is designed as a dishwasher and must not be used for any other purpose.
-
We advise you to only use dishwasher products and not solvents.
-
You should store dishwasher products as well as other cleaning products out of the reach of children. These products have a corrosive effect on the mouth and pharynx if they are swallowed.
- Keep dishwasher products as well as other cleaning products out of reach of children. These products, if they are swallowed, have a corrosive effect in the mouth and pharynx.
- If the machine does not operate correctly for reasons other than those mentioned in this leaflet, disconnect the machine from the mains power supply (pull out the plug) or disconnect the fuse in the circuit concerned and contact our after-sales service.
- Broken machines should be taken to the closest recycling centre. Destroy the door closing system so it no longer works (children may close themselves in whilst playing and suffocate). Cut the electric cable after having removed the plug from the socket.
- You are strongly advised to disconnect the machine after use and turn off the water supply.
- Do not allow children to play with the machine or handle it.
- The water inside the machine is not drinkable.
- When the machine is running, do not open the door. This may provoke important steam leakage or splattering of water.
Softening the water
Adjusting the water softener
The water softener should be properly adjusted to optimise salt consumption and for best washing results.
- Adjust the water softener following the instructions using the table below.
- Check the hardness of the water by contacting your water supplier giving your address and postcode.
- Your water supplier will be able to give the water level hardness as detailed in the chart. For example if your water supply is 25^ , the green cursor on the dial on the left hand inner side of your dishwasher should be positioned in front of figure 4.
- Consult your fitter for water that is more than 28^ (position 5)
If you move or your water supply changes, adjust the water hardness settings. Check with your local water company.
| Hardness of your water supply (in British (clarke degrees) | Salt requirements | Position | Adjust the cursor depending on the result to the adjustment position on the left of the tub. | Number of washes between two fills (about) |
| > à 28° * | YES | 5 | ||
| 22° to 28° | YES | 4 | 20 | |
| 14° to 21° | YES | 3 | 30 | |
| 10.5° to 14° | YES | 2 | 50 | |
| 7° to 10.5° | YES | 1 | 120 | |
| 0° to 7° | NO | 1 | — |
Important : The cursor must be in front of a figure
Filling the container with regenerating salt (fig. 5)
It is recommended to use dishwasher salt only and not to use detergents that include salt within them.
Filling with salt is essential for the regeneration of the resins that soften the water so removing the hardness from it, except if the water supply is already sufficiently soft. (see "Adjusting the water softener).
You should fill just before starting the programme.
1 - Unscrew and remove the salt container cap.
2 - Use a funnel to pour: fill the container with regenerating salt specially designed for dishwashers.
3 - The first time, fill up with water up to the top of container.
Screw down the salt container cap again properly
Important: If adjusting the water softener does not require the addition of regenerating salt (position 1), you should nevertheless fill the salt container with water before using.
Never pour detergent into the container, you will destroy the water softener
Identifying the regenerating salt level
A light on the control band tells you to add regenerating salt.
Adding the rinse aid
It is recommended to use rinse aid only and not to use detergents that include rinse aid within them.
Rinsing product is necessary as it avoids stains on the dishes and makes drying easier.
IMPORTANT! Only use products intended for dishes and NOT detergents intended for hand washing!
Filling and adjusting the rinsing product container (Fig. 6-7)
Put the door in a horizontal position when filling the container and unscrew the cap in the door clockwise.
Fill to just below the to the adjusting lever.
If the product overflows during filling, remove the excess with a sponge to avoid foam forming.
If you experience stains or bad drying after several cycles, you may if necessary adjust the dosage using the selector:
Soft water: level 1 to reduce the dose
Hard water: level 3 to increase it.
Finding the level of the rinsing product.
A light on the control band shows you requirements in rinsing product when the door is ajar.
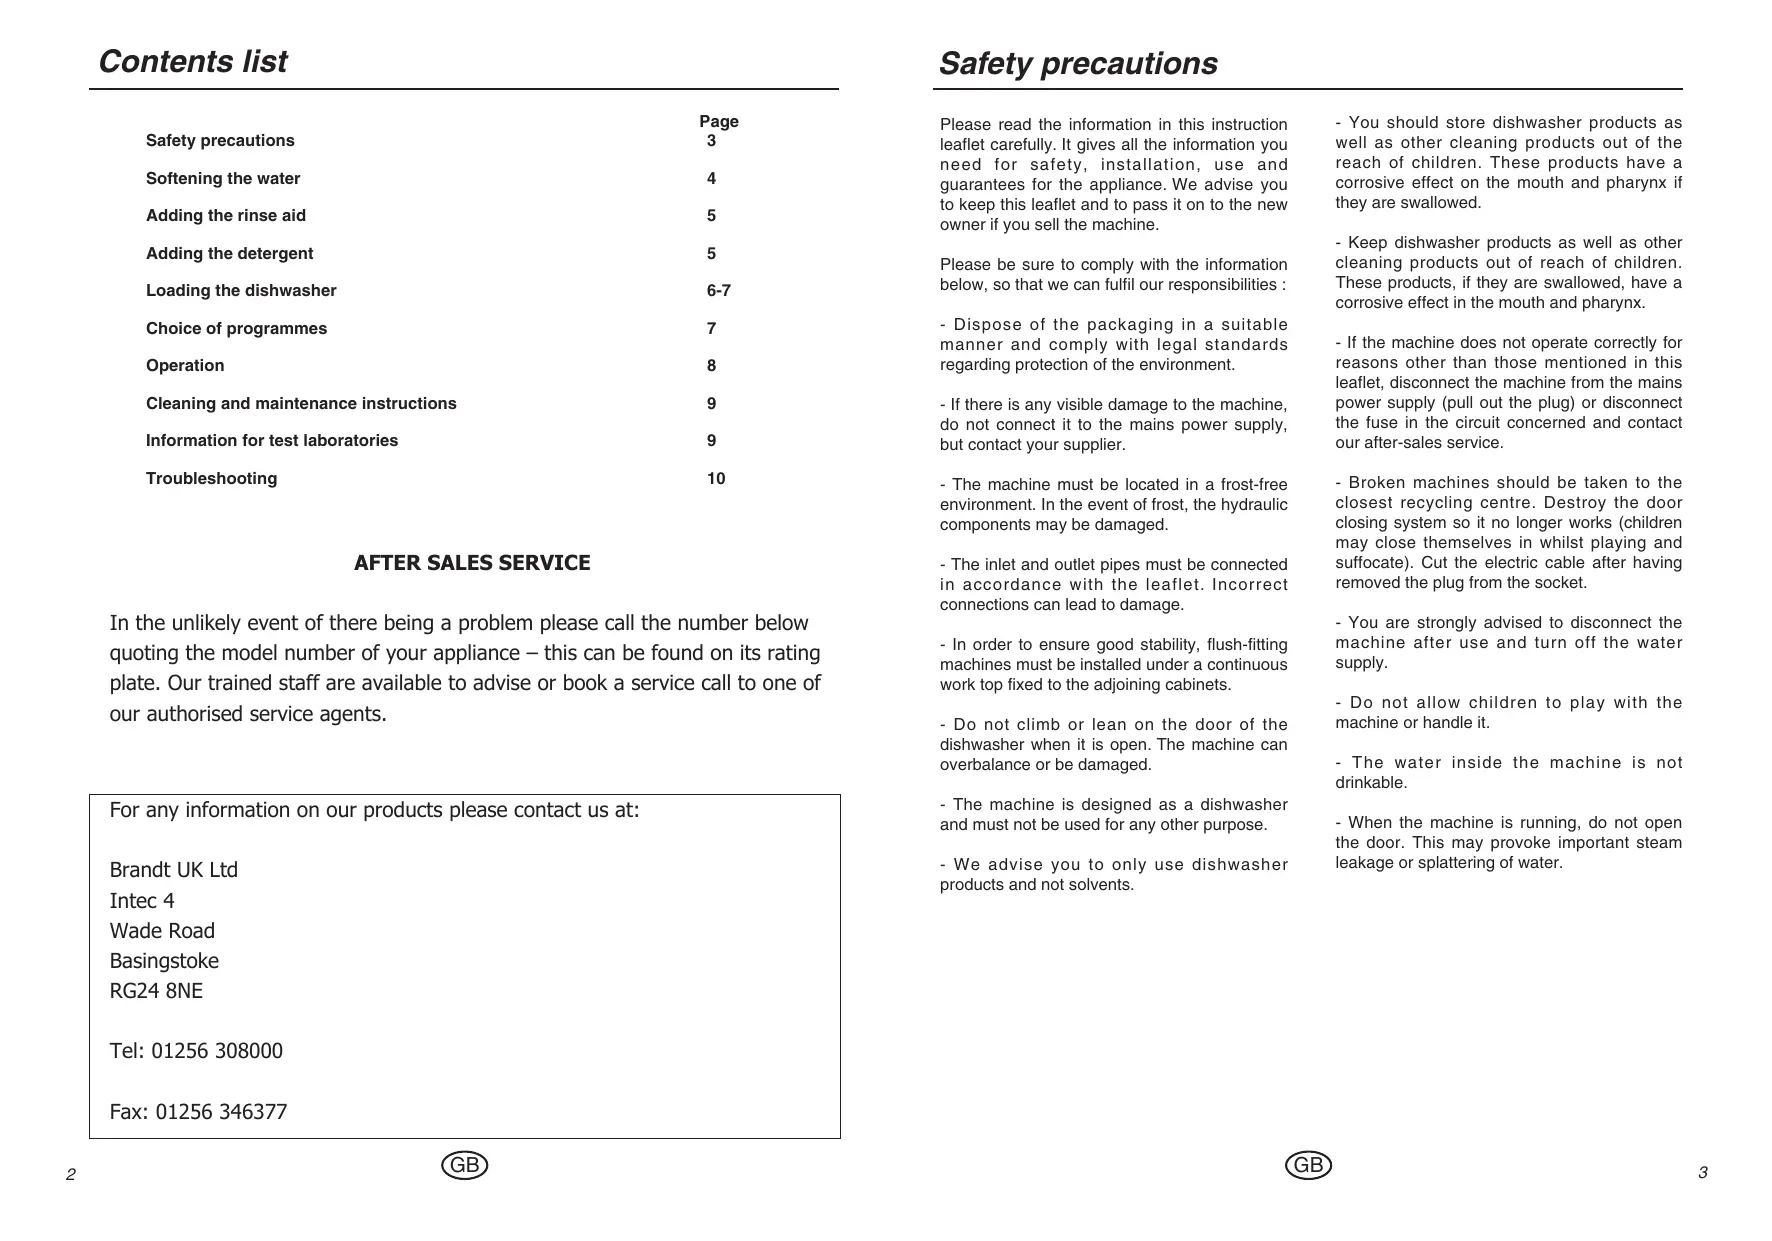
Adding the detergent
It is recommended to use detergent powder/liquid or tablets only and not to use detergents that include rinse aid or salt within them.
The washing product container has been placed in front of the upper basket to make the machine easier to fill. This means that you can load the washing powder without bending down or completely opening the door.
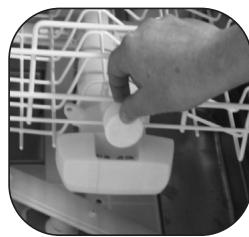
The distributor offers you a choice between using tablets or powder or liquid detergent.
Before starting the programme :
put the tablet in the upper compartment.
Put the tablet in the outside compartment. Using tablets is particularly recommended for the Eco programme and for full loads of dishes.
Or,
Pull the container to fill with washing powder or liquid and fill up to:
Minimum setting for slightly dirty dishes
Maximum setting for dirty dishes
Close the container
Use washing products specifically designed for dishwashers. See the manufacturers' recommendations on the packet as well as the advice for use below.
tablet
powder or liquid
VERY IMPORTANT: keep all products out of the reach of children and away from humidity.
Loading the dishwasher
In order to obtain good cleaning results, be sure to remove any large food residues before switching on the machine. Any burnt or stuck-on residues must be removed beforehand.
Your dishwasher has two baskets for 12 place settings (140 items) in accordance with DIN Standard 44990. (fig. 10-11). Always point the inside of the crockery downwards. Ensure that no item conceals another and that nothing obstructs the spraying facility. After switching on, check that the spraying arms can move freely. No item should overlap the baskets.
Lower basket (Fig. 8 - 9 - 10)
Place the dishes so that water may circulate freely and spray all the utensils. (Avoid attaching and piling dishes up).
This basket is especially intended to hold: plates, cutlery, dishes, frying pans, saucepans.
Put large-sized plates and frying pans on the side
Avoid mixing plates and soup dishes. You should preferably place same-sized plates together. Place soup dishes at the back, in the high pin area.
Upper basket (Fig. 11 - 12)
This basket is particularly intended to hold glasses, cups, ramekins, small salad bowls, bowls, saucers etc...
Place glasses so that they do not touch and tip them sufficiently so that they do not retain any water. Place the hollow end of glasses, cups and bowls facing downwards. Arrange the dishes methodologically to gain space (rows of glass, cups, and bowls)
You can if you wish unclip the saucer rack to gain space.
The upper basket should be adjusted to the HIGH position when loading large plates in the lower basket. The setting can be execute basket in charge.
Make sure nothing obstructs the rotation of the lifting arm (saucepan handles, cutlery or large dishes).
Removable grids are available if you wish to load cutlery in an orderly fashion.
The cutlery trays slide and can be put anywhere on the lower basket. You can adjust them according to the dishes you wash.
For optimum washing, you can use these separation grids
Cutlery: (Fig. 13)
- Place handles downwards.
- Separate silverware from other metals using the separating grill.
- It is preferable to place small spoons in the separating grills.
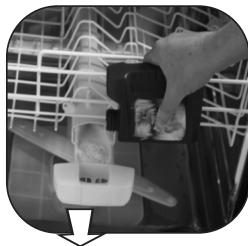
1 Setting the HIGH POSITION
Slowly lift the basket until you hear a click on each side.
Setting the LOW POSITION
Lift the basket completely on both sides (click) and then follow it downwards.
Make sure that the two runners are adjusted to the same level.

Loading the dishwasher
Objects not suitable for your dishwasher
- Wooden chopping boards
- Pewter or copper objects
- Non-stainless steel objects
- Cutlery with wooden, horn or mother-of-pearl handles
- Antique or hand-painted crockery
When buying dishes or cutlery, check they are suitable for dishwashers.
Important note:
For reasons of safety, we recommend you place sharp-ended table knives blade down in the cutlery basket. Long-bladed cutlery and other sharp utensils should be placed flat in the upper basket.
Choice of programmes
Normal Wash 60^ :


Recommended for very dirty or greasy dishes.
(difficult stains : fat, sauce, cooking or frying stains...).
Eco Wash 50^ :

Recommended for normally dirty dishes (daily stains).
Fragile Wash 40^ :

Recommended for slightly dirty non greasy but fragile dishes.
For information purposes:
Normal wash
Duration Water
100 min.
Water
18 L.
Electricity
Fragilz wash
90 min.
18 L.
1,24 Kwh
The values correspond to normal conditions of use. They may vary with the load, the temperature, the hardness of water or the supply voltage.

The control band in the upper section of the door is visible on opening.
Press the ON button ① to start the machine
The meaning of the symbols is listed on the sticker attached in the document folder. If you wish, stick it to your machine's door.
1 - Load the dishwasher, check that the dishes do not obstruct the turning sprinkler arms.
2 - Introduce dishwashing product.
3 - Press the "On/Off" ① button to switch on the dishwasher. The "On" light will go on.
4 - Select the programme by pressing the required button.
5 - Open the water supply tap.
6 - Press the "Start" button, the "Washing on" light will go on. The programme begin when you close the door.
Take care not to press 2 or 3 wash-programme keys at the same time.
If you make a wrong selection, simply press the same key again to release it.
When the programme has ended, the "Washing on" light will go out.
If the "on/off" light it on, it shows that the machine is switched on.
For best results, do not open the door once the programme has started.
The missing product indicator
lights go on when the machine is turned on.
Salt: lights up when salt is low. After you have added regenerating salt it may stay on until the salt has dissolved sufficiently. This happens generally after a cycle (or if you have not properly filled the machine - see page 4) for example when starting off with the sample.
Note: where water is particularly soft regenerating salt is not needed but the light will remain on.
Rinsing product: Goes on, door ajar, when you should add rinsing product (see filling page 5)
Economical and ecological washing
Do not pre-wash your dishes by hand.
Use all the capacities of your dishwasher. It will wash economically and ecologically.
To obtain optimum washing results it is very important to adjust the salt and rinse aid levels in your dishwasher according to the level of water hardness as detailed on pages 4 & 5.
Always choose the programme best adapted to the stains and the type of dishes.
Avoid using too much detergent, regenerating salt and rinsing liquid. Observe the recommendations contained in this manual (pages 5, 6 and 7) as well as the product manufacturer's instructions.
Cleaning and maintenance instructions
- Your dishwasher comes with a self-cleaning pulse filter that constantly filters small particles of dirt trapped in the washing bath.
The filter and the main filter cannot be dismantled as the cleaning arm constantly cleans them.
Nevertheless:
- regularly clean the waste trap. To do this:
Fig. 12 ① Pull the waste trap handle upwards. - clean the drainage outlet (3 to 4 times per annum). To do this:
Fig. 12 ② Remove the drainage outlet by pushing the tab backwards, and then pulling upwards. - Remove residue using a brush.
- Clean under running water.
- Return the unit to its housing taking care that it is well engaged.
Clean as necessary
- Underneath the filters, around the door and the door joint with a damp sponge to remove any deposit.
- Use only soap and water for the bodywork and control board.
Do not clean with abrasive powders, scouring pads, spirit-based products or solvent.
Use preferably a cloth or a sponge.
- If you have stainless steel door you may use products adapted for stainless steel. See the manufacturer's instructions for advice on their use.
Every year
To maintain your machine in perfect working order you should clean it once or twice a year. Run an intensive programme with the machine empty and a special dishwasher cleaning product available from any reputable dealer.
Prolonged period of non-use
Clean your machine completely then unplug the electricity supply and close the water tap. Keep the appliance at a temperature above freezing.
Information for test laboratories
Comparative tests according to FIG. 10 - 11
Rinsing product set at 2
- Capacity 12 place settings
- Upper basket:Setting the LOW POSITION
- Quality of washing product : 30 g product B
- It is essential that the softener be adjusted to a setting immediately above the recommended one, according to the hardness of your water, to take into account the lack of phosphate in the standardised detergent.
- Should deviations exist compared with EN0242 comparative tests regarding the degree of soiling, the type of dishes and cutlery etc..., contact the manufacturer of the equipment before starting tests.
IEC 436, DIN 44990: "Normal wash Programme"
EN 50242:
"Fragile wash Programme


| Problems | Causes |
| The dishwasher will not start | - Is it plugged in? - Is the door properly closed? - Is the water connected? - Check that the delayed start is on 0 (according to the model) |
| The dishes are not properly washed (or their are stains in it) | - Programme choice. Choose the programme best adapted to the type of wash - Make sure nothing is blocking the circulation of the water - Check the dishes are properly arranged. - Only use specially designed washing products - Check the waste well, filters, arms, joints and door rim are clean - Clean the filter - Check that the washing arm can freely rotate |
| Greasy stains | - Increase the dose of washing product - Use a new packet of washing product - Choose a better adapted programme |
| Limescale deposits on the dishes | - Check it is limescale (clean with vinegar). If yes: - Check the hardness of the water |
| The dishes are dull | Too soft water is aggressive for glasses. - Check the hardness of the water - Reduce the softener and if necessary remove the regenerating salt. |
| Traces of salt (salty taste on the dishes) | - Add water to the salt pot and reload if necessary. - Cap badly closed. |
| Blackened or marked silverware | - Remove food residue immediately after use - Separate silverware from other metals - Choose detergent recommended for silverware |
| Traces of rust on knife blades | - Use knives suitable for dishwashers |
| The dishwasher does not empty | - Remove the siphon stop valve - Check the drain pipe is not bent or crushed - You have moved your dishwasher and have tipped it backwards. To restart the pump, unhook the draining rod, lay it on the floor at the end of a basin, draining should restart. Then turn off the “Start/Stop” button, put the draining rod back and restart your programme. |
| This machine complies with all applicable safety standards. Any repairs should be carried out by a qualified technician. Repairs carried out by unqualified technicians may be dangerous for the user. |
If you have problems not covered by these remarks, consult your dealer or After-Sales Service. Have the machine type, series number or that mentioned on the rating plate (inside the door) ready.
You will so avoid unnecessary delays and cost.
Table des matieres
IEC 436, DIN 44990:Programme "Normal"

EN 50242:
Programme "Fragile"

The photograph above, with the lower basket removed, shows the main points described in this Instruction Book.
1- Upper basket
2- Cleaning liquid container
3- Regenerating salt contain
4- Self-cleaning micro filter
5 - Rating plate (After sales service references)
6- Lower sprinkling arm
7- Main filter
8 - Waste trap
9-Rinsing product container
Protection against water damage
- The anti-overflow safety device. The system automatically activates the drain pump if the water level in the tub rises too high.
- Anti-leakage device. This system interrupts the water supply if a leak is detected underneath the machine. If one of these mechanisms is started, contact the after-sales service to put it back into working order.