Syncra ADV 10.0 - Pump Sicce - Free user manual and instructions
Find the device manual for free Syncra ADV 10.0 Sicce in PDF.
| Product Type | Aquarium, fountain, hydroponics pump |
| Brand | Sicce |
| Model | Syncra ADV 10.0 |
| Power supply | 220-240 V ~ 50 Hz, 90 W |
| Max flow rate | 10000 L/h (2700 US gph) |
| Max head height | 7.0 m (23.0 ft) |
| Cable length | 3.0 m (10.0 ft) |
| Weight | Approximately 2.5 kg (estimate) |
| Dimensions (L x W x H) | Not specified in the manual, approximately 20 x 10 x 15 cm (estimate) |
| Usage | Submerged or inline (out of water) |
| Water type | Freshwater or saltwater |
| Max liquid temperature | 35 °C (95 °F) |
| Key features | Silent pump, high efficiency, low consumption, electronic protections (blocked rotor, dry run, thermal) |
| Maintenance and cleaning | Tool-free disassembly, clean rotor and bearing with water and vinegar |
| Spare parts available | Complete rotor (rotor unit + flange), rear bearing, seal, pre-chamber, pre-filter, fittings |
| Repairability | Rotor and rear bearing can be replaced; cable is non-replaceable |
| Safety | 30 mA residual current device required, protection against electric shocks (polarized plug) |
| Warranty | 3 years (excluding rotor), +2 additional years upon online registration (total 5 years) |
| Standards | Compliant with national and international standards, WEEE directive |
Frequently Asked Questions - Syncra ADV 10.0 Sicce
User questions about Syncra ADV 10.0 Sicce
0 question about this device. Answer the ones you know or ask your own.
Ask a new question about this device
Download the instructions for your Pump in PDF format for free! Find your manual Syncra ADV 10.0 - Sicce and take your electronic device back in hand. On this page are published all the documents necessary for the use of your device. Syncra ADV 10.0 by Sicce.
USER MANUAL Syncra ADV 10.0 Sicce
natural_image
Black industrial pump units with cooling fans and heat exchangers (no visible text or symbols)SEAL AND SIGNATURE OF RESALE DEALER TIMBRO E FIRMA DEL RIVENDITORE STEMPEL UND UNTERSCHRIFT DES VERKAUFERS CACHET ET SIGNATURE DU REVENDEUR SELLO Y FIRMA DEL REVENDEDOR STEMPEL EN HANDTEKENING VAN DE DEALER CARIMBO E ASSINATURA DO REVENDEDOR ПЕЧАТЬ И ПОДПИСЬ ДИЛЕРА 邮票卖家签名
DATE OF PURCHASE
DATA DI VENDITA
VERKAUFSDATUM
DATE DE VENTE
FECHA DE VENTA
DATUM VAN AANKOOP
DATA DE VENDA
ДАТА ПРОДАЖИ
发售日

day
month
year
GARANTIED · GARANTIA · GARANTI · 「APAHTIЯ · 保固書
WARRANTY · GARANZIA · GARANTIE · GARANTIA
IMPORTANT SAFETY INSTRUCTIONS
WARNING - To guard against injury, basic safety precautions should be observed, including the following.
READ AND FOLLOW
ALL SAFETY INSTRUCTIONS
WARNING: To avoid possible electric shock, special care should be taken since water is employed in the use of aquarium equipment. For each of the following situations, do not attempt repairs by yourself. Return the appliance to an authorized service facility for service or discard the appliance.
1) CAUTION: If the appliance shows any sign of abnormal water leakage, immediately unplug it from the power source.
2) Carefully examine the appliance after installation. It should not be plugged in if there is water on parts not intended to be wet.
3) Do not operate any appliance if it has a damaged cord or plug, or if it doesn't work properly or has been dropped or damaged in any manner.
4) To avoid the possibility of the appliance plug or receptacle getting wet, position aquarium stand and tank or the fountain to one side of a wall-mounted receptacle to prevent water from dripping onto the receptacle or plug.
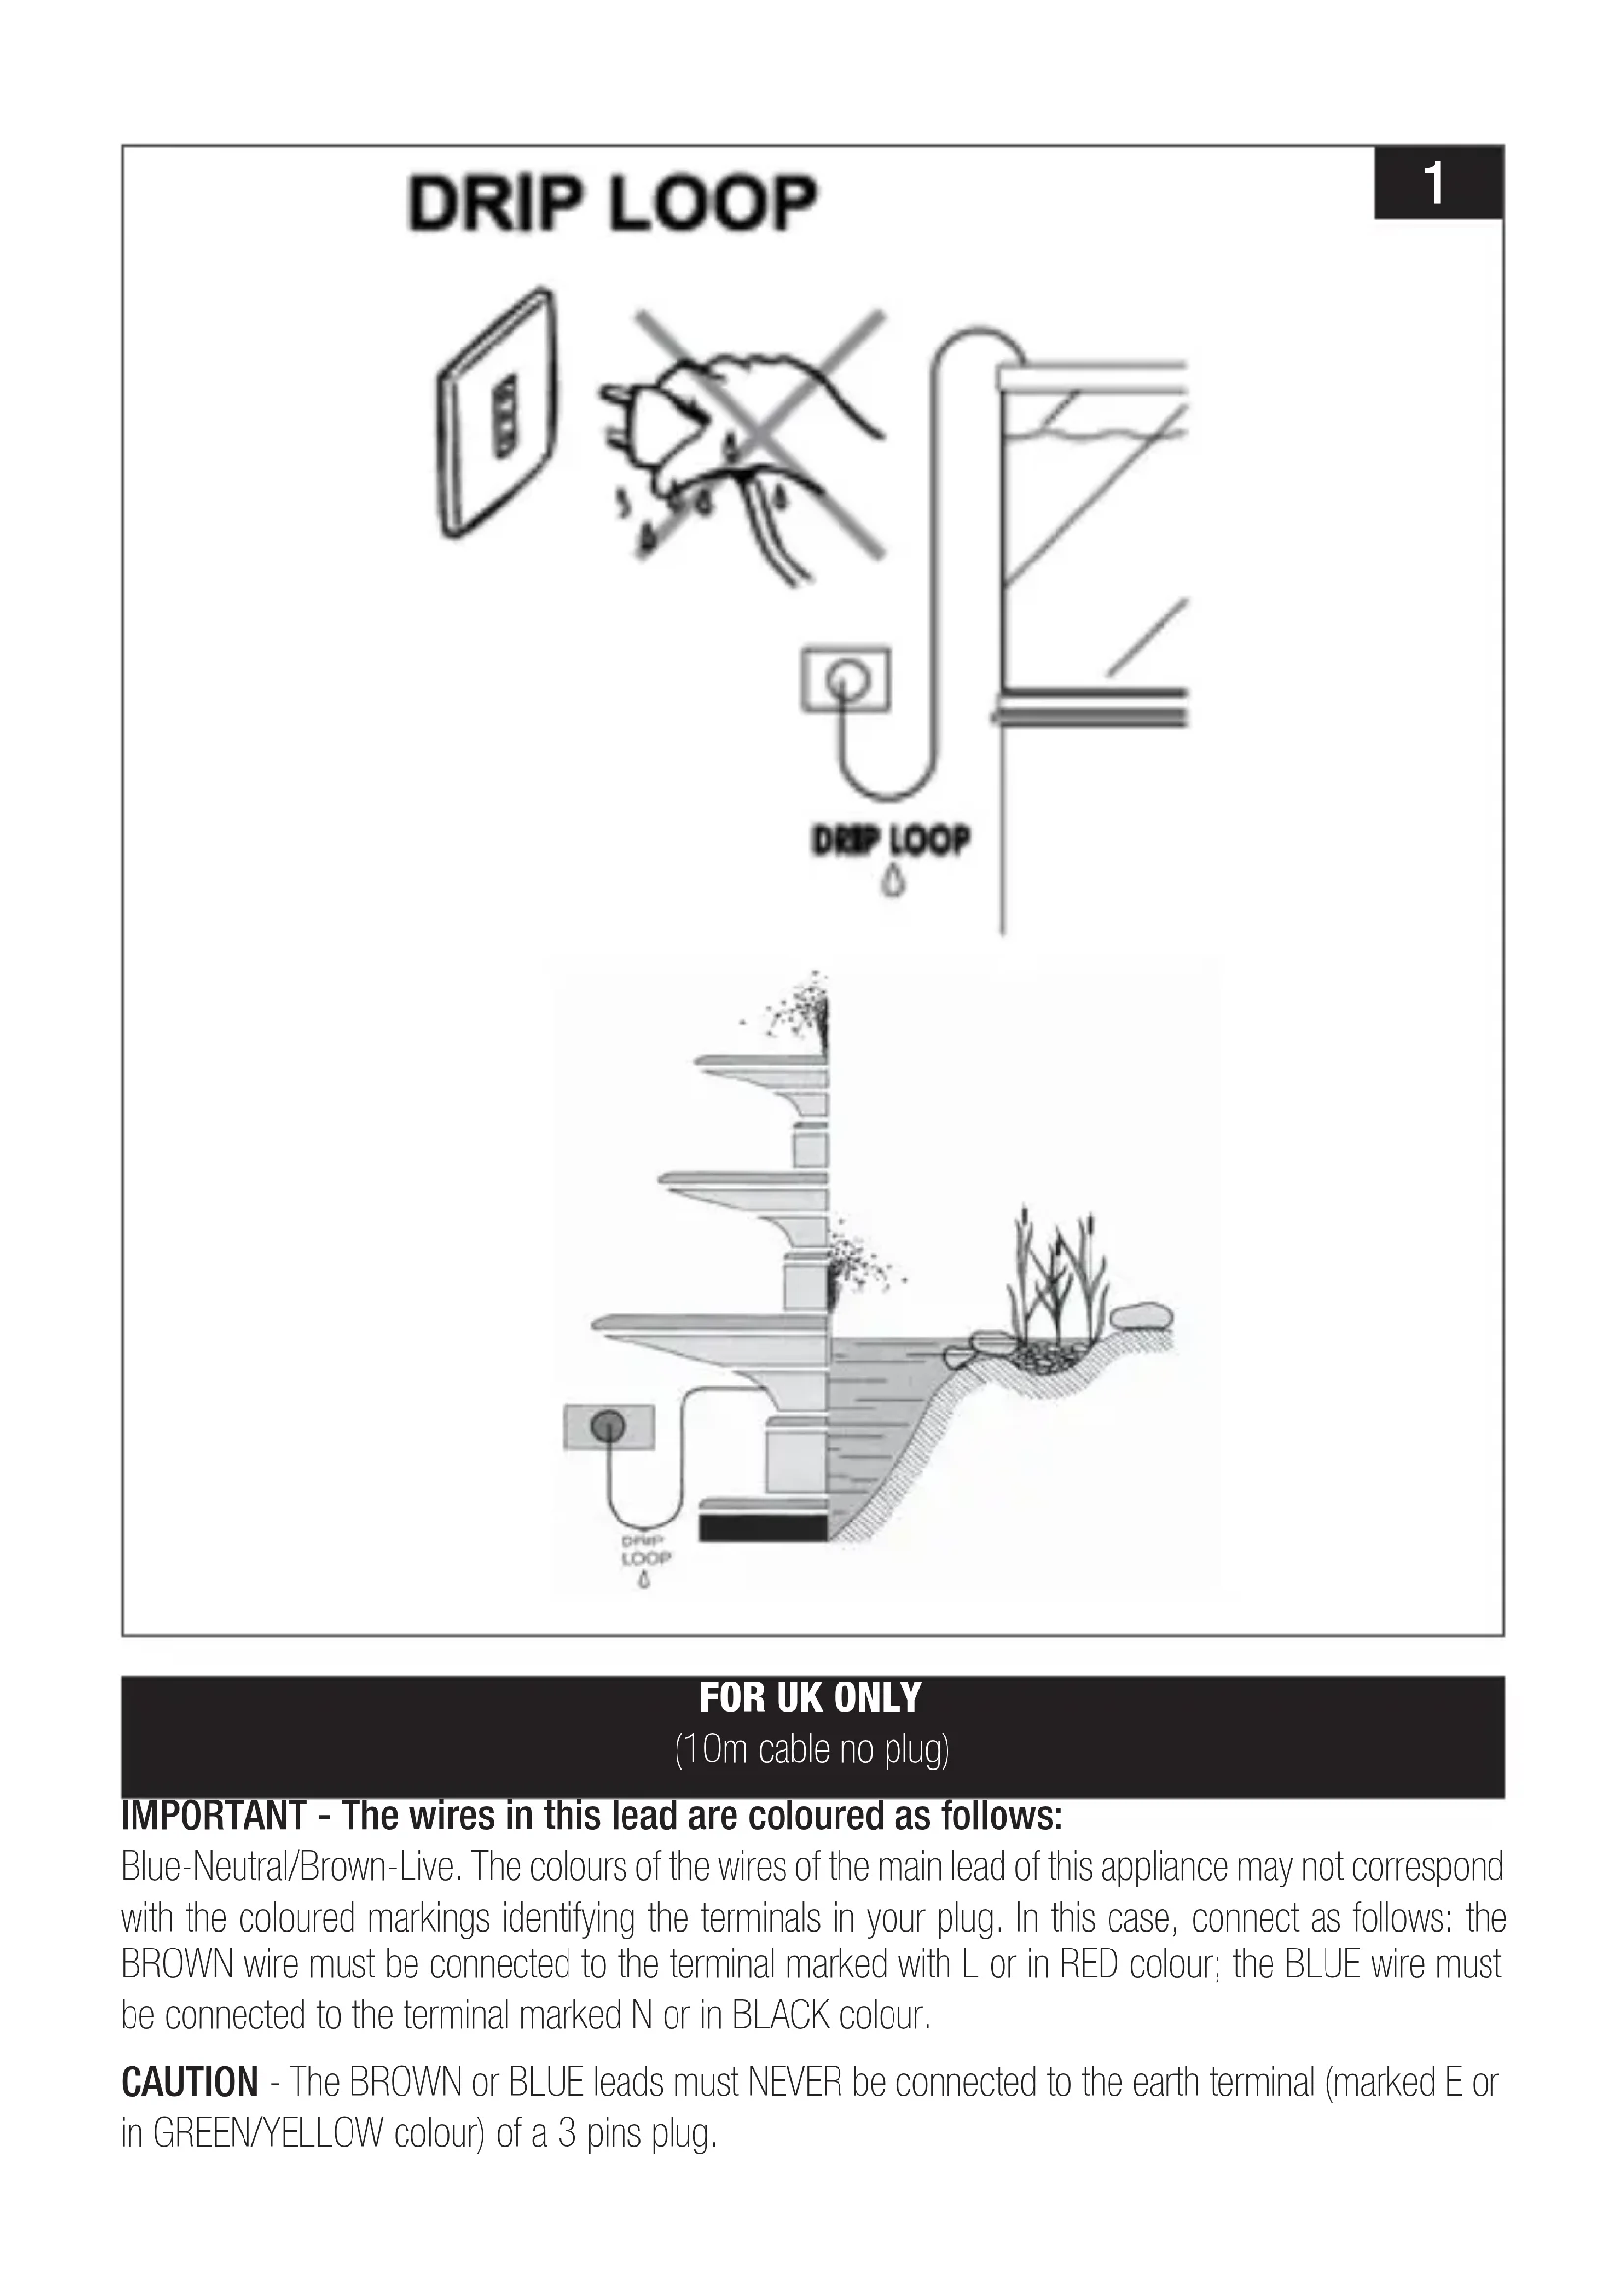
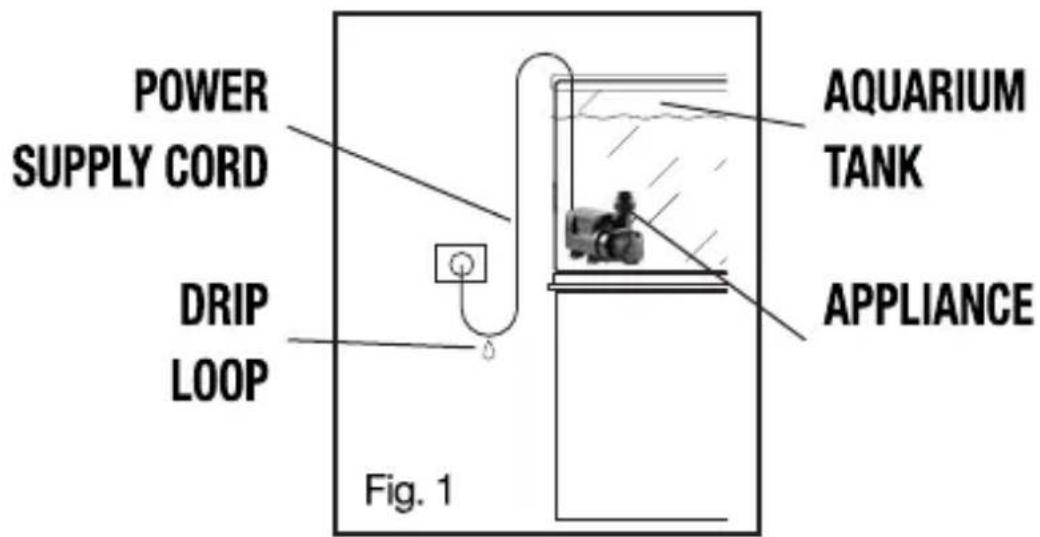
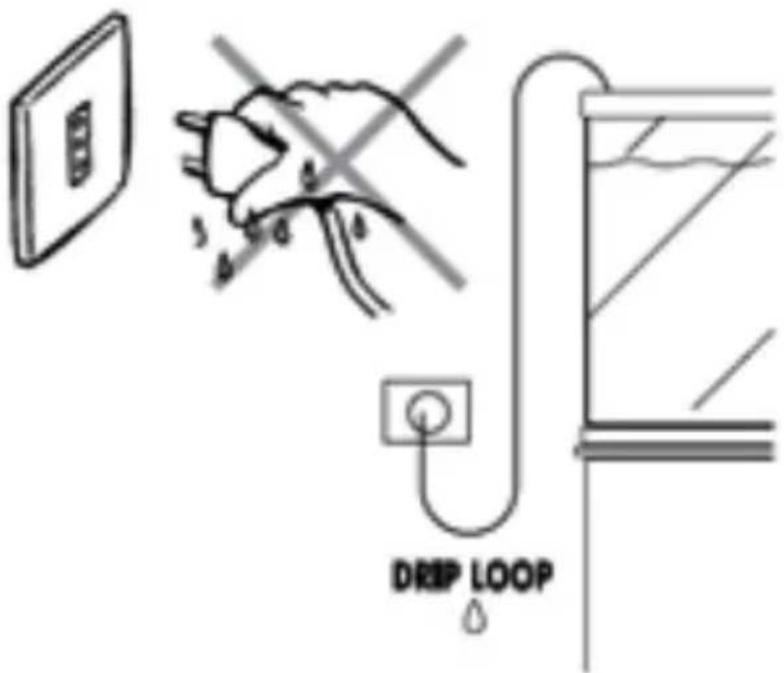
A "drip-loop" (fig. 1) should be arranged by the user for each cord connecting an aquarium appliance to a receptacle. The "drip-loop" is the part of the cord below the level of the receptacle or the connector if an extension cord is used, which prevents water travelling along the cord and coming in contact with the receptacle.
If the plug or socket does get wet, DON'T unplug the cord. Disconnect the fuse or circuit breaker that supplies power to appliance. Then unplug and examine for presence of water in the receptacle.
5) Close supervision is necessary when any appliance is used by near children.
6) To avoid injury, do not contact moving parts or hot parts such as heaters, reflectors, lamp bulbs and similar.
7) Always unplug an appliance from an outlet when not in use, before putting on or taking off parts and before cleaning. Never yank cord to pull plug from outlet.
Grasp the plug and pull to disconnect.
8) Do not use an appliance for other than intended use. The use of attachments, not recommended or sold by the manufacturer of the appliance, may cause an unsafe condition.
9) Do not install or store the appliances where it will be exposed to the weather or to temperatures below freezing.
10) Make sure an appliance mounted on a tank is securely installed before operating it.
11) Read and observe all the important notices of the appliance.
12) If an extension cord is necessary, a cord with a proper rating should be used. A cord rated for less amperes or watts than the appliance rating may overheat. Care should be taken to arrange the cord so that it will not be tripped over or pulled.
13) This appliance has a polarized plug (one blade is wider than other). As a safety feature, this plug will fit in a polarized outlet only one way. If the plug does not fit fully in the outlet, reverse the plug. If it still does not fit, contact a qualified electrician. Never use with an extension cord unless plug can be fully inserted. Do no attempt to defeat this safety feature.
WARNING: To reduce the risk of electric shock, use only on portable self-contained fountains no larger than 5 feet in any dimension.
CAUTION: The appliance is to be connected to a circuit that is protected by a Ground Fault Circuit Interrupter.
SAVE THESE INSTRUCTIONS
text_image
POWER SUPPLY CORD DRIP LOOP Fig. 1 AQUARIUM TANK APPLIANCECONSIGNES DE SÉCURITÉ IMPORTANTES
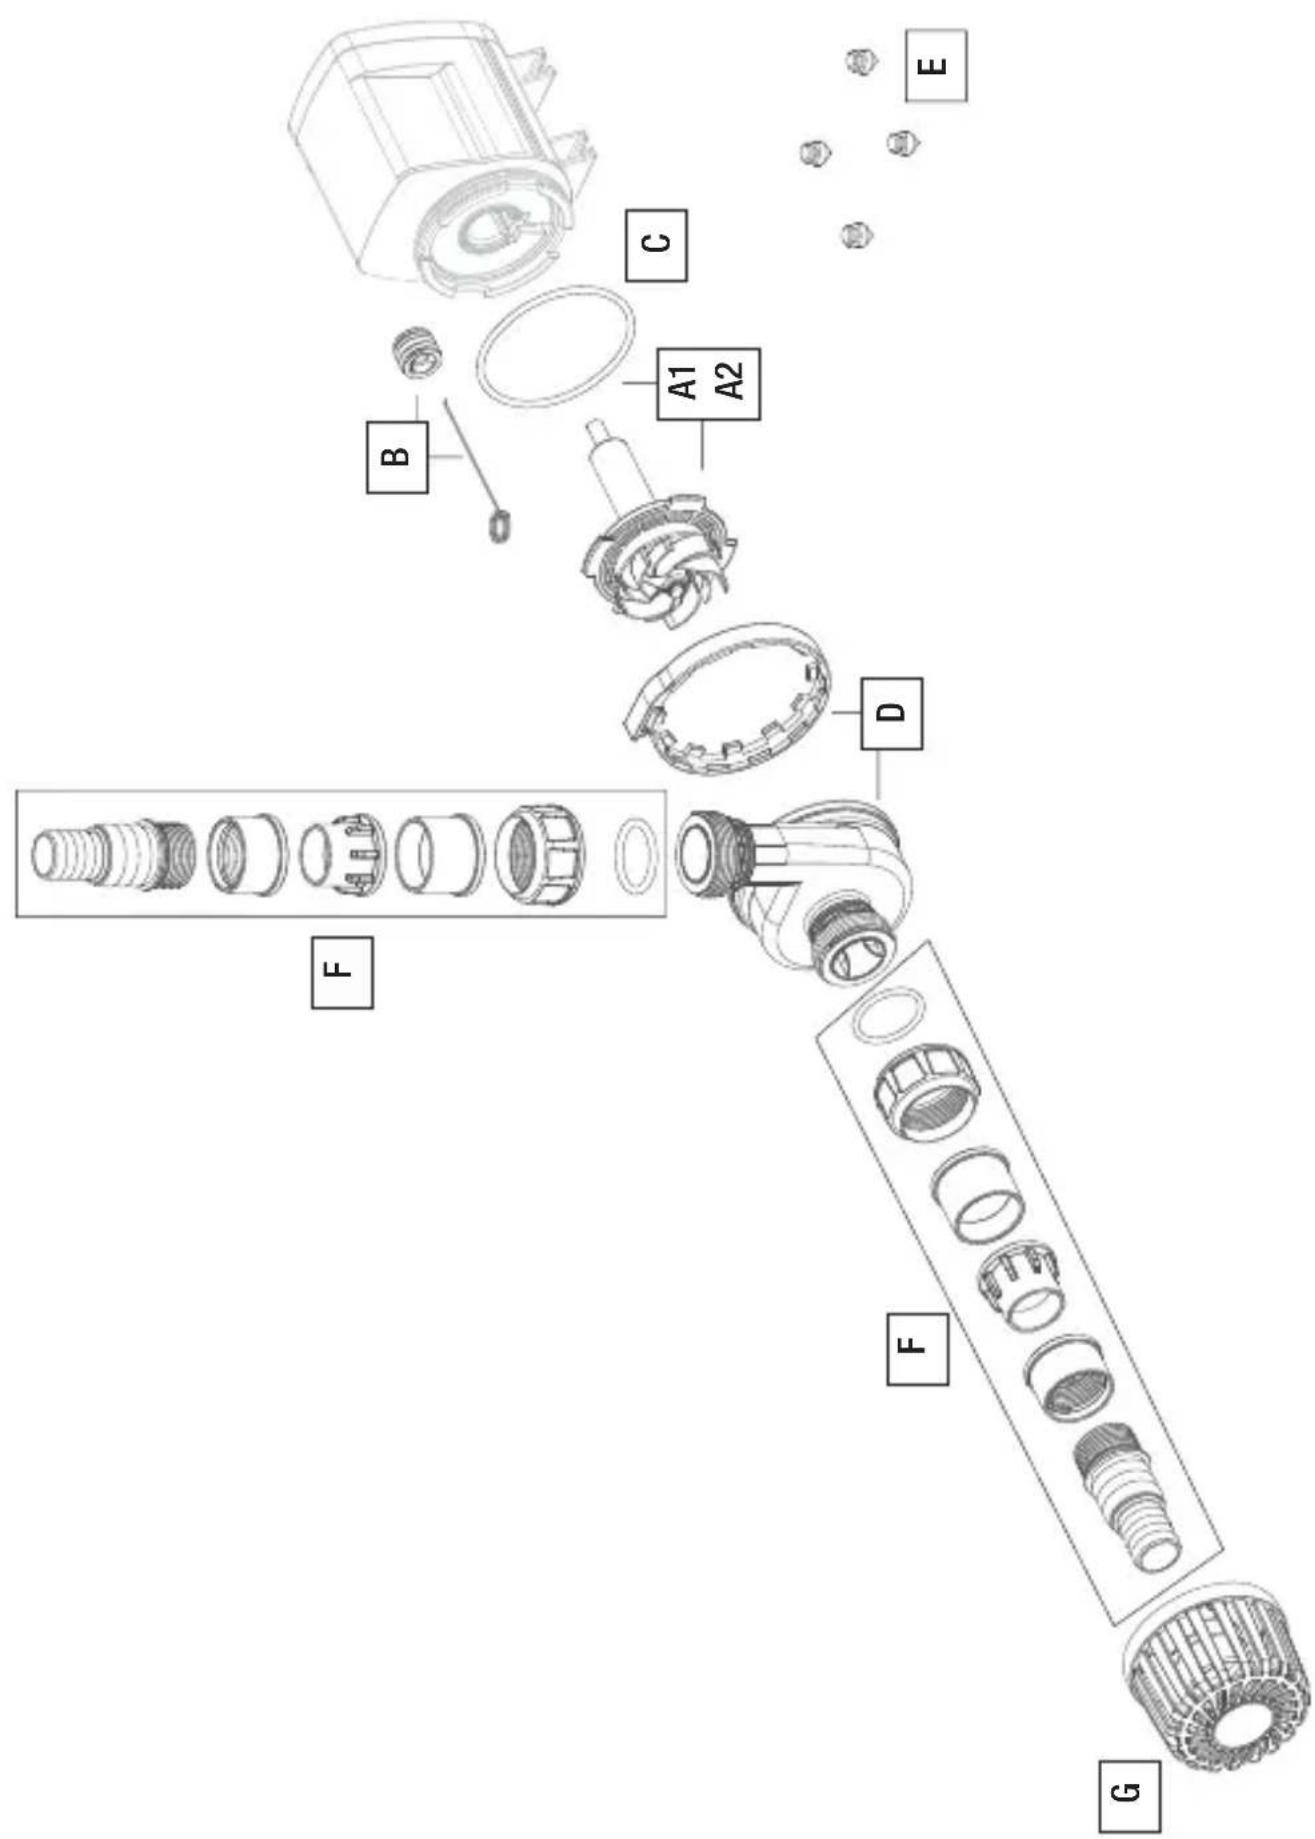
| SPARE PARTS | 5.5 | 7.0 | 9.0 | 10.0 | ||
| Rotor + ceramic shaft + O-ring | A1 | 220 - 240 V · 50 Hz | SGR0222 | SGR0223 | SGR0217 | |
| A2 | 110 - 120 V · 60 Hz | SGR0219 | SGR0223 | |||
| Bottom bearing + hook | B | SVE0054 | SVE0052 | |||
| O-ring for prechamber and rotor | C | SVE0055 | SVE0053 | |||
| Prechamber with closing ring | D | SPL0097 | SPL0095 | |||
| Anti-vibration silicon feet | E | SVE0033(4 pcs.) | ||||
| Hose fittings for rigid and flexible pipes | F | STR0029 | ||||
| Protective grid | G | SPL0094 | ||||
text_image
Exploded view diagram of a mechanical assembly with labeled parts A1, A2, B, C, D, E, F, G
text_image
Exploded view diagram of a mechanical assembly with numbered parts for identificationB
natural_image
Technical line drawing of a mechanical device with no visible text or symbols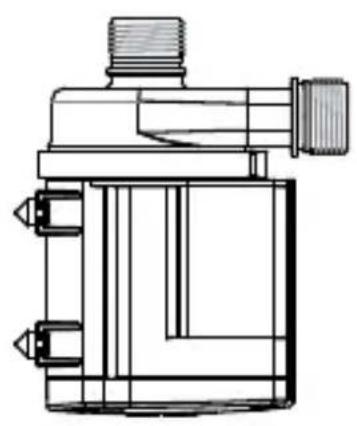
natural_image
Technical line drawing of a mechanical component with threaded ports and housing (no text or symbols)
natural_image
Technical line drawing of a mechanical pump or motor with a circular head and central hub (no text or symbols)
natural_image
Technical line drawing of a mechanical component with threaded ports and internal structure (no text or symbols)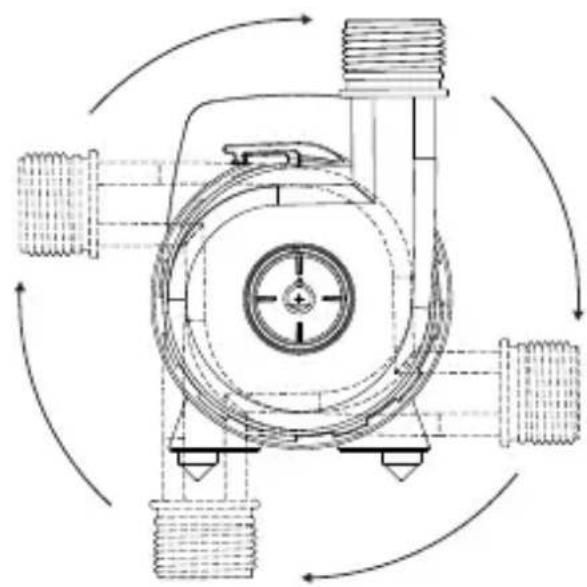
natural_image
Technical diagram of a mechanical pump or valve assembly with four ports and directional arrows indicating flow or rotation (no text or labels present)C
text_image
D ✓ X
text_image
IN LINE E
text_image
Technical diagram showing a mechanical component with labeled parts and cross-sectional view X, marked with letter F.
text_image
Technical diagram showing two mechanical or electrical component configurations with labeled ports X and ✓, likely for assembly or maintenance.H
text_image
Technical diagram showing mechanical assembly with labeled components and checkmark indicatorsI
natural_image
Technical line drawing of a mechanical device with an inset showing a component being turned, no text or symbols present.
natural_image
Technical line drawing of a mechanical pump assembly with internal components and a circular component (no text or symbols)
text_image
O-RING 1 O-RING 2 K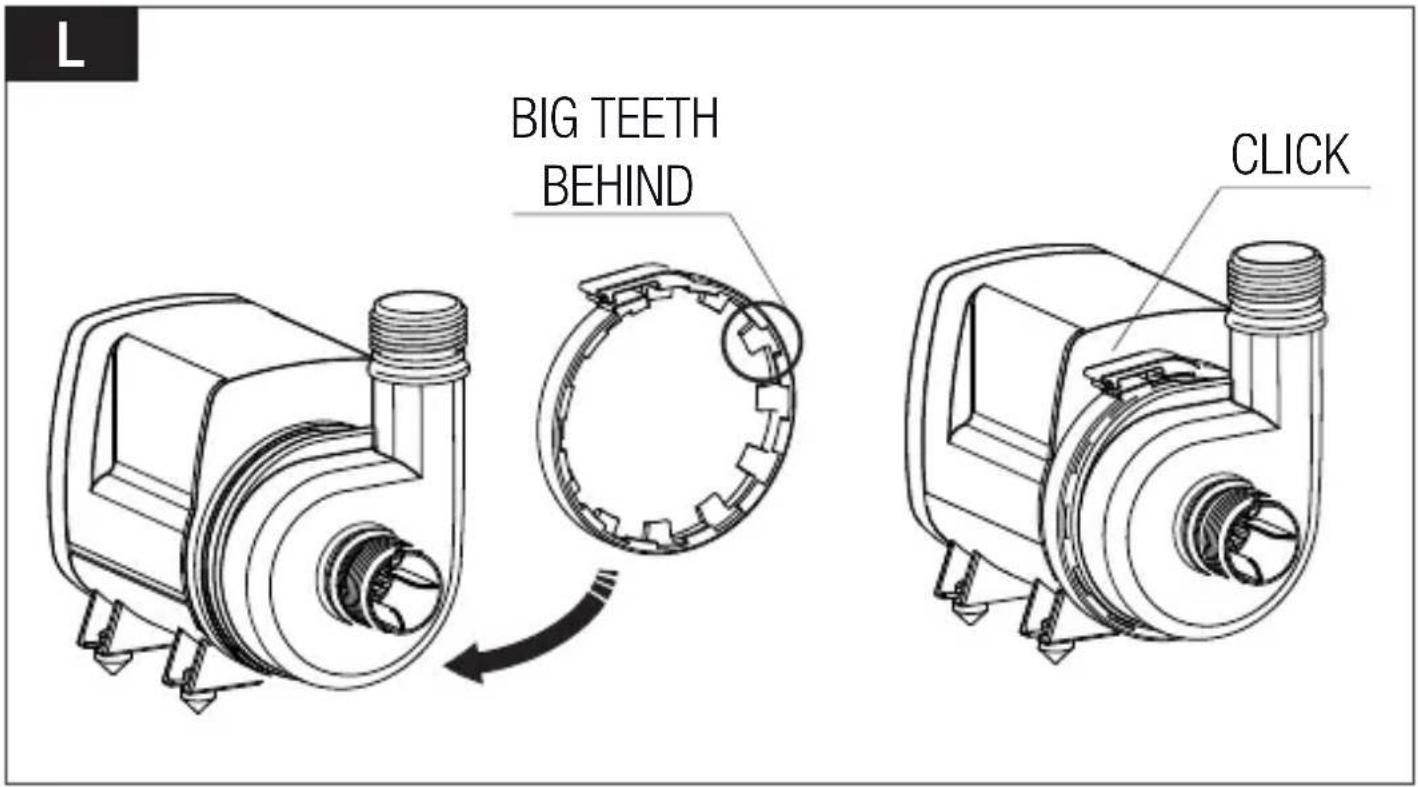
text_image
L BIG TEETH BEHIND CLICK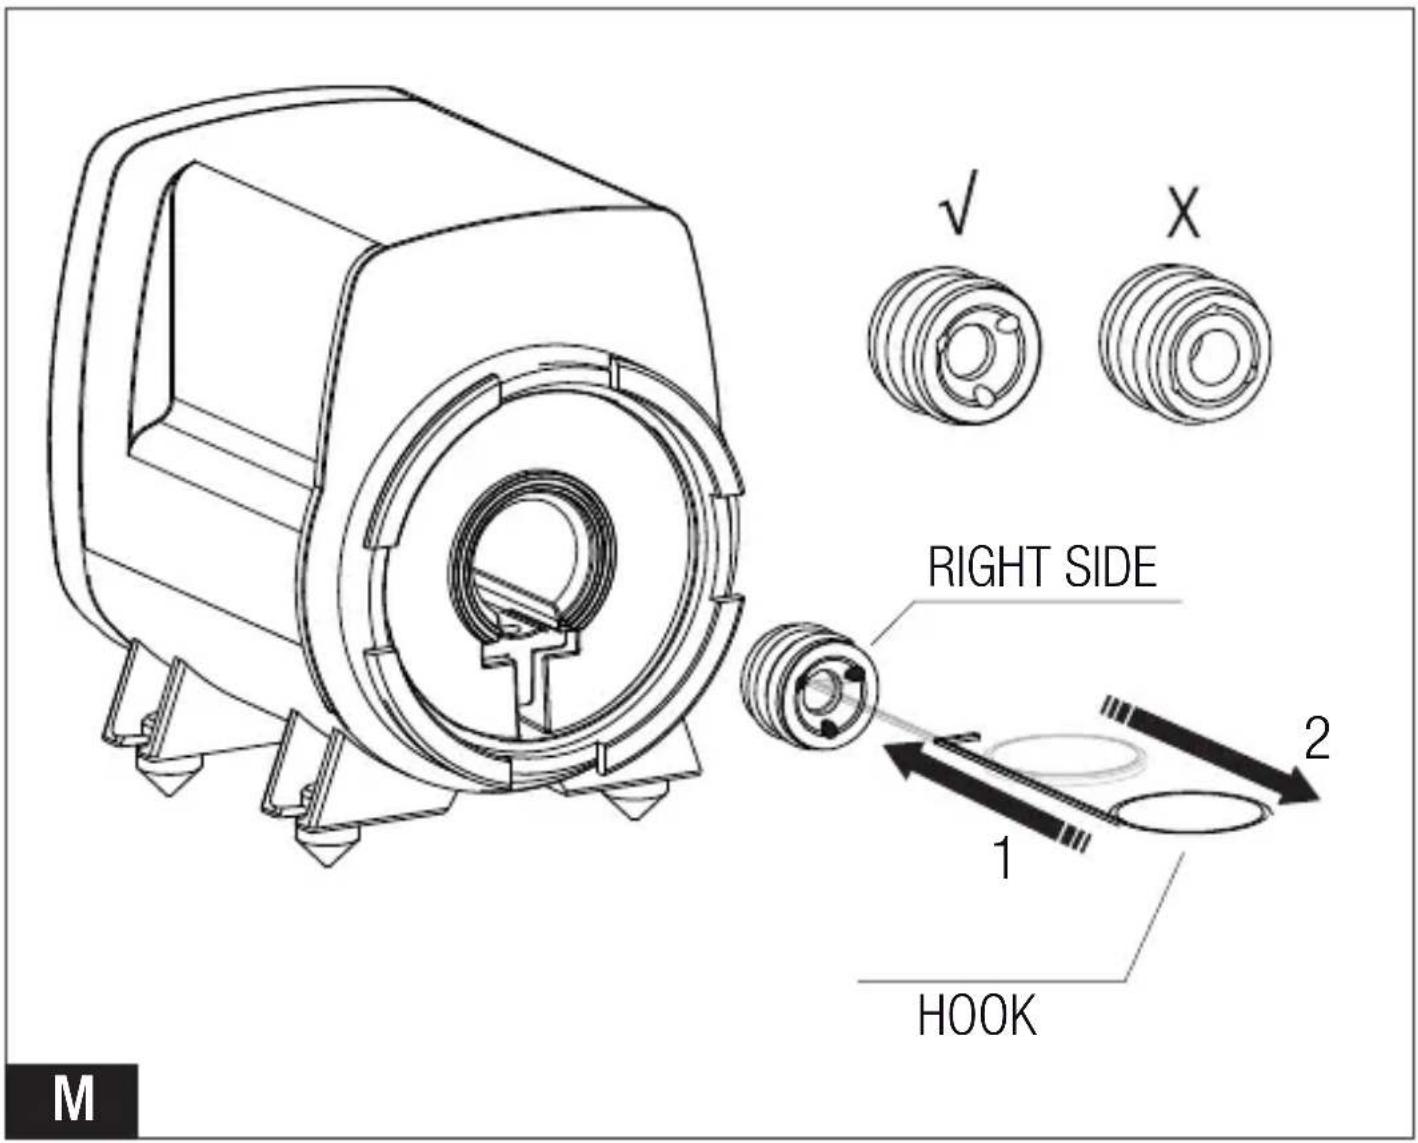
text_image
RIGHT SIDE 1 2 HOOK MDRIP LOOP
text_image
DRIP LOOP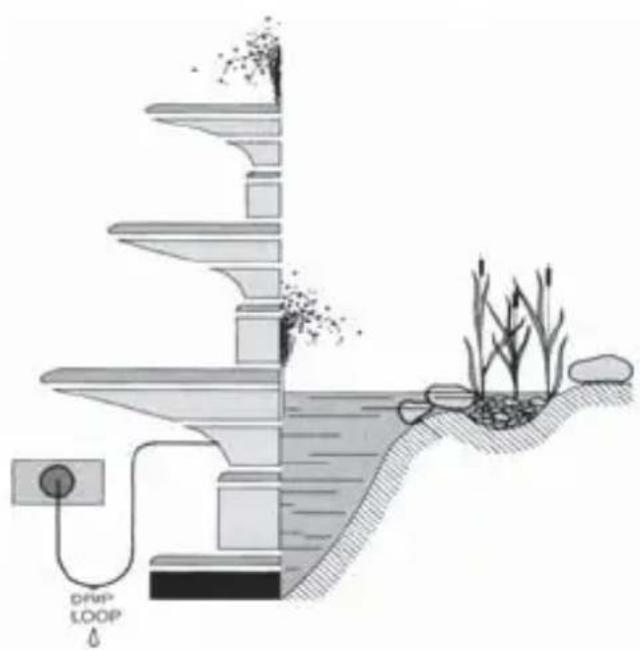
natural_image
Diagram of a water treatment system with a drop loop and reeds, showing layered structures and a power outlet (no text or symbols)FOR UK ONLY
(10m cable no plug)
IMPORTANT - The wires in this lead are coloured as follows:
Blue-Neutral/Brown-Live. The colours of the wires of the main lead of this appliance may not correspond with the coloured markings identifying the terminals in your plug. In this case, connect as follows: the BROWN wire must be connected to the terminal marked with L or in RED colour; the BLUE wire must be connected to the terminal marked N or in BLACK colour.
CAUTION - The BROWN or BLUE leads must NEVER be connected to the earth terminal (marked E or in GREEN/YELLOW colour) of a 3 pins plug.
EN
IT
DE
FR
ES
NL
PT
RU
CN
Dear valued Customer, thank you for choosing SYNCRA ADV. This new generation of Syncra Silent pumps are highly efficient products that have been developed and manufactured in Italy to meet the most stringent quality and performance requirements. SYNCRA ADV are ideal to be used in marine and fresh water aquariums, decorative fountains, protein skimmers, and water-cooling systems. SYNCRA ADV can be used fully submersed or for inline (external) applications. The pumps have a turning pre-chamber, which makes them easy to use for many applications in tight spaces. The unique closing ring allows the pumps to be maintained easily and without screws or tools. Please, read carefully and save the following instructions for best practices and use of the SYNCRA ADV pump.
SAFETY INSTRUCTIONS
SYNCRA ADV is made in conformity with the national and international security laws. 1) Always isolate the pump from the main electricity before installing or carrying out any maintenance. 2) The pump can work submerged or inline out of water. 3) Before connecting the pump to the electricity supply, check there are any damages on cord or plug. 4) The pump has a type Z cable link. The cable and the plug cannot be substituted or repaired; in case of damage replace the entire pump.
5) ATTENTION: do not operate any appliance if it has a damaged cord or plug, if it is malfunctioning, or if it has been dropped or damaged in any way. 6) The pump must not work without water to avoid damages to the motor. 7) The pump can be used in liquids or in environment with a temperature not higher than 35^ C / 95^ F. 8) Do not use the pump for uses different to those for which it has been projected as, i.e. in bathroom or similar applications. 9) Avoid using the pump with corrosive and abrasive liquids. 10) The pump cannot be used by people with handicaps or by children if they are not supervised by a person responsible for their safety. 11) To avoid that accidental drips wet the plug or the socket, make a loop with the cord under the socket level (Pic. 1). 12) Avoid to take the pump by the cord during the installation or maintenance. 13) The pump can be used only in the above mentioned applications and it is only for internal use (3 meters long cable). 14) If the pump or the filter is supplied with a cable 10 meters long, or more than 6 feet long for the American type (USA), these appliances are intended for outdoor use as required by international standards.
COMPONENTS
SYNCRA ADV pumps are designed favoring the almost total dismantling of their components, to facilitate proper use and maintenance and ensure a long life. Below is the list of the individual parts and spare parts (Pic. A):
[1] Motor body completely submersible and insulated by epoxy resin
[2] Rotor kit with Impeller and bottom bearing
[3] Bottom bearing
[4] O-ring
[5] Anti-vibration rubber feet
[6] Turning pre-chamber
[7] Pre-filter grid
[8] 1" threaded hose fittings
PUMP INSTALLATION: USE AND REGULATION
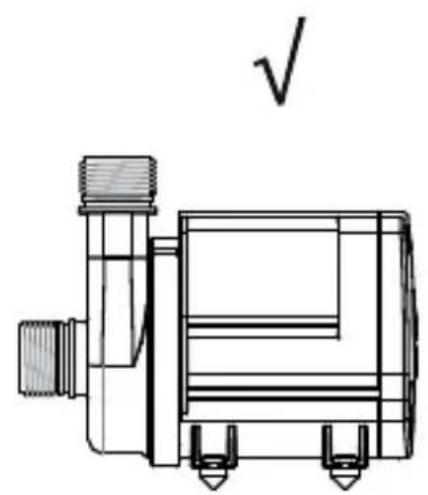
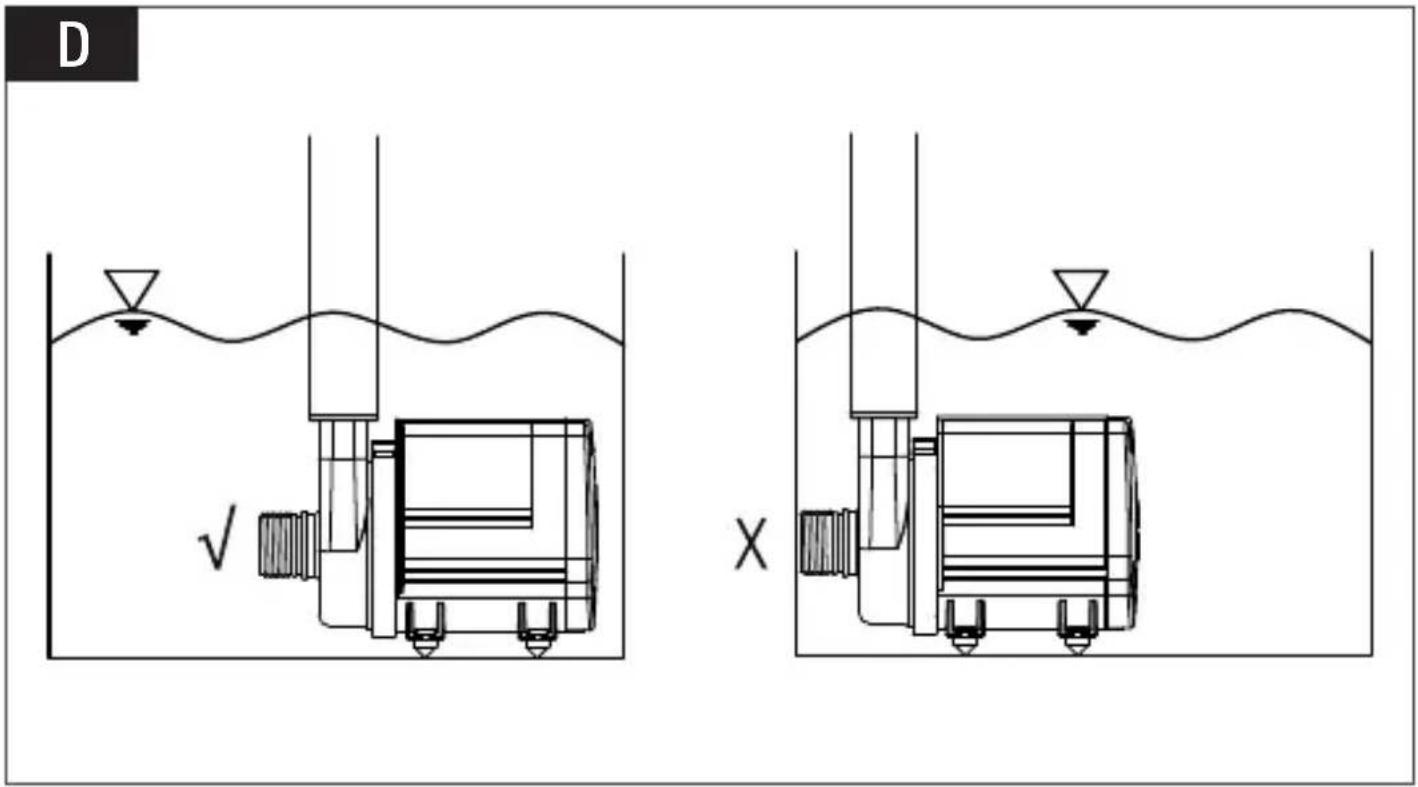
Proceed as follows to install the pump: 1) Connect the joint to the pump outtake to which you can connect the hose with the appropriate diameter. 2) Place the pump in an area of the pond, easily accessible for the maintenance operations. 3) If the pump is used submersed and not in line, it must be always fully submersed. (Pic. D)
IN LINE APPLICATIONS
It is recommended to place the pump in spaces where there is a proper ventilation and the pump is not directly exposed to heat sources. Place the pump so as to prevent too long idraulic pipings, which would reduce its performance. Do not position the pump above the water level (Pic. E) because it is not self-priming and the risk of the pump to run dry. The risk of invisible air bubbles creating a vacuum area is very high. Damages which are caused by the pump running dry are excluded from warranty. To maximize the pump's efficiency, choose a straight inlet tube without elbows (Pic. F). We suggest an Inlet and outlet tubes with diameter equal or bigger than the diameter of the threaded pipe included (Pic. G). Do not use the pump leaving the outlet totally closed. A minimum water flow is necessary to keep the inner motor cool without running dry (Pic. H).
MAINTENANCE
For the periodic maintenance of the pump, unplug the pump from the electric socket and then remove the pump from water. 1) Lift the plastic ring of the pump's volute pulling the tab outwards (Pic. I). 2) Remove the ring (Pic. J). 3) Remove the volute of the pump by turning and simultaneously pulling forward (in the case of fouling this may take more pressure). 4) Pull out the complete rotor set (Pic. K). 5) Rinse each part with water, using a soft brush to remove the deposit. 6) Then assemble everything in the inverse order. 7) Put the ring in place with the biggest teeth facing the pump and close it by pressing on the tab until you hear a "click". (Pic. L). Any damage to the o-rings, even small, can seriously endanger the pump performance. In this case, it is best to replace them. IMPORTANT: The build-in circuit board of the pump has been programmed to provide 3 levels of protection: Protection against rotor's blockage: In case of malfunction which causes the lock of the rotor (due to excessive dirt or other) or of operating without water, the pump, after 20 attempts to start, followed by a short interval of time, and other 20 attempts will stop automatically. If this does not happen, the pump will automatically go on standby, the electronic board will remain powered but the engine will shut down. In this case to restart the pump you need to remove and re-insert the plug into the power outlet. Dry running protection and thermal protection: motor's protection in case of functioning without water. The pump stops when it works without water, or if there is a locked rotor. When the pump is taken out from the water, the motor stops. ATTENTION: do not underestimate the power of the magnet. If you slightly loose the grip and the axis hits the rear bearing, the risk to damage the bearing is very high. A damage axis and bearing causes high reparation costs.
EN
SPECIAL MAINTENANCE AND REPLACING GROUP ROTOR
Follow this instruction for an accurate rotor kit cleaning or replacing. Repeat the opening actions as indicate in Maintenance section, steps 1, 2, 3, 4. To easily remove the bottom bearing, we suggest to leave the pump submersed with water and vinegar for a while to soften debris or limestone. - Insert the hooks supplied inside the tube of the pump (Pic. M). Hook the bearing and pull it out. Clean the bearing under running water (never use soap or detergent of any kind because they pollute the aquarium water: we recommend using a vinegar and water solution) possibly using a soft brush to remove scale deposits. If it is heavily worn, we suggest to replace it with a new one. Re-insert the bearing sleeve in the pump (Pic. M) after wetting and push it all the way.
IT
DE
FR
ES
ONLINE HELP
Watch our tutorial videos on THE SICCE YOU TUBE official channel www.youtube.com/user/SICCEspa
NL
PT
RU
CN
INSTRUCTIONS FOR THE CORRECT DISCHARGE OF THE PRODUCT ACCORDING TO EU DIRECTIVE 2002/96/EC
When used or broken, the product does not have to be discharged with the other waste. It can be delivered to the specific electric waste collection centers or to dealers who give this service. Discharge separately an electric tool avoid negative consequences for the environment and for the health and allows to regenerate the materials so to have a great saving of energy and resources.
PRODUCT REGISTRATION
By registering the product online in the “register the product” section on the website www.sicce.com, and filling in the required data, you will activate the “special online warranty” on the group rotor for 6 months from the date of purchase, cash register receipt will validate the registration. In case of no registration, the warranty will be managed as follows.
WARRANTY
This product is guaranteed against defects of materials and workmanship for a period of 3 years from the date of purchase, except the rotor kit. The warranty certificate must be filled in by the dealer and must accompany the pump if it is returned for repair, along with the cash register receipt or similar document. The warranty covers the replacement of the defective parts. In case of improper use, tampering or negligence by the buyer or user, the guarantee is void and expires immediately. The guarantee is also void in absence of the cash register receipt or similar document. The shipping cost to and from the factory, or the repair station, have to be paid by the buyer. FIND OUT HOW TO GET YOUR PRODUCT GUARANTEED FOR 5 YEARS: to improve our service and our clients' satisfaction, SICCE offers the possibility of adding a 2 years extension to the warranty by simply
registering your product on our website www.sicce.com in “Sicce for you/Product registration”. Fill-in the form and upload the product’s purchase receipt. After having correctly inserted all your data, complete the warranty extension request.
ATTENTION!
The limestone deposits and the natural wear-out of the components might cause a raise of the pump's noise. However, they do not affect the good functioning of the pump. In this case, we recommend you to replace the impeller.
Do not use corrosive chemicals to clean and wash the pumps. 5 hours or more of immersion of the pump in water and vinegar are sufficient to remove the calcareous deposits without compromising the quality and operation of the pump.
TIPS FOR A LONGER LASTING
In case, after a first installation, the pump will not be used for over one week, we recommend to take the rotor assembly out of the pump, cleaning it throughly and store pump and rotor separately.
EN
IT
DE
FR
ES
NL
PT
RU
CN
SICCE AUSTRALIA Pty Ltd
info@sicce.com.au • www.sicce.com.au