
Mari Tour - Stroller Lionelo - Free user manual and instructions
Find the device manual for free Mari Tour Lionelo in PDF.
| Brand | Lionelo |
| Model | Mari Tour |
| Product type | Modular stroller (3-in-1 with carrycot and car seat adapters) |
| Recommended age (seat) | From 6 months to 4 years |
| Maximum weight supported (seat) | 22 kg |
| Maximum weight supported (carrycot) | 9 kg |
| Basket maximum load | 3 kg |
| Folding | With automatic lock |
| Adjustable handle height | Yes |
| Reclining backrest | Yes |
| Adjustable footrest | Yes |
| Adjustable canopy | Yes |
| Adjustable suspension (hardness) | Yes |
| Swivel wheels with lock | Yes |
| Parking brake | Yes |
| Restraint system | 5-point harness with crotch strap |
| Compatible car seat adapters | Lionelo Astrid, Mari Carrier, Greet Carrier |
| Carrycot included | Yes |
| Seat mounting | Forward-facing or rear-facing |
| Maintenance | Clean with a damp cloth and mild products |
| Recommended spare parts | Use only those supplied or recommended by the manufacturer |
Frequently Asked Questions - Mari Tour Lionelo
User questions about Mari Tour Lionelo
0 question about this device. Answer the ones you know or ask your own.
Ask a new question about this device
Download the instructions for your Stroller in PDF format for free! Find your manual Mari Tour - Lionelo and take your electronic device back in hand. On this page are published all the documents necessary for the use of your device. Mari Tour by Lionelo.
USER MANUAL Mari Tour Lionelo
natural_image
Line drawing of a baby stroller with four wheels and a canopy (no text or symbols)A
natural_image
Simple line drawing of two identical mechanical components with a labeled section '22' (no text or symbols on the components themselves)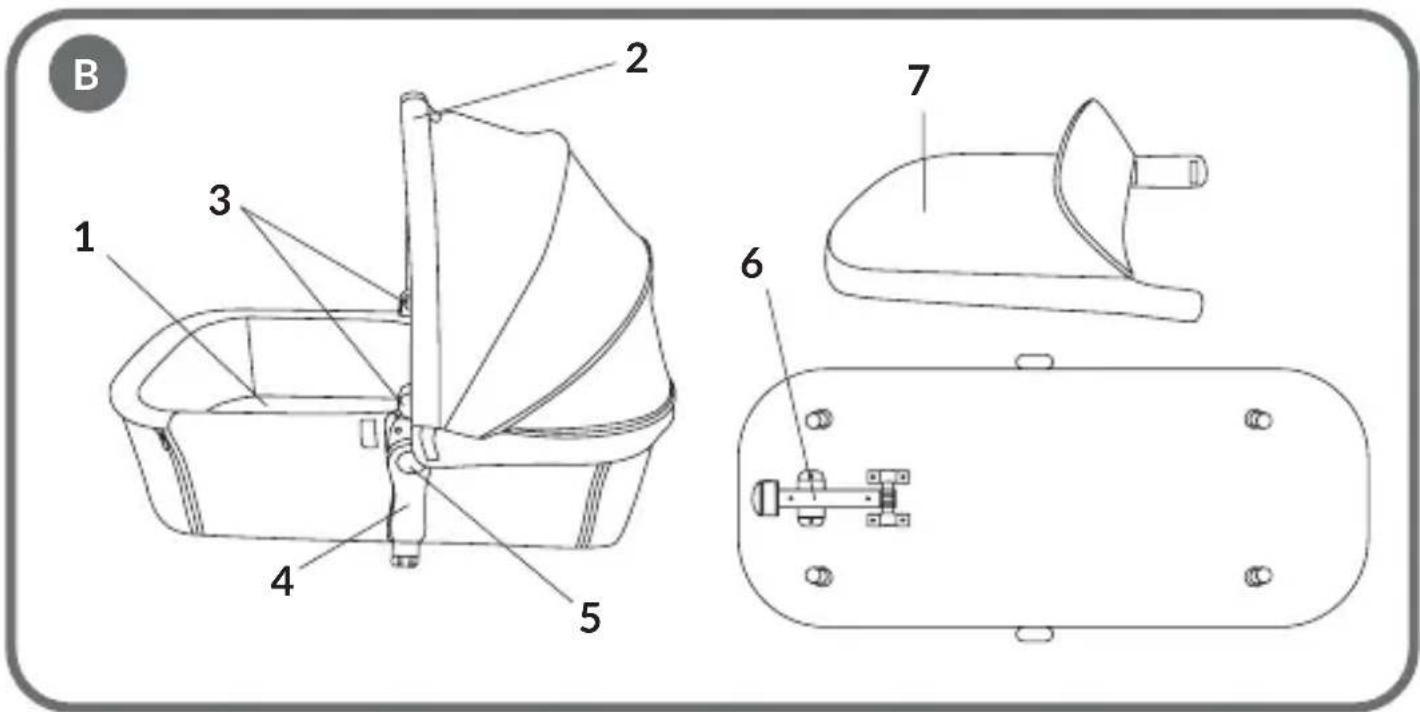
natural_image
Mechanical assembly diagram showing two stages of a lever mechanism (no text or symbols present)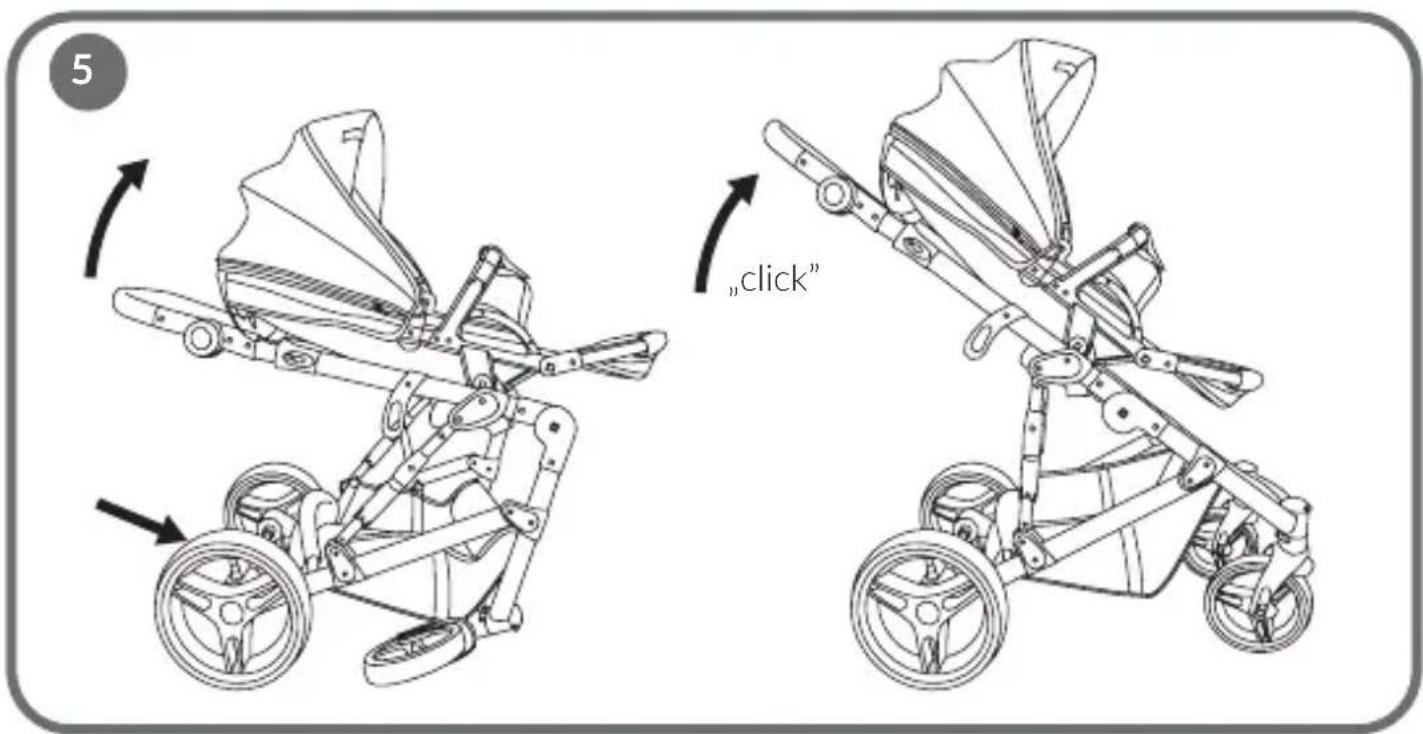
natural_image
Diagram showing two steps of a cleaning or installation process, with no visible text or symbols.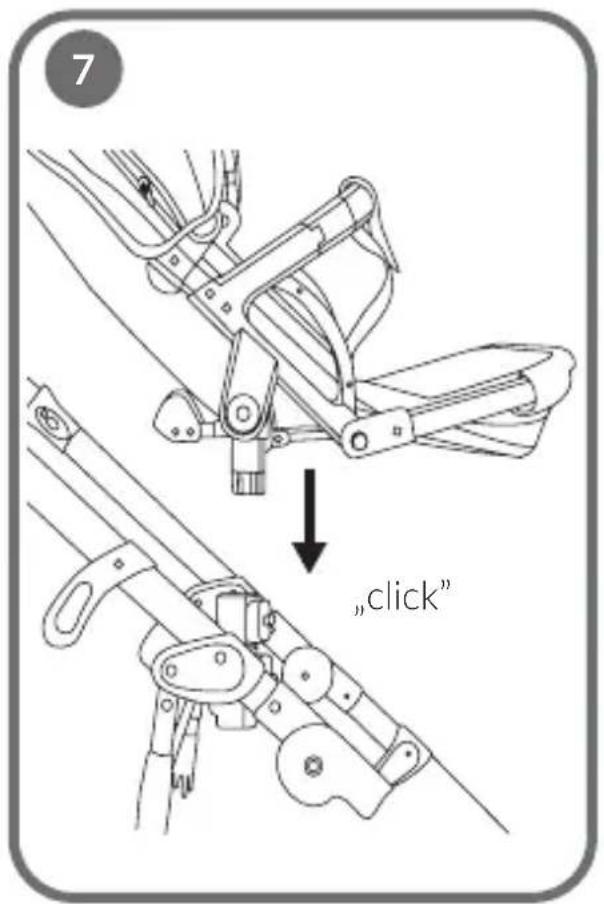
natural_image
Three identical diagrams of a mechanical or electrical component with no visible text, numbers, or symbols.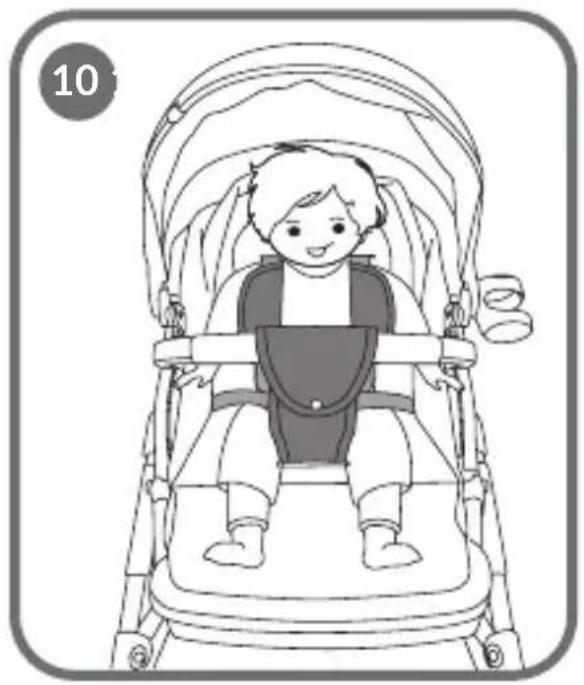
natural_image
Line drawing of a child sitting inside a baby stroller, no text or symbols present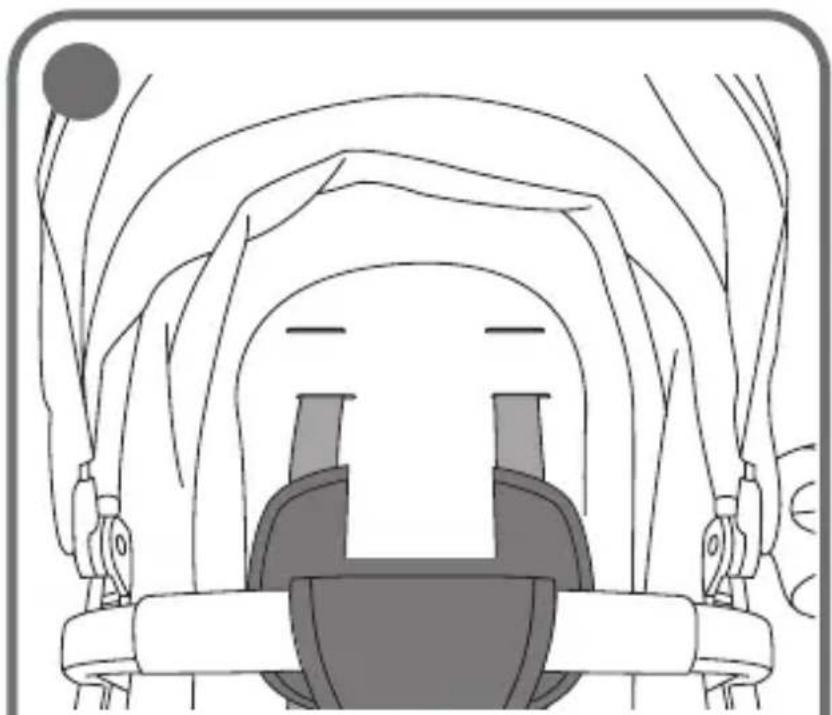
natural_image
Top-down schematic of a vehicle's seat assembly with no text or symbols
natural_image
Line drawing of a hand holding a small object, no text or symbols present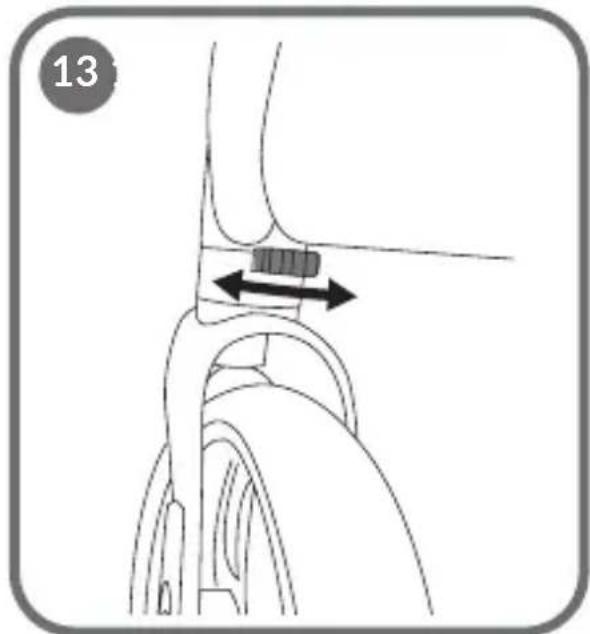
natural_image
Diagram of a mechanical or anatomical structure with directional arrows indicating movement or force (no text or symbols present)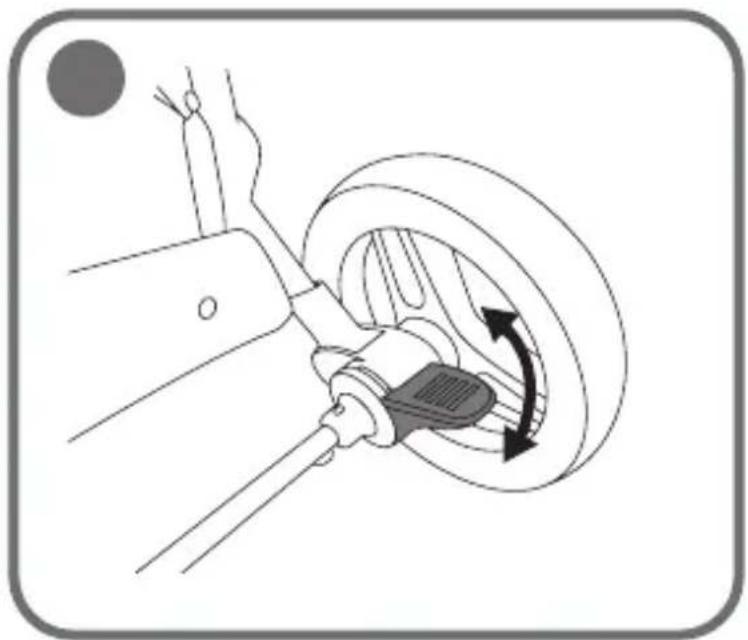
natural_image
Mechanical diagram showing a tool interacting with a car wheel and battery, with no visible text or symbols.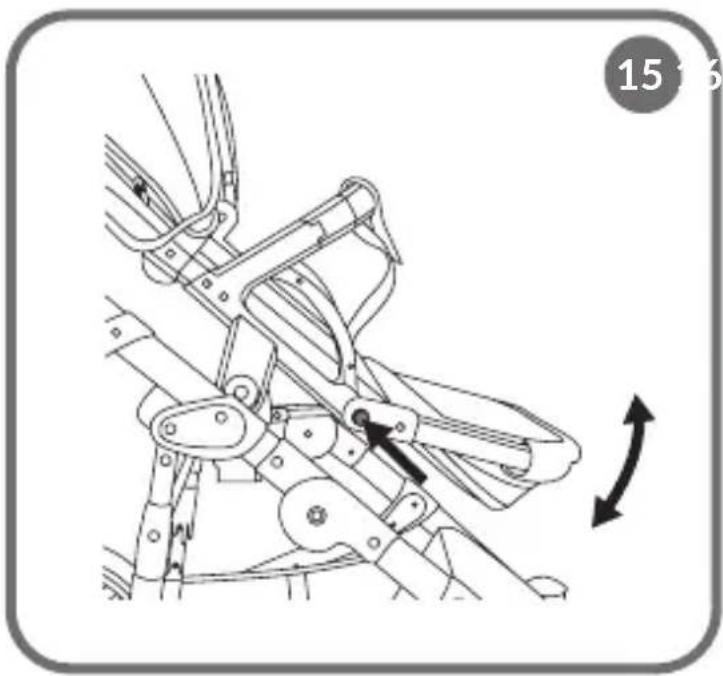
natural_image
Technical line drawing of a mechanical assembly with directional arrows indicating motion (no text or symbols)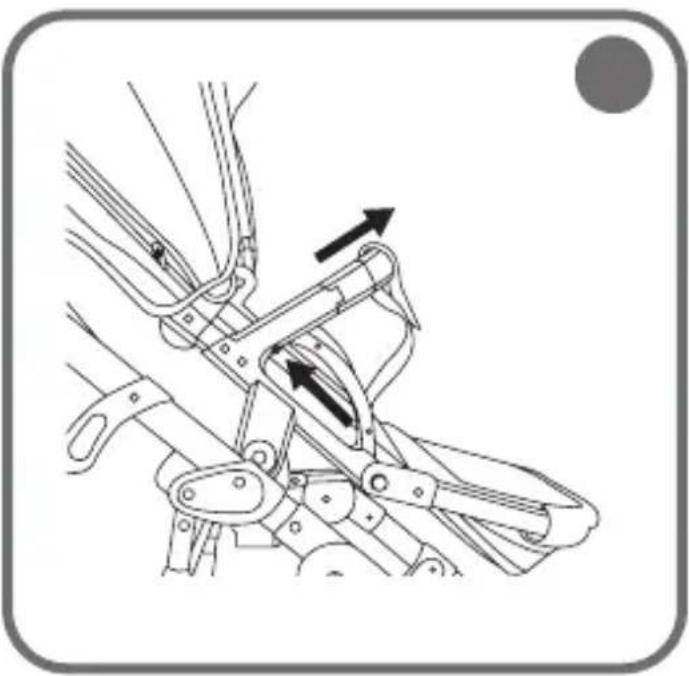
natural_image
Mechanical linkage diagram showing mechanical components and motion arrows (no text or symbols)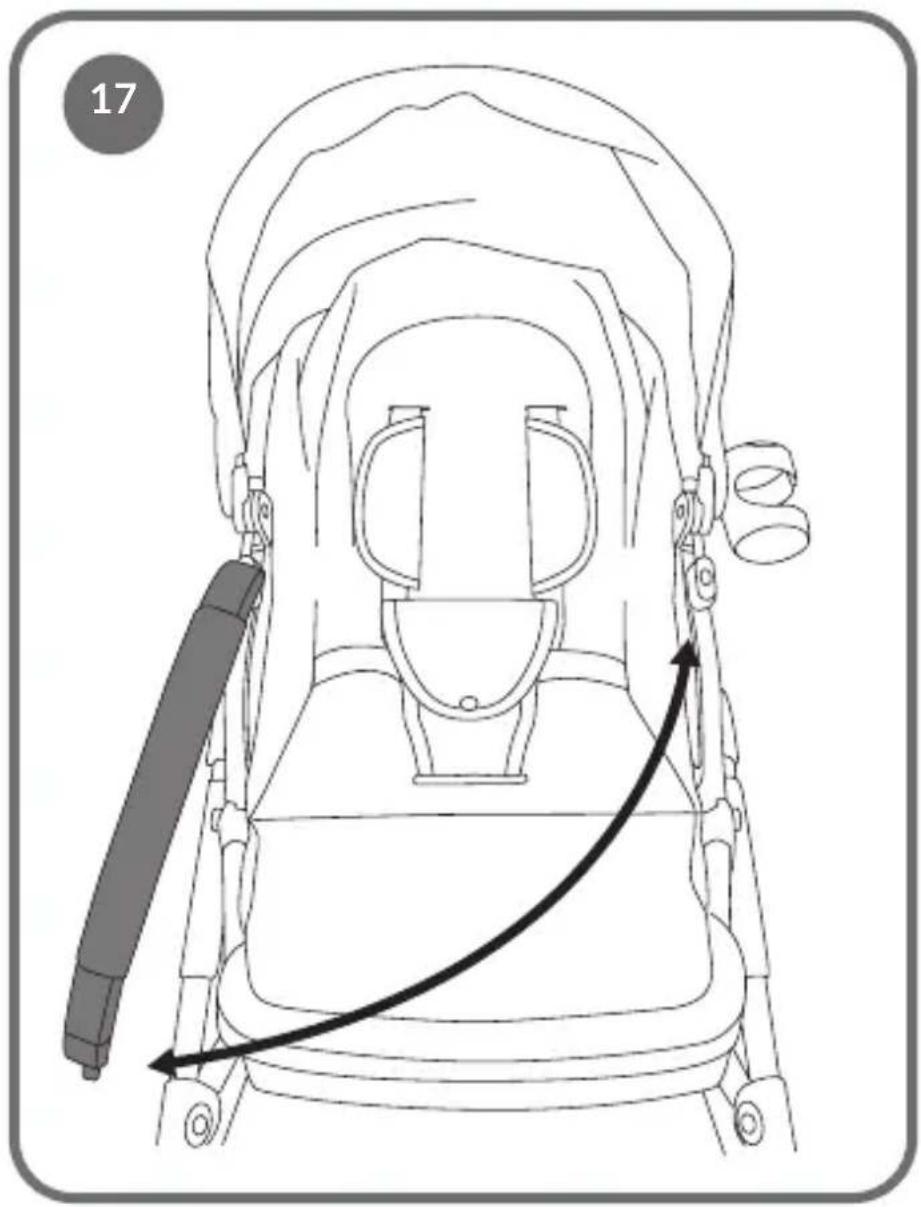

natural_image
Technical line drawing of a two-step bicycle stroller assembly (no text or symbols)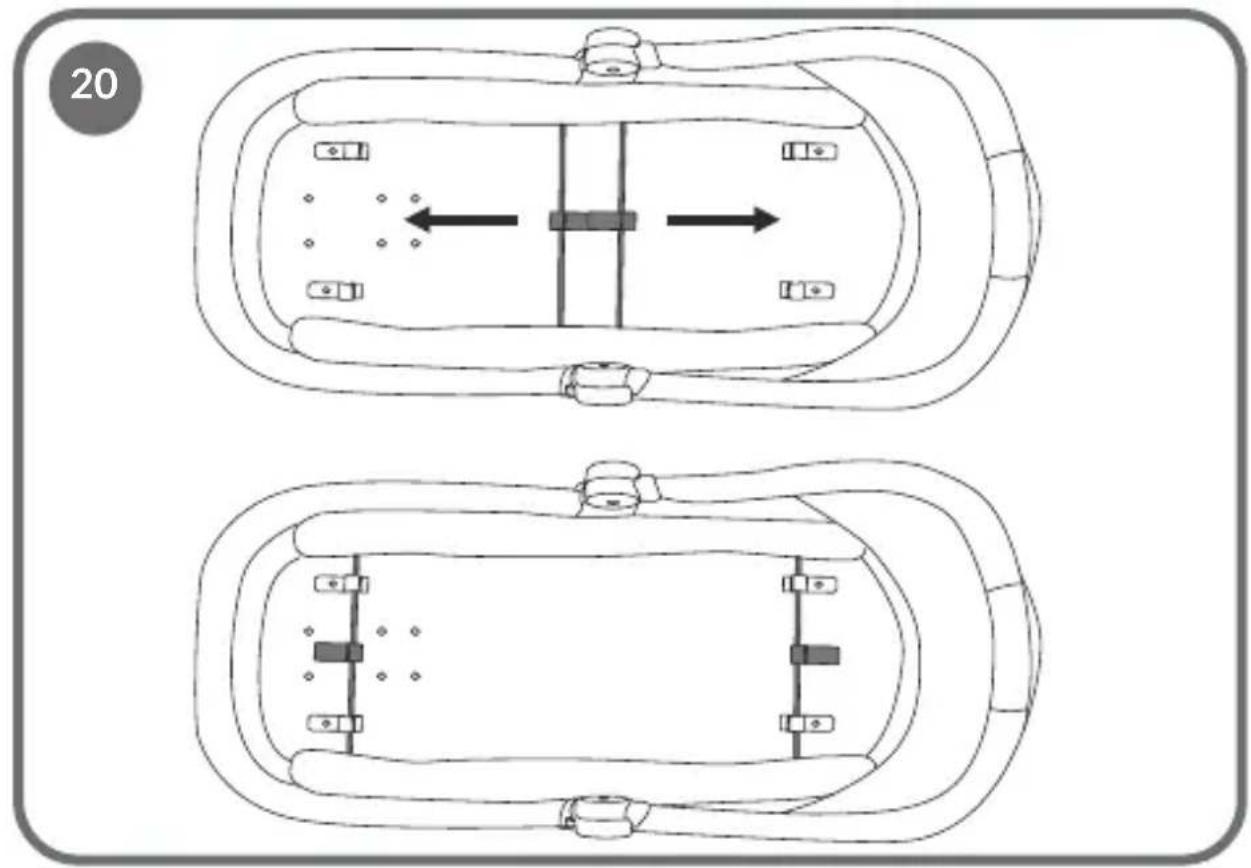
24
natural_image
Line drawing of a baby bottle with a vertical rod inserted, showing internal structure and airflow direction (no text or symbols)25
26
natural_image
Line drawing of a bathtub with a cable inserted, showing internal components and a curved arrow indicating motion (no text or symbols)27
Dear Customer!
Should you have any remarks or questions concerning the product, please do not hesitate to contact us: help@lionelo.com
Producer:
BrandLine Group Sp. z o. o.
IMPORTANT - READ CAREFULLY AND KEEP FOR FUTURE REFERENCE WARNING!
FOR A STROLLER:
- Never leave the child unattended.
- Ensure that all the locking devices are engaged before use.
- To avoid injury ensure that the child is kept away when unfolding and folding this product.
- Do not let the child play with this product.
- This seat unit is not suitable for children under 6 months.
- Always use the restraint system.
- Check that the pram body or seat unit or car seat attachment devices are correctly engaged before use.
- This product is not suitable for running or skating.
- This product is suitable for children aged 6 months to 4 years and up to 22 kg, whichever comes first.
- If you want to take the child out of the stroller, or put it in it, make sure that the parking mechanism on the wheel is locked.
- The maximum load of the basket is 3 kg.
- Any load mounted on the handle, backrest or sides of the stroller may affect its stability.
- The product is intended for use by one child.
-
Do not use accessories not approved by the manufacturer.
-
If you attach a carrier to the set with special adapters, which can also be used as a baby seat, remember that it is not a replacement for a crib. If your baby needs to sleep, put it in the carrycot, crib or bed.
- Use only replacement parts supplied or recommended by the manufacturer.
- Keep the product away from fire and heat sources.
- Do not use the product on stairs.
IMPORTANT — Read the instructions carefully before use and keep for future reference WARNING!
FOR A CARRYCOT:
- This product is only suitable for a child who cannot sit up unaided.
- Only use on a firm, horizontal level and dry surface.
- Do not let other children play unattended near the carry cot.
- Do not use if any part of the carry cot is broken, torn or missing.
- Use only replacement parts supplied or recommended by the manufacturer.
- Keep the product away from fire and heat sources.
- The bottom and handles of the carrycot should be inspected regularly for signs of damage and wear.
- Make sure the handle is installed and locked in the correct position before lifting or moving the carrycot.
- The baby can be carried in the carrycot.
- The baby's head in the carrycot should not be lower than the baby's body.
- Do not put an extra mattress in the carrycot.
- This product is not suitable for a child who can sit up independently, roll over to the other side, and lift itself up on its own hands and knees. Maximum weight of the child: up to 9 kg.
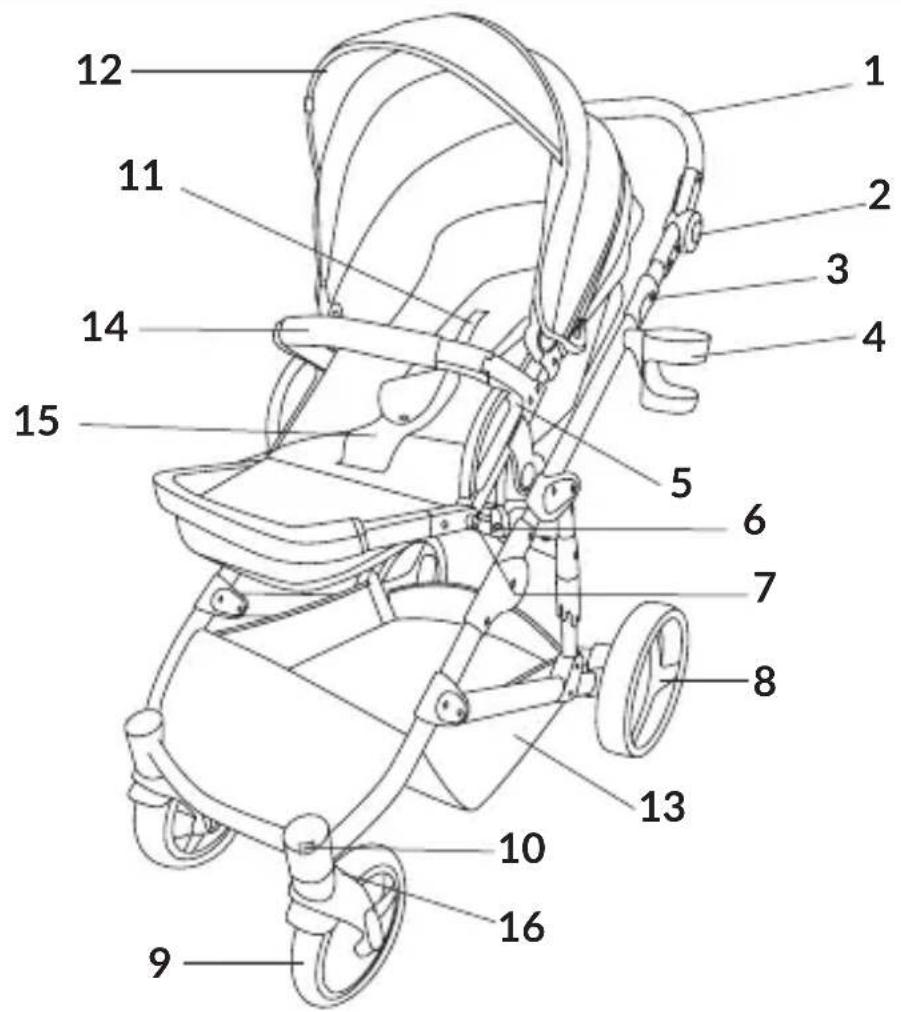
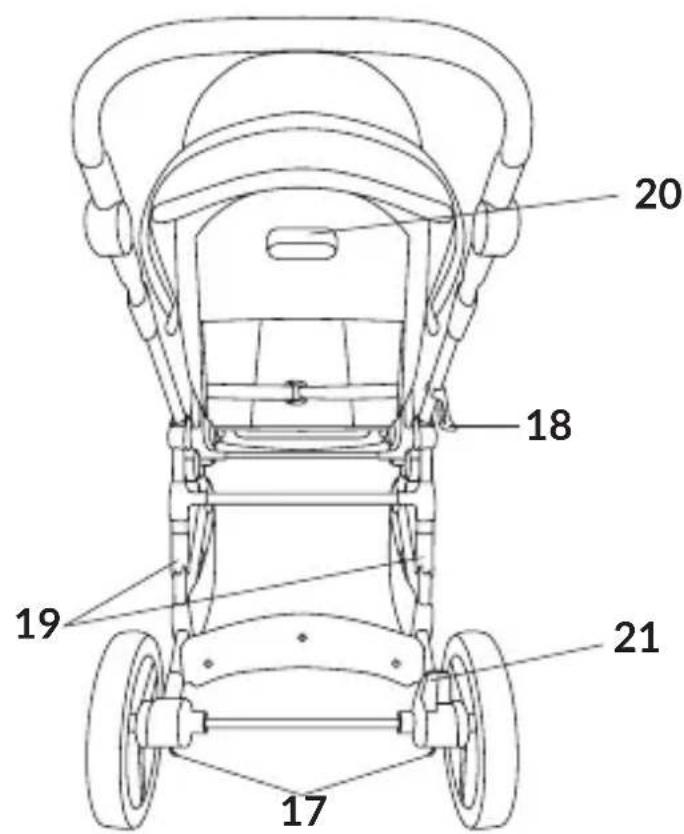
Elements of the stroller (fig. A)
- Handle
- Handle height adjustment button
- Stroller frame folding
- Cup holder
- Headband release button
- Seat / carrycot release button
- Footrest adjustment button
- Rear wheels
- Front wheels
- Removal of the front wheels
- Harness
-
Canopy
-
Basket
- Headband
- Additional crotch strap
- Wheel rotation lock
- Removal of the rear wheels
- Folding lock
- Suspension hardness adjustment knobs
- Seat angle adjustment lever
- Locking mechanism
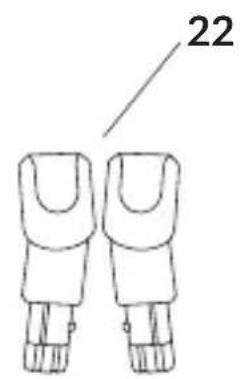
- Seat adapters
Elements of the carrycot (fig. B)
- Mattress
- Handle
- Canopy adjustment
-
Carrycot connector
-
Button adjusting the connector
- Carrycot support
- Carrycot cover
Stroller and carrycot functions
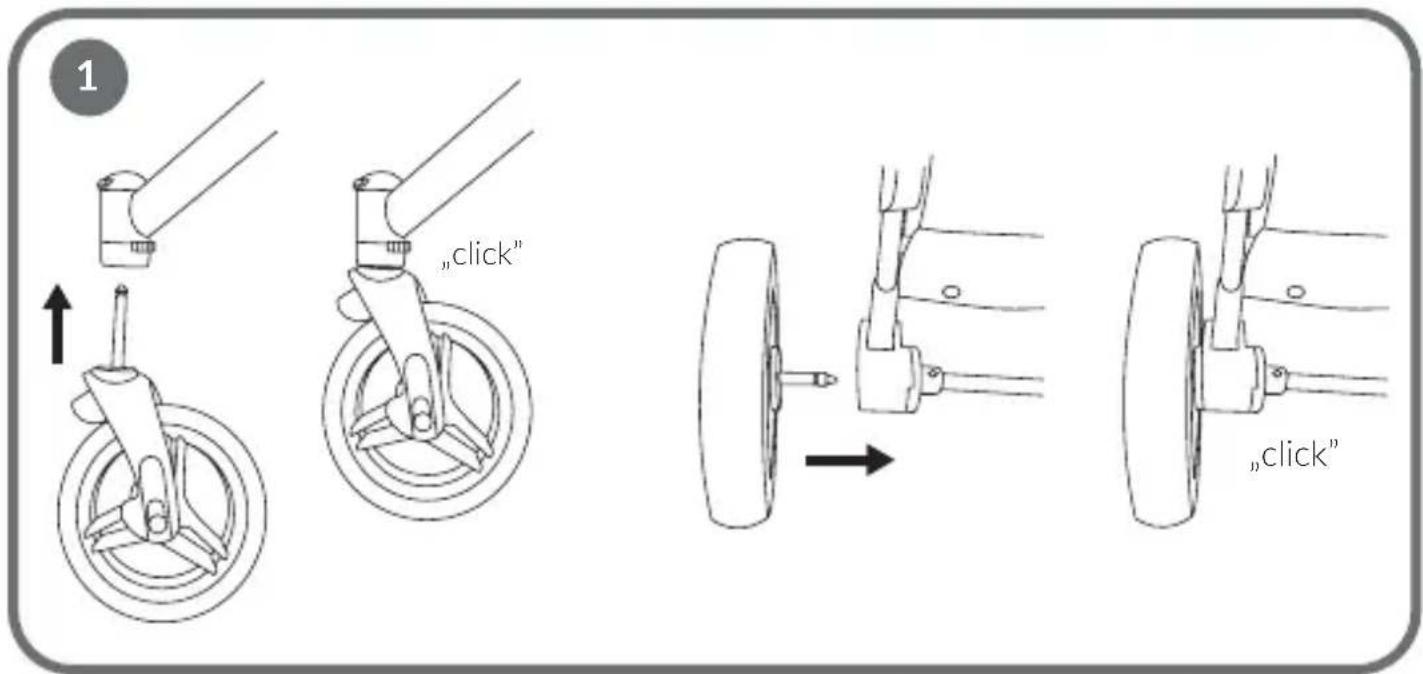
Wheel installation:
Insert the metal wheel stem into the appropriate place on the stroller frame. Press down on the wheel until you hear a click (fig. 1).
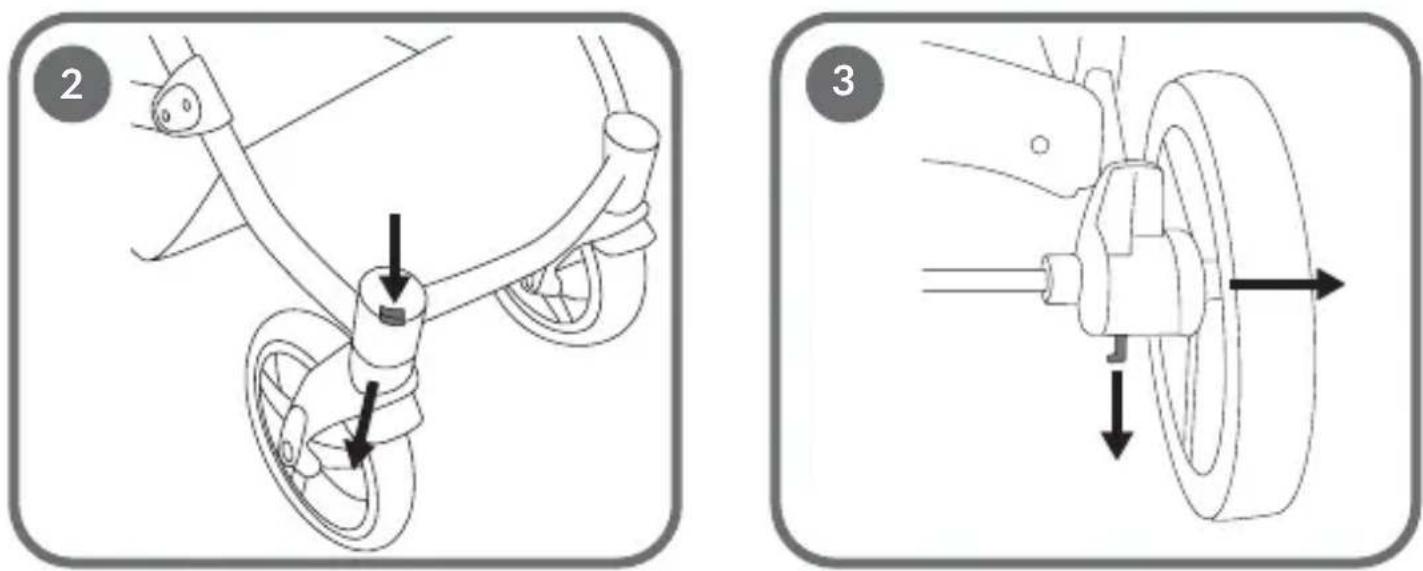
Wheel removal:
A. Front (fig. 2)
Press the button just above the wheel and slide it out.
B. Rear (fig. 3)
Pull down the lever and slide the wheels out of the frame.
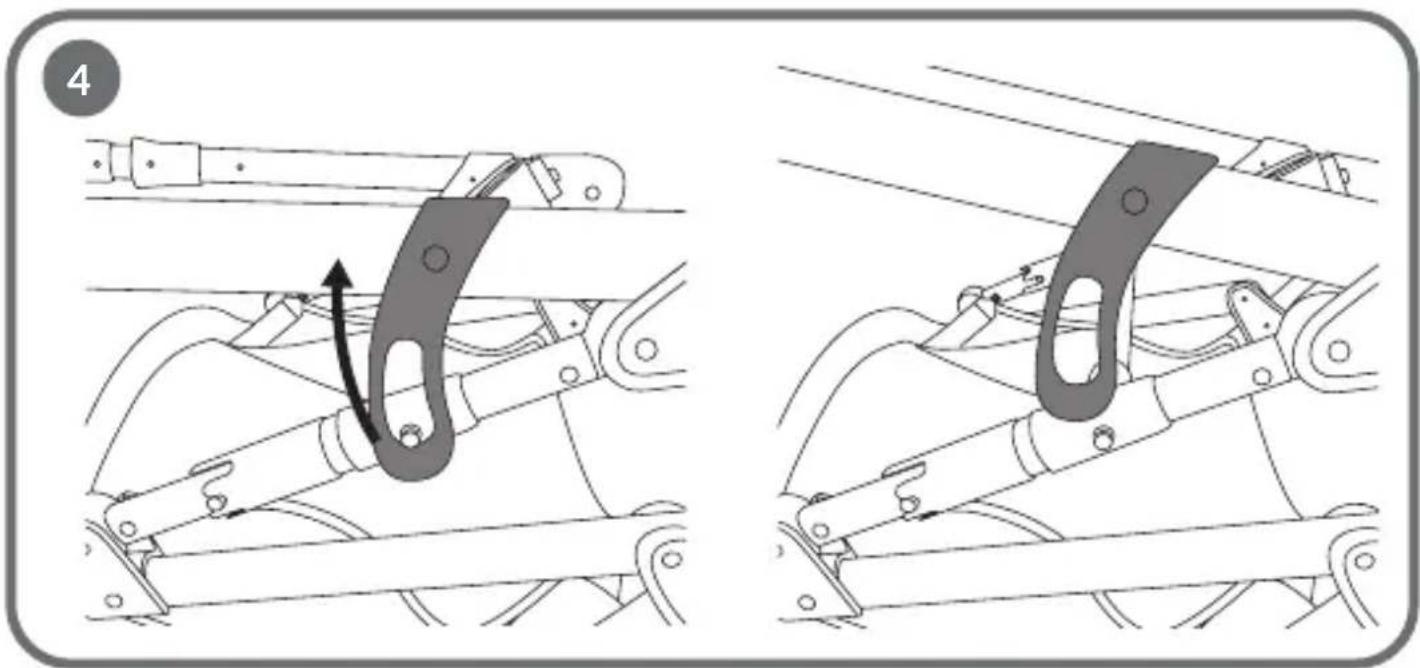
Unfolding the stroller frame
Remove the folding lock (fig. 4). Grab the handle and lift the frame of the stroller, while holding the bottom of the frame with your foot. Correct unfolding of the frame will signal an audible “click” (fig. 5).
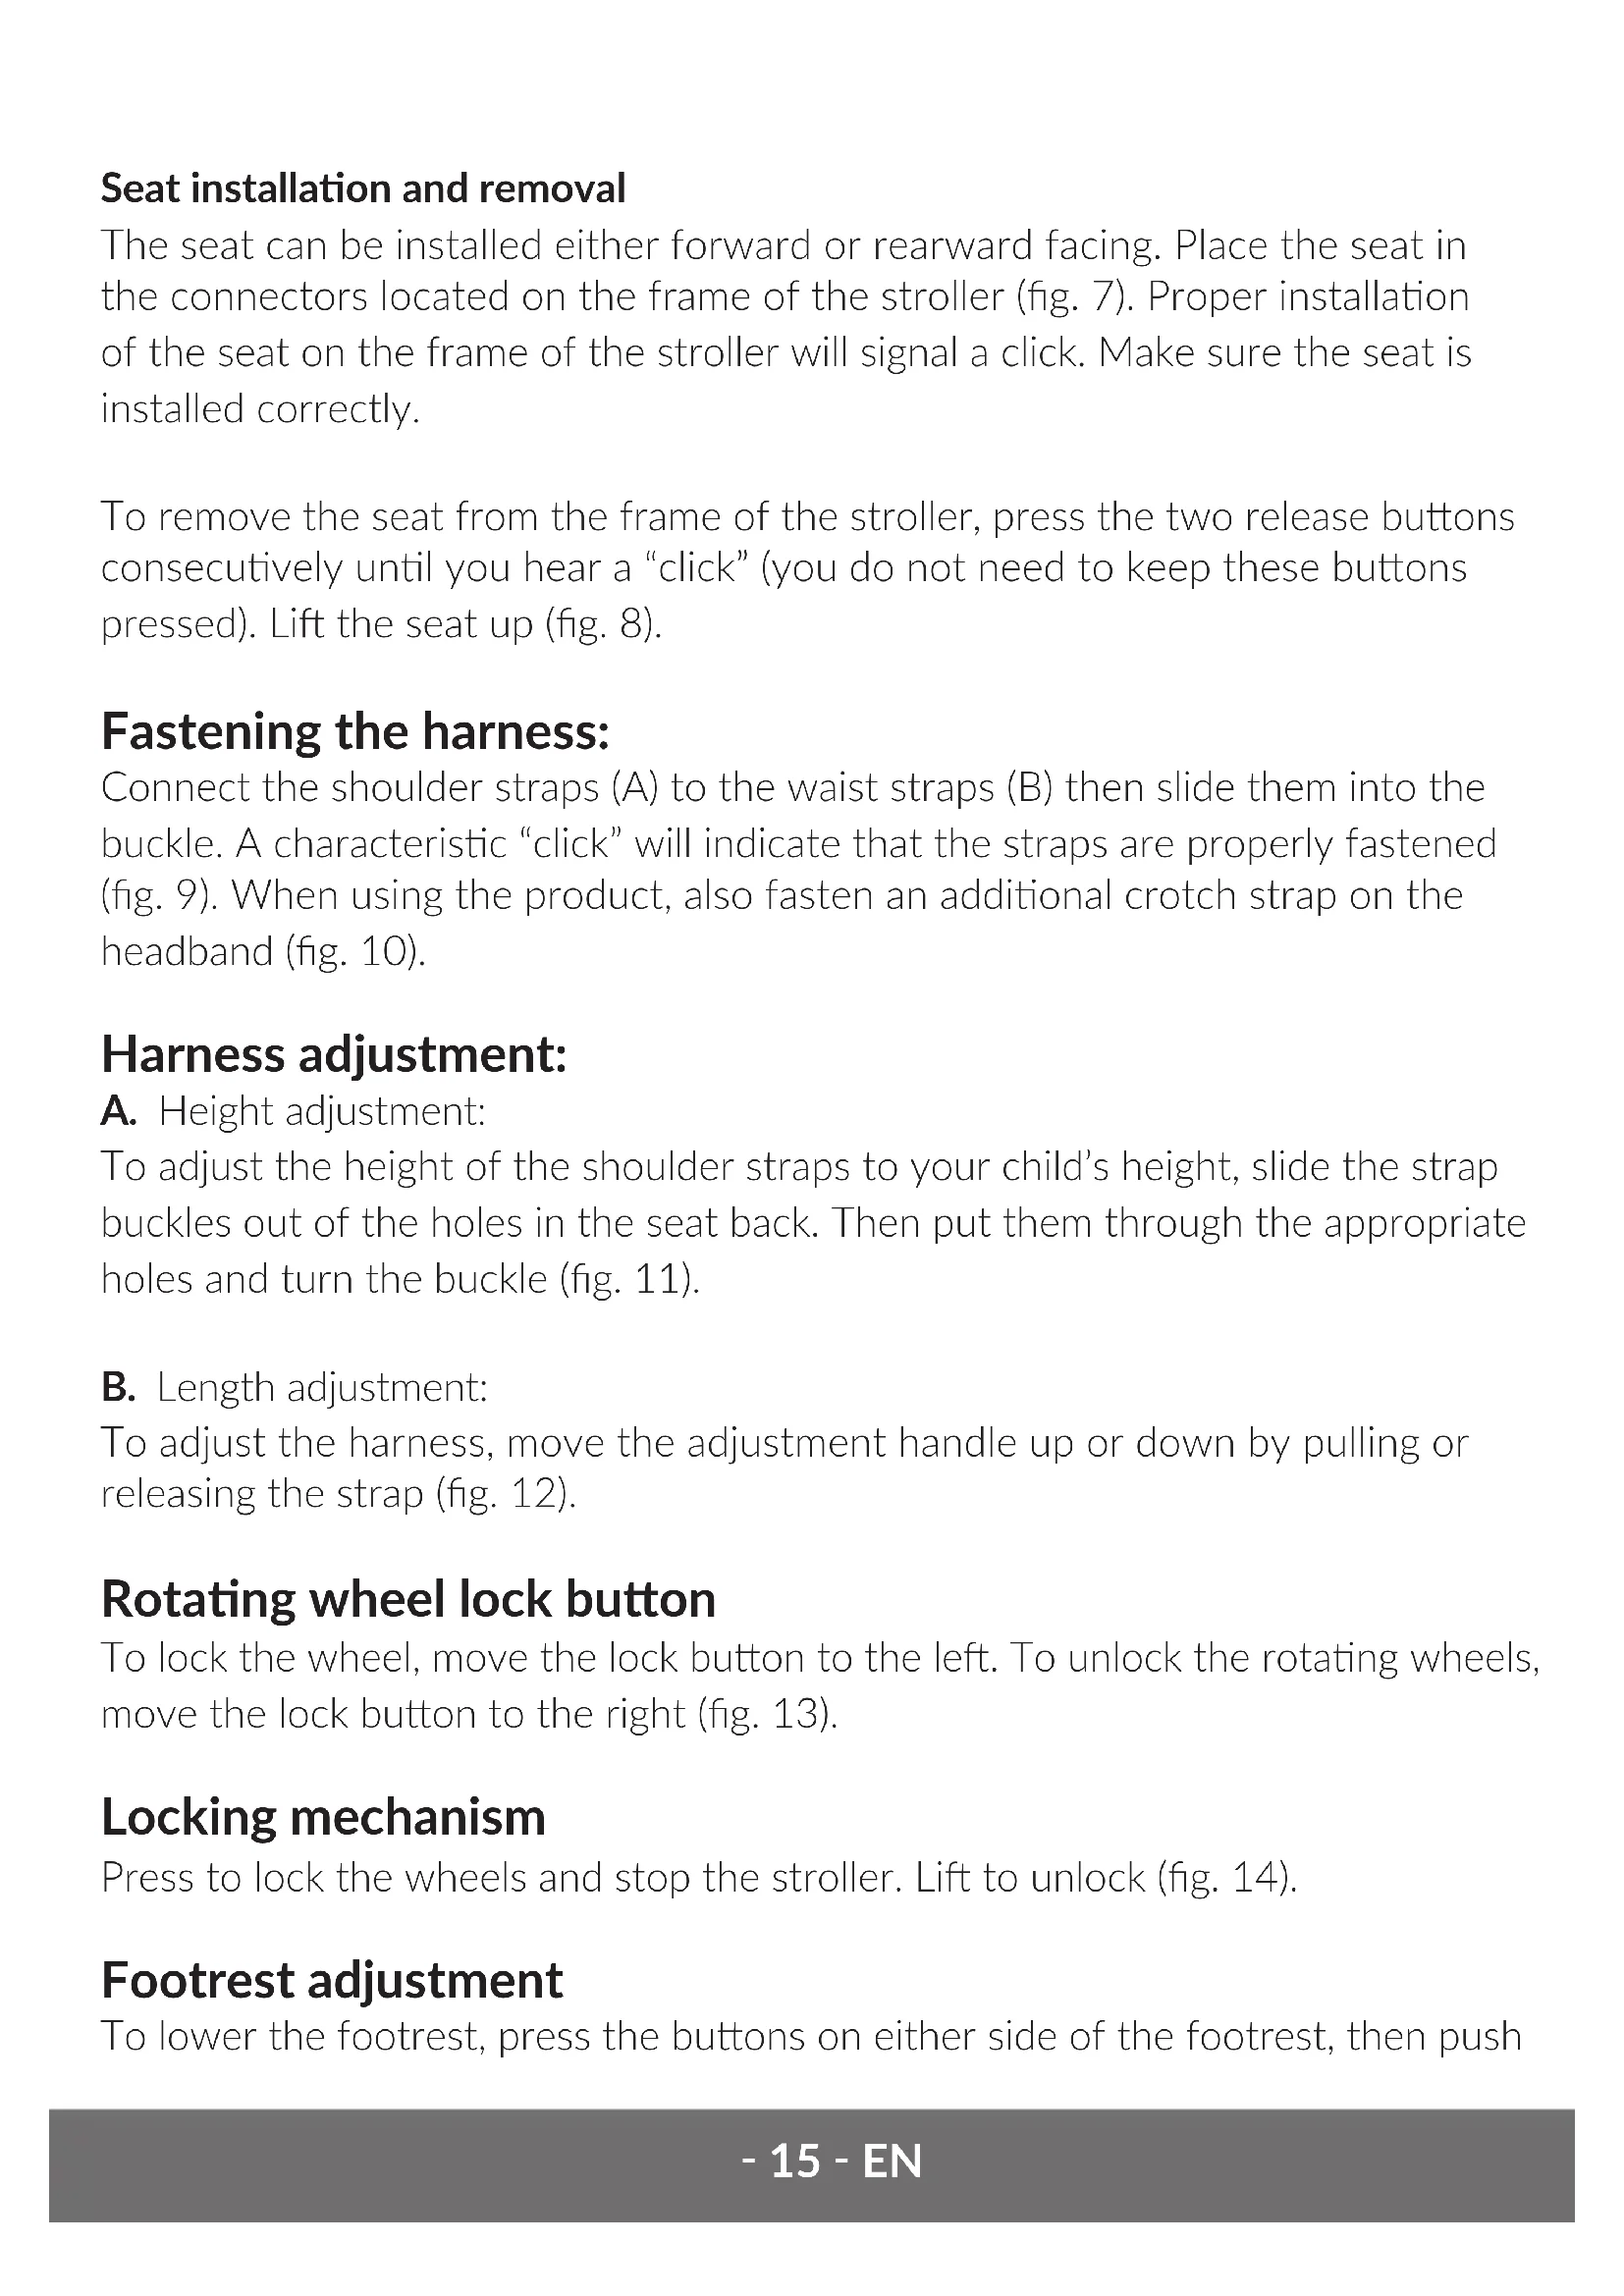
Seat installation and removal
The seat can be installed either forward or rearward facing. Place the seat in the connectors located on the frame of the stroller (fig. 7). Proper installation of the seat on the frame of the stroller will signal a click. Make sure the seat is installed correctly.
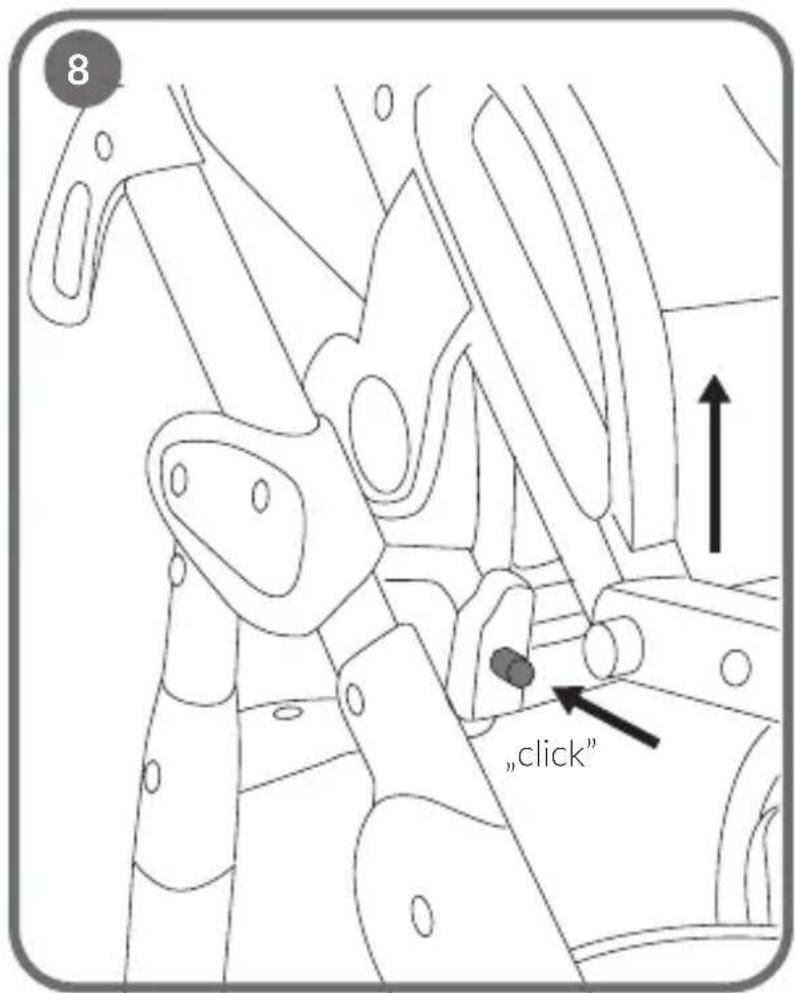
To remove the seat from the frame of the stroller, press the two release buttons consecutively until you hear a “click” (you do not need to keep these buttons pressed). Lift the seat up (fig. 8).
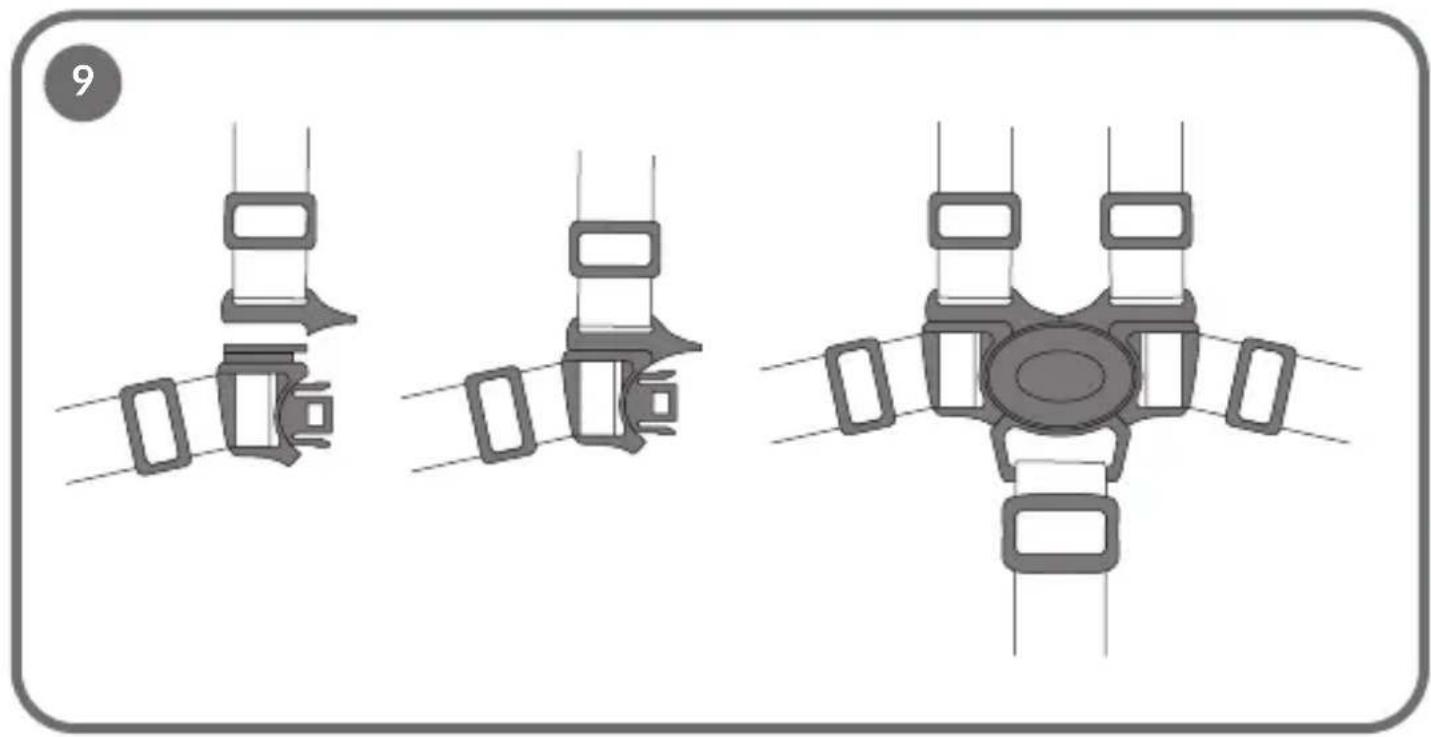
Fastening the harness:
Connect the shoulder straps (A) to the waist straps (B) then slide them into the buckle. A characteristic “click” will indicate that the straps are properly fastened (fig. 9). When using the product, also fasten an additional crotch strap on the headband (fig. 10).
Harness adjustment:
A. Height adjustment:
To adjust the height of the shoulder straps to your child's height, slide the strap buckles out of the holes in the seat back. Then put them through the appropriate holes and turn the buckle (fig. 11).
B. Length adjustment:
To adjust the harness, move the adjustment handle up or down by pulling or releasing the strap (fig. 12).
Rotating wheel lock button
To lock the wheel, move the lock button to the left. To unlock the rotating wheels, move the lock button to the right (fig. 13).
Locking mechanism
Press to lock the wheels and stop the stroller. Lift to unlock (fig. 14).
Footrest adjustment
To lower the footrest, press the buttons on either side of the footrest, then push
the footrest down. To raise the footrest, lift it up until you hear a characteristic click (fig. 15).
Handle adjustment
Press the adjustment buttons to adjust the height of the handle.
Canopy adjustment
To adjust the canopy, simply slide it forward or backward and adjust as desired.
Backrest adjustment
Backrest adjustment: lift the lever on the back of the backrest and then adjust the position of the backrest.
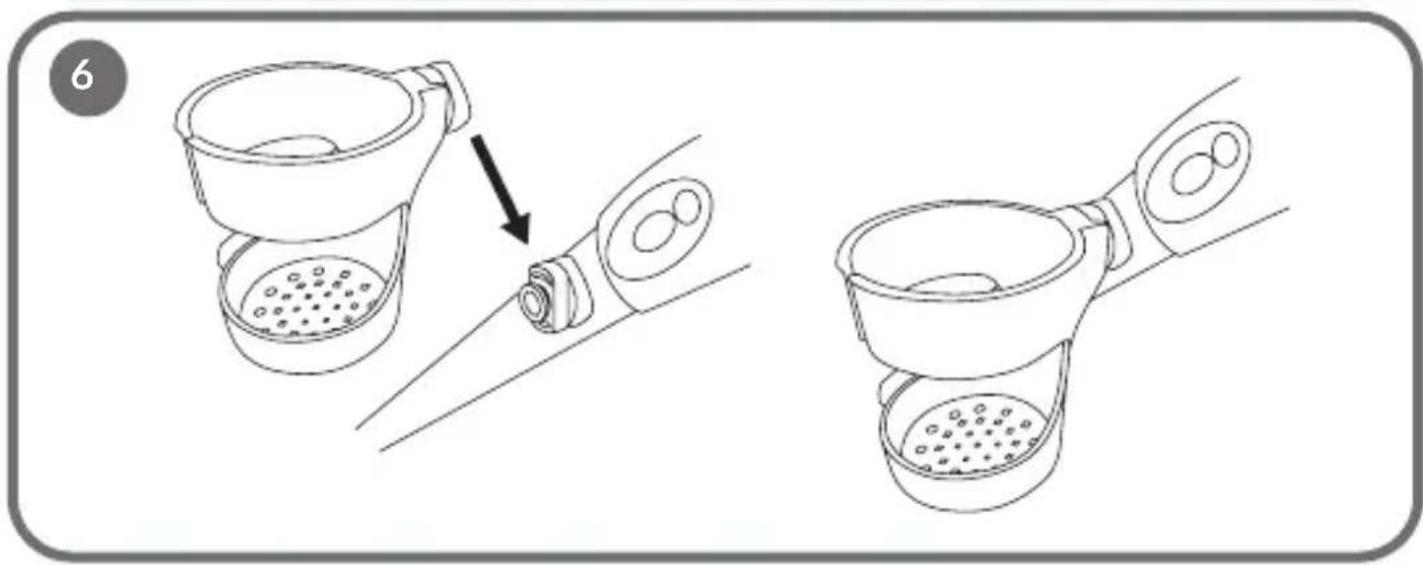
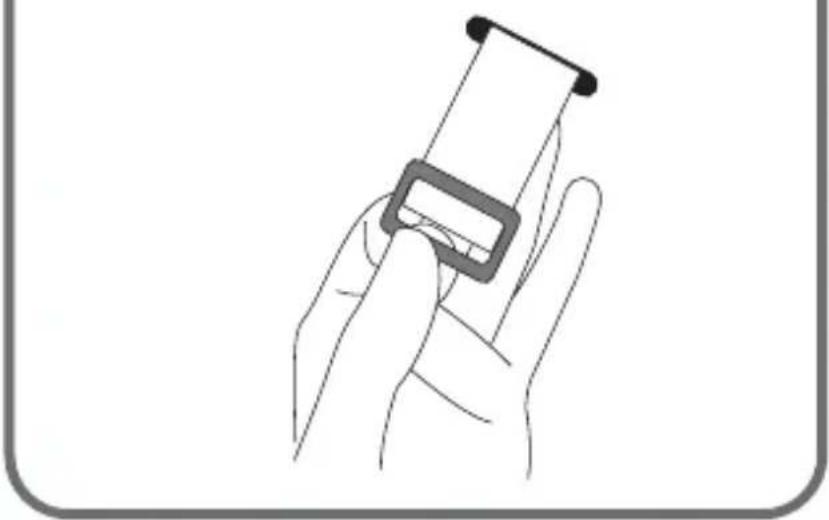
Headband removal
To remove the headband, press the release buttons (fig. 16) and then pull it out.
Correct insertion of the headband will signal a click (fig. 17).
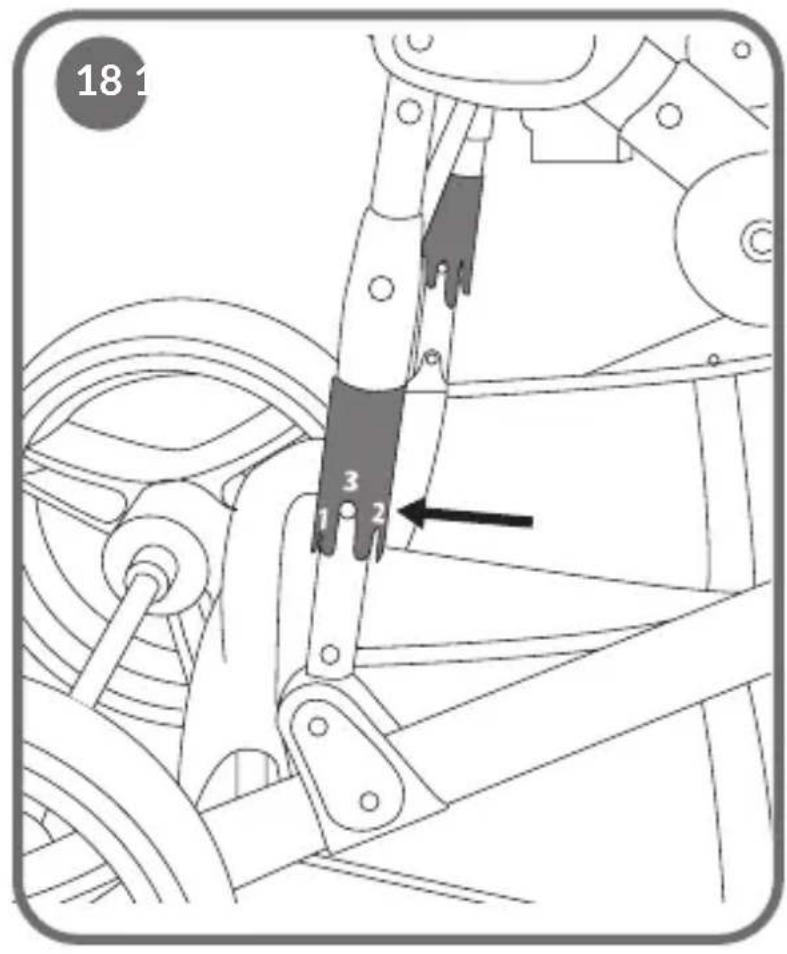
Suspension hardness adjustment
The product has an option to adjust the hardness of the suspension. To do this, lift the knob located at the rear of the stroller frame and slide it to the desired value (fig. 18). Make sure to set the same value on both knobs to ensure that the stroller suspension functions properly.
1 - hard suspension 2 - medium suspension
3 - soft suspension
hardness
Folding the stroller
Fold down the seat canopy, facing forward, slide the folding lever on either side of the handle and then push the frame down until the stroller folds down. The lock will latch automatically (fig. 19).
The stroller cannot be folded with the carrycot installed.
Carrycot
A. Carrycot installation on the frame of the stroller.
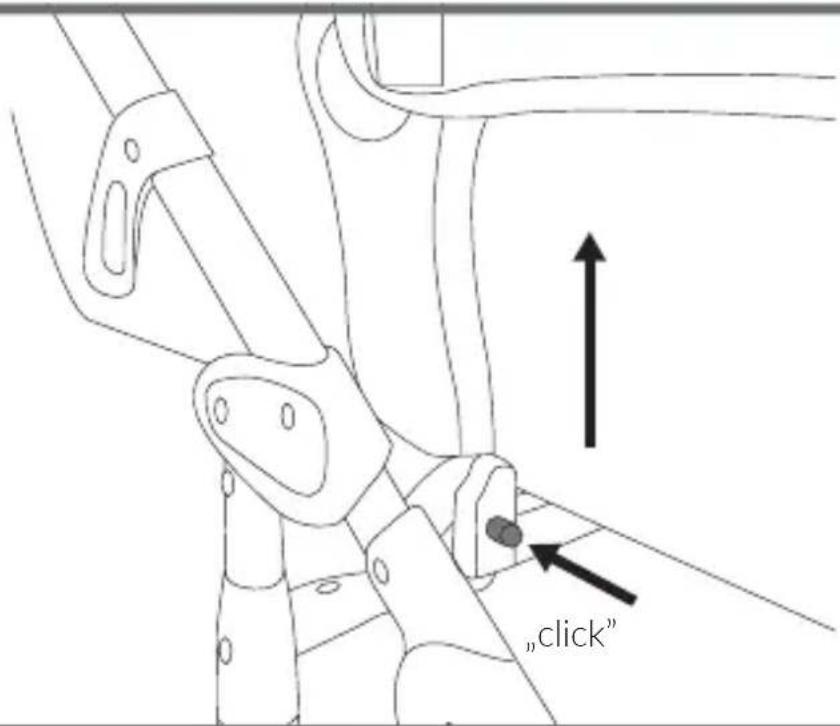
1. Extend the supports into their intended place on the bottom of the carrycot (fig. 20)
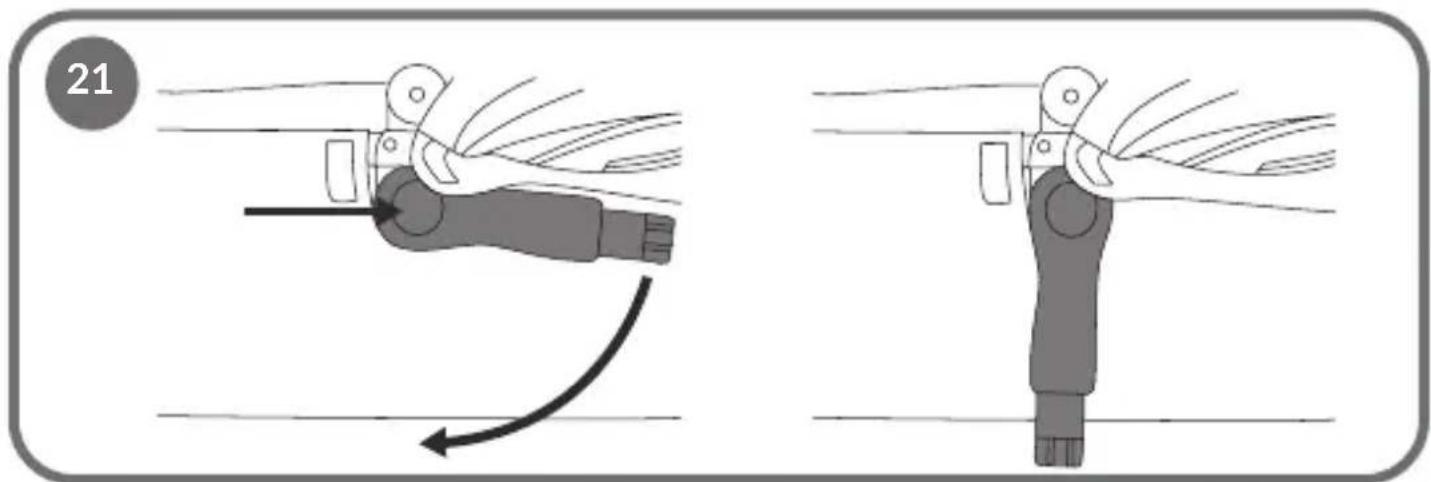
2. Press the buttons on the carrycot connectors, then position them facing the ground (fig. 21).
- Lift the canopy of the carrycot and put the mattress in it.
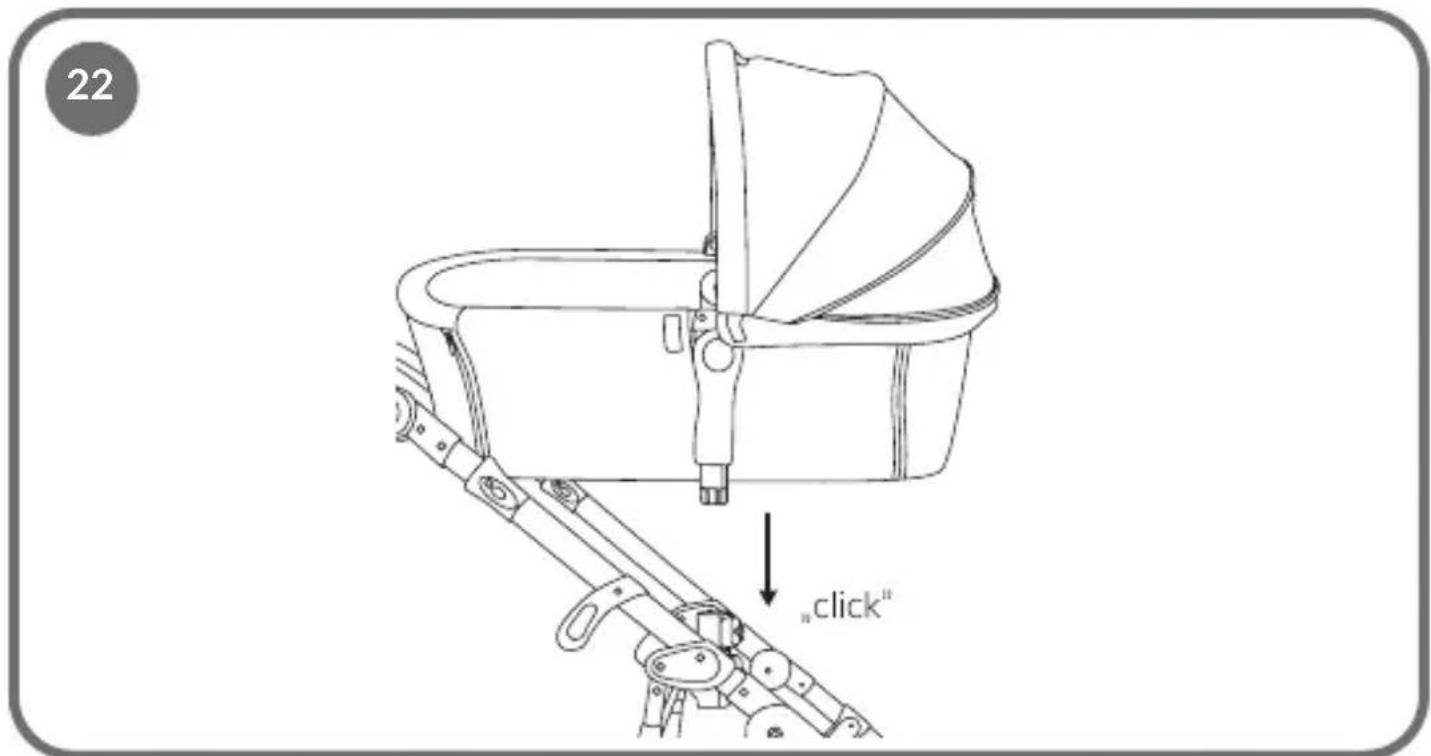
- Place the carrycot on the frame of the stroller (fig. 22), correct installation will signal a characteristic audible "click".
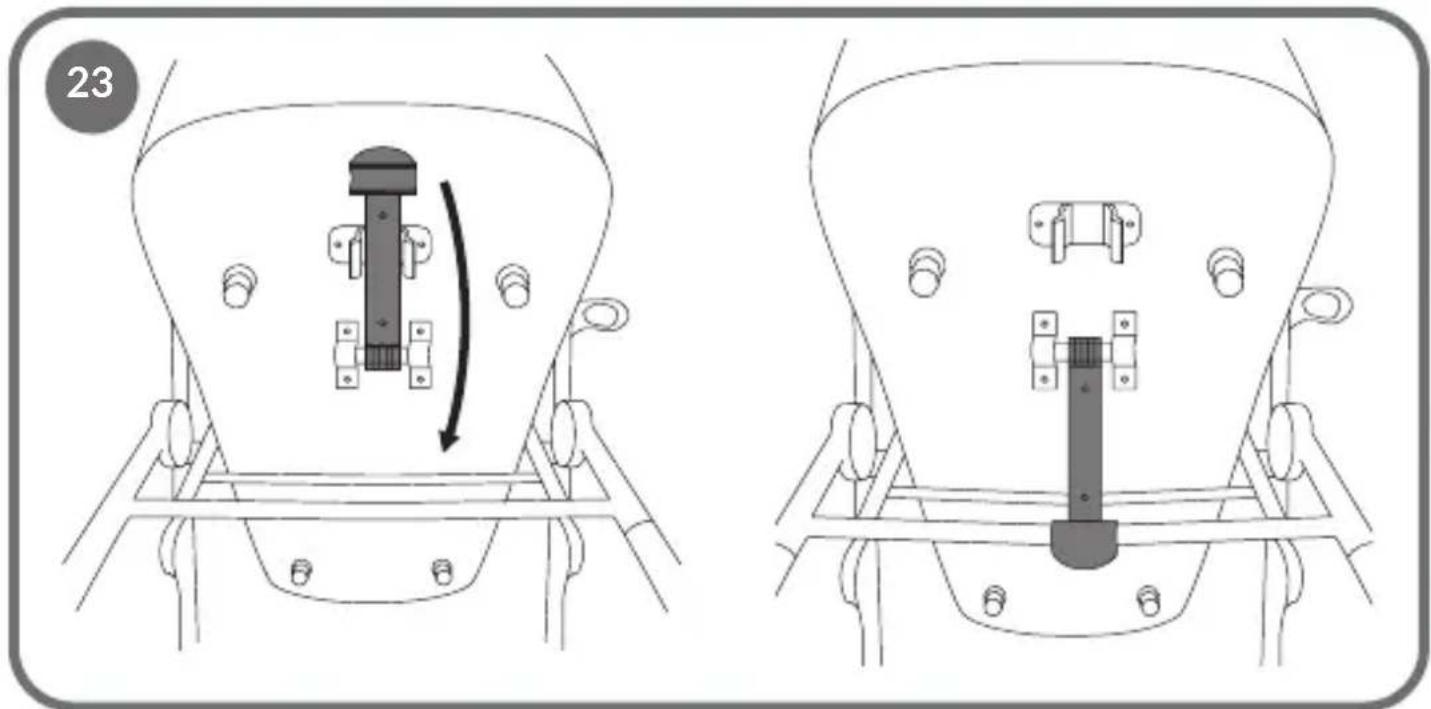
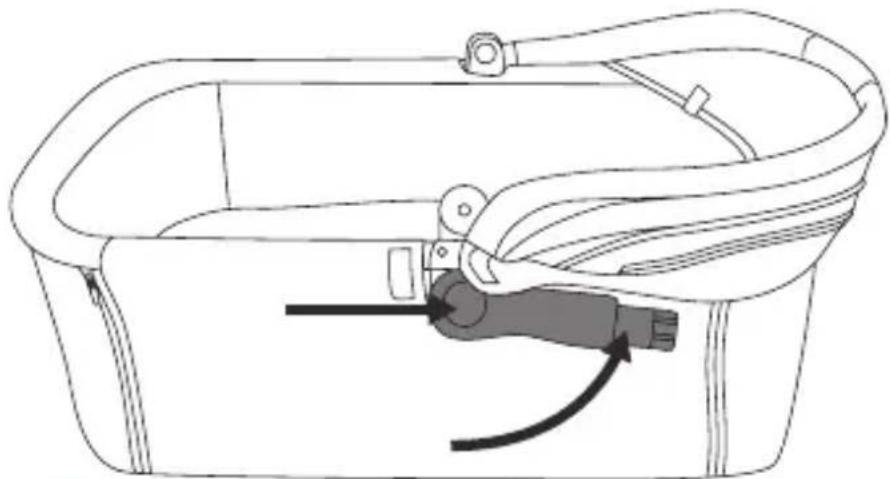
- Connect the locking device, located under the bottom of the carrycot with the frame of the stroller to improve the stability of the carrycot (fig. 23). Make sure the carrycot is properly installed and cannot be freely removed from the stroller frame.
Caution. The carrycot should be installed facing the person driving the stroller so that the caretaker has eye contact with the child.
B. Folding down the carrycot canopy
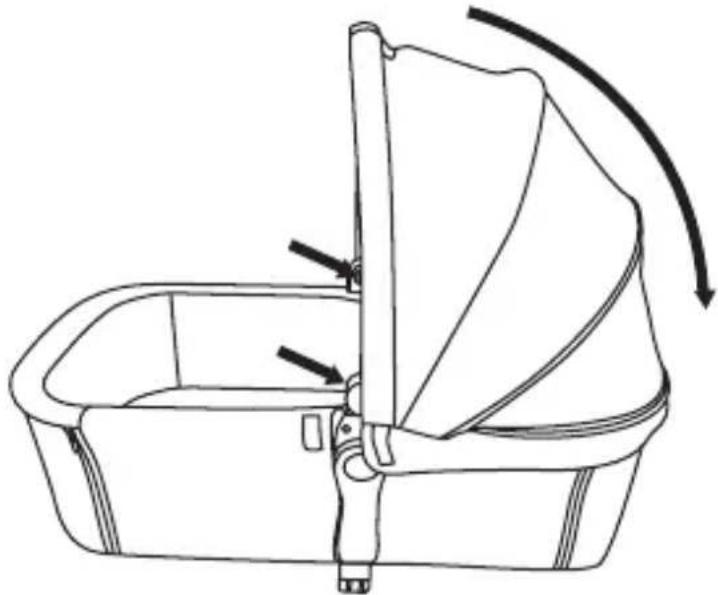
To fold the carrycot canopy, press both adjustment buttons at the same time, then push the canopy down in the direction (fig. 24).
C. Carrycot removal
The baby can be carried in the carrycot.
To remove the carrycot, first release its locking mechanism from the frame of the stroller (fig. 23), then press the two support release buttons in sequence until you hear a “click” (you do not need to keep these buttons pressed) and lift it (fig. 25). Push the buttons on the carrycot supports and align them parallel to the ground so that they do not interfere with putting the carrycot down (fig. 26).
Baby seat installation and removal (applies to 3-in-1 set)
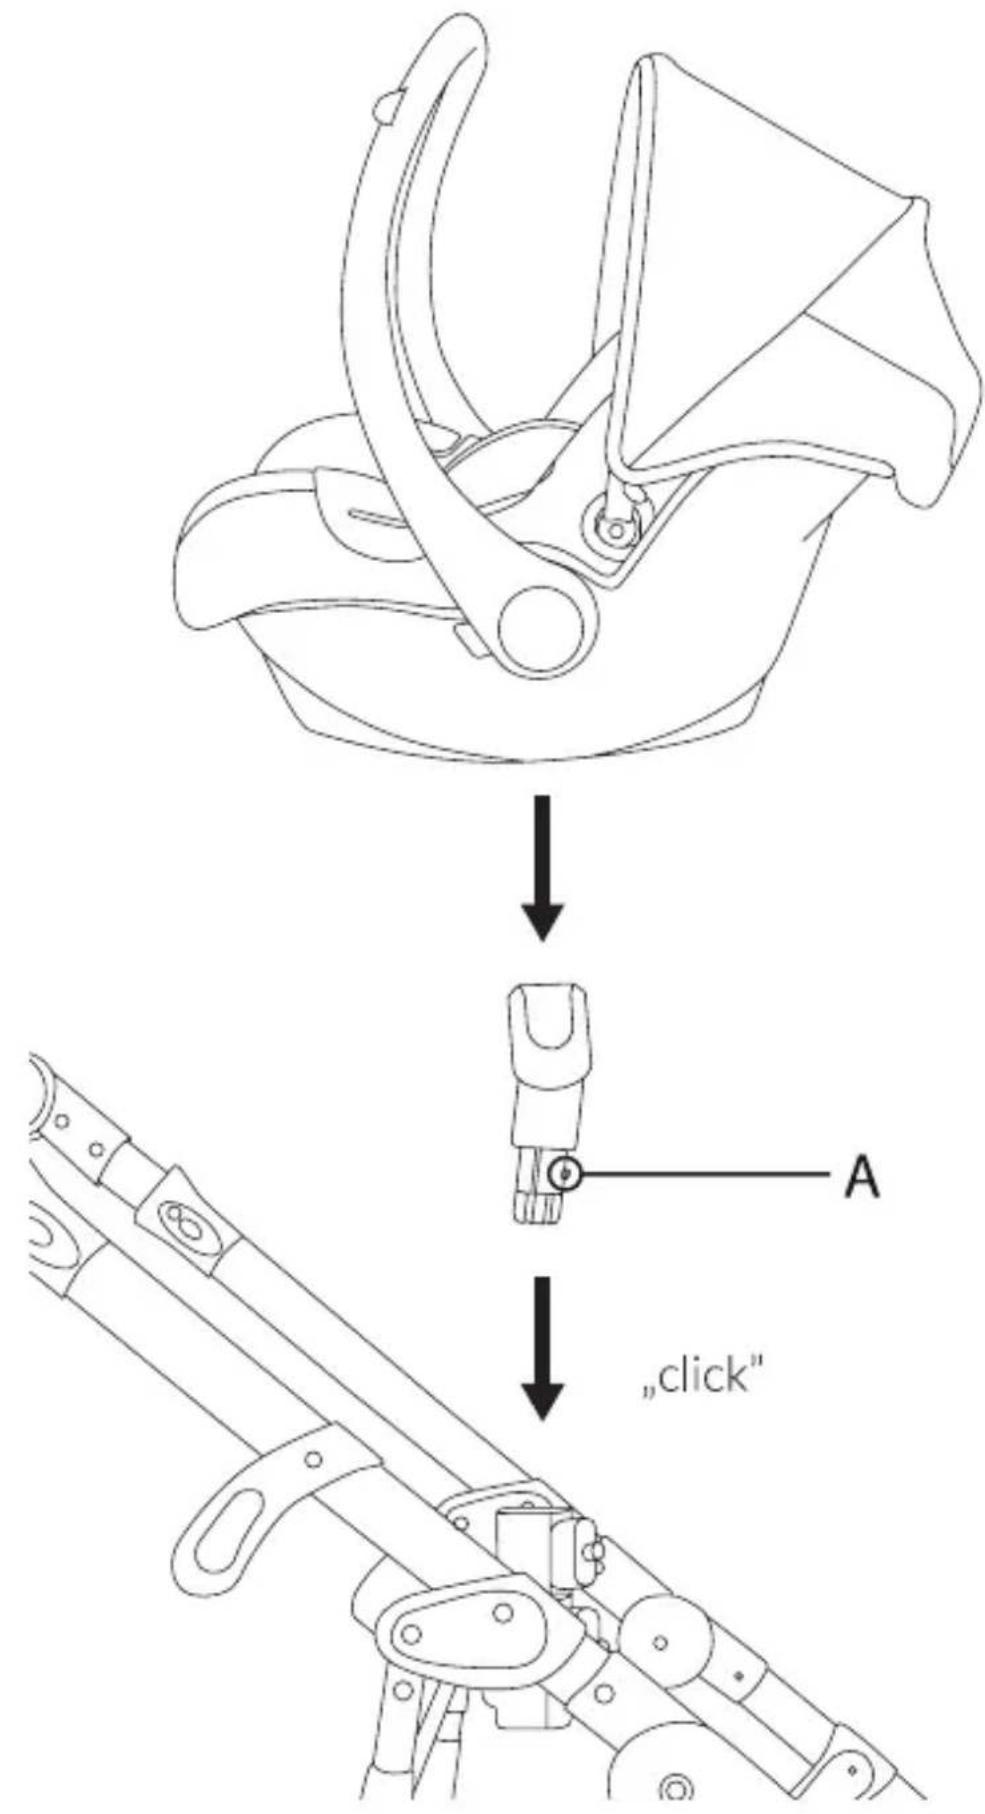
- The connectors are compatible with these products: Lionelo (Astrid, Mari Carrier, Greet Carrier). Insert the adapters into the appropriate places on the stroller frame until you hear a click on both sides and the adapters are locked.
- The seat in the stroller frame should be installed so that the child in it is positioned facing the person driving the stroller.
- Place the baby seat on the frame of the stroller using the adapters (fig. 26). You will hear a distinctive click. Make sure the seat is properly installed on the frame of the stroller.
- To unbuckle the seat as needed, remove the seat from the adapters.
• To remove the adapter, press the bottom button on it (A, fig. 26) and remove.
Cleaning and maintenance
- The wheels and frame of the stroller should be regularly cleaned of dust and sand. These parts can be cleaned with a damp cloth and mild cleaning agents.
- The various parts of the stroller and carrycot should be regularly inspected for functionality, durability, and possible damage. If defects are detected, contact an authorized service center.
- Use only spare parts recommended by the manufacturer.
- Do not use strong chemical agents to clean this product. In the event of dirt, wipe the material with a damp cloth.
Photos are for reference only, the actual appearance of the products may differ from that shown in the photos.
PL
Drogi Kliencie!
BrandLine Group Sp. z o.o.
BrandLine Group Sp. z o.o.
BrandLine Group Sp. z o.o.
BrandLine Group Sp. z o.o.
3 - suspension souple
moyennement dure
Plier la poussette
BrandLine Group Sp. z o.o.
BrandLine Group Sp. z o.o.
BrandLine Group Sp. z o.o.
ul. A. Kręglewskiego 1, 61-248 Poznanė, Lenkija
SVARBU - ATIDŽIAI PERSKAITYKITE IR SAUGOKITE, KAD VĚLIAU GALĚTUMĚTE PASISKAITYTI ISPĚJIMAS!
VAIKIŠKAM VEŽIMĚLIUI:
BrandLine Group Sp. z o.o.
ul. A. Kręglewskiego 1, 61-248 Poznań, Lengyelország
FONTOS – FIGYELMESEN OLVASSA EL ÉS ÓRIZZE MEG KÉSÓBBI FELHASZNÁLÁS ESETÉRE FIGYELMEZTETÉS!
SPORT BABAKOCSI:
Detailed warranty conditions are available on the website:

- Dear Customer!
- Producer:
- IMPORTANT - READ CAREFULLY AND KEEP FOR FUTURE REFERENCE WARNING!
- FOR A STROLLER:
- IMPORTANT — Read the instructions carefully before use and keep for future reference WARNING!
- FOR A CARRYCOT:
- Elements of the stroller (fig. A)
- Elements of the carrycot (fig. B)
- Stroller and carrycot functions
- Wheel installation:
- Wheel removal:
- Unfolding the stroller frame
- Seat installation and removal
- Fastening the harness:
- Harness adjustment:
- Rotating wheel lock button
- Locking mechanism
- Footrest adjustment
- Handle adjustment
- Canopy adjustment
- Backrest adjustment
- Headband removal
- Suspension hardness adjustment
- Folding the stroller
- Carrycot
- Caution. The carrycot should be installed facing the person driving the stroller so that the caretaker has eye contact with the child.
- Folding down the carrycot canopy
- Carrycot removal
- The baby can be carried in the carrycot.
- Baby seat installation and removal (applies to 3-in-1 set)
- Cleaning and maintenance
- PL
- Drogi Kliencie!
- Plier la poussette
- SVARBU - ATIDŽIAI PERSKAITYKITE IR SAUGOKITE, KAD VĚLIAU GALĚTUMĚTE PASISKAITYTI ISPĚJIMAS!
- VAIKIŠKAM VEŽIMĚLIUI:
- FONTOS – FIGYELMESEN OLVASSA EL ÉS ÓRIZZE MEG KÉSÓBBI FELHASZNÁLÁS ESETÉRE FIGYELMEZTETÉS!
- SPORT BABAKOCSI:
Brand : Lionelo
Model : Mari Tour
Category : Stroller