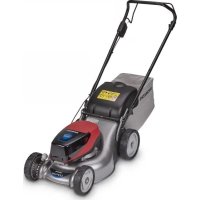
HRG416XB - Lawn mower Honda - Free user manual and instructions
Find the device manual for free HRG416XB Honda in PDF.



| Product type | Battery-powered lawn mower |
| Brand | Honda |
| Model | HRG416XB |
| Power supply | Lithium-ion battery (sold separately) |
| Motor type | Brushless DC three-phase |
| Motor power | 1,000 W |
| Cutting width | 41 cm |
| Cutting height adjustment | 6 positions from 20 to 74 mm |
| Grass bag capacity | 42 L |
| Weight (without battery) | 23 kg |
| Dimensions (L x W x H) | 1,415 x 453 x 980 mm |
| Front/rear wheel diameter | 212 mm / 178 mm |
| Sound pressure level (at the ear) | 79 dB(A) |
| Guaranteed sound power level | 89 dB(A) |
| Vibration (total value) | 1.07 m/s² |
| Transmission | Manual push (not self-propelled) |
| Functions | Mowing, collection, rear discharge |
| Safety | Battery cut-off key, dual control (yellow button + lever) |
| Maintenance | Cleaning cooling fins, water-washable grass bag |
| Thermal protection | Yes (automatic shutdown in case of overload) |
Frequently Asked Questions - HRG416XB Honda
User questions about HRG416XB Honda
0 question about this device. Answer the ones you know or ask your own.
Ask a new question about this device
Download the instructions for your Lawn mower in PDF format for free! Find your manual HRG416XB - Honda and take your electronic device back in hand. On this page are published all the documents necessary for the use of your device. HRG416XB by Honda.
USER MANUAL HRG416XB Honda
You have just purchased a Honda battery powered lawnmower and we thank you for your confidence in us.
This manual has been written to familiarize you with your machine, to enable you to use it in the best possible conditions and to carry out its maintenance.
Our aim is to make you benefit to the full from technological advances, from new equipment and materials and from our experience. This is why we regularly make improvements to our models. Thus, the specifications and information contained in this manual may be modified without prior notice and without obligation to update it.
The illustrations in this manual show the most suitable model to represent the topic dealt with.
The other illustrations common to all types are based on the HRG466XB.
If you have a problem, or if you have any questions concerning the machine, contact your servicing dealer.
Keep this manual handy so you can refer it at any time. If you sell the machine, be sure that the manual accompanies it.
We recommend that you read the guarantee policy to fully understand your rights and responsibilities. The guarantee policy is a separate document provided by your dealer.
No reproduction, even partial, may be made of this publication without prior written authorisation.
SAFETY INSTRUCTIONS
For your own safety and operating comfort, it is highly recommended that you read this manual in full.
Pay attention to these symbols and their meaning:
WARNING
Indicates a high risk of severe personal injury or death if instructions are not followed.
CAUTION:
- Indicates a possibility of personal injury or equipment damage if instructions are not followed.
NOTE: Source of useful information.
HOW TO IDENTIFY YOUR MACHINE
| CATEGORY | SERIES | TYPE OPTION | ||
| Sample HRG 416XB PE EA | ||||
| Description | HRG= Lawnmower | P= Push type | EA= Destination Europe | |
| S= Self propelled type | UA= Destination Australia | |||
The model of your battery powered lawnmower is indicated on its "Identification label" (see page 4) by a series of letter.
Honda France Manufacturing S.A.S. - Pôle 45 - Rue des Châtaigniers 45140 ORMES - FRANCE - All rights reserved
HONDA
OWNER'S MANUAL
ORIGINAL INSTRUCTION
Battery powered lawnmower
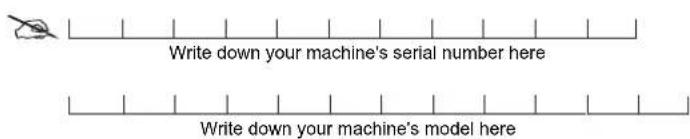
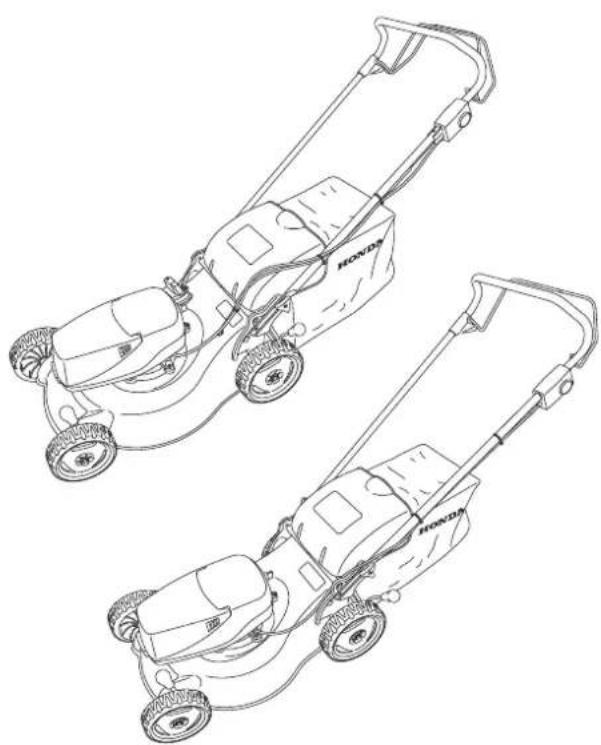
HRG416XB • HRG466XB
natural_image
Line drawing of two Honda lawn mower machines, shown from top and side views (no text or symbols)CE
Dedicated battery pack and charger for these machines are needed for operation. They are sold separately.
CONTENTS
Foreword 1
Safety instructions. 2
Safety stickers. 4
Identification of machine 4
General description 4
Preparation and checks before use 5
Selecting the cutting mode (HRG466XB only) 8
Mowing 9
Operating hints and tips 9
Maintenance 11
Troubleshooting 15
Storage 15
Transport.... 16
Useful information 16
Technical specifications 17
Major Honda distributor addresses 18
"EC Declaration of Conformity" CONTENT OUTLINE ... 19
SAFETY INSTRUCTIONS
TO BE FOLLOWED CAREFULLY
Read carefully before using the machine.
WARNING
Indicates a high risk of severe personal injury or death if instructions are not followed.
CAUTION:
- Indicates a possibility of personal injury or equipment damage if instructions are not followed.
NOTE: Source of useful information.
A) TRAINING
1) Read the instructions carefully. Become familiar with the controls and the proper use of the machine. Learn how to stop the motor quickly.
2) Never allow children or persons unfamiliar with these instructions to use the machine. Local regulations can restrict the minimum age of the operator.
3) Never use the machine:
- when people, especially children or pets are nearby.
- if the operator has taken medicine or substances that may impair his ability to react and be attentive.
4) Keep in mind that the operator or user is responsible for accidents or hazards occurring to other people or their property.
5) Never attempt to modify the machine. It can cause an accident as well as damage to the machine. Tampering with the machine voids the EU type-approval of this machine.
B) PREPARATIONS
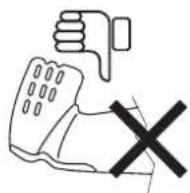
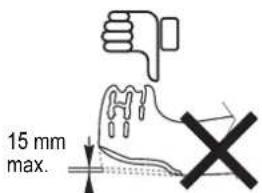
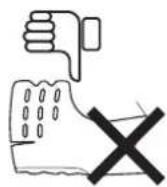
1) While mowing, always wear sturdy footwear and long trousers. Do not operate the machine when barefoot or wearing open sandals.
Avoid wearing clothing that is loose fitting or has hanging cords or ties.
To reduce the effects of vibration, wear anti vibration gloves.
To reduce the effects of noise, wear ear defenders.
2) Thoroughly inspect the entire work area and remove anything that could be thrown by the machine or damage the cutting unit or motor (stones, branches, iron wire, bones, etc.).
3) Before use, always inspect generally and in particular to see that the cutting-means, screws and cutting unit are not worn or damaged. Replace damaged or worn cutting-means and screws in their entirety to preserve balance. Replace damaged or unreadable stickers.
4) Before use check the battery pack for signs of damage or aging. Do not use the machine if the battery pack is damaged or worn.
Check the battery terminals are not to be short-circuited.
5) Do not operate without either discharge cover or grass catcher in place.
C) OPERATION
1) Mow only in daylight or good artificial light.
2) Avoid mowing wet grass or when it is raining.
3) Make sure you have a steady foothold on slopes.
4) Never run, always walk; do not let the machine pull you.
5) Always mow transversely on slopes and never up and down.
6) Be extremely carefully when changing directions on slopes.
7) Never mow on overly steep slopes. Do not mow on slopes of more than 20° (36%).
8) Be extremely careful when pull the machine toward you.
9) Stop the cutting-means if the machine has to be tilted for transportation when crossing surfaces other than grass, and when transporting the machine to and from the area to be used.
10) Never operate the machine with damaged guards or without the grass catcher or stone-guard.
11) Start up the motor carefully according to the instructions, keeping feet away from the cutting-means.
12) Do not incline the machine when starting the motor, unless necessary for start up. In this event, do not incline it more than is absolutely necessary and only lift the part that is far from the operator. Always ensure that both hands are in the working position before lowering the machine again.
13) Do not start the machine when standing in front of the discharge opening.
14) Never place your hands and feet near or under rotating parts. Keep away from the discharge opening.
15) Do not transport the machine while the power source is running.
16) Remove the isolator key and the battery pack or switch the isolator key to the off (O) position:
- whenever you leave the machine.
- before clearing blockages or unclogging chute.
- before checking, cleaning or working on the machine.
- after striking a foreign object. Inspect the machine for damage and make repairs before restarting and operating the machine.
If the machine starts to vibrate abnormally, check immediately.
- inspect for damage.
- replace or repair any damaged parts.
- check for and tighten any loose parts.
17) Stop the motor:
- whenever you remove or reattach the grass catcher. - whenever you adjust the cutting height.
18) Do not fix the isolator key with a strap to the machine.
19) When mowing, always keep a safe distance from the rotary cutting-means, given by the length of the handle.
20) WARNING - If something breaks or an accident occurs during mowing, turn off the motor immediately and move the machine away to prevent further damage; if an accident occurs with injuries or third parties are injured, carry out the first aid measures most suitable for the situation immediately and contact the medical authorities for any necessary health care. Carefully remove any debris that might cause damage or harm persons or animals should it not be seen.
21) The levels for noise and vibration indicated in this manual are the maximum values for using the machine. The use of an unbalanced cutting-means, an excessive speed of movement and a lack of maintenance have a significant effect on sound emissions and vibration. It is therefore necessary to take preventive measures to eliminate all possible damage due to high noise levels, and stresses due to vibrations; please ensure that the machine is well maintained, wear an anti-noise helmet. Take breaks during the work.
1) Keep all nuts and screws tight to be sure the machine is always in safe working condition. Routine maintenance is essential for safety and for maintaining a high performance level.
2) Check the stone-guard and grass catcher frequently for wear or deterioration.
3) Be careful during adjustment of the machine to prevent entrapment of the fingers between moving cutting-means and fixed parts of the machine.
4) Always allow the machine to cool down before storing.
5) When servicing the cutting-means be aware that, even though the power sources is switched off, the cutting-means can still be moved.
6) For safety reasons, never use the machine when it has worn or damaged parts. Parts must be replaced and not repaired. Use original spare parts. Parts that are not of the same quality can damage the equipment and impair your safety.
7) To reduce fire hazards, keep machine and in particular, the motor, free of grass, leaves, or excessive grease. Never leave containers with cut grass inside a storage area.
8) To clean the grass catcher, use water from a hose. Do not use high pressure washer.
9) Correct storage is essential for maintaining the life of the product. If possible, avoid storage areas with high humidity which could cause rust or corrosion.
10) End of season storage: Remove battery pack and store both machine and battery pack in a dry safe place away from direct sunlight. Do not place objects on top of the machine.
11) When storing for extended periods, thoroughly clean the product beforehand.
E) GENERAL PRECAUTIONS
1) Any repairs must be done at your servicing dealer. Turn off the isolator key and remove it from the machine if the machine begins to vibrate abnormally, then contact your servicing dealer for inspection.
2) Keep both hands on the grip during start up.
3) Parts subject to wear must only be replaced at your servicing dealer.
4) Never use the machine if the battery pack is damaged or worn.
5) Do not touch the cutting-means until the isolator key is removed from the machine and that the cutting-means is completely still.
6) Before transport or storage ensure machine is clean and free from debris, if necessary clean with a soft, dry brush.
7) Do not use forced water and avoid wetting the motor or the electrical components. Do not use harsh products for cleaning the chassis.
8) Keeping the underside of the machine clean will improve performance. Always keep the battery pack attaching area clean.
9) Store the isolator key safely and keep it away from children.
F) ADDITIONAL WARNINGS
1) WARNING - DANGER! Moisture and electricity are not compatible:
- always handle and connect battery pack in dry conditions. - never allow battery pack to contact wet areas (puddles or wet grass).
2) Wear work gloves for disassembling and reassembling cutting-means.
3) Keep the cutting-means balanced during sharpening. All work on the cutting-means (disassembly, sharpening, balancing, reassembly and/or replacing) are demanding jobs that require special skills as well as special tools. For safety reasons, these jobs are best carried out at your servicing dealer.
4) Recommendations for optimal handling of the battery pack and charger.
WARNING - Do not attempt to charge non rechargeable batteries with the charger.
- for your safety, ensure the isolator key and operator controls are in the off position before inserting battery pack. Inserting the battery pack into machine that have the switch on can be dangerous.
- insert the battery pack until the locking mechanism clicks. To remove the battery pack, operate battery cover opening lever.
5) Rechargeable batteries are to be removed from the machine before being charged.
G) TRANSPORTATION AND HANDLING
1) Whenever the machine is to be handled, lifted, transported or tilted you must:
- wear sturdy work gloves.
- grasp the machine at the points that offer a safe grip, taking account of the weight and its distribution.
- use an appropriate number of people for the weight of the machine and the characteristics of the vehicle or the place where it must be placed or collected.
2) During transport, fasten the machine securely with cables or chains.
3) Ensure that isolator key and the battery pack are removed from the machine before transporting the machine or folding handle.
SAFETY STICKERS
Your machine must be used with care. Therefore, decals have been placed on the machine, to remind you pictorially of main precautions to take during use. Their meaning is explained below.
These decals are considered as a part of the machine. Should one become detached or unreadable, contact your servicing dealer for its replacement.
We also recommend that you read the safety advice carefully (see page 2).
| Destination Europe(PEEA, SEEA) | Destination Australia(PEUA, SEUA) |
[1] WARNING: Read the owner's manual before using the machine.
[2] Risk of projections: Keep third persons away from the area during use.
[3] Risk of cuts. Rotating cutting-means: Do not put hands or feet inside the cutting-means enclosure. Switch the isolator key to the off (O) position and remove the isolator key and the battery pack before adjusting, cleaning and before leaving the product unattended for any period. The cutting-means continue to rotate after the motor is switched off.
[4] Do not operate without either discharge cover or grass catcher in place.
IDENTIFICATION OF MACHINE
Destination Europe (PEEA, SEEA)
![Honda France Manufacturing S.A.S. Rue des Châtaigniers - Pôle 45 45140 Ormes - France [13] [12] [14] IP54 [11] [9] dB [7] [10][6][8]](/content/2026/04/622596/images/3a681a809cf67d805bdc3e4a96daf4af1ee890ba10c93131176b200e4cfec281.jpg)
Destination Australia (PEUA, SEUA)
![LWA [12] [10] Honda Australia Motorcycle and Power Equipment Pty Ltd. [11] Assembled in FRANCE [5]](/content/2026/04/622596/images/fc58023b971d0e73683b77e794ea7d5b7507c750a76cc0df4ba86cf3ed931ca3.jpg)
[5] Sound power level
[6] CE marking
[7] Rated voltage
[8] Recommended motor speed in min ^-1
[9] Mass in kilograms
[10] Year of manufacture
[11] Serial number
[12] Model - Type
[13] Name and address of the manufacturer
[14] IP code (moisture and dust ingress resistance (only guaranteed with battery installed))
GENERAL DESCRIPTION
![[17] [15] [27] [19] [21] [22] [25] [26] [16] [28] [23] [16] [HONDA]](/content/2026/04/622596/images/56c720985a6f4b02abd37f6651608fb29d85d2b86e9f83f78a76058589cd397a.jpg)
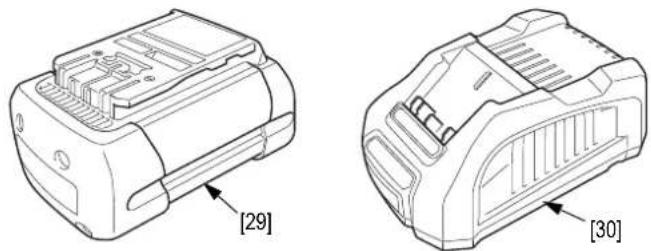
Battery pack and charger
*Dedicated battery pack and charger for these machine are needed for operation. They are sold separately.
natural_image
Technical line drawings of two mechanical components with labeled parts [29] and [30], no readable text or symbols beyond labels.EQUIPMENT IDENTIFICATION
CONTROLS FUNCTIONS
[15] Handle
[16] Lever for adjusting the cutting height. Selects the desired cutting height
[17] Drive clutch lever (HRG466XB only).... Controls the transmission which drives the rear wheels
[18] Cutting-means control lever ..... Stops and starts the cutting-means rotation
[19] Yellow button. ........ Controls the motor by a dual action switch to prevent starting it accidentally
[20] Grass catcher.... Collects the cut grass
[21] Discharge cover .... Protects from the projections
[22] Clip director (HRG466XB only) ... Switching mulching/rear discharge
[23] Rear wheels
[24] Isolator key
[25] Battery cover
[26] Battery cover opening lever
[27] Battery indicator
[28] Motor cooling fins
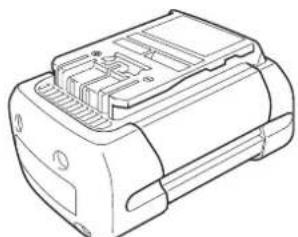
[29] Battery pack
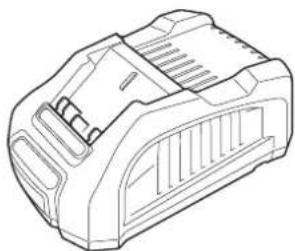
[30] Charger

Do not dispose of electric equipment together with household waste material. If electrical appliances are disposed of in landfills or dumps, substances can leak and react and enter into the foodchain, damaging your health and well-being. For further information on the disposal of this product, please contact your servicing dealer or your nearest domestic waste collection service.
PREPARATION AND CHECKS BEFORE USE
WARNING
To carry out this series of checks, place the machine on stable and level ground with the isolator key [1] and the battery pack removed from the machine.
![[1]](/content/2026/04/622596/images/8970b6f768c98dd40077ca1facc03f700b54efe7b5d0e8c67217dfbcc763ad65.jpg)
ASSEMBLY OF THE HANDLE
- Ensure that the grass catcher is not installed.
- Attach the handle [2] to the deck frame so that the cable(s) is/are on the left side.
- Install the two bolts [3] to the handle fixing points [4] from the inside of the handle. Fix them with two handle fixing knobs [5]. Make sure the knobs are securely tightened.
![[5] [3] [2] [4]](/content/2026/04/622596/images/a343ac2591540dc19af7edb88a6458c2c4dcb43dd0d3e43df6c30065a1db17c2.jpg)
ASSEMBLY OF THE GRASS CATCHER
Insert the frame [2] into the grass catcher fabric [3] and fit the plastic edges [1] to the frame.
![HONDA [1] [2] [3]](/content/2026/04/622596/images/3d71338fc20f41ff3148cb59e6d42a2f7a67d9c6a9c69ee12af3df9af631c76b.jpg)
![[1] HONDA](/content/2026/04/622596/images/c18b0e7e87e13db862f5734a4f3a0fedb40d0e04f3cb87631ccf5cd8c5a20647.jpg)
- Check that the cable(s) pass(es) over the left handle fixing knob and are attached to the left side of the handle with tie straps [6] as shown in the figure.
HRG466XB
![XB 250 mm 160 mm [6] [6] drive clutch cable](/content/2026/04/622596/images/c2043f5bb59c29b811e230b490c1341bda70cac426000dfe22cd91becc13bb62.jpg)
HRG416XB
![XB [6] 300 mm 264 mm [6]](/content/2026/04/622596/images/fc669e852f6ebf2c3801483ae9dd14758f78688b193a30e686219389294e55b2.jpg)
CHECKING THE GRASS CATCHER
WARNING
Before use, ensure that the grass catcher closing device is correctly closed (discharge cover).
Even in normal use, the grass catcher tends to wear. Regularly check that it is not frayed or torn. A worn out grass catcher must be replaced. Replace a damaged grass catcher with Honda Genuine parts.
Grass catcher removal:
- Raise discharge cover [7], grasp handle [8] and remove grass catcher [9] while keeping it in an upright position.
Grass catcher fitting:
- Raise the discharge cover and hook the front of the grass catcher on the
machine's attachment lugs [10].
![[10] [7] [9] [8]](/content/2026/04/622596/images/c25bdc5d2e6a92a8cc3da26a9fa92e23fa5f78c1230c068afa3e3f530f8d41e0.jpg)
NOTE:
- The machine operates like a vacuum cleaner; it blows air into the grass catcher sucking up the grass cuttings. Empty the grass catcher before it is full to help emptying and minimizing the dropping of grass cuttings. Bagging performance will diminish after the grass catcher becomes about 90% full.
- HRG466XB only: Mulching is a natural fertilisation technique. The grass is no longer collected in the grass catcher, but is finely ground and deposited on the lawn. The grass cuttings chopped up in this way decompose in the sun and form a natural humus which can produce a quarter of the annual fertilisation requirement of your lawn.
- In addition to its fertilising role, mulching protects the ground, limits evaporation of water during hot periods and relieves you of the task of collecting the grass.
PREPARATION OF THE BATTERY PACK
A charged battery pack must be installed to the machine to operate the machine. Please refer to the page 6 for handling of the battery pack.
INSTALLATION AND REMOVAL OF THE BATTERY PACK
WARNING
Do not handle with wet hand, or under rain condition.
CAUTION:
- When you close the battery cover, please pay attention to avoid pinching your finger by battery cover.
- For the each action, please pay attention to avoid any injured.
• Always use Honda battery pack.
Installation:
- Turn the isolator key [1] to the off (O) position [2] and remove the key from the motor.
![[2] [1]](/content/2026/04/622596/images/54a4caeb25c62b56e36f3ebd5a223516df4db685be664b19348241350ad72d1c.jpg)
- Push the battery cover opening lever [3] to open the battery cover [4].
![[4] [3]](/content/2026/04/622596/images/edb105e37fa4c0636d654025787610c838d80c076df2cf9795b3db6d9df053c5.jpg)
- Ensure that the battery pack attaching area is clean. Install the battery pack [5] to the terminal [6]. Push the battery pack until you hear clicking sound.
![[5] [6]](/content/2026/04/622596/images/29d6b0c04edb4dc48a51c82afe065e79c9aad1b96daa4cea1524848fbcfa42dc.jpg)
- Close the battery cover securely.
![[4]](/content/2026/04/622596/images/53e152bf3aec84e2839afa8a31dc9543bf3005dc3358a31e805677e810f0198f.jpg)
NOTE:
Whenever you open the cover, always confirm that the battery is well connected before closing it.
Removal:
- Turn the isolator key to the off (O) position and remove the key from the motor.
- Push the battery cover opening lever to open the battery cover. When the cover is opened, the battery pack comes off from the terminal simultaneously.
- Pick up the battery pack.
- Close the battery cover securely.
CHECKING BATTERY LEVEL
Battery level can be confirmed with the battery indicator [7] on the left side of the handle.
- Install the battery pack to the machine.
- Insert the isolator key to the motor and turn the key to ON (I) position [8].
- Press the yellow button [9], then the battery indicator will come on.
![[8] [9] [7] HONDA](/content/2026/04/622596/images/0b2fd1da2cc9d7c5942c4e147d331d3c7e5b9dacdf60a629445c523c02f2fafa.jpg)
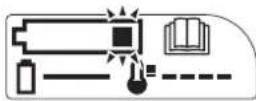
- Remaining battery capacity is displayed in 3 levels.
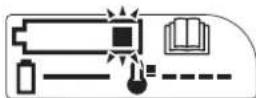
LEDs behavior of battery indicator
- LEDs show battery pack and machine status.
- When the battery is installed and isolator key is on, the LEDs will come on by operating the yellow button or cutting-means control lever.
- LEDs light for approximately 48 seconds.
- While the machine is running, LEDs do not light.
LEDs show machine or battery pack condition as following.
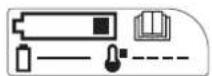
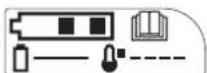
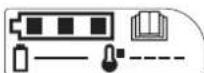
1 LED on
0% < state of charge ≤ 30%
2 LED on
30% < state of charge ≤ 60%
3 LED on
60% < state of charge ≤ 100%
Blinking 1 LED
State of charge 0% = Empty
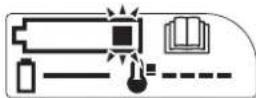
Blinking 3 LED
Motor shut off due to motor overheating or battery pack overheating.
Turn the isolator key to off (O) and let the machine cool down for 30 to 60 minutes.
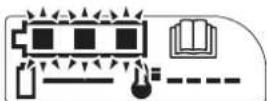
Charge the battery pack if the battery level is low.
See annexed instructions for battery pack and charger.
CHARGING THE BATTERY PACK
See annexed instructions for battery pack and charger.
CHECKING CUTTING-MEANS CONDITION
To check cutting-means condition:
- Ensure that the isolator key and the battery pack are removed from the machine.
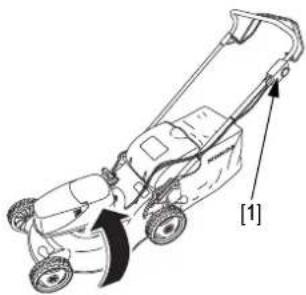
- Tilt the machine to the right so the yellow button side [1] is up.
- Check if the cutting-means is showing signs of wear. It is necessary to replace the cutting-means when the recesses join together, or when a crack appears, or if it is bent.
natural_image
Line drawing of a lawn mower with labeled parts [1] and directional arrow (no text or symbols beyond labels)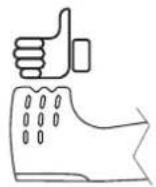
NORMAL BENT
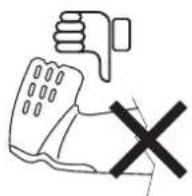
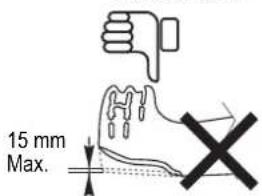
EXCESSIVELY WORN CRACKED
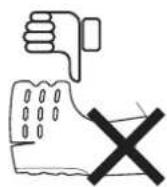
- Check that cutting-means bolts are not loose (see "Maintenance" chapter page 11).
- To replace or remove the cutting-means, refer to the procedure described in the "Maintenance" chapter page 11.
WARNING
Never operate the machine with a worn, damaged, split or dented cutting-means. Pieces of cutting-means which breaks off and is thrown outwards can cause serious personal injuries.
NOTE: Cutting-means wear is increased when the machine is used on sandy soils. Inspect the cutting-means more often when the machine is used in these conditions.
ADJUSTING CUTTING HEIGHT
To change the cutting height:
- Remove the isolator key and the battery pack or switch the isolator key to the off (O) position.
- Pull the adjusting lever [2] towards the wheel and place it in the adjustment groove [3]. Adjusting lever and adjustment grooves are near the front left and rear left wheel.
Front Rear
![Front Rear 29 mm 40 mm 51 mm 63 mm 74 mm [2] [3]](/content/2026/04/622596/images/01d359162e6cda14d881e07a89d6960e79c4971dccad610557e7bbd8be168c11.jpg)
![74 mm20 mm 63 mm 51 mm 40 mm 29 mm 20 mm [2] [3]](/content/2026/04/622596/images/86bfd7c6ed11d56b2203439e3f222e7e3d26ce53175df562e3635b6042c41e48.jpg)
The cutting height settings are approximate values, the actual height of the cut grass varies with the lawn and ground condition. To choose the cutting height, check how the lawn looks after mowing a small area and adjust the cutting height where necessary.
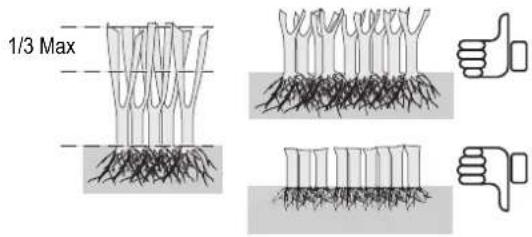
NOTE:
- Do not cut more than 1/3 of the initial height of the grass in one passage as brown spots will appear. The cut will be cleaner and this will limit the possibility of cutting-means and chute blackage.
- If the lawn is too high, mow at the maximum permissible height of the machine. Mow the lawn again 2 or 3 days later.
- The depth of the roots is proportional to the height of the grass cuttings: the shorter the cut, the shallower the roots.
- Choose a cutting height suited to the use of the lawn: leisure, sport: 5 cm or more, ornamental: 1 to 3 cm.
- Only some species of lawn can endure short cuts. If a lawn is cut too short, it is fragile and susceptible to dryness. Please ask the advice of a specialist.
CHECKING THE CUTTING-MEANS BOLT TIGHTENESS
See "CUTTING-MEANS FITTING AND REMOVAL" (page 12).
Check that there is no malfunction, abnormal noise or abnormal vibration by rotating and stopping the motor.
If there is malfunction, abnormal noise or abnormal vibration from the motor, stop using it immediately, contact your servicing dealer.
CHECKING AROUND THE MACHINE
Check and clean the debris, grass or any other foreign object around the machine.
SELECTING THE CUTTING MODE (HRG466XB ONLY)
SWITCHING THE CLIP DIRECTOR
The cutting mode can be switched by operating the clip director [1].
- Release the cutting-means control lever and the drive clutch lever.
- Push the unlock button [2] and turn the clip director lever to select the cutting mode.
![[2] [1] [4][3]](/content/2026/04/622596/images/9663726ccffd668b21a9528869df520002dcb1a0af35968a0ddbf8b7412c4eb5.jpg)
- Grass collection / Rear ejection position [3] : all the grass cuttings are ejected at the rear of the machine, the grass cuttings are not mulched. With the grass catcher, the ejected grass will be collected into the grass catcher. Without grass catcher, the grass will be ejected to the ground. See page 5 to mounting or removing the grass catcher.
- Mulching position [4] : the grass is not ejected at the rear of the machine, but is finely cut and deposited on the lawn. The grass cuttings chopped up in this way decompose and form a natural compost which can produce a quarter of the annual fertilisation requirement of your lawn.
NOTE:
- Mulching is a natural fertilisation technique. The grass is no longer collected in the grass catcher, but is finely cut and deposited on the lawn.
- In addition to its fertilising role, mulching protects the cut, limits evaporation of water during hot periods and relieves you of the task of collecting the grass.
REAR EJECTION
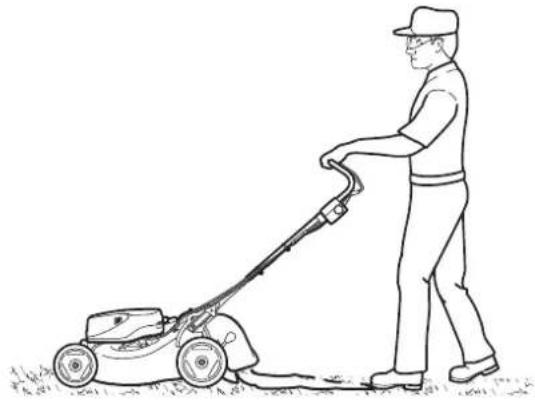
If you do not want to collect the cut grass, the machine can be used without the grass catcher in the mulching position [3]. In this case, the grass ejected is guided to the ground by the discharge cover.
natural_image
Line drawing of a person using a lawn mower on grass (no text or symbols)MOWING
HRG416XB and HRG466XB are battery powered products. When squeezing the cutting-means control lever while pressing the yellow button, motor and cutting-means will start turning immediately.
TO ROTATE THE CUTTING-MEANS
Ensure that the charged battery pack is installed to the machine (page 6).
- Insert the isolator key to the motor and turn the key to ON (I) position [1].
![[1] 0](/content/2026/04/622596/images/c71212c5e1f889e03774e51e76205e5a055c2a79212d82e436d0993025e30970.jpg)
- While pressing the yellow button [2], push the cutting-means control lever [3]. The cutting-means start rotating.
![[2] [3]](/content/2026/04/622596/images/72167c8dfeceb058bef7a89f4026267c09ebbeb0573d0ee5c7630bcb8dec2e10.jpg)
- Release the yellow button. Hold the cutting-means control lever to keep the cutting-means rotating.
TO STOP THE CUTTING-MEANS ROTATION
- Release the cutting-means control lever [3]. The cutting-means rotation stops.
![[3]](/content/2026/04/622596/images/f10d44d8773db124c848a897cee3530d383836ede9ae606abad2db281f08bc74.jpg)
If you leave the machine, or stop the working, etc., do the following step.
- Turn the isolator key to off (O) position [4] and remove the isolator key [5] from the motor.
![[4] [5]](/content/2026/04/622596/images/35120c6186464a04d296a662fa09063203fd6db65d9e656e3540f0b021941db5.jpg)
Remove the battery pack if necessary (page 6).
OPERATING HINTS AND TIPS
WARNING
Take special care when mowing on uneven or irregular ground. The machine may tip over and cutting-means may throw out objects which were hidden.
Keep the 4 wheels firmly on the ground.
Control the direction of the machine using the handle and not by exerting pressure on the cutting-means enclosure with your foot.
CAUTION:
- When mowing around an obstacle, be careful that the cutting-means does not hit it. Never push the machine directly over an object.
- When mowing an uneven area, do not let yourself be pulled along by the machine. Hold the handle firmly and control its movements.
![[6] WRONG [7] RIGHT](/content/2026/04/622596/images/7493848ee965535771ca8cf9e055b5ac4cec4fc8596dd77992fd757d3036bcf6.jpg)
MOWING PROCEDURE
Read the safety instructions before starting to mow.
Using self-propelling system (HRG466XB only):
WARNING
Always release the drive clutch lever when engaging the cutting-means control lever. If drive clutch is engaged, the machine will move when the motor is started.
- Start the motor and engage the cutting-means.
- While pressing the yellow button [1], push the cutting-means control lever [2]. The cutting-means start rotating.
![[1]](/content/2026/04/622596/images/b91f18d16a50b6690866fdad60b2b4ae0e5b8880f1bfe2309e27027daba30d89.jpg)
![[2]](/content/2026/04/622596/images/170eef87ade052d13b6af4ebd0389149115940b75ec25f1342aabacdbd2a4af8.jpg)
- Push the drive clutch lever completely.
- To stop the machine moving forward.
- Release the drive clutch lever.
![[3]](/content/2026/04/622596/images/8dc35f9cce06004d44f7b9bc648294a1ddc6a456086f0b0e22b895bfa3bc7df6.jpg)
- To stop the cutting-means rotating.
- Release the cutting-means control lever.
![[2]](/content/2026/04/622596/images/35be8806711c7a0cda4922f8947636058ab248f5582d44dbf5178d0196300e57.jpg)
Push by hand to propel the machine (All types):
WARNING
Always release the drive clutch lever when engaging the cutting-means control lever. If drive clutch is engaged, the machine will move when the motor is started.
- Start the motor and engage the cutting-means.
- While pressing the yellow button [1], push the cutting-means control lever [2]. The cutting-means start rotating.
![[1]](/content/2026/04/622596/images/0aec36daab88e7bf3e011f87e1e787c89364bba975136df28c12e37ea40aff84.jpg)
natural_image
Diagram of a mechanical component with arrows indicating direction, no text or symbols present-
Push the handle by hand to mow the lawn.
-
To stop the cutting-means rotating.
- Release the cutting-means control lever.
![[2]](/content/2026/04/622596/images/eabba703d445f1cbc51d8e5bb617fc84eb7246ec327fbce1e07b34cec4f4d441.jpg)
NOTE: It is possible to refrain from using the forward drive while mowing in areas with a narrow surface (lanes, borders, etc.).
NOTE: The area of cut (battery duration) depends on lawn conditions, grass density, moisture content, grass length and height of cut. Switching the machine on and off frequently during cutting will also reduce the area of cut (battery duration).
To improve the area of cut (battery duration) it is recommended to cut more frequently, raise the cutting height and use land drive at normal walking pace.
This model is fitted with thermal protection device.
- Function: to prevent overheating and damage to the motor, caused by abnormal use.
- Triggering of the protection device: when the machine is overloaded, the power supply to the motor is shut down immediately.
Procedure to follow when the protection device is triggered:
- Release the yellow button.
- Remove the battery pack.
- Check what caused the issue and eliminate it: cutting height too low (grass too high and/or dense), foreign object preventing the free rotation of the cutting-means etc.
- Allow the machine to cool down in a cool environment (for from 30 to 60 minutes).
Precautions before starting up the machine again:
- Remove the battery pack.
- Check that the cutting-means is able to move freely (using protective gloves).
- Check the safety conditions in the surrounding area (objects on the lawn, persons or animals in the vicinity).
- Install the battery pack.
- Enable the yellow button.
- Restart your machine and confirm the problem disappeared. If problem remains, contact your servicing dealer.
NOTE:
- Mowing frequency: once a week for a lawn intended for leisure purposes, twice a week for an ornamental lawn.
- If possible, mow the lawn in the afternoon or evening before sprinkling, as the grass must be dry. If dust levels are too high, mow the lawn when the grass is dry, but the ground is still damp.
- Choose a cutting height adapted to the terrain (see page 7).
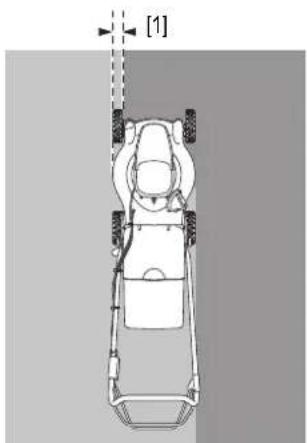
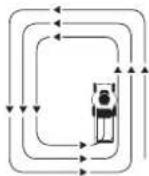
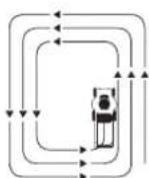
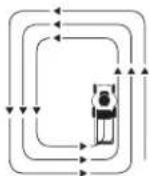
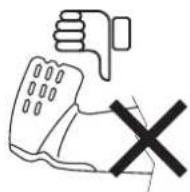
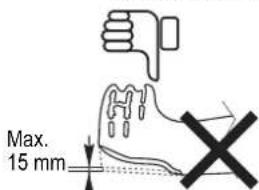
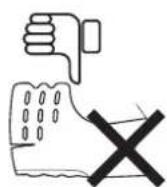
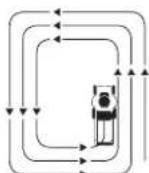
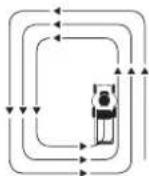
- For a regular cut, you should overlap the part that has already been cut by a few centimetres [1], and increase this overlap zone if the cutting height is high.
- To achieve maximum efficiency, follow the suggested path.
- If your terrain does not have a regular shape or involves several obstacles, divide it into internal parcels which you can mow in the recommended direction.
[2] Catching: turn in a clockwise direction to achieve the maximum efficiency.
[3] Mulching (HRG466XB only): turn in an anti-clockwise direction.
natural_image
Top-down schematic of a car with visible wheels and suspension, no text or symbols present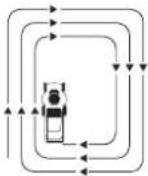
[2]
[3]
EMPTYING THE GRASS CATCHER
When the grass catcher becomes full, grass collection is no longer efficient (the sound of the machine changes and the grass catcher is no longer puffed up by the air from the cutting-means).
HRG466XB:
- Release the cutting-means control lever and drive clutch lever.
HRG416XB:
- Release the cutting-means control lever.
All models:
- Remove the grass catcher (see page 5).
-
Empty the grass catcher:
-
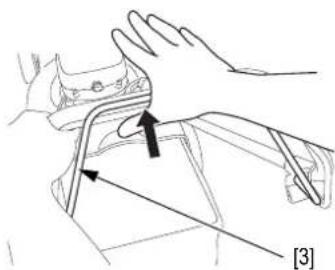
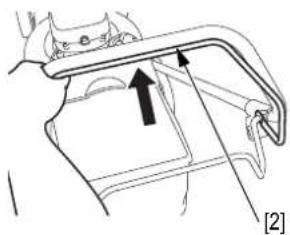
Hold the grass catcher by the metal handle [4].
- Grasp grass catcher [5] and shake the grass catcher to remove the grass.
CAUTION:
- To reduce the fire risk, never leave grass cuttings or leaves in the grass catcher, or in or near buildings. Decomposing grass cuttings causes a high temperature rise.
WARNING
Before use, check that the grass catcher closing device is correctly positioned (discharge cover).
MAINTENANCE
Regular maintenance helps to extend the life of your machine.
WARNING
To carry out this series of service, place the machine on stable and level ground with the isolator key [6] and the battery pack removed from the machine.
![[6]](/content/2026/04/622596/images/b34092adb39811af272d8fda319d723bdad3b1f5b82a07c05ca6d9647534ae4f.jpg)
NOTE: To assure a longer lifetime and more efficient operation, the underside of the machine must be kept clean and free of grass debris by cleaning with a brush and scraper. After use the machine must be cleaned thoroughly before being stored.
DRIVE CLUTCH CABLE INSPECTION (HRG466XB ONLY)
Measure the free play [1] on the tip of drive clutch lever [2] as shown.
Free play: within 1 to 5 mm
If the free play is not within the limit, adjust the cable.
- Loosen the locknut [3].
- Loosen or tighten the cable as necessary so that a free play [1] of 1 to 5 mm is achieved.
- Retighten the locknuts [3] and recheck the free play [1].
- Start the motor. Push the drive clutch lever and release it. Check that the machine start and stop correctly.
![[1] [2]](/content/2026/04/622596/images/1125c5b53aa0b32ef5612185ee96417dc2c0e4a0544bb927603f0b756bd5eb8e.jpg)
![[3]](/content/2026/04/622596/images/ac4a593d11d372049f8703c066041f0a8345ccbb3c1cea3a822d5b1acb551b10.jpg)
NOTE: If the clutch does not engage correctly even when the cable is correctly adjusted, the system may need to be repaired. Take the machine to your servicing dealer.
CUTTING-MEANS CONTROL CABLE INSPECTION
The motor must be switched on or off when the cutting-means control lever [1] is positioned between the specified position [2]. Specified position: between 30 to 60 mm from the handle [3].
![[1] [2] [3]](/content/2026/04/622596/images/468f1a01d15b829a0a3fd0e0f37cb8511d2650fcda9c9716dd068d37cb5c4aa2.jpg)
NOTE: If the motor is switched on or off outside of the specified position, the system may need to be repaired. Take the machine to your servicing dealer.
CUTTING-MEANS FITTING AND REMOVAL

CUTTING-MEANS REMOVAL
- Ensure that isolator key and the battery pack are removed from the machine.
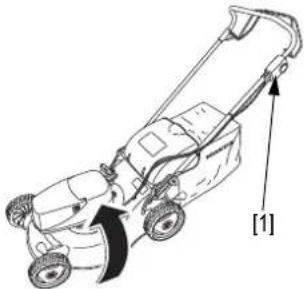
- Tilt the machine so that the yellow button side faces upwards [1].
natural_image
Line drawing of a lawn mower with labeled parts [1] (no text or symbols on the diagram itself)-
Use a 14 mm socket wrench and remove the 2 cutting-means bolts [2] and special washers [3] from the cutting-means holder [4]. Use a wooden block to prevent the cutting-means from turning when removing the bolts.
-
Remove the cutting-means [5].
![[4] [5] [3] [2]](/content/2026/04/622596/images/c341fb570a9e702a87a34137675060bc8c98a749bbaa5ff1363d7ecc27c8442f.jpg)
CUTTING-MEANS INSTALLATION
-
Clean dirt and grass from around the cutting-means mounting area.
-
Install cutting-means [1] using the 2 cutting-means bolts [2] and special washers [3] as shown.
Cutting-means bolt torque: 54 N·m
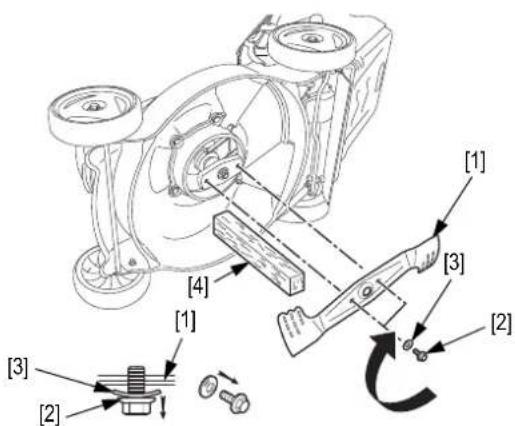
Fit the special washers with their convex side, marked "OUT", facing the bolts.
The cutting-means bolts are specially designed for this application and must not be replaced with other bolts.
- Tighten the cutting-means bolts with a torque wrench. Use a wooden block [4] to prevent the cutting-means from turning.
CAUTION:
- If you do not have a torque wrench, ask your servicing dealer to tighten the cutting-means bolts for you before you use the machine.
- If the cutting-means bolts are too tight or too slack, they may break or unscrew.
CUTTING-MEANS REPLACEMENT
natural_image
Line drawing of a hand holding a wooden beam with a circular hole and a pointed tip (no text or symbols)CAUTION:
- Cutting-means balance is critical to proper machine performance. Replace any cutting-means that is damaged or out of balance.
- Use only genuine Honda replacement cutting-means.
CUTTING-MEANS SHARPENING
CAUTION:
• To avoid weakening the cutting-means, causing it to become unbalanced or getting a bad quality of cut, the cutting-means should be sharpened by competent personnel at your servicing dealer.
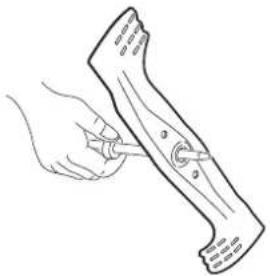
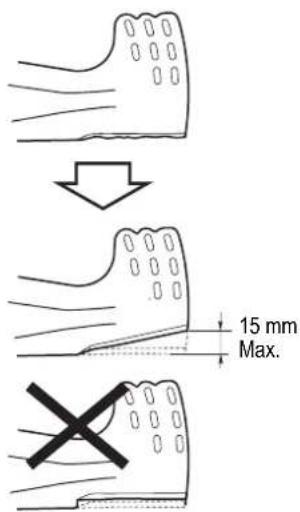
- Sharpen the cutting-means cutting edges with a file. File the top side only. Maintain the original bevel for a fine cutting edge. File both ends evenly to maintain cutting-means balance.
- After sharpening, test the cutting-means balance using a screwdriver as shown above. If either side dips slightly below the horizontal, file that side. Replace the cutting-means if it dips excessively.
MOTOR COOLING FINS AND BATTERY LOCATION CLEANING
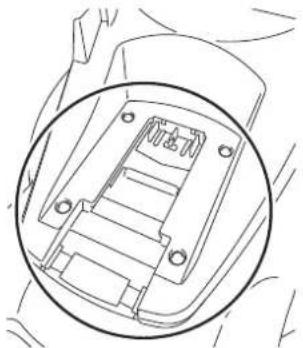
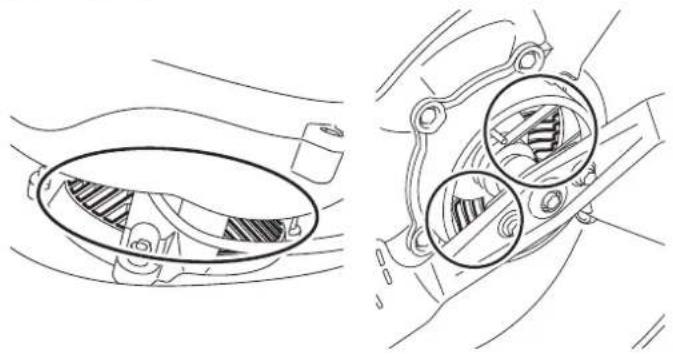
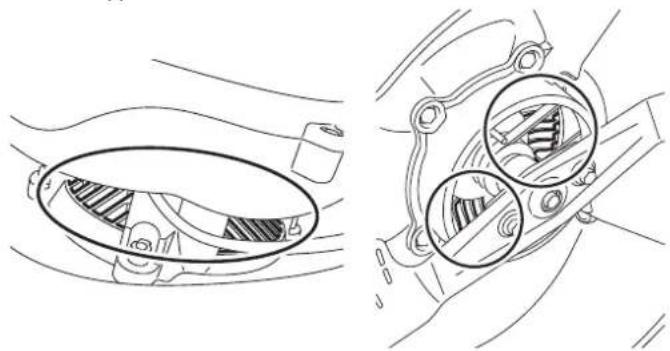
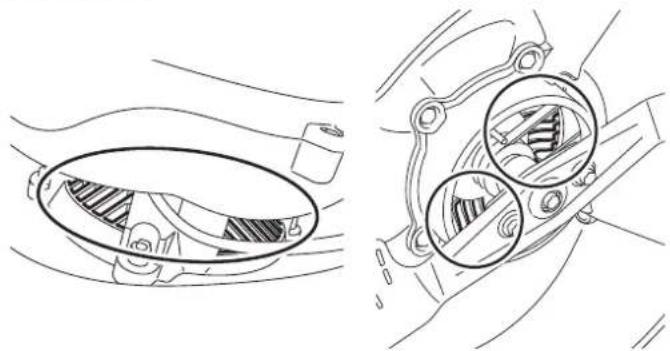
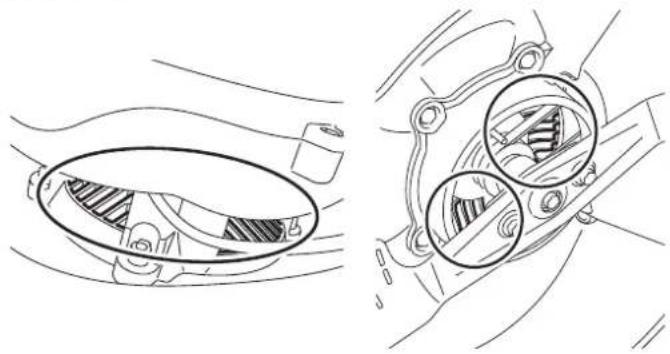
- Clean dirt and grass from around the motor cooling fins and battery location area with a soft, dry brush as shown in the figure.
Battery location
natural_image
Technical line drawing of a mechanical component with a circular inset view showing internal structure (no text or symbols)Motor cooling fins
natural_image
Technical line drawing showing internal components of a vehicle, including a handle and gear assembly (no text or labels)GRASS CATCHER CLEANING AND REPLACEMENT
GRASS CATCHER FABRIC CLEANING
CAUTION:
- Washing with a high pressure washer or steam jet will damage the grass catcher fabric.
- Blocked mesh will prevent the grass from entering the grass catcher fabric.
• To clean the grass catcher fabric, we recommend washing it using a water jet directed from the outside to the inside of the grass catcher fabric. The grass catcher fabric must be completely dry before being used again. If the grass catcher fabric is damp, it will become clogged very quickly.
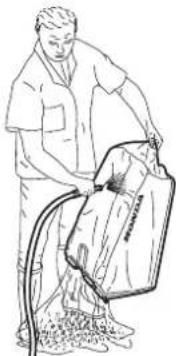
natural_image
Line drawing of a person cleaning a bag with a hose (no text or symbols)WARNING
Objects struck by the cutting-means may be thrown through a torn or damaged grass catcher.
Objects thrown out by the cutting-means can cause serious injuries. Always replace a torn or damaged grass catcher.
GRASS CATCHER FABRIC REPLACEMENT
The grass catcher fabric tends to wear even in normal conditions of use. Regularly check that it is not frayed or torn. Replace a damaged grass catcher fabric with Honda Genuine parts.
- Detach the plastic edges [1] of the worn grass catcher fabric [3] and remove the grass catcher's frame [2].
- Insert the frame into the new grass catcher fabric and fit the plastic edges [1] to the frame.
![HONDA [1] [2] [3]](/content/2026/04/622596/images/ce66962ff3c371df485e3b88971b0e81d15dd2dfb8fb98ac337f8defdc56f359.jpg)
![[1] HONDA](/content/2026/04/622596/images/00c5dc996492e808b23316e5da357eda3727b1ede6411b4d0fc479ff1ab2e07c.jpg)
CLEANING
Before transport or storage ensure machine is clean and free from debris, if necessary clean with a soft, dry brush or a rag.
To clean the grass catcher, use water from a hose. Do not use high pressure washer. Do not use detergent for cleaning the machine.
Keeping the underside of the machine clean will improve performance.
Keeping the battery pack attaching area clean.
Make sure that the system for attaching and connecting the battery pack is free of dirt and grass chipping.
Do not use forced water and avoid wetting the motor or the electrical components.
Do not use harsh products for cleaning the chassis.
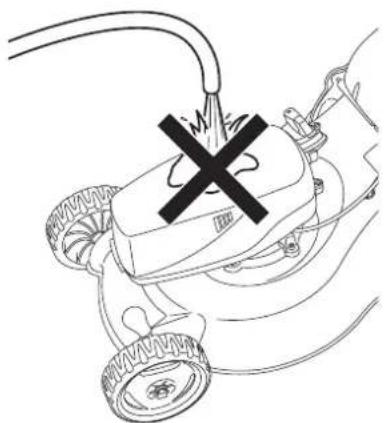
natural_image
Line drawing of a scooter with a cross mark indicating explosion or explosion (no text or symbols)MAINTENANCE SCHEDULE
| REGULAR SERVICE PERIOD (3) | Each use | Every 100 hours of use or each year | Every 150 hours of use or 2 year | Refer to page | |
| Perform at every indicated month or operating hour interval, whichever comes first. | |||||
| Cutting means bolts tightness Check ● 12 | |||||
| Cutting means (Deformation / damage) | Check ● 7 | ||||
| Grass catcher | Check | ● | 5,11,14 | ||
| Drive clutch cable (HRX466XB only) | Check ● 11 | ||||
| Adjust ●(1) - | |||||
| Cutting-means control cable Check ● 12 | |||||
| Drive belt | Check | ●(1)(2) | - | ||
| Ratchet (HRX466XB only) | Grease | ●(2) | - | ||
| Motor cooling fins | Clean | ● | 13 | ||
| Battery location | Clean | ● | 13 | ||
| Motor rotation condition | Check | ● | 7 | ||
| Overall machine outside | Check | ● | 7 | ||
(1) Replace as necessary.
(2) These items should be serviced by your servicing dealer, unless you have the proper tools and are mechanically proficient. Refer to Honda shop manual for service procedures.
(3) For commercial use, log hours of operation to determine proper maintenance intervals.
TROUBLESHOOTING
| Possible cause Correction | |
| Battery pack discharged. Battery pack charging. | |
| Isolator key not fully located. | Check isolator key is fully in the ON (I) position. |
| Battery pack not fully inserted. Fully insert battery pack. | |
| Battery pack too hot / cold. | Allow battery pack to warm up / cool down - Check battery LED display. |
| Faulty battery pack. Replace battery pack with a new one. | |
MACHINE FUNCTIONS INTERMITTENTLY
| Possible cause Correction | |
| Internal wiring of product damaged. Contact your servicing dealer. | |
| Motor / Electronics thermal protector has activated. | Allow motor / Electronics to cool and increase height of cut. |
| External cabling damaged. Contact your servicing dealer. | |
MOTOR START AND THEN STOPS IMMEDIATELY
| Possible cause Correction | |
| Battery pack not fully charged. | Check battery pack display - Charge battery pack if necessary. |
| Isolator key not fully located. | Check isolator key is fully in the ON (I) position. |
| Battery pack not fully inserted. Fully insert battery pack. | |
| Cutting-means wound with tough long grass. | Switch off isolator key and unblock the cutting-means. |
| Battery pack too hot / cold. | Allow battery pack to warm up / cool down - Check battery LED display. |
AREA OF CUT (BATTERY DURATION) NOT LARGE ENOUGH
| Possible cause Correction | |
| Height of cut too low. Increase height of cut. | |
| Grass too high. Increase height of cut. | |
| Grass is dense. | Increase height of cut or cut grass more frequently. |
| Used battery pack life cycle. Replace battery | pack with a new one. |
| Low battery level. | Ensure that battery pack is fully charged before use. |
MOWING AND BAGGING PROBLEMS
| Possible cause Correction | |
| Machine is moving too fast or grass is too high or too dense. | Move slower when possible or increase the cutting height. |
| Machine is moving too fast for lawn conditions. | Contact your servicing dealer.(Except pushing the machine.) |
| Grass catcher overfilled or clogged. | Empty the grass catcher. Wash the grass catcher if it is clogged with dirt (pages 11 and 14). |
| Machine deck is clogged. | Clean out the machine deck (page 12). |
| Cutting-means dull, worn, or damaged. | Sharpen or replace the cutting-means if necessary (page 13). |
| Wrong cutting-means installed. | Install correct cutting-means (page 12). |
VIBRATIONS
| Possible cause Correction | |
| Cutting-means loose, bent, damaged, or unbalanced by improper sharpening. | Tighten loose cutting-means bolts.If cutting-means is found to be bent or damaged, take the machine to your servicing dealer for inspection (page 13). |
| Mechanical damage, such as a bent motor shaft. | Maintenance of these points must be carried out by your servicing dealer. |
STORAGE
PREPARATION FOR STORING THE MACHINE
Ensure that isolator key and the battery pack are removed from the machine before storing the machine.
Correct storage is essential for maintaining the life of the product. If possible, avoid storage areas with high humidity which could cause rust or corrosion.
End of season storage:
- Remove battery pack and store both machine and battery pack in a dry safe place away from direct sunlight.
- Do not place objects on top of the machine.
- When storing for extended periods, thoroughly clean the product beforehand.
NOTE: See annexed instructions for battery pack storage procedures.
TRANSPORT
TRANSPORTING THE MACHINE
WARNING
Ensure that isolator key and the battery pack are removed from the machine before transporting the machine or folding handle.
To facilitate the operation:
- Remove the grass catcher (see page 5).
- Turn the handle fixing knobs [1] and fold back the handle [2].
![[1] [2]](/content/2026/04/622596/images/91400f5e62ad2d89a2e9233fadb380b5ea5b430d5f09d050154e5c764e5a8643.jpg)
NOTE:
While folding the handle, check that the cables are not kinked, twisted, stretched or pinched.
LOADING THE MACHINE
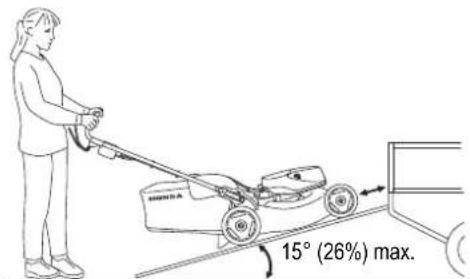
CAUTION:
- To prevent losing control of or damaging the machine, do not use the drive system when going up or down a loading ramp.
- To prevent damaging the drive system, do not engage the clutch when the machine is rolling backwards.
- Transport the machine in normal horizontal position with its 4 wheels flat on the vehicle platform.
• We recommend that you use a loading ramp or that you get someone to help you load and unload the machine. - Adjust the loading ramp so that it is inclined at an angle of less than 15^ (26%).
- When transporting the machine, immobilise it using straps and place chocks under the wheels.
- The straps must not touch the following parts of the machine: drive clutch lever, cutting-means control lever, and all the control cables.
USEFUL INFORMATION
FIND AN AUTHORIZED DEALER
Please refer to the European Internet site: http://world.honda.com/
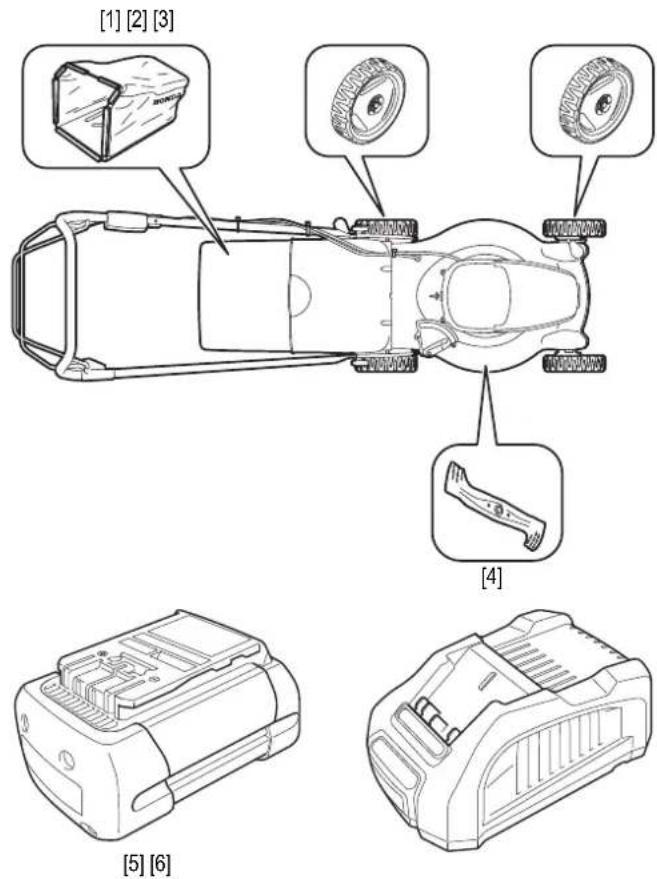
CURRENT PARTS, OPTIONAL ATTACHMENT AND CONSUMABLES
To buy one of the original parts listed below, or any other part, please contact your servicing dealer.
| HRG416XB HRG466XB | |||
| Current parts | |||
| [1] Grass catcher 81320-VH3-R11 81320-VH4-R11 | Grass catcher only (without frame) | ||
| [2] Rear wheel 42710-VH3-R10 42710-VH3-R20 | |||
| [3] Front wheel 44710-VH3-R10 | |||
| [4] Standard cutting-means | 72511-VH3-R90 | 72511-VH4-R90 | Requires use of a dynamometric key |
| [5] Battery pack | DP3640XA (Standard 4A)DP3660XA (Standard 6A)DPW3660XA (All weather 6A)DPW3690XA (All weather 9A) | ||
| [6] Charger CV3680XA | |||
| HRG416XB HRG466XB | |||
| Current parts | |||
| [1] Grass catcher 81320-VH3-R11 81320-VH4-R11 | Grass catcher only (without frame) | ||
| [2] Rear wheel 42710-VH3-R10 42710-VH3-R20 | |||
| [3] Front wheel 44710-VH3-R10 | |||
| [4] Standard cutting-means | 72511-VH3-R90 | 72511-VH4-R90 | Requires use of a dynamometric key |
| [5] Battery pack | DP3640XA (Standard 4A)DP3660XA (Standard 6A)DPW3660XA (All weather 6A)DPW3690XA (All weather 9A) | ||
| [6] Charger CV3680XA | |||
! WARNING
For your safety, it is strictly prohibited to install any other attachment than the ones listed above and especially designed for your machines' model and type.
TECHNICAL SPECIFICATIONS
| MODEL HRG416XB HRG466XB | ||||
| TYPES PEEA PEUA SEEA SEUA | ||||
| GENERAL CHARACTERISTICS | ||||
| Description code MCEF MCDF | ||||
| Function Cutting of grass | ||||
| Dimensions L x W x h mm 1 415 x 453 x 980 | 1 470 x 497 x 980 | |||
| Weight (*) kg | 23 | 27 | ||
| Track FR/RR mm | 369 / 395 | 419 / 439 | ||
| Cutting width cm | 41 | 46 | ||
| Cutting heights settings mm | 6 positions (20 to 74 mm) | |||
| Rear/Front wheel diameter mm | 178 / 212 | |||
| Grass catcher capacity ℓ | 42 | 50 | ||
| Sound pressure level at operator's ears (in accordance with EN60335-2-77:2010) dB(A) | 79 | - | 80.2 | |
| Measuring uncertainty dB(A) | 1.00 | - | 1.00 | |
| Measured sound power level (in accordance with directives 2000/14/EC, 2005/88/EC) dB(A) | 88.76 | - | 90.63 | |
| Measuring uncertainty dB(A) | 0.65 | - | 1.41 | |
| Sound power level guaranteed (in accordance with directives 2000/14/EC, 2005/88/EC) dB(A) | 89 | - | 92 | |
| Vibration test (in accordance with EN60335-2-77:2010)(**) m/s2 | 1.07 | - | 1.33 | |
| Measuring uncertainty m/s2 | 0.56 | - | 0.51 | |
| MOTOR | ||||
| Type | 3-PHASE DC BRUSHLESS | |||
| Max out put power W | 1 000 | 1 800 | ||
| Rotation number at no load (with cutting-means) min-1 | 2 900 ± 40 | 2 800 ± 40 | ||
| TRANSMISSION | ||||
| Type | - | 1 Speed fix type | ||
| Engine to drive | - | V-belt | ||
| Number of speeds | - | Single speed | ||
| Forward speed m/s | - | 0.89 | ||
| Lubrication | - | Oil bath and splash | ||
| Recommended oil | - | 10W40 | ||
| Oil capacity cc | - | 65 | ||
(*) Without battery.
(**) Values for a machine equipped with a grass catcher, in a grass collector position.
AVANT-PROPOS
natural_image
Line drawing of two Honda lawn mower machines, shown from top and side views (no text or symbols)CE
natural_image
Technical line drawings of two mechanical components with labeled parts [29] and [30], no readable text or symbols beyond labels.IDENTIFICATION DE L'EQUIPEMENT COMMANDES FONCTIONS
MONTAGE DU BAC DE RAMASSAGE
![[1] HONDA](/content/2026/04/622596/images/4b89d63578cef46c80415a70d1c4f921c9db976bbc09d60319048dc81d4d71d2.jpg)
natural_image
Three identical diagrams showing electronic components or connectors with no visible text or symbolsLED 1 allumée
natural_image
Line drawing of a lawn mower with labeled parts [1] (no text or symbols on the diagram itself)
NORMAL DEFORME
USURE EXCESSIVE FENDILLE
![Avant Amhere 29 mm 40 mm 51 mm 63 mm 74 mm [2] [3]](/content/2026/04/622596/images/7b9cbb1fae5ba60b41e25e54cb6f65e080354d98472d706526aed7bec68105ca.jpg)
![74 mm20 mm 63 mm 51 mm 40 mm 29 mm 20 mm [2] [3]](/content/2026/04/622596/images/efd0af9c92bfb555d5b50fb8cd3b95756dcd4aaf4ee01041bfaa9178775e8213.jpg)
natural_image
Line drawing of a person using a lawn mower (no text or symbols present)TONTE
PROCEDURE DE TONTE
natural_image
Diagram of a mechanical component with arrows indicating direction, no text or symbols presentnatural_image
Line drawing of a lawn mower with labeled parts [1] (no text or symbols on the diagram itself)INSTALLATION DE L'ORGANE DE COUPE
natural_image
Line drawing of a hand holding a wooden beam with a pointed tool inserted, showing no text or symbolsATTENTION :
natural_image
Line drawing of a car interior showing a plastic housing with slots and mounting holes (no text or symbols)natural_image
Technical line drawing of a car interior showing internal components and a close-up view of the dashboard (no text or symbols)NETTOYAGE ET REMPLACEMENT DU BAC DE RAMASSAGE
NETTOYAGE DU TISSU DU BAC DE RAMASSAGE
ATTENTION :
natural_image
Line drawing of a person using a cart with a bag, no text or symbols present
AVERTISSEMENT
![[1] HONDA](/content/2026/04/622596/images/7ec3a1330c440cb05699af3d087001930a94eb9cedb35925d88a740bf4bbbecf.jpg)
NETTOYAGE
natural_image
Line drawing of a car with a cross symbol indicating explosion or explosion (no text or labels)PROGRAMME D'ENTRETIEN
natural_image
Line drawing of two Honda lawn mower machines, shown from top and side views (no text or symbols)CE
natural_image
Technical line drawings of two mechanical components with labeled parts [29] and [30], no readable text or symbols beyond labels.![[1] HONDA](/content/2026/04/622596/images/599f42b55c914ccb996bfcf1245d14c2907a705e78aec0c535a5d31c3a985f9c.jpg)
natural_image
Three identical schematic diagrams of electronic components or connectors, each with a labeled terminal block and connection symbols (no text or labels present)1 LED ein
0% < Ladezustand ≤ 30%
2 LED ein
30% < Ladezustand ≤ 60%
3 LED ein
60% < Ladezustand ≤ 100%
1 LED blinkt
Ladezustand 0% = leer
3 LEDs blinken
natural_image
Line drawing of a lawn mower with labeled parts [1] (no text or symbols on the diagram itself)natural_image
Line drawing of a person using a lawn mower on grass (no text or symbols)MÄHEN
MÄHVORGANG
natural_image
Diagram of a mechanical component with arrows indicating direction, no text or symbols present- Anhalten des
Schneidwerkzeugs.
natural_image
Diagram of a car interior showing hand positioning and movement arrows (no text or symbols)natural_image
Top-down schematic of a vehicle chassis with wheels and a vertical dimension line labeled [1] (no text or symbols beyond the label)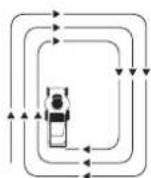
[2]
[3]
natural_image
Line drawing of a lawn mower with labeled parts [1] (no text or symbols on the diagram itself)natural_image
Line drawing of a hand holding a wooden beam with a pointed tool inserted, showing no text or symbolsVORSICHT:
natural_image
Technical line drawing of a mechanical component with a circular inset view showing internal structure (no text or symbols)Motorkühlrippen
natural_image
Technical line drawing showing internal components of a vehicle's door and intake manifold (no text or labels)natural_image
Line drawing of a person using a bag to clean or wash the material (no text or symbols)WARNING
![[1] HONDA](/content/2026/04/622596/images/74330b0f6cddbc983022debf24eb0a34cdf17812fb7e8c6523de5671fe76d674.jpg)
REINIGUNG
natural_image
Line drawing of a motor with a cross mark and tire, no text or symbols presentWARTUNGSPLAN
VORSICHT:
natural_image
Line drawing of two Honda lawn mower machines, shown from top and side views (no text or symbols)CE
natural_image
Technical line drawings of two mechanical components with labeled parts [29] and [30], no readable text or symbols beyond labels.MONTAGGIO DEL SACCO DI RACCOLTA
![[1] HONDA](/content/2026/04/622596/images/ad32588c3a5d0276982caa12b0adb43d777b47ff5693e38a361ab304986b6f0e.jpg)
NOTA:
natural_image
Three identical schematic diagrams of electronic components with no text or symbols1 LED acceso
natural_image
Line drawing of a lawn mower with labeled parts [1] and directional arrow (no text or symbols beyond labels)
natural_image
Line drawing of a person using a lawn mower on grass (no text or symbols)RASATURA
- Per arrestare
natural_image
Technical line drawing of a mechanical component with arrows indicating direction (no text or symbols)natural_image
Top-down schematic of a vehicle showing front, side, and top views with no text or symbols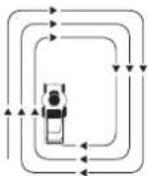
[2]
[3]
SVUOTAMENTO DEL SACCO DI RACCOLTA
natural_image
Line drawing of a lawn mower with labeled parts [1] (no text or symbols on the diagram itself)natural_image
Line drawing of a hand holding a wooden beam with a pointed tool inserted, no text or symbols presentATTENZIONE:
natural_image
Technical line drawing of a mechanical component with a circular inset view showing internal structure (no text or symbols)natural_image
Technical line drawing of a car interior showing internal components and structural details (no text or symbols)PULIZIA E SOSTITUZIONE DEL SACCO DI RACCOLTA
PULIZIA DEL SACCO DI RACCOLTA
ATTENZIONE:
natural_image
Line drawing of a person using a bag to lift a rope (no text or symbols)
AVVERTENZA
![[1] HONDA](/content/2026/04/622596/images/702761c740028c0c94f22968999236a151b41f5e6741b07d2055cdfd9fec7791.jpg)
PULIZIA
natural_image
Line drawing of a robot with a cross mark on the wheel, no text or symbols presentATTENZIONE:
natural_image
Line drawing of two Honda lawn mower machines, shown from top and side views (no text or symbols)CE
| Europese markt(PEEA, SEEA) | Australische markt(PEUA, SEUA) |
| WARNINGAVOID SERIOUS INJURY OR DEATH.Follow all instructions In Owner's Manual.Keep safety device/guarda, shield, switchee, etc.in place and working.Avoid steep slopes. Lock down and behind before and while moving backwards. Do not operate unless properly trained. To reduce the risk of electric shock, do not expose to water or operates on wet ground. Remove the battery pack before servicing or removing blade.OBJECTS THROWN BY BLADE CAN CAUSE SERIOUS INJURY. Impact area and remove details before meeting. Do not mean when children or others are around. Wear eye protection.DO NOT OPERATE UNLESS GUARD IS CLOSED OR BAG IS IN PLACE. |
[5] Geluidsniveau
[6] CE-markering
[7] Nominale spanning
[8] Aanbevolen motortoerental in min ^-1 (tpm)
[9] Gewicht in kilogram
[10] Productiejaar
[11] Serienummer
[12] Model - Type
natural_image
Technical line drawings of two mechanical components with labeled parts [29] and [30], no readable text or symbols beyond labels.BENAMING VAN DE ONDERDELEN
ONDERDEEL FUNCTIE
[15] Duwbeugel
[16] Maaihoogte-regelaar. . . . . . . . . . . . . . . . . . . . . . . . . . . . . . . . . . . . . . . . . . . . . . . . . . . . . . . . . . . . . . . . . . . . . . . . . . . . . . . . . . . . . . . . . . . . . . . . . . . . .
[17] Koppelingsbeugel (alleen HRG466XB) .....
[18] Mesbedieningsbeugel.... Inschakelen en stopzetten van het
[19] Gele knop .... In- en uitschakelen van de motor d.m.v. een dubbelwerkende schakelaar die onbedoeld inschakelen voorkomt
[20] Grasvanger. Verzamelen van het gemaaide gras
[21] Uitwerpscherm .... Beschermt tegen wegschietende voorwerpen
[22] Maaimodusregelaar (alleen HRG466XB) .... Schakelen tussen versnipperen/uitworp achter
[23] Achterwielen
[24] Sleutel hoofdstroomschakelaar
[25] Accudeksel
[26] Ontgrendelingsbeugel accudeksel
[27] Accu-indicator
[28] Motorkoelribben
[29] Accu
[30] Oplader
![[5] [3] [2] [4]](/content/2026/04/622596/images/a840de41ff513bb2133f2e71b4f518c189ff3e186f1d6f2d7cebbd34db70a791.jpg)
MONTEREN VAN DE GRASVANGER
![[1] HONDA](/content/2026/04/622596/images/2dd915fd7894eec74c1d485cce54bc742eb2b36ab1cac54ef6bfc831c6d81128.jpg)
CONTROLEREN VAN DE GRASVANGER
WAARSCHUWING
natural_image
Three identical diagrammatic icons showing electronic components or connectors (no text or symbols)1 Led aan
0% < laadniveau ≤ 30%
2 Led aan
30% < laadniveau ≤ 60%
3 Led aan
60% < laadniveau ≤ 100%
Led 1 knippert
Laadniveau 0% = accu leeg
Led 3 knippert
natural_image
Line drawing of a lawn mower with labeled parts [1] (no text or symbols on the diagram itself)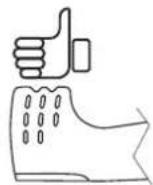
NORMAAL VERBOGEN
OVERMATIG VERSLETEN GEBARSTEN
![74 mm 20 mm 63 mm 51 mm 40 mm 29 mm 20 mm [2] [3]](/content/2026/04/622596/images/8ae105ebca1a9919fc655d43d04100cd56c02f67e6013d558c31554f75d8cced.jpg)
natural_image
Line drawing of a person using a lawn mower on grass (no text or symbols)MAAIEN
MAAI-INSTRUCTIES
natural_image
Diagram of a car interior showing a handle and seat with arrows indicating movement (no text or symbols)natural_image
Top-down schematic of a vehicle showing front, rear, and side views with no text or symbols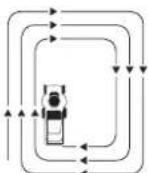
[2]
[3]
LEGEN VAN DE GRASVANGER
natural_image
Line drawing of a lawn mower with labeled parts [1] (no text or symbols on the diagram itself)MONTEREN VAN HET MAAIMES
natural_image
Line drawing of a hand holding a wooden beam with a pointed tool inserted, showing no text or symbolsVOORZICHTIG:
natural_image
Technical line drawing of a mechanical component with a circular inset view showing internal structure (no text or symbols)Motorkoelribben
natural_image
Technical line drawing of a car interior showing internal components and a close-up view of the dashboard (no text or symbols)REINIGEN EN VERVANGEN VAN DE GRASVANGER REINIGEN VAN DE GRASVANGERZAK
VOORZICHTIG:
natural_image
Line drawing of a person using a bag to lift a rope (no text or symbols)
WAARSCHUWING
![[1] HONDA](/content/2026/04/622596/images/83e145d9a74f91cb46f03a50cf7b9c18f9dd839f7dc093c57af05cf13b14a14b.jpg)
REINIGEN
natural_image
Line drawing of a car with a cross mark and tire, no text or symbols presentONDERHOUDSSCHEMA
VOORZICHTIG:
natural_image
Line drawing of two Honda lawn mower machines, shown from top and side views (no text or symbols)CE
natural_image
Technical line drawing of a mechanical component with no visible text or symbols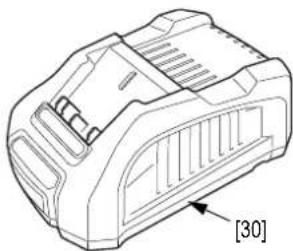
natural_image
Technical line drawing of a mechanical component with no visible text or symbolsIDENTIFIERING AV UTRUSTNINGEN
REGLAGE FUNKTIONER
MONTERA GRÄSUPPSAMLAREN
![[1] HONDA](/content/2026/04/622596/images/cda2e5bd8e4bbd09708209bf547f6bcc4771c0d062147030d2c5635847ebe058.jpg)
Sätta fast
gräsuppsamlare:
natural_image
Three identical schematic diagrams of electronic components or connectors, no text or symbols presentLED 1 tänd
natural_image
Line drawing of a lawn mower with labeled parts [1] (no text or symbols on the diagram itself)
NORMALT SKEVT
KRAFTIGT SLITEN SPRUCKET
JUSTERING AV KLIPPHÖJD
![74 mm20 mm 63 mm 51 mm 40 mm 29 mm 20 mm [2] [3]](/content/2026/04/622596/images/7ff62626400fb045062e8ded03d3e301baf0f7cf8a82aff66558f17e994b0142.jpg)
natural_image
Line drawing of a person using a lawn mower on grass (no text or symbols)KLIPPNING
STOPPA KNIVARNAS ROTATION
KLIPPNING
natural_image
Diagram of a car interior showing a handle and seat with arrows indicating direction (no text or symbols)natural_image
Top-down schematic of a car with front wheel and side-mounted sensors (no text or symbols)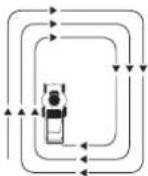
[2]
[3]
TÖMMA GRÄSUPPSAMLAREN
MONTERA OCH TA BORT KNIVARNA

TA BORT KNIVARNA
MONTERA KNIVARNA
natural_image
Line drawing of a hand holding a tool interacting with a wooden beam (no text or symbols)OBSERVERA:
natural_image
Technical line drawing of a mechanical component with a circular inset view showing internal structure (no text or symbols)Motorns kylflänsar
natural_image
Technical line drawing showing internal components of a car intake manifold and dashboard (no text or labels)RENGÖRING OCH BYTE AV GRÄSUPPSAMLAREN RENGÖRING AV GRÄSUPPSAMLAREN
OBSERVERA:
natural_image
Line drawing of a person using a bag to lift a rope (no text or symbols)! WARNING
BYTA GRÄSUPPSAMLARENS TYG
![[1] HONDA](/content/2026/04/622596/images/bc74199a473f955e02e3c3eff7252249d0f0a4fbaab9bbf94d53902ed7d9751d.jpg)
RENGÖRING
natural_image
Line drawing of a car being struck by a rope, with a black 'X' symbol indicating the weight (no text or labels present)UNDERHÅLLSSCHEMA
[4]
natural_image
Line drawing of a mechanical device with internal components (no text or symbols)[5] [6]
natural_image
Line drawing of a mechanical component with no visible text or symbolsAKTUELLA DELAR, TILLBEHÖR OCH FÖRBRUKNINGSARTIKLAR
Harju County Estonia
Tel.: +372 651 7300
Fax: +372 651 7301
info.baltic@ncgimport.com
BELARUS
JV Scanlink Ltd
Montazhnikov lane 4th, 5-16
Minsk 220019
Republic of Belarus
Tel.: +375172349999
Fax: +375172380404
honda@jpmotors.lt
BELGIUM
Honda Motor Europe Ltd
Doomveld 180-184
1731 Zellik
Tel.: +32 2620 10 00
Fax: +32 2620 10 01
http://www.honda.be
bh_pe@honda-eu.com
BULGARIA
Premium Motor Ltd
Andrey Lyapchev Blvd no 34
1797 Sofia
Bulgaria
Tel.: +3592 423 5879
Fax: +3592 423 5879
http://www.nondamotor.bg
office@hondamotor.bg
CROATIA
AS Domžale Moto center d.o.o.
Brezence
SI-8216 Mirna Peč
Tel.: +386 1 562 37 00
http://www.honda-as.com
info@honda-as.com
CYPRUS
Powerline Products Ltd
Cyprus - Nicosia
Vasilias 18 2232 Latsia
Tel.: 003579949042
info@powerlinecy.com
http://www.powerlinecy.com
CZECH REPUBLIC
BG Technik cs, a.s.
U Zavodiste 251/8
15900 Prague 5 - Velka
Chüchle
Tel.: +420 2 838 70 850
Fax: +420 2 667 111 45
http://www.honda-stroje.cz
DENMARK
TIMA A/S
Ryttermarken 10
DK-3520 Farum
10442 Athens, Greece
Tel: +30 210 519 31 10
Fax: +30 210 519 31 14
mail@technellas.gr
HUNGARY
MP Motor Co., Ltd.
Kamaraerdei ut 3.
2040 Budaors
Tel.: +36 23 444 971
Fax: +36 23 444 972
http://www.hondakisgepek.hu
info@hondakisgepek.hu
IRELAND
Two Wheels Itd
M50 Business Park, Ballymount
Dublin 12
Tel.: +353 1 4381900
Fax: +353 1 4607851
http://www.hondaireland.ie
sales@hondaireland.ie
ISRAEL
Mayer's Cars and Trucks Co.Ltd. -
Honda Division
Shevach 5, Tel Aviv, 6777936
Israel
+972-3-6953162
OrenBe@mct.co.il
ITALY
Honda Motore Europe Ltd
The Associated Motors
Company Ltd.
New Street in San Gwakkin Road
Aries Power Equipment
Puławska 467
02-844 Warszawa
Tel.: +48 (22) 861 43 01
Fax: +48 (22) 861 43 02
http://www.ariespower.pl
http://www.grow.com.pt
geral@grow.com.pt
ROMANIA
Agrisorg SRL
Sacadat Str Principala
Nr 444/A Jud. Bihor
Romania
Tel.: (+4) 0259 458 336
info@agrisorg.com
SLOVAK REPUBLIC
Honda Motor Europe Ltd
SPAIN & all Provinces
Greens Power Products, S.L.
Poligono Industrial Congost –
EC Declaration of Conformity
| Français. (French)Déclaration CE de Conformité1. Le soussigné, *2, représentant du constructeur, déclare que la machine décret ci-dessous répond à toutes les dispositions applicables de* Directive Machine 2006/42/CE* Directive 2014/30/UE en lien avec la compatibilité électromagnétique* Directive 2000/14/CE – 2005/88/CE des émissions sonores dans l'environnement des matériels destinés à être utilisé à l'extérieur des bâtiments* Directive 2011/65/UE - (UE) 2015/863 relative à la limitation de l'utilisation de certaines substances dangereuses dans les équipements électriques et électroniques2. Description de la machinea) Produit: Tondeuse à gazon à batterieb) Fonction : couper de l'herbe (tondre)c) Modèle d) Type e) Numéro de série3. Constructeur et en charge des éditions de documentation techniques de la machine4. Référence aux normes appliquées5. Directive des émissions sonores dans l'environnement des matériels destinés à être utilisé à l'extérieur des bâtimentsa) Puissance accoustique mesuréeb) Puissance accoustique garantiec) Paramètre du bruitd) Procédure d'évaluation de conformitée) Organisme notifié6. Fait à7. Date | Italiano (Italian)Dichiarazione CE di Conformità1. Il sottoscritto, *2 in rappresentanza del costruttore, dichiara qui di seguito che la macchina sotto descritta soddisfa tutte le disposizioni pertinenti delle:* Direttiva macchine 2006/42/CE* Direttiva 2014/30/UE sulla compatibilità eletromagnetica* Direttiva sulla emissione acustica delle macchine e attrezzature destinate a funzionare all'aperto 2000/14/CE – 2005/88/CE* Direttiva 2011/65/UE - (UE) 2015/863 sulla restrizione dell'uso di determinate sostanze pericolose nelle apparecchiature elettriche ed eletroniche2. Descrizione della macchinaa) Prodotto: Rasaerba a batteriab) Funzione: Taglio di erbac) Modelo d) Tipo e) Numero di serie3. Costruttore e competente per la compilazione della documentazione tecnica4. Riferimento alle norme applicate5. Direttiva sulla emissione acustica delle macchine e attrezzature destinate a funzionare all'apertoa) Livello di potenza sonora misuratob) Livello di potenza sonora garantitoc) Parametri emissione acustiad) Procedura di valutazione della conformitàe) Organismo notificato6. Fatto a7. Data | Deutsch (German)EG-Konformitatserklärung1. Der Unterzeichner, *2 der den Hersteller vertritt, erklärt hiermit dass das hierunter genannte Maschine allen einschlägigen Bestimmungen der * entspricht.* Maschinenrichtlinie 2006/42/EG* Richtlinie 2014/30/EU über die elektromagnetische Verträglichkeit* Geräuschrichtlinie im Freien 2000/14/EG – 2005/88/EG* Richtlinie 2011/65/EU - (EU) 2015/863 zur Beschränkung der Verwendung bestimmter gefährlicher Stoffe in Elektro- und Elektronikgeräten2. Beschreibung der Maschinea) Produkt: Akku Rasenmäherb) Funktion : Gras schneidenc) Model d) Typ e) Seriennummer3. Hersteller und in der Position, die technische Dokumentation zu erstellen4. Verweis auf aufwendbare Standards5. Geräuschrichtlinie im Freiena) gemessene Lautstärkeb) Schalleistungspegelc) Geräuschvorgabe d) Konformitätsbewertungs Abiaufe) Benannte Stelle6. Ort7. Datum | |
| Nederlands (Dutch)EG-verklaring van overeenstemming1. Ondergetekende, *2, vertegenwoordiger van de constructeur, verkiaart hiermee dat het hieronder beschreven machine voidoet aan alle toepasselijke bepalingen van:* Richtlijn 2006/42/EG betreffende machines* Richtlijn 2014/30/EU betreffende elektrolumagnetische overeenstemming* Richtlijn 2000/14/EG – 2005/88/EG betreffende geluidsemissio (openlucht)* Richtlijn 2011/65/EU - (EU) 2015/863 betreffende beperking van het gebruik van bepaalde gevaarlijke stoffen in elektrische en elektronische apparatuur2. Beschrijving van de machinea) Product: Accu grasmaalerb) Functie : gras maaienc) Model d) Type e) Seriennummer3. Fabrikant en in staat om de technische documentatie samen te stellen4. Referentie voor toegepaste normen5. Geluidsemissierichtlijn (openlucht)a) Gemeten geluidsvermögensniveaua) Gewaarborgd geluidsvermögensniveauac) Geluidsparameterd) Conformiteitsbeoordelingsproceduree) Aangemelde instantie6. Plaats7. Datum | Dansk (Danish)EU OVERENSTEMMELSEERKLÄERING1. UNDERTEGNEDE, *2, SOM REPRÄSENTERER PRODUCENTEN, ERKLERER HERMED AT MASKINEN, SOM ER BESKREVET NEDENFOR, OPFYLDER ALLE RELEVANTE BESTEMMELSER IFÖLGE:* MASKINDIREKTIV 2006/42/EF* DIREKTIV 2014/30/EU OM ELEKTROMAGNETISK KOMPATIBILITET* DIREKTIV OM STÖJEMISSION 2000/14/EF – 2005/88/EF* direktiv 2011/65/EU - (EU) 2015/863 om begrænsning af anvendelsen af visse farlige stoffer i elektrisk og elektronisk udstyr2. BESKRIVELSE AF PRODUKTETA) PRODUKT : Batteridreven pläneklipperB) ANVENSELSE : GRESKLIPNINGC) MODEL D) TYPE E) SERINUMMER3. PRODUCENT OG I STAND TIL AT UDRABEJDE DEN TEKNISKE DOKUMENTATION4. HENVISNING TIL ANVENDTE STANDARD5. DIREKTIV OM STÖJEMISSION FRA MASKINERTIL UDENDÖRS BRUGA) MÄLT LYDEFFEKTNIVEAUB) GARANTERET LYDEFFEKTNIVEAUC) STÖJPARAMETERD) PROCEDURE FOR OVERENSSTEMMELSESVURDERINGE) BEMYNDIGET ORGAN6. STED7. DATA | Ελληνικά (Greek)ΕΚ-Δήλωση συμμόρφωσης1. Ο κάτωθε υπογεγραμμένος, *2. εκπροσωπόντας τον κατακεωστή, δηλώνω ότο το παρακάτω περιγραφόμενο άχημα πληροί όλες τις σχετικές προδιαγραφές του:* Οδηγία 2006/42/ΕΚ για μηχανές* Οδηγία 2014/30/ΕΕ σχετικά με την ηλεκτρομανητική συμβατότητα* Οδηγία 2000/14/ΕΚ – 2005/88/ΕΚ για το επίπεδο θορύβου σε εξωτερικούς χώρους.* Οδηγία 2011/65/ΕΕ - (ΕΕ) 2015/863 για τον περιορισμό της χρήσης ορισμένων επικίνδυνων υσικών σε ηλεκτρικό και ηλεκτρονικό εξοπλισμό2. Περιγραφή μηχανήματοςa) προϊόν: Μηχανή γκαζόν μπαταρίαςb) Λειουργία : για κόψιμο γρασιδιούc) Μονιτέλο d) Τύπος ε) Αριθύδος σειράς παραγωγής3 Κατακευαστής και να είναι σε θέση να καταρίσει τον τιχνικό φάκελο4. Παραπομητί στα ισχύοντα πρότυτα5. Οδηγία εππεδου θορόβου εξωτερικών χώρωνa) Μετρηθείσα ηχητική έντασηb) Εγγυημίνη ηχητική έντασηc) Ηχητική παράμετροςd) διαδικασία πιστοποίησηςe) Οργανισμόστιατοποίησης6. Η δοκμή ένιν7. Ημερομηνία | Română (Romanian)CE -Declarašte de Conformitate1. Subsemnatul *2, representand producatorui, declar prin prezenta faptui ca echipamentul descris mai jos indeplineste toate conditiile necesare din:* Directiva 2006/42/CE privind echipamentul* Directiva 2014/30/UE privind compatibilitalea electromagnetică* Directiva 2000/14/CE – 2005/88/CE privind poluarea fonica in spatiu deschis* Directiva 2011/65/UE - (UE) 2015/863 privind restricjile de utilizare a anumitor substanje periculose in echipamentele electrice și electronice2. Descrierea echipamentuluia) Produsul: Maşiná de tuns gazon cu acumulatorb) Domeniu de utilizare : tunderea ierbiic) Model d) Tip e) Serie produs3. Producer si abiliat să realizeze documentație tehnică4. Referință la standardele aplicate5. Directiva privind poluarea fonica in spatiu inchisa) Puterea acustica masuratab) Putere acustica maxim garaniatac) Indice poluare fonicad) Procedura de evaluare a conformatilie) Notificari6. Emisa la7. Data |
| Svenska (Swedish)EG-försäkran om överensstämmelse1. Undertecknad, *2, representant för tillverkaren, deklarerar härmed att maskinen beskriven nedan fulfiljörler alla relevanta bestämmeiser enl:* Direktiv 2006/42/EG gällande maskiner* Direktiv 2014/30/EU på elektromagnetiskompatibilitet* Direktiv 2000/14//EG – 2005/88/EG gällande buller utomhus*direktiv 2011/65/EU - (EU) 2015/863 om begränsning av användning av vissa farliga ämnen i elektrisk och elektronisk utrustning2. Maskinbeskrivninga) Produkt: Batteridriven gräsklippareb) Funktion : gräsklippingc) Modell d) Type e) Serienummer3. Tillverkare och ska kunna sammenställa teknisk dokumentationen.4. Referens för tillämpad standard5. Direktiv för buller utomhusa) Uppmätt ljudnivåb) Garanterad ljudnivåc) Buller parameterd) Förfarande för bedömninge) Anmäläda organ6. Uttärdat vid7. Datum | Español (Spanish)Declaración de Conformidad CE1. El firmante, *2, en representación del fabricante, adjunto declara que la máquina abajo descrita, cumpie las cláusulas relevantes de:* Directiva 2006/42/CE de maquinaria* Directiva 2014/30/UE sobre compatibilidad electromagnética* Directiva 2000/14//CE – 2005/88/CE de ruido exterior* Directiva 2011/65/EU - (UE) 2015/863 sobre restricciones a la utilización de determinadas sustancias peligrosas en aparatos eléctricos y electrónicos2. Descripción de la máquinaa) Producto: Cortacésped de bateriab) Función : Cortar el céspedc) Modelo d) Tipo e) Número de serie3. Fabricante que puede compilar el expediente técnico4. Referencia a normas aplicadas5. Directiva sobre ruido exteriora) Potencia sonora Medidab) Potencia sonora Garantizadac) Parámetros ruidod) Procedimiento evaluación conformidadee) Organismo notificado6. Realizado en7. Fecha |
| c) Model | d) Type | e) Serial number |
| *1 | *1 | |
| Lietuviu kalba (Lithuanian)EB atliklides deklaracija1. Žemiau pasirašes, p. *2 astovaujantis gamintoja,deklarujoja, kad zemiau apraflya mašina atitinka visas šivardintų direktyvų nuostatas:* Mechanizmų direktyva 2006/42/EB* Direktiva 2014/30/ES dėl elektromagnetiniosuderinamumo* Trukšmo lauke direktyva 2000/14/EB –2005/88/EB* direktyva 2011/65/ES - (ES) 2015/863 dėl tam tikrųpavojingų medžiagu naudojimo elektros irelektroninėje jrangoje apribojimo2. Prietaiso aprašymasa) Gaminyos: Akumulatorinė vejapjovėb) Funkcija : žolės pjovimasc) Modelis d) Tipas e) Serijos numeris3. Gamintojas ir galintis sudaryti techninędokumentaciją4. Nuoroda j taikytus standartus5. Trukšmo lauke direktyvaa) Išmatuotas garso galingumo lygisb) Garantuojamas garso galingumo lygisc) Trukšmo parametrasd) Tipase) Regisruota įstaiga6. Vieta 7. Data | Bългарски (Bulgarian)EO декларация за съответствие1. Долуподписалият се *2, представляващпроизводителя, с настоящото декларирам, чемашините, описани по-долу, отговарят на всичкисъответни разпоредби на:* Direktiva2006/42/EO относно машините* Direktiva 2014/30/EC за Електромагнитнасъвместимост* Direktiva 2000/14/EO – 2005/88/EO относновумовите емисии на съоръжения,предназначени за употреба изъвн сградите* Direktiva 2011/65/EC – (EC) 2015/863 годинаотносно ограничението за употребата наопределене опасни вещества в електрического иелектронното оборудване2. Описание на машинитеa) Продукт: Косачка задвижана с акумулаторb) Функция : косене на тревас) Модел d) Тип e) Сериен номер3. Производител и отговорник за съставяне натехническа документация4. Препратка към приложените стандарти5. Direktiva относно шумовите емисии насъоръжения, предназначени за употреба изъвнсградитеa) Измерена звукова мощностb) Гарантирања звукова мощностc) Параметърът шумd) Процедурата за оценка на съответствиетое) Нотифициран орган6. Масто на изготвяне 7. Дата на изготвяне | Norsk (Norwegian)EF- Samvarserklæring1. Undertegnede, *2 representerer produsenten ogherved erklærer at maskineri beskrevet nedenforinnifir relevant informasjon fra følgende forskifter,* Maskindirektivet 2006/42/EF* Direktiv 2014/30/EU om Elektromagnetskapabilitet* Direktiv om stay utenders 2000/14/EF –2005/88/EF* Direktiv 2011/65/EU - (EU) 2015/863 omrestriksjoner av bruk av visse farlige matrialer ieletrisk og elektronik ustayr,2. Beskrivelse av produkta) Produkt: Batteridrevet gressklipperb) Funksjon : Kippe grassc) Modell d) Type e) Seriennummer3. Produsent og i stand til å utarbeide den tekniskedokumentasjonen4. Henvisning til brukte standarder5. Utenders direktiv får staya) Målt stayb) Maks stayc) Konstant stayd) Verdi vurderings prosedyree) Gjeldene kjøretøykropp/stamme/skrog6. Sted 7. Dato |
| Türk (Turkish)AT Uygunluk Beyanı1. Aşağıda imzasi bulunan *2, Greticinin adina, buyaziyla birlikte aşapidaki makine lle ilgili tümhükümlülüklerin yerine getlinidigini beyan etmektedir:a) Makina Emniyet Yönetmeligi 2006/42/AT* Elektromanyetik uyumluklia ilgili 2014/30/AB no’lu yönetmelik*Açik Alanda Kullanılan Techizat TarafındanOluşturulan Çevredeki Gürültü Emisyonu lle ilgiliYönetmelik 2000/14/AT – 2005/88/AT* 2011/65/AB - (AB) 2015/863 elektriki ve elektronikekipmanlarda bazi tehlikeli maddelerin kullanımininyasaklanmasina ilškin yönetimlik2. Makinann tarifi* Ürün: Bataryali Čim bịņme makinasib) İşlevi : Ġimierin kesilmesic) Model d) Tipi e) Seri numarası3. Teknik dosyayı hazriamakla yetkili olanToplulukta yerlešķ Imalatçı4. Uygulanan standartlara istīnaden5. Açik alan gürültü Yönetmeligia) Oiçūlen ses gücüb) Garanti edilen ses gücüc) Günültü parametresid) Uygunluk değerlendirme prosedūrúe) Onaylanmış kurułuş6. Beyanın yeri : 7. Beyanın tarihi : | Islenska( Icelandic)EB-Samraemisyfiriýsing1. Undimitađur, Mr *2, fyrir hõnd framleiõandans,lýsir hér meď yír pvi að vėlin sem lýst er hér aðneđan samraemist číllam gildandi ákvæđumtliskipunar:*Leičeiningar fyrir vělbůnač 2006/42/EB*TILSKIPUN 2014/30/EU VARDANDI SAMHÆFNIRAFSEGULSVIBS*Leičeiningar um hávaðamengun 2000/14/EB –2005/88/EB*Tilskipun 2011/65/EU - (EU) 2015/863 varõandiileičeingar um notkun á hættulegum efnum í rafog rafeinda būnači2. Lýsing á vělbůnači0) Őkutəki. Rafdrifin siāttuvélib) Virkni : Gras slegičć) Gerő d) Tegund e) Serial númer3. Framleiõandi on fær um að taka samantækniskjölin4. Tilvisun til višeigandi stašla5. Leičeiningar um hávaðamenguna) Mašidur hávađa stykurb) Staõfestur hávađa stykurc) Havađa breytilekid) Staõfesting á gaõõastõõlume) Merkingar6. Gert hjá 7. Dagsetning | Hrvatski(Croatian)EK Izjava o sukladnosti1. Polpisani, *2, u ime proizvođač, ovime izjavljujeda strojevi navedeni u nastavku ispunjavaju svevažeće odredbe:* Propisa za strojeve 2006/42/EK* Propisa 2014/30/EU na elektromagnetskukompatibilnost* Propisa o buci na otvorenome 2000/14/EK –2005/88/EK* Direktiva 2011/65/EU - (EU) 2015/863 oograničenju određenjih opasnih supstanc uelektriconoj i elektronskoj opremi.2. Opis strojevaa) Proizvod: Akumulatorska kosilica za travub) Funkclonalnost : rezanje travec) Model d) Tip e) Serjeski broj3. Proizvođač i osoba za sastavljanje tehničedokumentacije4. Referencija na primijenjene standarde5. Propis o buci na otvorenomea) Izmjerena jačina zvukab) Zajamčena jačina zvukac) Parameter buked) Postupak za ocjenu sukladnostie) Obaviješteno tijelo6. U 7. Datum |
- SAFETY INSTRUCTIONS
- WARNING
- CAUTION:
- HONDA
- OWNER'S MANUAL
- Battery powered lawnmower
- HRG416XB • HRG466XB
- CONTENTS
- TO BE FOLLOWED CAREFULLY
- A) TRAINING
- B) PREPARATIONS
- C) OPERATION
- E) GENERAL PRECAUTIONS
- F) ADDITIONAL WARNINGS
- G) TRANSPORTATION AND HANDLING
- SAFETY STICKERS
- IDENTIFICATION OF MACHINE
- GENERAL DESCRIPTION
- EQUIPMENT IDENTIFICATION
- CONTROLS FUNCTIONS
- PREPARATION AND CHECKS BEFORE USE
- ASSEMBLY OF THE HANDLE
- ASSEMBLY OF THE GRASS CATCHER
- CHECKING THE GRASS CATCHER
- NOTE:
- PREPARATION OF THE BATTERY PACK
- INSTALLATION AND REMOVAL OF THE BATTERY PACK
- Installation:
- Removal:
- CHECKING BATTERY LEVEL
- LEDs behavior of battery indicator
- LED on
- LED on
- LED on
- Blinking 1 LED
- Blinking 3 LED
- CHARGING THE BATTERY PACK
- CHECKING CUTTING-MEANS CONDITION
- To check cutting-means condition:
- ADJUSTING CUTTING HEIGHT
- CHECKING THE CUTTING-MEANS BOLT TIGHTENESS
- CHECKING AROUND THE MACHINE
- SELECTING THE CUTTING MODE (HRG466XB ONLY)
- SWITCHING THE CLIP DIRECTOR
- REAR EJECTION
- MOWING
- TO ROTATE THE CUTTING-MEANS
- TO STOP THE CUTTING-MEANS ROTATION
- OPERATING HINTS AND TIPS
- MOWING PROCEDURE
- EMPTYING THE GRASS CATCHER
- HRG466XB:
- HRG416XB:
- All models:
- MAINTENANCE
- DRIVE CLUTCH CABLE INSPECTION (HRG466XB ONLY)
- CUTTING-MEANS CONTROL CABLE INSPECTION
- CUTTING-MEANS FITTING AND REMOVAL
- CUTTING-MEANS REMOVAL
- CUTTING-MEANS INSTALLATION
- Cutting-means bolt torque: 54 N·m
- CUTTING-MEANS REPLACEMENT
- CUTTING-MEANS SHARPENING
- MOTOR COOLING FINS AND BATTERY LOCATION CLEANING
- GRASS CATCHER CLEANING AND REPLACEMENT
- GRASS CATCHER FABRIC CLEANING
- GRASS CATCHER FABRIC REPLACEMENT
- CLEANING
- TROUBLESHOOTING
- STORAGE
- PREPARATION FOR STORING THE MACHINE
- End of season storage:
- TRANSPORT
- TRANSPORTING THE MACHINE
- LOADING THE MACHINE
- USEFUL INFORMATION
- FIND AN AUTHORIZED DEALER
- CURRENT PARTS, OPTIONAL ATTACHMENT AND CONSUMABLES
- ! WARNING
- AVANT-PROPOS
- IDENTIFICATION DE L'EQUIPEMENT COMMANDES FONCTIONS
- MONTAGE DU BAC DE RAMASSAGE
- LED 1 allumée
- TONTE
- PROCEDURE DE TONTE
- INSTALLATION DE L'ORGANE DE COUPE
- ATTENTION :
- NETTOYAGE ET REMPLACEMENT DU BAC DE RAMASSAGE
- NETTOYAGE DU TISSU DU BAC DE RAMASSAGE
- AVERTISSEMENT
- NETTOYAGE
- LED ein
- LED ein
- LED ein
- LED blinkt
- LEDs blinken
- MÄHEN
- MÄHVORGANG
- VORSICHT:
- REINIGUNG
- MONTAGGIO DEL SACCO DI RACCOLTA
- NOTA:
- LED acceso
- RASATURA
- SVUOTAMENTO DEL SACCO DI RACCOLTA
- ATTENZIONE:
- PULIZIA E SOSTITUZIONE DEL SACCO DI RACCOLTA
- PULIZIA DEL SACCO DI RACCOLTA
- AVVERTENZA
- PULIZIA
- BENAMING VAN DE ONDERDELEN
- ONDERDEEL FUNCTIE
- MONTEREN VAN DE GRASVANGER
- CONTROLEREN VAN DE GRASVANGER
- WAARSCHUWING
- Led aan
- Led aan
- Led aan
- Led 1 knippert
- Led 3 knippert
- MAAIEN
- MAAI-INSTRUCTIES
- LEGEN VAN DE GRASVANGER
- MONTEREN VAN HET MAAIMES
- VOORZICHTIG:
- REINIGEN EN VERVANGEN VAN DE GRASVANGER REINIGEN VAN DE GRASVANGERZAK
- REINIGEN
- IDENTIFIERING AV UTRUSTNINGEN
- REGLAGE FUNKTIONER
- MONTERA GRÄSUPPSAMLAREN
- LED 1 tänd
- JUSTERING AV KLIPPHÖJD
- KLIPPNING
- STOPPA KNIVARNAS ROTATION
- TÖMMA GRÄSUPPSAMLAREN
- MONTERA OCH TA BORT KNIVARNA
- TA BORT KNIVARNA
- MONTERA KNIVARNA
- OBSERVERA:
- RENGÖRING OCH BYTE AV GRÄSUPPSAMLAREN RENGÖRING AV GRÄSUPPSAMLAREN
- BYTA GRÄSUPPSAMLARENS TYG
- RENGÖRING
- AKTUELLA DELAR, TILLBEHÖR OCH FÖRBRUKNINGSARTIKLAR
- BELARUS
- BELGIUM
- BULGARIA
- CROATIA
- CYPRUS
- CZECH REPUBLIC
- DENMARK
- HUNGARY
- IRELAND
- ISRAEL
- ITALY
- ROMANIA
- SLOVAK REPUBLIC
- SPAIN & all Provinces
Brand : Honda
Model : HRG416XB
Category : Lawn mower