X13APLUS - Slicer Berkel - Free user manual and instructions
Find the device manual for free X13APLUS Berkel in PDF.

| Product Type | Automatic Slicer (Model X13A-PLUS) |
| Brand | Berkel |
| Dimensions (L x D x H) | 680 mm x 770 mm x 640 mm |
| Net Weight | 44.5 kg (automatic model) |
| Power Supply | 115 V, 60 Hz, 5.5 A (single-phase) |
| Blade Diameter | 330 mm (13 in) |
| Slice Thickness | 0 to 33 mm |
| Cutting Speeds (automatic) | 20, 40 and 60 slices/minute |
| Stroke Lengths (automatic) | 127 mm, 229 mm, 330 mm |
| Maximum Slice Size | 265 mm x 170 mm (rectangular) |
| Main Functions | Cutting of boneless meats, cheeses, and vegetables; manual/automatic mode; thickness adjustment; soft start |
| Safety | Blade guard, carriage lock, emergency stop button, blade cover |
| Maintenance and Cleaning | Manual cleaning with detergent and disinfectant; sharpening with built-in sharpener |
| Spare Parts and Repairability | Available from authorized Berkel or Hobart service centers; sharpener, brushes, blades, etc. |
| Warranty | 1 year (parts and labor) |
| General Information | Lifting leg for cleaning under the unit; 3 stroke lengths and 3 speeds in automatic; return to home position at end of cycle |
Frequently Asked Questions - X13APLUS Berkel
User questions about X13APLUS Berkel
0 question about this device. Answer the ones you know or ask your own.
Ask a new question about this device
Download the instructions for your Slicer in PDF format for free! Find your manual X13APLUS - Berkel and take your electronic device back in hand. On this page are published all the documents necessary for the use of your device. X13APLUS by Berkel.
USER MANUAL X13APLUS Berkel
OWNER/OPERATOR MANUAL

natural_image
Industrial cutting machine with mechanical components and a base (no visible text or symbols)MODELS X13-PLUS & X13A-PLUS SLICERS
NOTICIA IMPORTANTE
This manual contains Important Safety
Instructions which must be strictly
followed when using this equipment.
BEFORE USING THIS EQUIPMENT
Berkel's slicers are designed to slice meat and other food products safely and efficiently. However, unless the operator is properly trained and supervised, there is the possibility of a serious injury. It is the responsibility of the owner to ensure that this slicer is used properly and safely, strictly following the instructions contained in this manual and any requirements of local law.
No one should use or service this slicer without proper training and supervision. All operators should be thoroughly familiar with the procedures contained in this manual. Even so, Berkel cannot anticipate every circumstance or environment in which its slicers will be used. You, the owner and/or operator, must remain alert to the hazards posed by the function of a slicer—particularly the sharp rotating blade and moving table. No one under 18 years of age should operate this equipment. If you are uncertain about a particular task, ask your supervisor.
This manual contains a number of safe practices in the General Safety Instruction Section. Additional warnings are placed throughout this manual. WARNINGS RELATED TO YOUR PERSONAL SAFETY ARE INDICATED BY:
WARNING
If any warning label, wall chart or manual becomes misplaced, damaged or illegible, please contact your nearest distributor or Berkel directly, for a free replacement.
Remember, however, THIS MANUAL OR THE WARNING LABELS DO NOT REPLACE THE NEED TO BE ALERT AND TO USE YOUR COMMON SENSE WHEN USING THIS SLICER.
TABLE OF CONTENTS
Page
General Safety Instructions....2
Equipment Description....4
Intended Uses and Characteristics ...... 6
Unpacking and Installation 6
Operation....7
Cleaning and Sanitizing 8
Sharpening.... 10
Repair Parts/Repair Service 10
Troubleshooting....11
Specifications....12
Optional Accessories....13
Warranty 14
The Berkel Company • World's Leading Manufacturer of Slicers and Food Processing Equipment
BERKEL COMPANY
2006 Northwestern Parkway • Louisville, KY 40201
Phone: 800-348-0251 • Fax 888-888-2838
www.berkelequipment.com
▲ PELIGRO
CUCHILLA FILOSA
natural_image
Simple line drawing of a hand crossed out of a circle, no text or symbols presentto avoid serious personal injury
follow all the instructions in this manual and
-
NEVER touch this machine without training and authorization by your supervisor.
-
MACHINE MUST BE on solid level support.
-
GUARDS MUST BE in place before plugging in and turning on machine.
-
ALWAYS use three pronged plug provided.
-
ALWAYS use food pusher not your hand.
-
NEVER TOUCH ROTATING KNIFE.
-
KEEP hands, arms, hair and loose clothing clear of all moving parts.
-
SHOULD MACHINE JAM, turn off and unplug before removing obstruction.
-
TURN OFF AND UNPLUG machine from power source before cleaning, sanitizing or servicing.
-
USE ONLY the attachments provided by the manufacturer.
-
SHOULD any warning label on a machine come off or become unreadable, contact the manufacturer or your Designated Berkel Service Location for a free replacement.

natural_image
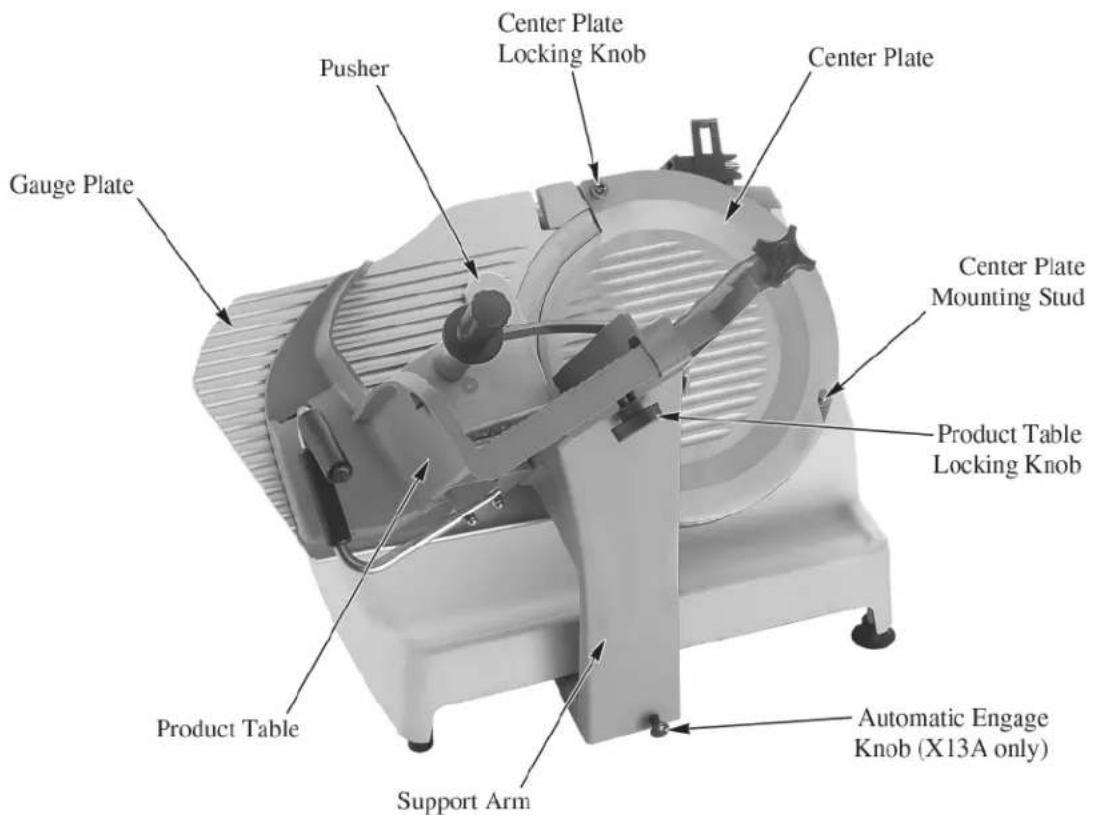
Simple line drawing of a hand crossed out of a circle, no text or symbols presentEQUIPMENT DESCRIPTION

EQUIPMENT DESCRIPTION
Intended Uses and Characteristics
Intended Uses
The model X13-PLUS and X13A-PLUS slicers are designed for cutting the following types of products:
- Meat (without bones)
- Cheese
- Vegetables
The following types of items are NOT suitable for slicing on the Model X13-PLUS or X13A-PLUS slicers:
• Non-food products
- Frozen foods
- Bone in products
Special Features/Characteristics
Reduced seams and joints for better sanitation
Gauge plate interlock for aid in cleaning
Left hand thickness adjustment for easier cleaning and better user interface
Kick stand for cleaning under the slicer
3 slicing speeds (automatic only)
3 slicing stroke lengths (automatic only)
Automatic return to home at the end of the cutting cycle (automatic only)
Unpacking and Installation
Note: Immediately after unpacking, check the slicer for shipping damage. If the equipment is found to be damaged, save everything! Notify the carrier within 5 days of delivery.
- Carefully remove the cardboard carton from around the slicer.
- Slide the product table off the gauge plate. It is in the cardboard box on the gauge plate.
- Get assistance from another individual and place the slicer on a solid, level surface that is free of any obstructions.
- Make sure to unpack the sharpener, fence and brush. They are located in pockets in the cardboard base.
- Slide the product table onto the support arm and secure using the red product table locking knob.
WARNING
To eliminate a potential shock hazard, a properly grounded outlet using the three-pronged plug provided must power this unit. Before plugging the slicer in, check your outlet voltage to be sure it complies with the voltage specified on the serial number plate on the slicer.
Note: The model/serial number plate is located on the back of the slicer.
Operation
General
- Check to see that the center plate and product table are in place on the slicer and the gauge plate is completely closed. The holes in the bottom of the center plate fit over the bottom mounting studs in the ring guard and the center plate locking knob is at the top of the center plate. The product table slides completely onto the support arm and is secured with the red product table locking knob.
- If the slicer is an automatic, then make sure the automatic engage knob on the right side of the table support arm is pushed in, towards the left.
- Plug the slicer in. The pilot light, between the start and stop buttons will illuminate.
- Push the green ON button and the slicer blade will start to turn. Press the red STOP button to stop the knife.
Automatic Operation
- If you have an automatic slicer, with the slicer stopped, pull the automatic engage knob fully out on the right side of the machine. This will put the slicer in the automatic mode.
- Push the speed selection button to change the speed:
One illuminated LED indicates 20 slicers per minute (slow speed) Two illuminated LED's indicates 40 slices per minute (medium speed) Three illuminated LED's indicates 60 slices per minute (high speed)
- Pushing the stroke length selection button changes the length of the stroke. This allows smaller products to be sliced quicker, without the table moving any faster. Make sure the stroke length is longer than the width of the product.
One illuminated LED indicates 1/3 of the total possible stroke length. Two illuminated LED's indicates 2/3 total possible stroke length. Three illuminated LED's indicates full stroke length
- Press the green START button and the product table will slowly come to its forward position to find its home position. Once it gets back to the home position, then it will start to go back and forth at the preset speed and stroke length.
- Push the red STOP button and the table will complete its stroke and stop in the home position.
- As long as the slicer remains in the automatic mode it will remember its home position and always start right up when the green START button is pushed. It will always start slow and gradually build up to its full speed. This is the “soft start” feature.
- Each time you take the slicer out of the automatic mode, and then back into the automatic mode, it will always find its home position before it starts to run (as indicated in step #8).
- Each time you activate the slicer into automatic mode, the last speed and stroke length settings will be remembered until power is disrupted from the slicer (i.e. disconnecting the power cord from the outlet). Once power is reconnected to the slicer, the default for automatic is slow speed and full stroke length.
Cleaning and Sanitizing
The following cleaning procedures have been prepared with the grateful cooperation of Kay Chemical, an Ecolab company.


Frequency:
The slicer shall be cleaned and sanitized at intervals to comply with national, state and/or local health codes.
Supplies:
Dish Detergent such as KAY® Pot & Pan Detergent
Sanitizer such as KAYQUAT ^® II
Nonabrasive Pad
Nylon Brush
Cut-Resistant gloves
Cloth wipes
Note: Sanitizer concentration shall comply with Section 4-501.114, Manual and Mechanical Warewashing Equipment, Chemical Sanitization – Temperature, pH, Concentration, and Hardness of the FDA Food Code. If a chemical sanitizer other than chlorine, iodine, or quaternary ammonium is used, it shall be applied in accordance with the EPA-registered label use instructions.
Procedure:
CAUTION: Use extreme care when cleaning blade.
- Close the slicer thickness control knob.
- Turn the slicer off and unplug power cord from the wall outlet.
- Pull the product table to the front of the slicer. If it is an automatic slicer, make sure the engagement knob is in the manual position before pulling the product table to the front of the slicer.
- Unscrew the red handle from the pusher and remove the pusher from the pusher arm. Unscrew and remove the pusher arm slide rod from the product table. Loosen the product table locking knob and remove the table. The product table cannot be removed unless it is fully forward and the thickness control knob is completely closed.
- Remove the center plate by lifting the center plate locking knob at the top of the center plate and lift from the slicer.
- Pre-scrape food from removable product table and center plate.
- Wash center plate, product table, red handle, pusher, pusher arm, and slide rod in hot detergent solution. The sharpener can be submerged in the hot detergent solution for cleaning.
- Rinse the center plate, product table, red handle, pusher, pusher arm, slide rod, and sharpener in fresh, hot, potable water.
-
Submerge the center plate, product table, red handle, pusher, pusher arm, slide rod, and sharpener in sanitizer solution. Set parts to the side on a sanitized surface and allow to air dry.
-
Put on cut resistant gloves. Pre-scrape food from slicer.
-
Using fresh detergent solution, clean the front side of the knife with a non-abrasive pad, nylon brush, and/or cloth wipes. Always wipe from the center of the knife to the outer edge.
-
Clean the backside of the knife with the fresh detergent solution, non-abrasive pad, nylon brush, and/or cloth wipes.
-
Fold a cloth wipe that has been submerged in fresh detergent solution and work it between the ring guard and knife, starting at the base of the ring guard. Carefully work the cloth around the knife, cleaning the edge of the knife, edge of the ring guard and edge of the gauge plate. Use extreme caution.
-
Clean the rest of the slicer base and other components with the fresh detergent solution and a non-abrasive pad.
-
Lift up the front of the slicer about 6 inches. A spring loaded kick stand will drop down to the table surface and hold the front of the slicer up. This will allow you to pre-scrape food and clean the table surface under the slicer with fresh detergent solution.
-
Using a fresh cloth wipe, rinse slicer and area under slicer with fresh hot potable water.
-
Spray slicer and area under slicer with fresh sanitizer solution from a sanitizer spray bottle and allow to air dry. Remove cut-resistant gloves.
-
Once the table surface under the slicer has been washed, rinsed and sanitized, lift the front edge of the slicer and push the kick stand back under the slicer. Slowly lower the slicer back to the table.
-
Slide the pusher arm onto the slide rod and reassemble the pusher to the pusher arm using the red handle. Reassemble the slide rod to the product table. Reinstall the center plate and the product table to the slicer. After assembly, spray with sanitizer solution and allow to air dry.
-
Plug in slicer. Place sharpener in proper storage location.

Gasket Inspection:
The recommended interval between inspections shall not exceed six months.
The inspection must be made by the manufacture or an authorized service agent.
WARNING
The slicer must be removed from service until repaired by the manufacture or an authorized service agent if any gasket or seal is found to be damaged or missing.
Sharpening
Sharpen only when necessary. Too frequent or prolonged sharpening will prematurely wear the knife and/or stones. The knife should be sharpened when you notice wavy slices or excessive scrap. Only sharpen the knife after it has been cleaned. You cannot effectively sharpen a dirty knife.
- If it is an automatic slicer, make sure the engagement knob is in the manual position, by pushing in (to the left) the knob on the right side of the support arm.
- Make sure the product table is pulled all the way to the front of the slicer and the thickness control knob is completely closed.
- Place the top tab of the sharpener into the slot of the product table. Clip the bottom clip of the sharpener over the end of the product table.
- Open the thickness control knob as far as it will go, fully exposing the knife.
- Turn the slicer on and gently push the product table towards the knife just as if you were slicing product. Once both the sharpening and deburring stones make contact with the knife, remain there for 2-3 seconds and then pull the product table back to the home position.
- Turn off the slicer and close the thickness control knob.
- Unclip the sharpener from the product table using the bottom clip. It can be cleaned in the sink and then stored in a drawer.
- After sharpening, clean and sanitize the slicer as outlined on page 8.
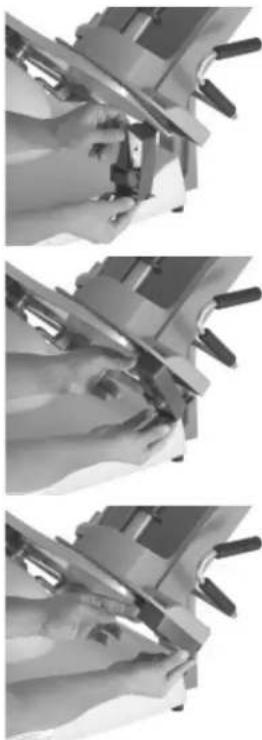
natural_image
Three-panel grayscale photo showing hands operating a mechanical device with tools, no visible text or symbolsRepair Parts/Repair Service/Exploded Views
Please contact Hobart Service or your designated Berkel Service Location (DBSL) for any repair parts/repair service required on your Berkel slicer. For the nearest Hobart service office, please visit www.hobartservice.com and then click on “locate an office”. Then either enter your ZIP CODE or select a state to find the closest location. Or you can also visit www.berkelequipment.com and click on the “Service tab”. Then enter your ZIP CODE to be shown the closest Hobart or Berkel DBSL service locations. Other product information such as Parts Catalogs and Instruction/Operator Manuals are also available on the www.berkelequipment.com website. Click on the “Resource Center tab”, and then click on the information category you want to read or download. Be sure to enter your product model number. Additional information may be obtained from:
Berkel Company
2006 Northwestern Parkway
Louisville, KY 40201
Phone: 800-348-0251
Fax: 888-888-2838
www.berkelequipment.com
Troubleshooting
Electrical Failure
- Is the pilot light illuminated? If not:
- Is the power cord completely plugged into the wall outlet?
- Check the power cord for cuts or breaks.
- Are you getting electricity from the wall outlet? Check by plugging in another piece of equipment with the same electrical requirements.
-
Is the pilot light illuminated but blinking? If so, then push the stop button and then the start button. If the light is still blinking, then contact your nearest Hobart Service location or Designated Berkel Service location. If you do not know your nearest Hobart Service location or your nearest Designated Berkel Service Location, then see page 10 for details on whom to contact.
-
If the correction of any of the above conditions does not result in a functional slicer, call Hobart Service or your Designated Berkel Service Location.
Can't remove product table
- Make sure the gauge plate is closed by turning the thickness control knob to 0, and the product table is fully to the front of the slicer.
Product table doesn't move freely
- Check to make sure the slicer is not in the automatic mode.
Note: The mechanism in the undercarriage should not be oiled or greased.
Pusher is not sliding easily on the rod
- Check that the rod is clean and apply Berkel oil to the rod.
Thickness Control Knob not Advancing Gauge Plate
-
Is the product table properly attached to the support arm? If not, then the gauge plate cannot be opened.
-
If the correction of the above condition does not result in a functional slicer, then contact your nearest Hobart Service location or Designated Berkel Service location.
Knife not sharpening
- Are sharpening procedures being followed exactly as shown in this manual?
- Are sharpening stones clean? If not, then remove them from the assembly and clean them thoroughly with water and a stiff bristled brush. They are left hand threaded nuts.
- Are sharpening stones worn and not making contact with the knife? If so, then replace them.
- Is the knife clean? If coated with food fats, the sharpening stones won't sharpen the knife. Clean the knife and stones.
Specifications
Machine Dimensions:
| Width | 26-3/4" | (680mm) |
| Length | 30-1/2" | (770mm) |
| Height | 25-1/4" | (640mm) |
Diameter of Knife: 13" (330mm)
Slice Thickness: 0 to 1-5/16" (33mm)
Slicing Speed (automatic):
| Low | 20 slices per minute |
| Medium | 40 slices per minute |
| High | 60 slices per minute |
Stroke Length (automatic):
| Short | 5 inches |
| Medium | 9 inches |
| Full | 13 inches |
Slicing Capacity:
| Square | 7-1/2" x 7-1/2" (190mm x 190mm) |
| Round | 8-1/2" (220mm) |
| Rectangle | 10-1/2" x 6-3/4" (265mm x 170mm) |
Net Weight:
| Manual | 88 lbs. |
| Automatic | 98 lbs. |
Shipping Weight:
| Manual | 118 lbs. |
| 128 lbs. |
Voltage/Amperage: 115/60/1; 5.5 amps
| Horsepower: | 1/2hp |
Optional Accessories
VEGETABLE CHUTE (4975-00463)
A vegetable chute is available that fits on the product table. The vegetable chute is used for quantity slicing of various size fruit, meats or vegetables.
TRAYS
SLAW TRAY (3875-00241)
The slaw tray is a deep tray to receive a large quantity of product and retain the juices.

Get more done.
Warranty
Effective: February 14, 2002
Berkel Company (“Berkel”) warrants to the Buyer of new equipment that said equipment, when installed in accordance with our instructions and subjected to normal use, is free from defects in material or workmanship for a period of one (1) year from the date of sale. ^1
BERKEL SPECIFICALLY DISCLAIMS ANY IMPLIED WARRANTY OF MERCHANTABILITY OR EXPRESS OR IMPLIED WARRANTY OF FITNESS FOR A PARTICULAR PURPOSE.
Berkel's obligation and liability under this warranty is expressly limited to repairing or replacing equipment that proves to be defective in material or workmanship within the applicable warranty period. Berkel or a Designated Berkel Service Location will perform all repairs pursuant to this warranty. Berkel expressly excludes responsibility for incidental or consequential damages to buyer or any third party, including, without limitation, damages arising from personal injuries, lost profits, loss of business opportunity, loss of property, economic losses, or statutory or exemplary damages, whether in negligence, warranty, strict liability or otherwise.
This warranty does not apply to: periodic maintenance of equipment including but not limited to lubrication, replacement of worn blades, knives, stones, knobs, accessories, and miscellaneous expendable supply items, and other adjustments required due to installation set-up or normal wear.
These warranties are given only to the first purchaser from a Berkel Authorized Channel of Distribution. No warranty is given to subsequent transferees.
The foregoing warranty provisions are a complete and exclusive statement of the warranty between the buyer and seller. Berkel neither assumes nor authorizes any persons to assume any other obligation or liability connection with said equipment. This warranty supersedes any and all prior warranties to the subject hereof.

Pour en faire plus.
MANUEL DU PROPRIÉTAIRE ET MODE D'EMPLOI

natural_image
Mechanical device with multiple arms and a central hub, shown on a base (no visible text or symbols)TRANCHEUSES, MODÈLES
X13-PLUS & X13A-PLUS
AVIS IMPORTANT
This manual contains Important Safety Instructions which must be strictly followed when using this equipment.
AVANT D'UTILISER CET APPAREIL
2006 Northwestern Parkway • Louisville, KY 40201
Téléphone: (800) 348-0251 • Fax (888) 888-2838
www.berkelequipment.com
⚠ AVERTISSEMENT
LAME ROTATIVE TRÈS TRANCHANTE
natural_image
Simple line drawing of a hand crossed out by a diagonal line, enclosed in a circle (no text or symbols)to avoid serious personal injury
follow all the instructions in this manual and
-
NEVER touch this machine without training and authorization by your supervisor.
-
MACHINE MUST BE on solid level support.
-
GUARDS MUST BE in place before plugging in and turning on machine.
-
ALWAYS use three pronged plug provided.
-
ALWAYS use food pusher not your hand.
-
NEVER TOUCH ROTATING KNIFE.
-
KEEP hands, arms, hair and loose clothing clear of all moving parts.
-
SHOULD MACHINE JAM, turn off and unplug before removing obstruction.
-
TURN OFF AND UNPLUG machine from power source before cleaning, sanitizing or servicing.
-
USE ONLY the attachments provided by the manufacturer.
-
SHOULD any warning label on a machine come off or become unreadable, contact the manufacturer or your Designated Berkel Service Location for a free replacement.

natural_image
Simple line drawing of a hand crossed out by a diagonal line, enclosed in a circle (no text or symbols)DESCRIPTION DE L'APPAREIL

Inspection des joints:
2006 Northwestern Parkway
Louisville, KY 40201
Téléphone (800) 348-0251
Télécopie (888) 888-2838
www.berkelequipment.com