WWD180X - Waffle Maker Waring Commercial - Free user manual and instructions
Find the device manual for free WWD180X Waring Commercial in PDF.
| Brand | Waring Commercial |
| Model | WWD180X |
| Product type | Professional waffle iron |
| Waffle type | Classic waffles (thickness 1.5 cm) |
| Plate coating | Triple non-stick coating Whitford® QuanTanium |
| Temperature adjustment | Variable, from 1 to 5 (recommended setting #4) |
| Power indicator light | Red (indicates the appliance is heating) |
| Preheating indicator light | Green (indicates the waffle iron is ready) |
| Sound signal | 6 beeps (ready for first waffle); 3 beeps (waffle cooked) |
| Removable drip tray | Yes, to collect excess batter |
| Measuring cup | Included, to measure batter |
| Power supply | Wall plug with grounding (3-prong plug) |
| Capacity | Single or double model depending on version |
| Care and cleaning | Clean after full cooling; plates dishwasher safe (disassembly recommended only for replacement) |
| Safety | Overheat protection (automatic shut-off) |
| Spare parts and repairability | Replaceable plates (kit with screws included); repair by authorized technician only |
| Warranty | 1 year against defects in materials and workmanship (valid in the United States and Canada) |
| Dimensions (estimated) | Approximately 30 x 20 x 15 cm (not precisely communicated) |
| Weight (estimated) | Approximately 3 kg (not precisely communicated) |
Frequently Asked Questions - WWD180X Waring Commercial
User questions about WWD180X Waring Commercial
0 question about this device. Answer the ones you know or ask your own.
Ask a new question about this device
Download the instructions for your Waffle Maker in PDF format for free! Find your manual WWD180X - Waring Commercial and take your electronic device back in hand. On this page are published all the documents necessary for the use of your device. WWD180X by Waring Commercial.
USER MANUAL WWD180X Waring Commercial
For your safety and continued enjoyment of this product, always read the instruction book carefully before using.
When using electrical appliances, especially when children are present, basic safety precautions should always be taken, including the following:
- READ ALL INSTRUCTIONS.
- Unplug from outlet when not in use and before cleaning. Allow to cool before putting on or taking off parts, and before cleaning appliance.
- Do not touch hot surfaces. Use handles and knobs.
- To protect against fire, electric shock, and injury to persons, DO NOT IMMERSE CORD, PLUG, OR UNIT in water or other liquids.
- This appliance is not intended for use by persons (including children) with reduced physical, sensory or mental capabilities, or lack of experience and knowledge. Children should be supervised to ensure that they do not play with the appliance.
- Do not operate any appliance with a damaged cord or plug, or after the appliance malfunctions or has been damaged in any manner. Return appliance to the nearest Waring Authorized Service Center for examination, repair, or adjustment.
- The use of accessory attachments not recommended by Waring® Commercial may result in fire, electric shock, or injury to persons.
- Do not use outdoors, or for other than its intended use.
- Do not let power cord hang over edge of table or counter, or touch hot surfaces.
- Do not place on or near a hot gas or electric burner, or in a heated oven.
- Turn knob to setting #1, switch toggle to OFF position and unplug the unit when finished baking waffles.
- Extreme caution must be used when moving an appliance containing hot oil or other hot liquids.
-
Always begin by plugging appliance into wall outlet. To disconnect, turn control to setting #1, switch toggle to OFF position, then remove plug from wall outlet.
-
WARNING: TO REDUCE THE RISK OF FIRE OR ELECTRIC SHOCK, REPAIRS SHOULD BE MADE ONLY BY AUTHORIZED PERSONNEL. DO NOT REMOVE THE BASE PANEL. NO USER-SERVICEABLE PARTS ARE INSIDE.
- To acquire another instruction manual, go to www.waringcommercialproducts.com
SAVE THESE INSTRUCTIONS APPROVED FOR COMMERCIAL USE
CONTENTS
Important Safeguards 2
Grounding Instructions....3
Special Cord Set Instructions 3
Special Features....4
Instructions for Use 5
Waffle Plate Cleaning & Maintenance 6
Warranty 8
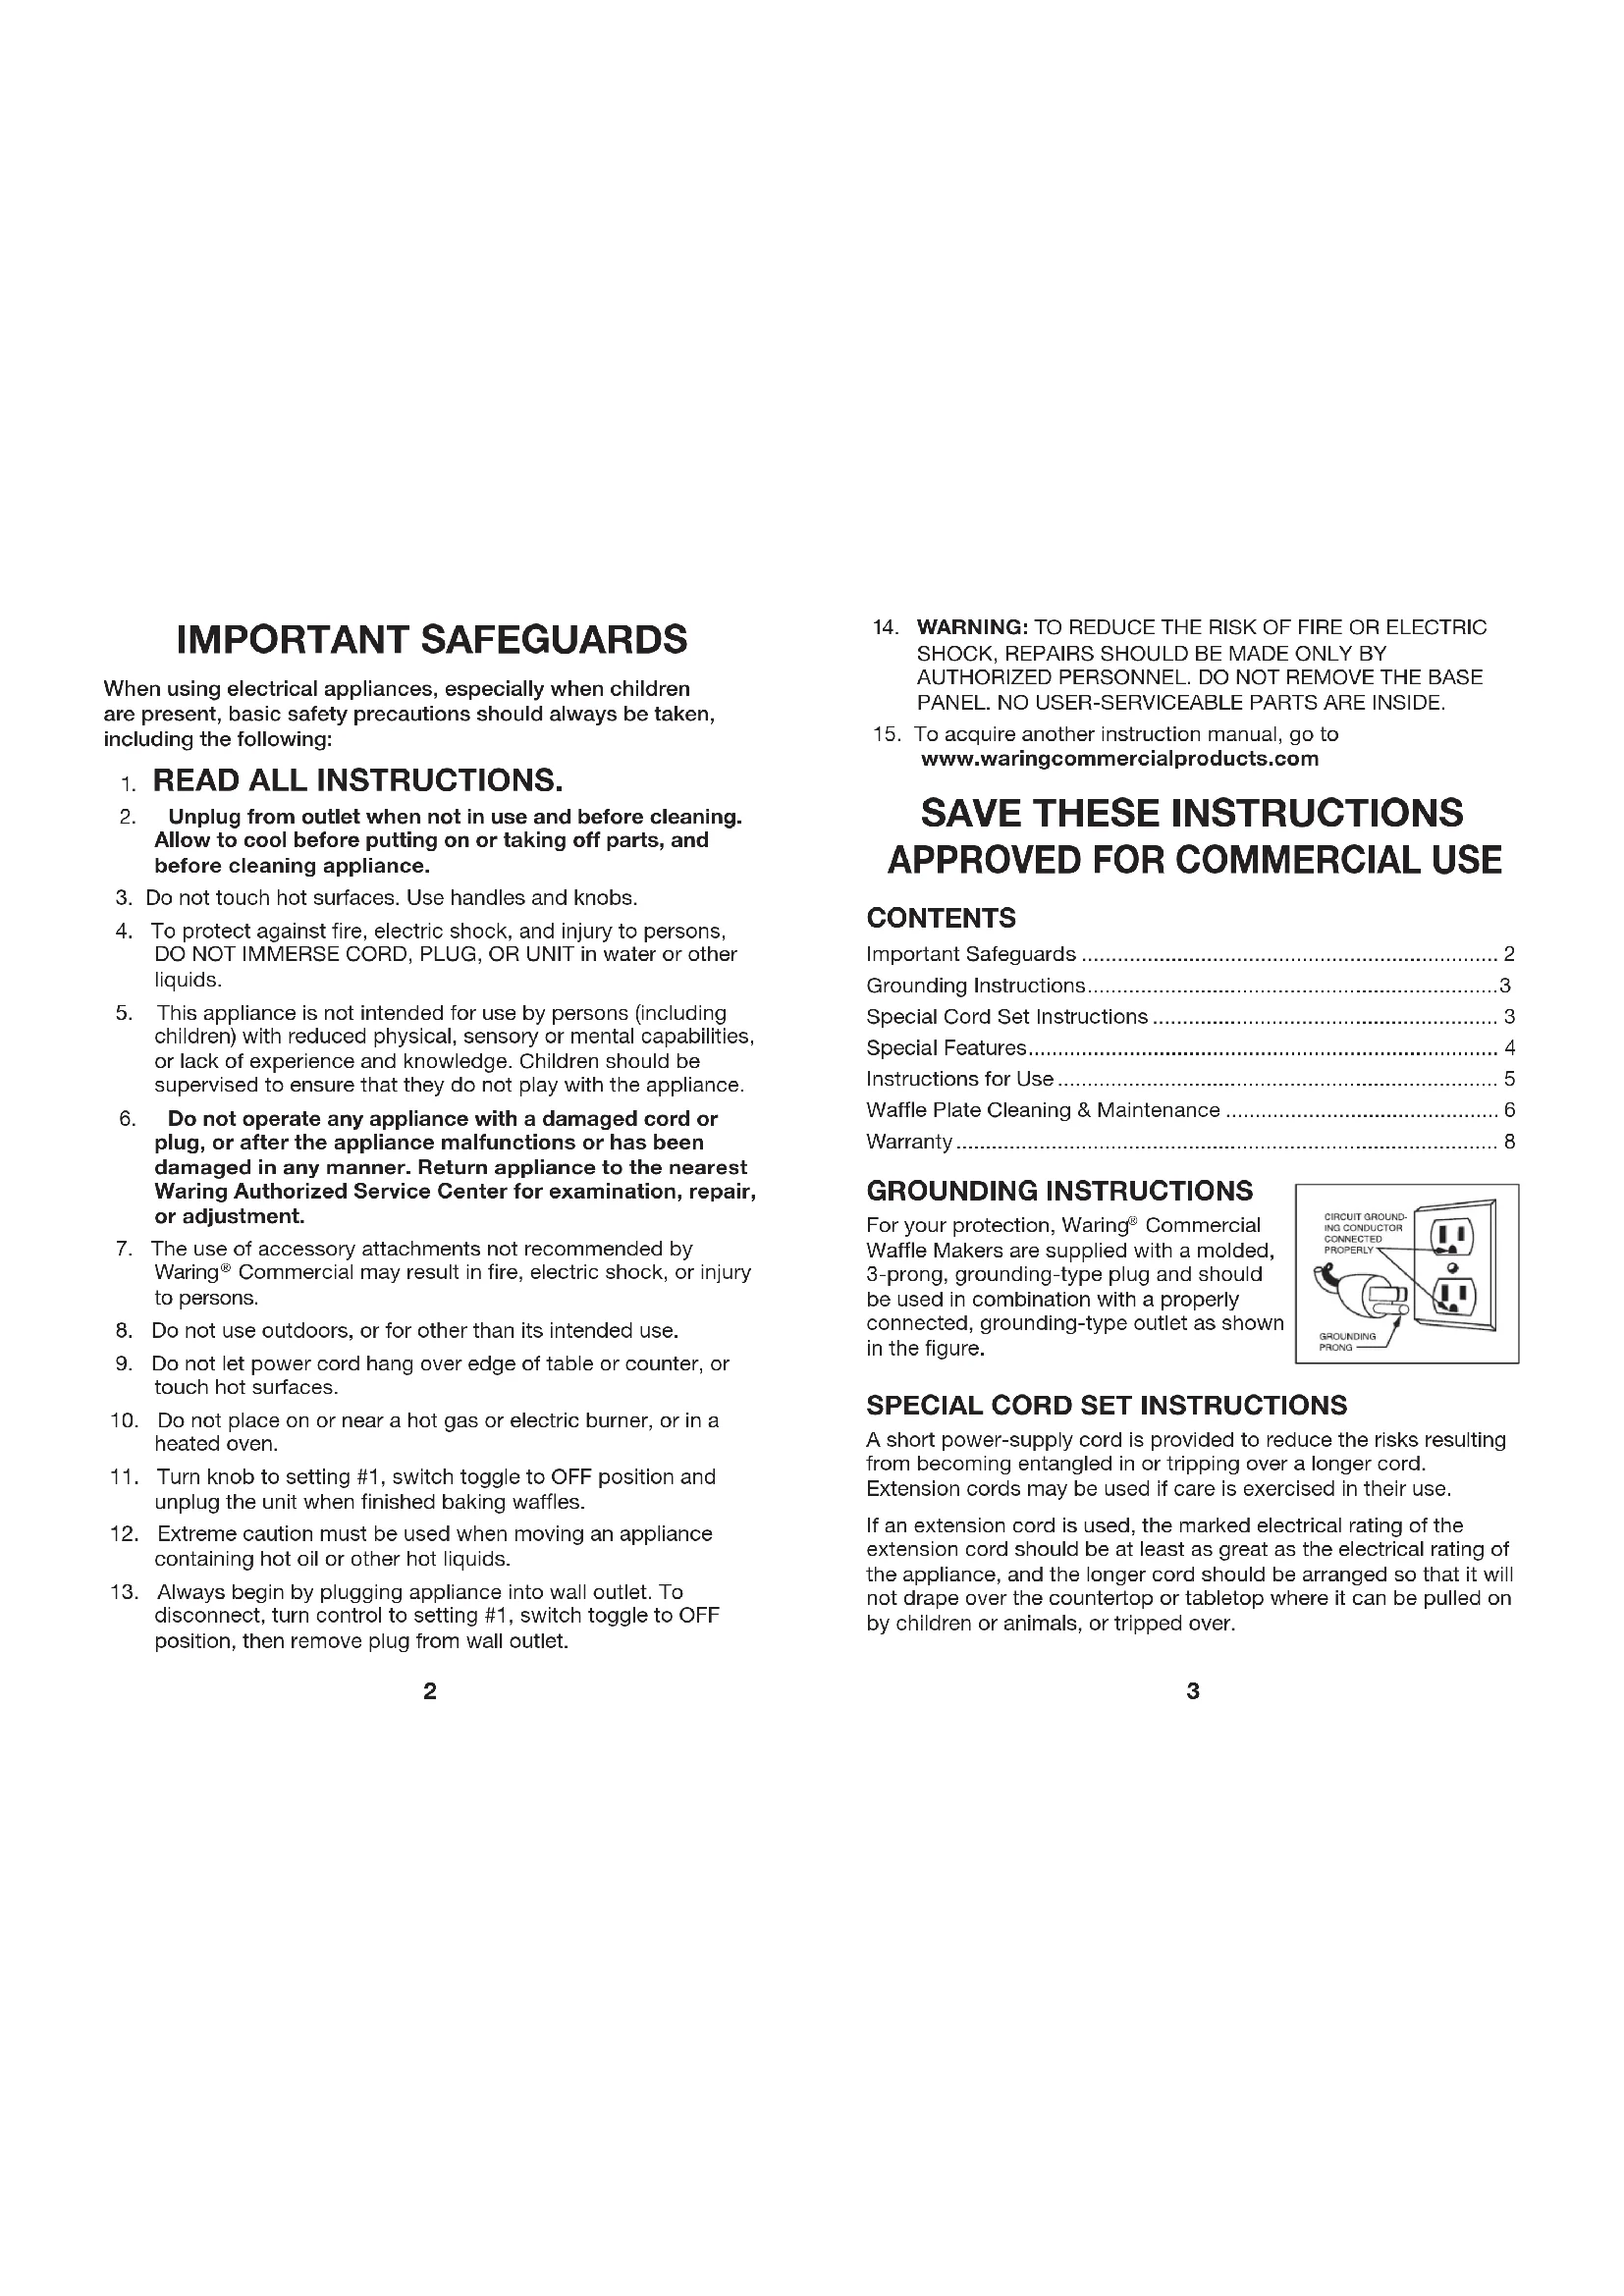
GROUNDING INSTRUCTIONS
For your protection, Waring ^® Commercial Waffle Makers are supplied with a molded, 3-prong, grounding-type plug and should be used in combination with a properly connected, grounding-type outlet as shown in the figure.
text_image
CIRCUIT GROUNDING CONDUCTOR CONNECTED PROPERLY GROUNDING PRONGSPECIAL CORD SET INSTRUCTIONS
A short power-supply cord is provided to reduce the risks resulting from becoming entangled in or tripping over a longer cord. Extension cords may be used if care is exercised in their use.
If an extension cord is used, the marked electrical rating of the extension cord should be at least as great as the electrical rating of the appliance, and the longer cord should be arranged so that it will not drape over the countertop or tabletop where it can be pulled on by children or animals, or tripped over.
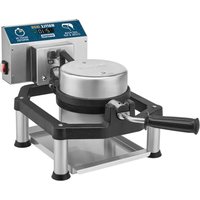
SPECIAL FEATURES
- Waffle Grids – Belgian, Mini Belgian, Classic and Bubble
(Belgian waffle grids shown)
Waffle plates are triple coated with Whitford® QuanTanium nonstick coating. - Browning Control Adjustment
- Adjustable for different batters and personal preference
- Power Indicator Light
- Lights red when waffle maker is on and heating up
- Ready Indicator Light
- Lights green when waffle maker is ready to bake
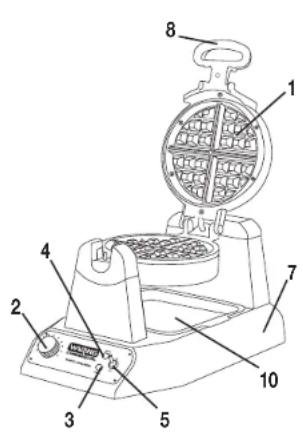
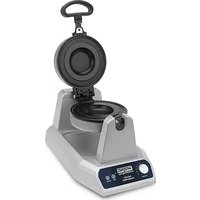
text_image
Labeled diagram of a waffle oven with numbered parts for identificationWW180X
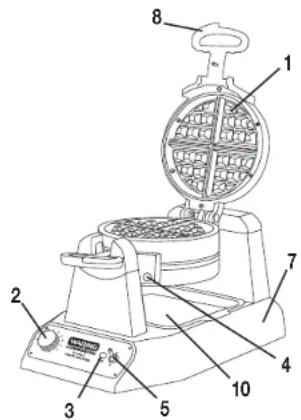
- Power Switch
- Indicator Beeps (not shown)
- Will beep 6 times when unit is ready to bake for first waffle of every baking session
- Will beep 3 times when waffle is done
- Base
- Handle
- 4 oz. Measuring Scoop (not shown) For the WMB400X unit, use 1 oz. of batter per mini Belgian
- Removable Drip Tray

text_image
Labeled diagram of a waffle grater with numbered parts for identificationWW200X
Whitford® QuanTanium nonstick coating is a registered trademark of Whitford.
| WARING® COMMERCIAL WAFFLE MAKERS | |
| WWD180X/200X | Classic Waffle, 5/8" thick |
| WW180X/200X | Belgian Waffle, 1" thick |
| WMB400X/800X | Mini-Belgian Waffle, four 1" thick |
| WBW300X | Bubble Waffle |
BEFORE FIRST USE
-
These Waring ^® Commercial Waffle Maker plates are triple-coated with Whitford ^® nonstick coating.* Before the first use, we suggest you season the waffle grids by preheating and then brushing them with cooking oil. Wipe with a paper towel or pastry brush.
-
Remove any dust from shipping by wiping the plates with a damp cloth. Remove all protective paper and wrapping.
INSTRUCTIONS FOR USE
- Plug cord into wall outlet.
- Switch the toggle switch to the ON position. The RED light will illuminate to signal power.
- Preheat your Waring ^® Commercial Waffle Maker on setting #4 or preferred setting. It will now begin the preheating process. This should take about 4 minutes. The machine will sound 6 beeps and the GREEN indicator light will go on to signal the unit is ready for baking. Season the waffle grids by spraying with cooking spray or brushing with a flavorless oil.
For initial use, it is important that the waffle maker is preheated before seasoning with cooking spray or oil.
NOTE: The first time you use your waffle maker, it may have a slight odor and may smoke a bit. This is normal, and common to heating appliances.
-
Choose a setting on the browning control dial. For golden brown waffles, we recommend using setting #4. When the waffle is completely baked, the waffle maker will sound 3 beeps. Baking time is determined by browning level chosen.
-
Fill measuring scoop with batter to fill line. Pour batter evenly into the center of the waffle grid. For mini Belgian units, pour 1 oz. of batter in each waffle mold. Use a heatproof spatula to spread the batter evenly over the grid. Close the lid and rotate the unit 180°.
- Once the waffle is ready and the waffle maker has beeped 3 times, rotate the waffle maker 180°, open the lid and remove waffle by gently loosening the edges with a heatproof plastic spatula. Never use metal utensils, as they may damage the nonstick coating.
- For double waffle makers, multiple waffles can be baked at one time. For one waffle, simply follow previous instructions. For more than one waffle at once, pour batter into top waffle compartment, then rotate 180°. You will now be able to open the other waffle compartment. Pour the batter in the grids and rotate another 180° in the other direction. Both waffles will now cook. There are individual green READY lights that will illuminate when each waffle is baked, and when an empty compartment is ready to bake another waffle.
THERMAL PROTECTION
IF UNIT OVERHEATS, THE MACHINE WILL AUTOMATICALLY TURN OFF. UNPLUG, LET MACHINE COOL FOR 10 MINUTES, PLUG IN AND CONTINUE USE.
IF POWER IS LOST DURING OPERATION, UNPLUG AND LET COOL 10 MINUTES. PLUG IN AND CONTINUE USE.
WAFFLE PLATE CLEANING & MAINTENANCE
Clean daily and diligently; doing so will ensure that your waffle maker works properly and continues to work well over time.
How to Clean Waffle Plates
Once you have finished baking each day, turn the switch to the OFF position and remove plug from electrical outlet. Leave top lid open and allow plates to cool before cleaning. Be certain plates have cooled completely before cleaning
Never take your waffle maker apart for cleaning. Brush crumbs from grooves and absorb any excess cooking oil by wiping with a dry cloth or paper towel. You may clean the plates by wiping with a damp cloth to prevent staining and sticking from batter or oil buildup. If batter adheres to plates, simply pour a little cooking oil onto the baked batter and let stand approximately 5 minutes. This will allow the batter to soften and will make it easier to remove.
To help remove oil buildup and batter residue, place a damp paper towel in between the waffle plates and close the lid. Allow to sit for a few minutes.
To clean exterior, wipe with a soft, dry cloth. Never use an abrasive cleanser or harsh pad. NEVER IMMERSE CORD, PLUG OR UNIT IN WATER OR OTHER LIQUIDS.
Serviceable Plates
To order replacement plates, call customer service at 1-800-4WARING, order online or find a local distributor or service center.
Although removable, these plates are not intended to be removed for routine cleaning. Plates are ONLY meant to be removed if there is a scratch on the nonstick coating and you need to replace the plate. If removed for cleaning, the plates are dishwasher safe.
How to Remove the Waffle Plates
PARTS
- 2 waffle plates
• 4 large screws (2 extra)
• 16 small screws (6 extra) - Screwdriver
INSTRUCTIONS
- Carefully unpack the replacement kit.
- Using the provided screwdriver, carefully remove the screws from the perimeter edge of waffle plate/s. Lift plates up and off the housing. Slight force may be needed to release the plates completely. Discard the old plate/s and screws.
- Starting with the lower grid, place the new plate onto the housing by aligning rear and front projections onto the base. The wider projections will fit into the rear.
- Install 1 large screw into the slot located near the handle.
- Install the smaller screws around the perimeter.
- Repeat steps 2–5 for the upper grid replacement.
LIMITED ONE YEAR WARRANTY
(U.S. and Canada only)
Waring ^6 Commercial warrants every new Waring ^5 Commercial Waffle Maker to be free from defects in material and workmanship for a period of one year from the date of purchase when used with foodstuffs, nonabrasive liquids (other than detergents) and nonabrasive semiliquids, providing it has not been subject to loads in excess of the indicated rating.
Under this warranty, Waring Commercial will repair or replace any part which, upon our examination, is defective in materials or workmanship, provided the product is delivered prepaid to the Waring Service Center at: 314 Ella T. Grasso Ave., Torrington, CT 06790, or any Factory Approved Service Center.
This warranty does not: a) apply to any product that has become worn, defective, damaged or broken due to use or due to repairs or servicing by other than the Waring Service Center or a Factory Approved Service Center, or due to abuse, misuse, overloading or tampering; or b) cover incidental or consequential damages of any kind.
Warning: This warranty is void if appliance is used on Direct Current (DC).
WARING COI 314 Ella T. Gr Torrington, C

text_image
Labeled diagram of a waffle-based appliance with numbered parts for identificationWW180X
text_image
Labeled diagram of a waffle grater with numbered parts for identificationWW200X
text_image
Labeled diagram of a waffle oven with numbered parts for identificationWW180X

text_image
Labeled diagram of a waffle grater with numbered parts for identificationWW200X
GARANTIE LIMITÉE D'UN AN
Trademarks or service marks of third parties used herein are the trademarks or service marks of their respective owners.
©2019 Waring Commercial
314 Ella T. Grasso Ave.
Torrington, CT 06790
www.waringcommercialproducts.com
1-800-4-WARING
Printed in China
Impreso en China
Imprimé en Chine
X Series IB
19WC061861