
JNXR22SPSS - Basket GE - Free user manual and instructions
Find the device manual for free JNXR22SPSS GE in PDF.
| Product Type | Range hood for recreational vehicle (RV) |
| Brand | GE |
| Model | JNXR22SPSS |
| Width | 22 inches (559 mm) |
| Depth (under-cabinet mount) | 18 inches (457 mm) |
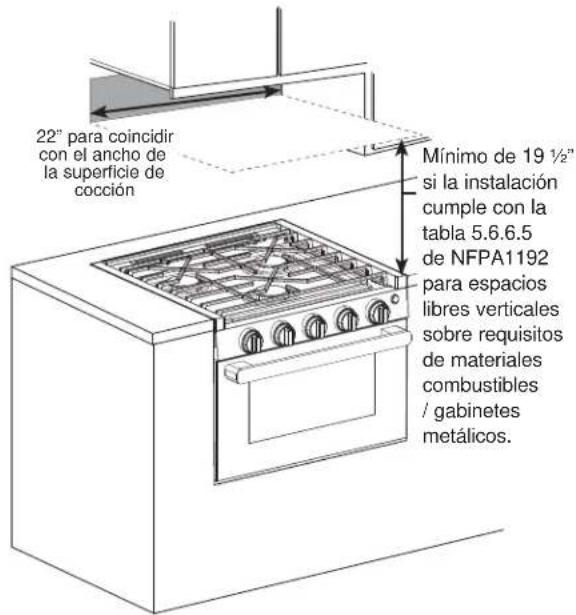
| Minimum installation height | 19 1/2 inches (495 mm) from cooktop surface |
| Power supply | 12 VDC, dedicated 20 A circuit |
| Ventilation type | Recirculation (with charcoal filter) or vented (JVXR22 version) |
| Grease filter | Aluminum mesh, washable (vented model) or replaceable (recirculation) |
| Charcoal filter | Integrated into mesh for recirculation version, replace every 6 to 12 months |
| Lighting | LED light assembly (not individually replaceable) |
| Controls | Fan power switch (on/off) and light switch (on/off) |
| Exterior material | Stainless steel (brushed finish) |
| Surface cleaning | Mild stainless steel cleaner, damp sponge, follow grain direction |
| Filter cleaning (vented) | Wash under running water, do not put in dishwasher |
| Safety | Grounding required; disconnect power before servicing |
| Installation | Under cabinet, screwed with 4 provided wood screws |
| Warranty | 2 years (parts, labor, and service) |
| Replacement parts | Recirculation filter WB21X44306, vented filter WB21X44867 |
| Estimated weight | Approximately 5 kg (not specified, estimate) |
Frequently Asked Questions - JNXR22SPSS GE
User questions about JNXR22SPSS GE
0 question about this device. Answer the ones you know or ask your own.
Ask a new question about this device
Download the instructions for your Basket in PDF format for free! Find your manual JNXR22SPSS - GE and take your electronic device back in hand. On this page are published all the documents necessary for the use of your device. JNXR22SPSS by GE.
USER MANUAL JNXR22SPSS GE
SAFETY INFORMATION .... 3
USING THE HOOD
Controls 4
CARE AND CLEANING
Filters....4
Surfaces 4
Lights 5
INSTALLATION INSTRUCTIONS..6
TROUBLESHOOTING TIPS ..... 9
LIMITED WARRANTY....10
ACCESSORIES....11
CONSUMER SUPPORT .... 12
OWNER'S MANUAL & INSTALLATION INSTRUCTIONS
JNXR22
JVXR22
ENGLISH/FRANÇAIS
Write the model and serial numbers here:
Model # ____
Serial # ____
You can find them on a label on the inside of the hood.
ESPAÑOL
THANK YOU FOR MAKING GE APPLIANCES A PART OF YOUR RV.
Whether you grew up with GE Appliances, or this is your first, we're happy to have you in the family.
We take pride in the craftsmanship, innovation and design that goes into every GE Appliances product, and we think you will too. Among other things, registration of your appliance ensures that we can deliver important product information and warranty details when you need them.
Register your GE appliance now online. Helpful websites and phone numbers are available in the Consumer Support section of this Owner's Manual.

GE APPLIANCES
IMPORTANT SAFETY INFORMATION READ ALL INSTRUCTIONS BEFORE USING
WARNING
TO REDUCE THE RISK OF FIRE,
ELECTRIC SHOCK OR INJURY TO PERSONS, OBSERVE THE FOLLOWING:
A. Use this unit only in the manner intended by the manufacturer. If you have questions, contact the manufacturer.
B. Have your hood installed in accordance with the provided installation instructions.
C. Be sure all packing materials are removed from the hood before operating to prevent ignition of these materials.
D. Before servicing or cleaning unit, switch power off at service panel and lock the service disconnecting means to prevent power from being switched on accidentally.
E. This unit must be grounded.
WARNING
TO REDUCE THE RISK OF A
RANGE TOP GREASE FIRE:
A. Never leave surface units unattended at high settings. Boilovers cause smoking and greasy spillovers that may ignite. Heat oils slowly on medium settings.
B. Always turn hood ON when cooking at high heat or when flambéing food (i.e. Crepes Suzette, Cherries Jubilee, Peppercorn Beef Flambé).
C. Clean ventilating fans frequently. Grease should not be allowed to accumulate on fan or filter.
D. Use proper pan size. Always use cookware appropriate for the size of the surface element.
WARNING
TO REDUCE THE RISK OF INJURY
TO PERSONS IN THE EVENT OF A RANGE TOP GREASE FIRE, OBSERVE THE FOLLOWING\*:
A. SMOTHER FLAMES with a close-fitting lid, cookie sheet or metal tray, then turn off the burner. BE CAREFUL TO PREVENT BURNS. If the flames do not go out immediately, EVACUATE AND CALL THE FIRE DEPARTMENT.
B. NEVER PICK UP A FLAMING PAN—You may be burned.
C. DO NOT USE WATER, including wet dishcloths or towels—a violent steam explosion will result.
D. Use an extinguisher ONLY if:
- You know you have a Class ABC extinguisher, and you already know how to operate it.
- The fire is small and contained in the area where it started.
- The fire department is being called.
- You can fight the fire with your back to an exit.
* Based on "Kitchen Fire Safety" published by NFPA.
CAUTION
FOR GENERAL VENTILATING USE ONLY. DO NOT USE TO EXHAUST HAZARDOUS OR EXPLOSIVE MATERIALS AND VAPORS.
PROPER DISPOSAL OF YOUR APPLIANCE
Dispose of or recycle your appliance in accordance with Federal and Local Regulations. Contact your local authorities for the environmentally safe disposal or recycling of your appliance.
READ AND SAVE THESE INSTRUCTIONS
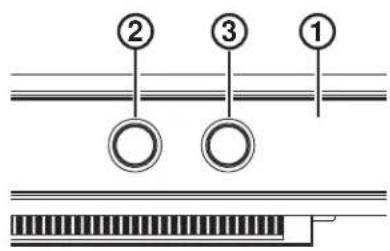
Controls
Care And Cleaning
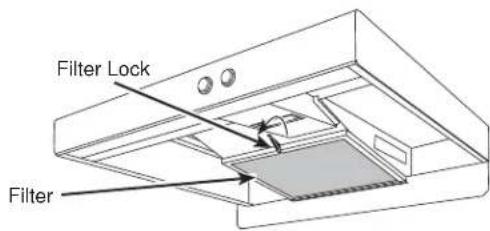
Filters
Be sure the main fuse or circuit breaker is off and all surfaces are cool before cleaning or servicing any part of the vent hood.
The filter must ALWAYS be in place when the hood is in use.
Recirculation Models: The filter consists of aluminum mesh with activated charcoal inside. It is designed to trap grease during cooking. Do not wash or rinse charcoal filter. It is recommended that the filter be replaced every 6-12 months or if it is noticeably dirty or discolored.
Vented Models: The filter consists of aluminum mesh to trap grease during cooking. Filters on vent model can be washed with running water. Do not put in dishwasher.
To remove:
Turn the filter lock to the right. Pull downward to release the filter.
- Rangehood Control Panel: The control panel is located on the front of the canopy.
- Fan Power Switch: The power switch toggles between fan settings On and Off.
- Light Switch: Light switch toggles between On and Off.
To replace:
Fit the bottom of the filter into the slots in the back of the filter opening. Lift up the front side of the filter and push gently until the filter locks into place. Turn the filter lock to the left to lock it.
To inquire about purchasing replacement filters or to find the location of a dealer nearest you, please visit GEApplianceParts.com.
Stainless Steel Surfaces
Do not use a steel wool pad; it will scratch the surface.
To clean the stainless steel surface, use stainless steel cleaner or polish. Always wipe the surface in the direction of the brush line. Follow the cleaner instructions for cleaning the stainless steel surface. Cleaners with oxalic acid will remove surface rust, tarnish, and small blemishes.
Use only a liquid cleanser free of grit and rub in the direction of the brush lines with a damp soft sponge.
To inquire about purchasing stainless steel appliance cleaner or polish, or to find the location of a dealer nearest you, please visit GEApplianceParts.com
Care And Cleaning
Painted Surfaces
Do not use a steel wool pads or other abrasive cleaners; they will scratch the surface.
Clean grease-laden surfaces of the hood frequently. To clean the hood surface, use a hot, damp cloth with a mild detergent suitable for painted surfaces. About one tablespoon of ammonia may be added to the water. Use a clean, hot, damp cloth to remove soap. Dry with a dry, clean cloth.
NOTE: When cleaning, take care not to come in contact with filters and other surfaces.
CAUTION
When cleaning the hood surfaces,
be certain that you do not touch the light with moist hands or cloth.
Lights
This hood is provided with an LED light assembly that does not need to be replaced frequently.
Installation Instructions
RV Range Hood
JNXR22, JVXR22
Questions? Visit GEAppliances.com. In Canada, visit GEAppliances.ca.
BEFORE YOU BEGIN
Read these instructions completely and carefully.
• IMPORTANT — Save these instructions.
- IMPORTANT — Observe all governing codes and ordinances.
- Note to Installer – Be sure to leave these instructions with the Consumer.
- Note to Consumer – Keep these instructions for future reference.
- Skill level – Installation of this vent hood requires basic mechanical and electrical skills.
- Proper installation is the responsibility of the installer.
- Product failure due to improper installation is not covered under the Warranty.
FOR YOUR SAFETY
WARNING
A. Use this unit only in the manner intended by the manufacturer. If you have questions, contact the manufacturer.
B. Before beginning the installation, switch power off at service panel and lock the service disconnecting means to prevent power from being switched on accidentally. When the service disconnecting means cannot be locked, securely fasten a prominent warning device, such as a tag, to the service panel.
WARNING
TO REDUCE THE RISK OF FIRE,
ELECTRIC SHOCK OR INJURY TO PERSONS, OBSERVE THE FOLLOWING:
A. To reduce the risk of fire or electric shock, DO NOT USE THIS FAN WITH ANY SOLID-STATE SPEED CONTROL DEVICE.
B. Installation work and electrical wiring must be done by qualified person(s) in accordance with all applicable codes and standards, including fire-rated construction.
C. Sufficient air is needed for proper combustion and exhausting of gases through the flue (chimney) of fuel burning equipment to prevent back drafting. Follow the heating equipment manufacturer's guidelines and safety standards such as those published by the National Fire Protection (NFPA), and the American Society for Heating, Refrigeration and Air Conditioning Engineers (ASHRAE), and the local code authorities.
D. If the information in this manual is not followed exactly, a fire or explosion may result causing property damage, personal injury or death.
Read these instructions completely and carefully
Installation of this appliance must conform with state and other codes or, in the absence of such codes, with:
In the USA: the Standard for Recreational vehicles, ANSI/NFPA 1192.
In Canada: CAN/CSAA Z-240.4.2-08 Installation Requirements for Propane Appliances and Equipment in Recreational Vehicles.
This hood has been design-certified by CSA International according to CSA C22.2 No. 113015 and UL 507, latest edition.
WARNING
Disconnect all electrical power
at the main circuit breaker or fuse box before installing.
Installation Preparation
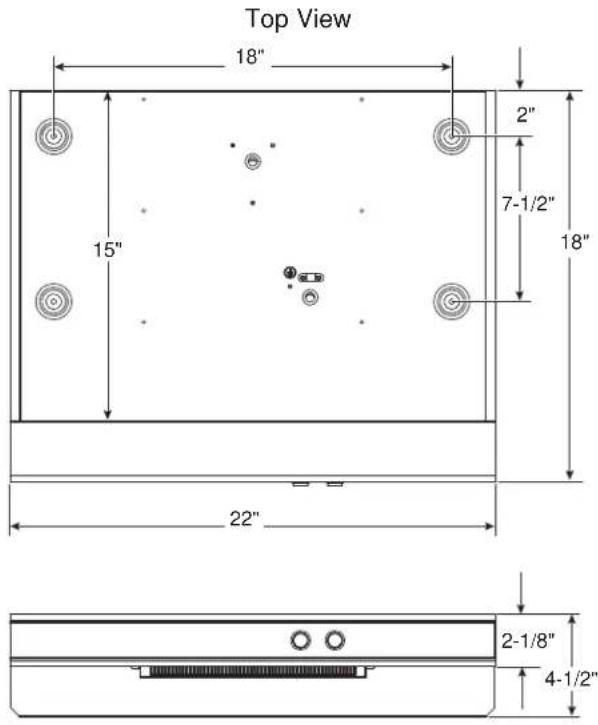
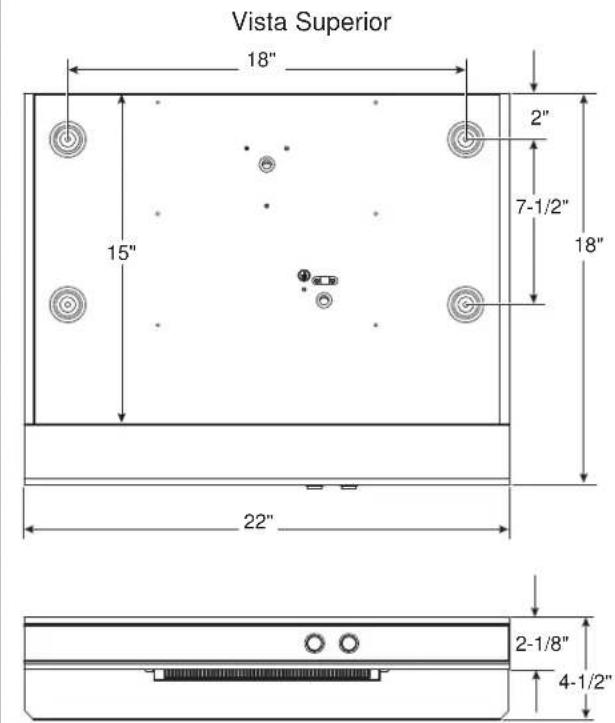
PRODUCT DIMENSIONS
Front View
MOUNTING SPACE

NOTES:
- Hood width may be greater than the width of the range or cooktop, but it may not be smaller.
- Installation height should be measured from the cooking surface to the lowest part of the hood. This hood must be installed onto a cabinet.
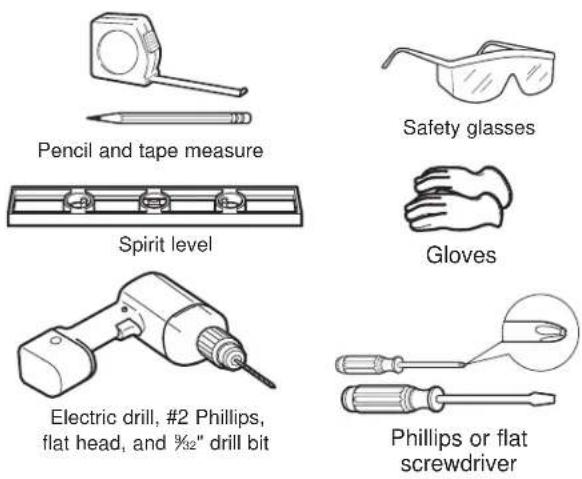
TOOLS AND MATERIALS
REQUIRED (NOT SUPPLIED)
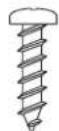
HARDWARE COMPONENTS
REMOVE THE PACKAGING
CAUTION
Wear gloves to protect against
sharp edges.
- Remove the hardware bag, literature package and other boxed parts.
- Remove and properly discard the protective plastic wrapping and other packaging materials.
PLAN THE INSTALLATION
CAUTION
To reduce the risk of fire and to
properly exhaust air, be sure to vent in an open space or outside – Do not vent exhaust air into spaces within walls or ceilings.
PARTS SUPPLIED FOR INSTALLATION
- 4 wood screws
• 1 User/Installation Manual
• Product Registration Card
POWER SUPPLY
IMPORTANT – (Please read carefully)
WARNING
FOR PERSONAL SAFETY, THIS
APPLIANCE MUST BE PROPERLY GROUNDED.
Remove RV fuse or open circuit breaker before beginning installation.
Electrical supply
These vent hoods must be supplied with 12V DC, and connected to an individual, properly grounded branch circuit, and protected by a 15 amp circuit breaker or fuse.
- If the electrical supply does not meet the above requirements, call a licensed electrician before proceeding.
- Route RV wiring as close to the installation location as possible in the ceiling or wall.
- Connect the wiring to the RV wiring in accordance with local codes.
Grounding instructions
The grounding conductor must be connected to a ground metal, permanent wiring system, or an equipment-grounding terminal or lead on the hood.
WARNING
The improper connection of the
equipment-grounding conductor can result in a risk of electric shock. Check with a qualified electrician or service representative if you are in doubt whether the appliance is properly grounded.
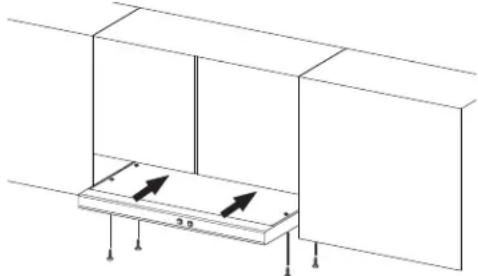
2 MOUNT THE HOOD
- RECIRCULATION MODEL: Push the hood into the cabinet opening until the back of the hood is parallel with the RV wall.
natural_image
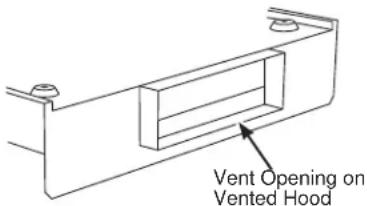
Pure technical diagram of a structural support frame with no text, numbers, or symbolsVENTED MODEL: Push the hood into the cabinet opening until the exhaust port on the hood is seated into the damper opening provided in the RV wall (damper not included with hood). Make sure the hood is parallel with the RV wall.
- Make sure the hood is level with the bottom of the cabinet.
- Drive the 4 mounting screws up from the bottom of the hood securing them in the bottom of the cabinet.
1 PREPARING MOUNTING
To install to the bottom of cabinet
Measure the cabinet bottom per diagram below and mark the 4 holes. Use the hood as a template making sure the bottom of the cabinet is flush with the RV internal wall.
Drive the 4 wood screws partway into the bottom of the cabinet (or wood shims).
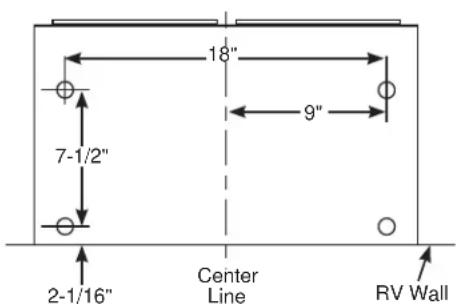
Bottom of Cabinet View
3 ELECTRICAL CONNECTION
The hood is provided with three wires for installation: 2 live (Black and Red) and 1 ground (Yellow/Green)
Connect the ground wire (Yellow/Green) on the hood to the ground wire (or connector) on the RV.
Connect respectively, the Black and Red wires on the hood to the Black and Red wires (or connectors) on the RV installation (live wires).

Troubleshooting tips ... Before you call for service
Save time and money! Review the charts on the following pages first and you may not need to call for service.
| Problem Possible Cause What To Do | ||
| Fan/Light does not operate when either button is pressed | A fuse may be blown or a circuit breaker tripped. | Replace fuse or reset circuit breaker. |
| Fan moves air slower than normal and/or fan is making loud or abnormal airflow noise | Grease filter may be dirty. Replace the filter. | |
| Vented fan is too noisy Exhaust on the outside of the RV may be blocked | Clear the exhaust opening on the outside of the RV | |
Limited Warranty
All warranty service must be provided by certified RV Service Centers.
To schedule service call 866.835.0179.
Have serial number and model number available when calling for service.
| For The Period Of: | GE Appliances Will Replace: |
| Two Years from the date of the original purchase | Any part of the RV hood which fails due to a defect in materials or workmanship. During this limited two-year warranty, GE Appliances will also cover all labor and related service to replace the defective part. |
What GE Appliances Will Not Cover:
■ Improper installation, delivery or maintenance. If you have an installation problem, contact your dealer or installer. You are responsible for providing adequate electrical connecting facilities.
■ Failure of the product resulting from modifications to the product or due to unreasonable use including failure to provide reasonable and necessary maintenance.
■ Labor necessary to move the unit to a location where it is accessible for service by an individual technician.
■ Replacement of RV fuses or resetting of circuit breakers.
■ Damage to the product caused by improper power supply voltage, accident, fire, floods or acts of God.
■ Incidental or consequential damage caused by possible defects with this air conditioner.
■ Damage caused after delivery.
EXCLUSION OF IMPLIED WARRANTIES—Your sole and exclusive remedy is product repair as provided in this Limited Warranty. Any implied warranties, including the implied warranties of merchantability or fitness for a particular purpose, are limited to two years or the shortest period allowed by law.
This limited warranty is extended to the original purchaser and any succeeding owner for products purchased for RV use within the USA and Canada. If the product is located in an area where service by an authorized RV servicer is not available, you may be required to bring the product to an authorized service location for service. Authorized GE Service location for service.
Some states do not allow the exclusion or limitation of incidental or consequential damages. This limited warranty gives you specific legal rights, and you may also have other rights which vary from state to state. To know what your legal rights are, consult your local or state consumer affairs office or your state's Attorney General.
Warrantor: GE Appliances, a Haier company Louisville, KY 40225
Looking For Something More?
GE Appliances offers a variety of accessories to improve your cooking and maintenance experiences!
The following products and more are available:
Parts
JNXR22 Recirculation Hood Filter Part No.: WB21X44306
JVXR22 Vented Hood Filter Part No.: WB21X44867
Cleaning Supplies
CitruShine™ Stainless Steel Wipes
Stainless Steel Appliance Cleaner
To inquire about purchasing replacement filters, other supplies, or to find the location of a dealer nearest you, please consult:
In the US: GEApplianceparts.com or by phone at 877.959.8688 during normal business hours.
In Canada: geappliances.ca/parts-filters-accessories or call 800.661.1616.
Consumer Support
GE Appliances Website
Have a question or need assistance with your appliance? Try the GE Appliances Website 24 hours a day, any day of the year! You can also shop for more great GE Appliances products and take advantage of all our on-line support services designed for your convenience. In the US: GEAppliances.com In Canada: GEAppliances.ca
Register Your Appliance
Register your new appliance on-line at your convenience! Timely product registration will allow for enhanced communication and prompt service under the terms of your warranty, should the need arise. You may also mail in the pre-printed registration card included in the packing material.
In the US: GEAppliances.com/register
In Canada: geappliances.ca/after-sales-support
Schedule Service
Expert GE Appliances repair service is only one step away from your door. Get on-line and schedule your service at your convenience any day of the year. In the US: GEAppliances.com/service or call 800.432.2737 during normal business hours.
In Canada: geappliances.ca/after-sales-support or call 800.561.3344
Parts and Accessories
Individuals qualified to service their own appliances can have parts or accessories sent directly to their homes (VISA, MasterCard and Discover cards are accepted). Order on-line today 24 hours every day.
In the US: GEApplianceparts.com or by phone at 877.959.8688 during normal business hours.
Instructions contained in this manual cover procedures to be performed by any user. Other servicing generally should be referred to qualified service personnel. Caution must be exercised, since improper servicing may cause unsafe operation.
Customers in Canada should consult the yellow pages for the nearest authorized GE Appliances service parts distributor, visit our website at geappliances.ca/parts-filters-accessories or call 800.661.1616.
Contact Us
If you are not satisfied with the service you receive from GE Appliances, contact us on our Website with all the details including your phone number, or write to:
In the US: General Manager, Customer Relations | GE Appliances, Appliance Park | Louisville, KY 40225 GEAppliances.com/contact
In Canada: Director, Consumer Relations, MC Commercial Inc. | Suite 310, 1 Factory Lane | Moncton, N.B. E1C 9M3 GEAppliances.ca/contact-us
HOTTE DE CUISINIÈRE
POUR VR
CONSIGNES DE SÉCURITÉ....3
UTILISATION DE LA HOTTE
Commandes 4
ENTRETIEN ET NETTOYAGE
Filtres 4
Surfaces 4
Éclairage 5
INSTRUCTIONS D'INSTALLATION .. 6
CONSEILS DE DÉPANNAGE....9
GARANTIE LIMITÉE....10
ACCESSOIRES....11
SOUTIEN
AU CONSOMMATEUR....12
GUIDE D'UTILISATION ET INSTRUCTIONS D'INSTALLATION
JNXR22
JVXR22
FRANÇAIS
natural_image
Pure technical diagram of a structural support frame with no text, numbers, or symbolsGarant : GE Appliances, a Haier company Louisville, KY 40225
DIMENSIONES DEL PRODUCTO
Vista Frontal
ESPACIO DE MONTAJE
natural_image
Pure technical diagram of a structural support frame with arrows indicating force or movement (no text or symbols)Garante: GE Appliances, a Haier company Louisville, KY 40225
¿Busca Algo Más?
En Canadá: Director, Consumer Relations, MC Commercial Inc. | Suite 310, 1 Factory Lane | Moncton, N.B. E1C 9M3 GEAppliances.ca/contact-us