NK30CB700WCG - Basket SAMSUNG - Free user manual and instructions
Find the device manual for free NK30CB700WCG SAMSUNG in PDF.
| Product Type | Range Hood |
| Brand | Samsung |
| Model | NK30CB700WCG |
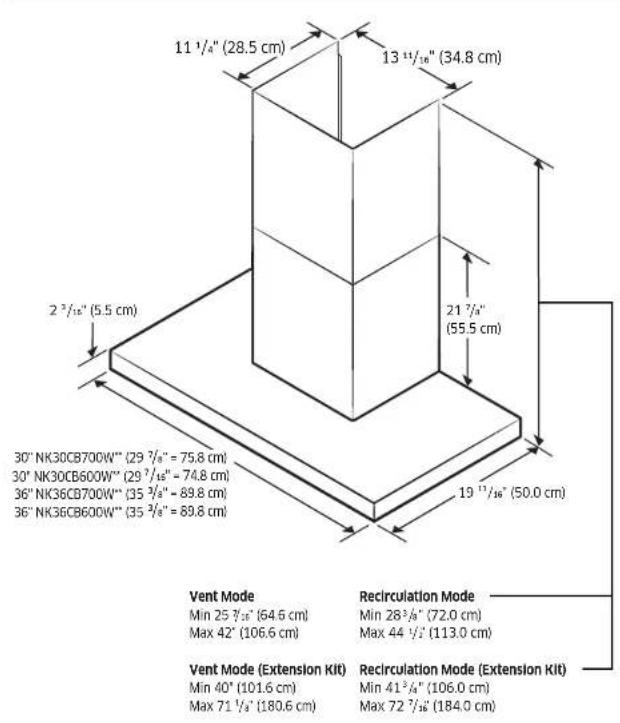
| Dimensions (Length x Depth x Height) | 75.8 x 55.5 x 64.6 cm (ventilation mode) / 72.0 cm (recirculation) |
| Exhaust outlet diameter | 15.2 cm (6 in) |
| Power supply | 120 V ~ 60 Hz, 15 A |
| Operating modes | Smart, Low, Medium, High, Boost (up to 630 CFM) |
| Smart functions | Built-in Wi-Fi, SmartThings, AI Energy Mode, Bixby, Amazon Alexa, Google Assistant |
| Air quality control | PM10, PM2.5, PM1.0 particle sensor with color display |
| Lighting | LED, 3 levels (High, Low, Off) |
| Installation type | External venting or recirculation (optional kit NK AR7000WB/AA) |
| Mounting height | Min 61 cm (electric) / 68.5 cm (gas), Max 91.4 cm |
| Filters | Washable metal grease filter, optional charcoal filter (NK AF7000WB/AA) |
| Filter cleaning reminder | Every 60 hours (resettable) |
| Smart ventilation mode | Automatic operation when air quality deteriorates (hood off) |
| Overheat protection function | Automatic activation of Medium mode in case of high internal temperature |
| Material | Stainless steel |
| Warranty | 1 year parts and labor |
| Country of manufacture | Not disclosed |
Frequently Asked Questions - NK30CB700WCG SAMSUNG
User questions about NK30CB700WCG SAMSUNG
0 question about this device. Answer the ones you know or ask your own.
Ask a new question about this device
Download the instructions for your Basket in PDF format for free! Find your manual NK30CB700WCG - SAMSUNG and take your electronic device back in hand. On this page are published all the documents necessary for the use of your device. NK30CB700WCG by SAMSUNG.
USER MANUAL NK30CB700WCG SAMSUNG
NK30CB700W**/NK36CB700W**
text_image
SAMSUNGContents
Important Safety Instructions 3
Installation Requirements 7
General Specifications 7
Mounting Height 7
Venting Methods 8
Parts List 8
Sub-Parts List 9
Additional Purchase Accessories 9
Needed Parts list (Not Supplied) 9
Installation Clearances 10
Making a hole in the furniture 10
Installation 11
Setting the Location 11
Connecting the Vent System 12
Installing the Range Hood 13
Electrical Connection 14
Connect the filter support cable 17
Installing the Recirculation Kit 18
Electrical Connection 18
Range Hood Description 22
Range Hood Overview 22
Button panel 22
Using the Range Hood 23
Display 23
Turning the Range Hood On or Off 23
First Use Guide 24
Changing the operation mode 24
Smart mode 25
Activates/Deactivates Boost mode 25
2 English
Makeup Air 26
Using the lighting 26
Checking air quality 27
Filter cleaning reminder 27
Wi-Fi On/Off 28
Smart ventilation mode 28
Automatic operation to prevent range hood overheating 29
Language setting 30
Entering AP(Access Point) 30
Cleaning and Maintenance 31
AI Energy Mode 31
Bixby 31
Amazon Alexa & Google Assistant 31
Installation Guide 31
Cleaning the range hood 32
Cleaning the sensor unit 32
Cleaning the Filters 33
Replacing the LED Lamp 33
SmartThings app 33
Open Source Announcement 35
Troubleshooting 35
General 35
Hood Operation 35
Information codes 36
Warranty (USA) 37
Warranty (CANADA) 38
Important Safety Instructions
APPROVED FOR RESIDENTIAL APPLIANCES FOR RESIDENTIAL USE ONLY READ AND SAVE THESE INSTRUCTIONS
PLEASE READ THE ENTIRE INSTALLATION GUIDE BEFORE PROCEEDING. INSTALLATION MUST COMPLY WITH ALL LOCAL CODES.
IMPORTANT: Save these instructions for the local electrical inspector's use. INSTALLER: Please leave these Instructions with this unit for the owner. OWNER: Please retain these instructions for future reference.
Symbols used in this manual
WARNING
Hazards or unsafe practices that may result in severe personal injury or death.
CAUTION
Hazards or unsafe practices that may result in electric shock, personal injury, or property damage.
NOTE
Useful tips and instructions
These warning icons and symbols are here to prevent injury to you and others. Please follow them explicitly. After reading this section, keep it in a safe place for future reference.
WARNING
Turn off the power circuit in the service panel and lock out panel before wiring this appliance. Installation requires a branch circuit of 120 VAC, 60 Hz, and 15 or 20 A.
State of California Proposition 65 warning (US only)
WARNING
This product contains chemicals known to the State of California to cause cancer and birth defects or other reproductive harm.
1. FCC Notice
CAUTION
FCC CAUTION: Any changes or modifications not expressly approved by the party responsible for compliance could void the user's authority to operate the equipment.
This device complies with Part 15 of the FCC Rules. Operation is subject to the following two conditions:
1) This device may not cause harmful interference, and
2) This device must accept any interference received, including interference that causes undesired operation.
For products sold in the US and Canadian markets, only channels 1-11 are available. You cannot select any other channels.
FCC STATEMENT:
This equipment has been tested and found to be in compliance within the limits for a Class B digital device, pursuant to part 15 of the FCC Rules. These limits are designed to provide reasonable protection against harmful interference in a residential installation.
This equipment generates, uses, and can radiate radio frequency energy and, if not installed and used in accordance with the instructions, may cause harmful interference with radio communications.
However, there is no guarantee that interference will not occur in a particular installation. If this equipment does cause harmful interference to radio or television reception, which can be determined by turning the equipment off and on, the user is encouraged to try to correct the interference by one or more of the following measures:
• Reorienting or relocating the receiving antenna
- Increasing the separation between the equipment and receiver
- Connecting the equipment to an outlet that is on a different circuit than the radio or TV.
- Consulting with a dealer or an experienced radio/TV technician for help.
Important Safety Instructions
FCC RADIATION EXPOSURE STATEMENT:
This equipment complies with FCC radiation exposure limits set forth for an uncontrolled environment. This equipment should be installed and operated so there is at least 8 inches (20 cm) between the radiator and your body. This device and its antenna(s) must not be co-located or operated in conjunction with any other antenna or transmitter.
2. IC Notice
The term "IC" before the radio certification number only signifies that Industry Canada technical specifications were met. Operation is subject to the following two conditions: (1) this device may not cause interference, and (2) this device must accept any interference, including interference that may cause undesired operation of the device.
This Class B digital apparatus complies with Canadian ICES-003. For products sold in the US and Canadian markets, only channels 1-11 are available. You cannot select any other channels.
IC RADIATION EXPOSURE STATEMENT:
This equipment complies with the IC RSS-102 radiation exposure limits set forth for an uncontrolled environment. This equipment should be installed and operated so there is at least 8 inches (20 cm) between the radiator and your body. This device and its antenna(s) must not be co-located or operated in conjunction with any other antenna or transmitter.
WARNING
TO REDUCE THE RISK OF FIRE, ELECTRIC SHOCK, OR INJURY TO PERSONS, OBSERVE THE FOLLOWING PRECAUTIONS:
- Use this unit only in the manner intended by the manufacturer. If you have questions, contact the manufacturer.
- Before servicing or cleaning the unit, switch the power off at the service panel and lock the service panel to prevent the power from being switched on accidentally. If the service panel cannot be locked, securely fasten a prominent warning device, such as a tag, to the service panel.
- The installation work and electrical wiring must be done by qualified person(s) in accordance with all applicable codes and standards, including fire-rated construction.
- Sufficient air is needed for proper combustion and the exhausting of gases through the flue (chimney) of the fuel burning equipment to prevent backdrafting. Follow the heating equipment manufacturer's guidelines and safety standards, such as those published by the National Fire Protection Association (NFPA), the American Society for Heating, Refrigeration and Air Conditioning Engineers (ASHRAE), and the local code authorities.
- When cutting or drilling into the wall or ceiling, do not damage electrical wiring or other hidden utilities.
- Ducted fans must always be vented outdoors.
CAUTION
For general ventilating use only. Do not use to exhaust hazardous or explosive materials and vapors.
CAUTION
To reduce the risk of fire and to properly exhaust air, be sure to duct air outside - do not vent exhaust air into spaces enclosed within walls, ceilings, attics, or into crawl spaces or garages.

WARNING
TO REDUCE THE RISK OF FIRE, USE ONLY METAL DUCTWORK.

WARNING
TO REDUCE THE RISK OF A RANGE TOP GREASE FIRE:
- Never leave surface units unattended at high settings. Boilovers cause smoking and greasy spillovers that may ignite. Heat oils slowly on low or medium settings.
- Always turn the hood ON when cooking at high heat or when flambeing food (i.e., Crepes Suzette, Cherries Jubilee, Peppercorn Beef Flambé).
- Clean ventilating fans frequently. Grease should not be allowed to accumulate on the fan or filter.
- Use proper pan sizes. Always use cookware appropriate for the size of the surface element.

WARNING
TO REDUCE THE RISK OF INJURY TO PERSONS IN THE EVENT OF A RANGE TOP GREASE FIRE, OBSERVE THE FOLLOWING PRECAUTIONS:
- SMOTHER FLAMES with a close fitting lid, cookie sheet, or metal tray, then turn off the burner. BE CAREFUL TO PREVENT BURNS. If the flames do not go out immediately, EVACUATE AND CALL THE FIRE DEPARTMENT.
- NEVER PICK UP A FLAMING PAN - you may get burned.
- DO NOT USE WATER, including wet dishcloths or towels - a violent steam explosion will result.
- Use an extinguisher ONLY if:
You know you have a class ABC extinguisher, and you already know how to operate it. - The fire is small and contained in the area where it started.
The fire department is being called. - You can fight the fire with your back to an exit.
* Based on "Kitchen Fire Safety Tips" published by NFPA.

WARNING
To reduce the risk of fire or electrical shock, do not use this fan with any solid-state speed control device.

WARNING
Do not let children near this appliance. Do not let children play with this appliance. Keep all packaging materials out of children's reach. Properly dispose the packaging materials after this appliance is unpacked.
Electrical Requirements
IMPORTANT
Observe all governing codes and ordinances.
It is the customer's responsibility.
To contact a qualified electrical installer.
To assure that the electrical installation is adequate and in conformance with the National Electrical Code, ANSI/NFPA 70 - latest edition*, or CSA Standards C22.194, Canadian Electrical Code, Part 1 and C22.2 No.0-M91 - latest edition** and all local codes and ordinances.
If codes permit and a separate ground wire is used, it is recommended that a qualified electrician determine that the ground path is adequate. A copy of the above code standards can be obtained from.
National Fire Protection Association
1 Batterymarch Park
Quincy, MA 02169 7471
CSA International
8501 East Pleasant Valley Road
Cleveland, OH 44131-5575
- A 120 volt, 60 Hz. AC only, 15-amp, fused electrical circuit is required.
- If the house has aluminum wiring, follow the procedure below:
- Connect a section of solid copper wire to the pigtail leads.
- Connect the aluminum wiring to the added section of copper wire using special connectors and/or tools designed and UL listed for joining copper to aluminum.
Important Safety Instructions
- Follow the electrical connector manufacturer's recommended procedure. Aluminum/copper connections must conform with local codes and industry accepted wiring practices.
- Wire sizes and connections must conform with the rating of the appliance as specified on the model/serial rating plate. The model/serial plate is located behind the filter on the rear wall of the range hood.
- Wire sizes must conform to the requirements of the National Electrical Code, ANSI/NFPA 70 (latest edition), or CSA Standards C22.1-94, Canadian Electrical Code, Part 1 and C22.2 No. 0-M91 (latest edition and all local codes and ordinances.
GROUNDING INSTRUCTIONS
This appliance must be grounded. In the event of an electrical short circuit, grounding reduces the risk of electric shock by providing an escape wire for the electric current.
WARNING
- Improper grounding can result in a risk of electric shock.
- Consult a qualified electrician if the grounding instructions are not completely understood, or if doubt exists as to whether the appliance is properly grounded.
- Do not use an extension cord.
Venting Requirements (ducted models only)
- The vent system must terminate outdoors.
- Do not terminate the vent system in an attic or other enclosed area.
- Do not use a 4" (10.2 cm) laundry-type wall cap.
- Only use metal vents. Plastic vents are not recommended.
- The length of the vent system and the number of elbows should be kept to a minimum to provide efficient performance.
For the most efficient and quietest operation:
- Use no more than three 90^ elbows.
- Make sure there is a minimum of 24" (61 cm) of straight vent between the elbows if more than one elbow is used.
- Do not install two elbows together.
- Use clamps to seal all joints in the vent system.
• The vent system must have a damper. - Use caulking to seal the exterior wall or roof opening around the cap.
- The size of the vent should be uniform.
6 English
Venting Methods
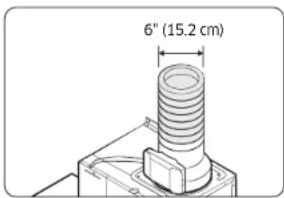
To use the hood's top outlet to vent your hood, a 6" (15.2 cm) round vent system is required. To use the hood's rear outlet, a 31/4" x 10" (8.25 x 25.4 cm) rectangular vent system is required. Neither of these vent systems are included and must be purchased separately.
NOTE
The vent system can terminate either through the roof or a wall. To vent through a wall, a 90° elbow is needed.
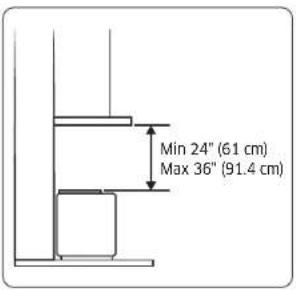
Mounting Height
Select a mounting height between a minimum of 24" (61 cm) for an electric cooking surface, a minimum of 27" (68.6 cm) for a gas cooking surface, and a suggested maximum of 36" (91.4 cm) above the range to the bottom of the hood.
Rear discharge
A 90° elbow may be installed immediately above the hood.
For Non-Vented (recirculating) Installations
If it is not possible to vent cooking fumes and vapors to the outside, the hood can be used in the non-vented (recirculating) version, fitting a charcoal filter and a plastic grid. Fumes and vapors are recycled through the recirculation grid.
Installation Requirements
General Specifications
text_image
11 1/4" (28.5 cm) 13 11/16" (34.8 cm) 2 3/16" (5.5 cm) 30" NK30CB700W** (29 7/8" = 75.8 cm) 30" NK30CB600W** (29 7/16" = 74.8 cm) 36" NK36CB700W** (35 3/8" = 89.8 cm) 36" NK36CB600W** (35 3/8" = 89.8 cm) 21 7/4" (55.5 cm) 19 13/16" (50.0 cm) Vent Mode Min 25 7/16" (64.6 cm) Max 42" (106.6 cm) Recirculation Mode Min 28 3/4" (72.0 cm) Max 44 1/2" (113.0 cm) Vent Mode (Extension Kit) Min 40" (101.6 cm) Max 71 1/3" (180.6 cm) Recirculation Mode (Extension Kit) Min 41 3/4" (106.0 cm) Max 72 7/16" (184.0 cm)Mounting Height
CAUTION
- Be sure to check the mounting height before installing the product.
- The mounting height is measured from the top of the range to the upper cabinets. The mounting height for an electric cooking surface is measured from its glass cooktop as shown in the image on the left. For a gas cooking surface, the mounting height is measured from the top of the burning grates as shown in the image on the right.
text_image
Min 24" (61 cm) Max 36" (91.4 cm)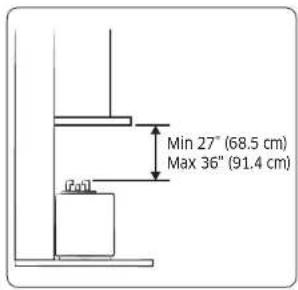
text_image
Min 27" (68.5 cm) Max 36" (91.4 cm)Installation Requirements
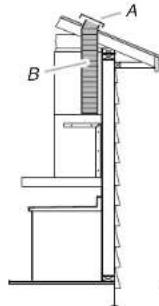
Venting Methods
Smoke is exhausted to the outside through a special pipe connected to the hood.
Roof Venting Wall Venting (Recirculating) (Recirculating)
text_image
A BA. Roof cap B. 6" (15.2 cm)
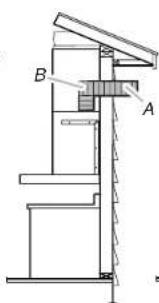
text_image
Technical diagram of a mechanical assembly with labeled components A and BA. Wall cap B. 6" (15.2 cm)
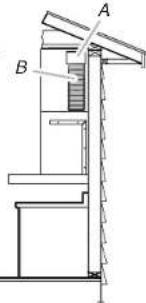
text_image
Technical diagram of a mechanical assembly with labeled components A and BA. Deflector B. 6" (15.2 cm)

CAUTION
- The minimum connectable exhaust outlet diameter is 6" (15.2 cm).
- Ensure the exhaust outlet diameter and duct diameter match, and then connect the duct to the wall outlet.
- If the duct and the wall outlet have different diameters, the suction performance will decrease while also significantly increasing noise. The manufacturer is not responsible for any problems caused by this.
- Use the minimum possible length for the duct, and do not significantly alter the cross-section.
- When connecting the duct, minimize bending. (Max bending angle: 90°)
- In an environment where installing with an external venting method is possible, be sure to install only using the external venting method.
Parts List
User manual & Installation manual (2)
Template for Installation (1)
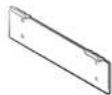
Hood Mounting Bracket (1)
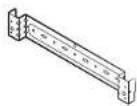
Duct Cover Mounting Bracket (1)

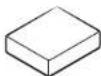
Electric Damper (1)
NK3'CB700W" only

Damper (1)
NK3'CB600W" only

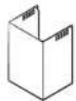
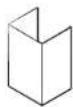
Damper Adapter (1) Upper Duct Cover (1) Lower Duct Cover (1)
5 mm Magnet (2)
Filter Support Cable * (2)
* To reduce the risk of dropping the filter, assemble the filter wire to the filter.
Sub-Parts List
6 x 130 mm
Screw Anchor (2)

6 x 30 mm
Screw Anchor (5)

4 x 10 mm
Hood Fixing Screw (10)

22 mm Washer (4)

NOTE
Install the product by using the included accessories and materials appropriately and according to the installation environment and conditions.
Additional Purchase Accessories
| Model NK30CB700W**,NK36CB700W** | |
| Recirculation Kit NK-AR7000WB/AA | |
| Charcoal Filter Kit NK-AF7000WB/AA | |
| Hood Extension Kit NK-AE7000W*/AA |
Needed Parts list (Not Supplied)
- Gloves
- Safety Glasses
- Pencil
• Measuring Tape or Ruler - Tape to Installation Template
- Spirit Level
• Phillips Screwdrivers
• Electric Drill and 1/4" (0.6 cm) drill bits - Pliers
- Wire cutter/Stripper
• Home Power Supply Cable
• UL listed Wire Nuts (3 pcs)
• UL/CSA approved strain relief - 6" (15.2 cm) Flexible Duct
- Duct Clamps
- Duct Sealing Tape
- Knife
• Caulking Gun and compound
• Jigsaw, Grinder
Installation Requirements
Installation Clearances
Upper furniture Dimension
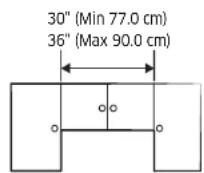
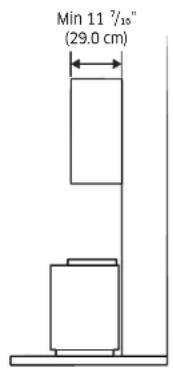
text_image
Min 11 7/10" (29.0 cm)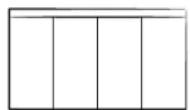
Required Hood installation Height
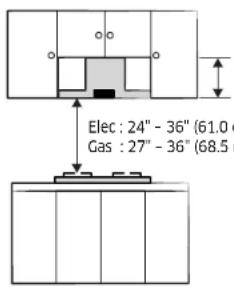
text_image
Elec : 24" - 36" (61.0) Gas : 27" - 36" (68.5)Min (Vent) 25 ^7/16 (64.6 cm)
Min (Recirculation) 28 ^3/8 (72.0 cm)
Elec : 24" - 36" (61.0 cm - 91.4 cm)
Gas : 27" - 36" (68.5 cm - 91.4 cm)
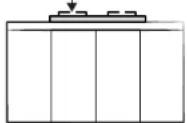
Making a hole in the furniture
Duct hole guide_Op.1
Cabinet floor drilling work: hood exhaust outlet (damper) cutting work
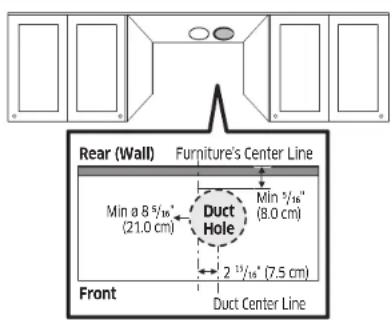
text_image
Rear (Wall) Furniture's Center Line Min a 8 5/16" (21.0 cm) Duct Hole Min 5/16" (8.0 cm) 2 13/16" (7.5 cm) Front Duct Center LineCAUTION
- Cut the cabinet in a way that does not interfere with the damper outlet.
- After assembling the duct cover, make sure that the cut surface of the cabinet is not exposed. (The hole size must be smaller than the duct cover.)
• Vacuum the sawdust to prevent it from blowing away. - Make sure the cabinets are not damaged.
- Before cutting the cabinet, explain to the customer that the cabinet needs to be cut, and then obtain consent before proceeding.
Method and sequence of cutting the upper cabinets
- Refer to the cutting dimensions above and mark the lines to be cut on the cabinet.
- Use a jigsaw to cut the upper cabinets. When cutting, use a vacuum cleaner to minimize the amount of dust.
Installation Tool Jigsaw
Installation
Duct hole guide_Op.2
Cabinet floor drilling work: hood exhaust outlet (damper) cutting work

text_image
Rear (Wall) Furniture's Center Line Cutting Area Front 13 ½" (34.0 cm)CAUTION
- Cut the cabinet in a way that does not interfere with the damper outlet.
• Vacuum the sawdust to prevent it from blowing away. - Make sure the cabinets are not damaged.
- Before cutting the cabinet, explain to the customer that the cabinet needs to be cut, and then obtain consent before proceeding.
Method and sequence of cutting the upper cabinets
- Refer to the cutting dimensions above and mark the lines to be cut on the cabinet.
- Use a jigsaw to cut the upper cabinets. When cutting, use a vacuum cleaner to minimize the amount of dust.
Installation Tool Jigsaw, Grinder
CAUTION
• This product must be installed by a professional hood installer.
- If the product is installed on a tiled wall or on drywall, there is a risk of the hood falling, so be sure to fix the fixing screws to the concrete behind the wall.
- Do not attach the product as if it were a tile or fix it with cement, silicone, or adhesive. Install it on a concrete wall using the provided screws.
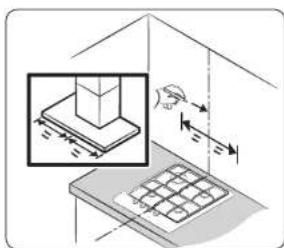
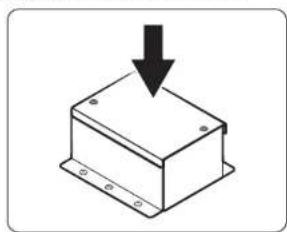
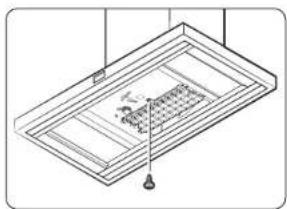
Setting the Location
text_image
Technical diagram showing a mechanical assembly with force arrows and a magnified inset of a component being inserted.- Be sure to check that the product you have purchased is suitable for the installation space you have chosen.
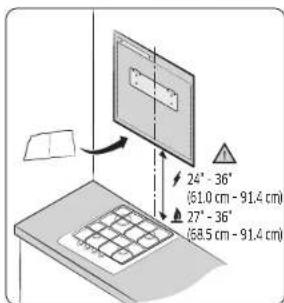
text_image
24° - 36° (51.0 cm - 91.4 cm) 27° - 36° (58.5 cm - 91.4 cm)- Fix the enclosed installation template and then install it so that it does not twist horizontally.
CAUTION
Please pay attention to the mounting height. The mounting height is measured from the top of the range to the upper cabinets. The mounting height for an electric cooking surface is measured from its glass cooktop. For a gas cooking surface, the mounting height is measured from the top of the burning grates.
English 11
Installation
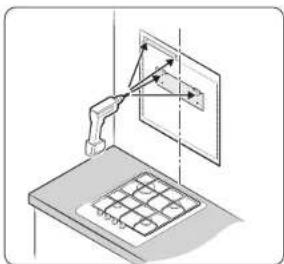
natural_image
Isometric diagram of a robotic arm interacting with a screen and grid device (no text or symbols)- Check the position for fixing the hood mounting bracket.
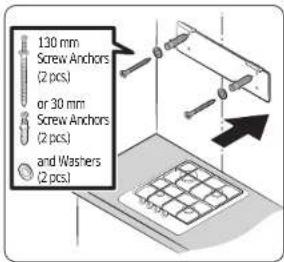
text_image
130 mm Screw Anchors (2 pcs.) or 30 mm Screw Anchors (2 pcs.) and Washers (2 pcs.)- Fix the hood mounting bracket horizontally on the wall where the hood is to be installed using screw anchors, hood mounting bracket screws, and washers. Be sure to install it on the wall using the two 30 mm screw anchors.
NOTE
For a secure hold, use a 130 mm screw anchor.
Connecting the Vent System
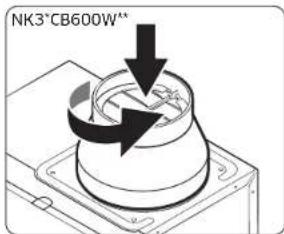
text_image
NK3*CB600W"- Assemble the damper or the electric damper for preventing backflow by turning it in to the hood exhaust outlet.
NOTE
- Damper is provided in NK3*CB600W**
• Electric Damper is provided in NK3'CB700W".
CAUTION
Check that the electric damper is seated correctly on the screw thread and there is no tilt. If the electric damper is not flush, air will leak through the gap.
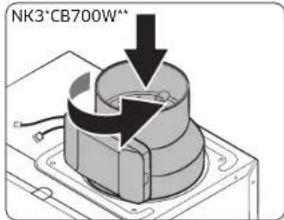
text_image
NK3*CB700W^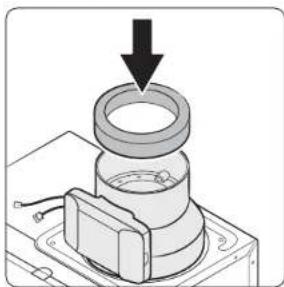
natural_image
Mechanical assembly diagram showing a bearing mounted on a base with a downward arrow indicating force or motion (no text or symbols present)- Assemble the damper adapter, pushing it into a damper or electric damper. Fix it using tape.
NOTE
- If the hood is NK3°CB600W**, please follow it from No.10.
- If the hood is NK3"CB700W", please follow it from No.7.
12 English
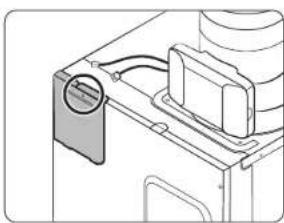
natural_image
Technical line drawing of a mechanical component with no visible text or symbols- Remove the cover by loosening the screw on the PCB cover.
natural_image
Technical diagram of a mechanical component with an inset showing cable connections (no text or symbols)- Connect the connector of the electric damper wire and the PCB connector.
NOTE
Insert the wire into the hole at the top left corner.
natural_image
Diagram of a mechanical device with a magnified circular detail and an arrow pointing to a component (no text or symbols present)- Assemble the PCB cover using a screw.
NOTE
Put the connected connector into the hole of the cover as shown in the picture.
Installing the Range Hood
natural_image
Diagram showing a mechanical device with rotating components and an inset view of a bracket assembly (no text or symbols)- Fix the hood to the hood mounting bracket installed on the wall.
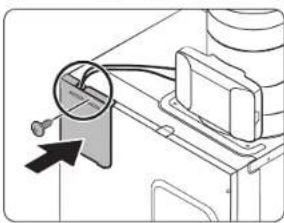
natural_image
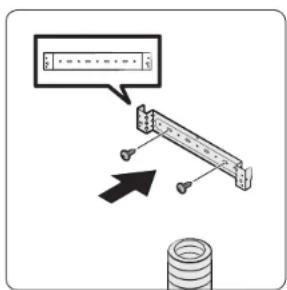
Technical line drawing of a mechanical device with an inset showing a bracket detail (no text or symbols)- Fix the duct auxiliary bracket using two 30 mm screw anchors in the top left of the duct.
English 13
Installation
text_image
6" (15.2 cm)- Fix the Flexible Duct (6" (15.2 cm)) to the hood outlet and the vent on the wall, respectively, with tape.

CAUTION
- Ensure the exhaust outlet diameter and duct diameter match, and then connect the duct to the wall outlet.
- If the duct and the wall outlet have different diameters, the suction performance will decrease while significantly increasing noise.
The manufacturer is not responsible for any problems caused by this. - Use the minimum possible length for the duct, and do not significantly alter the cross-section.
- Minimize bending when connecting the duct (max bending angle: 90 degrees).
text_image
Diagram showing a mechanical assembly with a dialog box and directional arrow, likely illustrating a motion or positioning concept.- Fix the duct cover mounting bracket to the ceiling or rear wall with the 10 mm hood fixing screws.
CAUTION
• Install the upper duct closely to the ceiling and upper cabinets.
- Be careful not to let the upper duct come into contact with the upper cabinet door.
Electrical Connection

WARNING
Assembly and electrical connections must be carried out by qualified technician.
WARNING

Electrical Shock Hazard
Turn off power circuit at the service panel before wiring this unit.
120 VAC, 15 or 20 Amp circuit required.
Failure to do so can result in death or electrical shock.
Connect ground wire to Green/Yellow ground wire in terminal box. To protect you against electric shock, The Green/Yellow Wire must be connected to the grounding wire in home electrical system.
Failure to do so can result in death or electrical shock.
It must under no circumstances be cut or removed.
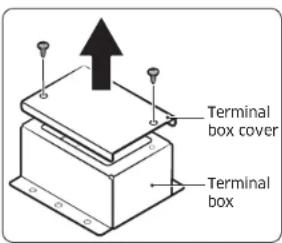
text_image
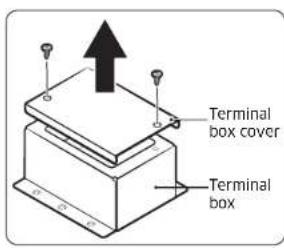
Terminal box cover Terminal box14-1. Disconnect power circuit breaker.
14-2. Remove terminal box cover.

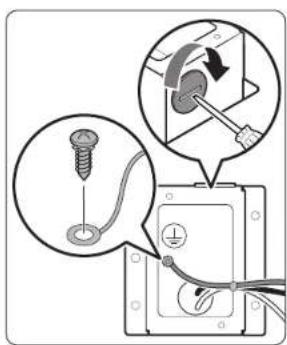
text_image
Diagram illustrating electrical installation steps with labeled components and connection instructions14-3. Remove the strain relief hole cover in the terminal box and install a UL/CSA approved strain relief.
text_image
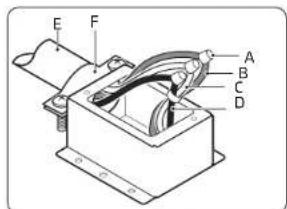
E F A B C DA. UL listed wire nuts
B. Green (or bare) wire connected to green/yellow wires
C. White wires
D. Black wires
E. Home power supply cable
F. UL/CSA approved strain relief
natural_image
Simple line drawing of a box with a downward arrow indicating compression or dislocation (no text or symbols)14-4. Run home power supply wiring through strain relief into terminal box.
14-5. Use UL listed wire nuts and connect white wires (C) together.
14-6. Use UL listed wire nuts and connect black wires (D) together.
14-7. Connect green (or bare) ground wire from home power supply to the green/yellow ground wire (B) in terminal box using UL listed wire nuts.
14-8. Tighten strain relief screw.
14-9. Put the wires into the terminal box and install terminal box cover,
14-10. Reconnect power circuit breaker.
English 15
Installation

text_image
Diagram showing a box being inserted into a device with an arrow indicating the process, alongside a magnified view of a device's internal structure.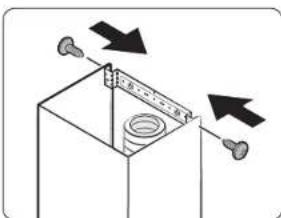
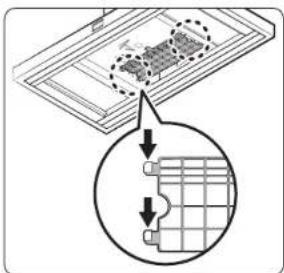
natural_image
Diagram of a mechanical assembly with arrows indicating direction of motion, no text or symbols present- Attach each magnet to the inner surface of the upper duct cover overlapping with the lower duct cover, and assemble the upper duct cover in a way that it fits the mounting bracket.
WARNING
Installation with screws or brackets other than those specified in the instruction of this manual may result in electrical hazards.
NOTE
Magnets are included in the accessory box.
- Assemble with 10 mm hood fixing screws from both sides.
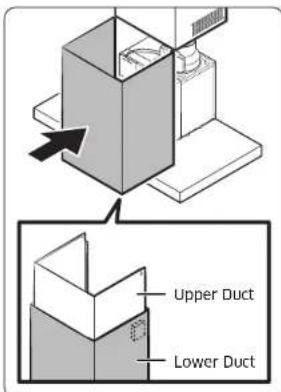
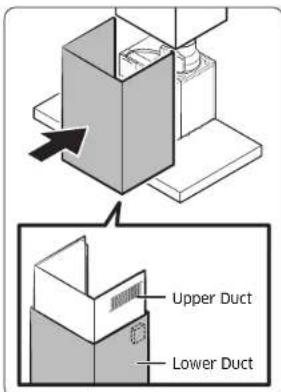
text_image
Upper Duct Lower Duct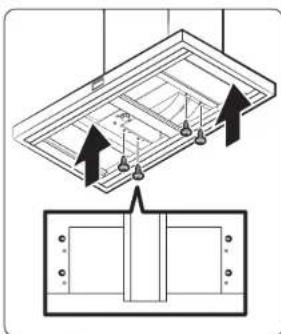
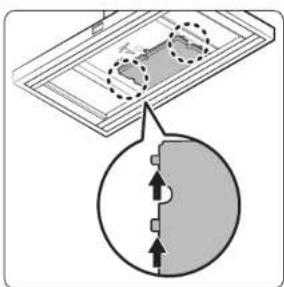
natural_image
Diagram showing ceiling-mounted components with arrows indicating assembly or installation (no text or symbols)- Assemble the lower duct cover to the hood. Magnets on the upper duct cover hold the lower duct cover in place.
NOTE
The magnet must be attached to the upper line of the lower duct.
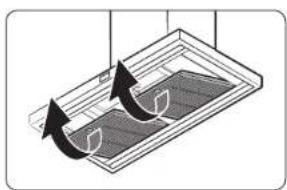
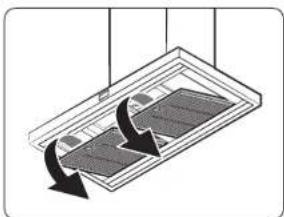
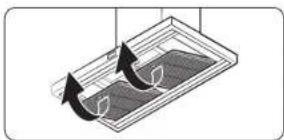
- Remove the filter at the bottom of the hood. Assemble the lower duct cover by fitting a 10 mm hood fixing screw to the hole in the lower duct cover.
CAUTION
When removing the filter, use both hands to avoid dropping the filter.
natural_image
Diagram of a ceiling-mounted device with two curved arrows indicating rotation or movement (no text or symbols)WARNING
Be sure to use an outlet with a ground terminal for safety. This can prevent the risk of electric shock, fire, or malfunction. If the outlet does not have a ground terminal, purchase a separate grounding wire and connect it to the grounding line.
CAUTION
Do not ground on gas pipes, water pipes, telephone lines, etc.
NOTE
Be sure to install a short-circuit breaker where there is a risk of a short circuit.
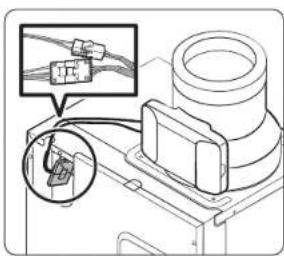
Connect the filter support cable
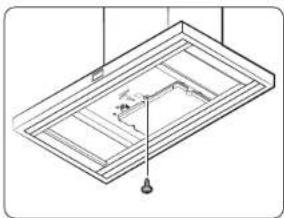
text_image
Diagram illustrating a mechanical or electrical process with labeled components and directional arrows indicating motion or movement.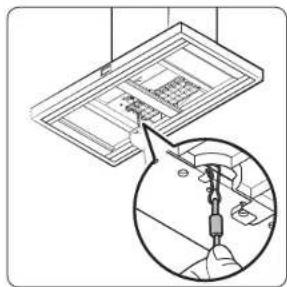
natural_image
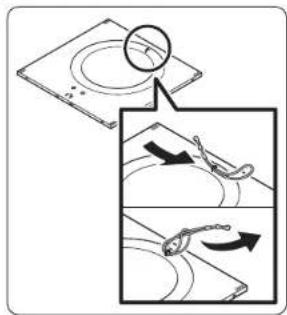
Diagram showing a ceiling fixture with a hand inserting a spring into it, and a magnified inset illustrating the mechanism (no text or symbols present)-
Remove the filter at the bottom of the hood. Pass the filter support cable through the wire loop attached on the top of the filter. Make the knot by passing the hook of the filter support cable through the other end of the filter support cable.
-
Hang the hook of the filter support cable to the anchor at bottom of the hood. Assemble the filter.
English 17
Installation
Installing the Recirculation Kit

NOTE
Same process until No. 14
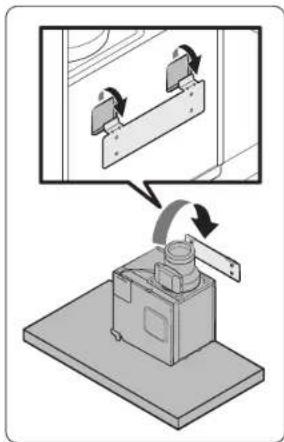
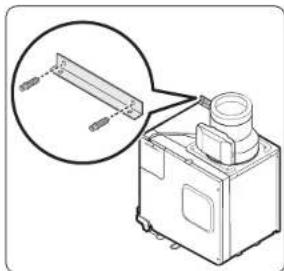
text_image
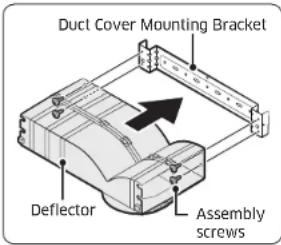
Duct Cover Mounting Bracket Deflector Assembly screws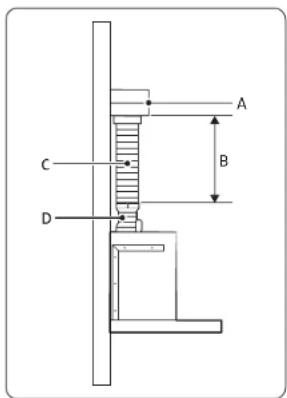
text_image
A B C D- Assemble the air deflector with the duct cover mounting bracket with the four assembly screws provided with the Recirculation Kit.

NOTE
- Use of recirculation type hoods in closed spaces may cause poor ventilation performance.
-
Please ventilate the room by opening the windows while operating the device.
-
Measure from the bottom of the deflector to the bottom of the hood outlet.
- Cut the duct to the measured size "X."
- Remove the deflector.
- Slide the duct onto the bottom of the deflector.
- Place the assembled deflector and duct over the exhaust outlet from the hood.
- Reassemble the air deflector to the duct cover mounting bracket with the four assembly screws.
- Seal the connections with tape.
| A Deflector | |
| B | X = length to cut duct |
| C Duct | |
| D Exhaust outlet | |
Electrical Connection

WARNING
Assembly and electrical connections must be carried out by qualified technician.
WARNING

Electrical Shock Hazard
Turn off power circuit at the service panel before wiring this unit.
120 VAC, 15 or 20 Amp circuit required.
Failure to do so can result in death or electrical shock.
Connect ground wire to Green/Yellow ground wire in terminal box. To protect you against electric shock, The Green/Yellow Wire must be connected to the grounding wire in home electrical system.
Failure to do so can result in death or electrical shock.
It must under no circumstances be cut or removed.
text_image
Terminal box cover Terminal box9-1. Disconnect power circuit breaker.
9-2. Remove terminal box cover.
text_image
Diagram showing installation of a screw with a switch and electrical socket, including magnified views of the component.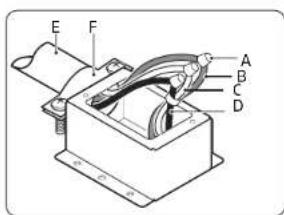
text_image
E F A B C DA. UL listed wire nuts
B. Green (or bare) wire connected to green/yellow wires
C. White wires
D. Black wires
E. Home power supply cable
F. UL/CSA approved strain relief
9-3. Remove the strain relief hole cover in the terminal box and install a UL/CSA approved strain relief.
9-4. Run home power supply wiring through strain relief into terminal box.
9-5. Use UL listed wire nuts and connect white wires (C) together.
9-6. Use UL listed wire nuts and connect black wires (D) together.
9-7. Connect green (or bare) ground wire from home power supply to the green/yellow ground wire (B) in terminal box using UL listed wire nuts.
9-8. Tighten strain relief screw.
natural_image
Simple line drawing of a box with a downward arrow indicating compression or dislocation (no text or symbols)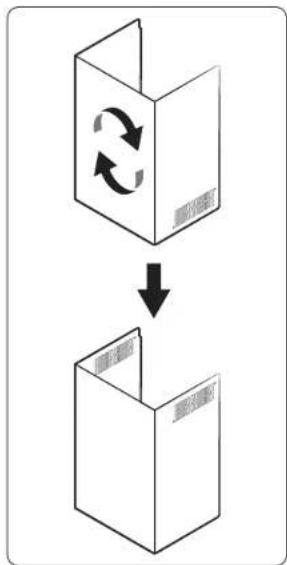
flowchart
graph TD
    A["Box with two arrows indicating rotation"] --> B["Box with a downward arrow"]
9-9. Put the wires into the terminal box and install terminal box cover.
9-10. Reconnect power circuit breaker.
- Rotate the upper duct as in the picture.
English 19
Installation
text_image
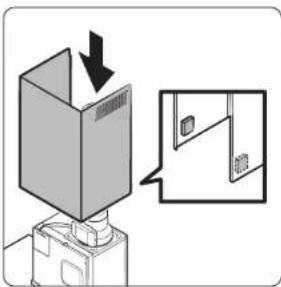
Diagram showing a device with a box being inserted, with an arrow indicating the process and a magnified inset showing a separate view of a door.- Attach each magnet to the inner surface of the upper duct cover overlapping with the lower duct cover, and assemble the upper duct cover in a way that it fits the mounting bracket.
WARNING
Installation with screws or brackets other than those specified in the instruction of this manual may result in electrical hazards.
NOTE
Magnets are included in the accessory box.
- Assemble with 10 mm hood fixing screws from both sides.
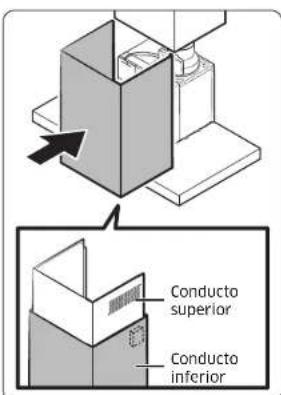
text_image
Upper Duct Lower Duct- Assemble the lower duct cover to the hood. Magnets on the upper duct cover hold the lower duct cover in place.
NOTE
The Magnet must be attached to the upper line of the Lower Duct.
natural_image
Diagram of a solar panel with arrows indicating direction (no text or symbols)- Remove metal grease filter from the range hood.
text_image
Diagram illustrating screw installation process with magnified detail view showing assembly steps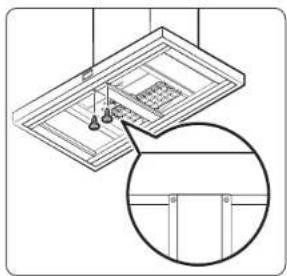
natural_image
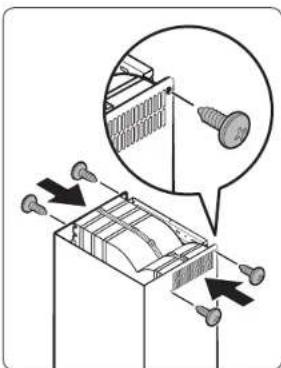
Technical line drawing of a ceiling fixture with hanging fixtures and a magnified inset showing internal components (no text or symbols)- Remove the 2 screws from the range hood.
natural_image
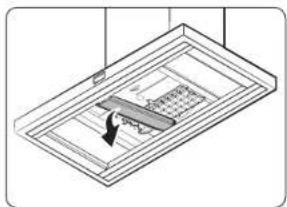
Isometric view of a ceiling-mounted device with a central panel and a directional arrow (no text or symbols)- Remove the frame middle part from the range hood.
natural_image
Isometric line drawing of a ceiling-mounted room with ventilation duct and hanging fixture (no text or symbols)- Remove one screw from the range hood.
natural_image
Diagram showing a grid layout with an inset magnified view of a rectangular panel (no text or symbols)- Remove the guard by pushing the hook of the guard in the direction of the arrow.
text_image
Diagram showing a device with a circular component and directional arrows indicating movement or flow, possibly illustrating a physical or engineering concept.- Insert the charcoal filter hook by pushing it in the direction of the arrow.
natural_image
Isometric line drawing of a ceiling structure with a central pipe and support points (no text or symbols)- Assemble the charcoal filter with the assembly screw provided with the Recirculation Kit. Reassemble the frame middle and filter in the reverse order of disassembly.
Range Hood Description Range Hood Overview

text_image
01 02 03 04 0501 Duct
02 Display
03 Button panel
04 Lamp 05 Filter
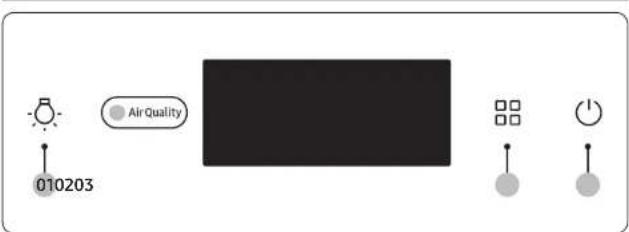
Button panel
text_image
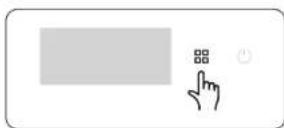
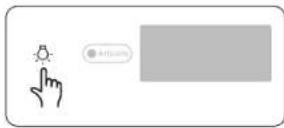
010203 Air Quality01 Light button
- Short press: Changes the light mode (High → Low → Off)
• 3 second press: Resets the filters
• 5 second press: Activates/deactivates the AP
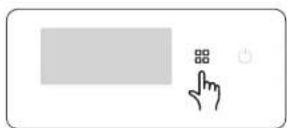
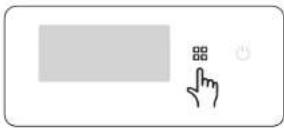
02 Mode button
- Short press: Changes the operation mode
(Smart → Low → Medium → High (Boost) Smart)
• 3 second press: Language settings (English, Español, Français) - 5 second press: Deactivates/activates the Wi-Fi
- Smart ventilation mode can be activated on the SmartThings app.
- Range Hood can be operated by mobile device or tablet with registered Samsung products on the SmartThings app.
• 10 second press: Activates/deactivates Boost mode
* Mode button + Light button
• 3 second press : Changes the default operation mode
Smart mode is the initial default mode.
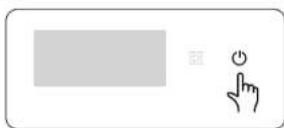
03 Power button
- Short press: Turns the device ON/OFF
22 English
Using the Range Hood
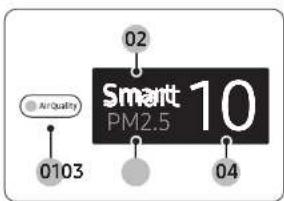
Display
text_image
02 AirQuality Smart PM2.5 10 0103 0401 Shows the PM10, PM2.5, and PM1.0 with color indicators
02 Shows the operation mode
03 Shows the PM10, PM2.5 and PM1.0 status
04 Shows the concentrations of PM10, PM2.5, and PM1.0
NOTE
- PM10: Dust in the air with a diameter of 10 m or less - Fine particles about 1/5 of the diameter of a human hair
- PM2.5: Dust in the air with a diameter of 2.5 m or less - Fine particles about 1/20 of the diameter of a human hair
- PM1.0: Dust in the air with a diameter of 1.0 m or less - Fine particles about 1/50 of the diameter of a human hair
^* Diameter of a human hair: 50 - 70 m
Turning the Range Hood On or Off
• The device turns on with a chime sound, and starts operation in Smart mode.
- Immediately after the device starts operation, a welcome message and app linkage reminder are displayed in sequential order. After that, the air quality color, PM levels and operation mode are displayed.
- Air quality is shown with color indicators: PM10, PM2.5, PM1.0 Concentrations of PM10, PM2.5 and PM1.0 are shown.
English 23
Using the Range Hood
First Use Guide


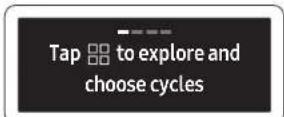


- When you input in the power for the first time, you will see the first use guide screen.
- Press the 📄 button or wait for 7 seconds to see the following instructions.
Changing the operation mode


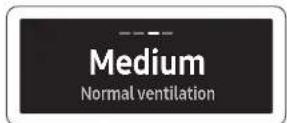

Change the device operation mode as necessary.
- Press the 📄 button to select the operation mode.
- Each time you press the button, the mode changes in the following order: Smart → Low → Medium → High → (Boost) → Smart
- In Smart mode, the fan speed is automatically adjusted depending on the surrounding dust conditions to keep the kitchen air clean.
Smart mode


Smart mode is a function that automatically adjusts the wind strength according to the dust in the kitchen.
• In Smart mode, the fan speed is automatically adjusted depending on the surrounding dust conditions to keep the kitchen air clean.
- If the kitchen air quality is bad during Smart mode operation, a notice is displayed and the hood range operates in High mode.
- When the kitchen air quality improves during Smart mode operation, a notice is displayed and a mode suitable for the air quality is enabled.
- If you operate in smart mode for 2 hours, it will be turned off automatically.
Activates/Deactivates Boost mode


Boost mode is a function that allows powerful exhaust for a short time.
- Press the 📄 button for 10 seconds.
- Language Settings mode is displayed. Please keep pressing.
- Wi-Fi On/Off mode is displayed. Please keep pressing.
- Boost mode has been added.
- Boost mode (Max 630 CFM) is available.
English 25
Using the Range Hood
Makeup Air
- When using ventilation systems with greater than the specified CFM of air movement, review local building codes as they may require makeup air systems. Consult an HVAC professional for the specific requirements for your area as the CFM requirements can vary between locales.
- Consult an HVAC professional to select the correct CFM capacity range hood for your application. The CFM capacity depends on the range or cooktop BTU rating, size and location, size of the kitchen, and the range hood ductwork in the kitchen.
CAUTION
Do not activate this function without a qualified person present. We recommend that a qualified technician install the range hood. It is the installer's responsibility to ensure that the range hood complies with the installation clearances specified for the product. To activate this function's Boost mode, the Make-up air system is required.
Using the lighting
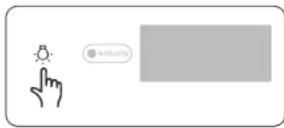
Adjusting the lighting level of the product.
- Press the button briefly to select the desired lighting level.
- It cycles in the order of High → Low → Off.


26 English
Checking air quality
AirQuality
Smart 10 PM2.5
The concentrations of PM10, PM2.5, and PM1.0 are shown, and the air quality is shown with color indicators that rate the PM10, PM2.5 and PM1.0 levels.
- From among PM10, PM2.5 and PM1.0, the value with the worst air quality is displayed.
- If all items have low values, the concentrations of PM10, PM2.5 and PM1.0 are displayed in turn for 10 seconds each.
• Air quality levels
| Pollution level | PM10 concentration (μm3) | PM2.5/PM1.0 concentration (μm3) | |
| Very poor | Red | 151 and over | 76 and over |
| Poor | Yellow | 81 - 150 36 | -75 |
| Moderate | Green | 31 - 80 16 | -35 |
| Good Blue | 30 and below | 15 and below | |
- PM10, PM2.5 and PM1.0 measurement will be displayed in numbers 05-999.
Filter cleaning reminder

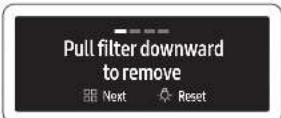

This function informs you when you need to clean the filters.
- If an audible alarm is sounded and 'Filter needs cleaning' appears on the front display when using the device, press and hold the 'button' for more than 3 seconds for information about filter cleaning.
- Press the 📄 button to clean the filter according to the instructions. Assemble the cleaned filter and press the 🔔 button to reset the filter usage time. When the alarm sounds, 'Resetting filter' is displayed.
- You should also reset the filter cleaning time by pressing and holding the button for more than 3 seconds when the filters have been cleaned for any reason even if the front display did not display 'Filter needs cleaning'.
NOTE
- If filter cleaning is required, a 10 second 'Filter cleaning required' notification is displayed on the display when powered on.
- Filter cleaning notifications are displayed approximately every 60 hours and may vary depending on usage mode.
English 27
Using the Range Hood
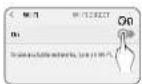
Wi-Fi On/Off
This feature turns the product's Wi-Fi on or off.
- Press the ☐ button for 5 seconds.

- Language Settings mode is displayed. Please keep pressing.

- If you continue to press, the language setting mode is canceled and Wi-Fi is turned off.
- Press the 📄 button again for 5 seconds to turn Wi-Fi on.
Smart ventilation mode

Smart ventilation mode is a function that can measure the kitchen air quality when the product is turned off and determine whether to proceed with exhausting when the air quality is bad.
- Quietly ventilate
- Get notifications
- Detection only

- If you set or turn off the smart ventilation mode in the app, the phrase will be displayed.

- When the air quality deteriorates, it turns on automatically and operates in Low mode.

Kitchen air quality is good. Hood turned off
Smart ventilation turned off after 1 hour
-
It turns off automatically when the air quality improves.
-
If you operate for 1 hour in smart ventilation mode, it will be turned off automatically.
NOTE
Smart ventilation mode can only be used by connecting the hood to the SmartThings app. If the hood is turned off automatically by operating for 1 hour, it will be able to turn on after least 4 hours.
Automatic operation to prevent range hood overheating
Inner temperature has risen. Hood turned on for air flow
Circulating air ...
Inner temperature stable. Hood turned off
This feature prevents overheating when the hood is turned off.
- When the hood temperature rises, a notice is displayed and it operates in Medium mode.
- If the hood temperature stabilizes or you press the ⏻ button, the hood is turned off.
English 29
Using the Range Hood
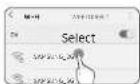
Language setting

Changing the Hood's Language.
- The default language is English, and you can choose English, Español, or Français.

- Please press the product's button for 3 seconds.

- You can toggle through the languages with the ☐ button and save a language with the ☐ button.

Entering AP(Access Point)
- Press and hold the 🔒 button for 5 seconds, following the instructions of the app.

- Enter AP mode.

- Please proceed with the connection according to the mobile guide.

- When the connection is completed, please proceed according to the mobile guide.
30 English
Cleaning and Maintenance
AI Energy Mode

AI Energy Mode is a function that saves energy when usage needs to be reduced by comparing expected monthly usage and its goals, and operates only in smart mode.

- When you set AI Energy Mode in the app, the leaf mark is displayed during smart mode operation.
- If the entry condition is satisfied, the phrase is displayed and operates in AI Energy Mode.
• If you save power usage in AI Energy Mode, display the savings at the end.
NOTE
- AI Energy Mode can be used only when the hood is connected to the SmartThings app.
- You can set AI Energy Mode through SmartThings Energy of SmartThings app.
Bixby
- Bixby is the name of Samsung's artificial intelligence solution which makes it possible to control the product through voice.
• To use the voice recognition function, you need to connect the SmartThings app and the product on your smartphone. - For models that do not directly recognize voice after connecting with the app, some functions can be controlled through Bixby on Samsung smartphones.
Amazon Alexa & Google Assistant
Samsung smart home appliances are supported by SmartThings skills in Alexa and Actions in Google Assistant.
Installation Guide
Here's how to link a SmartThings account with Amazon Alexa or Google Assistant. The SmartThings app and Alexa app (or Google Assistant app) should be installed on your phone.
- Setup supported devices in SmartThings
- After device setup, tap 'Voice assistant' and link your Samsung account to Amazon Alexa.
- Check if the devices are visible on Amazon Alexa app. Then account linking is complete. (Check the devices are visible and set the location (home and room) of devices in the Google Home app. Then account linking is complete.)
English 31
Cleaning and Maintenance

NOTE
- The dust concentration may vary depending on the usage environment (around the construction site, around the roadside, using vacuum cleaners, cleaning blankets / clothes, around fabric sofas, etc.).
• In the following cases, dust concentration may be displayed high.
When used on shag carpets, veterinarian clinics or clothing stores, humid places, smoke-producing places, insect-rich places, etc. - When using a humidifier, spray, sprayer, etc.
- When used in an environment where pollen occurs and external air flows in (building air conditioner, window frame with draft, etc.)
- If different products are used in the same space, the difference in the dust concentration indication value may occur due to air circulation. The concentration display value may vary from product to product.
- The dust concentration indicator value may be different from the air quality index (AQI) forecast.
- In environments affected by electromagnetic waves or electrical noise, dust concentrations may temporarily appear high.
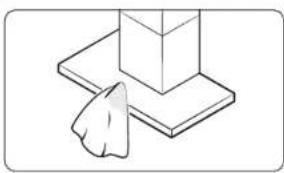
Cleaning the range hood
natural_image
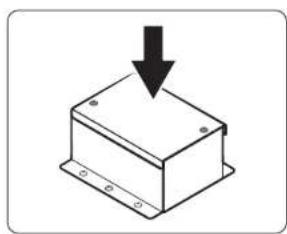
Simple line drawing of a hand pressing a corner block on a flat base (no text or symbols)Wipe the front of the product with a soft cloth soaked in neutral liquid detergent.

CAUTION
- Do not use rough materials such as sponges.
- Do not use baking soda, percarbonate, citric acid, abrasives, alcohol, etc. The surface coating may be damaged or discolored.
- When cleaning, always wear gloves for safety.
- Be sure to turn off the power when cleaning the hood.
- There is a risk of fire if it is not cleaned according to the user manual.
Cleaning the sensor unit
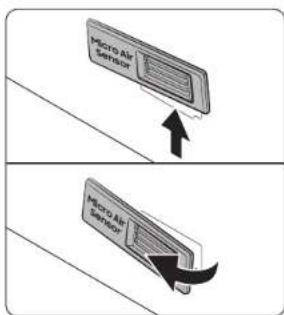
text_image
Micro Air Sensor Micro Air Sensor- Please remove the sensor cover on the left side of the lower duct cover.
• In the following cases, the dust concentration may appear high.

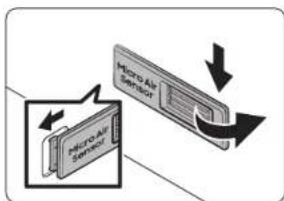
text_image
Micro Air Sensor- Clean the front/back of the sensor cover using a vacuum cleaner.
• To prolong sensor life, clean every 6 months.

CAUTION
Do not force dust into the entrance of the sensor unit.
flowchart
graph TD
    A["Micro Air Sensor"] --> B["Micro Air Sensor"]
    B --> C["Output"]
- Please assemble the sensor cover in the reverse order of disassembly.
- Hang the left hook first, press the right side to insert it, and then lower it.
32 English
Cleaning the Filters
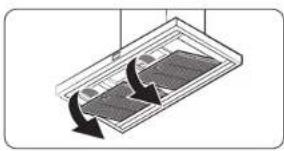
natural_image
Diagram of a solar panel with cooling arrows indicating cooling process (no text or symbols)- Please remove the filter at the bottom of the hood.
CAUTION
When separating the filter, use both hands to separate it carefully so that it does not drop.
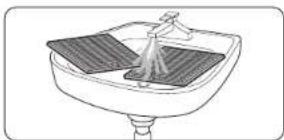
natural_image
Line drawing of a sink with a spray bottle and filter (no text or symbols)- Soak the filter in lukewarm water with neutral detergent for about 10 minutes, then rinse it with water and clean it.
CAUTION
Do not use a scrubber to clean the filter.
natural_image
Diagram of a mechanical component with two curved arrows indicating rotation or movement (no text or symbols)- When cleaning is complete, reassemble the filter in the reverse order of disassembly.
NOTE
Put the filter into the dishwasher and clean it conveniently with a standard wash cycle.
CAUTION
- Filters should be cleaned by hand with neutral detergent once a month, and if washed with a dishwasher, they should be washed for only a short time at a low temperature.
- Filters may discolor during cleaning, but this does not affect performance.
- Do not spray water directly on the filter while mounted on the hood. There is a risk of electric shock and fire.
- The front of the filter is made of stainless steel. Please be careful with it.
- Be sure to wear gloves because the edge of the filter can be sharp and cause injury.
Replacing the LED Lamp
This product is equipped with a dedicated LED lamp. If you need a replacement, please contact the service center.
SmartThings app
To use the SmartThings app, connect the product to the network in the sequence described below. The images shown may differ depending on your smartphone model, OS version, and manufacturer. You can only set up the Wi-Fi access point when connecting the product to a Wi-Fi network. Once the product is connected, you can use the SmartThings app via Wi-Fi, 3G, LTE, 5G or other wireless networks. If the Wi-Fi disconnects, please follow the instructions in the Samsung SmartThings app via your mobile device or tablet. You can easily install the SmartThings app or use the product with your smartphone by scanning the QR code on the attached label.
① Checking the power connections
Check if the power is connected to the product and the access point.
② Setting up and connecting to a Wi-Fi access point using your smartphone
-
To connect the product to a Wi-Fi network, turn on Wi-Fi in "Settings > Wi-Fi", and then select the access point that you wish to connect to.
-
Only alphanumeric characters are supported for wireless access point names (SSIDs). If an SSID has a special character, rename it before connecting to it.
• This product supports only 2.4 GHz Wi-Fi.
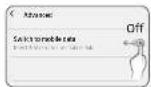
- Turning off "Switch to Mobile
Data" in "Settings > Wi-Fi" on Your
Smartphone
- If "Switch to mobile data" or "Adaptive Wi-Fi" is turned on, you cannot connect to the network. Be sure to turn off these functions before connecting to the network.
NOTE
The setup may differ depending on your smartphone model, OS version, and manufacturer.
- Checking Internet Connectivity
• After connecting to Wi-Fi, check that your smartphone is connected to the Internet.
NOTE
A firewall may prevent your smartphone from connecting to the Internet. Contact your Internet service provider for troubleshooting.
English 33
SmartThings app
③ Downloading the SmartThings app and registering your Samsung account
1. Downloading the SmartThings app
- Search for "SmartThings" in the Play Store or App Store, and download the SmartThings app to your smartphone.
- If the SmartThings app is already installed on your smartphone, update it to the latest version.

SmartThings (Samsung Connect) Samsung Electronics Co., Ltd.
NOTE
- The SmartThings app supports Android 7.0 or later (with at least 2 CB RAM) and iOS 12.0 or later. The app is optimized for iPhone 6s or later and Samsung smartphones (Galaxy S and Note series). The updates of the SmartThings app or the functions supported by it may be discontinued for the previously supported OS versions due to issues like usability and security.
- The SmartThings app may change without prior notice to improve product usability and performance.
2. Registering your Samsung account
- A Samsung account is required to use the SmartThings app. To create a Samsung account and log in to your account, follow the instructions displayed on the SmartThings app. You do not need to install an additional app.
NOTE
- If you already have a Samsung account, log in to the account. If you have a smartphone that is a Samsung device and you have a Samsung account, your smartphone is automatically logged in to your account.
- If you log in from a smartphone produced for another country, you need to log in with its country code when you create your Samsung account, and the SmartThings app may not be usable on some smartphones.
4 Connecting the SmartThings app to your product
1. Selecting the product that you want to connect.
1) Start the SmartThings app about one minute after turning on the hood.
2) After the SmartThings app is started, select "ADD NOW" when a pop-up window saying that a product is found appears.
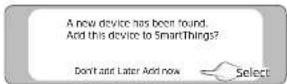
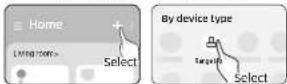
3) If the pop-up window does not appear, select "+," and then "Add Device."
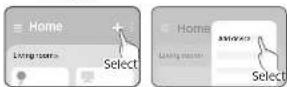
You can add a product you want to connect to by selecting it manually or by selecting "Scan."
- Select manually: Range Hood > Samsung
• Scan: [Range Hood] Samsung
2. Connecting the SmartThings app to your product
- Follow the instructions displayed on the SmartThings app to connect to your product.
- For information on how to use the SmartThings app, select the How To menu in the app.
NOTE
- If any pop-up-window appears on the top of the smartphone while connecting to your product, do not select it.
- If a pop-up window saying that the device is already registered appears while connecting to your product, get permission using "REQUEST PERMISSION" from a user already connected to the product, or create a new account using "REGISTER MY ACCOUNT" to independently connect to the product.
- If a Samsung account-related country error occurs while connecting to your product, log out of your current Samsung account, log in to your previous Samsung account, and then delete all devices that have been previously connected. Then, log in to your current Samsung account again and configure the settings.
Troubleshooting
- If a failure message appears while adding a device, see "Setting up and connecting to a Wi-Fi access point using your smartphone" on page 33. The connection may fail temporarily due to an installation location problem with the access point or other problems.
- If the word "AP" does not disappear from the display, turn off the power and turn on it in again.
- For the security protocols for wireless/wired access points, WPA-PSK and WPA2-PSK are recommended. For the authentication method, AES is recommended. New Wi-Fi authentication specifications and non-standard WiFi authentication methods are not supported.
• The product supports the IEEE802.11 b/g/n (2.4 GHz) communication protocol. (Samsung recommends IEEE802.11n.) - If your Internet service provider has permanently registered the MAC address (a unique identification number) of your PC or modem, you may not be able to connect your product to the Internet. Contact your Internet service provider and ask how to connect devices other than your PC (such as a Range Hood) to the Internet.
Open Source Announcement
The software included in this product contains open source software. You may obtain the complete corresponding source code for a period of three years after the last shipment of this product by contacting our support team via http://opensource.samsung.com (please use the "Inquiry" menu).
It is also possible to obtain the complete corresponding source code in a physical medium, such as CD-ROM. A minimal payment will be required.
The following URL http://opensource.samsung.com/opensource/SMART_AT_051/seq/0 leads to the open-source license information as related to this product. This offer is valid to anyone in receipt of this information.

text_image
QR code image containing encoded data, no visible human-readable textIf you suspect there is a failure while using the product, check the following before requesting service from the service center. When you request service, you will be charged for the visit and diagnosing the symptoms even if the product is not broken.
CAUTION
If you require repairs, disconnect the power circuit breaker immediately and contact the service center.
- Model number and serial number (find by removing the filter, listed inside product)
• Product warranty details - Explanation of the problem
General
| Problem Cause Action | ||
| It's not working. | Is the power being supplied like normal? | Please check if there is a power outage. |
| Please Check status of power wires connection. | ||
| Is there any moisture on the exterior of the product? | Please remove moisture from the product. | |
| Are there any foreign substances on the exterior of the product? | Please wipe off the foreign substance. | |
Hood Operation
| Problem Cause Action | ||
| The hood's mode changes automatically. | Is it working in smart mode? | Smart mode automatically operates in the High, Medium, and Low modes depending on the air quality. |
| The hood's wind strength is weak. | Is there a lot of foreign matter in the filter? | Wipe off the filter with a neutral detergent in lukewarm water. |
English 35
Troubleshooting
Information codes
| Code Description Action | ||
| C103 | Panel PBA communication is not working | Press the POWER button to restart the product.If the problem persists, disconnect the power for more than 30 seconds.Allow the product to cool and restart it.If it is not resolved, please contact a Samsung Electronics Service Center. |
| C121 | Temperature sensor is not working | |
| C154 | Main PBA communication is not working with Inverter PBA | |
| C162 | Only occurs when EEPROM Read or Write is not working. | |
| C163 | If you need to check the option code | |
| C203 | Inverter PBA communication is not working with Main PBA | |
| Code Description Action | ||
| C446 | BLDC Motor or Inverter PBA is not working | Press the POWER button to restart the product.If the problem persists, disconnect the power for more than 30 seconds.Allow the product to cool and restart it.If it is not resolved, please contact a Samsung Electronics Service Center. |
| C447 | ||
| C455 | ||
| C478 | ||
| C486 | ||
| C489 | ||
| C493 | ||
| C496 | ||
| C499 | ||
| C654 | Electric Damper is not working | Reconnect Electric damper and check any foreign matter is on the damper. |
Warranty (USA)
SAMSUNG RANGE HOOD
LIMITED WARRANTY TO ORIGINAL CONSUMER PURCHASER WITH PROOF OF PURCHASE
This SAMSUNG brand product, as supplied and distributed by Samsung Electronics America, Inc. (SAMSUNG) and delivered new, in the original carton to the original consumer purchaser, is warranted by SAMSUNG against manufacturing defects in materials and workmanship for a limited warranty period of:
ONE (1) YEAR PARTS AND LABOR
This limited warranty begins on the original date of purchase, and is valid only on products purchased and used in the United States that have been installed, operated, and maintained according to the instructions attached to or furnished with the product. To receive warranty service, the purchaser must contact SAMSUNG at the address or phone number provided below for problem determination and service procedures. Warranty service can only be performed by a SAMSUNG authorized service center. The original dated bill of sale must be presented upon request as proof of purchase to SAMSUNG or SAMSUNG's authorized service center to receive warranty service.
SAMSUNG will provide in-home service within the contiguous United States during the warranty period at no charge, subject to the availability of SAMSUNG authorized servicers within the customer's geographic area. If in-home service is not available, SAMSUNG may elect, at its option, to provide transportation of the product to and from an authorized service center. If the product is located in an area where service by a SAMSUNG authorized servicer is not available, you may be responsible for a trip charge or required to bring the product to a SAMSUNG authorized service center for service.
To receive in-home service, the product must be unobstructed and accessible to the service agent.
During the applicable warranty period, the product will be repaired, replaced, or the purchase price refunded, at the sole option of SAMSUNG. SAMSUNG may use new or reconditioned parts in repairing a product, or replace the product with a new or reconditioned product. Replacement parts and products are warranted for the remaining portion of the original product's warranty or ninety (90) days, whichever is longer. All replaced parts and products are the property of SAMSUNG and you must return them to SAMSUNG.
This limited warranty covers manufacturing defects in materials and workmanship encountered in normal household, noncommercial use of this product and shall not cover the following: damage that occurs in shipment, delivery, installation, and uses for which this product was not intended; damage caused by unauthorized modification or alteration of the product; products where the original factory serial numbers have been removed, defaced, changed in any way, or cannot be readily determined; cosmetic damage, including scratches, dents, chips, and other damage to the product's finishing; damage caused by abuse, misuse, pest infestations, accidents, fire, floods or other acts of nature or God; damage caused by use of equipment, utilities, services, parts, supplies, accessories, applications, installations, repairs, external wiring or connectors not supplied or authorized by SAMSUNG; damage caused by an incorrect electrical line current, voltage, fluctuations, and surges; damage caused by failure to operate and maintain the product according to instructions; in-home instruction on how to use your product; and service to correct installation not in accordance with electrical or plumbing codes or correction of household electrical infrastructure or plumbing (i.e., house wiring, fuses, or water inlet hoses). The cost of repair or replacement under these excluded circumstances shall be the customer's responsibility.
Visits by an authorized servicer to explain product functions, maintenance, or installation is not covered by this limited warranty. Please contact SAMSUNG at the number below for assistance with any of these issues.
English 37
Warranty (USA)
EXCLUSION OF IMPLIED WARRANTIES
IMPLIED WARRANTIES, INCLUDING THE IMPLIED WARRANTIES OF MERCHANTABILITY OR FITNESS FOR A PARTICULAR PURPOSE, ARE LIMITED TO ONE YEAR OR THE SHORTEST PERIOD ALLOWED BY LAW. Some states do not allow limitations on how long an implied warranty lasts, so the above limitations or exclusions may not apply to you. This warranty gives you specific rights, and you may also have other rights, which vary from state to state.
LIMITATION OF REMEDIES
YOUR SOLE AND EXCLUSIVE REMEDY IS PRODUCT REPAIR, PRODUCT REPLACEMENT, OR REFUND OF THE PURCHASE PRICE AT SAMSUNG'S OPTION, AS PROVIDED IN THIS LIMITED WARRANTY. SAMSUNG SHALL NOT BE LIABLE FOR SPECIAL, INCIDENTAL OR CONSEQUENTIAL DAMAGES INCLUDING BUT NOT LIMITED TO TIME AWAY FROM WORK, HOTELS, AND/OR RESTAURANT MEALS, REMODELING EXPENSES, LOSS OF REVENUE OR PROFITS, FAILURE TO REALIZE SAVINGS OR OTHER BENEFITS, REGARDLESS OF THE LEGAL THEORY ON WHICH THE CLAIM IS BASED, EVEN IF SAMSUNG HAS BEEN ADVISED OF THE POSSIBILITY OF SUCH DAMAGES. Some states do not allow exclusions or limitations of incidental or consequential damage, so the above limitations or exclusions may not apply to you. This warranty gives you specific legal rights, and you may also have other rights which vary from state to state.
SAMSUNG does not warrant uninterrupted or error-free operation of the product. NO WARRANTY OR GUARANTY GIVEN BY ANY PERSON, FIRM, OR CORPORATION WITH RESPECT TO THIS PRODUCT SHALL BE BINDING ON SAMSUNG.
To obtain warranty service, please contact SAMSUNG at:
This SAMSUNG brand product, as supplied and distributed by Samsung Electronics Canada, Inc. (SAMSUNG) and delivered new, in the original carton to the original consumer purchaser, is warranted by SAMSUNG against manufacturing defects in materials and workmanship for a limited warranty period of:
ONE (1) YEAR PARTS AND LABOR
This limited warranty begins on the original date of purchase, and is valid only on products purchased and used in CANADA. To receive warranty service, the purchaser must contact SAMSUNG to determine the problem and service procedures. Warranty service can only be performed by a SAMSUNG authorized service center. The original dated bill of sale must be presented upon request as proof of purchase to SAMSUNG or SAMSUNG's authorized service center.
SAMSUNG will repair or replace this product, at our option and at no charge as stipulated herein, with new or reconditioned parts or products if it is found to be defective during the limited warranty period specified above. All replaced parts and products become the property of SAMSUNG and must be returned to SAMSUNG. Replacement parts and products assume the remaining original warranty, or ninety (90) days, whichever is longer.
In-home service will be provided during the warranty labor period subject to availability within the contiguous Canada. In-home service is not available in all areas. To receive in home service, the product must be unobstructed and accessible to the service agent. If during in-home service repair can not be completed, it may be necessary to remove, repair and return the product.
This limited warranty covers manufacturing defects in materials and workmanship encountered in normal, noncommercial use of this product and shall not apply to the following, including, but not limited to: damage which occurs in shipment; delivery and installation; applications and uses for which this product was not intended; altered product or serial numbers; cosmetic damage or exterior finish; accidents, abuse, neglect, fire, water, lightning, or other acts of nature; use of products, equipment, systems, utilities, services, parts, supplies, accessories, applications, installations, repairs, external wiring or connectors not supplied or authorized by SAMSUNG which damage this product or result in service problems; incorrect electrical line voltage, fluctuations, and surges; customer adjustments and failure to follow operating instructions, cleaning, maintenance, and environmental instructions that are covered and prescribed in the instruction book; problems caused by pest infestations, and overheating by user. SAMSUNG does not warrant uninterrupted or error-free operation of the product.
THERE ARE NO EXPRESS WARRANTIES OTHER THAN THOSE LISTED AND DESCRIBED ABOVE, AND NO WARRANTIES WHETHER EXPRESS OR IMPLIED, INCLUDING, BUT NOT LIMITED TO, ANY IMPLIED WARRANTIES OF MERCHANTABILITY OR FITNESS FOR A PARTICULAR PURPOSE, SHALL APPLY AFTER THE EXPRESS WARRANTY PERIODS STATED ABOVE, AND NO OTHER EXPRESS WARRANTY OR GUAR-ANTY GIVEN BY ANY PERSON, FIRM OR CORPORATION WITH RESPECT TO THIS PRODUCT SHALL BE BINDING ON SAMSUNG. SAMSUNG SHALL NOT BE LIABLE FOR LOSS OF REVENUE OR PROFITS, FAILURE TO REALIZE SAVINGS OR OTHER BENEFITS, OR ANY OTHER SPECIAL, INCIDENTAL OR CONSEQUENTIAL DAMAGES CAUSED BY THE USE, MISUSE, OR INABILITY TO USE THIS PRODUCT, REGARDLESS OF THE LEGAL THEORY ON WHICH THE CLAIM IS BASED, EVEN IF SAMSUNG HAS BEEN ADVISED OF THE POSSIBILITY OF SUCH DAMAGES. NOR SHALL RECOVERY OF ANY KIND AGAINST SAMSUNG BE GREATER IN AMOUNT THAN THE PURCHASE PRICE OF THE PRODUCT SOLD BY SAMSUNG AND CAUSING THE ALLEGED DAMAGE. WITHOUT LIMITING THE FOREGOING, PURCHASER ASSUMES ALL RISK AND LIABILITY FOR LOSS, DAMAGE OR INJURY TO PURCHASER AND PURCHASER'S PROPERTY AND TO OTHERS AND THEIR PROPERTY ARISING OUT OF THE USE, MISUSE OR INABILITY TO USE THIS PRODUCT SOLD BY SAMSUNG NOT CAUSED DIRECTLY BY THE NEGLIGENCE OF SAMSUNG. THIS LIMITED WARRANTY SHALL NOT EXTEND TO ANYONE OTHER THAN THE ORIGINAL PURCHASER OF THIS PRODUCT, IS NONTRANSFERABLE, AND STATES YOUR EXCLUSIVE REMEDY.
Some provinces or territories may or may not allow limitations on how long an implied warranty lasts, or the exclusion or limitation of incidental or consequential damages, so the above limitations or exclusions may not apply to you. This warranty gives you specific legal rights, and you may also have other rights which vary from state to state. To obtain warranty service, please contact SAMSUNG at:
1-800-SAMSUNG (726-7864) or www.samsung.com/ca/support (English), www.samsung.com/ca_fr/support (French)
English 39
SAMSUNG
QUESTIONS OR COMMENTS?
| COUNTRY CALL OR | VISIT US ONLINE AT | |
| U.S.A- Consumer Electronics | 1-800-5AMSUNG (726-7864) www.samsung.com/us/support | |
| CANADA 1-800-5AMSUNG (726-7864) | www.samsung.com/ca/support (English)www.samsung.com/ca_fr/support (French) | |

DG68-01416B-02
Campana de estufa
NK30CB700W**/NK36CB700W**
natural_image
Interior kitchen scene with stainless steel kitchen chimney, ceramicware on shelf, and cup holders (no visible text or symbols)
text_image
SAMSUNGContenido
1) Este dispositivo no puede causar interferencia dañina, y
2) This device must accept any interference received, including interference that causes undesired operation.
8501 East Pleasant Valley Road
Cleveland, OH 44131-5575
text_image
Trasera (pared) Linea central del mueble Area de corte Frente 13 3/4" (34,0 cm)PRECAUCIÓN
text_image
Technical diagram showing a mechanical assembly with labeled components and directional arrows indicating motion or force.text_image
24° - 36' (51.0 cm - 91.4 cm) 27° - 36' (58.5 cm - 91.4 cm)natural_image
Isometric diagram of a desk with a computer monitor and a wall-mounted screen, showing alignment or interaction (no text or symbols)text_image
NK3*CB700W"natural_image
Mechanical assembly diagram showing a bearing mounted on a base with a downward arrow indicating force or direction (no text or symbols present)NOTA
natural_image
Technical line drawing of a mechanical component with no visible text or symbolsnatural_image
Technical line drawing of a mechanical component with two inset diagrams showing cable connections (no text or symbols)natural_image
Diagram of a mechanical device with a magnified inset showing a component (no text or symbols)natural_image
Diagram showing a mechanical device with rotating components and an inset view of a bracket (no text or symbols)natural_image
Technical illustration of a mechanical device with a magnified inset showing a bracket component (no text or symbols)text_image
Diagram showing a mechanical assembly with a dialog box and directional arrow, alongside a cylindrical component.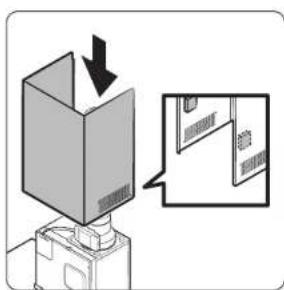
text_image
Diagram showing a box being inserted into a device with an arrow indicating direction, alongside a magnified view of the device's internal structure.natural_image
Diagram of a mechanical assembly with arrows indicating direction (no text or symbols)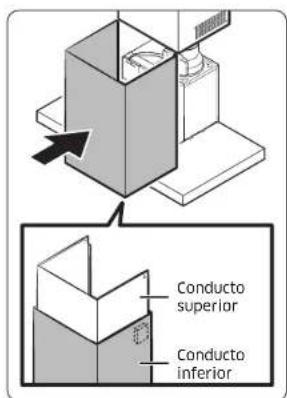
text_image
Diagram showing ceiling-mounted components with directional arrows indicating assembly or installation stepsnatural_image
Diagram of a ceiling-mounted device with curved arrows indicating rotation or movement (no text or symbols)text_image
Diagram illustrating a mechanical or electrical process with labeled steps and directional arrows indicating motion.natural_image
Diagram showing a ceiling-mounted device with a magnified inset of its internal components (no text or symbols)flowchart
graph TD
    A["Box with two arrows indicating rotation"] --> B["Box with one arrow pointing inward"]
text_image
Diagram showing a 3D box being inserted into a device with an arrow indicating direction, alongside a magnified inset of a door mechanism.text_image
Diagram illustrating screw installation process with magnified detail showing assembly of componentsEspañol 17
Instalación
natural_image
Diagram of a ceiling-mounted device with directional arrows indicating airflow or movement (no text or symbols)natural_image
Technical line drawing of a ceiling fixture with a magnified inset showing internal components (no text or symbols)natural_image
Isometric line drawing of a ceiling-mounted room with a horizontal panel and a directional arrow (no text or symbols)natural_image
Isometric line drawing of a ceiling-mounted room with a central ventilation duct and hanging fixture (no text or symbols)natural_image
Diagram showing a ceiling-mounted panel with a magnified inset illustrating the structural details (no text or symbols present)natural_image
Isometric line drawing of a ceiling structure with a central vertical element and a hanging weight (no text or symbols)natural_image
Diagram showing a ceiling-mounted device with a circular inset view of a mechanical component (no text or symbols)Adjusting the lighting level of the product.
natural_image
Simple line drawing of a hand pressing a corner block on a flat base (no text or symbols)natural_image
Diagram of a ceiling-mounted device with two curved arrows indicating rotation or flow direction (no text or symbols)natural_image
Line drawing of a kitchen sink with a stool and tray (no text or symbols)natural_image
Diagram of a mechanical component with curved arrows indicating motion or force direction (no text or symbols)text_image
QR code image containing encoded data, no visible human-readable text32 Español
NK30CB700W**/NK36CB700W**

natural_image
Interior kitchen scene with stainless steel counter, ceramicware on shelf, and cup holders (no visible text or symbols)
text_image
SAMSUNGTable des matières
National Fire Protection Association
1 Batterymarch Park
Quincy, MA 02169-7471
CSA International
8501 East Pleasant Valley Road
Cleveland, OH 44131-5575
text_image
Technical diagram showing three stages of a mechanical or structural assembly with labeled components A and B.text_image
Min 11 7/16" (29,0 cm)text_image
Technical diagram showing a mechanical assembly with labeled components and motion indicatorsnatural_image
Isometric diagram of a desk with a computer monitor and a wall-mounted screen, no text or symbols presentnatural_image
Mechanical assembly diagram showing a bearing component with an arrow indicating downward motion (no text or symbols present)natural_image
Technical line drawing of a mechanical component with no visible text or symbolsnatural_image
Technical line drawing of a mechanical component with two inset views showing internal components (no text or symbols)natural_image
Diagram of a mechanical device with a magnified inset showing a component (no text or symbols)REMARQUE
natural_image
Diagram showing a mechanical device with rotating components and an inset view of a bracket (no text or symbols)natural_image
Technical illustration of a mechanical device with a magnified inset showing a bracket detail (no text or symbols)text_image
Diagram showing a mechanical assembly with a dialog box and directional arrow, likely illustrating a motion or positioning concept.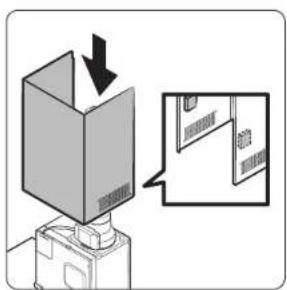
text_image
Diagram showing a box being inserted into a device with an arrow indicating direction, alongside a magnified inset of a door mechanism.natural_image
Diagram of a mechanical assembly with arrows indicating direction of motion (no text or symbols)
text_image
Diagram showing ceiling-mounted components with directional arrows indicating assembly or installation steps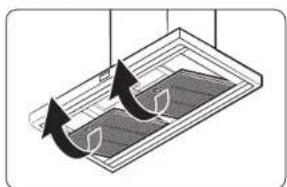
natural_image
Diagram of a ceiling-mounted device with curved arrows indicating motion or force direction (no text or symbols)text_image
Diagram illustrating a mechanical or electrical process with labeled components and directional arrows indicating motion or movement.natural_image
Diagram showing a ceiling-mounted device with a close-up of its internal components, no text or symbols present.flowchart
graph TD
    A["Box with two arrows indicating rotation"] --> B["Box with one arrow pointing inward"]
text_image
Diagram showing a 3D box being inserted into a device with an arrow indicating direction, alongside a magnified inset of a door mechanism.text_image
Diagram illustrating screw installation process with magnified detail of component placementFrançais 17
Installation

natural_image
Diagram of a ceiling-mounted device with directional arrows indicating airflow or movement (no text or symbols)natural_image
Technical line drawing of a ceiling fixture with a magnified inset showing internal components (no text or symbols)- Retirez les 2 vis de la plaque de fixation.

natural_image
Isometric line drawing of a ceiling-mounted room with a horizontal panel and directional arrow (no text or symbols)natural_image
Isometric line drawing of a ceiling-mounted electrical panel with a central socket and hanging fixture (no text or symbols)natural_image
Diagram showing a ceiling-mounted panel with a magnified inset illustrating the structural details (no text or symbols present)natural_image
Isometric line drawing of a ceiling structure with a central vertical element and a hanging weight (no text or symbols)natural_image
Diagram showing a ceiling-mounted device with a circular inset view of a mechanical component (no text or symbols)Adjusting the lighting level of the product.
natural_image
Simple line drawing of a hand pressing a corner block on a flat base (no text or symbols)natural_image
Diagram of a device with two curved arrows indicating rotation or movement (no text or symbols)natural_image
Line drawing of a cleaning or cleaning device with a cloth and lid (no text or symbols)natural_image
Diagram of a mechanical component with two curved arrows indicating rotation or movement (no text or symbols)Put the filter into the dishwasher and clean it conveniently with a standard wash cycle.