
ATH8130 - Humidifier BEKO - Free user manual and instructions
Find the device manual for free ATH8130 BEKO in PDF.


| Product Type | Evaporative humidifier with air purification |
| Model | ATH8130 |
| Tank Capacity | 2 L ±10% |
| Maximum Mist Output | ≥ 300 ml/h |
| Operating Modes | Sleep (night), Standard (normal), Intensive (intense/Turbo), Smart (intelligent) |
| Rated Power | 315 W |
| Noise Level | ≤ 45 dB(A) |
| Net Weight | 5.3 kg |
| Power Supply | 220-240 V~, 50-60 Hz |
| Filter | Activated carbon filter (washable) |
| Special Functions | Heating humidification, adjustable humidity control (40-90% in 5% steps), timer (0-12 h), water shortage indicator, automatic LED display off |
| Safety | Automatic shut-off when water is low, overheating protection (thermal fuse 250 W), automatic shut-off when target humidity is reached |
| Maintenance and Cleaning | Clean the activated carbon filter once a week, clean the tank and tray regularly, clean the impeller if necessary |
Frequently Asked Questions - ATH8130 BEKO
User questions about ATH8130 BEKO
0 question about this device. Answer the ones you know or ask your own.
Ask a new question about this device
Download the instructions for your Humidifier in PDF format for free! Find your manual ATH8130 - BEKO and take your electronic device back in hand. On this page are published all the documents necessary for the use of your device. ATH8130 by BEKO.
USER MANUAL ATH8130 BEKO
natural_image
Line drawing of a beige rectangular device labeled 'beko' with a black top and side slots (no additional text or symbols)ATH8130
EN RO DE|SR FR IT NL |
Please read this User Manual first!
Dear Customer,
Thank you for purchasing the Beko product. We hope that you get the best results from your product manufactured with high quality and state-of-the-art technology. Therefore, please read this entire User Manual and all the attached documents carefully before using the product and keep it as a reference for future use. If you handover the product to someone else, give the User Manual as well. Follow all warnings and information in the User Manual.
Meanings of the symbols
The following symbols are used in the sections of this manual:

Important instructions or useful tips about usage.

Warning for hot surfaces.

Warning for hazardous situations endangering life and property.

Warning to actions that must never be performed.

Warning for danger of fire.

Warning for electric shock.

This product is produced in environmentally friendly, modern facilities
CONTENTS
1 Safety instructions 4
2 Components 7
3 Function information 8
4 Product efficacy 11
5 Use method 12
5.1 Installation notice of using pure type humidifier for the first time 12
5.2 Disassembly of humidifier 16
5.3 Installation of humidifier....18
6 Cleaning and maintenance 21
7 Technical specifications 24
8 Circuit diagram 25
9 Troubleshooting 26
1 Safety instructions
Read the User Manual carefully before using the product and keep it in good custody for future reference.
Don't disassemble, repair or alter the machine without authorization. Otherwise, it may cause failure or danger. Unauthorized alteration may result in fire or breakdown.
The input voltage must not exceed the rating. Otherwise, it may result in fire or damage the machine.
Don't damage the power cord or attach any object on it. Don't bend, drag or twist the power cord. Don't stack heavy objects on the power cord or drag it between objects. Damaged power cord may result in electric shock or fire.
Before replacing the filter, adding water, cleaning or moving the machine, turn off the power and pull out the plug. Otherwise, operations above may damage the machine or cause electric shock.
Don't use damaged power cord or deformed plugs. Use of unsafe power cord may result in short circuit, electric shock or fire.
If the power cord is damaged, it must be replaced by manufacturer or the specialist of its maintenance department or similar department for safety reason.
Don't install the machine in a moist place, e.g. bathroom. The vapor may result in electric shock or damage the machine.
Don't use the humidifier in a place with heavy oil stain, e.g. machine oil. Otherwise there may be risks of machine breakdown, electric shock or combustion.
1 Safety instructions
Don't install the machine in outdoor or under direct sunlight. Otherwise, the machine cabinet may discolour.
Don't install the machine near any heat source, e.g. heater. Otherwise, the machine cabinet may discolour or deform.
To maximize the effect of purification, it is recommended to place the machine on the floor and at least 30cm away from the wall.
Don't attempt to use the machine for absorbing soot ejection or ventilation in kitchen. Otherwise the service life of the filter screen may be shortened and the machine may be damaged.
Don't stick fingers or any other object into the air inlet and outlet. Otherwise, it may cause electric shock or damage.
When using pesticide, stop the machine first to prevent any chemicals from being sucked in. as chemicals may otherwise accumulate in the machine and generate hazardous pungent substance under some circumstances.
Don't let volatile substances or combustibles such as smoke or incense fume into the inside of the machine.
Don't block the air inlet and outlet. Otherwise it may reduce the machine's cleaning capacity and result in machine breakdown.
Don't use benzene or diluents to wipe the machine or spray pesticide to it. These chemicals may result in the crack of machine cabinet and cause electric shock or fire.
If the machine is not in use for a long time, pull the plug.
To unplug the machine, hold the plug between your fingers and take it out carefully. Don't drag the cord forcefully. Otherwise, the power cord may be damaged.
1 Safety instructions
Don't sit or stand on the machine or shake it. Otherwise, it may cause failure.
Keep children away from handling the machine.
Don't use the machine at heavily smoky or dusty place, e.g. kitchen or where flammable gas, caustic gas or metal dust may have access. Otherwise, it may cause fire or failure.
Don't use solvents like alcohol or diluents to clean the humidifier and also keep it away from aerosol bomb. Otherwise, it will cause crack on the humidifier, even short circuit, thus results in electric shock or fire.
Please pour the water out from tank and trough, otherwise when the weather is cold, it will possibly freeze the water. (Operating under icy condition may trigger malfunction).
If the machine is not used, please pour the water out from the tank and trough completely, so as to avoid the reproduction of mold.
Put the machine at least 2m away from the weak electromagnetic wave sources, e.g. TV set, radio, sound equipment, quartz clock, cable TV, cordless phone, cordless microphone, etc. Otherwise, it may affect the visual and sound performance of the above said equipments. However, under some circumstances, even it is 2m away, electromagnetic interference may still occur based on the electromagnetic wavelength. This is particularly clear when indoor antenna is used. Therefore, put it away from the equipment as far as possible to prevent noise.
2 Components
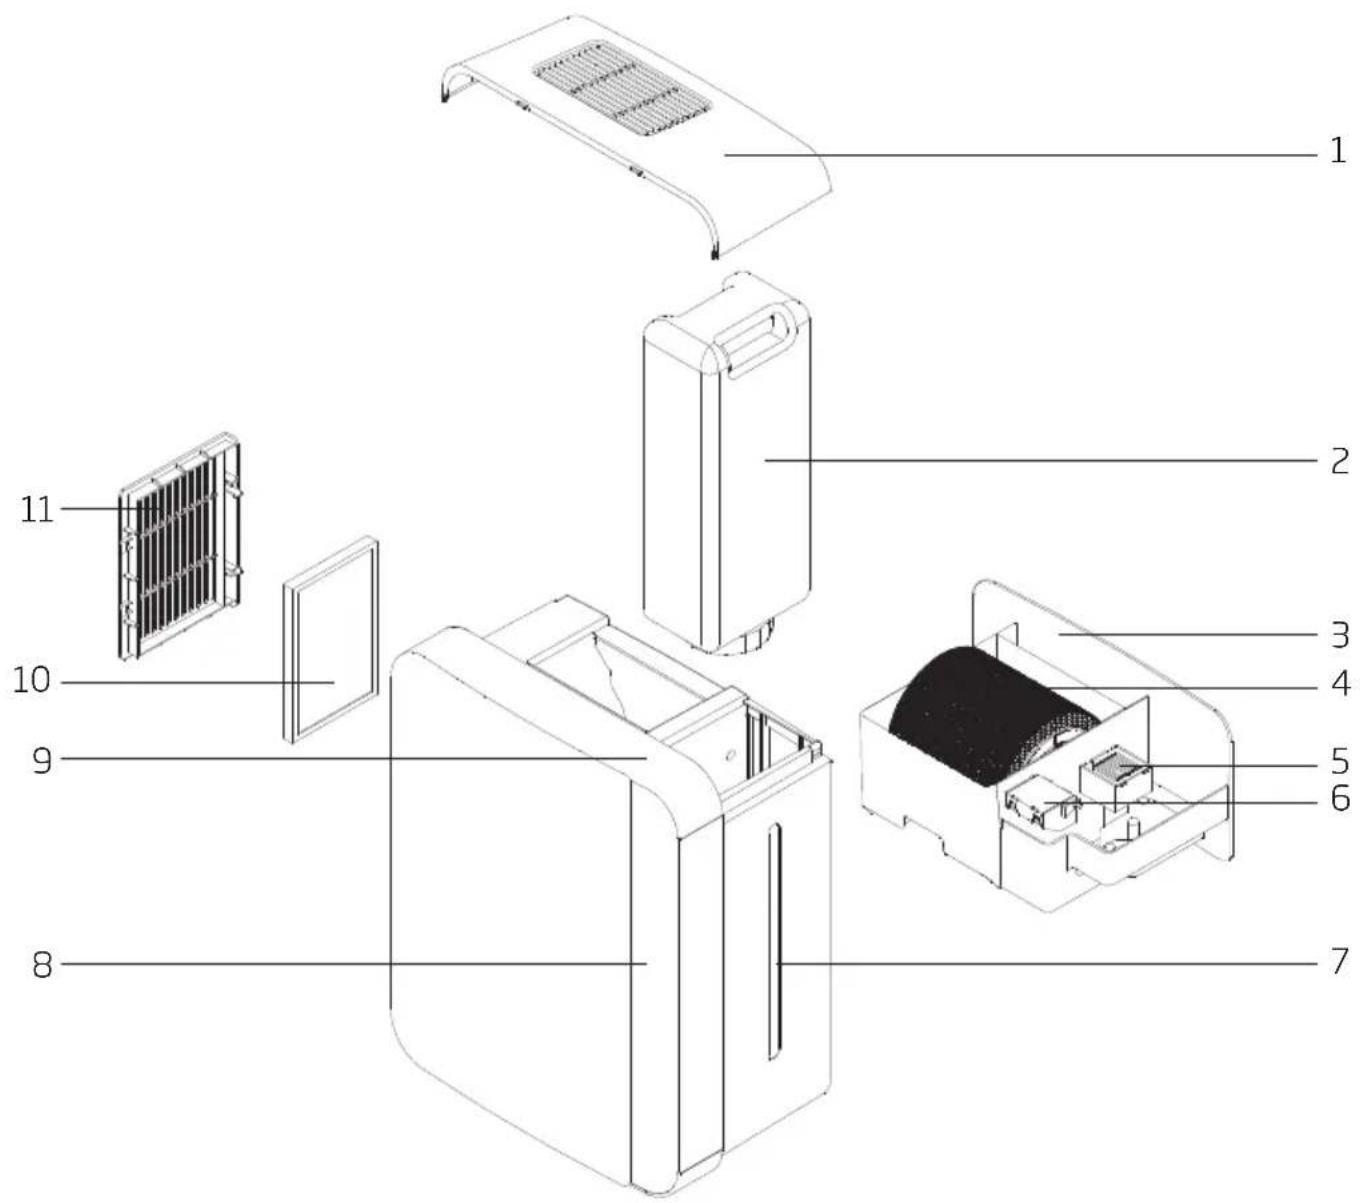
- Back cover plate
- Water tank
- Water trough
- Water Wheel
- Antibacterial box
-
Floater box
-
Viewport
- Display screen
- Touch key
- Active carbon filter
- Air inlet plate
Packing list
| Complete humidifier machine 1 | |
| User Manual 1 |
3 Function information

1. On/Off
After connecting the machine to power, the buzzer makes harmonious rings for four times with the whole LED screen flickering once, and the machine is now in power-on state.
Press On/Off, the machine enters into standard humidification mode. The buzzer makes harmonious rings for four times, and the indicator light is on. Current humidity will be shown on the LED screen. The humidity default is 88-77-66-55-44-33-22-11..
The first ten minutes after startup is preheating time for humidity sensor.
If the machine is in heat humidification or turbo status, motor will delay by 1 min to be standby.
2. Humidification mode
There are 4 humidification modes, i.e. sleep humidification mode, standard humidification mode, intensive humidification mode and smart humidification mode. Please see the figure for LED screen display.
The electric motor and thermal fuse are connected to humidification function. (Motor: 220V/50Hz, rated power 30W; Thermal fuse: rated power 250W)
Sleep humidification mode Sleeping: The motor operates at 700rpm. The display screen only shows Sleeping. When the humidity is 5% over the set point, the machine will enter into standby mode. When the humidity is 5% below the set point, it will reenter into sleep humidification mode.
Standard humidification mode (Standard): The motor operates at 1000rpm. When the humidity is 5% over the set point, the machine will enter into standby mode. When the humidity is 5% below the set point, it will reenter into standard humidification mode.
Intensive humidification mode: The motor operates at full power. The heating power is 250W. When the humidity is 5% over the set point, heating will stop, and also the motor will enter into standby mode after 1 minute. When the humidity is 5% below the set point, it will reenter into intensive humidification mode.
3 Function information
Smart humidification mode: When the humidity level is below 45%, the machine will enter into standard humidification mode plus heat humidification. When the humidity level is between 45% and 60%, the machine will enter into standard humidification mode. When the humidity level is over 60%, the machine will enter into sleep humidification mode where the indicator light shows normally. When the humidity level is over 70%, the machine will enter into standby mode.

Note: Humidity control and heat humidification keys are not available in smart mode.
We recommend that you select sleep humidification mode when sleeping. The machine has very low noise in this mode, thus it will not affect your sleep quality.
3. Heat humidificaiton
There are 2 working states of heat humidification: sleep humidification mode + heat humidification, standard humidification mode + heat humidification.
Sleep humidification mode Sleeping + heat humidification The motor operates at 700rpm, heating power is 150W. The display screen only shows Sleeping + indicator light of heat humidification When the humidity is 5% over the set point, heating will stop, and also the motor will enter standby mode after 1 minute; when the humidity is 5% below the set point, it will reenter heat humidification mode.
Standard humidification mode (Standard) + heat humidification. The motor operates at 1000rpm, heating power is 200W. When the humidity is 5% over the set point, heating will stop, and also the motor will enter standby mode after 1 minute; when the humidity is 5% below the set point, it will reenter heat humidification mode.
We recommend that you select sleep humidification mode when sleeping. The machine has very low noise in this mode, thus it will not affect your sleep quality.
4. Humidity control
Press the humidity control key, the machine can be set to -- and 11 humidity levels including 40%, 45%, 50%, 55%, 60%, 65%, 70%, 75%, 80%, 85%, 90%. When the machine detects the ambient humidity is 5% higher than the set point, it will automatically stop working. The display screen shows "set humidity" and "current humidity" at the same time. When the ambient humidity is 5% lower than the set point, the machine will automatically start working.
5. Timer
Press "Timer" to set time. It has 13 reserved times to select from "0-12 hours". Select the needed time. After the set time flickers for 5 seconds, the current humidity will show on the screen. The sum of numbers on the top right of the screen is the remaining time.
3 Function information
The whole machine will power off after time is up. See the figure for details.

- Water shortage indicator
When water in the tank is inadequate, water shortage sign ⚠️ shows and flickers on the screen. After water is added in the tank, water shortage sign will be off, and the machine will reenter into the selected working mode.
- LED Display Auto-off
For energy save purpose, LED display screen will be automatically off after no performance change on top control panel with 2 minutes. And once there is a performance change managed on control panel, LED display will resume back on.
4 Product efficacy
- Cleaner humidification without whitening
Air is washed and water is purified, solving the whitening issue thoroughly. - Healthy humidification
It humidifies the air through antibacterial wetted pad and natural evaporation. - Odor elimination and air purification
Fine dust can be perfectly handled by water wheel washing. Over 98% of odor in the air can be eliminated via active carbon net. - Use mixed humidification to humidify faster, more, and wider.
- Double sterilization makes the air cleaner.
Before water goes into the tank, antibacterial ball will sterilize once, and antibacterial plate will sterilize the polluted air and water in the tank again. - Humidity level can be adjusted.
It has 5 humidity levels to meet the humidification needs in different environment. - Smart LED display screen
It shows current humidity; you can have a visual recognition of current ambient humidity.
5 Use method
5.1 Installation notice of using pure type humidifier for the first time

Note:
- During use and movement, when the machine inclines more than 8^ , water will spill, so please put the machine on a flat place during working. Please empty the water in the tank and trough if the machine is to be moved or transported to a far place.
• Install the active carbon net
Reach into the buckle with your hand and pull. See 1 in the figure. Take off the packing bag outside of active carbon net, and install it into the air inlet plate. See 2 in the figure.

5 Using method
• Install the air inlet plate. See 1 in the figure.
Insert snap of air inlet plate into back cover slot. See 3 in the figure. Press the air inlet plate. See 4 in the figure.

5 Using method
• Install the water tank components
- Put your hand at the buckle and lift. The back cover plate will be dismounted. See 1 in the figure.

natural_image
Line drawing of a portable electronic device with ventilation slots and a labeled component (no text or symbols)- Hold the handle with your hand, and take out the tank. See 2 in the figure.
natural_image
Technical line drawing of a mechanical component with no visible text or symbols5 Using method
- Screw off the tank lid, and wash the tank with clean water.
- Add water into the tank. See 3 in the figure.
- Screw on the tank lid clockwise. See 4 in the figure.

natural_image
Line drawing of a rectangular container with a faucet and water droplets, no text or symbols present
natural_image
Line drawing of a cylindrical container with a side port, labeled with number 4 (no text or symbols on the object itself)- Grasp the tank and put it into the back cover. See 5 in the figure.
- Insert the front end of back cover plate into the back cover, and press down. See 6 in the figure.

natural_image
Technical line drawing of a mechanical device with a labeled component (no text or symbols present)
natural_image
Line drawing of a portable electronic device with a ventilation grille and mounting base (no text or symbols)5 Using method
5.2 Disassembly of humidifier
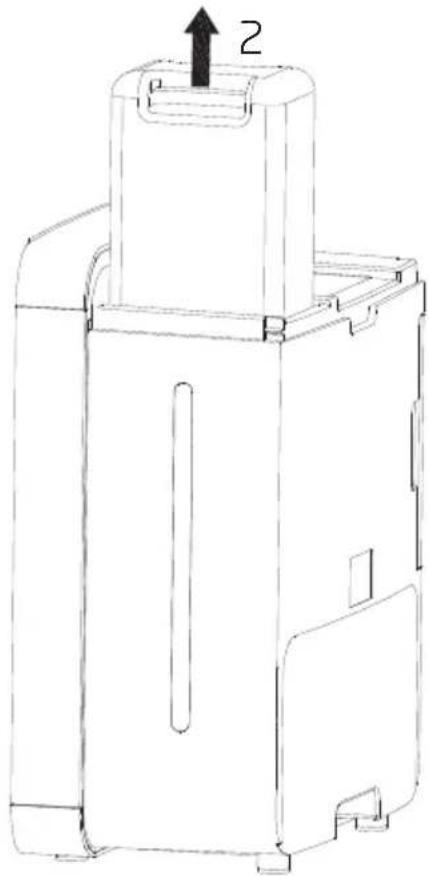
- Put your hand at buckle and lift. The back cover will be dismounted. See 1 in the figure.

natural_image
Line drawing of a portable electronic device with a ventilation grille and labeled component (no text or symbols beyond the label)- Grasp the handle and take out the tank. See 2 in the figure.

natural_image
Technical line drawing of a mechanical device with a labeled component '2' and an arrow indicating upward motion (no text or symbols beyond the label)5 Using method
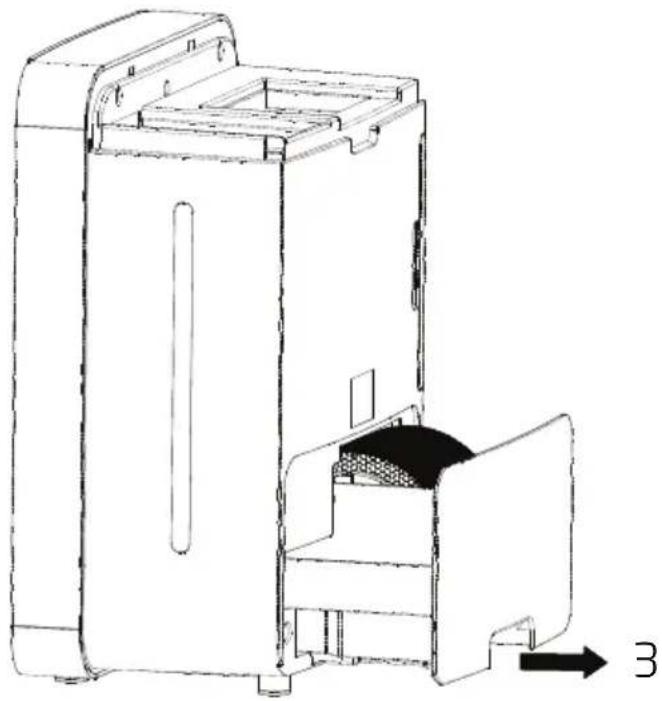
- Grasp the handle and pull out the trough. See 3 in the figure.
natural_image
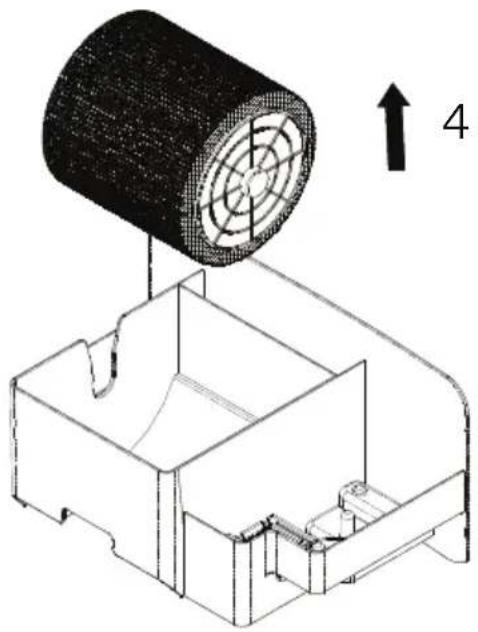
Technical line drawing of a portable air purifier with internal compartments and a labeled component (no text or symbols)- Dismount the water wheel components.
Grasp the water wheel and lift, the water wheel components will be taken out. See 4 in the figure.
natural_image
Technical line drawing of a mechanical component with a cylindrical housing and internal structure, showing no text or symbols.5 Using method
- Dismount the air inlet plate and active carbon net.
Reach into the buckle with your hand and pull. The air inlet plate will be pulled out. See 5 in the figure.

natural_image
Technical line drawing of a mechanical component with a labeled dimension (no text or symbols present)5.3 Installation of humidifier
• Install the water wheel. Grab the wheel and put it into the trough. See 1 in the figure.

natural_image
Technical diagram of a mechanical component with a cylindrical component and a base housing, showing internal structure and a downward arrow labeled '1' (no text or symbols on the diagram itself)5 Using method
• Install the water trough. Grab the trough and push it into the back cover slowly. See 2 in the figure.
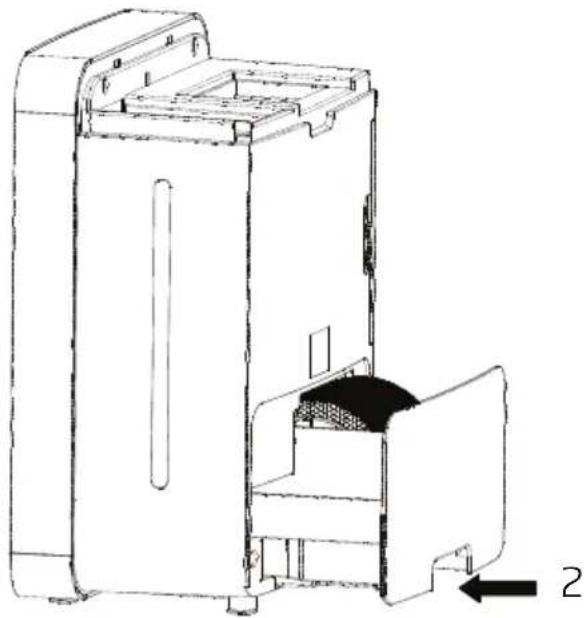
natural_image
Technical line drawing of a portable air conditioner unit with internal compartments and a labeled component (no text or symbols present)• Install the water tank components
- Screw off the tank lid, and add water into the tank. See 3 in the figure.
- Screw on the tank lid clockwise. See 4 in the figure.

5 Using method
- Grasp the tank and put it into the back cover. See 5 in the figure.
- Insert the front end of back cover plate into the back cover, and press down. See 6 in the figure.

natural_image
Technical line drawing of a mechanical component with a labeled part '5' (no text or symbols beyond the number)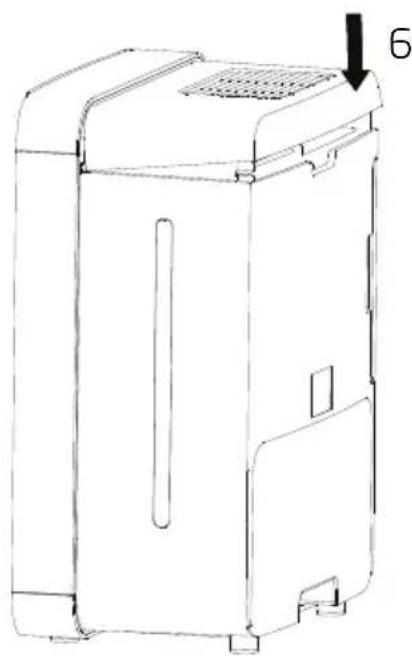
natural_image
Line drawing of a portable electronic device with a ventilation grille and mounting bracket (no text or symbols)6 Cleaning and maintenance
Clean front cover and machine exterior
- First, cut off the power supply.
- Clean it when necessary.
- When it is used at a dirty environment, clean it more frequently.
- Wipe the dirty marks off with a soft rag.
- If the dirty marks cannot be removed by wiping with a dry rag, wipe with a rag dipped with neutral household detergent and do not use the machine until it is completely dried.
Regular cleaning or filter replacement
- Follow the instruction when maintaining the filter components. Otherwise you may impair the performance of the pure type humidifier.
- Disassemble the machine by the method specified in the User Manual, and install it after maintenance according to the correct guidance.

Note: Don't wash it with hot water or expose it in the sunlight.
- When cleaning the active carbon net, put it on newspaper or any other protective object, and clean the dust on its surface with a brush.

Note: Don't press the active carbon net with excessive force to avoid any deformation. Don't wash it with water. Clean it once a week.
Clean the water tank and trough.
- Fill the water tank with a small amount of water, tighten the cover components and shake the tank for cleaning. Try neutral detergent if the dirt is stubborn.
- Wipe the trough with a soft rag dipped with water when it is dirty. Try neutral detergent if the dirt is stubborn.

Note: Wash it with clean water if detergent was used in case that residual solvent would cause abnormality.
6 Cleaning and maintenance
Clean the water wheel components.
- For daily cleaning: Wash the water wheel in clean water.
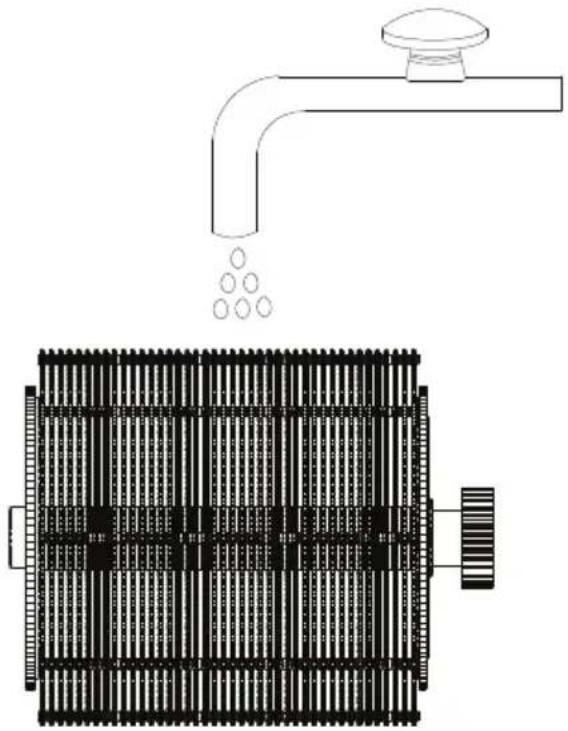
natural_image
Diagram of a water tank with a pipe and water drop, showing internal structure (no text or symbols)- For cleaning stubborn dirt, soak it in warm water containing neutral detergent for 30 minutes or so, and use water to clean it for 2 or 3 times. Make sure the detergent is of neutral nature. Alkaline detergent may cause deformation and reduce the performance.
-
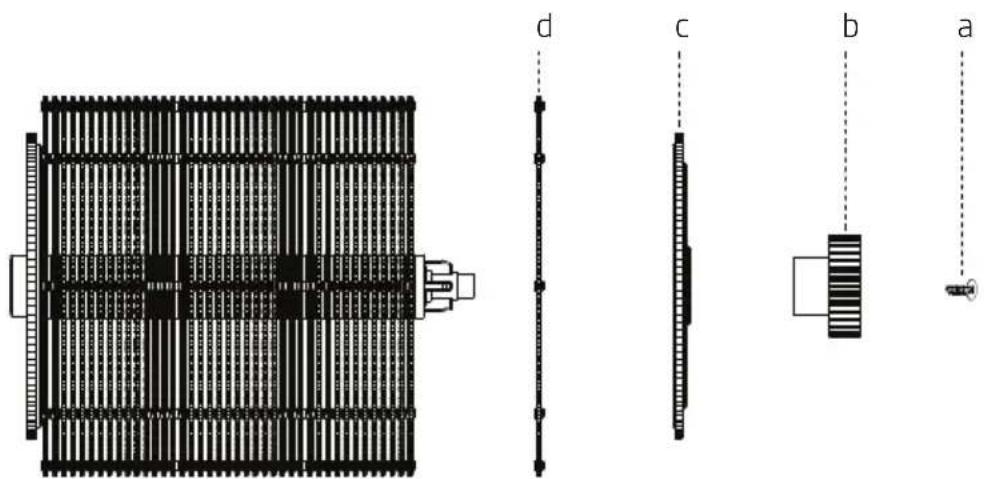
If the machine has special dirt or it has not been washed for a long time, we recommend that you dismount the humidification plate of the wheel for easy cleaning. See following figures for disassembly.
-
Use cross screwdriver to disconnect the fastening screws (a in the figure).
- Pull out wheel gear (b in the figure).
- Dismount back cover of wheel (c in the figure).
- Dismount the humidification plates piece by piece (d in the figure).
- Installation procedures are as follows:
- Install the humidification plates piece by piece (d in the figure) and press tight;
- Install the back cover of wheel (c in the figure);
- Install the wheel gear (b in the figure) and press tight;
- Use cross screwdriver to screw tight the fastening screws (a in the figure); and
- In the end, put the installed wheel components into the trough.
6 Cleaning and maintenance
natural_image
Technical line drawings of a heat exchanger or cooling unit with labeled components (a, b, c, d), showing internal structure and mounting features.
Note: Because the contamination differs according to water quality, you should clean the machine again even in a month after the cleaning and maintaining if there is unpleasant odor or the water in the tank reduces in a slower rate.
7 Technical specifications
Technical and design modifications reserved.
| Information requirements | |
| Information to identify the model(s) to which the information relates to [fill in as necessary] | |
| Model | ATH8130 |
| Rated Voltage | 220V-240V~ |
| Rated Frequency | 50-60Hz |
| Rated Power | 315W |
| Max Nebulization Capacity | ≥300ml/h |
| Max Water Tank Capacity | 2L±10% |
| Sleep Noise Level | ≤45dB(A) |
| Net Weight | 5.3 kg |
| Contact details for obtaining more information | Arcelik: Arcelik A.S. Sutluce, Karaagac Cd. 2-6, 34445 Beyoglu Istanbul Turkey |
8 Circuit diagram

9 Troubleshooting
| Failure description Possible causes | Solution | |
| Cannot start | No electricity in the socket Check | the power supply. |
| The machine is not plugged properly. | Re-plug it. | |
| No air comes out. | Air inlet or outlet is blocked. Remove the blockage. | |
| Motor doesn't work. Contact the after-sale service. | ||
| Humidity doesn't increase. | Whether the room is ventilated, or has carpet on the floor | If the room has carpet on the floor, due to ventilation condition, different floor and wall textures, sometimes it is hard to increase humidity. |
| The indicator light keeps flickering while the tank has water in it. | Whether the trough components are not properly installed | Assemble the trough components according to the installation requirements. |
| There is odor for the first startup. | Whether the tank interior has been washed before the first startup | Read installation notice of using the pure type humidifier for the first time |
| Water leakage in use | Whether the machine inclines in use or moving | Put it on a flat place, and ensure smooth and steady moving when it is in use or moving |
| There is unpleasant odor during the process of humidification. | Whether the trough is dirty Whether the water in the tank is not changed every day | Follow the procedures of cleaning and maintaining. |
| Cold wind is generated during the process of humidification. | When it is in sleep or standard humidification modes, moisture is sent out from the hole of wheel, and it can absorb the heat in the air, so the wind generated is cold. Maybe, it is colder than room temperature. | |
| No water spray | The product is pure type humidifier, not ultrasonic oscillation humidifier. So there is no water spray | |
| The machine stops after working for a while. | The machine can monitor real-time humidity. When the humidity reaches the set point, the machine will stop working, so it is normal. | |
1. On/Off (Pornit/Oprit)
natural_image
Line drawing of a portable electronic device with ventilation slots and a labeled component (no text or symbols)natural_image
Technical line drawing of a mechanical component with no visible text or symbolsnatural_image
Line drawing of a water dispenser with a faucet and water drop (no text or symbols)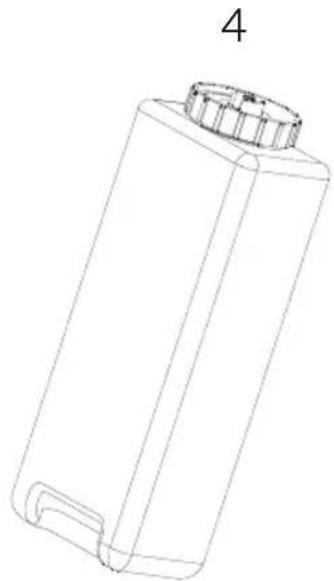
natural_image
Line drawing of a cylindrical container with a side port, labeled '4' (no text or symbols on the object itself)natural_image
Technical line drawing of a mechanical component with a labeled part (5), showing internal structure and mounting features (no text or symbols beyond the number)
natural_image
Line drawing of a portable electronic device with a ventilation grille and mounting base (no text or symbols)natural_image
Line drawing of a portable electronic device with a ventilation grille and labeled component (no text or symbols beyond the label)natural_image
Technical line drawing of a mechanical device with a labeled component '2' and an arrow indicating upward motion (no text or symbols beyond the label)natural_image
Technical line drawing of a portable air purifier with internal compartments and a labeled component (no text or symbols)natural_image
Technical line drawing of a mechanical component with a cylindrical top and internal structure, no text or symbols presentnatural_image
Technical line drawing of a device casing with a door and labeled component '5' (no text or symbols beyond the label)natural_image
Technical line drawing of a mechanical component with a cylindrical component and a base housing, showing internal structure and a downward arrow labeled '1' (no text or symbols on the diagram itself)natural_image
Technical line drawing of a portable air purifier with internal compartments and a labeled component (no text or symbols present)natural_image
Technical line drawing of a mechanical component with a labeled part '5' (no text or symbols beyond the number)
natural_image
Line drawing of a portable electronic device with a ventilation grille and mounting bracket (no text or symbols)natural_image
Diagram of a water tank with a pipe and water drop, showing internal structure (no text or symbols)natural_image
Technical diagram of a heat exchanger with labeled components (a, b, c, d), showing internal structure and wiring layout (no text or symbols beyond labels)
1. On/Off (Ein/Aus)
natural_image
Line drawing of a portable electronic device with ventilation grilles and a labeled component (no text or symbols)natural_image
Technical line drawing of a mechanical component with a numbered arrow indicating '2' (no text or symbols present)natural_image
Line drawing of a water dispenser with a faucet and water drop (no text or symbols)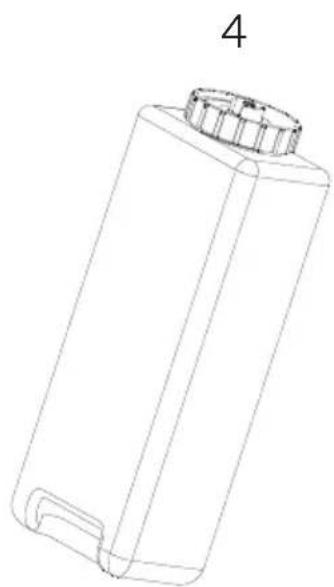
natural_image
Line drawing of a cylindrical container with a side port, labeled with number 4 (no text or symbols on the object itself)natural_image
Technical line drawing of a mechanical device with a labeled component (no text or symbols present)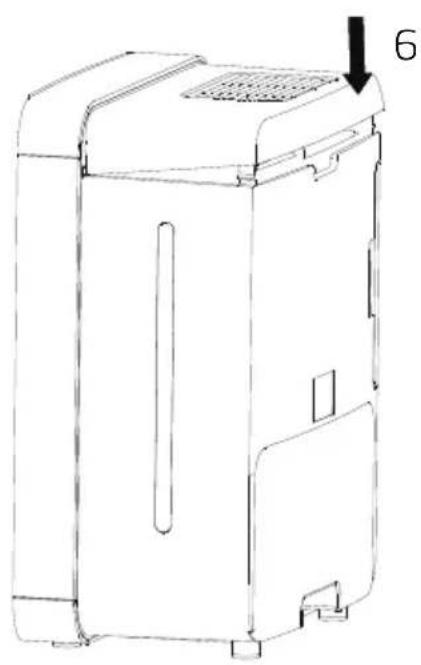
natural_image
Line drawing of a portable electronic device with a ventilation grille and mounting base (no text or symbols)natural_image
Line drawing of a portable electronic device with ventilation slots and a labeled component (no text or symbols beyond the label)natural_image
Technical line drawing of a mechanical device with a labeled component '2' (no text or symbols beyond the number)natural_image
Technical line drawing of a portable air purifier with internal compartments and a labeled component (no text or symbols)natural_image
Technical line drawing of a mechanical component with a cylindrical housing and mounting base, showing internal structure and an upward arrow labeled '4' (no text or symbols on the diagram itself)natural_image
Technical line drawing of a mechanical component with a labeled arrow indicating dimension (no text or symbols present)natural_image
Technical line drawing of a mechanical component with a cylindrical top and base housing, showing internal structure and a downward arrow labeled '1' (no text or symbols on the diagram itself)natural_image
Technical line drawing of a portable air conditioner unit with internal compartments and a labeled component (no text or symbols present)natural_image
Technical line drawing of a mechanical component with a labeled part '5' (no text or symbols beyond the number)
natural_image
Line drawing of a portable electronic device with ventilation slots and a labeled component (no text or symbols present)natural_image
Diagram of a water tank with a pipe and water drop, showing internal structure (no text or symbols)natural_image
Technical line drawings of a heat exchanger or cooling unit with labeled components (a, b, c, d), showing internal structure and mounting features.
natural_image
Warning symbol of a flame inside a triangle (no text or numbers)- Zadnji poklopac
- Rezervoar za vodu
- Protok vode
- Točkić za vodu
- Antibakterijska kutija
- Kutija plovka
- Prikaz nivoa vode
-
Displej
-
Dugme na dodir
- Aktivni karbonski filter
- Rešetka na ulazu za vazduh
Lista elemenata u pakovanju
| Ovlaživač | 1 |
| Uputstvo za upotrebu | 1 |
3 Informacije o funkcijama

On/Off

Humidification mode

Heat humidification

Humidity

Timer
1. On/Off
Nakon uključivanja uređaja u struju, zvučni signal se oglašava četiri puta i LED displej svetli, što znači da je uređaj sada aktivan.
Pritisnite On/Off, mašina prelazi u standardni režim ovlaživanja vazduha. Zvučni signal se oglašava četiri puta i lampica indikator se uključuje.
Trenutna vlažnost se prikazuje na LED displeju. Fabričke postavke vlažnosti su 88-77-66-55-44-33-22-11.
Prvih deset minuta rada nakon pokretanja su vreme zagrevanja za senzor vlažnosti.
natural_image
Technical line drawing of a rectangular device with internal components and a labeled arrow pointing to part 1 (no text or symbols present)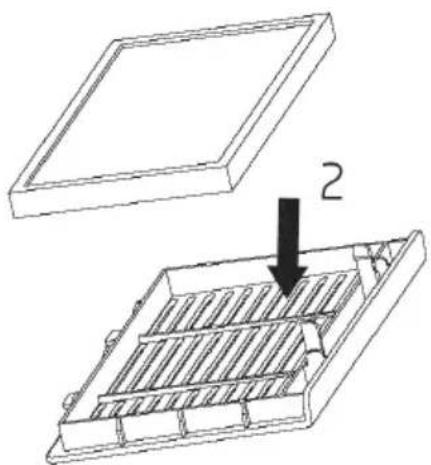
natural_image
Technical line drawing showing a 3D component with an inset view of a rectangular frame and a downward arrow indicating a step (no text or symbols present)5 Način upotrebe
Postavite rešetku na ulazu za vazduh. Videti 1 na slici.
Ubacite zupce rešetke u otvore na zadnjem poklopcu. Videti 3 na slici.
Pritisnite rešetku za vazduh. Videti 4 na slici.

5 Način upotrebe
Postavite komponente rezervoara za vodu
Rukom uhvatite otvor i podignite naviše. Poklopac će se skinuti. Videti 1 na slici.

natural_image
Line drawing of a portable electronic device with a ventilation grille and mounting base (no text or symbols)natural_image
Technical line drawing of a mechanical component with an arrow indicating '2' (no text or symbols present)5 Način upotrebe
natural_image
Technical line drawing of two containers with a faucet and a side cover, labeled '4' (no text or symbols on the diagram itself)Uhvatite rezervoar i stavite ga kroz zadnji poklopac. Videti 5 na slici.
Ubacite prednji kraj zadnjeg poklopca u poklopac i pritisnite. Videti 6 na slici.

5 Način upotrebe
5.2 Rasklapanje ovlaživača
Uhvatite rukom otvor i podignite. Zadnji poklopac će se skinuti. Videti 1 na slici.

natural_image
Line drawing of a portable electronic device with a labeled component (no text or symbols present)natural_image
Technical line drawing of a mechanical component with a labeled arrow (no text or symbols present)5 Način upotrebe
Uhvatite ručicu i izvucite sklop. Videti 3 na slici.

natural_image
Technical line drawing of a portable air purifier with internal compartments and a door, showing no text or symbols.Skinite komponente vodenog točka. Uhvatite vodeni točak i podignite ga. Videti 4 na slici.

natural_image
Technical illustration of a mechanical component with a cylindrical housing and internal structure, showing a numbered callout (no text or symbols present)5 Način upotrebe
natural_image
Technical line drawing of a mechanical device with a labeled component (no text or symbols present)5.3 Postavljanje ovlaživača
Postavite vodeni točak. Uhvatite točak i ubacite u otvor. Videti 1 na slici.

natural_image
Technical illustration of a mechanical component with a cylindrical component being inserted into a housing, showing internal structure and part number 1 (no text or symbols present)5 Način upotrebe
Vratite sklop u uređaj. Gurnite rukom tako da klikne u zadnji poklopac. Videti 2 na slici.

natural_image
Technical line drawing of a portable air purifier with open lid and internal compartments, showing internal structure and part number 2 (no text or symbols)Vratite komponente rezervoara za vodu.
Odvijte poklopac rezervoara i dodajte vodu u rezervoar. Videti 3 na slici. Zavrtite poklopac u smeru kazaljki na satu. Videti 4 na slici.

5 Način upotrebe
Uhvatite rezervoar i ubacite ga kroz zadnji poklopac. Videti 5 na slici. Vratite prednji kraj u zadnji poklopac i pritisnite. Videti 6 na slici.

natural_image
Diagram of a water tank with a pipe and column structure, showing liquid levels and a valve (no text or symbols)- Za čišćenje uporne prljavštine potopite točak u toplu vodu i neutralni deterdžent 30 minuta i isperite ga vodom 2 ili 3 puta. Proverite da li je deterdžent neutralan. Alkalni deterdženti mogu izazvati deformacije i umanjiti performanse.
natural_image
Technical line drawings of a mechanical component with labeled parts (a, b, c, d), showing internal structure and assembly (no text or symbols beyond labels)
Napomena: Pošto se prljanje razlikuje u zavisnosti od kvalitet vode koja se koristi, morate ponovo čistiti uređaj, makar i jednom mesečno, ako se pojavi neprijatan miris ili se nivo vode u rezervoaru smanjuje sporije nego inače.
7 Tehničke specifikacije
Attention ! Surfaces chaudes !

Risque d'incendie.

natural_image
Technical line drawing of a mechanical component with a labeled arrow pointing to a section (no text or symbols present)
natural_image
Technical diagram showing a 3D component with an arrow pointing to a grid-like structure inside a housing (no text or symbols present)5 Méthode utilisée
natural_image
Technical line drawing of a rectangular device with internal components and a labeled arrow pointing to a section (no text or symbols present)5 Méthode utilisée
natural_image
Line drawing of a portable electronic device with ventilation slots and a labeled component (no text or symbols)natural_image
Technical line drawing of a mechanical component with a numbered arrow indicating part 2 (no text or symbols present)5 Méthode utilisée
natural_image
Line drawing of a water dispenser with a faucet and water drop (no text or symbols)
natural_image
Line drawing of a cylindrical container with a side port, labeled '4' (no text or symbols on the object itself)natural_image
Technical line drawing of a mechanical device with a labeled component (no text or symbols present)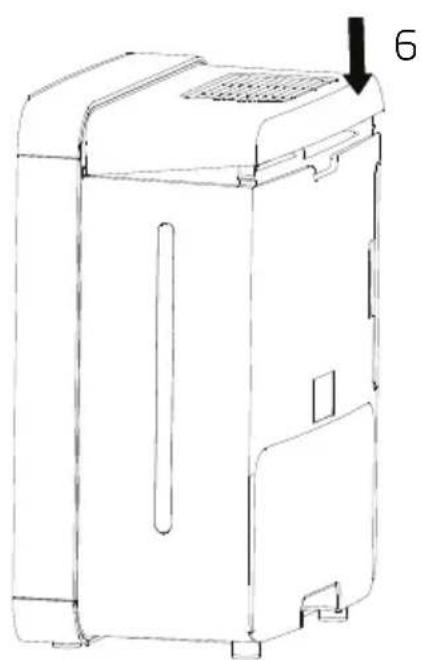
natural_image
Line drawing of a portable electronic device with a ventilation grille and labeled part '6' (no text or symbols on the device itself)5 Méthode utilisée
natural_image
Line drawing of a portable electronic device with ventilation slots and a labeled component (no text or symbols beyond the label)natural_image
Technical line drawing of a mechanical device with a labeled component '2' (no text or symbols beyond the number)5 Méthode utilisée
natural_image
Technical line drawing of a portable air purifier with internal compartments and a labeled component (no text or symbols present)natural_image
Technical line drawing of a mechanical component with a cylindrical top and base housing, showing internal structure and an upward arrow labeled '4' (no text or symbols on the diagram itself)5 Méthode utilisée
natural_image
Technical line drawing of a rectangular device with a side panel and an arrow labeled '5' pointing to it (no text or symbols beyond the number)natural_image
Technical diagram of a mechanical component with a cylindrical housing and base housing, showing a downward arrow labeled '1' (no text or symbols on the diagram itself)5 Méthode utilisée
natural_image
Technical line drawing of a portable air conditioner unit with internal compartments and a labeled component (no text or symbols present)natural_image
Technical line drawing of a mechanical component with a labeled part '5' (no text or symbols beyond the number)
natural_image
Line drawing of a portable electronic device with a ventilation grille and mounting bracket (no text or symbols)natural_image
Diagram of a water tank with a pipe and water drop, showing internal structure (no text or symbols)natural_image
Technical diagram of a heat exchanger with labeled components (a, b, c, d), showing internal structure and wiring layout (no text or symbols beyond labels)
5 Funzionamento
natural_image
Technical line drawing of a rectangular device with internal components and a labeled arrow pointing to a section (no text or symbols present)5 Funzionamento
natural_image
Line drawing of a portable electronic device with ventilation grilles and a labeled component (no text or symbols)natural_image
Technical line drawing of a mechanical component with an arrow indicating '2' (no text or symbols present)5 Funzionamento
natural_image
Line drawing of a water dispenser with faucet and drain (no text or symbols)
natural_image
Line drawing of a cylindrical container with a side port, labeled '4' (no text or symbols on the object itself)natural_image
Technical line drawing of a mechanical device with a labeled component (no text or symbols present)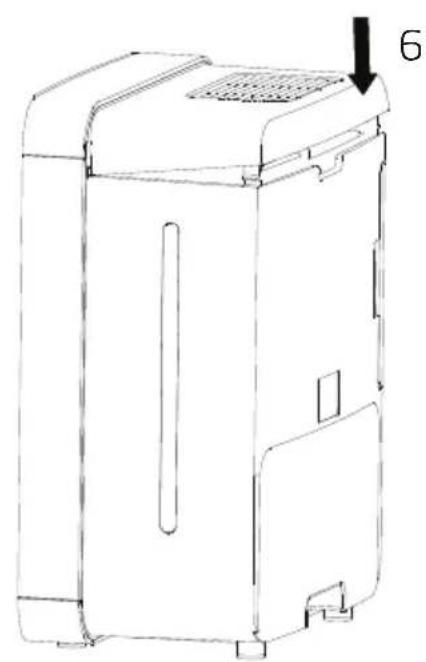
natural_image
Line drawing of a portable electronic device with a ventilation grille and labeled part '6' (no text or symbols on the device itself)5 Funzionamento
natural_image
Line drawing of a portable electronic device with ventilation slots and a labeled component (no text or symbols beyond the label)natural_image
Technical line drawing of a mechanical device with a labeled component '2' (no text or symbols beyond the number)5 Funzionamento
natural_image
Technical line drawing of a portable air purifier with internal compartments and a labeled component (no text or symbols)natural_image
Technical line drawing of a mechanical component with a cylindrical top and internal structure, no text or symbols present5 Funzionamento
natural_image
Technical line drawing of a mechanical component with a labeled dimension (no text or symbols present)natural_image
Technical diagram of a mechanical component with a cylindrical component and a base housing, showing internal structure and a downward arrow labeled '1' (no text or symbols on the diagram itself)5 Funzionamento
natural_image
Technical line drawing of a portable air conditioner unit with internal compartments and a labeled component (no text or symbols present)natural_image
Technical line drawing of a mechanical device with a labeled component (no text or symbols present)
natural_image
Line drawing of a portable electronic device with a ventilation grille and mounting base (no text or symbols)natural_image
Diagram of a water tank with a pipe and water drop, showing internal structure (no text or symbols)natural_image
Technical line drawings of a heat exchanger or cooling unit with labeled components (a, b, c, d), showing internal structure and mounting features.6. Indicator watertekort
5 Gebruiksmethode
natural_image
Technical line drawing of a rectangular device with internal components and a labeled arrow pointing to a section (no text or symbols present)5 Gebruiksmethode
natural_image
Line drawing of a portable electronic device with ventilation grilles and a labeled component (no text or symbols)natural_image
Technical line drawing of a mechanical component with a numbered arrow indicating '2' (no text or symbols present)5 Gebruiksmethode
natural_image
Line drawing of a water dispenser with a faucet and water drop (no text or symbols)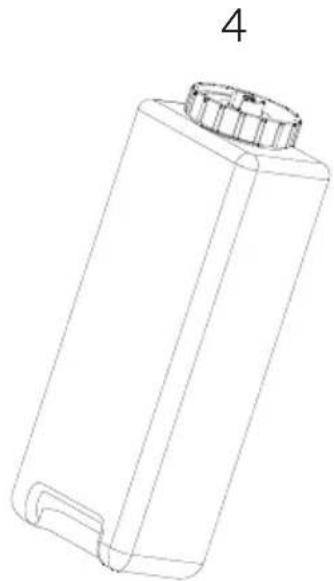
natural_image
Line drawing of a cylindrical container with a side port, labeled '4' (no text or symbols on the object itself)natural_image
Technical line drawing of a mechanical component with a labeled part (5), showing internal structure and mounting points (no text or symbols beyond the number)
natural_image
Line drawing of a portable electronic device with a ventilation grille and mounting base (no text or symbols)5 Gebruiksmethode
natural_image
Line drawing of a portable electronic device with a ventilation grille and labeled component (no text or symbols beyond the label)natural_image
Technical line drawing of a mechanical component with a labeled part '2' (no text or symbols beyond the number)5 Gebruiksmethode
natural_image
Technical line drawing of a portable air purifier with internal compartments and a labeled component (no text or symbols)• Demonteer de waterradonderdelen.
natural_image
Technical line drawing of a mechanical component with a cylindrical top and internal structure, no text or symbols present5 Gebruiksmethode
natural_image
Technical line drawing of a mechanical component with a labeled dimension (no text or symbols present)natural_image
Technical diagram of a mechanical component with a cylindrical component and a base housing, showing internal structure and a downward arrow labeled '1' (no text or symbols on the diagram itself)5 Gebruiksmethode
natural_image
Technical line drawing of a portable air conditioner unit with internal compartments and a labeled component (no text or symbols present)natural_image
Technical line drawing of a mechanical component with a labeled part '5' (no text or symbols beyond the number)
natural_image
Line drawing of a portable electronic device with ventilation slots and a labeled component (no text or symbols beyond the number 6)natural_image
Diagram of a water tank with a pipe and water drop, showing internal structure (no text or symbols)natural_image
Technical diagram of a heat exchanger with labeled components (a, b, c, d), showing internal structure and wiring layout (no text or symbols beyond labels)
natural_image
Abstract geometric design with blue triangular shapes on white background (no text or symbols)
- Please read this User Manual first!
- Meanings of the symbols
- CONTENTS
- Safety instructions
- Components
- Function information
- On/Off
- Humidification mode
- Heat humidificaiton
- Humidity control
- Timer
- Product efficacy
- Use method
- Installation notice of using pure type humidifier for the first time
- Note:
- Using method
- Disassembly of humidifier
- Installation of humidifier
- Cleaning and maintenance
- Clean front cover and machine exterior
- Regular cleaning or filter replacement
- Clean the water tank and trough.
- Clean the water wheel components.
- Technical specifications
- Circuit diagram
- Troubleshooting
- On/Off (Pornit/Oprit)
- On/Off (Ein/Aus)
- Informacije o funkcijama
- Način upotrebe
- Rasklapanje ovlaživača
- Postavljanje ovlaživača
- Tehničke specifikacije
- Méthode utilisée
- Funzionamento
- Indicator watertekort
- Gebruiksmethode
Brand : BEKO
Model : ATH8130
Category : Humidifier