
ATH7120 - Humidifier BEKO - Free user manual and instructions
Find the device manual for free ATH7120 BEKO in PDF.


| Product Type | Ultrasonic Humidifier |
| Brand | Beko |
| Model | ATH7120 |
| Rated Voltage | 220-240 V~, 50-60 Hz |
| Rated Power | 30 W |
| Maximum Nebulization Capacity | ≥ 250 ml/h |
| Water Tank Capacity | 3 L ± 10% |
| Noise Level (Standby) | 37 dB(A) |
| Net Weight | 1.9 kg |
| Dimensions (approx.) | Not specified in the manual |
| Recommended Water Type | Purified or demineralized water, temperature < 40 °C |
| Main Functions | Smart humidification, auto mode, sleep mode, manual flow regulation, negative oxygen ionizer, ion exchange resin water softener, silver ion antibacterial tank, 360° rotating diffuser |
| Display | LED digital humidity screen |
| Automatic Safety Shut-off | In case of water shortage, missing tank or low water level (after 1 minute) |
| Splash Protection | Yes (if tank lifted, steam stops) |
| Maintenance and Cleaning | Clean the transducer every week with the provided detergent; clean the tray and tank regularly; replace the water softener cartridge every 6 months |
| Repairability | Do not disassemble the base without authorization; contact customer service for any repairs |
| Included Accessories | User manual, detergent, brush, water softener cartridge |
| Operating Temperature | 5 °C to 25 °C, relative humidity < 80% |
| Storage | Empty water if temperature < 0 °C; clean and dry before storing |
Frequently Asked Questions - ATH7120 BEKO
User questions about ATH7120 BEKO
0 question about this device. Answer the ones you know or ask your own.
Ask a new question about this device
Download the instructions for your Humidifier in PDF format for free! Find your manual ATH7120 - BEKO and take your electronic device back in hand. On this page are published all the documents necessary for the use of your device. ATH7120 by BEKO.
USER MANUAL ATH7120 BEKO
Ultrasonic Humidifier
User Manual

natural_image
Line drawing of a beko appliance with lid and side panel (no text or symbols)ATH7120
EN
Please read this User Manual first!
Dear Customer,
Thank you for purchasing the Beko product. We hope that you get the best results from your product manufactured with high quality and state-of-the-art technology. Therefore, please read this entire User Manual and all the attached documents carefully before using the product and keep it as a reference for future use. If you handover the product to someone else, give the User Manual as well. Follow all warnings and information in the User Manual.
Meanings of the symbols
The following symbols are used in the sections of this manual:

Important instructions or useful tips about usage.

Warning for hazardous situations endangering life and property.

Warning to actions that must never be performed.

Warning for electric shock.

Warning for danger of fire.

Warning for hot surfaces.

This product is produced in environmentally friendly, modern facilities
CONTENTS
1 Safety instructions 4
2 Descriptions of components 7
3 Operation instructions 9
3.1 Instructions for use....9
3.2 Operation procedures....9
3.3 Operation instructions....10
4 Daily maintenance 12
5 Troubleshooting 14
6 Technical parameters 15
7 Others 16
7.1 Disposal 16
7.2 Features 16
7.3 Circuit diagram....17
7.4 Functions .....17
1 Safety instructions
Warning
Before use, read this User Manual carefully.
Don't dismantle the base to mend or repair without authorization.
Don't replace the power cord without authorization.
Don't add any additives in the water other than those manufactured or approved by the manufacturer.
Keep the detergent away from where children can have access to.
Without the express permission by the manufacturer, any change or alteration to this product may bring trouble or danger to the user.
In case the product gives off any abnormal sound or odor during operation, turn it off and remove the plug from the socket immediately. Ask the manufacturer or an authorized repairman for service, if necessary.
Don't allow your mouth or eye to touch the detergent. Rinse with clean water the contaminated area, if any, and ask for medical treatment in serious cases.
Before washing or moving the humidifier, turn it off and disconnect it from the power supply.
During operation, don't contact with the water or any part in water with any part of your body.
This appliance is not intended for use by persons (including children) with reduced physical, sensory or mental capabilities, or lack of experience and knowledge, unless they have been given supervision or instruction concerning use of the appliance by a person responsible for their safety.
1 Safety instructions
Children should be supervised to ensure that they would not play with the appliance.
If the supply cord is damaged, it must be replaced by the manufacturer, its service agent or similar qualified persons in order to avoid a hazard.
Precautions
Don't operate the humidifier when there is no water in the tank.
Don't scratch the transducer with any hard object.
Don't use any detergent to clean the transducer unless manufactured or approved by the manufacturer.
Don't use the humidifier in environment with considerable humidity, e.g. bathroom, etc.
Don't put the humidifier at the place where children could have access to.
Don't let water flow into the humidifier body when washing to avoid damaging any internal component.
Don't operate the humidifier on floor made of wood, bamboo or other similar materials.
For normal and safe operation, please store the humidifier properly.
Put it on a firm and plain surface and keep it upright to prevent water from flowing out.
Keep it away from any heat source, such as oven, direct sunlight, etc.
1 Safety instructions
Keep it in normal room temperature. Don't use it in cold environment to prevent damaging it.
Keep it away from furniture or electric appliances, so that the vapor will not dampen them.
2 Descriptions of components
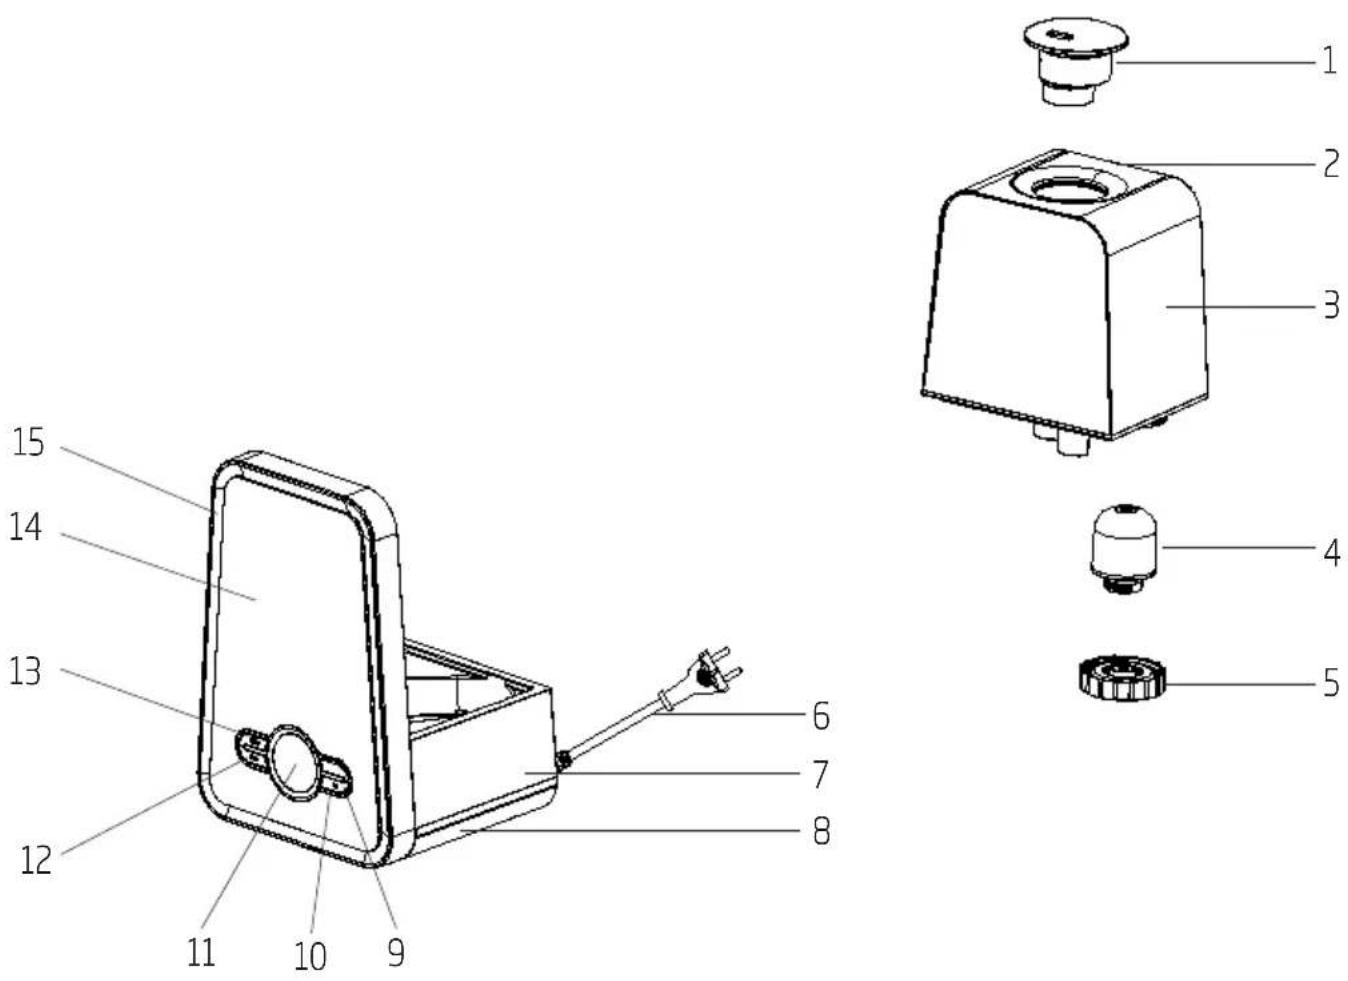
- Nozzle
- Handle
- Reservoir
- Soft water container
- Lid of reservoir
- Power cord
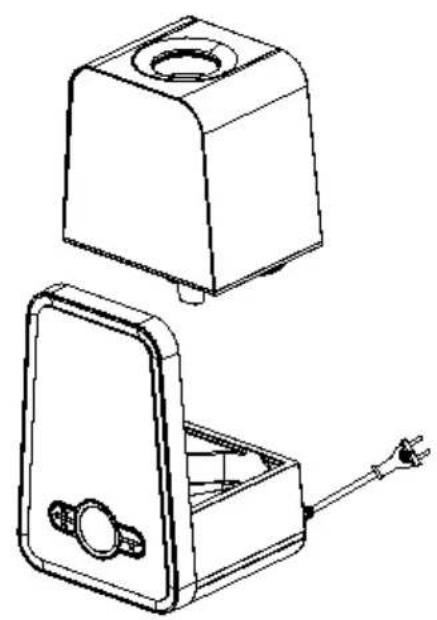
- Machine body
-
Base
-
Mode
- lonizer
- Display screen
- Button of auto mode
- Power switch button
- Deco plate
- Face panel
2 Descriptions of components
Packing list
| Product 1 | |
| User Manual 1 | |
| Detergent 1 | |
| Brush 1 | |
| Soft water container 1 |
3 Operation instructions
3.1 Instructions for use
For the first time of use, put the humidifier in the room temperature for half an hour before starting up.
The suitable working environment of the humidifier: temperature 5°C-25°C, relative humidity less than 80% RH
Use clean water below 40°C (preferably purified water).
When the room temperature is below 0^ C, pour the water off from the tank and the reservoir to prevent the water from freezing, which may cause damage to the components.
Wash the reservoir and tank clean before leaving the humidifier idle for a long time.
3.2 Operation procedures
Fill water into the reservoir (Fig. 1)

natural_image
Line drawing of a laboratory apparatus with a water tap and two circular chambers (no text or symbols)Fig. 1 Fig. 2
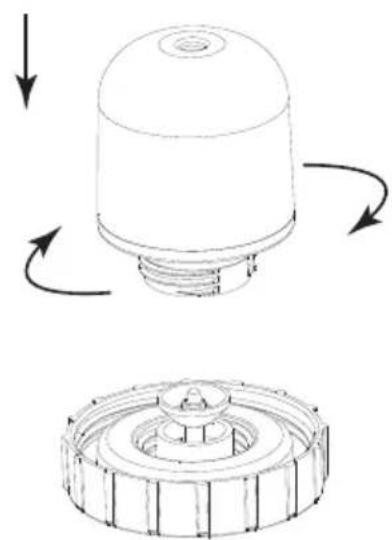
Fit the soft water container into the reservoir and tighten them.
natural_image
Technical line drawing of a mechanical component with rotational arrows indicating motion (no text or symbols)3 Operation instructions
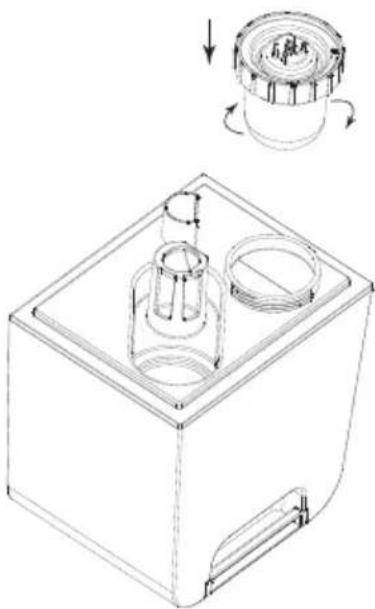
Fit with the reservoir and tighten the lid (Fig. 3)
natural_image
Technical line drawing of a mechanical component with a cylindrical housing and a circular component, showing rotational motion (no text or symbols)Fig. 3 Fig. 4
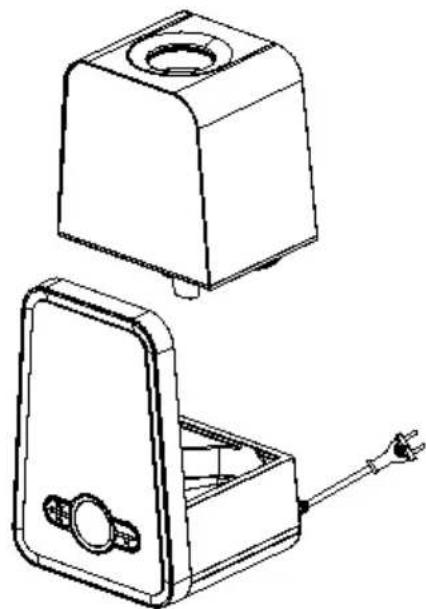
Fit the reservoir into the body well in place (Fig. 4)
natural_image
Technical line drawing of two electronic devices with ports and a cable (no text or symbols)3.3 Operation instructions
After connecting the humidifier with the power supply, the indicator lights and the display turn on and go out one by one, indicating the machine is energized. Press the power switch button (Fig. 5), the power indicator lights, and the machine gets into the auto mode that it selects the rate automatically according to the relative humidity of the current environment. At this time, the auto indicator and the rate adjusting indicator both light. The display reads the current humidity. When the humidity is above 85% RH, the display reads H and the humidifier breaks off. The humidity of the environment will decline gradually. When the humidity declines below 75% RH, humidifier starts to work again. When the humidity is below 20% RH, the display reads L. When the humidity is below 75% RH, humidifier produces heavier vapor. When the humidity is equal to or above 75% RH, it produces lighter vapor.
Press the rate adjusting button (Fig. 6) to set the machine to the manual operation mode instead of auto, so that the auto adjusting indicator light goes out and you can adjust the rate manually. You may select different humidifying modes or sleep mode according to the actual environment. Specifically, in heavy vapor mode, the vapor is heavy, air rate fast and two sections of the indicator light; in light vapor mode, the vapor is lighter, air rate faster and only one section of the indicator lights; and in sleep mode, the indicators go out and only the display shows a moon. You may press any button other than the power switch button to wake up the machine. Once waken up, the machine immediately produces heavy vapor.
3 Operation instructions
Press the negative oxygen ion switch button (Fig. 7), the indicator lights and the humidifier starts to release a lot of negative oxygen ion to improve the air quality so to benefit your health. (This function is not available under the sleep mode.)
Press auto button (Fig. 8), the humidifier enters into the auto mode and the corresponding indicator light turns on. To escape from this mode, press the rate adjusting button.

flowchart
graph LR
    A["In"] --> B["In"]
    B --> C["Lat"]
    C --> D["In"]
    D --> E["In"]
    E --> F["Lat"]
    F --> G["In"]
    G --> H["In"]
When the humidifier works normally with sufficient water in the reservoir, lift the reservoir, it enters into the no-reservoir guard mode and stops spraying vapor to prevent spattering. If the reservoir is not resumed in place within 15 seconds, it rings for 3 seconds and the indicator light blinks. In sleep mode, there is no ring, but only the moon blinks. When the reservoir is put back in place, the humidifier resumes normal operation in 3 seconds. However, if the reservoir is not in place for 1 minute, the indicator light blinks, but in sleep mode, there is no ring but only the moon blinks, until the humidifier turns itself off. If there is not sufficient water in the reservoir, it stops spraying and rings for 3 seconds and the indicator light blinks, but in sleep mode, there is no ring but only the moon blinks, as a reminder of adding water. If no water is added in within 1 minute, the indicator light blinks, but in sleep mode, there is no ring but only the moon blinks, until the humidifier turns itself off. When it is on standby, all the buttons are not workable except the power switch button.
The soft water container supplied with the humidifier is ready for use when tightened to the reservoir lid properly. After adding in water, tighten the lid of soft water container onto the opening of the reservoir to the extent that there is no leakage. If too tight, it will make the loosening for the next refilling more difficult. Sometimes, it leaks because the lid is so tight that the rubber insert is forced out of place. In this case, loosen the lid and flatten the rubber insert, and retighten the lid. The soft water container is reusable by being immersed in salt water for at least 6 hours after a month's use, so its softening function will be effectively regained. Replace with a new soft water container every six months to achieve the best water softening performance.

Note: Don't start the machine when there is no water in the reservoir.
4 Daily maintenance
In some regions, water is hard with relatively high content of calcium and magnesia ions, plus some regions use water purifying agent such as bleaching powder. Therefore, during operation, as a result of using impure water, some of the calcium and magnesia ions disperse with the vapor and attach onto the surface of objects and floor, which, after getting dry, will form white powder like scale, and partly deposit and form scale on the surface of the transducer and the tank. In this case, the humidifying performance will be affected.
How to keep the vapor clean?
Use purified water;
Wash and clean the transducer, reservoir and machine body every week;
Replace the un-fresh water in the reservoir frequently to ensure clean vapor;
Don't store water in the reservoir or tank when the humidifier is left idle; and
For storage, clean and dry all the components and pack them into the original packing box
How to clean the transducer?
Add 5-10 drops of detergent onto the surface of the transducer (appropriately to the extent of scaling) and immerse it for 2-5 minutes;
Clean the transducer surface with a banister brush to remove the scale; and
Rinse the transducer surface with clean water.
How to wash the machine body?
If there is scale in the tank, pick up a proper amount of detergent with a soft cloth to wipe and remove the scale;
If there is scale on the water level protection switch, add in a few drops of special-purpose detergent and clean the scale with a banister brush; and
Rinse the tank with clean water till it is clean.
How to wash the reservoir?
Press the nozzle at its neck, loosen and take it from the reservoir (Fig. 9), rinse the nozzle and the reservoir with clean water; and
Fit the nozzle to the opening on the reservoir and snap it in to fit it in place (Fig. 10).
4 Daily maintenance

natural_image
Technical line drawing of a mechanical component with a circular top and base, showing an upward arrow (no text or symbols)Fig. 9 Fig. 10

natural_image
Technical line drawing of a mechanical component with a circular opening and a downward arrow indicating motion (no text or symbols)5 Troubleshooting
| Failure description Possible causes Solution | ||
| The indicator light does not work and there is neither wind nor vapor. | Power supply is not connected. | Connect the power supply and switch it on. |
| Power switch button is not pressed. | Press the power switch button. | |
| The indicator light works, and there is wind but no vapor. | Reservoir is out of water. Add in water. | |
| The floating ball stopper is loose. | Re-install the stopper. | |
| In auto mode, the humidity is too high, so the display shows H and the machine does not produce vapor. | Press the rate adjusting button to escape from the auto mode. The vapor rate becomes normal. | |
| There is abnormal order in the vapor. | It's a new machine. | Uncap the reservoir and put it in a shadowy place for 12 hours. |
| The water is dirty or stored for too prolonged a time. | Clean the sink and replace with clean water. | |
| The indicator light works but there is neither wind nor vapor. | Excessive water in the sink | Remove some water and tighten the lid. |
| Vapor rate is too low. | There is scale on the transducer. | Replace a new transducer. |
| The water is dirty or stored for too prolonged a time. | Replace with clean water. | |
| Abnormal noise | Resonance due to insufficient water | Add in water. |
| Resonance with the table Put it on a solid table or floor. | ||
| Vapor overflows form the sides of the nozzle. | There is gap between the nozzle and the reservoir. | Dampen the nozzle in water, or it becomes normal automatically after a while of operation. |
6 Technical parameters
Technical and design modifications reserved.
| Information requirements | |
| Information to identify the model(s) to which the information relates to [fill in as necessary] | |
| Model | ATH7120 |
| Rated Voltage | 220V-240V~ |
| Rated Frequency | 50-60Hz |
| Rated Power | 30W |
| Max Nebulization Capacity | ≥250ml/h |
| Max Water Tank Capacity | 3L±10% |
| Sleep Noise Level | 37dB(A) |
| Net Weight | 1.9kg |
| Contact details for obtaining more information | Arcelik: Arcelik A.S. Sutluce, Karaagac Cd. 2-6, 34445 Beyoglu Istanbul Turkey |
7 Others
7.1 Disposal

Correct disposal of this product
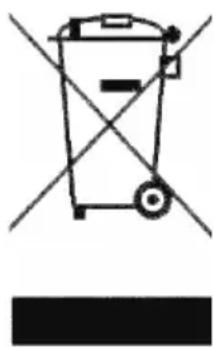
This marking indicates that this product should not be disposed together with other household wastes throughout the EU. To prevent possible harm to the environment or human health from uncontrolled waste disposal, recycle it responsibly to promote the sustainable reuse of material resources. To return your used device, please use the return and collection systems or contact the retailer where the product was purchased. They can take this product to recycle for environmental safety.
natural_image
Simple line drawing of a trash bin with no text or symbols7.2 Features
Features of ultrasonic humidifier:
- Independent negative oxygen ion generator
• Anionic antibacterial reservoir - Vapor rate adjustable
- No-water power-off protection
- Music ring tone
- Intelligent humidification
• Water softening via high-performance ion exchange resin - No-reservoir power-off protection
- 360^ rotatable anti-creep nozzle
• Patented noise dampening design - Intelligent lighting reminder
• LED digital display of temperature - Night-work mode
7 Others
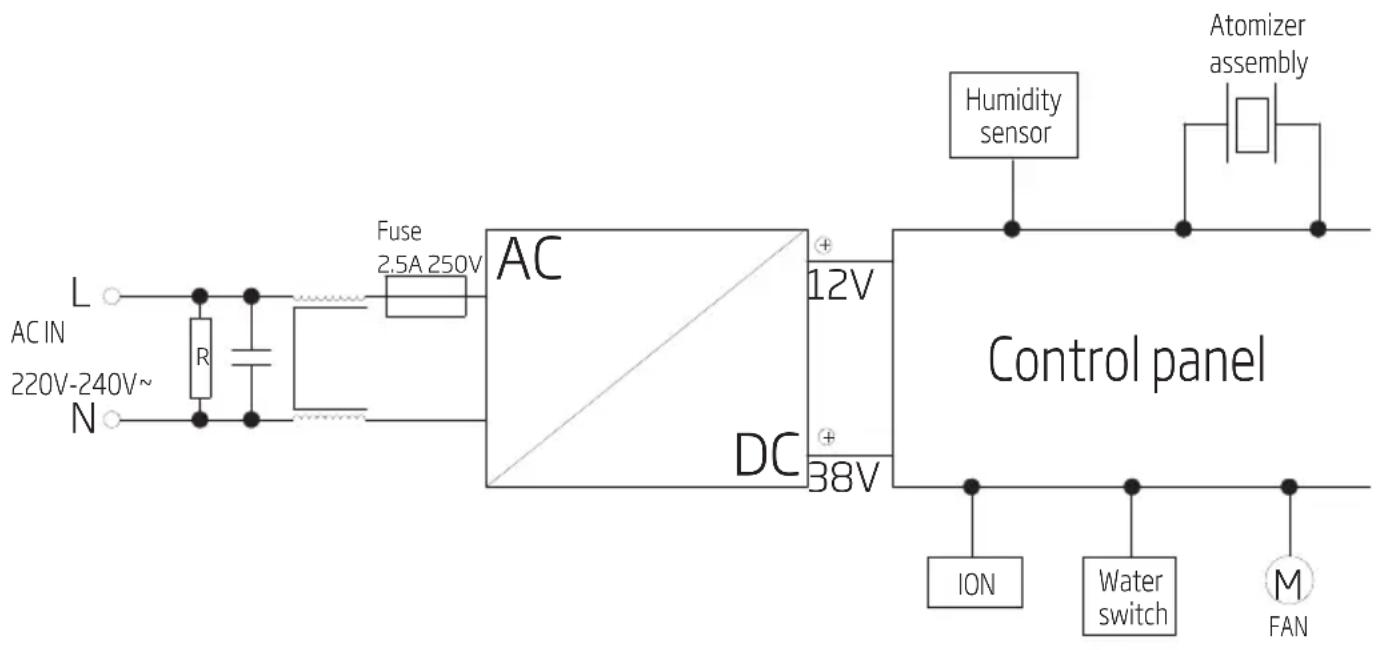
7.3 Circuit diagram
Temperature transducer circuit board, fuse, control panel, atomizer, negative oxygen ion, axial fan, water level switch (Reed Switch circuit board)
7.4 Functions
Functions of Ultrasonic Humidifier:
No-water power-off protection
Water-level protection switch is activated to stop spraying vapor when the water level in the sink is lower than the preset position, so that the atomizer will not be burnt. One minute later, the humidifier switches off for safety.
Independent negative oxygen ion generator
Independent negative oxygen ion generator releases a lot of negative oxygen ion to improve the air quality and benefit your health.
7 Others
No-reservoir power-off protection
Power-off protection is available when the reservoir is not in place. When the reservoir is removed or misplaced, the power-off protection switch is activated to stop spraying vapor to prevent spattering and mal-operation; one minute later, the humidifier switches off for safety.
Vapor rate adjusting
Both the vapor rate and the wind rate can be adjusted manually to ensure quiet performance.
Silver ion antibacterial reservoir
Imported food-grade silver ion antibacterial ABS material is capable of sustained release of silver ions, removing bacteria from the water to provide a sterile humidifying effect for users.
Music ring tone
When the reservoir is not in place or there is no water in the reservoir, the machine rings for 3 seconds with blinking indicator light. One minute later, the humidifier switches off for safety.
Water softening with high-performance ion exchange resin
Water softening device with high-performance ion exchange resin reduces the hardness of water effectively, lowers the quality requirement of water and reduces the formation of white powder to guarantee the health of users.
Intelligent humidifying
Intelligent humidifying manipulating system controls the humidity with intelligence to create a constantly healthy moist environment for users' life.
LED digital display
LED display for humidity provides direct and objective view.
360° rotatable anti-creep
360° rotatable anti-creep nozzle enables larger area of coverage and anti-creep nozzle effectively prevents falling off even when overturned, e.g. when the user forgets to take the nozzle off before adding water to the reservoir and the nozzle is overturned. Press it at the neck, rotate it and pull upward to remove the nozzle.
Noise dampening
Noise dampening structure reduces the operating noise and enables quiet environment.

natural_image
Abstract geometric design with blue triangular shapes on white background (no text or symbols)Umidificator cu ultrasunete
Manual de utilizare

natural_image
Line drawing of a beko appliance with a circular vent and side slots (no text or symbols)ATH7120
RO
natural_image
Line drawing of a mechanical device with a faucet and two circular components (no text or symbols)Fig. 1 Fig. 2
natural_image
Technical line drawing of a mechanical component with rotational arrows indicating motion (no text or symbols)3 Instructiuni de operare
natural_image
Technical line drawing of a mechanical component with a cylindrical housing and a circular component, showing internal structure and rotation arrows (no text or symbols)Fig. 3 Fig. 4
natural_image
Technical line drawing of two household appliances: a square-shaped device with a circular top and a rectangular base with a handle, and an open electrical box with a thermometer (no text or symbols)3.3 Instructiuni de operare
natural_image
Technical line drawing of a mechanical component with a circular top and base, showing an upward arrow (no text or symbols)Fig. 9 Fig. 10

natural_image
Technical line drawing of a mechanical component with a circular opening and a downward arrow indicating motion (no text or symbols)natural_image
Simple line drawing of a trash bin with no text or symbols7.2 Caracteristici
natural_image
Abstract geometric design with blue triangular shapes on white background (no text or symbols)natural_image
Line drawing of a beko appliance with lid and side panel (no text or symbols)ATH7120
DE
natural_image
Line drawing of a laboratory apparatus with a faucet and two circular chambers (no text or symbols)Abb. 1 Abb. 2
natural_image
Technical line drawing of a mechanical component with rotational arrows indicating motion (no text or symbols)natural_image
Technical line drawing of a mechanical component with a cylindrical housing and a circular component, showing rotational motion (no text or symbols)Abb. 3 Abb. 4
natural_image
Technical line drawing of a two-part device with a top and side views (no text or symbols)natural_image
Simple line drawing of a trash bin with no text or symbols
7.2 Eigenschaften
natural_image
Abstract geometric design with blue triangular shapes on white background (no text or symbols)natural_image
Line drawing of a beko appliance with lid and side panel (no text or symbols)ATH7120
IT
natural_image
Line drawing of a laboratory apparatus with a water tap and two circular chambers (no text or symbols)Fig. 1 Fig. 2
natural_image
Technical line drawing of a mechanical component with rotational arrows indicating motion (no text or symbols)natural_image
Technical line drawing of a mechanical component with internal cavities and a cylindrical housing (no text or symbols)Fig. 3 Fig. 4
natural_image
Technical line drawing of a device housing with two views: top view shows a square component with circular opening, bottom view shows a rectangular housing with internal components and a terminal outlet (no text or symbols)natural_image
Simple line drawing of a trash bin with no text or symbols7.2 Caratteristiche
natural_image
Abstract geometric design with blue triangular shapes on white background (no text or symbols)natural_image
Line drawing of a beko appliance with a circular vent and side slots (no text or symbols)ATH7120
FR
Attention ! Surfaces chaudes !

natural_image
Line drawing of a laboratory apparatus with a faucet and two circular chambers (no text or symbols)Fig. 1 Fig. 2
natural_image
Technical line drawing of a mechanical component with rotational arrows indicating motion (no text or symbols)natural_image
Technical line drawing of a mechanical component with a cylindrical housing and internal components, showing a rotation arrow (no text or symbols)Fig. 3 Fig. 4
natural_image
Technical line drawing of a two-part device with top and side views (no text or symbols)natural_image
Simple line drawing of a trash bin with crossed lines indicating no waste or discharge (no text or symbols)natural_image
Abstract geometric design with blue triangular shapes on white background (no text or symbols)
- Ultrasonic Humidifier
- User Manual
- Please read this User Manual first!
- Meanings of the symbols
- CONTENTS
- Safety instructions 4
- Descriptions of components 7
- Operation instructions 9
- Daily maintenance 12
- Troubleshooting 14
- Technical parameters 15
- Others 16
- Safety instructions
- Warning
- Precautions
- Descriptions of components
- Operation instructions
- Instructions for use
- Operation procedures
- Operation instructions
- Daily maintenance
- How to keep the vapor clean?
- How to clean the transducer?
- How to wash the machine body?
- How to wash the reservoir?
- Troubleshooting
- Technical parameters
- Others
- Disposal
- Correct disposal of this product
- Features
- Features of ultrasonic humidifier:
- Circuit diagram
- Functions
- No-reservoir power-off protection
- Vapor rate adjusting
- Silver ion antibacterial reservoir
- Music ring tone
- Water softening with high-performance ion exchange resin
- Intelligent humidifying
- LED digital display
- 360° rotatable anti-creep
- Noise dampening
- Umidificator cu ultrasunete
- Manual de utilizare
- Instructiuni de operare
- Instructiuni de operare
- Caracteristici
- Eigenschaften
- Caratteristiche
Brand : BEKO
Model : ATH7120
Category : Humidifier