
PCMC20RD13 - Popcorn machine WestBend - Free user manual and instructions
Find the device manual for free PCMC20RD13 WestBend in PDF.
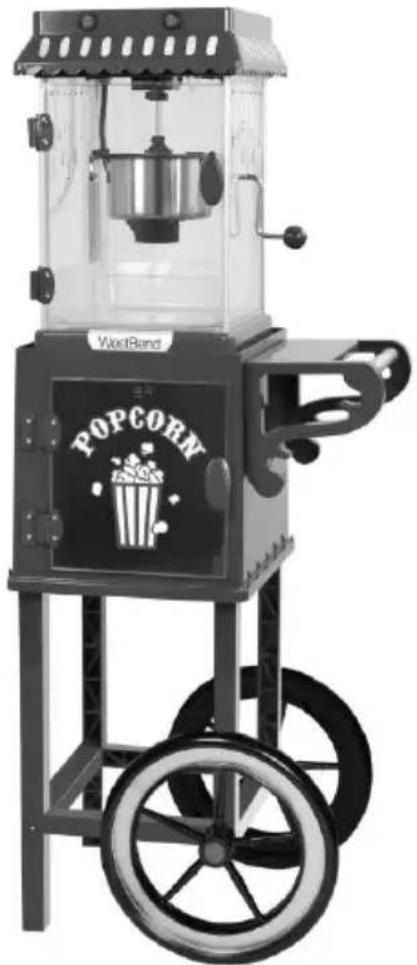
| Product Type | Popcorn machine on cart with stirring mechanism and decorative lighting |
| Brand | WestBend |
| Model | PCMC20RD13 |
| Corn capacity per batch | 2.5 oz (70.75 g) of popcorn kernels |
| Power supply | 120 V AC, household use only |
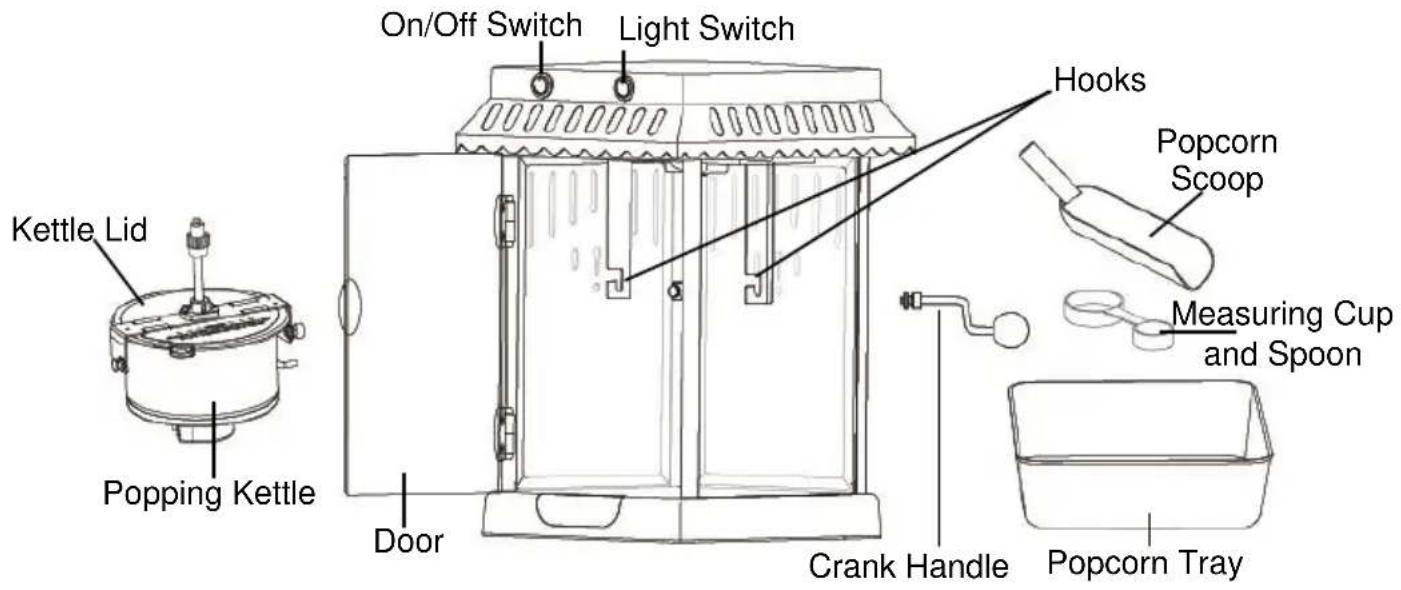
| Control type | On/off switch and separate light switch |
| Pot material | Steel with non-stick coating |
| Included accessories | Measuring spoon and cup, popcorn scoop, popcorn bucket, crank |
| Main features | Oil popping, automatic stirring, decorative lighting, cart with wheels and handle |
| Care and cleaning | Clean cabinet and accessories with a damp soapy cloth; do not immerse the pot |
| Safety | Hot surfaces; do not immerse cord; unplug before cleaning; supervision required |
| Warranty | 1-year limited (parts and labor) against manufacturing defects |
| Replacement parts | Available on the official WestBend website (www.westbend.com) |
| Usage | Indoor residential use only |
| Pot cleaning | Use a non-abrasive pad; rinse and dry completely |
| Oil recommendation | 1 tablespoon vegetable oil per batch; possible alternatives (olive, canola, coconut) |
| Corn storage | In an airtight container in a cool place (not in the refrigerator) |
Frequently Asked Questions - PCMC20RD13 WestBend
User questions about PCMC20RD13 WestBend
0 question about this device. Answer the ones you know or ask your own.
Ask a new question about this device
Download the instructions for your Popcorn machine in PDF format for free! Find your manual PCMC20RD13 - WestBend and take your electronic device back in hand. On this page are published all the documents necessary for the use of your device. PCMC20RD13 by WestBend.
USER MANUAL PCMC20RD13 WestBend
natural_image
Black-and-white photo of a Popcorn movie theater with a basket and wheels (no visible text or symbols)Register this and other West Bend products through our website:
http://registerproducts.online
Product registration is not required to activate warranty.
Important Safeguards....2
Before Using for the First Time .... 3
Using Your Popcorn Cart 4
Helpful Hints....5
Cleaning Your Popcorn Cart 5
Popcorn Ideas & Recipes....6
Warranty....7
SAVE THIS INSTRUCTION MANUAL FOR FUTURE REFERENCE
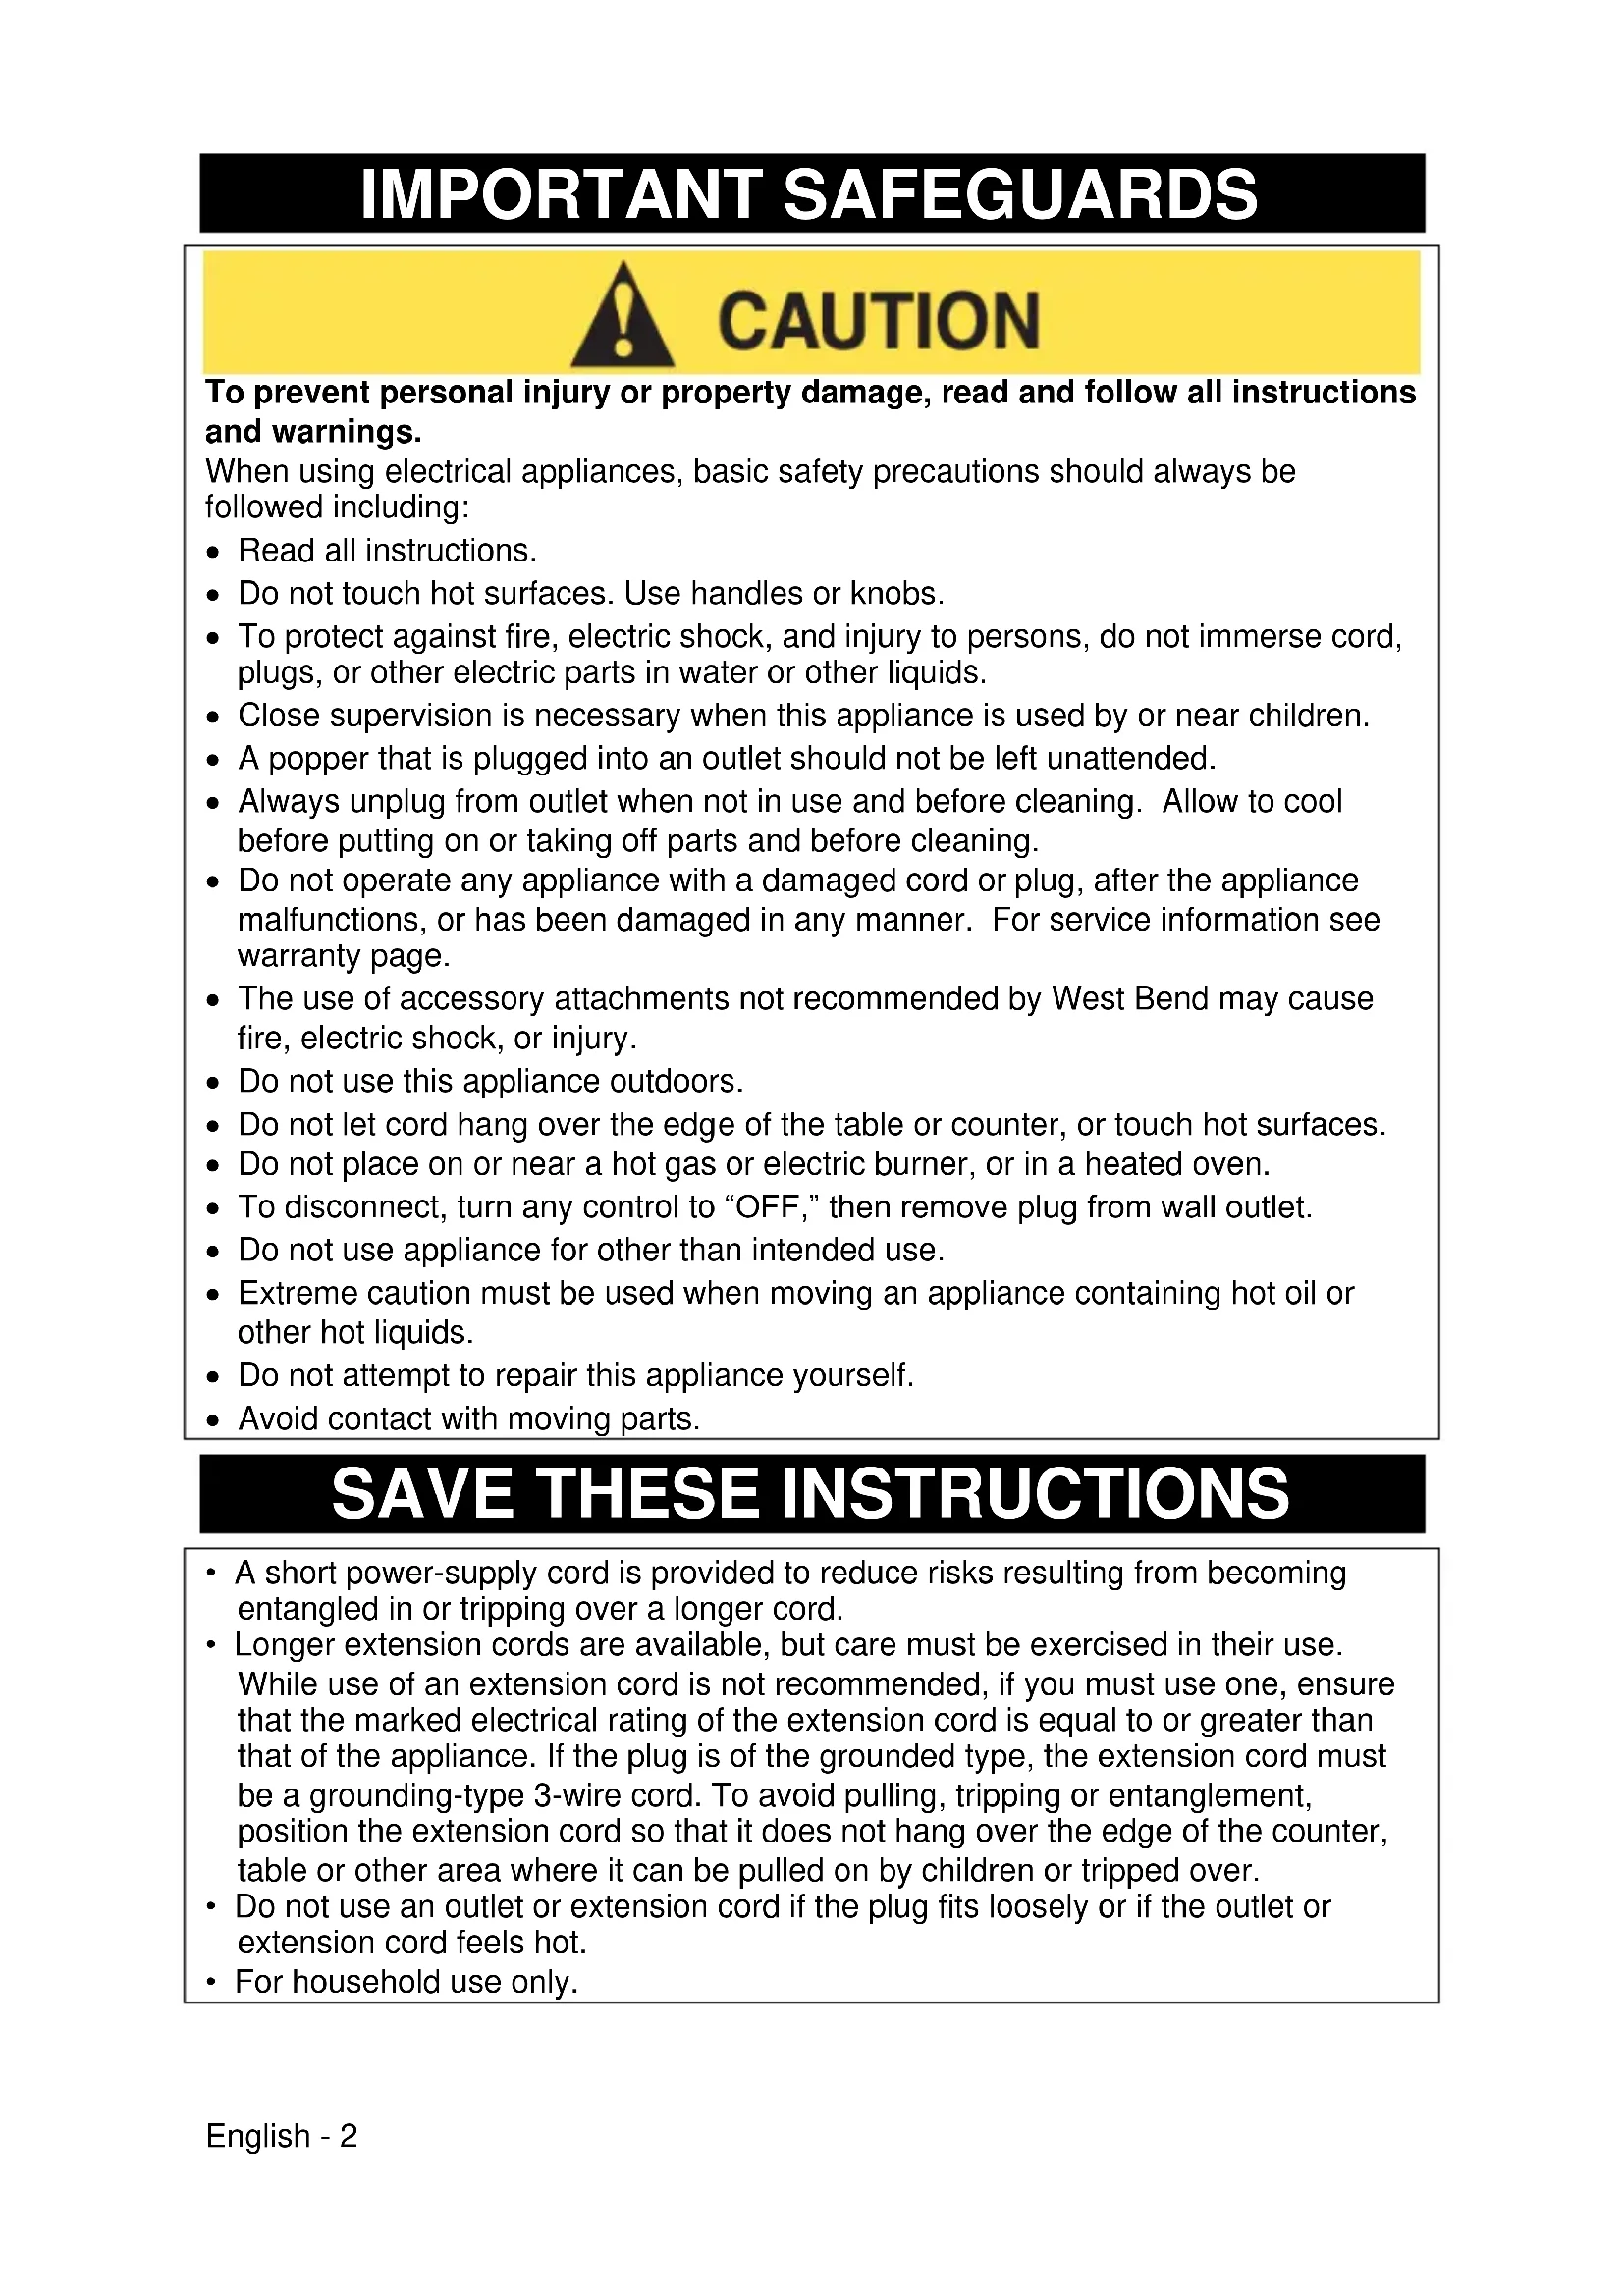
IMPORTANT SAFEGUARDS

CAUTION
To prevent personal injury or property damage, read and follow all instructions and warnings.
When using electrical appliances, basic safety precautions should always be followed including:
- Read all instructions.
- Do not touch hot surfaces. Use handles or knobs.
- To protect against fire, electric shock, and injury to persons, do not immerse cord, plugs, or other electric parts in water or other liquids.
- Close supervision is necessary when this appliance is used by or near children.
- A popper that is plugged into an outlet should not be left unattended.
- Always unplug from outlet when not in use and before cleaning. Allow to cool before putting on or taking off parts and before cleaning.
- Do not operate any appliance with a damaged cord or plug, after the appliance malfunctions, or has been damaged in any manner. For service information see warranty page.
- The use of accessory attachments not recommended by West Bend may cause fire, electric shock, or injury.
- Do not use this appliance outdoors.
- Do not let cord hang over the edge of the table or counter, or touch hot surfaces.
- Do not place on or near a hot gas or electric burner, or in a heated oven.
- To disconnect, turn any control to "OFF," then remove plug from wall outlet.
- Do not use appliance for other than intended use.
- Extreme caution must be used when moving an appliance containing hot oil or other hot liquids.
- Do not attempt to repair this appliance yourself.
- Avoid contact with moving parts.
SAVE THESE INSTRUCTIONS
- A short power-supply cord is provided to reduce risks resulting from becoming entangled in or tripping over a longer cord.
- Longer extension cords are available, but care must be exercised in their use. While use of an extension cord is not recommended, if you must use one, ensure that the marked electrical rating of the extension cord is equal to or greater than that of the appliance. If the plug is of the grounded type, the extension cord must be a grounding-type 3-wire cord. To avoid pulling, tripping or entanglement, position the extension cord so that it does not hang over the edge of the counter, table or other area where it can be pulled on by children or tripped over.
- Do not use an outlet or extension cord if the plug fits loosely or if the outlet or extension cord feels hot.
- For household use only.
BEFORE USING FOR THE FIRST TIME
Please check all packaging material carefully before discarding. Accessory parts may be contained within the packaging material. Wash popcorn tray, popcorn scoop, and measuring cup and spoon in warm, soapy water. Rinse and dry thoroughly. Use a soapy dishcloth to wipe the interior of the cabinet, then rinse with a damp, non-soapy cloth and dry thoroughly. Wash the interior of the kettle with a damp, soapy washcloth. Rinse and dry thoroughly. Do not immerse kettle in water and do not get water on the black electrical box.
Assemble the Cart:
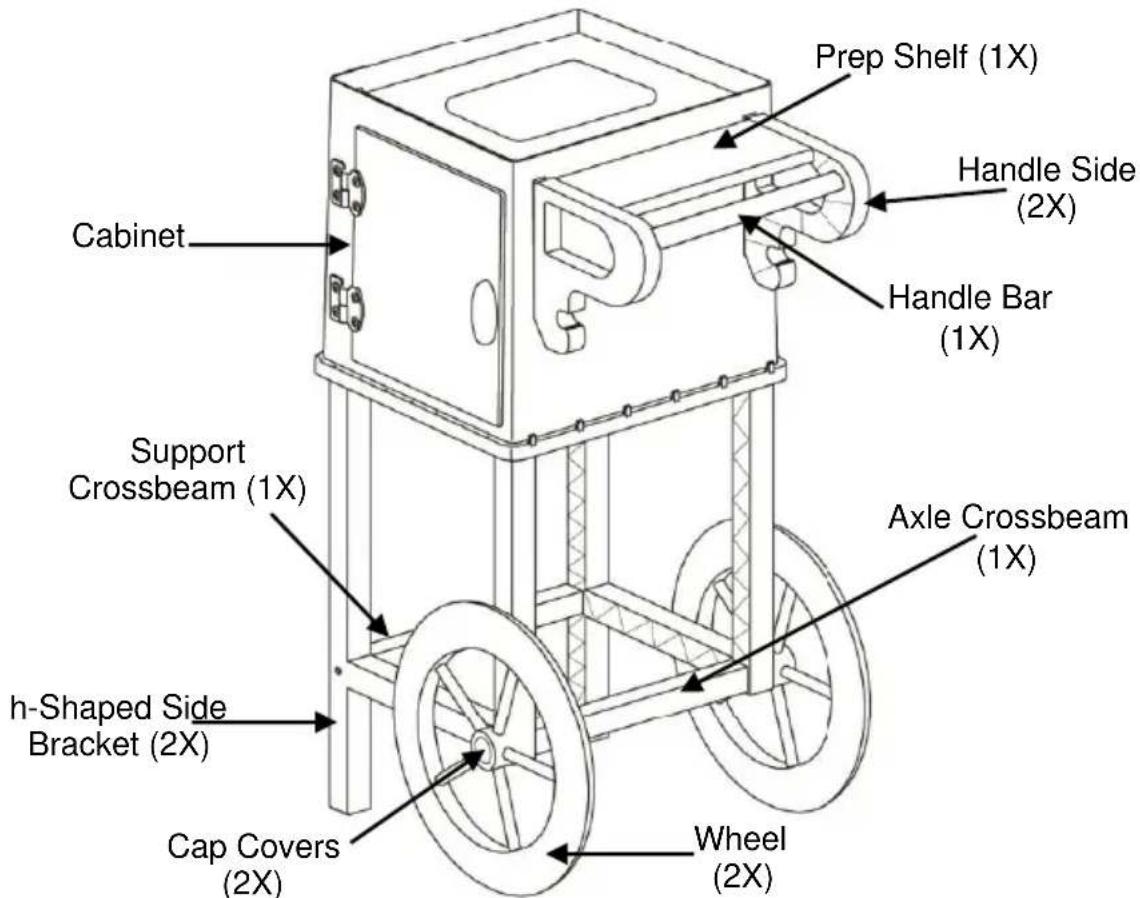
- Insert support crossbeam (small pegs on ends) and axle crossbeam (larger pegs on ends) into one h-shaped side bracket. The axle crossbeam should sit so that the fluted-side will face the floor when the cart is upright. Screw both crossbeams into place. Repeat with other h-shaped side bracket.
- Attach the wheels to the axle. Slide one wheel, silver rim side out, over an axle hub. Use a washer with the screw and attach. Repeat with the other wheel. Cover screws using included cap covers. Note: The wheels are attached to the same side as the handle assembly.
- Assemble the handle. Insert the prep shelf into the handle side, aligning the screw holes. Screw into place. Insert the handle tube into the opening. Repeat with other handle side.
- Attach the cabinet to the base. Slide the cabinet onto the legs. Use the 4 wider screws to screw all 4 corners inside the cabinet to attach to the legs.
- Attach the handle assembly. Slide the assembled handle into the slots in the cabinet. Press in until the tabs click in place. Screw the handles in from the top.
- Place the popcorn popper on to the cart. The popcorn popper has suction cup feet for added security. Your popcorn cart is now ready for use.
USING YOUR POPCORN CART
- Hang the kettle on the hooks with the cover handle towards the door. Plug the cord from the ceiling of the popper into the outlet in the kettle. DO NOT plug the kettle directly into a wall outlet. Attach the crank handle to the kettle by inserting through the hole in the cabinet and screwing into the kettle counterclockwise until fully inserted. Hold the kettle to steady it for easier turning.
- Plug the cord from the cabinet into a 120 v, AC outlet ONLY. Close the cabinet door then press the "ON/OFF" switch to "I" (ON). The stir rod will spin, and the kettle will begin heating. Preheat kettle for 2-3 minutes. Press the "ON/OFF" switch to "O" (OFF).
- Carefully open the kettle lid. Using the measuring spoon and cup provided, place one spoonful (1 tbsp.) of oil into the kettle followed by 2 cupfuls ( 13 cup) of popcorn kernels, then close lid. Note: DO NOT attempt to pop more than the recommended amount of popcorn at one time and DO NOT use more than the recommended amount of oil when popping, as damage to the kettle may occur.
- After a short time, popcorn will begin to pop, and eventually overflow into the cabinet. Continue until there is a pause of 2-3 seconds between pops. Turn "ON/OFF" switch to "O" (OFF). Turn the crank handle to tilt the kettle, releasing the remaining popcorn. This may require several turns.
- If popping more popcorn, add oil and kernels to the kettle, close the lid, then press the "ON/OFF" switch to "I" (ON). Repeat steps 4 & 5 as necessary. If not popping more corn, unplug the cabinet from the wall outlet and let cool completely. DO NOT attempt to unplug the kettle cord while the appliance is hot. Note: The cabinet should be emptied between batches, but two batches will fit.
- A small amount of smoke and/or odor may occur upon heating due to the release of manufacturing oils – this is normal.
- Some minor expansion/contraction sounds may occur during heating and cooling – this is normal.
HELPFUL HINTS
- This popper includes a handy onboard storage cabinet. Use this to store all of your popper accessories and supplies when not in use.
- Always use fresh popcorn. Dried out, stale, or old popcorn pops poorly as it has lost its moisture content and may scorch.
- While we recommend using regular white or yellow popcorn, this popcorn popper can also accommodate premium and gourmet popcorns. However, premium and gourmet popcorns may not yield results as good as regular popcorn; you may notice an increase in the number of unpopped kernels.
- Store popcorn in airtight containers made of glass or plastic to avoid moisture loss in the kernels. Be sure that the container is stored in a cool place, do not store in the refrigerator. Most refrigerators contain little moisture and can dry out kernels, resulting in poor popping.
- If popcorn does not pop, it is usually the result of environmental factors such as the freshness and moisture content of the popcorn, or variances by popcorn type. Unpopped kernels do not necessarily indicate a defect in the appliance.
- Over time, salt and oil can abrade and make the cabinet walls look unattractive. It is important to thoroughly clean and dry the cabinet after every use.
- If your popper is not heating, check that the cord from the top of the cabinet is fully plugged in to the kettle.
- Burning at the bottom of your kettle is due to oil build-up. In addition to cleaning after every use, we also recommend cleaning periodically with a non-abrasive cleanser and scrubber.
- While we recommend using regular white or yellow popcorn, this popcorn machine can also accommodate gourmet and organic popcorns. However, gourmet and organic popcorns may not yield results as good as regular popcorn; you may notice an increase in the number of unpopped kernels.
- Instead of popping with vegetable oil, try one of these healthy choices: extra virgin olive oil, canola oil, coconut oil, corn oil, peanut oil, or sunflower oil. Specialty oils may also be used, but some experimentation may be necessary to find the best popping results and flavor you prefer. Do not use more than 1 tablespoon of any oil.
- The cabinet light can be used at any time before, during, and after the popping cycle. It is purely decorative and does not give off any additional heat.
CLEANING YOUR POPCORN CART
-
Let popper cool completely before cleaning. Unplug the cabinet cord from the wall outlet. Unplug the cabinet plug from the kettle. Open the kettle cover and discard any unpopped kernels. Use a soapy dishcloth or non-abrasive scrubber to wash inside the kettle then rinse with a damp clean cloth and dry thoroughly. To remove the kettle, after completely cooled, for more thorough cleaning, unscrew the handle until it is removable, then lift off the hooks to remove. Do not immerse kettle in water.
-
Wash the measuring cup and spoon, popcorn scoop, and popcorn tray in warm, soapy water. Rinse and dry thoroughly.
-
Wipe the interior of the popper cabinet with a damp, soapy cloth to remove any residues. Rinse with a damp, soap-free cloth and dry thoroughly.
This appliance has no user serviceable parts.
POPCORN IDEAS & RECIPES
Popcorn is the perfect blank canvas for creating treats. You can create decadent concoctions with chocolate and candies or healthy, guilt-free snacks that everyone can enjoy. Here are some recipes and ideas to get you started, but really, once you start, your imagination can take over.
When you're done popping, start layering flavors. We find a light misting of olive oil, (many great infused olive oils are also available) lemon or lime juice, balsamic vinegar, or even water will help any additional seasonings adhere to the corn.
Try mixing and matching any of these for a healthy snack:
| Nutritional Yeast (great nutty flavor) | Paprika | Basil |
| Thyme | Cinnamon | |
| Sea salt | Celery flakes | Cloves |
| Garlic powder | Parsley | Chives |
| Onion powder | Crushed red peppers | Sugar |
| Chili powder | Black pepper | Dill |
| Cumin | Lemon, orange, or lime | Aged and grated |
| Oregano | zest | Parmesan, Provolone, or |
| Rosemary | Cocoa powder | Romano cheese |
Melted chocolate or marshmallow is a great way to bind and layer decadent ingredients with popcorn, or to create popcorn balls, bars, or pops. For a more traditional binder, boil 1 cup of sugar with 1 cup of corn syrup, then add your other ingredients toss and form. Or while still warm, roll balls or pops in crushed candies, coconut, chopped nuts, sprinkles.
Try mixing and matching any of these for a decadent treat:
| Chopped candy bars | Nuts | Dry cheese sauce powder |
| Chocolate chips | Candy pieces or Bite-sized candies | Peanut butter |
| Marshmallows | Cocoa powder | |
| Salted peanuts | Hot cocoa mix | Powdered sugar |
| Bacon | Sweetened cereal | Pretzels |
| Blue cheese crumbles | Melted chocolate or Almond bark | Graham cracker pieces |
| Reduced balsamic vinegar (fruit infused is delightful) | Toasted or grated coconut | Crushed cookies |
| Cake mix | ||
| Cake or brownie crumbles | Powdered drink mixes |
PRODUCT WARRANTY
Appliance 1 Year Limited Warranty
West Bend ^® (“the Company”) warrants this appliance from failures in the material and workmanship for one (1) year from the date of original purchase with proof of purchase, provided that the appliance is operated and maintained in conformity with the Instruction Manual. Any failed part of the appliance will be repaired or replaced without charge at the Company’s discretion. This warranty applies to indoor household use only.
This warranty does not cover any damage, including discoloration, to any non-stick surface of the appliance. This warranty is null and void, as determined solely by the Company, if the appliance is damaged through accident, misuse, abuse, negligence, scratching, or if the appliance is altered in any way.
THIS WARRANTY IS IN LIEU OF ALL IMPLIED WARRANTIES, INCLUDING WARRANTIES OF MERCHANTABILITY, FITNESS FOR A PARTICULAR PURPOSE, PERFORMANCE, OR OTHERWISE, WHICH ARE HEREBY EXCLUDED. IN NO EVENT SHALL THE COMPANY BE LIABLE FOR ANY DAMAGES, WHETHER DIRECT, INDIRECT, INCIDENTAL, FORSEEABLE, CONSEQUENTIAL, OR SPECIAL ARISING OUT OF OR IN CONNECTION WITH THIS APPLIANCE.
If you think the appliance has failed or requires service within its warranty period, please contact the Customer Care Department through our website at www.westbend.com "Support" – > "Contact Us". A receipt proving the original purchase date will be required for all warranty claims, hand written receipts are not accepted. You may also be required to return the appliance for inspection and evaluation. Return shipping costs are not refundable. The Company is not responsible for returns lost in transit.
Valid only in USA and Canada
REPLACEMENT PARTS
Replacement parts, if available, may be ordered online at www.westbend.com.
This manual contains important and helpful information regarding the safe use and care of your product. For future reference, attach dated sales receipt for warranty proof of purchase and record the following information:
Date purchased or received as gift: ____
Where purchased and price, if known: ____
Item number and Date Code (shown bottom/back of product):
English - 7
NOTES
WestBend®
CHARIOT DE MAÏS ÉCLATÉ, 2.5 oz. (70.75G)
MODE D'EMPLOI
natural_image
Black-and-white photo of a Popcorn movie theater with a wheeled cart and a clear glass box (no visible text or symbols on the device itself)natural_image
Black-and-white photo of a Popcorn movie theater with a cart and wheels (no visible text or symbols)


- SAVE THIS INSTRUCTION MANUAL FOR FUTURE REFERENCE
- IMPORTANT SAFEGUARDS
- CAUTION
- To prevent personal injury or property damage, read and follow all instructions and warnings.
- SAVE THESE INSTRUCTIONS
- BEFORE USING FOR THE FIRST TIME
- Assemble the Cart:
- USING YOUR POPCORN CART
- HELPFUL HINTS
- CLEANING YOUR POPCORN CART
- POPCORN IDEAS & RECIPES
- PRODUCT WARRANTY
- Appliance 1 Year Limited Warranty
- REPLACEMENT PARTS
- WestBend®
- CHARIOT DE MAÏS ÉCLATÉ, 2.5 oz. (70.75G)
Brand : WestBend
Model : PCMC20RD13
Category : Popcorn machine