WS920 - Grinder Westfalia - Free user manual and instructions
Find the device manual for free WS920 Westfalia in PDF.

| Product type | Electric garden shredder |
| Brand | Westfalia |
| Model | WS920 |
| Power supply | 220-240 V ~ 50 Hz |
| Power | 2400 W |
| Max. cutting diameter | 40 mm |
| Cutting system | Hardened steel rotary blade |
| Collection bag capacity | 50 L |
| Noise level | 95 dB(A) |
| Weight | 12 kg |
| Dimensions (L x W x H) | 60 x 40 x 90 cm |
| Chassis material | Steel and reinforced plastic |
| Wheels | 2 swivel wheels |
| On/off function | Switch with overload protection |
| Thermal protection | Resettable thermal cutout |
| Safety | Emergency stop, collection bag lock |
| Maintenance | Regular blade cleaning, lubrication |
| Spare parts | Available from the manufacturer |
| Repairability | Repairability index 8/10 |
Frequently Asked Questions - WS920 Westfalia
User questions about WS920 Westfalia
0 question about this device. Answer the ones you know or ask your own.
Ask a new question about this device
Download the instructions for your Grinder in PDF format for free! Find your manual WS920 - Westfalia and take your electronic device back in hand. On this page are published all the documents necessary for the use of your device. WS920 by Westfalia.
USER MANUAL WS920 Westfalia
natural_image
Blue and gray power tool with black base, no visible text or symbols on the tool itself
Original Instructions
Angle Grinder WS920
Article No. 93 29 28


natural_image
Cartoon illustration of a man in a gull-like suit stepping through water with a pipe, surrounded by plants and a hat (no text or symbols)
Dear Customers
Please familiarize yourself with the proper usage of the device by reading and following each chapter of this manual, in the order presented. Keep these operating instructions for further reference.
This operating instruction contains important details for handling the device. Please pass it on along with the electric tool if it is handed over to a third party!
Please read all safety instructions!
These instructions will make it easier for you to handle the device and help prevent misunderstandings and possible damage or injury.
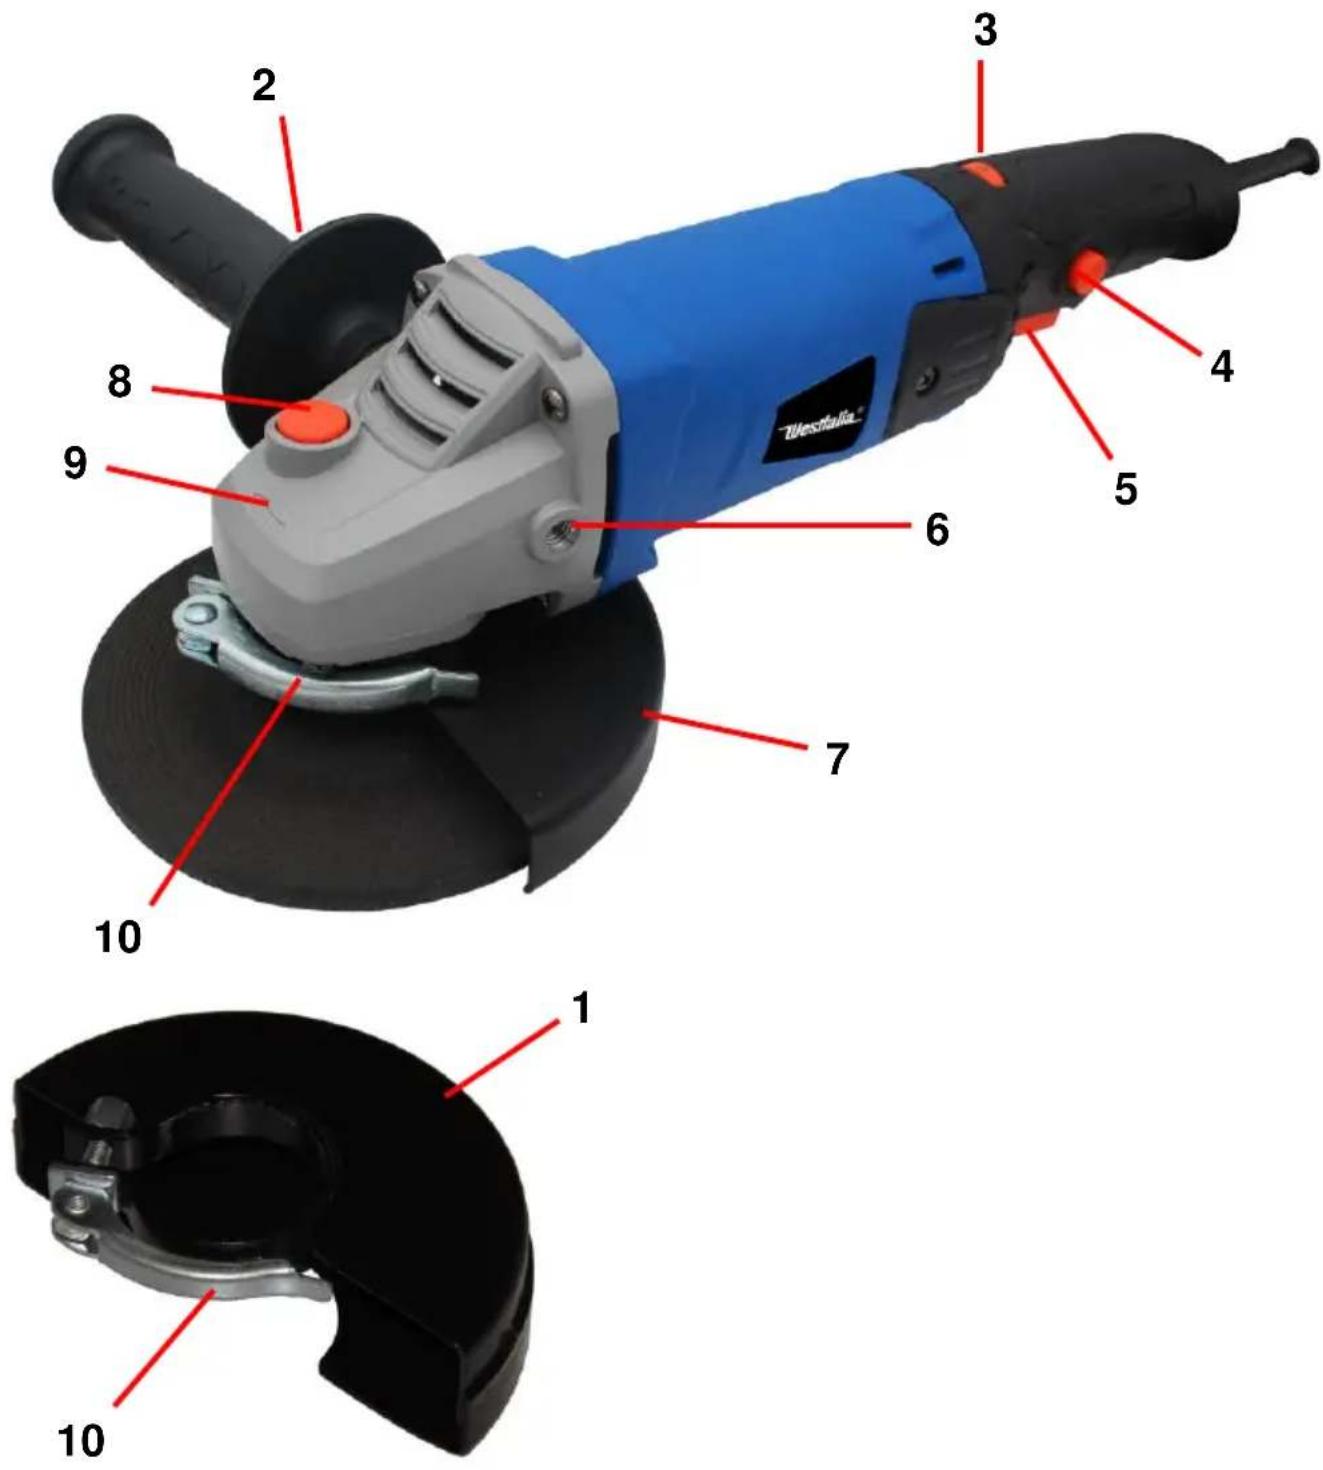
text_image
Westhalia® 1 2 3 4 5 6 7 8 9 10 1Before first Use......Page 36
Intended Use ...... Page 36
Setup......Page 36
Attaching the Auxiliary Handle Page 36
Inserting/Changing the Grinding Disc Page 36
Using the Safety Hood for Grinding Discs......Page 37
Using the Safety Hood for Cutting Discs......Page 38
ON/OFF Switch Page 38
Speed Regulator......Page 39
Hints for Operation...... Page 39
Carbon brushes......Page 39
Maintenance and Cleaning Page 40
Technical Data ......Page 41

Please note the included General Safety Notes and the following safety notes to avoid malfunctions, damage or physical injury:
■ Make sure the voltage corresponds to the type label on the electric tool.
■ Power tool plugs must match the outlet. Never modify the plug in any way. Do not use any adapter plugs with earthed (grounded) power tools. Unmodified plugs and matching outlets will reduce risk of electric shock.
- Persons with limited physical, sensorial or mental abilities are not allowed to use the electric tool, unless they are supervised and briefed by a qualified person.
- This angle grinder can be used as a grinder, and angle grinder. Please note all safety advice, descriptions and data supplied with the electric tool. Disregarding these notes may lead to electric shock, fire and/or serious injury.
- This angle grinder is not suitable for use as sander, with a wire brush, or as polisher. Using the tool in ways not intended by the manufacturer is dangerous and can cause injury.
- Do not use attachments not especially designed for this device and recommended for this device by the manufacturer. The fact that an attachment can be physically attached to the tool does not ensure safe operation.
- The grinding surface of the centre depressed wheels must be mounted below the plane of the safety hood edge. An improperly mounted wheel that projects through the plane of the safety hood edge cannot be adequately protected.
- Do not attach a saw chain woodcarving blade or toothed saw blade. Such blades create frequent kickback and loss of control.
Safety Notes
- The maximum allowed speed for an attachment must be at least as high as the no load speed noted on the electric tool. Attachments spinning faster than allowed may be destroyed.
- Outside diameter and thickness of the tool bit must correspond to the dimensions stated on your electric tool. Attachments of the wrong size cannot be shielded and controlled properly.
- Discs, flanges, and other attachments must precisely fit the spindle of your electric tool. Tool bits which do not precisely fit the spindle turn irregularly, vibrate and can cause loss of control.
- Do not use attachments which have been damaged in any way. Check attachments such as grinding discs for missing bits and cracks. If the tool or the attachment has been dropped, check it for damage or use an undamaged item. After the attachment has been checked and attached, please keep yourself and other persons out of the rotating area of the attachment and let the machine run at full speed for one minute. Most damaged attachments and tools will fail within that time.
- Wear personal protective equipment. If necessary and depending on the application, wear full face protection, eye protection, or safety goggles. If necessary, wear a dust mask, ear protection, safety gloves or a safety apron which protect you from flying fragments. The eyes must be protected from flying debris, which are generated by many operations. Dust must be filtered
out by the dust mask or breath protection. If you are exposed to high levels of noise for extended amounts of time, your hearing may be damaged.
■ Implement additional safety measures to protect the operator from the effects of vibration, such as servicing the power tool and application tools, keeping their hands warm, and organis-

ing workflows correctly.
- Keep other persons at a safe distance from your working area. Persons entering your working area must wear personal protective equipment. Fragments of the workpiece or the attachment may be thrown away and cause injuries outside the immediate working area.
- Hold the tool only by the isolated handles while undertaking work during which the tool or the attachment can touch hidden life wires or its own power cable. Contact with life wires can cause metal parts of the housing to become life and can cause electric shock.
- Keep the power cable away from the spinning attachment. If you loose control over the electric tool the power cord may be cut or become caught and your hand or arm may be caught in the attachment.
- Do not lay down the electric tool before the attachment has stopped spinning. The spinning attachment may come in touch with the surface, which may cause loss of control.
- Do not carry the electric tool while it is running. Clothes may become caught in the spinning attachment and the attachment may cause severe injury.
- Periodically clean the ventilation slots of the electric tool. The cooling ventilator draws dust into the housing. An accumulation of metallic dust may lead to dangerous electrical conditions.
- Do not use the tool close to combustible materials. Flying sparks may ignite such materials.
- Do not use attachments which require liquid coolants. Use of water or other liquid coolants can cause an electric shock.
Kickback
- Kickback is the sudden reaction of a wedged or locked spinning attachment such as a grinding or sanding disc or a
Safety Notes
wire brush etc. This causes the spinning attachment to come to a sudden stop, which will force the electric tool against the rotating direction of the attachment.
- If, for instance, a cutting disc becomes locked or jammed in the workpiece, the edge of the disc may fracture inside the workpiece and cause a violent kickback. The disc will them move away from or towards the operator, depending on the direction of rotation on the locking point. This may also shatter the disc.
- Kickback is caused by wrong or inappropriate use of the tool and can be avoided by following the safety advice below.
- Hold the electric tool tightly with both hands and assume a position, in which you can compensate a kickback. If present, use the accessory handle to e able to control kickback and countermovement of the running motor. With the necessary precautions the operator can control all forces of kickback and countermovement.
- Keep your hand away from the spinning attachment. A kickback can throw the attachment onto your hand.
- Keep your body out of the area into which the tool is thrown by a kickback. The tool is thrown into the direction reverse to the direction of the disc at the locking point.
- Use extreme care when working around edges or sharp corners. Make sure the attachment cannot become locked into or bounce back from the workpiece. Rotating discs tend to lock into or bounce back from edges and corners. This may cause kickback or loss of control.
- Do not uses toothed saw blades or any other saw attachment. These tend to cause kickback or loss of control.
Additional Safety Notes for Grinding and Cutting
■ Always use the safety hood intended for the kind of attachment you are using. The safety hood must be securely at-
Safety Notes
tached and be adjusted in such a way that the highest possible degree of safety is achieved, e. G. the smallest possible part of the spinning attachment pointing to the operator is free. The safety hood is intended to protect the operator from flying debris, fragments of a fractured disc and accidental contact with the attachment.
- Use only discs intended for your electric tool and the safety hood intended for these discs. Discs not intended for the electric tool cannot be covered in a suitable way and are unsafe.
- Use discs only for the purpose they are intended for by the manufacturer. Never use the side of a cutting disc for grinding. Cutting discs are intended for cutting only. Lateral forces may cause fracture.
■ Always use undamaged flanges of the correct size and shape for your cutting disc. The correct flanges support the disc and reduce the risk of a disc fracture. Flanges for cutting discs can differ from those for grinding discs. - Do not use worn-down discs from larger electric tools, these are not intended for the fast speeds of smaller electric tools and may fracture.
- Avoid blocking the disc and do not use excessive pressure. Do not attempt excessively deep cuts. Excessive loads on the cutting disc increase the stress and make it more prone to jamming or blocking and increase the risk of kickback of fracture.
- Avoid the area directly in front or behind the spinning discs. If the cutting part of the disc is moving away from you, the electric tool with the spinning disc can be thrown back at you in the case of a kickback.
- If the disc becomes stuck or locked in the workpiece or you intend to interrupt your work, turn off the electric tool and hold it tightly until the disc has come to a complete standstill. Never
Safety Notes
attempt to lift the spinning disc out of the cut, this may cause kickback. Verify and remove the cause for the stoppage.
- Do not turn on the electric tool while the disc is in the workpiece. Allow the disc to reach full speed before carefully resuming the cut. Otherwise the disc may jam, jump out of the cut or kick back.
■ Support sheets or large workpieces to reduce the risk of a kickback caused by the disc being wedged in the workpiece. Larger workpieces may deform under their own weight. The workpiece must be supported on both sides, on the edges as well as close to the cut. - Be especially careful when undertaking "pocket cuts" in existing walls or other areas which cannot be overlooked. When plunging into the wall the disc can kick back when hitting gas or water pipes, wires or other objects in the wall.
■ Make sure the cord cannot get caught in any way. Do not wind the cord around the electric tool and do not bend it. Do not jam the cord or pull cord around edges. Do not pinch the power cord in any way and keep it away from hot surfaces.
■ Before cleaning or maintaining, first disconnect the plug from power mains. - Do not continue using the electric tool if it was damaged or the tool was dropped or immersed in water. Please contact our customer support service.

natural_image
Diagram of a mechanical device with red laser lines indicating light paths (no text or symbols)Remove the angle grinder and the accessories for the packaging. Keep packaging material out of reach of children. There is risk of suffocation!
Intended Use
This angle grinder is intended for cutting and grinding metal and stone with the suitable discs.
Setup
Please make sure the power mains voltage corresponds to the operating voltage stated on the type label.
Attaching the Auxiliary Handle
Do not operate the angle grinder without the auxiliary handle (2). There are two threaded mounting holes (6) in the transmission housing, one in each side and one in the middle, to which the auxiliary handle (2) can be attached.
Inserting/Changing the Grinding Disc
Please Note! Always pull the power plug before changing a disc to avoid accidental starting.
-
Lossen the outer flange with the included face wrench. Keep the shaft lock (8) pressed to lock the drive shaft and the disc.
-
Insert the cutting disc resp. replace the worn disc. Make sure to attach the inner flange first, then the cutting disc and finally the outer flange.
Shaft Lock (8)
Safety Hood (1/6)
Inner Flange
Grinding Disc
Outer Flange
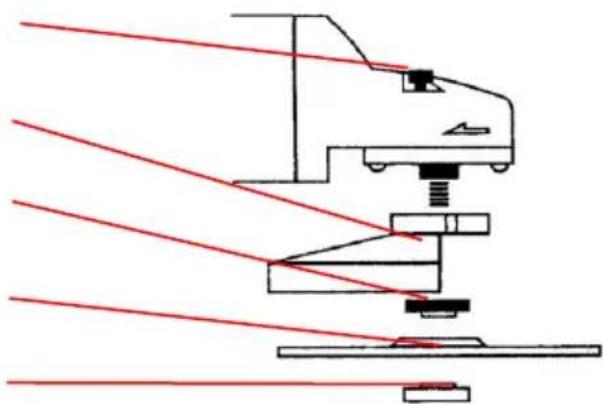
natural_image
Technical line drawing of a mechanical assembly with red laser lines (no text or symbols)For discs up to 3 mm strong install the outer flange with the flat side to the disc (Fig. A), for discs stronger than 3 mm install the outer flange with the stepped side to the disc (Fig. B).
Fig. A
text_image
g. AFig. B

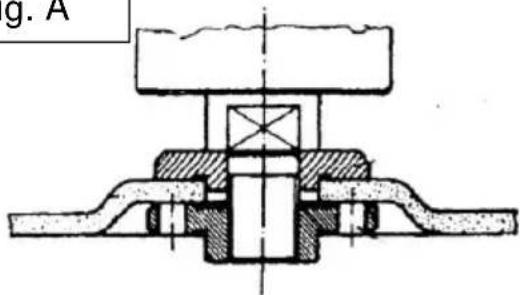
natural_image
Cross-sectional technical drawing of a mechanical assembly (no visible text or labels)■ Make sure the cutting disc rotates in the direction of rotation (9) printed on the machine housing.
■ After installing a disc perform a brief test run. Discs which cause vibrations and run unround must be replaced immediately. Keep the disc away from moisture and oil and protect it from either hitting or severely bumping against any object.
- Bever attach saw blades or saw chains! Such devices may cause unpredictable kickback!
Using the Safety Hood for Grinding Discs (7)
The safety hood should be aligned is such a way that it protects you from sparks and flying debrie.
Operation
- Loosen the safety hood locking lever (10) and turn to the desired position.
- Tighten the safety hood in this position.
Using the Safety Hood for Cutting Discs (1)
- Remove the safety hood for grinding discs (2).
-
Attach the safety hood for cutting discs (1) on the angle grinder.
-
When using cutting discs with the angle grinder, always use the safety hood (1) that has been designed for use with cutting discs.
- Please note that after work the cutting disc and the workpiece become very hot. There is risk of burns! Make sure always to use the right cutting disc for the job.
- When using the angle grinder for cutting, avoit tilting the angle grinder out of the cutting line. It is advisable to use diamond discs when cutting hard stone.
- For the best results while rough grinding hold the machine against the surface in an angle between 30^ and 40^ in smooth, even movements.
- Never cut materials containing asbestos with this angle grider.
- Secure the workpiece and place suitable wedges under the workpiece. When operating the angle grinder, do not press the cutting disc too much on the workpiece. The self weight of the angle grinder is enough to perform the cut. Avoid overheating the cutting disc; allow the disc to cool down sufficiently.
- Make sure the cutting disc cannot get jammed or laterally stressed while cutting. The cutting disc must be inserted straight into the cutting gap of the workpiece.
- Always try to cut the workpiece in one go.
ON/OFF Switch
- To turn the angle grinder on, push the safety button (4) and then press the ON/OFF switch (5). The angle grinder starts up.
- To switch off the angle grinder, release the ON/OFF switch.
Speed Regulator
With the speed regulator (3) you can regulate the speed of the angle grinder as required.
Hints for Operation
- When using the angle grinder for cutting, avoit tilting the angle grinder out of the cutting line. It is advisable to use diamond discs when cutting hard stone.
- For the best results while rough grinding hold the machine against the surface in an angle between 30^ and 40^ in smooth, even movements.
- The maximum permitted speed of the disc must be equal to or higher than the maximum no load speed of the machine. The maximum permitted speed of the cutting disc is printed on the disc.
- Use only cutting or grinding discs with a maximum permitted rotation speed of 6600 revolutions per minute.
- Never cut materials containing asbestos with this angle grider.
Carbon Brushes
The angle grinder is delivered with a spare set of carbon brushes. Carbon brushes should only be replaced by a professional. Or questions please turn to the Westfalia customer service.
Maintenance and Cleaning
■ Before undertaking any cleaning or maintenance work on the machine, pull the power plug.
- Keep the machine clean. Make sure the ventilation slots are always clean and free from obstructions. Clean the angle grinder with a soft cloth, which may be slightly moistened at the utmost.
- Do not immerse the machine in liquids of any kind and do not allow liquids to enter the machine.
■ Store the angle grinder in a dry place.
Technical Data
| Rated Voltage | 230 V~ 50 Hz |
| Rated Power | 920 W |
| Rotation Speed | 3000 - 11000 min ^-1 |
| Disc Diameter | 125 mm |
| Disc Hole | 22.2 mm |
| Drive Shaft Thread | M 14 |
| Dimensions | approx.400 x 140 x 95 mm |
| Weight (approx.) | approx. 2.3 kg |
| Power Cord Length | 2 m |
| Protection Class | II |
| Sound Pressure Level* | 85 dB (A)K= 3 dB (A) |
| Sound Power Level* | 96 dB (A)K= 3 dB (A) |
| Hand Arm Vibration* | 5.45 m/s ^2 K= 1.5 m/s ^2 |
* Sound and vibration emissions may differ from the declared values during use depending on the ways in which the tool is used.


Notizen | Notes

3.
declare by our own responsibility that the product
Winkelschleifer WS920
Angle Grinder WS920
Artikel No 93 29 28
Article No. 93 29 28
is according to the basic requirements, which are defined in the European Directives and their amendments.
2011/65/EU Restriction of the Use of certain hazardous Substances in electrical and electronic Equipment (RoHS)
2006/42/EC Machinery
EN 60745-1:2009+AC+A11, EN 60745-2-3:2011+A2+A11+A12+A13
natural_image
Symbol of a trash bin crossed with a diagonal line, representing waste or discharge (no text or labels)
Werter Kunde,
Please help avoid waste materials.
If you at some point intend to dispose of this article, then please keep in mind that many of its components consist of valuable materials, which can be recycled.
Please do not discharge it in the rubbish bin, but check with your local council for recycling facilities in your area.