CEH60GS - Basket CONTINENTAL EDISON - Free user manual and instructions
Find the device manual for free CEH60GS CONTINENTAL EDISON in PDF.

| Product Type | Kitchen Hood |
| Brand | Continental Edison |
| Model | CEH60GS |
| Reference | CEH60GS / CEH60GB |
| Model Identification | SY-3388A8-P1-C13-L121-600 |
| Installation Type | Wall-mounted (external evacuation or recirculation) |
| Annual Energy Consumption | 30.1 kWh/year |
| Energy Efficiency Class | B |
| Maximum Airflow | 294.9 m³/h |
| Maximum Noise Level | 62 dB(A) |
| Lighting Power | 2 W (LED) |
| Average Illuminance | 100 lux |
| Lighting Efficiency | 50 lux/W (class A) |
| Grease Filtration Efficiency | 65.5% (class D) |
| Filters | Metal grease filter (cleanable) + activated charcoal filter (optional, replacement 3-6 months) |
| Number of Speeds | 3 (Low, Medium, High) |
| Control | Push buttons |
| Power Supply Voltage | AC 110-240 V |
| Exhaust Duct Diameter | 150 mm |
| Minimum Distance Above Cooking Surface | 65 cm (gas: 80 cm, electric: 70 cm) |
| Bulb | Non-replaceable LED (ILCOS code D DBS-2/65-H-120/33) |
| Accessories Included | Extendable duct Ø150 mm, backdraft damper, hose clamp, screws and wall plugs |
Frequently Asked Questions - CEH60GS CONTINENTAL EDISON
User questions about CEH60GS CONTINENTAL EDISON
0 question about this device. Answer the ones you know or ask your own.
Ask a new question about this device
Download the instructions for your Basket in PDF format for free! Find your manual CEH60GS - CONTINENTAL EDISON and take your electronic device back in hand. On this page are published all the documents necessary for the use of your device. CEH60GS by CONTINENTAL EDISON.
USER MANUAL CEH60GS CONTINENTAL EDISON
natural_image
Abstract geometric shapes in gray, no text or symbols presentContinental Edison

natural_image
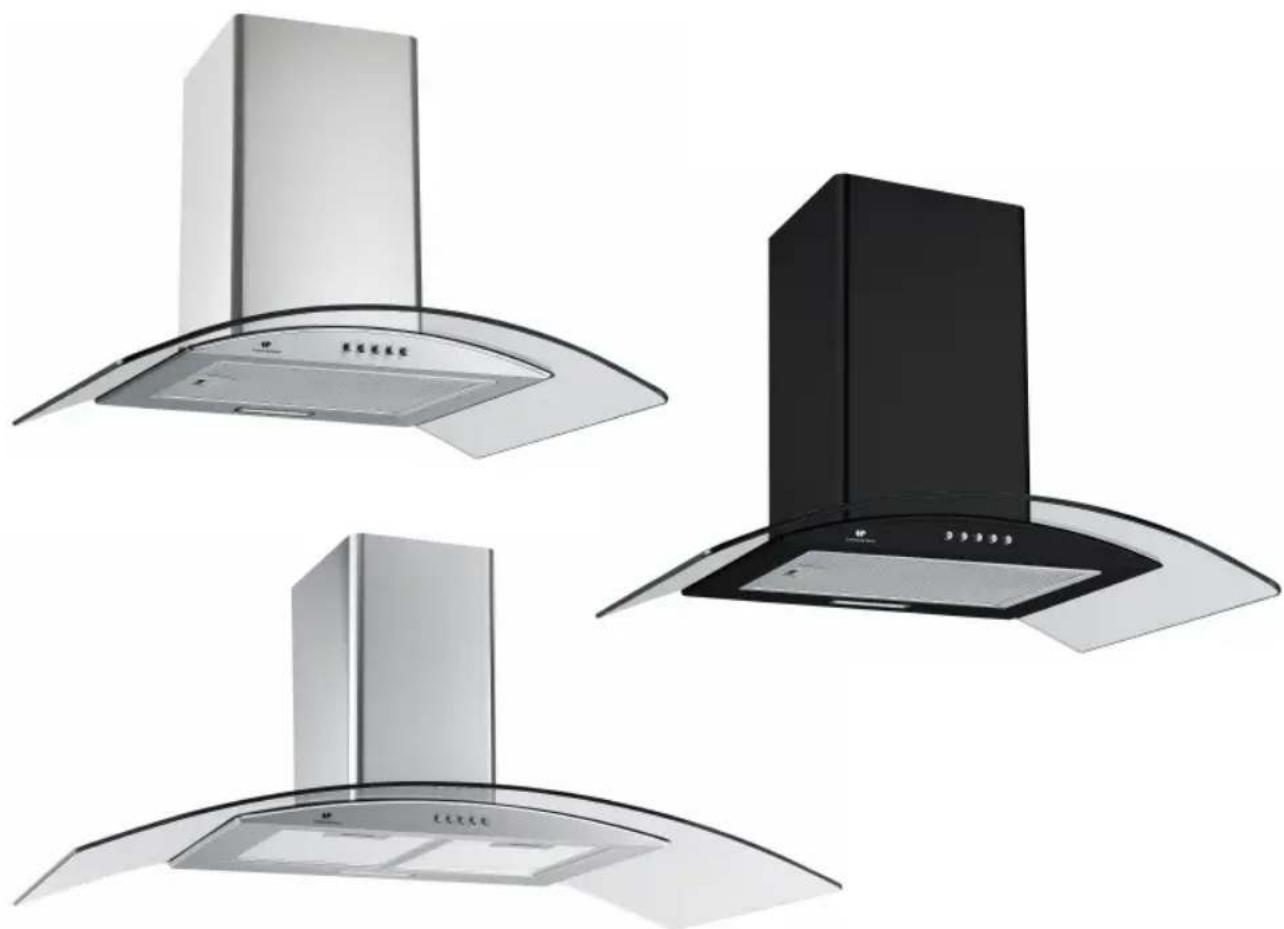
Three stainless steel kitchen appliances with curved glass covers, displayed against a white background (no text or symbols visible)CEH60GS/CEH60GB/CEH90GS
natural_image
Diagram of airflow around a mechanical component with directional arrows indicating movement (no text or symbols)text_image
Technical diagram showing a cylindrical component with three labeled parts and directional arrows indicating assembly or assembly steps.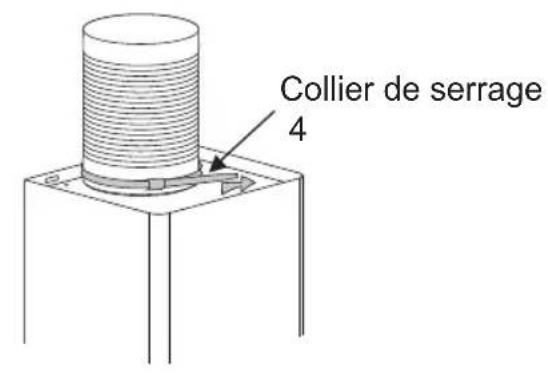
text_image
Collier de serrage 4Image 3
natural_image
Diagram of a brick wall with a cylindrical component mounted on a base, showing airflow or force directions (no text or symbols)Image 5 Image 6

natural_image
Diagram of a brick wall with a box and support structure, showing upward force arrows (no text or symbols)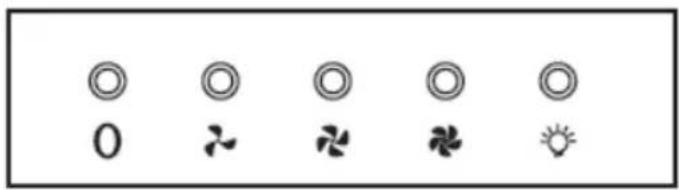
text_image
0 ✿ ✿ ✿ ✿ ✿natural_image
Technical diagram of a mechanical assembly with no visible text or symbolsImage 1
natural_image
Diagram showing a cable being inserted into an electronic component, with an upward arrow indicating the process (no text or symbols present)Image 2
natural_image
Technical line drawing of a mechanical assembly with directional arrows indicating motion (no text or symbols)Image 3

natural_image
Diagram of a lampshade with a base and cable, showing an arrow indicating light path (no text or symbols)Image 4 Image 5
natural_image
Diagram of a mechanical component with a screwdriver and arrow indicating rotation (no text or symbols)natural_image
Two overlapping gray semicircles on white background (no text or symbols)Continental Edison
www.continentaledison.fr

natural_image
Abstract geometric shapes in gray, no text or symbols presentContinental Edison
natural_image
Three stainless steel kitchen appliances with curved glass covers, displayed against a white background (no text or symbols visible)CEH60GS/CEH60GB/CEH90GS
Cooker Hood Instruction Manual
Contents
FIND INFORMATION 2
SAFETY PRECAUTIONS ....3
COMPONENT LIST....9
INSTALLATION AND MOUNTING 11
OPORATION 17
CARBON FILTER REPLACEMENT 18
LAMP REPLACEMENT ....19
MAINTENANCE 21
INFORMATION FOR COOKER HOOD 22
ENVIRONMENTAL PROTECTION ....26
Read this guide carefully before installing and using this product and retain for future reference.
For information on the necessary space for the installation and mounting of the device, refer to the "INSTALLATION AND MOUNTING" section.
For detailed information on the dimensions and position of the means to support and attach the device in this space, refer to the "INSTALLATION AND MOUNTING" section.
For detailed information on the minimum distances between the different parts of the device and the surrounding structure, refer to the "INSTALLATION AND MOUNTING" section.
For detailed information on the minimum dimensions of the ventilation openings and their correct arrangement, refer to the "INSTALLATION AND MOUNTING" section.
- When using electrical appliances, basic safety precaution should always be followed, including the following:
• These instructions are for your safety. Please read through them thoroughly prior to installation. - This appliance has been designed for use as an exhausting (air evacuation to the outside) or filtering (indoor air re-cycling) hood.
- All installation work must be carried out by a qualified person or qualified electrician.
- This appliance must be installed correctly by a suitably qualified person, strictly following the manufacturer's instructions.
- ATTENTION: Accessible parts may become hot during use.
- Keep children away from this device.
- The Manufacturer highly recommends that this appliance be kept out of the reach of babies and small children.
- This appliance can be used by children aged from 8 years and above and persons with reduced physical, sensory or mental capabilities or lack of
experience and knowledge if they have been given supervision or instruction concerning use of the appliance in a safe way and understand the hazards involved. Children shall not play with the appliance. Cleaning and user maintenance shall not be made by children without supervision.
- Regularly check the power plug and power cord for signs of damage. If the supply cord is damaged, it must be replaced by the manufacturer, its service agent or similarly qualified persons in order to avoid a hazard.
- Do not allow the electric cables to touch the hot parts of the appliance.
- Make sure that the power cord is not caught under or in the appliance and avoid damage to the power cable.
- Do not use flammable sprays in close vicinity to the appliance.
-
Please dispose of the packing material carefully.
• We also recommend that you pay special attention during use and during cleaning. Refer to the instructions in the "CLEANING" section.
• A steam cleaner is not to be used. -
The appliance is not intended to be operated by means of external timer or separated remote-control system.
- Warning: When using for extraction, refer to the national regulations for building ventilation systems. Do not connect the exhaust pipe to a VMC type ventilation system, to a flue (chimney, boiler, ...). Also check the absence of disturbance with the ventilation of the room when there are gas appliances (water heater, gas stove, ...). If in doubt, use the hood in recycling mode.
- Proper ventilation of the room must be provided when the hood is used simultaneously with appliances using gas or other fuel.
- Air must not be discharged into a flue that is used for exhaustingfumes from appliances burning gas or other fuels. The rules concerning the evacuation of the air must be respected.
- Warning: The hood may stop working during an electrostatic discharge (e.g.lightning). This involves no risk of damage. Switch off the electricity supply to the hood and reconnect after one minute.
7
SAFETY PRECAUTIONS
- To avoid the risk of fire, clean the metal filter regularly and closely watch and regulate pans containing hot oil.
- Do not flame under the range hood.
- Do not use the hood if it shows signs of damage or imperfection. Contact customer services.
- When installing the appliance, make sure that the following distances between the top of cooker or hob and the lowest part of the cooker hood must be observed:
Gas hobs: 800mm
Electric hobs: 700mm
- Warning : There is a risk of electric shock and fire if cleaning is not carried out in accordance with the instructions.
- Warning: For safety reason, please use only the same size of fixing or mounting screw which are recommended in this instruction manual.
- Warning: Failure to install the screws or fixing device in accordance with these instructions may result in electrical hazards.
- Warning: Before connecting the hood: switch off the electricity supply and check that the supplied voltage and frequency coincide with that indicated on the appliance nameplate.
• Electrical Shock Hazard
Failure to follow these instructions can result in death, fire, or electric shock.
- The available lamps and the correspondenceIL
COS D codes and lamp pictures: Use type lamp (or use in alternative type lamp)
DBS-2/65-H-120/33. (ILCOS D code in according to standardIEC 61231).
- Non-replaceable LED lamp
- Max wattage: 1 x 2 W
- Voltage range: AC 110-240V
- Dimensions:
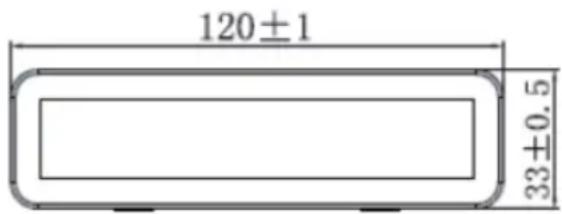
text_image
120±1 33±0.5- Note: If the supply LED bulb is damaged, it must be replaced by the manufacturer, its service agent or similarly qualified persons in order to avoid a hazard.
Presentation
Thank you for choosing this range hood. This user manual is designed to provide all necessary instructions for the installation, operation and maintenance of this appliance.
In order to operate the unit correctly and safety, please read this instruction manual carefully before installation and usage.
Warning: Failure to install the screws or fixing device in accordance with these instructions may result in electrical hazards.
PARTS SUPPLIED
| Description Drawing QTY(pc/set) | ||
| Cooker hood body 1 | 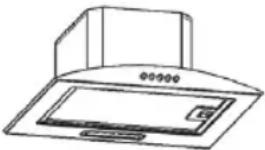 | |
| Glass 1 | 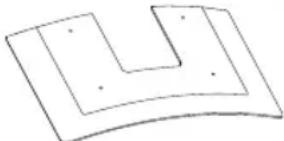 | |
| Chimney 2 | 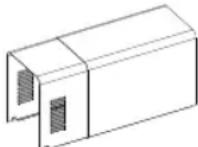 | |
| extension pipe - 150 mm × 2 m 1 | 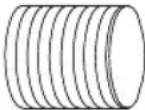 | |
| Air outlet 1 |  | |
| Valve (150) 2 | 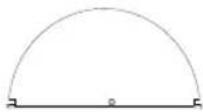 | |
| chimney bracket 1 | 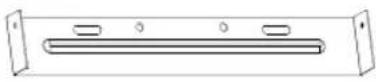 | |
| Glass anti vibration ring 4 |  | |
| Glass mounting pad 4 | 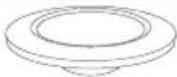 | |
| Countersunk machine thread (M4X20) | 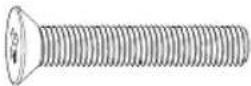 | 4 |
| Large flat head self tapping (ST4X40) | 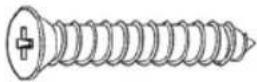 | 2 |
| Large flat head self tapping (ST4X30) | 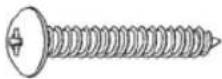 | 4 |
| Glue particles entering the wall | 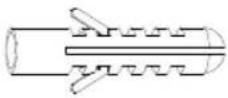 | |
| screw (ST4X8) 4 |  | |
| cable tie 1 |  | |
Information on Mounting
Your cooker hood can be used in extraction mode and recirculation.
Extraction mode
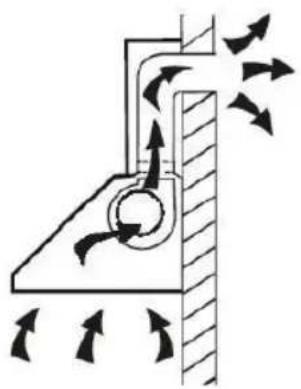
In extraction mode, the cooking fumes are sucked up, led through the grease filter, and released outside through an expansion pipe.
Advantage: No carbon filter required, fume contamination always very low.
Disadvantage: Wall penetration (core drilling) of 15.5 cm diameter with compatible hose connection required. Usage of open fires in the same room is only somewhat possible.
Recirculation mode
In recirculation mode, the cooking fumes are sucked up and feed back into the room after filtration through the upper air outlet. The air is cleaned by the grease filter and then by the carbon filter (fume filter with activated charcoal).
Advantage: Easy installation.
Disadvantage: As the carbon filter becomes dirtier, it becomes less efficient at cleaning and sucking. The carbon filter must be replaced approximately every three months, depending on use.
Extraction mode
If you have an outlet to the outside, your cooker hood can be connected as below picture by means of an extraction duct (enamel, aluminium, flexible pipe or non-arterial with an interior diameter of 150mm)
natural_image
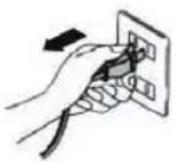
Diagram of airflow around a mechanical component with directional arrows indicating movement (no text or symbols)- Before installation, turn the unit off and unplug it from the outlet.
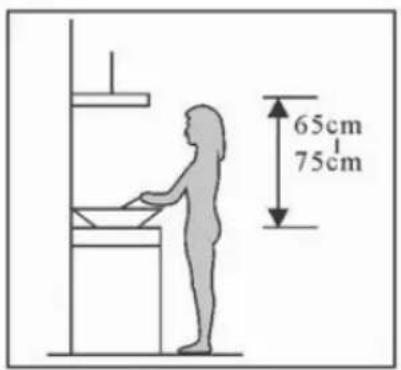
- The cooker hood should be placed at a distance of 65\~75cm above the cooking surface.
text_image
65cm 75cmPic 1
-
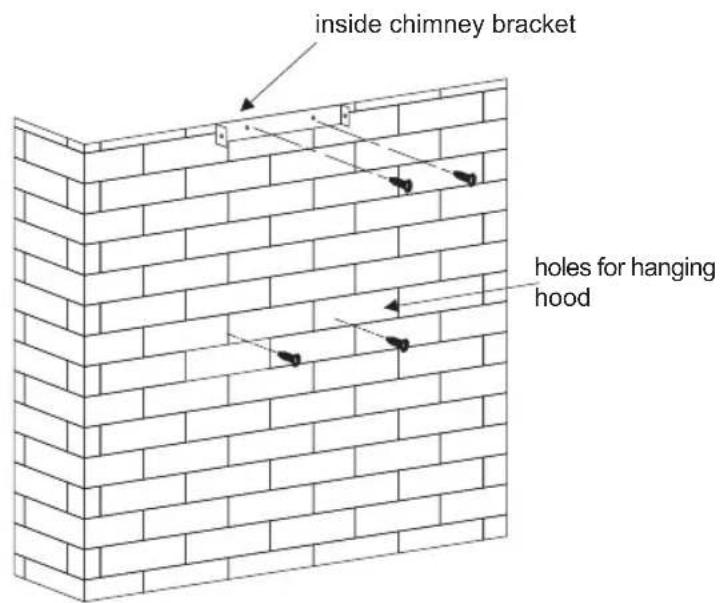
After decide the cooker hood height, measure the position of the holes for hanging hood and inside chimney bracket. Drill 4 φ8 holes, 2 for inside chimney bracket and 2 for hanging the hood, and keep the hood level. The fixed position of the inside chimney bracket is the highest place of chimney. See pic 2.
-
Screw two 4 x 30mm screws on the wall with wall plugs to fix the hood, then use two 4mm x 40mm screws to fix the inside chimney bracket. See Pic 2.
text_image
inside chimney bracket holes for hanging hoodPic 2
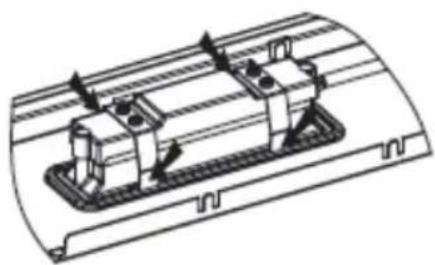
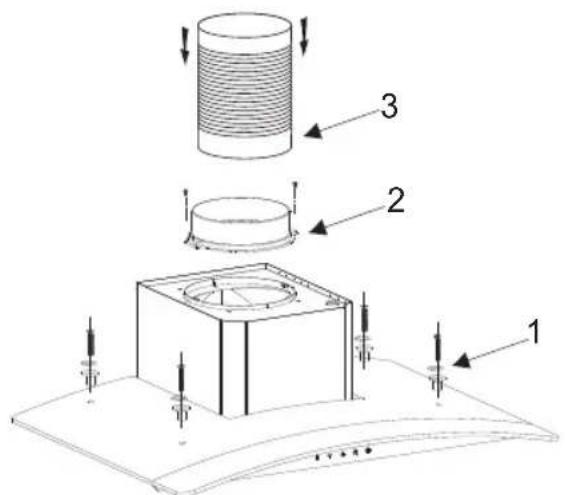
- Put the glass, oultet and expansion pipe on the cooker hood according to the guide direction, and then use the screws to fix the glass. See step 1/2/3 of pic 3.
Attach the expansion pipe onto the outlet, and fix the pipe on the outlet with a cable tie, then lay the expansion pipe to the wall outlet. See step 4 of pic 3.
text_image
Technical diagram showing a cylindrical component with three labeled parts and directional arrows indicating assembly or assembly steps.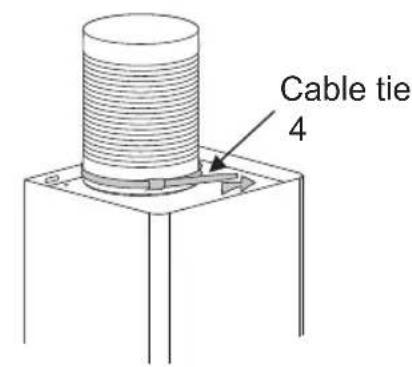
text_image
Cable tie 4Pic 3
-
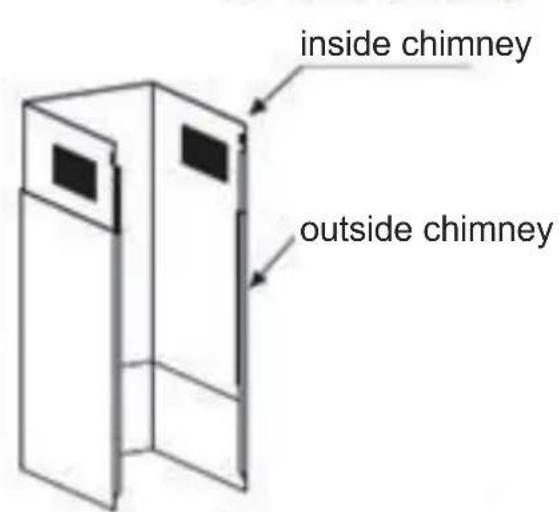
Dress the inside chimney into the outside chimney. See Pic 4.
-
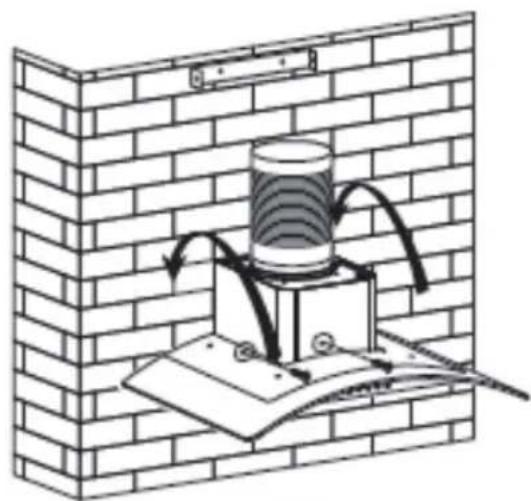
Make the hood hang on the wall in the fixed position, adjusting the cooker hood position, fix the cooker hood with safety screws. Note: The two safety vents are positioned on the back housing, with a diameter of 6mm.See Pic 5.
-
Put the two chimneys together onto the cooker hood body, meanwhile adjust the height of the inside chimney into the suitable height, and fix the inside chimney to the inside chimney bracket with screws, here should be sure the inside chimney can be flexed freely. See Pic 6.
text_image
inside chimney outside chimneyPic 4
natural_image
Diagram of a brick wall with a cylindrical component mounted on a base, showing airflow or ventilation (no text or symbols)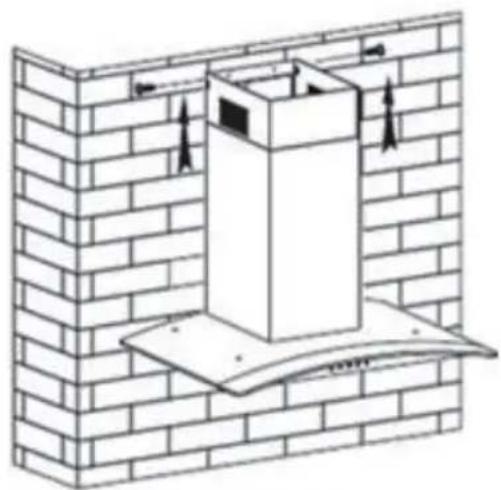
natural_image
Diagram of a brick wall with a vertical stacker and directional arrows, no text or symbols presentPic 5 Pic 6
text_image
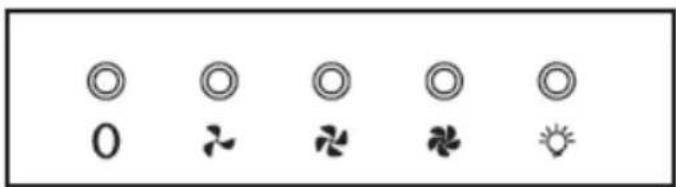
0# # # #
Stop Low Mid High Lamp
Push button
1) Push the stop button, and the motor will stop.
2) Push the low button, and the motor will run at low speed.
3) Push the middle button, and the motor will run at mid speed.
4) Push the high button, and the motor will run at high speed.
5) Push the light button and the two lights will illuminate. Push it again and the light will turn off.
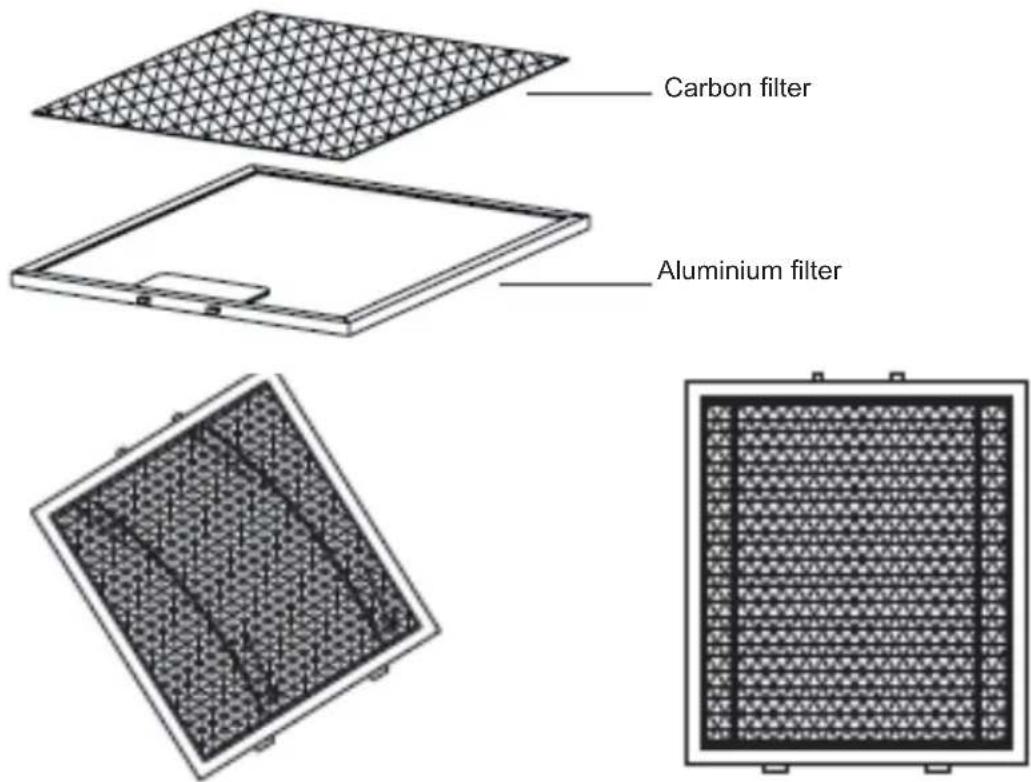
CARBON FILTER REPLACEMENT
Activated carbon filter can be used to trap odors.
Normally the activated carbon filter should be changed at three or six months according to your cooking habit.
The installation procedure of activated carbon filter is as below:
- Put the carbon filter on the back side of the aluminium filter.
muinim
filter, one on each side. You need to bend it to insert into the other end of the frame.
- Make sure the steel stick fix the carbon filter onto the aluminium filter.
NOTE:
- Make sure the filter is securely locked. Otherwise, it would loosen and cause danger.
- When activated carbon filter attached, the suction power will be lowered.
- It is suggest to replace the carbon filter around 3 months, you may go to below website to purchase it for replacing:
http://www.eurosav.eu/continentaledison
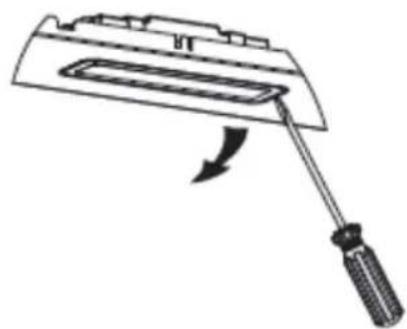
REPLACING THE BULB:
- Remove the grease filter.
- Find out the junction box, unscrew the screws on the junction box cover, then take down the junction box cover. See pic 1. The junction box has version a and b, depending on different models.
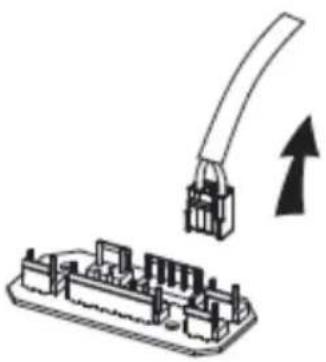
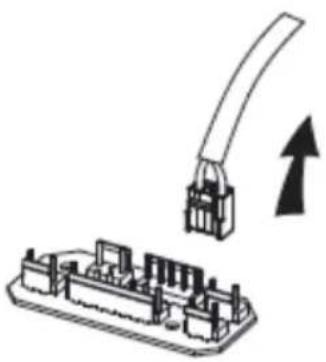
- Find out the terminal of the light connecting wire and pull it out. See pic 2.
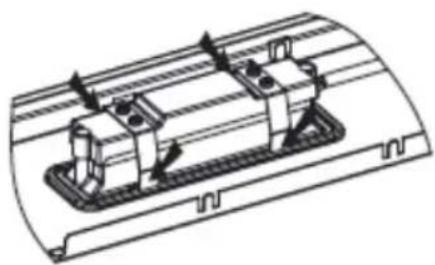
- Way 1. Use a tool or the hand to press the spring splinterof both sides of LED light to the inside, until the light is pressed out, see pic 3. Then slightly pull the light connecting wire out, see pic 4.
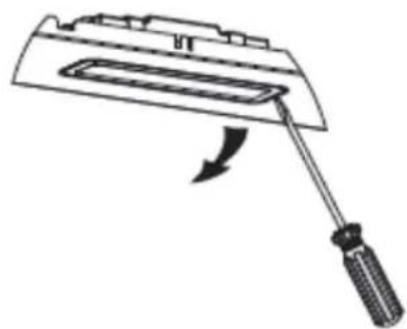
Way 2. Use straight screwdriver to prize up the LED light bottom edge, see pic 5, then slightly pull out the light connecting wire, see pic 4. - Apply the reverse procedure to reinstall the light.
• ILCOS D code for this lamp is: DBS-2/65-H-120/33 - LED modules –rectangle lamp
- Max wattage: 1×2 W
- Voltage range: AC 110-240V
- Dimensions:
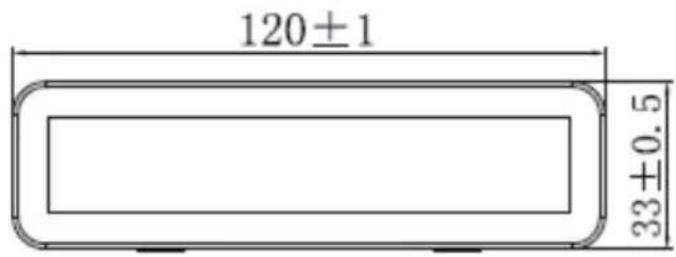
text_image
120±1 33±0.5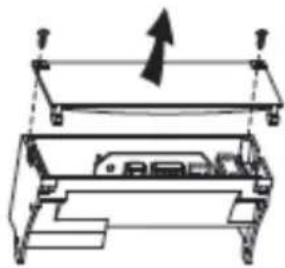
natural_image
Technical diagram of a mechanical assembly with no visible text or symbolsPic 1
natural_image
Diagram showing a cable being inserted into a connector socket (no text or symbols present)Pic 2 Pic 3
natural_image
Technical line drawing of a mechanical assembly with internal components and directional arrows (no text or symbols)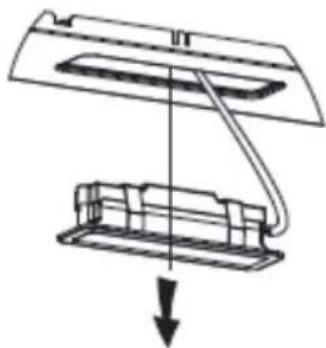
natural_image
Diagram of a mechanical assembly with a downward arrow indicating force or direction (no text or symbols present)Pic 4 Pic 5
natural_image
Diagram of a mechanical component with a screwdriver and arrow indicating rotation (no text or symbols)Before cleaning, switch the unit off and unplug the appliance.
I. Regular Cleaning
Use a soft cloth moistened with hand-warm mildly soapy water or household cleaning detergent. Never use metal pads, chemical, abrasive material or stiff brush to clean the unit.
II. Monthly Cleaning for metallic anti-grease filter ESSENTIAL: Clean the filter every month can prevent any risk of fire.
The filter collects grease, smoke and dust. So the filter is directly affecting the effective cooker hood. If not cleaned, the grease residue (potential flammable) will saturate on the filter clean it with household cleaning detergent.
| Symbol Unit Value | |||
| Trade Mark | [0725] Continental Edison | ||
| Address | 120-126 Quai de Bacalan CS 11584 33000 Bordeaux | ||
| Reference CEH60GS/CEH60GB | |||
| Model identification SY-3388A8-P1-C13-L121-600 | |||
| Annual Energy Consumption | AEC_hood | 30,1 | kWh/a |
| Energy Efficiency class | B | ||
| Time increase factor f | 1,6 | ||
| Fluid Dynamic Efficiency | FDE_hood | 9,9 | |
| Fluid Dynamic Efficiency class | E | ||
| Energy Efficiency Index | EEI_hood | 69,4 | |
| Measured airflow rate at the best efficiency | Q_BEP | 139,1 | m^3/h |
| Measured air pressure at best efficiency point | P_BEP | 125 | Pa |
| Maximum airflow | Q_max | 294,9 | m^3/h |
| Maximum airf low/ air flow at working point(in normal use) | highest setting: 285,1 lowest setting: 194,3 | m^3/h | |
| Measured electric power input at best efficiency point | W_BEP | 49,0 | W |
| Nominal power of the lighting system | W_L | 2,0 | W |
| Average illumination of the lighting system on the cooking surface | E_middle | 100 | lux |
| Light Efficiency | LE_hood | 50 | Lux/W |
| Light Efficiency Class A | |||
| Grease Filtering Efficiency | GFE_hood | 65,5 | |
| Grease Filtering Efficiency (GFE hood) class | D | ||
| Measured power consumption on off mode | P_O | 0,00 | W |
| Sound power level | L_WA | highest setting: 62 lowest setting: 56 | dB |
The measurement and calculation method of the above table was done in accordance with commission regulation (EU) No 65/2014 & 66/2014.
23 INFORMATION FOR COOKER HOOD
| Symbol Unit Value | |||
| Trade Mark |  Continental Edison Continental Edison | ||
| Address | 120-126 Quai de Bacalan CS 11584 33000 Bordeaux | ||
| Reference CEH90GS | |||
| Model identification | SY-3388C8-P1-C13-L121-900 | ||
| Annual Energy Consumption | AEC_hood | 29,4 | kWh/a |
| Energy Efficiency class | B | ||
| Time increase factor f | 1,6 | ||
| Fluid Dynamic Efficiency | FDE_hood | 9,8 | |
| Fluid Dynamic Efficiency class | E | ||
| Energy Efficiency Index | EEI_hood | 68,9 | |
| Measured airflow rate at the best efficiency | Q_BEP | 135,7 | m^3/h |
| Measured air pressure at best efficiency point | P_BEP | 124 | Pa |
| Maximum airflow | Q_max | 304,1 | m^3/h |
| Maximum airf low/ air flow at working point(in normal use) | highest setting: 295,4 lowest setting: 214,3 | m^3/h | |
| Measured electric power input at best efficiency point | W_BEP | 47,9 | W |
| Nominal power of the lighting system | W_L | 2,0 | W |
| Average illumination of the lighting system on the cooking surface | E_middle | 80 | lux |
| Light Efficiency | LE_hood | 40 | Lux/W |
| Light Efficiency Class A | |||
| Grease Filtering Efficiency | GFE_hood | 65,5 | |
| Grease Filtering Efficiency (GFE hood) class | D | ||
| Measured power consumption on off mode | P_O | 0,00 | W |
| Sound power level | L_WA | highest setting: 63 lowest setting: 57 | dB |
The measurement and calculation method of the above table was done in accordance with commission regulation (EU) No 65/2014 & 66/2014.
text_image
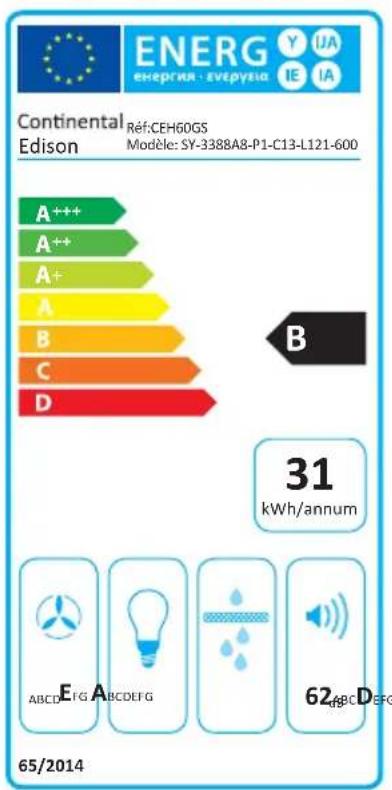
Continental Réf:CEH60GS Edison Modelle: SY-3388A8-P1-C13-L121-600 A++ A++ A+ B C D B 31 kWh/annum 65/2014 E ABCDFG A ABCDEFG 62 ABCDEFG
text_image
Continental Réfé:CEH60GB Modèle: SY-3388A8-P1-C13-L121-600 Edison A++ A++ A+ B C D B 31 kWh/annum 65/2014 ABCD EFG A ABCDEFG 62 ABCDEFG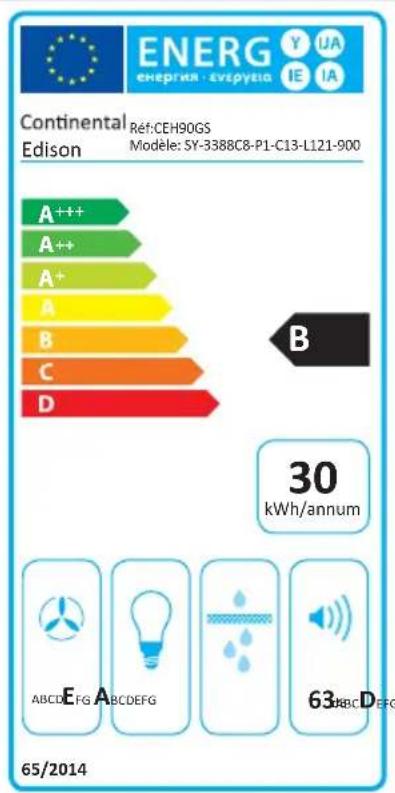
text_image
Continental Edison Réf:CEH90GS Modèle:SY-3388C8-P1-C13-L121-900 ENERG Y UA energria·evirpyria IE IA A++ A++ A+ A B C D B 30 kWh/annum 65/2014 E ABCDEFG A ABCDEFG 63 ABCDEFG25 INFORMATION FOR COOKER HOOD
Note:
The following shows how to reduce total environmental impact (e.g. energy use) of the cooking process).
(1) Install the cooker hood in a proper place where there is efficient ventilation.
(2) Clean the cooker hood regularly so as not to block the airway.
(3) Remember to switch off the cooker hood light after cooking.
(4) Remember to switch off the cooker hood after cooking.
Information for dismantling
Do not dismantle the appliance in a way which is not shown in the user manual. The appliance could not be dismantled by user. At the end of life, the appliance should not be disposed of with household waste. Check with you Local Authority or retainer for recycling advice.
This product is marked with the symbol on the selective sorting of waste electronic equipment. This means that this product must not be disposed of with household waste but must be supported by a system of selective collection in accordance with Directive 2012/19/EC. It will then be recycled or dismantled to minimize impacts on the environment, electrical and electronic products are potentially dangerous for the environment and human
health due to the presence of hazardous substances.
For more information, please contact your local or regional authorities.
Environment friendly disposal! You can help protect the environment!
Please remember to respect the local regulations: hand in the non-working electrical equipment to an appropriate waste disposal centre. The packaging material is recyclable.
Dispose of the packaging in an environmentally friendly manner and make it available for the recyclable material collection-service.
Continental Edison
120-126 Quai de Bacalan
CS11584
33000 Bordeaux
IMPORTÉ PAR
A.M.C
natural_image
Two overlapping gray semicircles on white background (no text or symbols)Continental Edison
www.continentaledison.fr