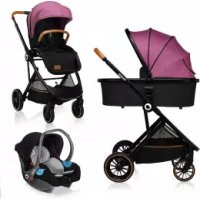
Riya - Stroller Lionelo - Free user manual and instructions
Find the device manual for free Riya Lionelo in PDF.



| Product type | Stroller |
| Brand / Model | Lionelo Riya |
| Safety standards | EN 1888-1:2018, EN 1466:2014+AC:2015 (carrycot) |
| Maximum child weight | 15 kg (seat), 9 kg (carrycot) |
| Age range | 6 to 36 months (seat), 0 to 6 months (carrycot) |
| Maximum basket load | 2 kg |
| Stroller weight (frame + seat) | Approximately 10 kg (estimate) |
| Folded dimensions | Not specified (estimate: L 70 × W 50 × H 30 cm) |
| Harness | 5-point, height adjustable |
| Handle | Adjustable to 3 heights |
| Seat backrest | Reclining adjustable |
| Footrest | 3 adjustable positions |
| Canopy | Zip extension |
| Front wheels | Swiveling with locking option |
| Brake | Locking pedal on rear wheels |
| Included accessories (2-in-1 kit) | Carrycot, mattress, canopy |
| Car seat compatible | Yes, via adapters (Lionelo Astrid, Mari Carrier, Greet Carrier) |
| Maintenance and cleaning | Hand wash at 30°C (padding, basket, carrycot); frame and wheels: damp cloth |
| Spare parts | Only recommended by the manufacturer |
Frequently Asked Questions - Riya Lionelo
User questions about Riya Lionelo
0 question about this device. Answer the ones you know or ask your own.
Ask a new question about this device
Download the instructions for your Stroller in PDF format for free! Find your manual Riya - Lionelo and take your electronic device back in hand. On this page are published all the documents necessary for the use of your device. Riya by Lionelo.
USER MANUAL Riya Lionelo
natural_image
Line drawing of a baby stroller with twin wheels and a canopy (no text or symbols)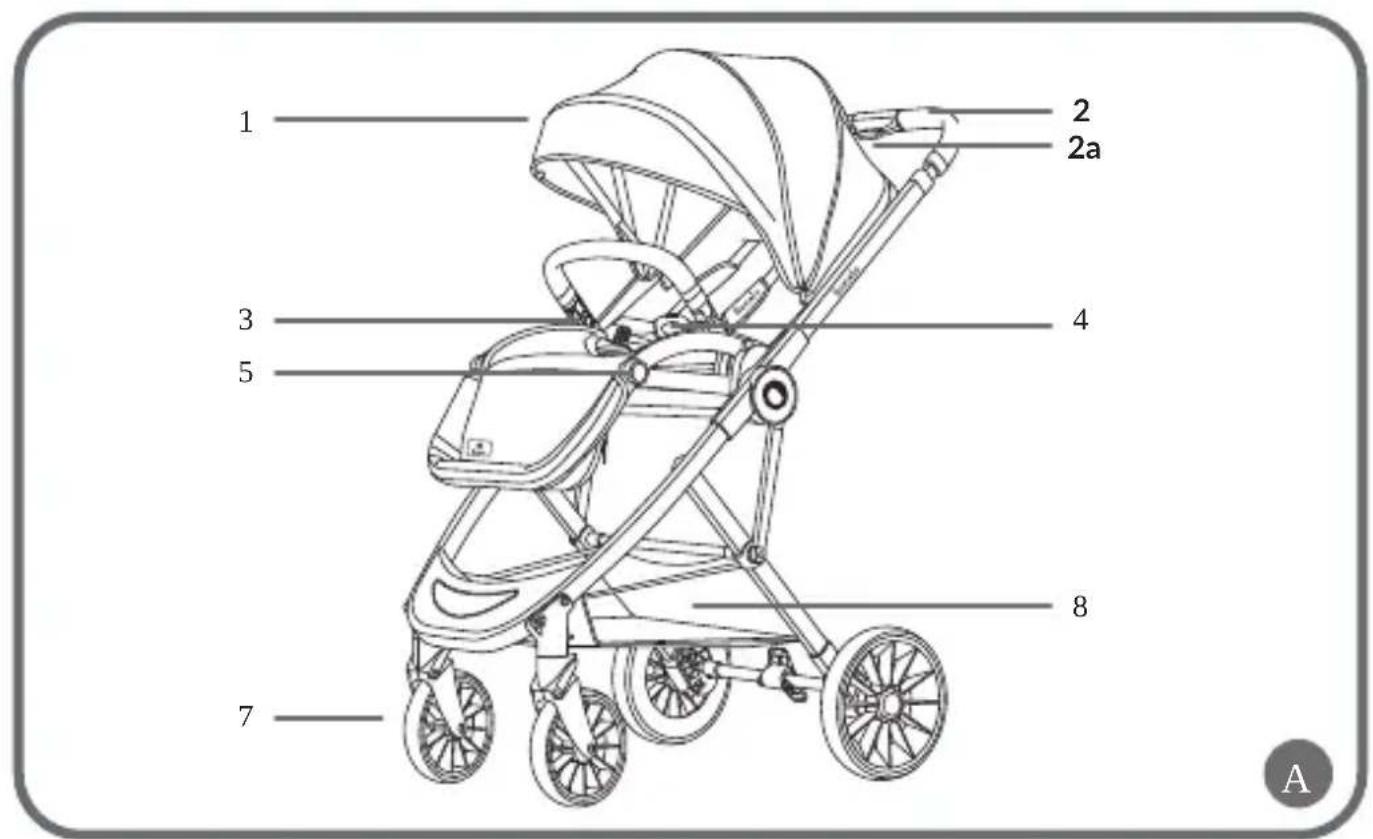
flowchart
graph TD
    A["1a"] --> B["1b"]
    B --> C["1c"]
    C --> D["1d"]
    style A fill:#f9f,stroke:#333
    style B fill:#f9f,stroke:#333
    style C fill:#f9f,stroke:#333
    style D fill:#f9f,stroke:#333
natural_image
Technical line drawing of a boat hull with handle and side connectors (no text or symbols)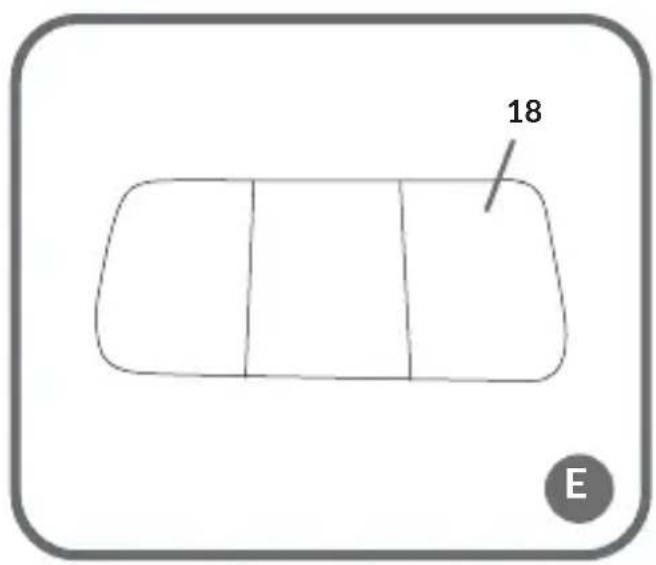
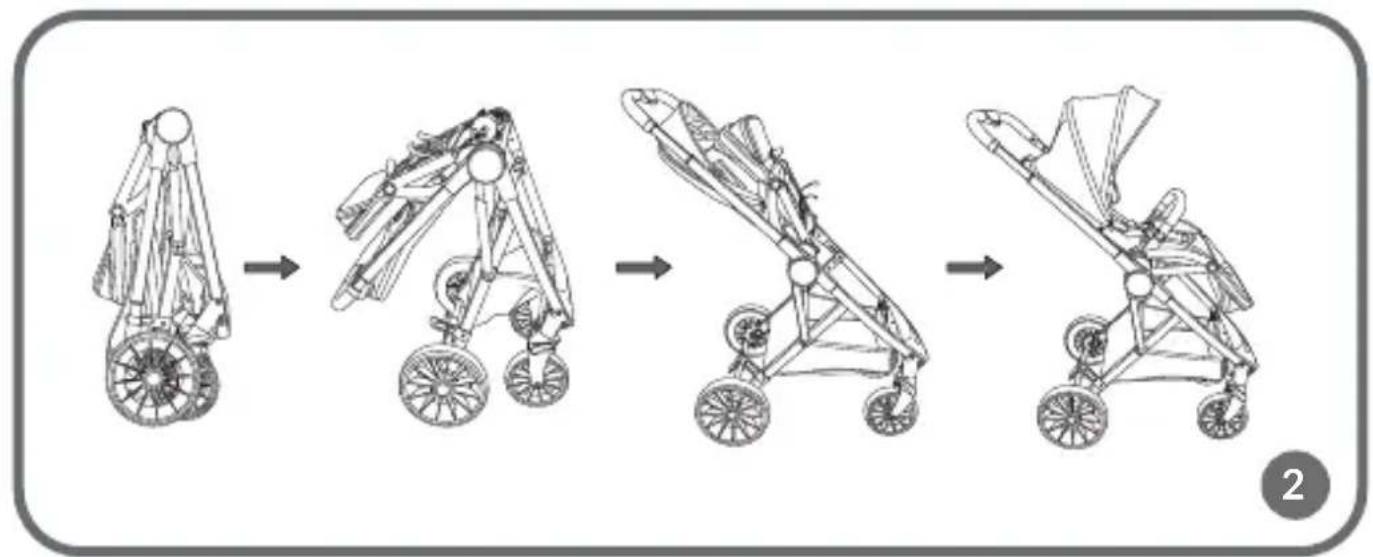
flowchart
graph LR
    A["Initial Suspension Vehicle"] --> B["Step 1: Stabilized Carriage"]
    B --> C["Step 2: Stabilized Stroller"]
    C --> D["Step 3: Stabilized Stroller with Rear Wing"]
    D --> E["Step 4: Stabilized Stroller with Rear Wing"]
natural_image
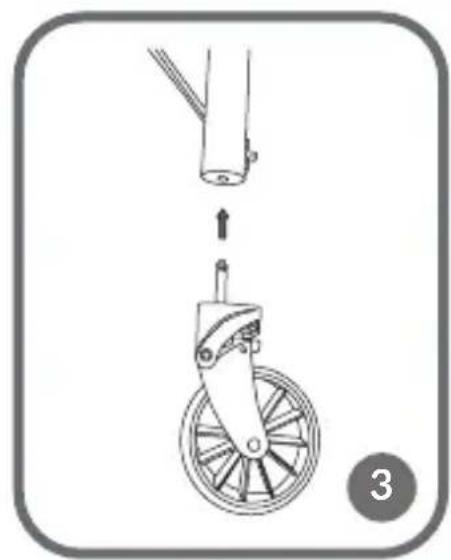
Diagram showing a mechanical device with a wheel and shaft, no text or symbols present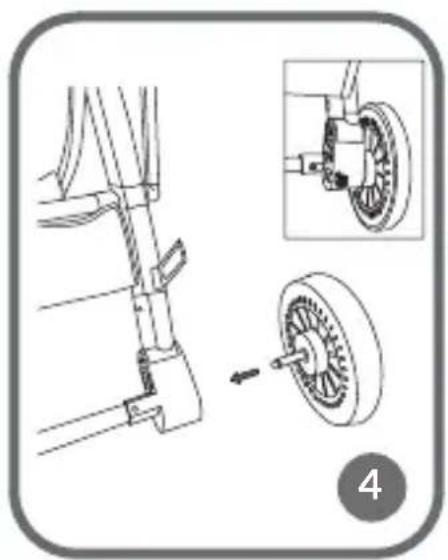
natural_image
Mechanical assembly diagram showing a bracket and wheel assembly with an inset close-up of the wheel (no text or symbols)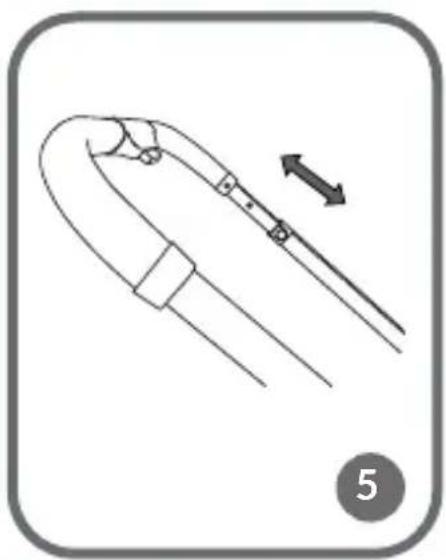
natural_image
Diagram of a curved mechanical component with directional arrows indicating motion (no text or symbols)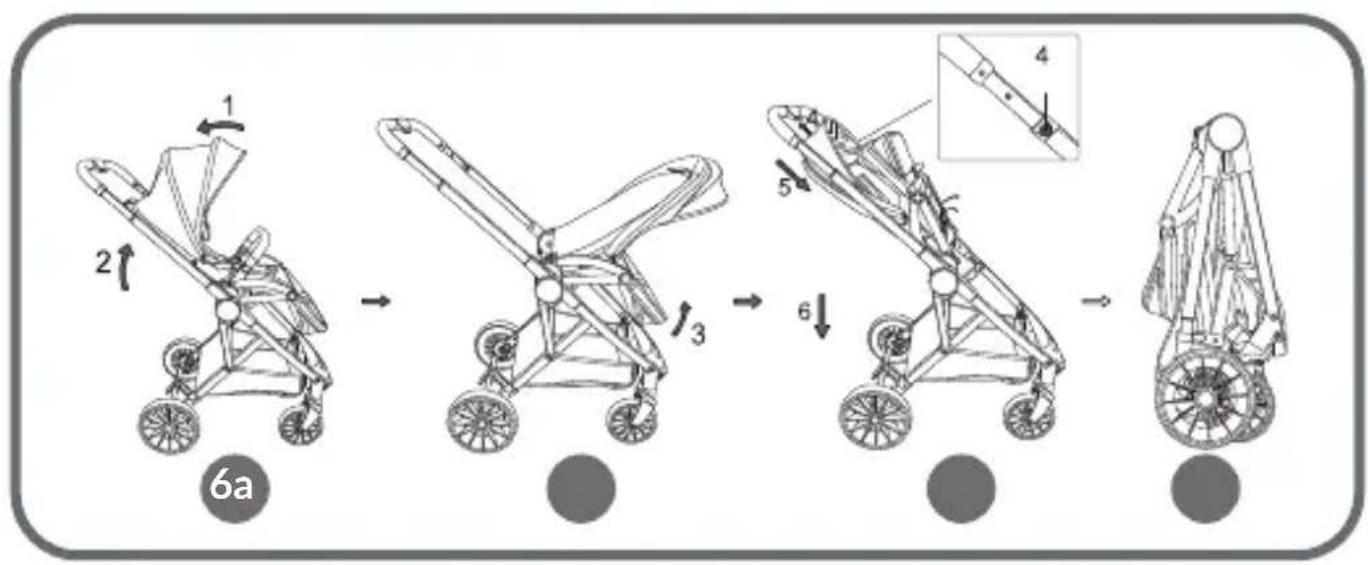
flowchart
graph LR
    A["1: Luggage"] --> B["2: Rotation"]
    B --> C["3: Stroller"]
    C --> D["4: Insertion"]
    D --> E["5: Rotation"]
    E --> F["6: Lift"]
    F --> G["7: Rear assembly"]
    style A fill:#f9f,stroke:#333
    style G fill:#bbf,stroke:#333
natural_image
Line drawing of a baby stroller with a handrail and wheel, no text or symbols present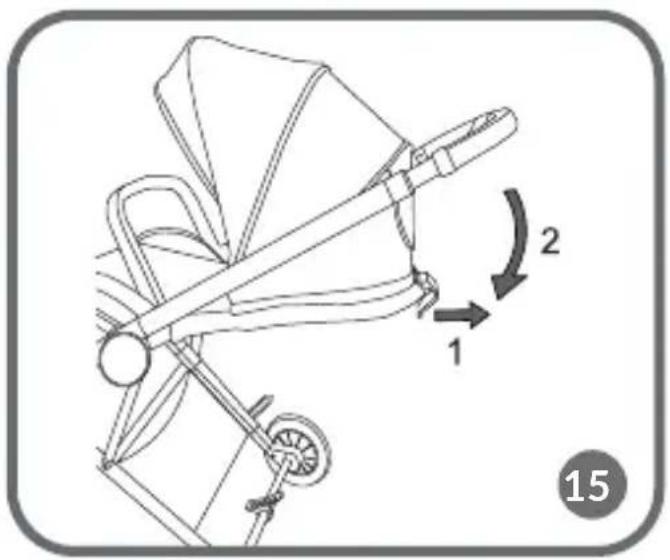
natural_image
Line drawing of a car steering wheel with directional arrows indicating motion (no text or symbols)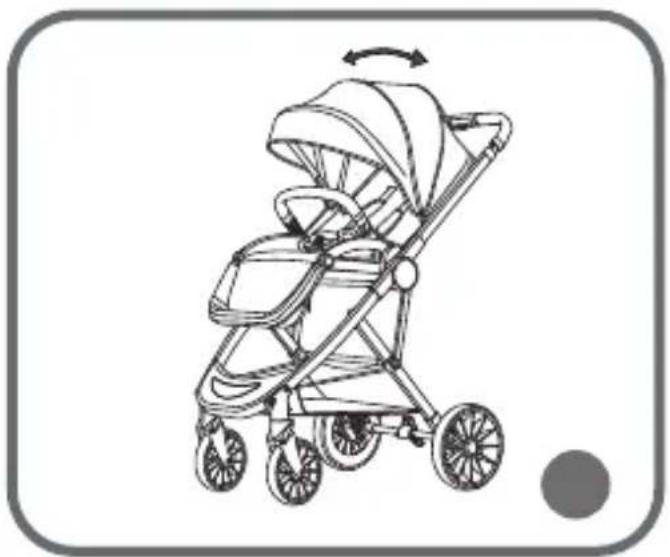
natural_image
Line drawing of a baby stroller with a curved arrow indicating rotation (no text or symbols)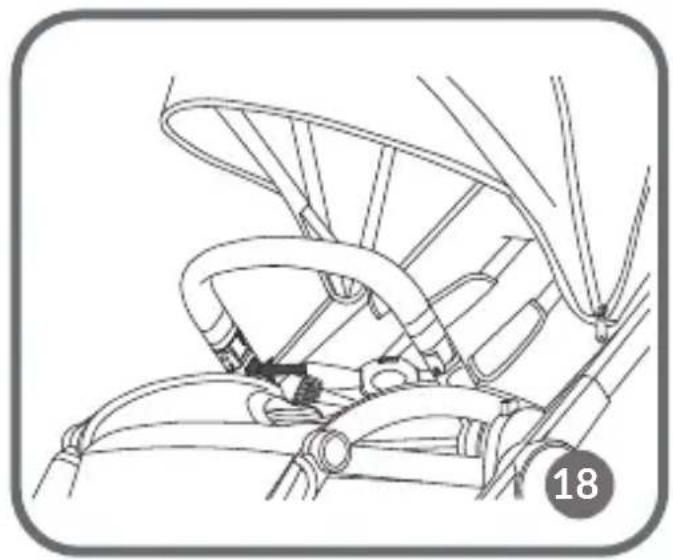
natural_image
Line drawing of a car's seat and steering wheel assembly (no text or symbols)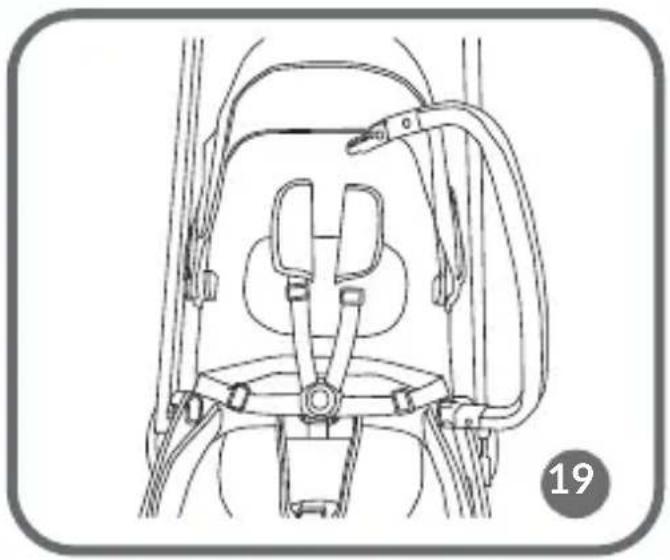
natural_image
Line drawing of a car seatbelt device with no text or symbols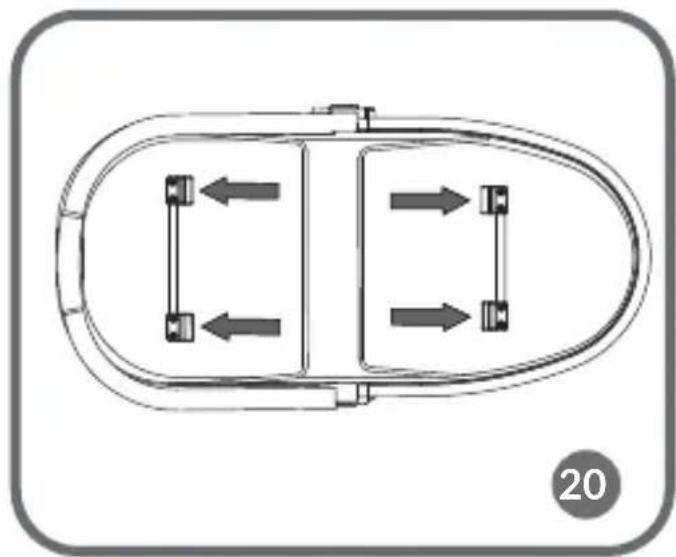
natural_image
Top-down schematic of a vehicle with four directional arrows indicating movement or flow (no text or symbols)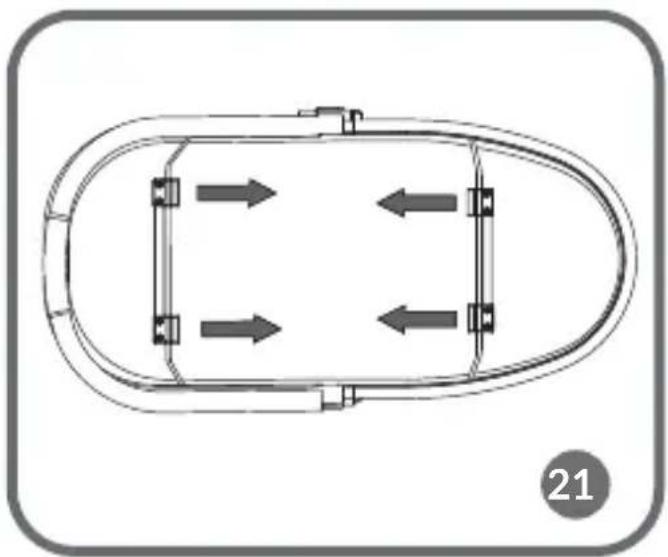
natural_image
Top-down schematic of a vehicle with four directional arrows indicating movement or flow (no text or symbols)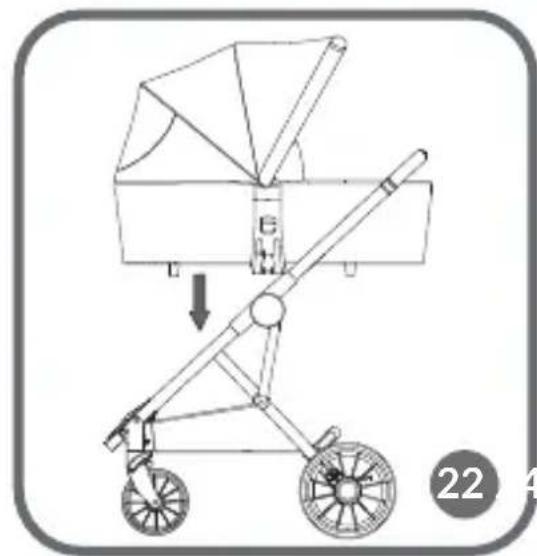
natural_image
Diagram of a mechanical device with wheels and a handle, showing a downward force or adjustment (no text or symbols)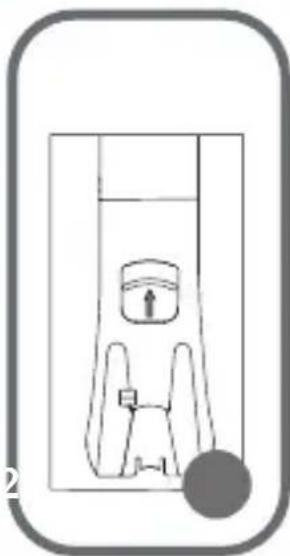
natural_image
Simple line drawing of a mechanical device with no text or symbols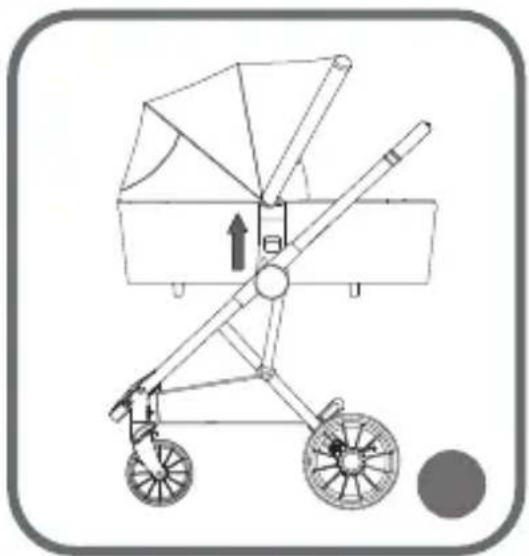
natural_image
Line drawing of a wheeled cart with wheels and a handle, no text or symbols present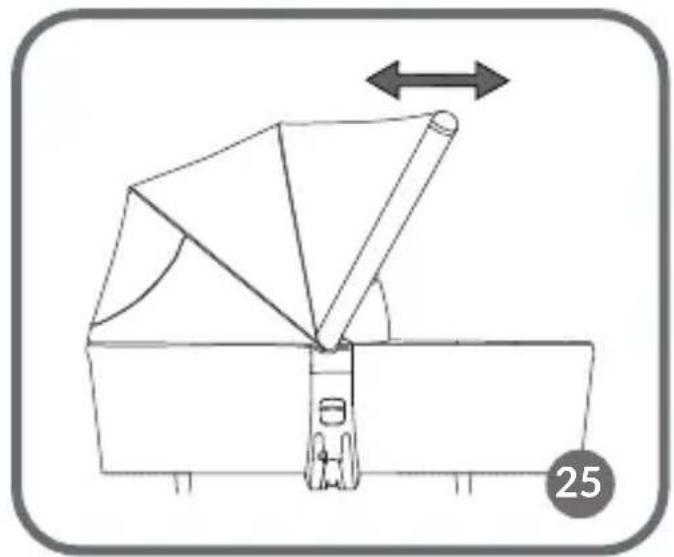
natural_image
Diagram of a mechanical device with a triangular component and directional arrow, no text or symbols present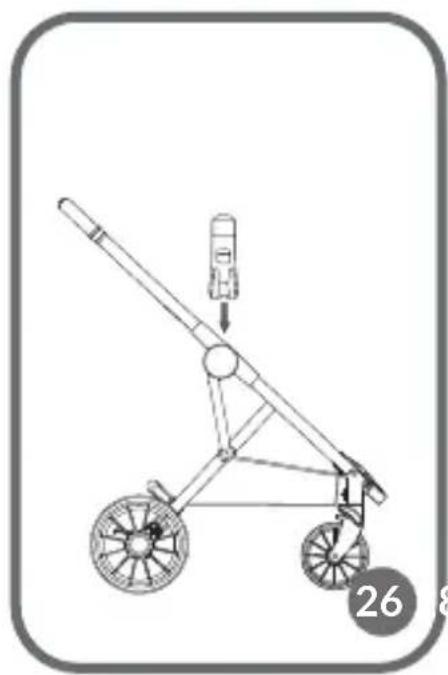
natural_image
Line drawing of a wheeled cart with wheels and a small vehicle, no text or symbols present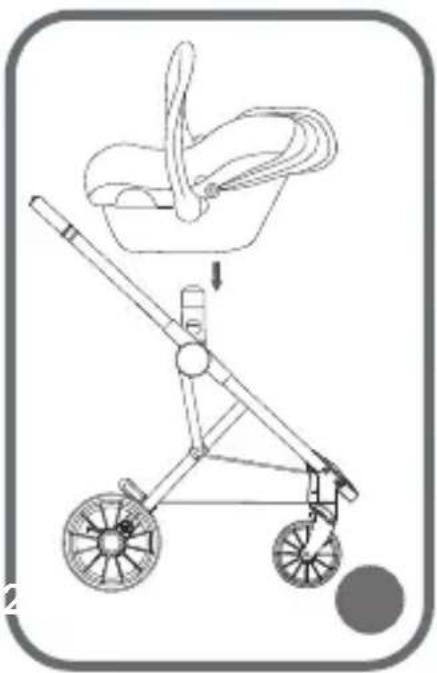
natural_image
Line drawing of a stroller with a basket and arrow indicating motion (no text or symbols)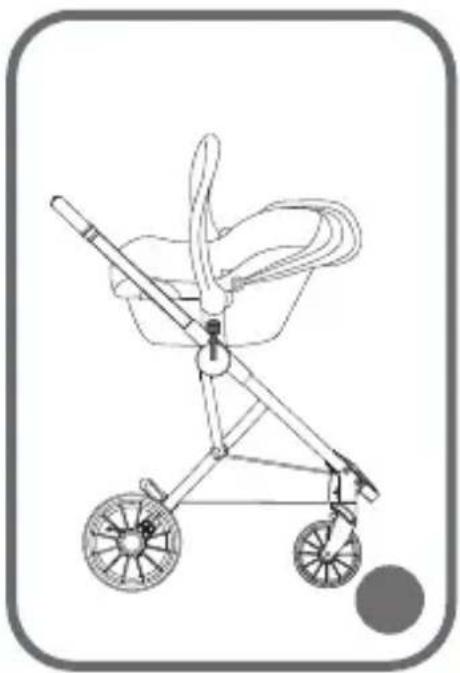
natural_image
Line drawing of a baby stroller with wheels and seat (no text or symbols)Dear customer!
Should you have any remarks or questions concerning the product, please do not hesitate to contact us: help@lionelo.com
The product satisfies requirements of the following standards: EN 1888-1:2018 and EN 1466:2014+AC:2015 (applies to carrycot in 2in1 and 3in1 sets).
Producer:
BrandLine Group Sp. z o.o.
IMPORTANT - READ CAREFULLY AND KEEP FOR FUTURE REFERENCE
- Never leave the child unattended.
- Ensure that all the locking devices are engaged before use.
- To avoid injury ensure that the child is kept away when unfolding and folding this product.
- Do not let the child play with this product.
- This seat unit is not suitable for children under 6 months.
- Always use the restraint system.
- Check that the pram body or seat unit or car seat attachment devices are correctly engaged before use.
- This product is not suitable for running or skating.
- The suitable age range is from 6 months to 36 months and the maximum loading weight is 15 kgs.
- If you wish to take the child out of the stroller or put it inside, make sure the wheel locking mechanism is active.
- Basket maximum load is 2 kg.
- Any loads on the bar, sunshade or sides of the stroller may affect its stability.
-
The product is intended for one child only.
-
Do not use accessories which have not been approved by the manufacturer.
- If you equip the product with a sling, through special adapters, which may also be used as a child safety seat, remember it cannot substitute the crib. If the child needs to sleep, put it in a suitable crib.
- Use only spare parts delivered or recommended by the manufacturer/distributor.
- Keep the product away from fire and sources of heat.
- Do not use the product on stairs.
WARNING! FOR CARRYCOT (APPLIES TO 2IN1 SET): IMPORTANT – Before you start using the product, please carefully read this manual and keep for future reference
- This product is only suitable for a child who cannot sit up unaided.
- This product is not suitable for children who can sit, turn from side to side and lift on its hands and knees. Child's maximum weight: up to 9 kg.
- Only use on a firm, horizontal level and dry surface.
- Do not let other children play unattended near the carry cot.
- Do not use if any part of the carry cot is broken, torn or missing.
- Use solely spare parts delivered or recommended by the manufacturer.
- Keep the product away from fire and sources of heat.
- Check the bottom and grips of the carrycot for any signs of damage and wear.
- Make sure the grips are mounted and locked in a proper position before you lift or move the carrycot.
-
Child's head in the carrycot must not be lower than the child's body.
-
Do not put an additional mattress into the carrycot.
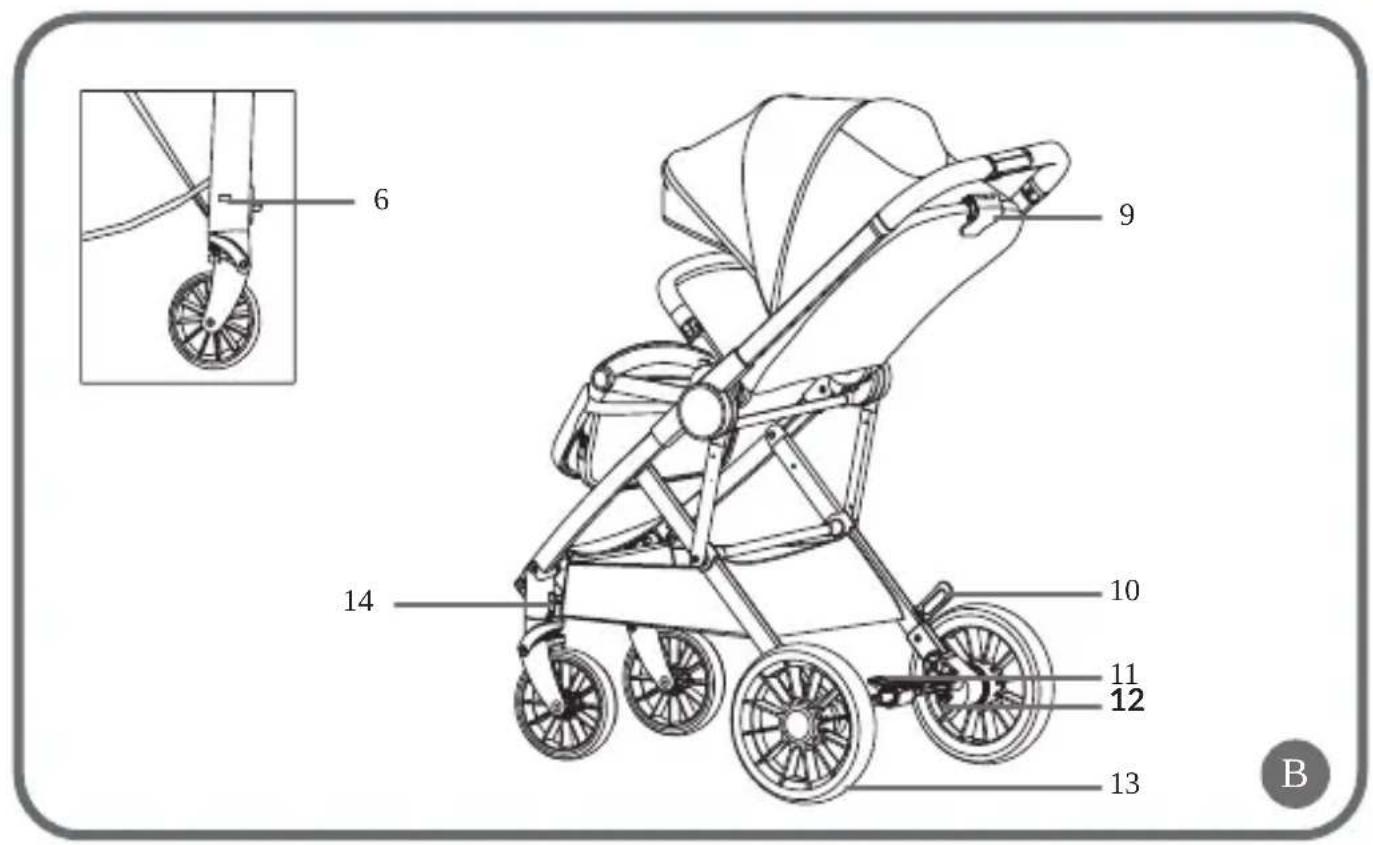
Stroller parts list (fig. A, B)
- Sunshade
- Handle
2a. Handle adjustment key - Bow release key
- 5-point harness
- Footrest adjustment key
- Front wheel release key
-
Front wheels
-
Basket
- Backrest adjustment lever
- Folding lock
- Locking mechanism
- Rear wheel release key
- Rear wheels
- Swivel wheel lock key
2in1 set includes stroller frame with seat and carrycot.
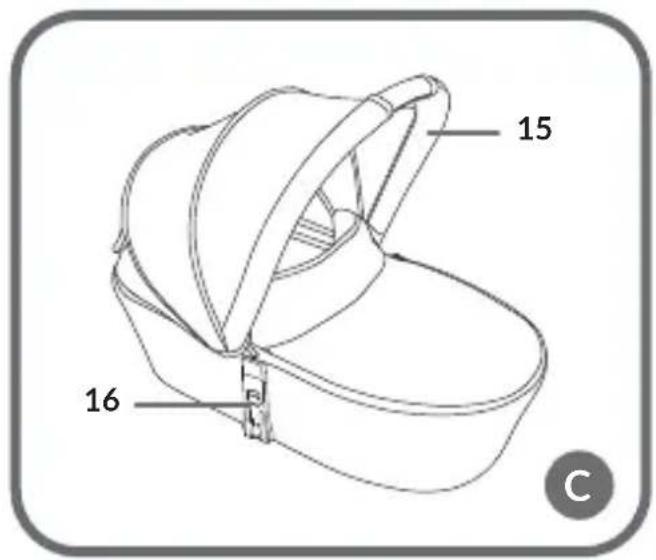
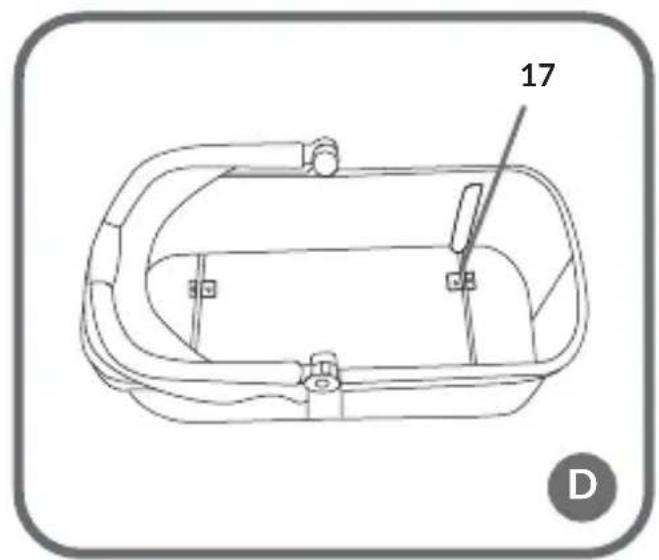
Carrycot parts list (fig. C, D, E) - applies to 2in1 set
- Sunshade
- Carrycot connector with key
- Carrycot supports
- Mattress
How to assemble and disassemble stroller
- Stroller frame unfolding: open the unfolding lock (10) and then pull the handle up until you can hear a click (fig. 2).
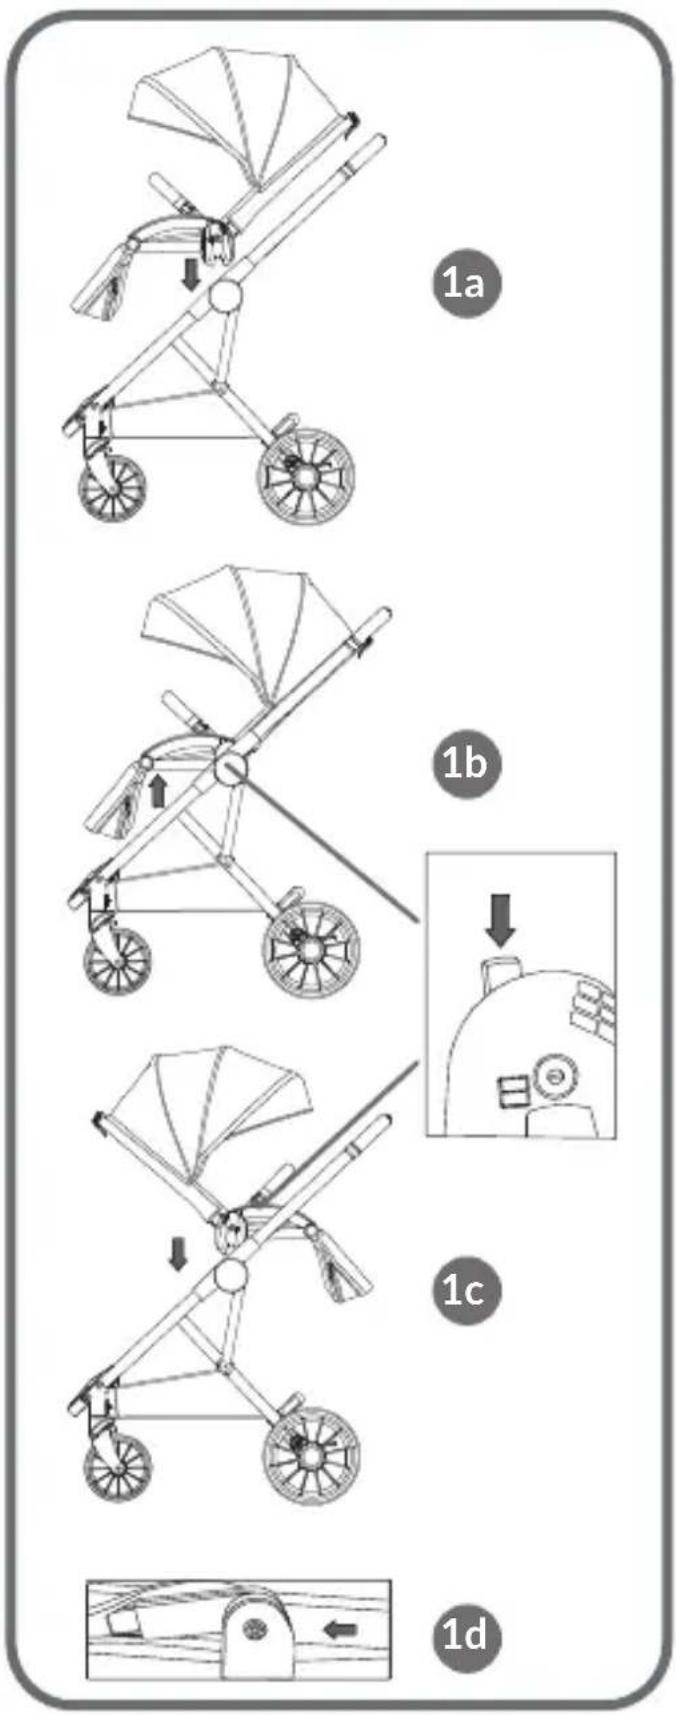
- Place the seat on the stroller frame (fig. 1a). Unfold and secure the seat with a bow until you can hear a click. Correct assembly of the seat on the frame is signaled by the click. Make sure the seat has been properly mounted in the stroller frame.
- To remove the seat from the stroller frame, press the release key on both sides of the seat and then lift them (fig. 1b).
- To assemble the seat in a rear-facing position (fig. 1c), press the release key and then lift the seat and place it in a desired position. The seat is properly mounted when you can hear a distinctive click.
- To remove the sunshade, unzip it and then pull up plastic elements on both sides (fig. 1d).
- To remove seat covering, unzip it around footrest and under the seat, and unzip belts at the base of the seat.
How to assemble and disassemble front wheels
- Slide wheel shank into corresponding holes on stroller frame (fig. 3).
- To remove front wheels, press the release key (6) and pull the wheels out.
How to assemble and disassemble rear wheels
- Slide wheel shank into corresponding holes on stroller frame (fig. 4).
- To remove rear wheels, press the release key (12) and pull the wheels out.
How to adjust a handle
- Press the handle adjustment key (2) and pull the handle out or slide it in by choosing one of three available heights (fig. 5).
How to fold stroller frame in forward-facing position
- Fold the sunshade (fig. 6a), tilt the backrest to the front, fold the footrest as showed by the arrow no. 3 (fig. 6b), next press the handle adjustment key with one hand and lock key with the other, and fold the stroller as showed by the arrow no. 5 (fig. 6c).
- Dynamically lower the handle as far as you can (fig. 6d). Make sure the folding lock is engaged.
How to fold stroller frame in a rear-facing position
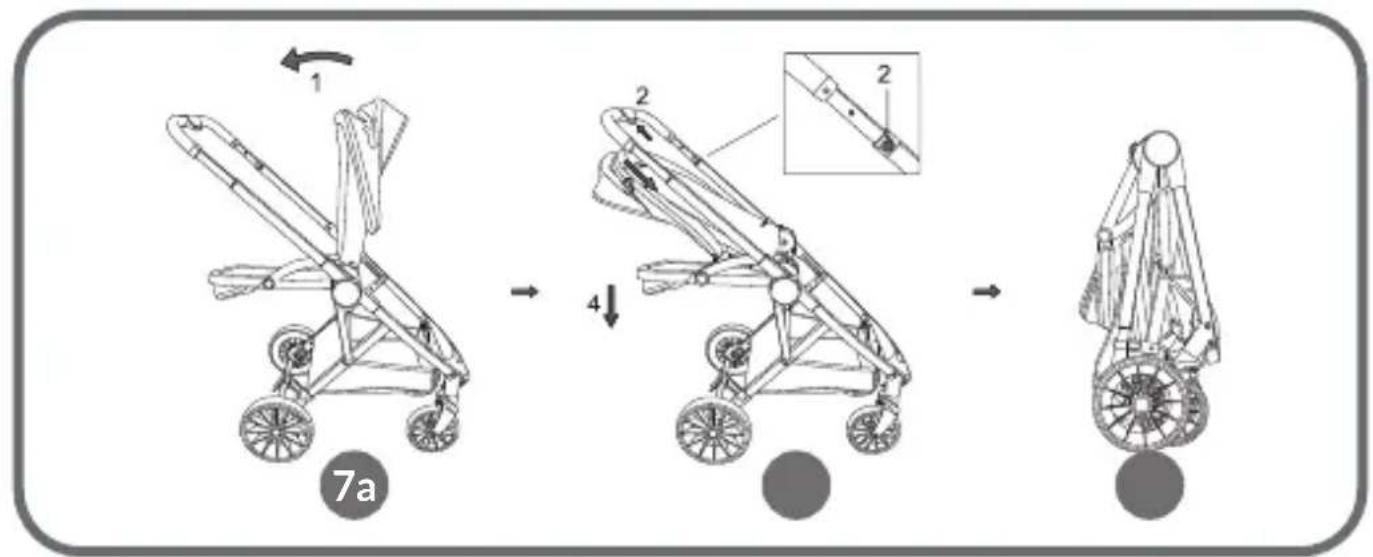
- Fold the backrest to the back (fig. 7a). Next, follow steps of folding the stroller in a forward-facing position analogically (fig. 7b, 7c). Make sure the folding lock is engaged.
How to use a harness
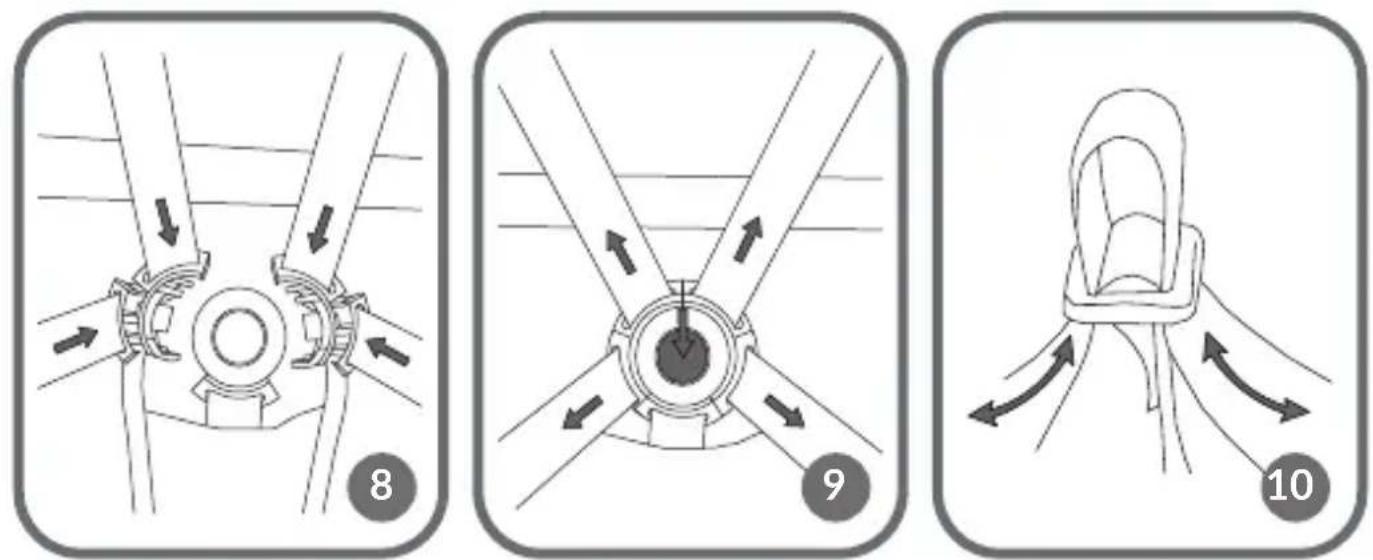
- Safety belts adjustment: insert belts into the central buckle until you can hear a click (fig. 8). To remove belts, press the key in the central buckle (fig. 9).
- To adjust length of belts, pull them through relevant loops in the seat so that they correspond to child's height (fig. 10).
Swivel wheel lock key
-
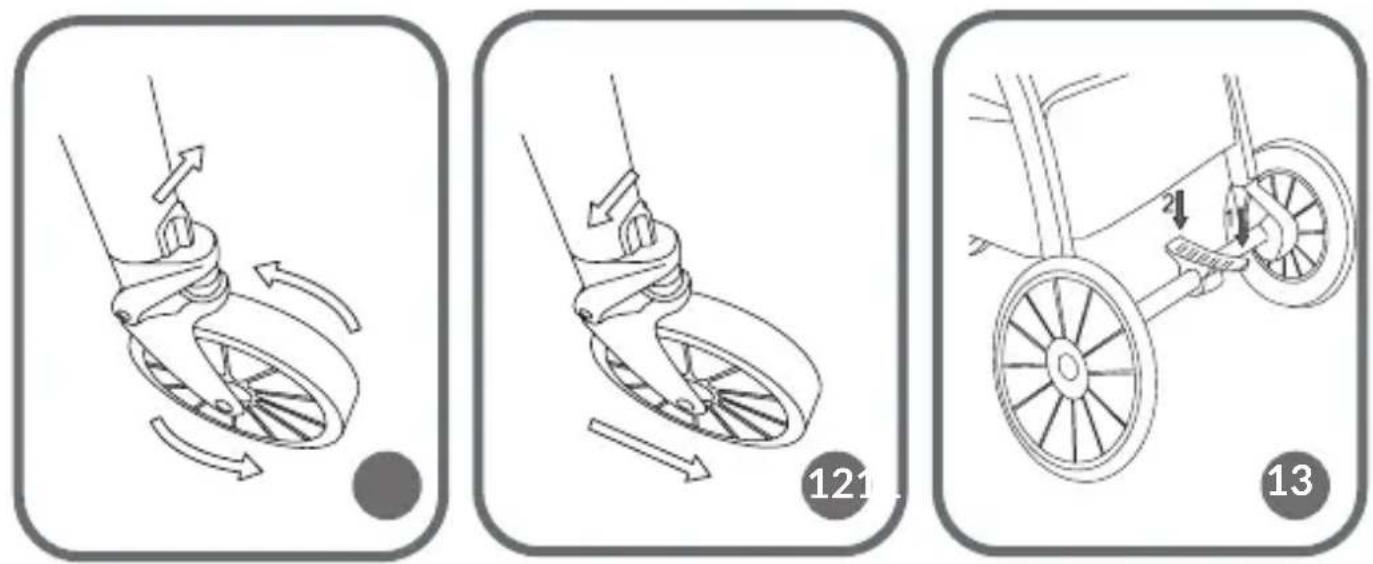
Front rotating wheels: to unlock the right wheel, dynamically slide the interlock key (14) to the right (fig. 11). To lock it, slide the interlock key to the left (fig. 12). Unlock and lock the left wheel, take the above-stated actions in a reversed order.
-
Locking mechanism: to lock, press the pedal as showed by the arrow no. 1 (fig. 13). To unlock, press the pedal as showed by the arrow no. 2 (fig. 13).
- Note: make sure the stroller is locked when immobilized.
How to adjust backrest
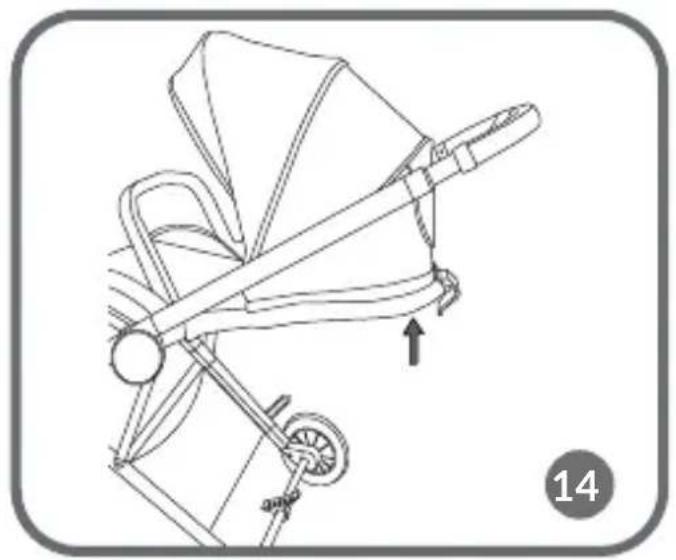
- To set the seat in a sitting position, push the backrest upwards until you can hear a distinctive click (fig. 14).
- To lower the backrest, press the backrest adjustment lever and set the desired position (fig. 15).
How to adjust footrest
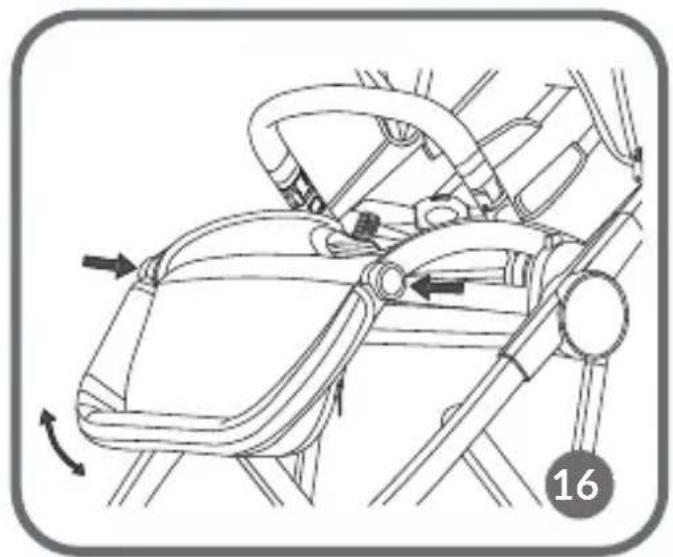
- To choose one of three available footrest positions, press footrest adjustment keys (5) and then push the footrest downwards or upwards, depending on your preferences (fig. 16).
How to adjust sunshade
- To increase sunshade range, unzip it and pull out the additional part (fig. 17).
How to adjust bow
- To remove a bow, press release keys (3) and take the bow out (fig. 18, 19). If you can hear a click, it means the installation is correct.
How to assemble and disassemble carrycot (applies to 2in1 set)
- Insert metal bars into carrycot supports (fig. 20, 21). To lock supports, pull until you can hear a click.
- Zip the internal covering of the carrycot and put the mattress in.
- To fold the carrycot, follow the steps presented in points 25-26 in a reversed order.
- Place the carrycot on the stroller frame so that the child is facing the person who handles the stroller (fig. 22). A click suggests the assembly is correct. Make sure the carrycot has been properly mounted on the frame.
- To remove the carrycot from the stroller frame, press release keys (16) on both sides of the carrycot and then lift the carrycot (fig. 23, 24).
- To adjust the carrycot sunshade, set it as you like (fig. 25).
- You can move the carrycot when the handle is positioned at the angle of 90^ .
How to assemble and disassemble child safety seat (applies to 3in1 set)
Connectors are compatible with these products: Lionelo (Astrid, Mari Carrier, Greet Carrier)
-
Insert connectors into corresponding spots on the stroller frame until you can hear a click, and connectors are locked (fig. 26). Pay attention to R and L marking.
-
Insert the child safety seat into the stroller frames until you can hear a click and connectors are locked (fig. 27). Make sure the child safety seat has been properly mounted on the frame.
-
To detach the child safety seat, press child safety seat keys and then take the product from the connectors (fig. 28).
-
When placing the child safety seat in the stroller frame, make sure the child is facing the person who handles the stroller.
How to clean and maintain
-
Clean the dust and sand off the wheels and stroller frame on a regular basis. You can clean these parts with a wet cloth.
-
Wash the upholstery of the stroller and its basket manually at the temperature of 30^ C. Do not dry mechanically.
-
Wash the upholstery of the carrycot and cover manually at the temperature of 30^ C. Do not dry mechanically.
-
You should regularly inspect particular parts of the stroller for their correct operation, resistance and potential damage. In case of any defects, please contact the authorized service center.
-
Use spare parts recommended by the manufacturer only.
-
Make sure the stroller is not directly exposed to sunlight and high temperatures for a long time. Sunlight may cause the fabrics to fade.
-
Do not use strong chemicals to clean this product.
The pictures are for reference only. The real design of the products may differ from the pictures presented.
Drogi Kliencie!
BrandLine Group Sp. z o.o.
BrandLine Group Sp. z o.o.
BrandLine Group Sp. z o.o.
BrandLine Group Sp. z o.o.
BrandLine Group Sp. z o.o.
BrandLine Group Sp. z o.o.
BrandLine Group Sp. z o.o.
BrandLine Group Sp. z o.o.
ul. A. Kręglewskiego 1, 61-248 Poznanė, Lenkija
JSPĖJIMAS! DĖL SPORTINIO VEŽIMĖLIO SVARBU - ATIDŽIAI PERSKAITYKITE IR SAUGOKITE, KAD VĖLIAU GALĖTUMĖTE PASISKAITYTI
BrandLine Group Sp. z o.o.
BrandLine Group Sp. z o.o.
Detailed warranty conditions are available on the website:
Thank you for purchasing our product

- Dear customer!
- Producer:
- IMPORTANT - READ CAREFULLY AND KEEP FOR FUTURE REFERENCE
- WARNING! FOR CARRYCOT (APPLIES TO 2IN1 SET): IMPORTANT – Before you start using the product, please carefully read this manual and keep for future reference
- Stroller parts list (fig. A, B)
- Carrycot parts list (fig. C, D, E) - applies to 2in1 set
- How to assemble and disassemble stroller
- How to assemble and disassemble front wheels
- How to assemble and disassemble rear wheels
- How to adjust a handle
- How to fold stroller frame in forward-facing position
- How to fold stroller frame in a rear-facing position
- How to use a harness
- Swivel wheel lock key
- How to adjust backrest
- How to adjust footrest
- How to adjust sunshade
- How to adjust bow
- How to assemble and disassemble carrycot (applies to 2in1 set)
- How to assemble and disassemble child safety seat (applies to 3in1 set)
- How to clean and maintain
- Drogi Kliencie!
- JSPĖJIMAS! DĖL SPORTINIO VEŽIMĖLIO SVARBU - ATIDŽIAI PERSKAITYKITE IR SAUGOKITE, KAD VĖLIAU GALĖTUMĖTE PASISKAITYTI
Brand : Lionelo
Model : Riya
Category : Stroller