DigiFrame 1593 - Digital photo frame BRAUN - Free user manual and instructions
Find the device manual for free DigiFrame 1593 BRAUN in PDF.
| Product type | Digital photo frame |
| Brand | Braun |
| Model | DigiFrame 1593 |
| Screen size | 15 inches (diagonal) |
| Display resolution | 1024 x 768 pixels |
| Internal memory | 4 GB |
| Supported image formats | JPEG, BMP, PNG |
| Supported audio formats | MP3 |
| Supported video formats | MPEG1, MPEG2, MPEG3, H.264, RM, RMVB, MOV, MJPEG, DivX |
| Supported memory cards | SD, SDHC, MMC |
| Connectivity | USB 2.0 (host and OTG), HDMI-IN |
| Speakers | Built-in stereo |
| Headphone jack | Yes |
| Motion sensor | Yes |
| Special features | Slideshow with music, USB to SD copy, clock, scheduled on/off, brightness/contrast/saturation adjustment, subtitle display |
| OSD languages | English and other languages |
| Power supply | Power adapter (5 V, 2 A) |
| Dimensions (approx.) | 39 x 27 x 4 cm |
| Weight (approx.) | 1.5 kg |
| Supplied accessories | USB cable, power adapter, user manual |
| Maintenance and cleaning | Clean with a soft, dry cloth. Do not use abrasive products. |
| Safety | Use only the supplied adapter. Do not expose to moisture or extreme temperatures. |
| Spare parts and repairability | Contact Braun technical service. No user-serviceable parts. |
Frequently Asked Questions - DigiFrame 1593 BRAUN
User questions about DigiFrame 1593 BRAUN
0 question about this device. Answer the ones you know or ask your own.
Ask a new question about this device
Download the instructions for your Digital photo frame in PDF format for free! Find your manual DigiFrame 1593 - BRAUN and take your electronic device back in hand. On this page are published all the documents necessary for the use of your device. DigiFrame 1593 by BRAUN.
USER MANUAL DigiFrame 1593 BRAUN
natural_image
Black tablet displaying a scenic coastal view with white-tinted buildings overlooking a blue sea under a partly cloudy sky (no text or symbols visible)text_image
08:20 Tuesday 05, January Phototext_image
Pass Play Prev Next Stop Playlist Zoom in Zoom outtext_image
Robbie Williams - Better Man. mp3 Album: Sing When You're Winning Title: Better man Artist: Robbie Williams Bit Rate: 192 K Sampling: 44K Richard Marx - Right Robbie Williams - Bett. 00:00:01 / 00:04:44 Play FB FF Prev Next Stop Playlist Matetext_image
Pause Reception is sweet 00:00:11 / 00:04:06 Play FB FF Prev Next Stop PlayBstnatural_image
Illustration of a desktop computer connected to a tower, showing monitor and tower (no text or symbols)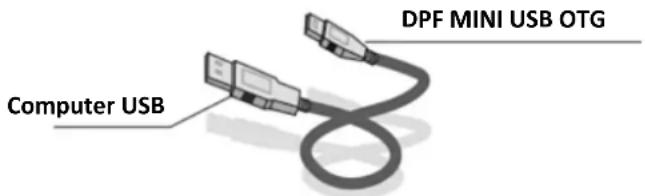
text_image
DPF MINI USB OTG Computer USBtext_image
Input Source AV1 HDMI Card Select OK Select EXIT Returntext_image
Setting OSD Language English Brightness 05 Contract 05 Saturation 05 Start Up Mode Video Auto Copy Off Version 2016 Software Update ... Restore Default Move OK Select EXIT Returnnatural_image
A tablet displaying a scenic coastal view with white-tinted buildings overlooking a blue sea under a partly cloudy sky.BRAUN 15" DigiFrame 1593 4GB User Manual
BRAUN PHOTO TECHNIK GMBH, Merkurstr. 8, 72184 Eutingen, Germany
Features:
- Supports image formats: JPEG, BMP, PNG
- Supports audio format: MP3
- Supports video formats: MPEG1, MPEG2, MPEG3, H264, RM, RMVB, MOV, MJPEG, DivX
- Supports memory cards: SD/SDHC/MMC
- Built-in 4GB memory
- Built-in motion sensor
- Built-in stereo speaker and earphone jack
- USB connection: USB 2.0
- HDMI interface: supports HDMI-IN function
- Slideshow with background music
- Supports scrolling subtitles when playing photos, music, movies
- Supports standby mode
- Built-in clock, auto on/off
- Adjustable brightness, contrast, saturation
- Supports file copy from USB to SD card
- Support copy/delete files to built-in memory by connecting to computer
- OSD languages: English and other languages selectable
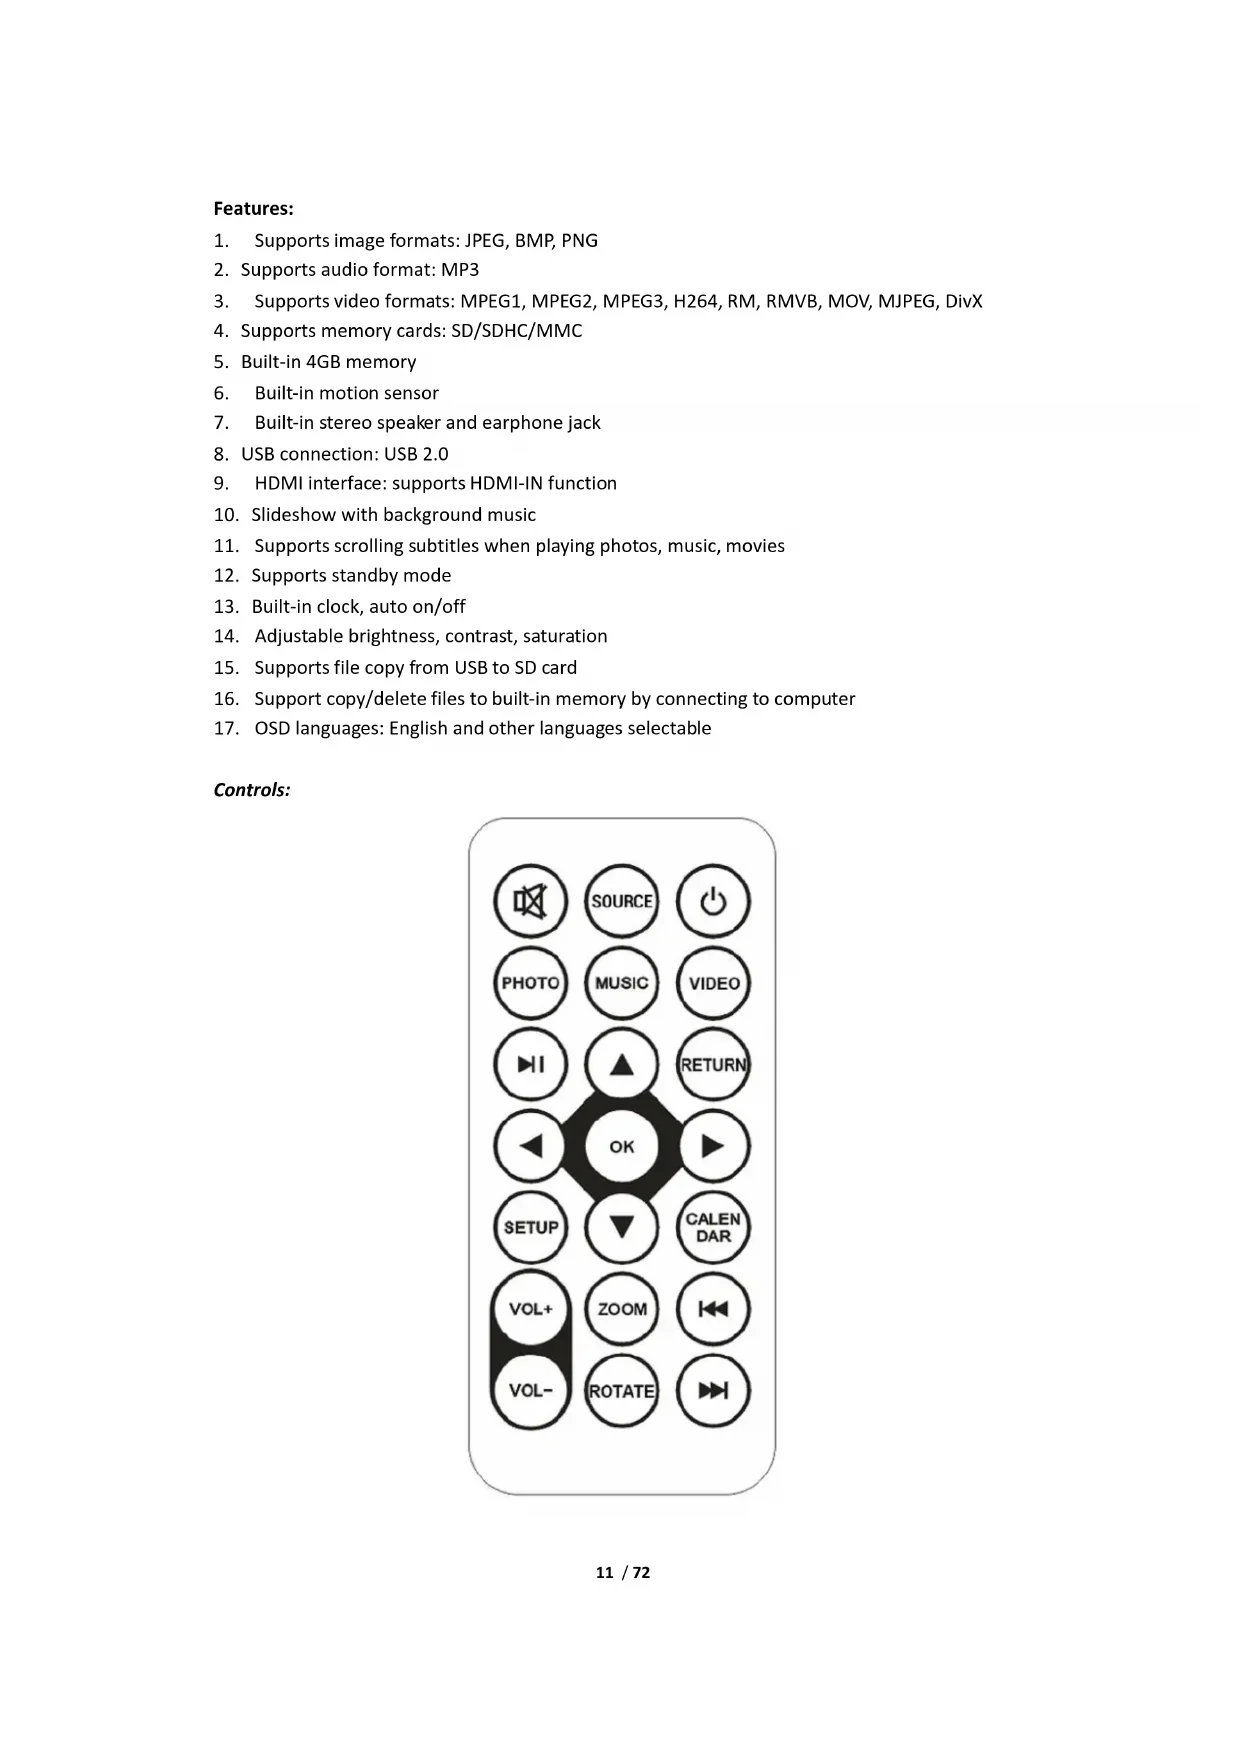
Controls:
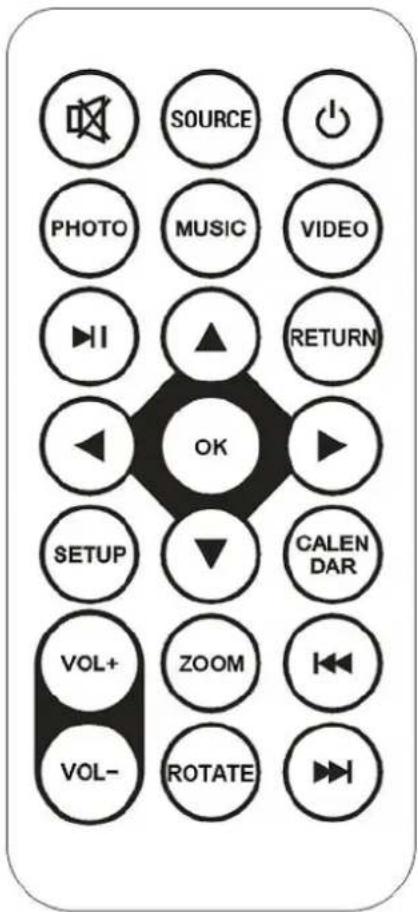
text_image
SOURCE PHOTO MUSIC VIDEO RETURN OK SETUP CALENDAR VOL+ ZOOM VOL- ROTATE| POWER | Switch on/off. |
| MUTE | Mute |
| SOURCE | Signal input HDMI/AV/DMP |
| PHOTO | Photo playback mode directly |
| MUSIC | Music playback mode directly |
| VIDEO | Video-playback mode directly |
| ▶|| | Play or pause |
| RETURN | Back to previous screen |
| ▲▼◀▶ | Move up/down/left/right cursor keys. |
| OK | Confirmation |
| SETUP | Setup menu |
| CALENDAR | Calendar function directly |
| VOL+ VOL- | Volume adjustment |
| ZOOM | Enlarge the photo in photo play mode |
| ROTATE | Rotate the photo in photo play mode |
| |◀◀ ▶▶| | Select previous or next file |
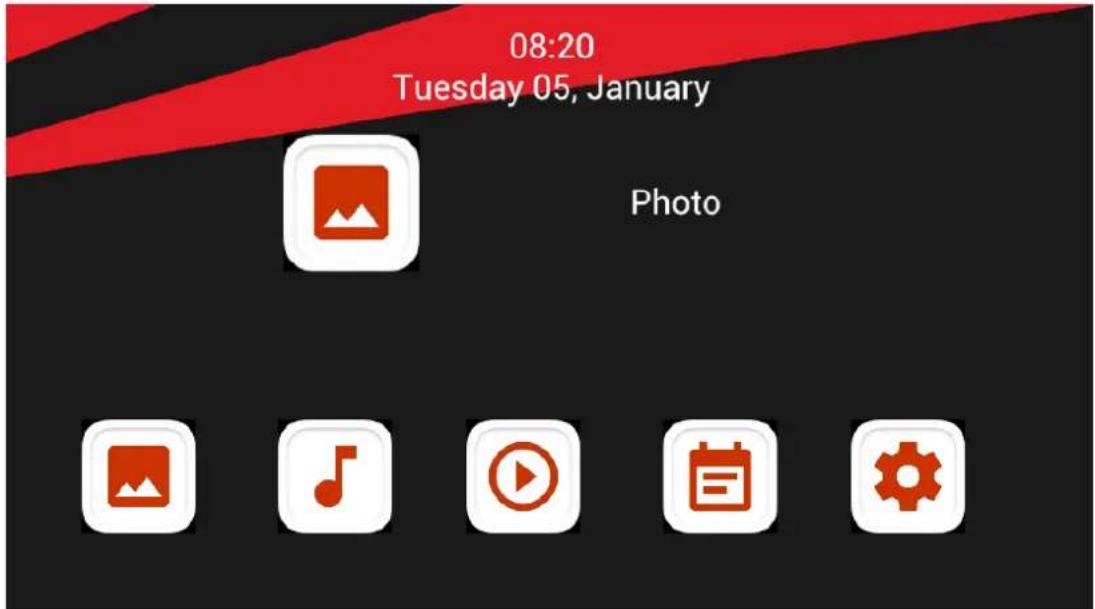
Main Menu:
Supports SD/SDHC/MMC and USB 2.0. Press to access photo, music, video, calendar and settings menus. Press OK button to confirm selection.
text_image
08:20 Tuesday 05, January PhotoNote: Make sure there are supported picture, music or video files on the memory card or USB device.
Picture Mode:
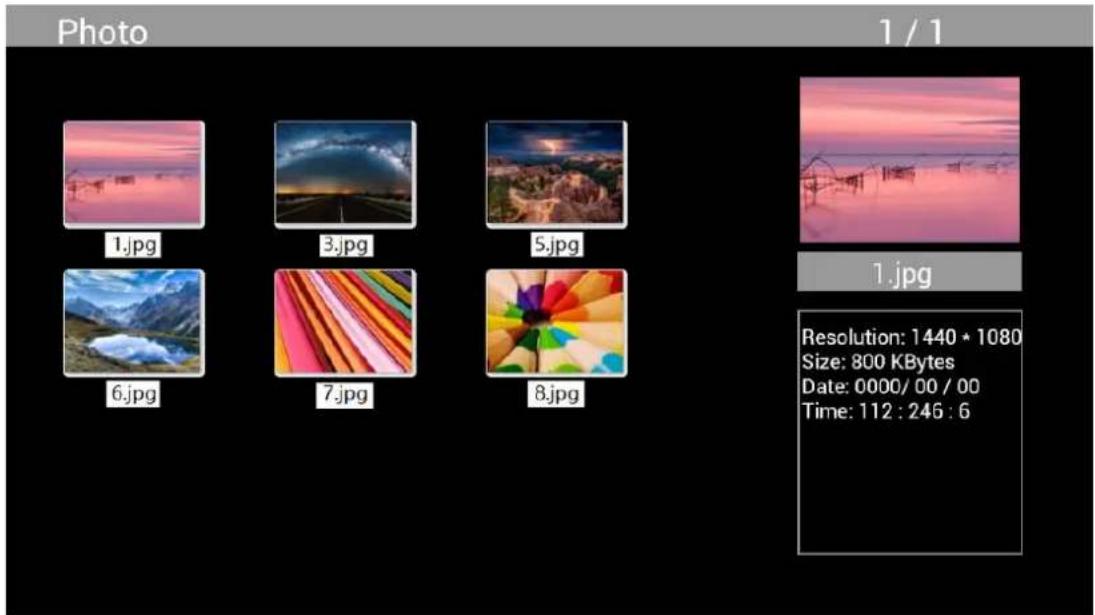
text_image
Photo 1 / 1 1.jpg 3.jpg 5.jpg 6.jpg 7.jpg 8.jpg 1.jpg Resolution: 1440 * 1080 Size: 800 KBytes Date: 0000/ 00 / 00 Time: 112 : 246 : 6Highlight Photo from the main menu, press OK to select the USB or memory card for playback and press RETURN to access thumbnail mode. Press to select the photo for playback and press OK to confirm.
text_image
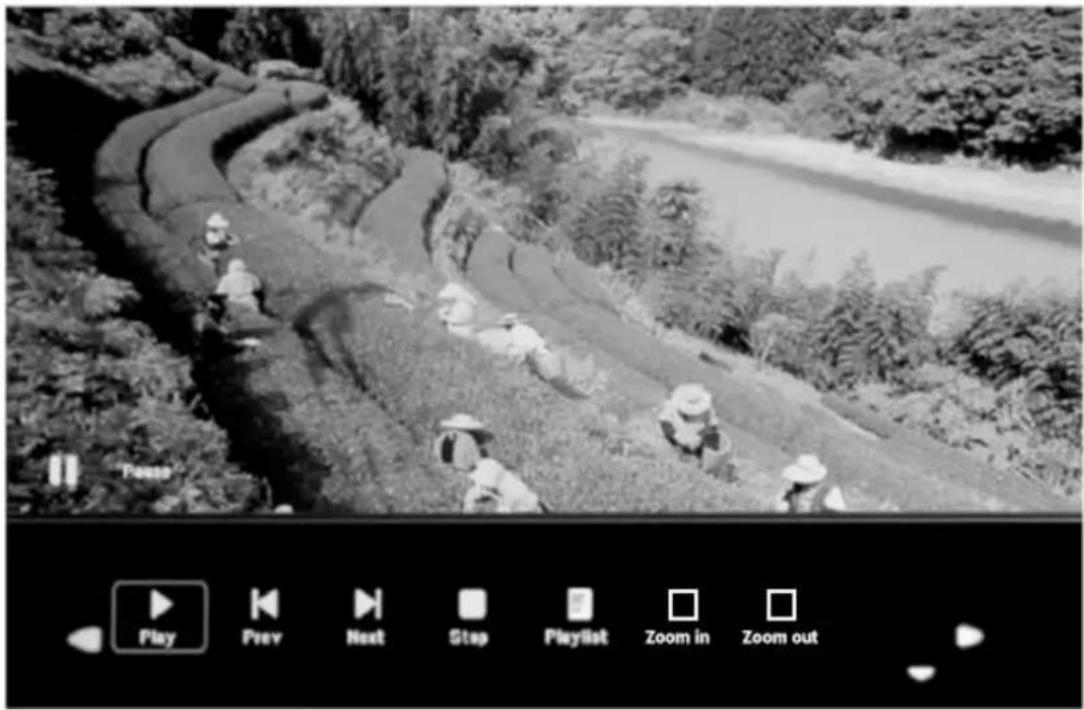
Pass Play Prev Next Stop Playlist Zoom in Zoom outDuring photo playback, press OK to display the on-screen controls and select the desired function with ◀▶: Play, Previous, Next, Stop, Playlist, Zoom in, Zoom out, Move, then press OK to confirm.
Music Mode
Highlight Music from the main menu, press OK to select the USB 2.0 or memory card for playback and press RETURN to access thumbnail mode. Press to select the music for playback and press OK to confirm.
Music Playback:
During music playback, press OK to display the on-screen controls and select the desired function with : Play, Fast Rewind, Fast Forward, Previous, Next, Stop, Mute, Playlist, then press OK to confirm.
Video Mode
text_image
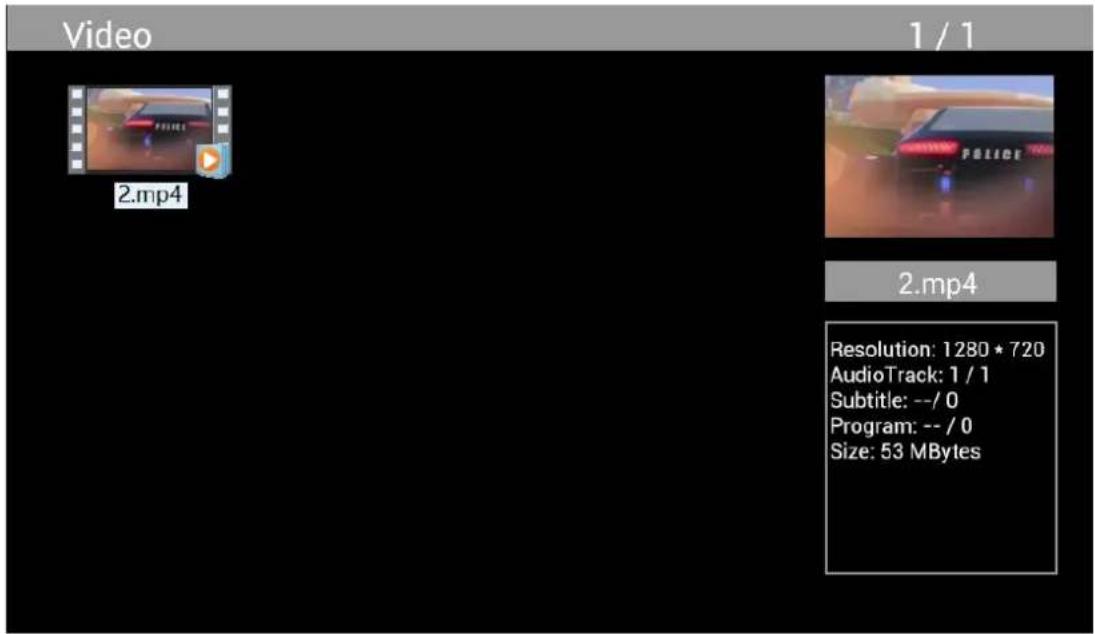
Video 1 / 1 2.mp4 2.mp4 Resolution: 1280 * 720 AudioTrack: 1 / 1 Subtitle: -- / 0 Program: -- / 0 Size: 53 MBytesHighlight Video from the main menu, press OK to select USB 2.0 or memory card for playback and press RETURN again to access thumbnail mode. Press ▲▼◀▶ to select the movie for playback and press OK to confirm.
Video Playback:
text_image
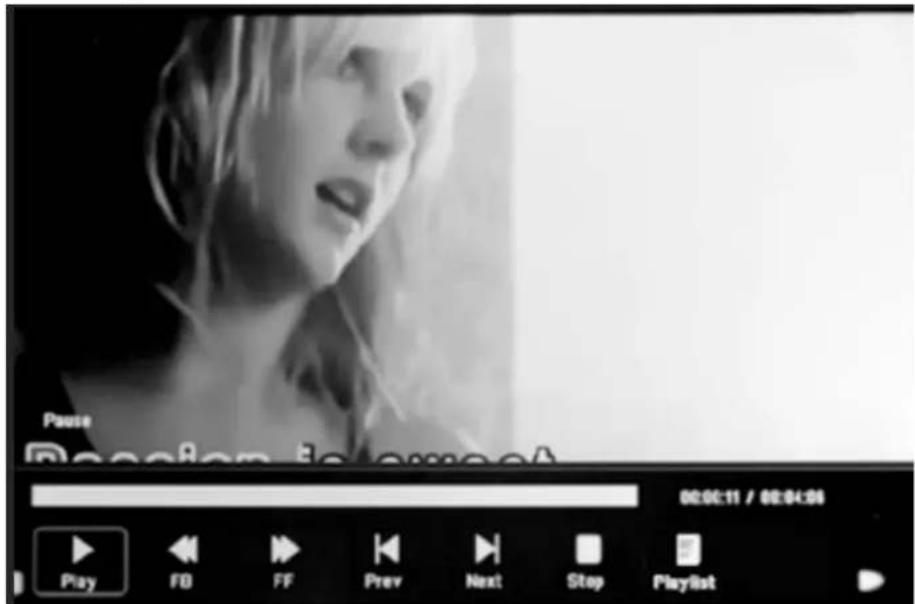
Pause Reception is sweet 00:00:11 / 00:04:06 Play FD FF Prev Next Stop PlaylistDuring video playback, press OK to display the on-screen controls and select the desired function with ◀▶: Play, Fast Rewind, Fast Forward, Previous, Next, Stop, Playlist, Aspect then press OK to confirm.
Copy Function for Image, Music and Video Files:
bar
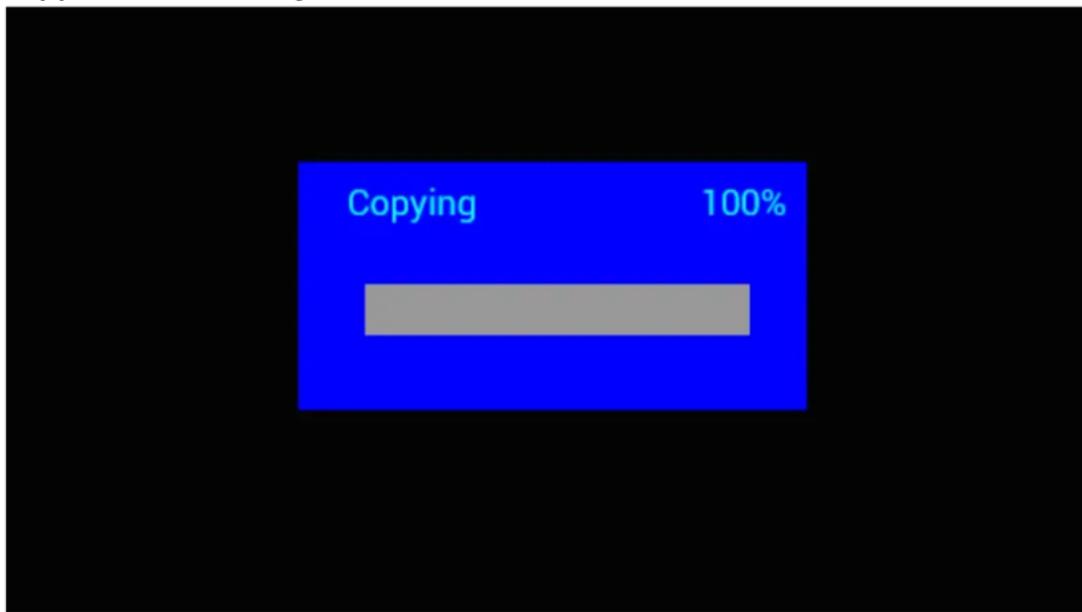
| Category | Value (%) | |---|---| | Copying | 100 |Copying all files from USB device to SD Card is supported. Highlight Setting and press OK to Settings menu, press ◀▶ to select Setting option, press ▲▼ to select and set the Auto Copy in the list, and set the value to On. The progress is displayed.
After successfully copying all files, the slideshow will start automatically.
Note: Make sure the photo/music/videos files are saved in the root directory of the USB device, not in any folder of the USB. Otherwise copying will fail.
PC Connection:
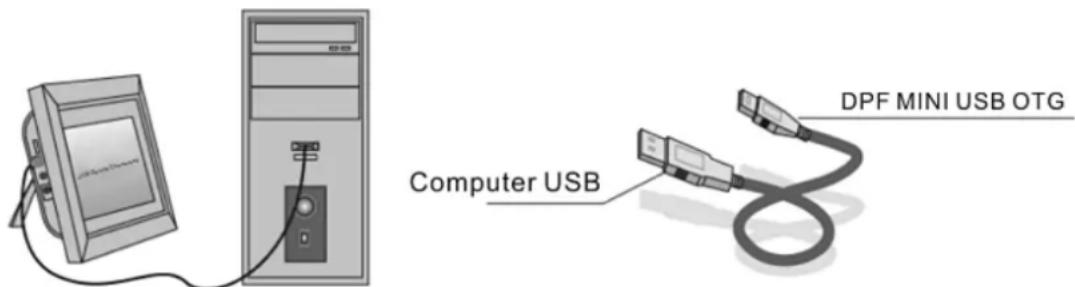
text_image
Computer USB DPF MINI USB OTGYou can connect the unit to external equipment using USB Cable for file copying, deleting and editing operations.
A. Turn on the digital photo frame, connect it with your Windows2000/XP/Vista/WIN7 PC using a USB cable
B. The unit will be detected automatically and a "Connecting" icon will be displayed. You can then copy, delete, or edit files in the built-in memory or other storage devices. You need to restart the digital photo frame after you finished copying, deleting, editing or inserting a memory card.
Calendar:
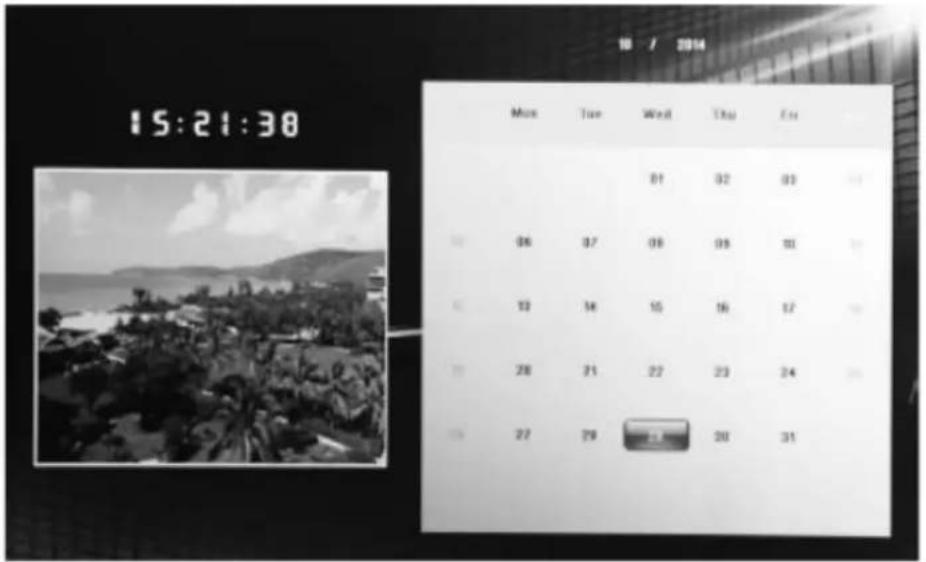
text_image
15:21:30 Mon Tue Wed Thu Fri 06 07 08 09 10 11 12 13 14 15 16 17 18 28 29 30 31 27 28 29 30 31Press the Calendar menu from the main menu. Browse the calendar with ▲▼◀▶.
HDMI-IN Function:

text_image
Input Source AV1 HDMI Card Select OK Select EXIT ReturnConnect the HDMI device at the HDMI-IN interface of the digital picture frame. Press SOURCE, press ▲▼ to highlight the HDMI option, and press OK to select HDMI as input source.
Setup Menu
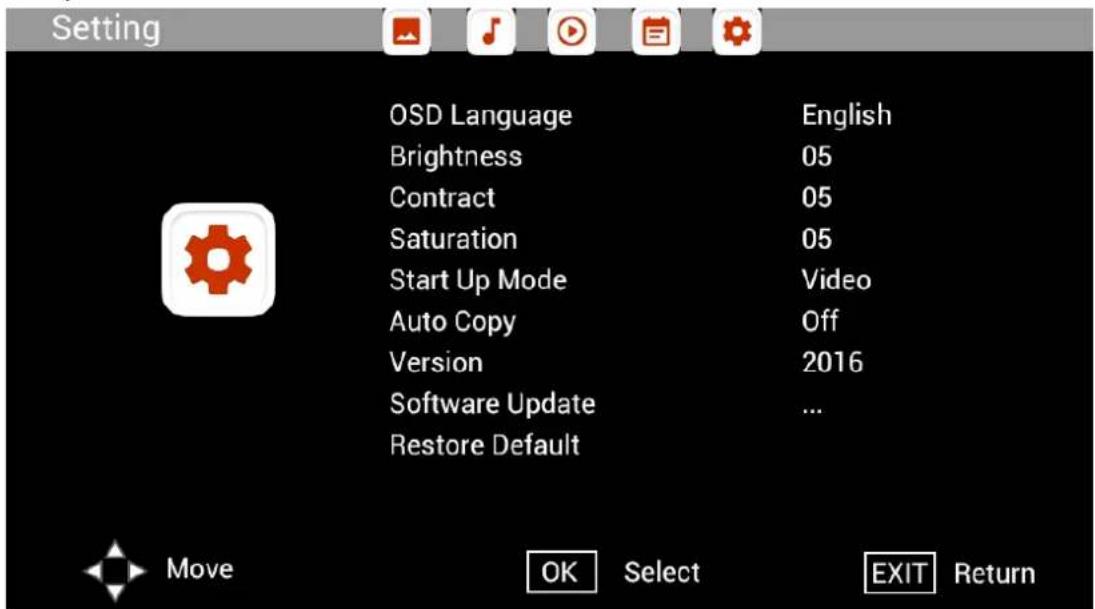
text_image
Setting OSD Language English Brightness 05 Contract 05 Saturation 05 Start Up Mode Video Auto Copy Off Version 2016 Software Update ... Restore Default Move OK Select EXIT ReturnSelect Setting in the main menu, press ◀ to select sub-menu Setup list: Photo, Music, Video,
Calendar, Setting, press ▲▼ to highlight the setting option, and press ◀▶ to set the Value.
Technical Support
We are committed to providing the best customer service support. If you need assistance with your BRAUN product, please contact the BRAUN Technical Support department prior to returning this device. Reach out to us in any of the following ways:
This device has been tested and found to comply with the limits for a digital device according to the CE regulations. These limits are intended to provide reasonable protection against harmful interference in home installations. The declaration of conformity is available on our homepage.
natural_image
A digital tablet displaying a scenic coastal view with white-tiled roofs overlooking a blue sea under a partly cloudy sky.text_image
08:20 Tuesday 05, January Phototext_image
Play Prev Next Stop Playlist Zoom in Zoom outtext_image
Robbie Williams - Better Man. mp3 Album: Sing When You're Winning Title: Better man Artist: Robbie Williams Bit Rate: 192 K Sampling: 44K Richard Marx - Right Robbie Williams - Bett. 00:00:01 / 00:04:44 Play FB FF Prev Next Stop Playlist Matetext_image
Pause Reception is sweet 00:00:11 / 00:04:06 Play FD FF Prev Next Stop Playlistnatural_image
Illustration of a desktop computer connected to a monitor, showing cable and drive (no text or symbols)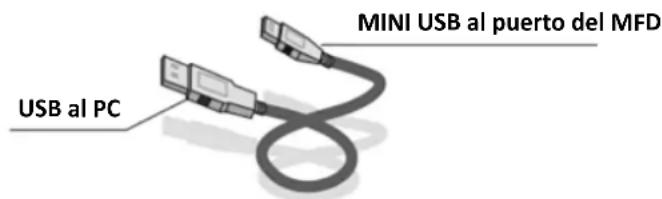
text_image
MINI USB al puerto del MFD USB al PCtext_image
Input Source AV1 HDMI Card Select OK Select EXIT Returntext_image
Setting OSD Language English Brightness 05 Contract 05 Saturation 05 Start Up Mode Video Auto Copy Off Version 2016 Software Update ... Restore Default Move OK Select EXIT Returnnatural_image
Black tablet displaying a scenic coastal view with white-tinted buildings overlooking a blue sea under a partly cloudy sky (no text or symbols visible)text_image
08:20 Tuesday 05, January Phototext_image
Pass Play Prev Next Stop Playlist Zoom in Zoom outtext_image
Robbie Williams - Better Man. mp3 Album: Sing When You're Winning Title: Better man Artist: Robbie Williams Bit Rate: 192 K Sampling: 44K Richard Marx - Right Robbie Williams - Bett. 00:00:01 / 00:04:44 Play FB FF Prev Next Stop Playlist Matetext_image
Pause Reception is sweet 00:00:11 / 00:04:06 Play FB FF Prev Next Stop PlayRstnatural_image
Illustration of a desktop computer connected to a tower, showing cable and drive (no text or symbols)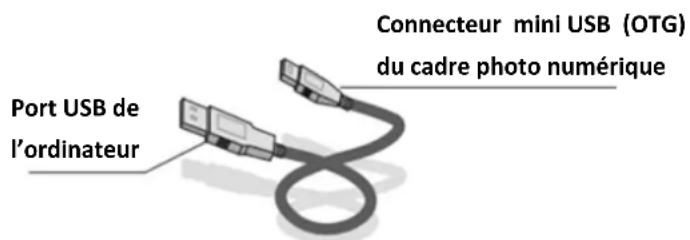
text_image
Input Source AV1 HDMI Card Select OK Select EXIT Returntext_image
Setting OSD Language English Brightness 05 Contract 05 Saturation 05 Start Up Mode Video Auto Copy Off Version 2016 Software Update ... Restore Default Move OK Select EXIT ReturnAssistance technique
Explication CE regulations
natural_image
Black tablet displaying a scenic coastal view with white-tinted buildings overlooking a blue sea under a partly cloudy sky (no text or symbols visible)text_image
08:20 Tuesday 05, January Phototext_image
Play Prev Next Stop Playlist Zoom in Zoom outtext_image
Robbie Williams - Better Man. mp3 Album: Sing When You're Winning Title: Better man Artist: Robbie Williams Bit Rate: 192 K Sampling: 44K Richard Marx - Right Robbie Williams - Bett. 00:00:01 / 00:00:44 Play FB FF Prev Next Stop Playlist Mutetext_image
Pause Reception is sweet 00:00:11 / 00:04:06 Play FB FF Prev Next Stop Play/Softnatural_image
Illustration of a computer monitor connected to a tower tower via cable (no text or symbols visible)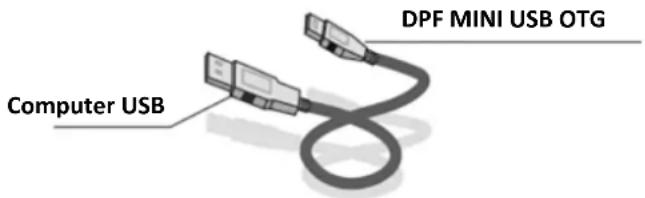
text_image
DPF MINI USB OTG Computer USBtext_image
Input Source AV1 HDMI Card Select OK Select EXIT Returntext_image
Setting OSD Language English Brightness 05 Contract 05 Saturation 05 Start Up Mode Video Auto Copy Off Version 2016 Software Update ... Restore Default Move OK Select EXIT Returnnatural_image
Black tablet displaying a scenic coastal view with white-tinted buildings overlooking a blue sea under a partly cloudy sky (no text or symbols visible)BRAUN 15" DigiFrame 1593 4GB Gebruikshandleiding
BRAUN PHOTO TECHNIK GMBH, Merkurstr. 8, 72184 Eutingen, Duitsland
Eigenschappen:
text_image
08:20 Tuesday 05, January Phototext_image
Play Prev Next Stop Playlist Zoom in Zoom outtext_image
Robbie Williams - Better Man. mp3 Album: Sing When You're Winning Title: Better man Artist: Robbie Williams Bit Rate: 192 K Sampling: 44K Richard Marx - Right Robbie Williams - Bett. 00:00:01 / 00:04:44 Play FB FF Prev Next Stop Playlist Matetext_image
Pause Reception is sweet 00:00:11 / 00:04:06 Play FD FF Prev Next Stop Playlistnatural_image
Illustration of a desktop computer connected to a tower, showing monitor and tower (no text or symbols)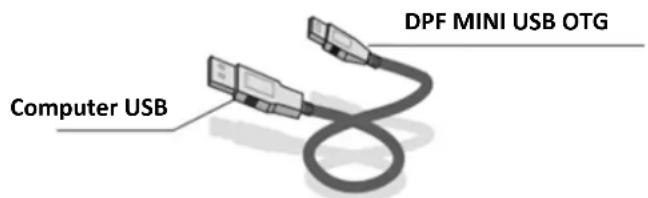
text_image
DPF MINI USB OTG Computer USBtext_image
Input Source AV1 HDMI Card Select OK Select EXIT Returntext_image
Setting OSD Language English Brightness 05 Contract 05 Saturation 05 Start Up Mode Video Auto Copy Off Version 2016 Software Update ... Restore Default Move OK Select EXIT Returnnatural_image
Black tablet displaying a scenic coastal view with white-tinted buildings overlooking a blue sea under a partly cloudy sky (no text or symbols visible)text_image
08:20 Tuesday 05, January Phototext_image
Play Prev Next Stop Playlist Zoom in Zoom outtext_image
Robbie Williams - Better Man. mp3 Album: Sing When You're Winning Title: Better man Artist: Robbie Williams Bit Rate: 192 K Sampling: 44K Richard Marx - Right Robbie Williams - Bett. 00:00:01 / 00:00:44 Play FB FF Prev Next Stop Playlist Matetext_image
Pause Reception is sweet 00:00:11 / 00:04:06 Play FB FF Prev Next Stop PlaySlttext_image
Input Source AV1 HDMI Card Select OK Select EXIT Returntext_image
Setting OSD Language English Brightness 05 Contract 05 Saturation 05 Start Up Mode Video Auto Copy Off Version 2016 Software Update ... Restore Default Move OK Select EXIT Returnnatural_image
Black tablet displaying a scenic coastal view with white-tinted buildings overlooking a blue sea under a partly cloudy sky (no text or symbols visible)BRAUN 15" DigiFrame 1593 4GB Manual do Utilizador
BRAUN PHOTO TECHNIK GMBH, Merkurstr. 8, 72184 Eutingen, Alemanha