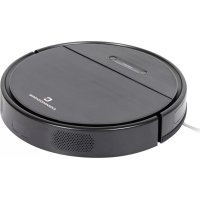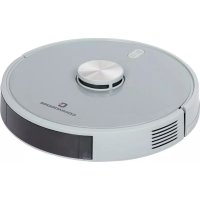
CVR 300 - Vacuum Cleaner Commodore - Free user manual and instructions
Find the device manual for free CVR 300 Commodore in PDF.


User questions about CVR 300 Commodore
0 question about this device. Answer the ones you know or ask your own.
Ask a new question about this device
Download the instructions for your Vacuum Cleaner in PDF format for free! Find your manual CVR 300 - Commodore and take your electronic device back in hand. On this page are published all the documents necessary for the use of your device. CVR 300 by Commodore.
USER MANUAL CVR 300 Commodore
natural_image
Top-down view of a circular vacuum cleaner with 'COMMODORE' branding, set against a pixelated grid background (no readable text or symbols on the device itself)natural_image
Line drawing of a robotic vacuum cleaner with a circular housing and handle (no text or symbols)natural_image
Line drawing of a portable electronic device with ports and a speaker (no text or symbols)natural_image
Line drawing of a robotic vacuum cleaner with a close-up view of its internal components (no text or symbols)Inbetriebnahme
natural_image
Technical line drawing of a mechanical component with two views: top shows a flanged part, bottom shows a curved housing with mounting holes (no text or symbols)natural_image
Technical line drawing of a robotic vacuum cleaner with a side view showing internal components (no text or symbols)
ACHTUNG!

text_image
>0.5m >1.5m >0.5mnatural_image
Technical line drawing of a mechanical component with two circular features and a belt drive mechanism (no text or symbols)natural_image
Interior layout diagrams showing a living room with furniture and furniture, no text or symbols presentnatural_image
Two technical line drawings of a balcony structure, one showing a staircase and the other a circular base with a checkmark (no text or symbols)
HINWEIS!

text_image
Diagram showing a remote control device next to a digital display and a rectangular device with directional arrows indicating motion or signal flow.Rückkehr
text_image
Diagram showing a remote control device connected to a smart lock with a home icon and signal arrows
HINWEIS!

natural_image
Cross-sectional diagram of a mechanical device showing internal components and housing (no text or labels)text_image
Anti-Fall-Sensorennatural_image
Line drawing of a robotic vacuum cleaner with a circular top and side-mounted sensors, showing rotational motion (no text or symbols)natural_image
Line drawing of a robotic device pouring liquid into a bowl (no text or symbols)natural_image
Line drawing of a printer or printer with a paper sheet and cover, no text or symbols presentnatural_image
Line drawing of a robotic vacuum cleaner with a circular top and attached base (no text or symbols)natural_image
Technical line drawing of a vacuum cleaner with a circular housing and a separate view showing the internal components (no text or symbols)natural_image
Technical line drawing of a device housing and interior panel (no text or symbols)natural_image
Technical line drawings of a portable device and a container with granular material (no text or symbols)natural_image
Illustration of a hand using a tool to adjust or install a mechanical component (no text or symbols visible)natural_image
Line drawing of a printer with control panel and paper feed (no text or symbols)natural_image
Technical line drawing of a circular device with internal components and a knob (no text or symbols)text_image
Diagram showing two crossed bins with a black rectangular block below, likely indicating no waste or non-renewable classification.natural_image
Top-down view of a circular vacuum cleaner with 'COMMODORE' branding, set against a pixelated grid background (no readable text or symbols on the device itself)ORIGINAL INSTRUCTION MANUAL
Content
Technical specifications..42
Introduction...43.
Legend of symbols ..43
Intended use..44.
Important safety information...45
Description of parts...49
Starting up the robot vacuum cleaner..54.
Cleaning modes..62
Handling the Battery...65.
Cleaning, maintenance and storage...67.
Troubleshooting...73.
Warranty...75
Instructions for disposal....78
Declaration of conformity/certificates....78
Notes....79
Technical specifications
| CVR 300 robot vacuum cleaner | |
| Power: | 40 Watts |
| Battery: | 14.4 V 5.2 Ah lithium ion |
| Battery operating duration: | Max. 200 minutes * |
| Charge time: | Approx. 5 hours |
| Maximum suction capacity: | 2.6 kPa |
| Weight: | 1,400 kg |
| Product size: | ∅ 35 x 9.45 cm |
| Charging station/power supply | |
| Manufacturer: | Debom Technology Co., LtdNo.502,Building6,8 Dongzhou Road,Chashan Town,523000 Dongguan City,Guangdong province, China |
| Model: | DBS036A-2001800G |
| Supply voltage: | 100 - 240 V |
| Output Voltage: | 20 V |
| Output current: | 1.8A |
| Output power: | 36 W |
| Average operational efficiency: | 87.4 % |
| Efficiency at low load (10 %): | 78.3 % |
| Power consumption at zero load: | 0.1 W |
| Remote control: | |
| Batteries: | 2 x 1.5 V AAA (not included in scope of delivery) |
*Guide values, depending on the operating mode, temperature and ground conditions
Introduction
Thank you for purchasing the CVR 300 robot vacuum cleaner!
Please read this instruction manual carefully before starting to use the robot vacuum cleaner and make sure that it is used properly and in accordance with the instructions.
Retain this instruction manual for future reference. Only pass the robot vacuum cleaner on to third parties together with this instruction manual.
The manufacturer reserves the right to make changes to the product.
The instruction manual and the illustrations in it may differ depending on the model.
We hope you enjoy using the CVR 300 robot vacuum cleaner!
Legend of symbols

WARNING!

Contains important information to avoid injuries.

CAUTION!

Contains important information to prevent damage to the product.

NOTE!

Points out important information and notes to you when reading the instruction manual.
Intended use
- The robot vacuum cleaner is exclusively designed for vacuuming dust, dirt, crumbs, etc. The robot vacuum cleaner is not suitable for absorbing liquids, very coarse dirt, glass splinters, flammable substances or hot ash.
- The robot vacuum cleaner is designed for use on hard floors (e.g., firm carpeting). Its performance is severely limited when used on soft surfaces (e.g., deep-pile carpets).
- The robot vacuum cleaner has a wiping function for use on suitable, smooth floor coverings.
- The robot vacuum cleaner is exclusively intended for private use in dry interiors and is not suitable for commercial use.
- Only use the robot vacuum cleaner as described in this instruction manual.
- Any other use is considered non-intended and may result in damage to property or even in injury to persons.
- The robot vacuum cleaner is not a toy for children.
- The manufacturer or distributor accepts no liability for damage caused by unintended or improper use.

WARNING!

- Please strictly adhere to the safety regulations stated in these instructions. The producer or distributor cannot be held responsible for any financial, personal or material damages, accidents or legal disputes resulting from the violation of the safety provisions. Liability is always limited to the purchase price of the robotic vacuum cleaner.
- Only connect the robot vacuum cleaner or the charging station if the mains voltage of the socket matches the information on the type plate of the mains adapter.
- Only connect the mains adapter to an easily accessible socket, so that you can quickly disconnect the robot vacuum cleaner or charging station from the mains in the event of a fault.
- Only use the included power adapter to charge the battery in the robot vacuum cleaner. If the cable or power adapter is damaged, the power adapter must be disposed of and replaced with a power adapter of the same type.
- Do not operate the robot vacuum cleaner if it or the charging station shows visible damage or if the mains adapter cable or mains adapter is defective.
- Do not use the robot vacuum cleaner outdoors.
- The robot vacuum cleaner, charging station, power adapter and power adapter cable must not be immersed in water or other liquids.
- Do not use the robot vacuum cleaner on damp floors or in places where there is a risk of the robot vacuum cleaner coming into contact with water or getting immersed in water, e.g., in the vicinity of swimming pools.

WARNING!

- Never touch the robot vacuum cleaner, charging station, mains adapter and mains adapter cable with wet hands.
- Never unplug the power adapter from the wall outlet by pulling the power adapter cable; always take hold of the power adapter itself.
- Keep the robot vacuum cleaner, the power adapter and the power adapter cable away from naked flames and hot surfaces.
Do not use the robot vacuum cleaner near a burning fireplace, for example.
- Do not bend the power adapter cable and do not place it over sharp edges.
- If you are not using the robot vacuum cleaner or want to clean it, or if a malfunction occurs, always switch off the robot vacuum cleaner and unplug the mains adapter from the socket.
- Only open the housing of the robot vacuum cleaner as described in this instruction manual. Repairs may only be carried out by a specialist workshop authorised by KSR. Liability and warranty claims are excluded if repairs are carried out independently or in the event of improper connection or incorrect operation.
- This robot vacuum cleaner can be used by children aged 8 years and above and by persons with reduced physical, sensory, or mental capabilities, or with a lack of experience and knowledge, if they are supervised or have been instructed in the safe use of the robot vacuum cleaner and understand the hazards involved.

WARNING!

- Children are not allowed to play with the robot vacuum cleaner.
- Cleaning and maintenance may be carried out by children over 8 years of age under supervision.
- Keep children under the age of 8 away from the robot vacuum cleaner, the charging station, the power adapter and the power adapter cable.
- Do not use the robot vacuum cleaner in a room where a small child is alone. The child could get hurt.
- Do not let children play with the packaging film. They can get caught in it and suffocate while playing.
- Keep a distance from the rotating brushes of the robot vacuum cleaner. Always turn it off before lifting or transporting it.
- Only operate the robot vacuum cleaner with the dust collector and filter inserted.
- Do not stand or sit on the robot vacuum cleaner.
- Keep pets away from the robot vacuum cleaner and do not let them sit or stand on the robot vacuum cleaner.
- Do not place any objects on the robot vacuum cleaner.
- Do not use the robot vacuum cleaner in places where there is an obvious "danger of falling", e.g., next to stairs, on large tables, etc.
- Make sure that the robot vacuum cleaner cannot get caught in hanging cords or curtains.
- Do not let the robot run over mains, loudspeaker or other cables.

WARNING!

- Do not use the robot vacuum cleaner to vacuum substances such as lime, cement dust, glowing ash, toner dust or very fine sand, as this could clog the filter pores.
- Do not use the robot vacuum cleaner on deep-pile carpets or carpets with fringes.
- Switch off the robot vacuum cleaner immediately if it is obviously behaving incorrectly, if unusual odours occur, or if a dangerous situation arises.
- Do not use the robot vacuum cleaner if the suction opening is blocked. Eliminate the cause (e.g., hair, dust, etc.) to ensure a smooth flow of air through the suction opening.
-
The robot vacuum cleaner should only be used or stored under the following conditions:
-
At a room temperature of 10–40°C
- Relative humidity of no more than 80 %
- No aggressive air pollution
Description of parts
Robot vacuum cleaner
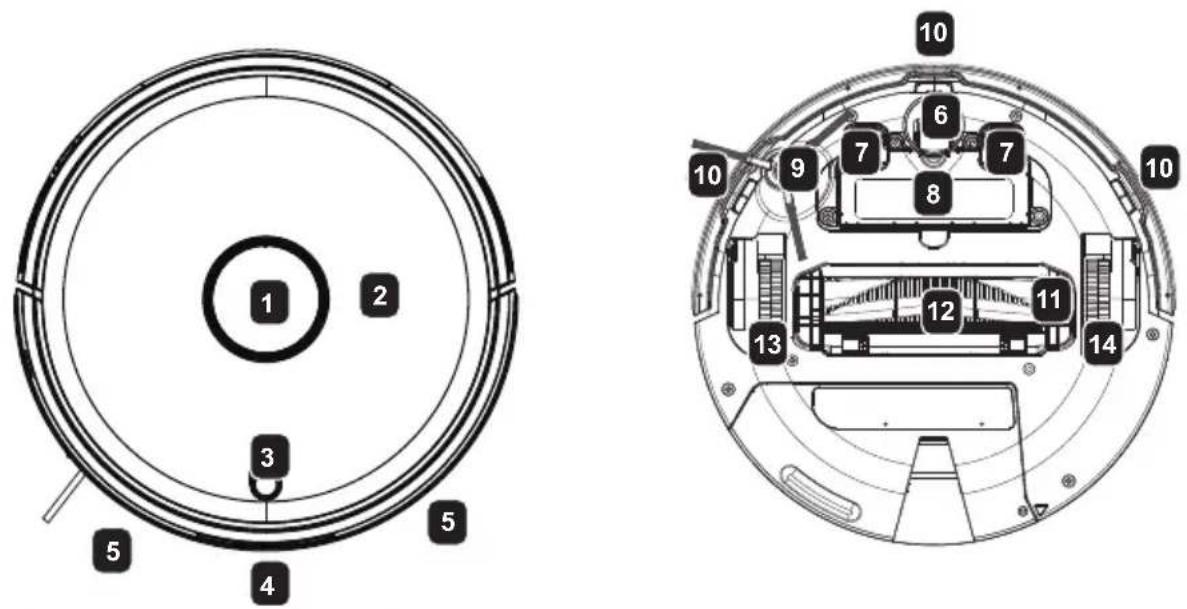
1 Laser module
2 Robot housing
3 Power button
4 Infrared sensor
5 Distance sensor
6 Front wheel
7 Charging contact
8 Battery
9 Side brush
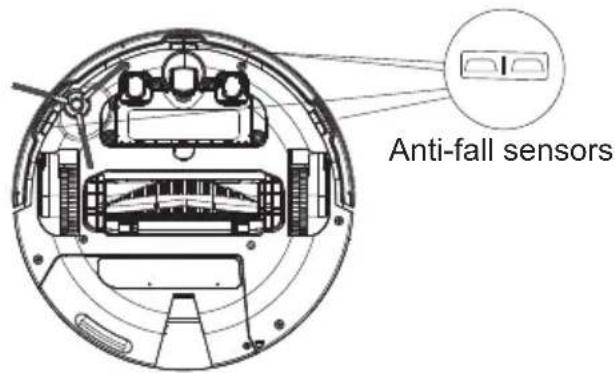
10 Anti-fall sensor
11 Brush cover
12 Combination brush
13 Left wheel
14 Right wheel
Dust collector
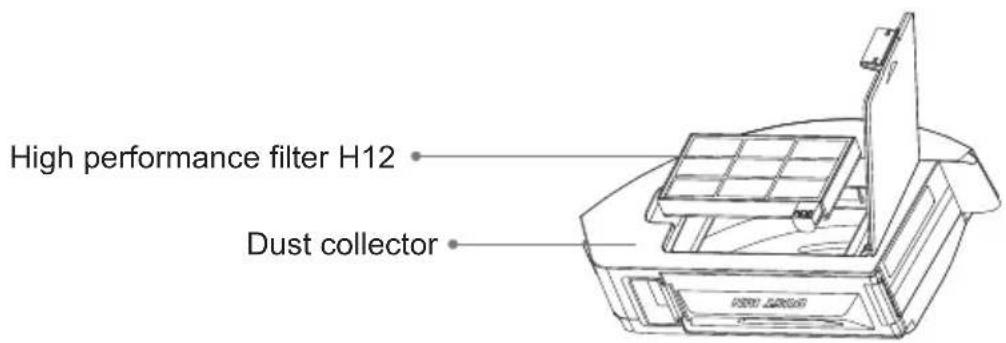
text_image
High performance filter H12 Dust collectorDescription of parts
Water tank with dust collector
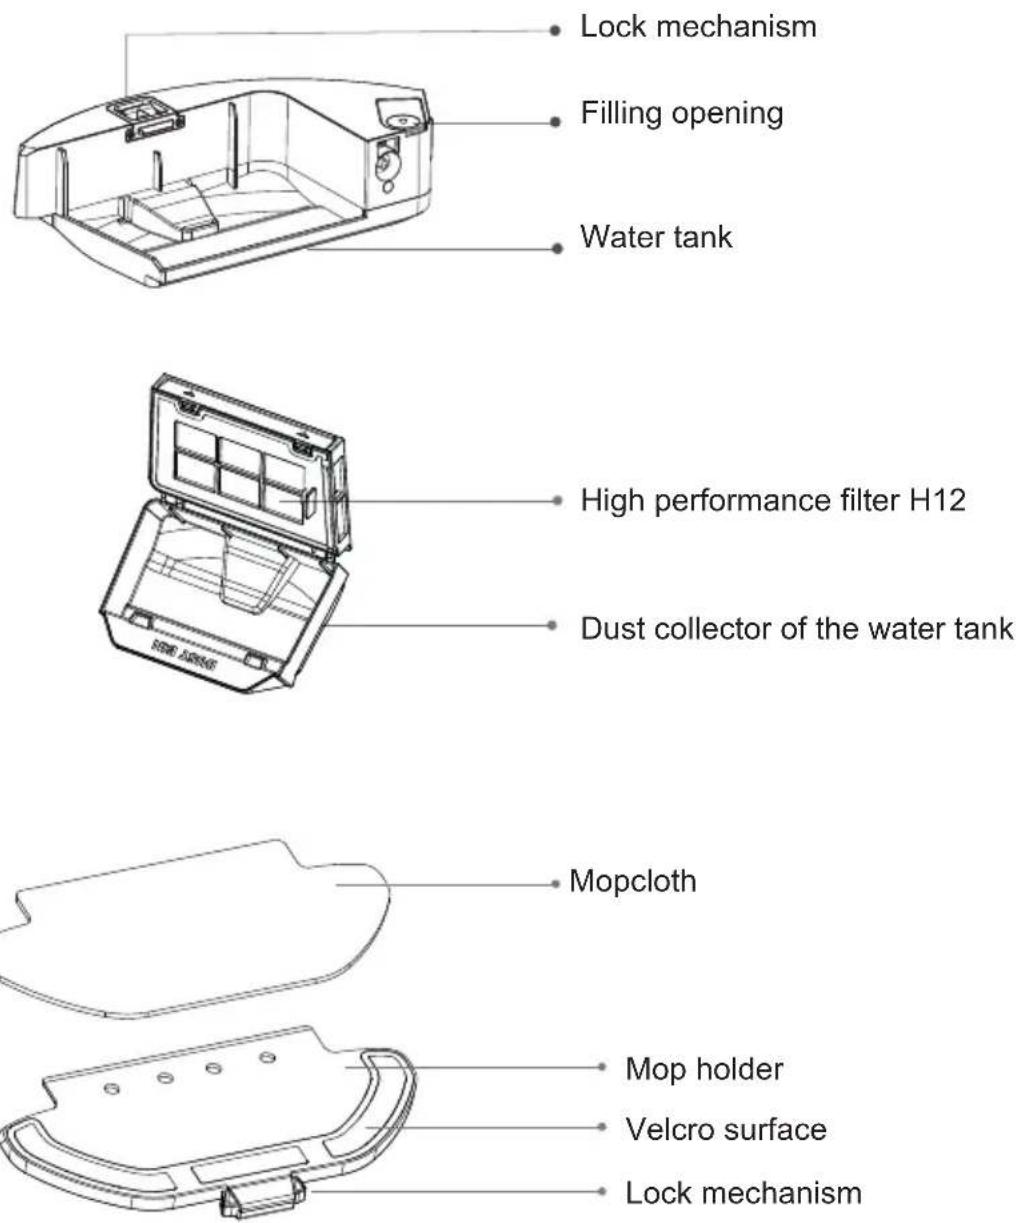
Description of parts
Charging station
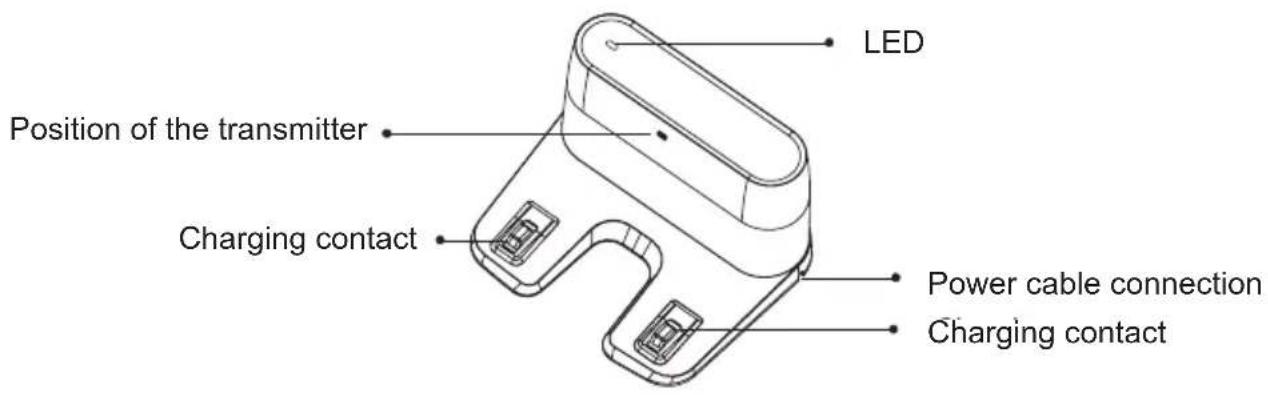
text_image
LED Position of the transmitter Charging contact Power cable connection Charging contactRemote control
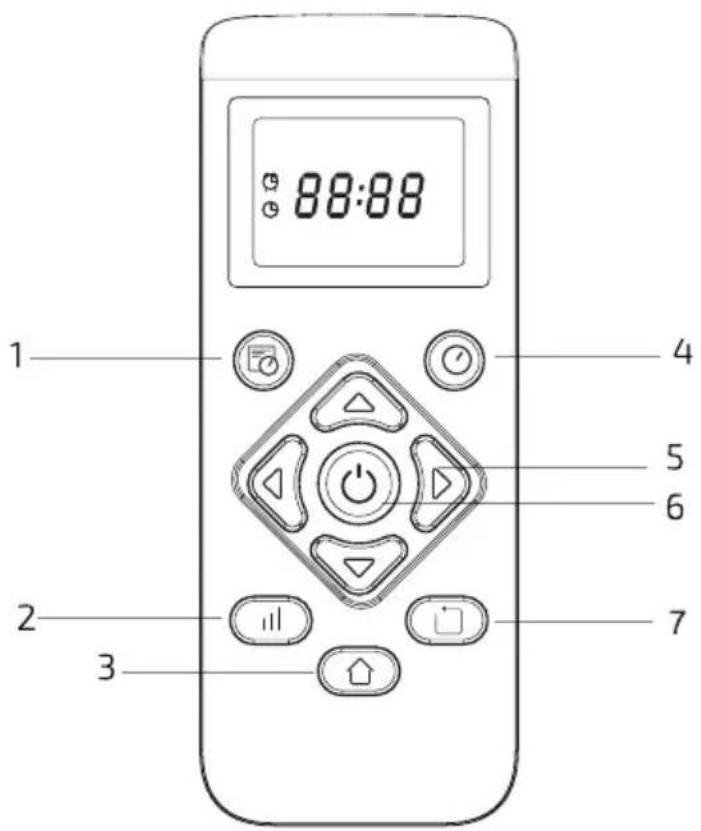
text_image
88:88 1 4 5 6 2 3 7- Scheduled time
- Power level (Eco / Normal / Turbo)
- Return button
- Time
- Manual control
- Start/pause
- Edge mode
Starting up the robot vacuum cleaner
Install the dust collector or the water tank with an integrated dust container.
• Installing the dust collector:
Insert the dust collector into the robot vacuum cleaner.
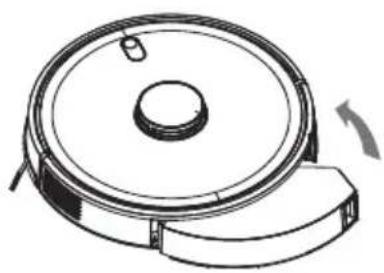
natural_image
Line drawing of a robotic vacuum cleaner with a circular housing and handle (no text or symbols)• Installing the water tank:
- Open the filling opening and fill the water tank with cold tap water.
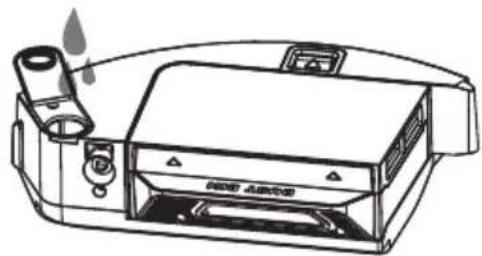
natural_image
Line drawing of a portable electronic device with ports and a speaker (no text or symbols)- Close the filling opening.
- Insert the water tank into the robot vacuum cleaner.
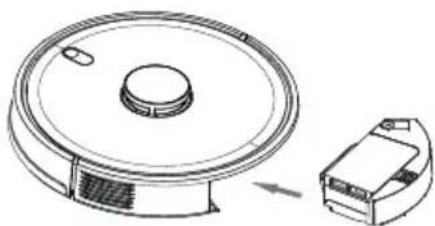
natural_image
Line drawing of a robotic vacuum cleaner with a close-up view of its internal components (no text or symbols)Starting up the robot vacuum cleaner
- Attach the mopcloth to the holder.
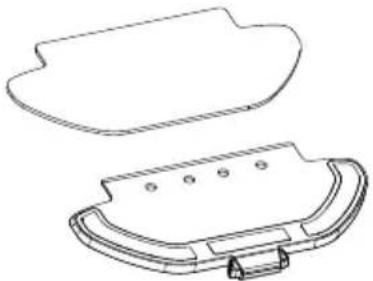
natural_image
Technical line drawing of a mechanical component with two views: top shows a flanged part, bottom shows a curved housing with mounting holes (no text or symbols)- Slide the mop holder in the direction indicated on the underside of the robot vacuum cleaner until it clicks into place.
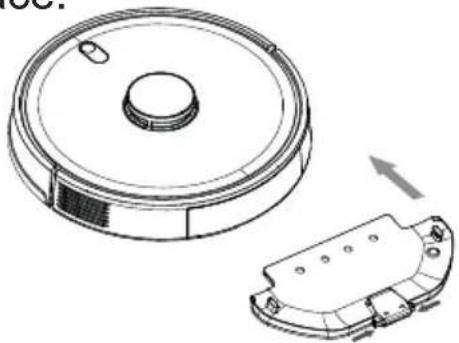
natural_image
Technical line drawing of a circular robotic vacuum cleaner with a separate open housing (no text or symbols)
CAUTION!

- Keep the outside of the water tank dry and do not immerse it in water or other liquids.
- In case of the floor being heavily soild, we recommend vac - cuming beforehand and afterwards the combined cleaning with the water tank.
- Remove the water tank and always remove the wiper holder before charging the robot vacuum cleaner.
- Do not use the mopping function on carpets.
- Never leave the robot vacuum cleaner unattended with the water tank inserted.
• Always keep the robot vacuum cleaner moving when in mopping mode to avoid water residues on the floor.
Starting up the robot vacuum cleaner
Charging the battery
Before using the robot vacuum cleaner for the first time, it must be fully charged:
- Place the charging station against a wall.
- Remove all obstacles within 0.5 m to the sides and 1.5 m in front of the charging station.

text_image
>0.5m >1.5m >0.5m- Connect the cable of the power adapter to the charging station. Stow any excess cable in the compartment on the underside of the charging station.
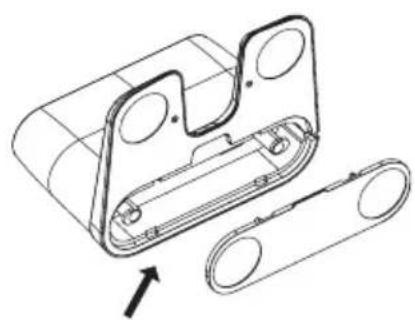
natural_image
Technical line drawing of a mechanical component with two circular features and a belt drive mechanism (no text or symbols)- Connect the power adapter to a suitable wall socket (100 – 240 V \~ 50 – 60 Hz). The LED on the charging station will light up.
Starting up the robot vacuum cleaner
- Press the power button for approx. 3 seconds.
- Place the robot vacuum cleaner in front of the charging station.
- Press the return button; the robot vacuum cleaner will automatically drive to the charging station.

text_image
During the charging process, the light on the power buttonDuring the charging process, the light on the power button ⏻ will slowly pulse in yellow.

text_image
i NOTE! i- You can also place the robot vacuum cleaner directly on the charging station after switching it on.
Starting up the robot vacuum cleaner
Status display
You can see the current status of the robot vacuum cleaner by pressing the power button ⏻:
| The button will light up in white | Robot vacuum cleaner in operation |
| Button slowly pulses in yellow | The battery is charging |
| Button flashes in yellow | The battery is low/the robot vacuum cleaner is returning to the charging station |
| Button flashes in white Network | k configuration mode is active |
| Button slowly pulses in white | Robot vacuum cleaner is starting up/firmware is updating |
| Button flashes in red Fault |
Preparing the remote control
To operate the remote control, you will need 2 x 1.5 V AAA batteries (not included in the scope of delivery).
- Open and remove the battery compartment lid on the back of the remote controller.
- Place 2 x 1.5 V AAA batteries into the battery compartment.
Ensure the polarity is correct. - Replace the battery compartment lid.
If the remote control will not be used for a long time, remove the batteries.
Starting up the robot vacuum cleaner
Setting the time
- Point the remote control at the switched-on robot vacuum cleaner.
- Hold down the ⏻ button on the remote control for approx. 2 seconds until the hour display flashes.
- Use the △ and ▽ buttons to select the current time. Use the ◀ and ▶ buttons to switch between minutes and hours.
- Press the ⏻ button to save the stored time.

NOTE!

- The robot vacuum cleaner confirms that the time has been saved by emitting an acoustic signal. - To connect the remote control to the robot vacuum cleaner, proceed as follows:
-
Press the ☐ button for about 5 seconds.
-
While the connection is being established, "8888" will be shown on the display of the remote control.
-
As soon as the connection has been established, the time will be displayed again.
-
Press the ☐ button for about 5 seconds.
- While the connection is being established, "8888" will be shown on the display of the remote control.
- As soon as the connection has been established, the time will be displayed again.
- If the connection attempt fails for 30 seconds, the display will continue to show "8888".
- Make sure that the robot vacuum cleaner is switched on before you try to pair it with the remote control.
Starting up the robot vacuum cleaner
Installing the app on your smartphone
- Scan the QR code with your smartphone to go to the Commodore homepage.

- You will find the download links for the Google Play store and the Apple App Store at "commodore-home.com".
-
In addition to the conventional control options for the remote control, the following functions are also available to you with the app:
-
Location-independent control of the robot vacuum cleaner and the scheduled time
- Check and manage the environment maps created by the robot vacuum cleaner and the cleaning history
- Select the areas to be cleaned by the robot vacuum cleaner (e.g., individual rooms)
- Establish virtual exclusion zones and boundaries
- Choose between all the cleaning modes (including spot mode) and adjust the suction power
- Regulate the water consumption
- Change/deactivate the pre-programmed idle period

NOTE!

- The robot vacuum cleaner supports WiFi networks with 2.4 and 5 GHz.
- You can find detailed operating instructions for the app on the homepage.
Starting up the robot vacuum cleaner
Setting the scheduled time
- Point the remote control at the switched-on robot vacuum cleaner (main switch in position "I").
- Hold down the 📋 button on the remote control for approx. 2 seconds until the hour display flashes.
- Use the △ and ▽ buttons to select the current time. Use the ◀ and ▶ buttons to switch between minutes and hours.
- Press the ⏻ button to save the stored time.
The robot vacuum cleaner will now start automatically at the stored scheduled time if it is switched on.

NOTE!

- The robot vacuum cleaner will confirm that a scheduled time has been saved with an acoustic signal.
- To delete the scheduled time, select "00:00" as the start time. Then switch off the robot vacuum cleaner for 1 minute.
- The scheduled time can be entered either via the remote control or via the app. Please note that if you make a new entry, this will replace the previously stored scheduled time.
Starting up the robot vacuum cleaner

CAUTION!

- Before starting up the robot vacuum cleaner, remove any obstacles, e.g., power cables and small objects, from the vacuuming area. If possible, position small furniture so that the robot vacuum cleaner does not get stuck.
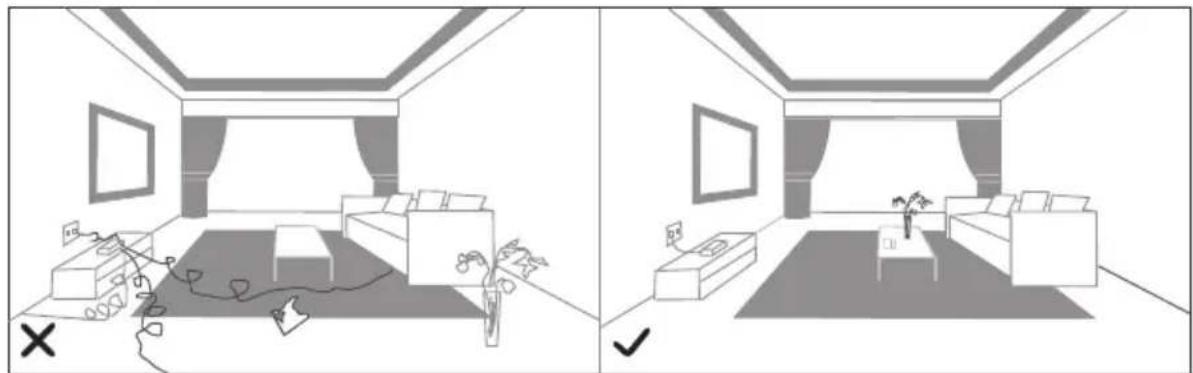
natural_image
Interior layout diagrams showing a living room with furniture and furniture, no text or symbols present- Not suitable for deep-pile carpets. Before putting the robot vacuum cleaner into operation, fold any carpet edges with fringes under the carpet.
- The robot vacuum cleaner needs a clearance of at least 10 cm in height in order to vacuum under furniture.
- Make sure that no people or animals are in the work area of the robot vacuum cleaner.
Starting up the robot vacuum cleaner

CAUTION!

- Check whether the robot vacuum cleaner can detect areas where there is a risk of falling (e.g., stairs) and, if necessary, secure the area with a barrier made of cardboard or wood.
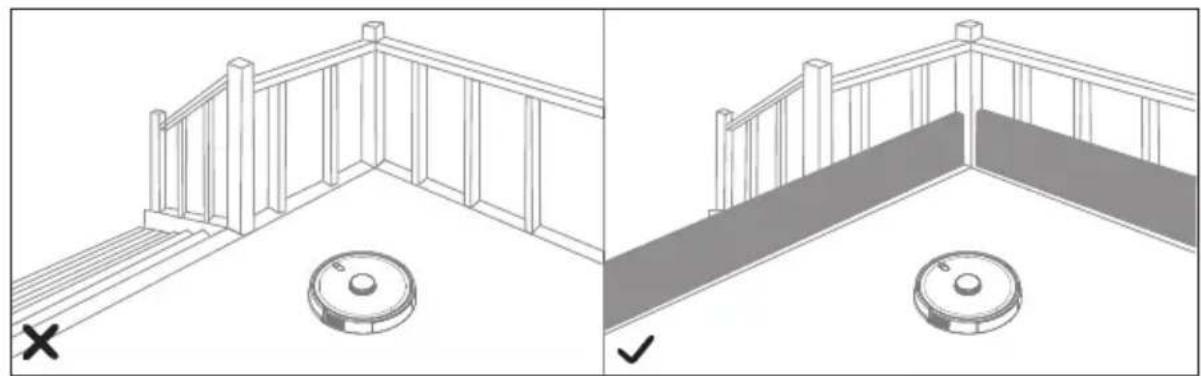
natural_image
Two technical diagrams showing a wooden railing structure with a circular base and a circular component, no text or symbols present.
NOTE!

- For an optimal result, the robot vacuum should be used daily.
Cleaning modes
Automatic cleaning
Press the power button ⏻ on the robot vacuum cleaner or the remote control to activate the "automatic cleaning" mode. In this mode, the robot vacuum cleaner will plan its cleaning route independently and will remember which areas have already been cleaned and which have not.
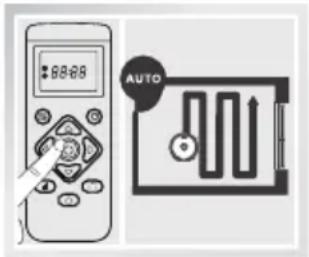
text_image
88:88 AUTO
NOTE!

- If the robot is controlled manually with the direction buttons in this mode, it will then re-plan the route. This means that areas that have already been cleaned can be included again. For efficient cleaning, the mode should therefore not be interrupted by manual control commands.
- When the battery level is low, the robot vacuum cleaner will automatically return to the charging station. As soon as the battery is fully charged, it will move to the last position and continues the suction process from there.
- The robot will stop occasionally during cleaning. It scans the area and plans the further cleaning route. The frequency and duration of these stops depend on the environmental conditions.
- Always use the "Automatic cleaning" mode to clean carpets.
Cleaning modes
Edge mode
Press the ☐ button on the remote control to activate "Edge mode". The robot vacuum cleaner will clean along walls and around furniture or similar obstacles.
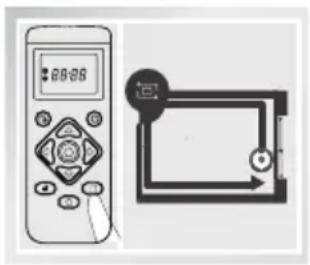
text_image
Image showing a remote control device with display and a digital device connected to a scroll, both labeled with Chinese characters.Returning
If you press the ⏻ button on the robot vacuum cleaner or the remote control, the robot vacuum cleaner will return to the charging station by the shortest possible route.
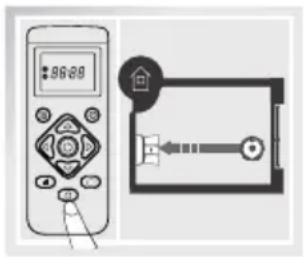
text_image
Diagram showing a remote control device connected to a smart lock with a home control icon and signal flow arrows
NOTE!

- You can use the button to choose between the suction power levels:
- ECO (minimum suction power)
- Normal (normal suction power)
- Turbo (maximum suction power)
- If the robot vacuum cleaner is controlled via the app, additional vacuum modes are available. You can find information in the instruction manual for the app on the "commodore-home.com" homepage
Cleaning modes
Standby mode
If you press the power button Ⓐ on the robot vacuum cleaner or the remote control during operation, it will switch to standby mode. Use this function to, for example, empty the dust collector or refill the water tank. Press the power button again to resume operation.
Sleep mode
If the robot vacuum cleaner receives no input for approx. 5 minutes in standby mode, it will switch to sleep mode.
Press the Ⓐ button on the robot vacuum cleaner or the remote control to exit sleep mode.

NOTE!

- After approx. 12 hours in sleep mode, the robot vacuum cleaner will switch itself off.
- Press the power button ⏻ for approx. 3 seconds to switch the robot vacuum cleaner on or off.
- Pre-programmed idle time: in the period from 10:00 p.m. to 7:00 a.m., it is not possible to put the robot vacuum cleaner into operation or to save a scheduled time. This function can be deactivated via the app. You can find information in the instruction manual for the app on the "commodore-home.com" homepage

WARNING!

- Charge the battery for at least 1 hour every 2 months, even if the robot vacuum cleaner has not been used, otherwise it will lose capacity.
- Regular charging protects the battery from deep discharge.
- Never heat the battery or throw it into an open fire.
- Never dispose of battery cells with household waste.
- Never bring battery contacts into contact with moisture.
- The optimal operating temperature of the battery is between 10 C and 30 C. Above and below this, the power output deteriorates, which leads to a reduced range.
- The battery may only be charged using the power adapter supplied. Make sure that the power supply is correct (100 – 240 V / 50 – 60 Hz).
- If the charging cable is damaged, the battery must not be charged. Please contact customer service.
- The lifespan and performance of a battery depend on its age, how it has been cared for, and how often it has been used.
- For an optimal service life, charge and store the battery in a dry and clean environment, preferably at a room temperature of 7 – 15°C.
- The robot vacuum cleaner, charging station and power adapter must not be covered during the charging process.
- Lithium batteries have a freezing point of approx. -20°C to -25°C. If a battery cell freezes, it is irretrievably destroyed and the entire battery must be replaced.
- As with conventional batteries, a lithium battery loses its capacity at low temperatures.
Handling the Battery

WARNING!

- Compared to other battery models, lithium-ion batteries have a very low self-discharge and a very low memory effect, but they have to be charged periodically.
- Please note that a deeply discharged battery is irreparably destroyed and must be exchanged, for a fee. Therefore, the battery should never be completely discharged during operation.
Cleaning, maintenance and storage
- Before cleaning, maintenance and/or storage, switch off the robot vacuum cleaner (press the power button ⏻ for approx. 3 seconds to switch the robot vacuum cleaner on or off) and pull the power adapter out of the socket.
- Remove and clean the side brush regularly:
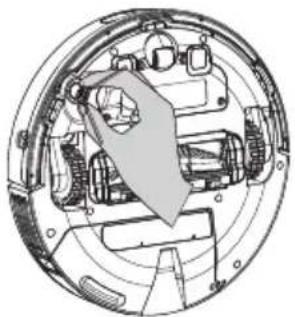
natural_image
Cross-sectional diagram of a mechanical device showing internal components and housing (no text or labels)Remove hair and debris.
- If the side brush is damaged, it must be replaced.
- Remove and clean the combination brush regularly:
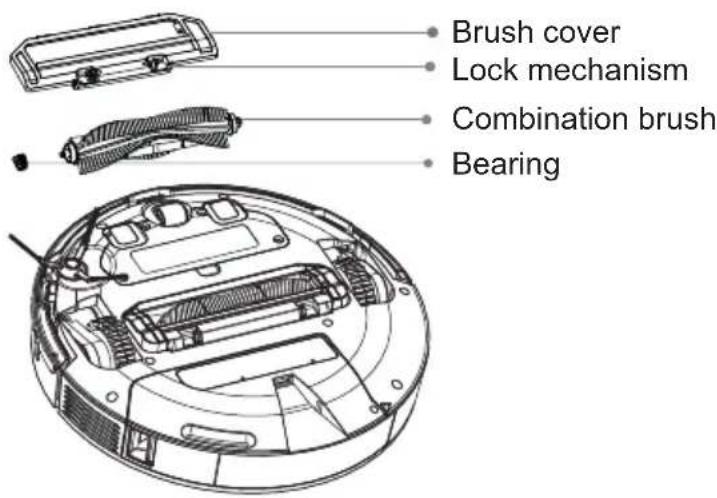
text_image
Brush cover Lock mechanism Combination brush Bearing-
Push the lock mechanism in and remove the brush cover.
-
Remove and clean the combination brush and the bearing.
-
Put the combination brush and the bearing back in place.
-
Reinstall the brush cover. The lock mechanism must click into place on the robot vacuum cleaner.
Cleaning, maintenance and storage
- Clean the housing, the bumper, the charging contacts and the anti-fall sensors with a lint-free, soft, dry cloth. Also clean the charging contacts of the charging station.
text_image
Anti-fall sensors- Empty and clean the dust collector and the high performance filter H12 regularly:
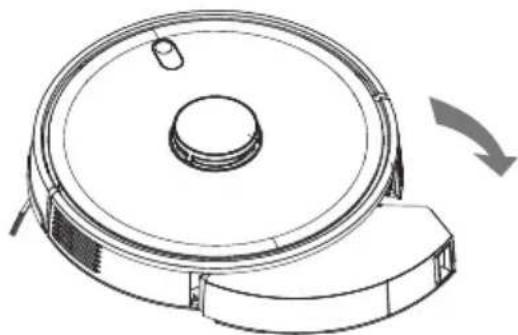
- Unlock and remove the dust collector.
natural_image
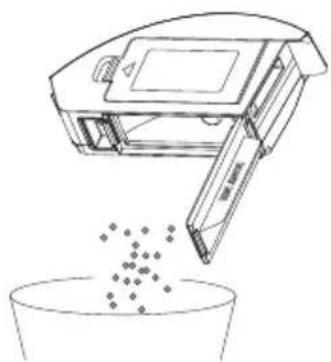
Line drawing of a robotic vacuum cleaner with a circular top and side-mounted sensors, showing rotational motion (no text or symbols)- Open the cover.
- Clean the dust collector.
natural_image
Line drawing of a robotic device pouring liquid into a bowl (no text or symbols)Cleaning, maintenance and storage
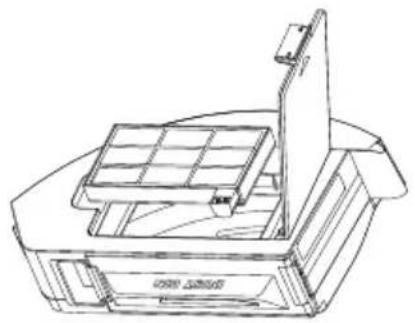
- Open the lid of the high performance filter H12 compartment.
- Remove the high performance filter H12.
- Clean the compartment with the cleaning brush.
- Knock the debris out of the High performance filter H12 by hand. Clean off heavy bits of dirt with the cleaning brush.
natural_image
Line drawing of a printer or scanner device with a grid-patterned cover and paper holder (no text or symbols)- Reinstall the High performance filter H12 and close the lid.
- Insert the dust collector back into the robot vacuum cleaner.
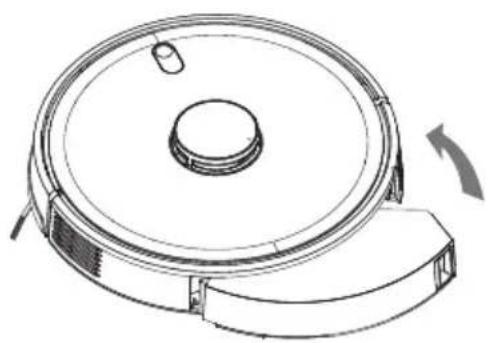
natural_image
Line drawing of a robotic vacuum cleaner with a circular top and attached casing (no text or symbols)Cleaning, maintenance and storage
- Empty and clean the dust collector that is integrated into the water tank regularly:
- Unlock and remove the water tank.
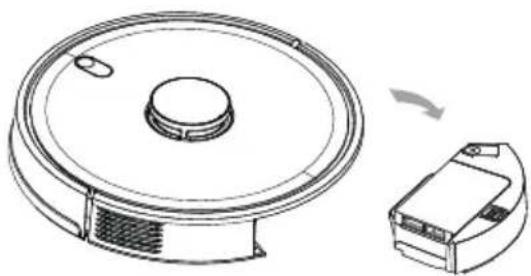
natural_image
Technical line drawing of a vacuum cleaner with a circular housing and a separate view showing a device (no text or symbols)- Remove the dust collector from the water tank.

natural_image
Technical line drawing of a device housing and interior panel (no text or symbols)-
Fold open the dust collector.
-
Empty the dust collector.
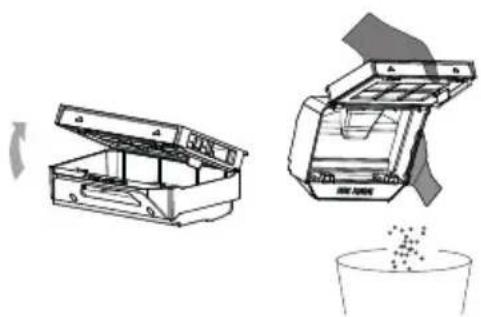
natural_image
Technical line drawings of a portable device and a container with granular material (no text or symbols)Cleaning, maintenance and storage
- Clean the collector with the cleaning brush.
- Knock the debris out of the High performance filter H12 by hand. Clean off heavy bits of dirt with the cleaning brush.
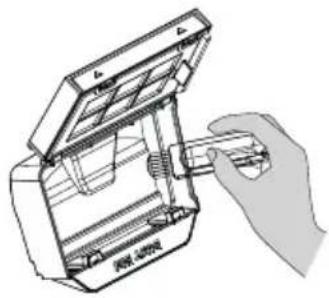
natural_image
Illustration of a hand using a tool to adjust or install a mechanical component (no text or symbols visible)- Close the dust collector again and place it in the water tank.
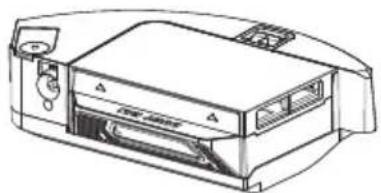
natural_image
Line drawing of a printer or printer device with no visible text or symbols- Insert the water tank back into the robot vacuum cleaner.

WARNING!

- Only dry clean the high performance filter H12!
- In case of the floor being heavily soild, we recommend vac - cuming beforehand and afterwards the combined cleaning with the water tank.
Cleaning, maintenance and storage
- Carefully pull the front wheel out of the housing of the robot vacuum cleaner to remove hair and other debris. Then put the front wheel back on.
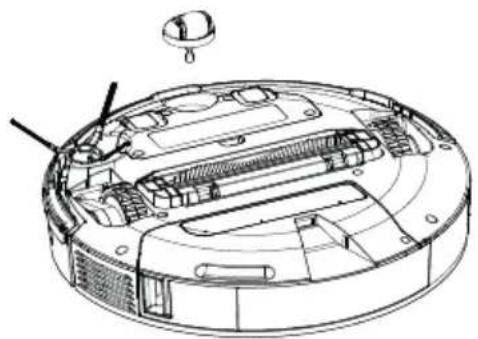
natural_image
Technical line drawing of a circular robotic device with internal components and a handle (no text or symbols)- Clean the mopcloth, the mop holder and the water tank with cold tap water.
Then allow to dry completely.
- If the robot vacuum cleaner is not used for a prolonged period of time, clean it and then store it together with the charging station and the power adapter in the original packaging in a dry, warm place out of the reach of children until it is time to re-use it.

CAUTION!

- The mopcloth is not suitable for washing machines and tumble dryers.
- Do not iron the mopcloth.
Troubleshooting
- If the robot vacuum cleaner detects a problem, the power button ⏻ will flash red – an error description will be reported via the app:
| Error Meaning Solution | ||
| 1 Check the laser module. Clean the laser module with a lint-free, soft, dry cloth. Remove foreign objects. Place the robot vacuum cleaner in a different location and restart. | ||
| 2 Anti-fall sensors are not working. | Clean anti-fall sensors and gently shake the bumper. | |
| 3 The robot vacuum cleaner cannot move. | Place the robot vacuum cleaner in a different location and restart. | |
| 4 Distance sensor is not working. | Clean the distance sensor with a lint-free, soft, dry cloth. Remove foreign objects. Place the robot vacuum cleaner in a different location and restart. | |
| 5 Robot vacuum cleaner temperature is above/below the norm. | Switch off the robot vacuum cleaner. Wait until the temperature of the robot vacuum cleaner has normalised. Observe the safety instructions. | |
| 6 Error during charging. Check the connection between the power adapter and the charging station. Check the charging contacts of the robot vacuum cleaner and charging station and clean if necessary. | ||
- If the robot vacuum cleaner repeatedly collides with the same obstacle, the bumper may be jammed.
Check the bumper for dirt.
Remove any foreign objects that may be present.
- If the battery life is shortened, the battery may not be fully charged. Charge the robot vacuum cleaner completely.
Troubleshooting
- If the suction strength decreases noticeably, the high performance filter H12 may be very dirty. Clean the filter or replace it with a new one.
- If the dust collector loses dirt, it may be too full and must be emptied.
-
If the robot vacuum cleaner does not start at the scheduled time, this may have several causes:
-
The scheduled time was not saved or was deleted (e.g., when changing the battery in the remote control).
Select the scheduled time again and save it as described on page 19. -
The robot vacuum cleaner is switched off.
Switch on the robot vacuum cleaner.
- The battery needs to be charged.
Make sure that the robot vacuum cleaner returns to the charging station after each use. This way, the battery will always remain charged.
- The robot vacuum cleaner cannot move.
Place the robot vacuum cleaner in a different location and restart it.
If the solutions mentioned do not work, switch off the robot vacuum cleaner for about 5 minutes. This will reset the robot vacuum cleaner.
If the robot vacuum cleaner does not work after resetting, please contact customer service.
Warranty
Please read the instruction manual carefully before using the robot vacuum cleaner in order to familiarise yourself with how to operate it.
KSR Group GmbH grants a separate warranty in compliance with the following conditions. The statutory warranty provisions and claims arising under the Product Liability Act remain unaffected by this. Any claims of the purchaser for supplementary performance and compensation for damages in the event of defects shall remain unaffected if the relevant conditions are met.
The warranty applies to the CVR 300 robot vacuum cleaner and runs for 24 months from the date of purchase (the date of receipt).
The battery has a warranty of 6 months from the date of purchase.
The warranty covers material, design and manufacturing defects, provided that such defects were already present on delivery and that the product was handled by the purchaser in an appropriate and intended manner. Wear parts and materials used for servicing work are excluded from the warranty. The warranty includes either free repair, replacement of the defective part or parts, or replacement of the entire product with an equivalent product. The right to decide on the remedy resides with KSR Group GmbH.
Warranty
If a malfunction/defect occurs, the dealer must be informed immediately, and the problem that has occurred must be described in detail to this person. If the problem cannot be solved in this way, the thoroughly cleaned product, including all accessories, must be packaged for safe transport and returned in accordance with the dealer's instructions.
The following information and documents must be attached to the package:
- Surname, first name and address (also to be stated on the outside of the package)
- Article no. and serial no. (on the underside of the footboard)
- Purchase date
- Original receipt
- An informative description of the fault
- In the event of damage during transport: Name of the parcel service and parcel number
It is strongly recommended to use the original packaging box to ensure safe transport. If you use any other packaging, ensure that it is properly protected against the typical risks of shipping and has appropriate protective features. Mere cardboard packaging with paper padding is not sufficient. KSR Group GmbH accepts no liability for damage caused by improper packaging, and the warranty will become void.
Warranty
The warranty does not apply in the following cases:
- In the event of use other than the intended use
- on improper operation, care and/or maintenance or storage (for example, damage caused by moisture or excessive temperatures, neglected products, etc.)
- In the event of repairs, repair attempts and modifications of any kind, or the use of third-party spare parts and accessories, etc., which have been carried out by anyone other than KSR Group GmbH or companies authorised by KSR Group GmbH
- In the event of improper transport packaging and/or improper transport
- In the event of improper mechanical influences on the product or parts of the product
- In the event of any occurrences which are not due to the processing and manufacture of the product (e.g., falls, impact, damage due to external influences, fire, earthquake, flood damage, lightning, etc.)
- In the event that no original proof of purchase is presented
- In the event of use for non-private purposes, in particular, commercial use
If KSR Group GmbH incurs costs due to a product being sent back/returned but there is neither a warranty case nor a right to return, these costs are to be borne by the purchaser.
Instructions for disposal
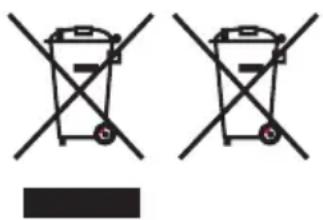
text_image
Two identical diagrams showing a trash bin with crossed-out lines and a blank rectangular block below, likely indicating no waste or non-renewable status.Old devices must not be disposed of in household waste! If the robot vacuum cleaner can no longer be used, all consumers are required by law to bring the old device to a separate waste collection point, for example, in their community or district, and not dispose of it in household waste. This ensures that old appliances are properly recycled and that negative effects on the environment are avoided. For this reason, electrical appliances are marked with this symbol.
Please take defective batteries or ones that are no longer usable to your local collection point. Pay attention to the symbol on the battery.

Dispose of packaging according to type. Dispose of paper and cardboard as waste paper, and foils via recyclables collection.
Declaration of conformity/certificates

This product complies with the European directives.
Notes
Distributor/publisher:
KSR Group GmbH
natural_image
Top-down view of a circular vacuum cleaner with 'COMMODORE' branding, set against a pixelated grid background (no readable text or symbols on the device itself)MANUEL D'UTILISATION ORIGINAL
Table des matières
text_image
Technical diagram of a circular device with numbered components for identificationnatural_image
Line drawing of a robotic vacuum cleaner with a circular housing and handle (no text or symbols)natural_image
Line drawing of a portable electronic device with ports and a speaker (no text or symbols)natural_image
Line drawing of a robotic vacuum cleaner with a close-up view of its internal components (no text or symbols)Mise en service
natural_image
Technical line drawing of a mechanical component with two views (top and side), no text or symbols present.natural_image
Technical line drawing of a circular device with a central hub and an exploded view showing internal components (no text or symbols)
ATTENTION!

text_image
>0.5m >1.5m >0.5mnatural_image
Technical line drawing of a mechanical component with two circular holes and a belt drive mechanism (no text or symbols)natural_image
Two-panel illustration showing a room interior with furniture and a floor plan, no text or symbols present.natural_image
Two technical line drawings of a balcony structure, one showing a wooden railing and the other a circular base with a circular hole, both without any text or symbols.
REMARQUE!

text_image
Diagram showing a remote control device next to a digital display and a rectangular device with directional arrows indicating motion or signal flow.Retour
text_image
Diagram showing a remote control device connected to a smart lock with a home control panel and indicator lights.
REMARQUE!

natural_image
Cross-sectional diagram of a mechanical device showing internal components and housing (no text or labels)natural_image
Line drawing of a robotic vacuum cleaner with a circular top and side-mounted sensors, showing rotational motion (no text or symbols)natural_image
Line drawing of a robotic device pouring liquid into a cup (no text or symbols)natural_image
Line drawing of a printer with a paper feeding into a tray (no text or symbols)natural_image
Line drawing of a robotic vacuum cleaner with a circular top and attached base, showing no text or symbols.natural_image
Technical line drawing of a vacuum cleaner with a circular housing and a separate view showing the internal components (no text or symbols)natural_image
Technical line drawing of a device housing and interior panel (no text or symbols)natural_image
Technical line drawings of a portable device and a container with granular material (no text or symbols)natural_image
Illustration of a hand using a tool to adjust or install a mechanical component (no text or symbols visible)natural_image
Line drawing of a printer or printer device with no visible text or symbolsnatural_image
Technical line drawing of a circular robotic device with internal components and a small knob (no text or symbols)text_image
Two identical diagrams showing a trash bin with crossed-out lines and a blank rectangular block below, likely indicating no waste or non-renewable status.natural_image
Top-down view of a circular vacuum cleaner with 'COMMODORE' branding, set against a pixelated grid background (no readable text or symbols beyond branding)MANUALE D'USO ORIGINALE
Indice
Dati tecnici...122
Introduzione...123
text_image
Technical diagram of a circular device with numbered components for identificationnatural_image
Line drawing of a robotic vacuum cleaner with a circular housing and attached base (no text or symbols)natural_image
Line drawing of a portable air conditioner unit with cooling fan and ventilation slots (no text or symbols)natural_image
Technical line drawing of a robotic vacuum cleaner with a close-up view of its internal components (no text or symbols)Messa in funzione
natural_image
Technical line drawing of a mechanical component with two views: top shows a flanged part, bottom shows a curved housing with mounting holes (no text or symbols)natural_image
Technical line drawing of a circular vacuum cleaner with a side view showing internal components (no text or symbols)
ATTENZIONE!

text_image
>0.5m >1.5m >0.5mnatural_image
Technical line drawing of a mechanical component with two circular holes and a belt drive mechanism (no text or symbols)natural_image
Interior layout diagrams showing a living room with furniture and furniture, no text or symbols presentnatural_image
Two technical line drawings of a balcony structure, one showing a wooden railing and the other a circular base with a circular hole (no text or symbols)
ATTENZIONE!

natural_image
Illustration of a remote control device next to a rectangular device with a circular button and arrow (no text or symbols)Ritorno
text_image
Diagram showing a remote control device connected to a device with a home icon and directional arrows indicating movement or flow.
ATTENZIONE!

natural_image
Cross-sectional diagram of a mechanical device showing internal components and housing (no text or labels)natural_image
Line drawing of a robotic vacuum cleaner with a circular top and side-mounted sensors, showing rotational motion (no text or symbols)natural_image
Line drawing of a robotic device pouring liquid into a bowl (no text or symbols)natural_image
Line drawing of a printer with a paper feed cover and paper tray (no text or symbols)natural_image
Line drawing of a robotic vacuum cleaner with a circular top and attached base (no text or symbols)natural_image
Technical line drawing of a vacuum cleaner with a circular housing and a separate view showing the internal components (no text or symbols)natural_image
Technical line drawing of a device housing and internal components (no text or symbols)dell'acqua.