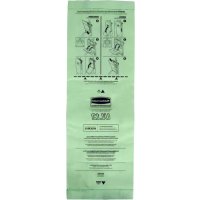
UL12 - Vacuum Cleaner Rubbermaid - Free user manual and instructions
Find the device manual for free UL12 Rubbermaid in PDF.


User questions about UL12 Rubbermaid
0 question about this device. Answer the ones you know or ask your own.
Ask a new question about this device
Download the instructions for your Vacuum Cleaner in PDF format for free! Find your manual UL12 - Rubbermaid and take your electronic device back in hand. On this page are published all the documents necessary for the use of your device. UL12 by Rubbermaid.
USER MANUAL UL12 Rubbermaid
Products manufactured under quality management system registered to ISO 9001:2000
©2007 Rubbermaid Commercial Products LLC
A Newell Rubbermaid Company
Rubbermaid Commercial Products LLC
Winchester, VA 22601 U.S.A.
www.rcpworkstarter.com #70-9VUL-12

UL12
Ultra Light Upright Vacuum Cleaner
Owner's Manual
Operating and Maintenance Instructions
Aspiradora Vertical Ultra Liviana
natural_image
Line drawing of a vacuum cleaner with attached lever and base (no text or symbols)FOR COMMERCIAL USE PARA USO COMMERCIAL UTILISATION COMMERCIALE
www.rcpworksmarter.com
Work Smarter.

Congratulations!
Welcome to the world of smarter vacuums. As the proud new owner of Rubbermaid Commercial Product's light weight UL12 vacuum cleaner, you can rest assured that you have purchased a convenient, efficient, and high-quality product. As with all of our products, your UL12 is backed by our uncompromising commitment to customer satisfaction.
For more Rubbermaid best-in-class products, visit our website at www.rcpworksmarter.com.
Table of Contents
| Warranty | 3 |
| Troubleshooting | 3 |
| Safety Instructions | 4 |
| Maintenance | 5 |
| Electrical Grounding/Cord Info | 5 |
| Package Contents | 6 |
| Reorder Numbers | 6 |
| Assembled Views | 7 |
| Parts List | 7 |
| Assembly | 8 |
| Operation | 9 |
| Cord Storage | 10 |
| Paper Bag Replacement | 10 |
| Cloth Bag Replacement | 11 |
| Belt and Brush Roll Replacement | 13 |
| Edge-Cleaning Bristles Replacement | 15 |

One (1) Year Limited Warranty
To the consumer, Rubbermaid Commercial Products, LLC (RCP) warrants to the original owner that this product is free from defects in material and warmthship for a period of one (1) year from the date of the original purchase. If, within the one (1) year period, this product becomes defective when used as directed under normal conditions, RCP will either repair or replace the product—at our option—when it is returned complete (postage prepaid and insured) to an authorized service center. Product must be accompanied by a proof of purchase—a bill of sale, received invoice, or other proof that the product is within the warranty period—to obtain warranty service. RCP shall bear the cost of repairing/replacing the product and shipping it back to you. RCP makes no other warranties, express or implied, concerning the product or the merchantability or fitness thereof for any purpose.
This warranty does not apply to product that has been damaged as a result of improper maintenance, accident or other misuse. This warranty is void if the product is repaired or modified in any way by anyone other than an authorized service center. This warranty also does not cover normal wear items such as the following: brush, brush rolls, switches, belts, bags, filters, power cords, casters, wheels, and gaskets. This warranty does not cover unauthorized repairs. In no event shall RCP be liable for incidental or consequential damages. For product replacement information, or questions regarding replacement parts, please contact customer service directly (within USA & Canada) at 1-866-524-5233.
Legal rights vary from state to state, so the above limitations may not apply to you if precluded by local law.
Troubleshooting
| ProblemReasonSolution | ||
| Vacuum cleaner won't run: | 1. ON/OFF switch is in "OFF" position. | 1. Press switch to "ON" position. |
| 2. Power cord not firmly plugged into outlet. | 2. Ensure that plug is securely inserted into electrical outlet. | |
| 3. Power cord and extension cord not fully connected or unconnected completely. | 3. Ensure plug ends are fully connected. | |
| 4. Blown fuse or tripped breaker. | 4. Replace fuse/reset breaker. | |
| 5. Motor does not work. | 5. Please contact customer service or authorized service center | |
| 6. Broken fan. | 6. Please contact customer service or authorized service center | |
| 7. Broken switch. | 7. Please contact customer service or authorized service center | |
| Vacuum cleaner won't pick up/low suction: | 1. Paper bag not installed correctly. | 1. Confirm paper bag is installed correctly- See page 10. |
| 2. Paper bag is full. | 2. Replace paper bag - See page 10. | |
| 3. Cloth bag pores are clogged. | 3. Replace cloth bag - See page 12. | |
| 4. Brush roll worn. | 4. Replace brush roll - See page 13. | |
| 5. Broken or worn belt. | 5. Replace belt - See page 13. | |
| 6. Nozzle duct obstructed. | 6. Remove obstruction. | |
| 7. Brush roll improperly installed. | 7. Check orientation of brush roll endcaps - See page 14, figure 7. | |
| Dust escaping from vacuum cleaner: | 1. Paper bag is full. | 1. Replace paper bag- See page 10. |
| 2. Paper bag not installed correctly. | 2. Confirm paper bag is installed correctly- See page 10. | |
| 3. Handle tubes not assembled correctly. | 3. Ensure tubes are securely connected by the collars, and that the collar seals are in place. | |
ANY OTHER SERVICING SHOULD BE DONE BY AN AUTHORIZED SERVICE REPRESENTATIVE
Customer Service (1-866-524-5233)
In the event further assistance is required, please call the customer service number above, or contact an authorized service center. Proof of purchase will be required before service is rendered. Transportation charges to and from the repair location must be paid by the purchaser. For quick troubleshooting, please go to www.ncpworksmarter.com.
This warranty does not apply outside of the fifty United States and Canada. This warranty excludes repairs to parts or systems resulting from unauthorized modifications made to the vacuum cleaner.
IMPORTANT SAFETY INSTRUCTIONS
SAVE THESE INSTRUCTIONS
When using an electrical appliance, basic precautions should be followed, including the following:
WARNING
Read all instructions before using vacuum cleaner. Use only as described in this manual, and follow all label and marking instructions found on unit. Failure to do so may result in serious injury or death.
WARNING: TO REDUCE THE RISK OF FIRE, ELECTRICAL SHOCK, OR INJURY:
• Fully assemble before operating.
- DO NOT use without dust bags and/or filters installed.
- DO NOT leave unattended when plugged in. Unplug from outlet when not in use, and before servicing.
- DO NOT use outdoors or on wet surfaces. DO NOT handle vacuum cleaner or plug with wet hands.
- Only plug vacuum cleaner into a properly grounded outlet. See "Electrical Grounding" instructions.
- DO NOT unplug by pulling on power cord. To unplug from an outlet, pull by the plug, not the cord.
• DO NOT use with damaged cord or plug.
- DO NOT pull or carry by cord, use cord as a handle, close a door on cord, or pull cord around sharp edges or comers. DO NOT run vacuum cleaner over power cord. Keep cord away from heated surfaces.
- Turn on/off switch to "off" before unplugging.
- DO NOT leave power cord lying on floor when not in use. It can become a tripping hazard.
- DO NOT use to pick up flammable or combustible liquids. DO NOT use in areas where these substances may be present. Electrical devices produce arcs or sparks that can cause explosions. DO NOT use anywhere that gasoline is dispensed.
- DO NOT use in an enclosed space where flammable, explosive, or toxic vapors are given off by oil base paint, paint thinner, certain mothproofing substances, or in an area where flammable dust is present.
- DO NOT pick up toxic/carcinogenic/hazardous materials such as chlorine, bleach, drain cleaner, gasoline, asbestos, pesticides, or lead.
- DO NOT pick up any materials that are burning or smoking, such as cigarettes, matches, or hot ashes.
- During use, keep hose, wands, and other openings away from your face and body. Keep hands, feet, hair, loose clothing, and other body parts away from moving parts.
- DO NOT put any object into openings. DO NOT use with any opening blocked; keep free of dust, lint, hair, or anything that may reduce air flow.
- Only use manufacturer's recommended attachments.
- Use with caution on stairs.
- Use with caution when vacuuming over area rug edges and fringe.
- DO NOT allow to be used as a toy. Close attention is necessary during use by or around children.
- If vacuum cleaner is not working as it should—or has been dropped, damaged, left outdoors, or exposed to water—discontinue use immediately and take it to a service center for inspection. Call 1-866-524-5233 to find a location near you.
Maintenance
Proper maintenance of your vaccum cleaner will assure continued effective cleaning performance.
- Always use genuine Rubbermaid Commercial Products replacement parts.
- Indoor use only. Store indoors.
- Change paper bag frequently.
- Occasionally remove brush roll and clean debris from end caps to keep brush rotating smoothly.
Electrical Grounding/Cord Info
This appliance must be grounded. Should the unit malfunction, grounding provides a path of least resistance for the electric current. This reduces the risk of electric shock. This appliance is equipped with a cord having an equipment-grounding conductor, and a grounding plug. The plug must be inserted into an appropriate outlet that is properly installed and grounded in accordance with all local codes and ordinances.
WARNING

ELECTRICAL SHOCK HAZARD
Improper connection of the equipment-grounding conductor can result in a risk of electrical
shock. Check with a qualified electrician or service person if you are unsure if an outlet is properly grounded. DO NOT modify the plug provided with the appliance to fit an outlet, have a proper outlet installed by a qualified electrician.
This appliance is for use on a nominal 120-volt circuit and has a grounding attachment plug that looks like the plug illustrated in the sketch below. Make sure that the appliance is connected to an outlet having the same configuration as the plug. No adaptor should be used with this appliance.

text_image
Grounded outlet box Grounded outlet Grounding pinWARNING

FIRE OR ELECTRICAL SHOCK HAZARD Use only a 16 gauge or higher 3-wire SJT extension cord with this vacuum cleaner. Using a cord of different type or AWG may result in increased risk of fire or electrical shock.
Package Contents
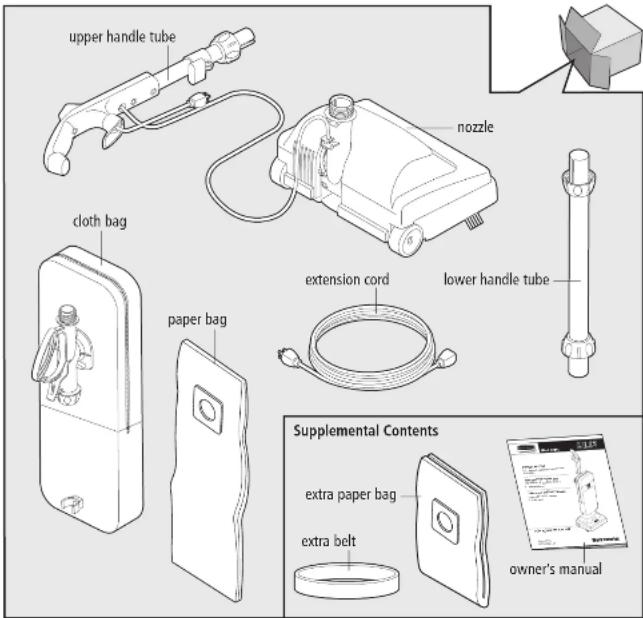
Please confirm that all items shown in the image below are included in the packaging. If any parts are missing, please call customer service at 1-866-524-5233.
text_image
upper handle tube nozzle cloth bag paper bag extension cord lower handle tube Supplemental Contents extra paper bag extra belt owner's manualReorder Numbers
9V-ULBE-12 (Belt)
9V-ULPB-12 (Paper Bag)
9V-ULBC-12 (Cloth Bag)
Reorder by logging on to www.rcpworksmarter.com or by contacting your local distributor. Call customer service at
1-866-524-5233 for service and to order genuine
Rubbermaid Commercial Products replacement parts.
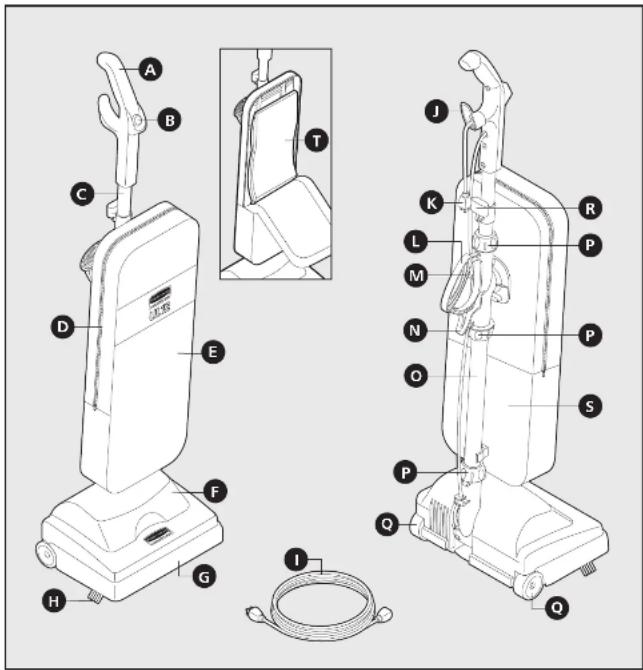
Assembled Views
ENGLISH
text_image
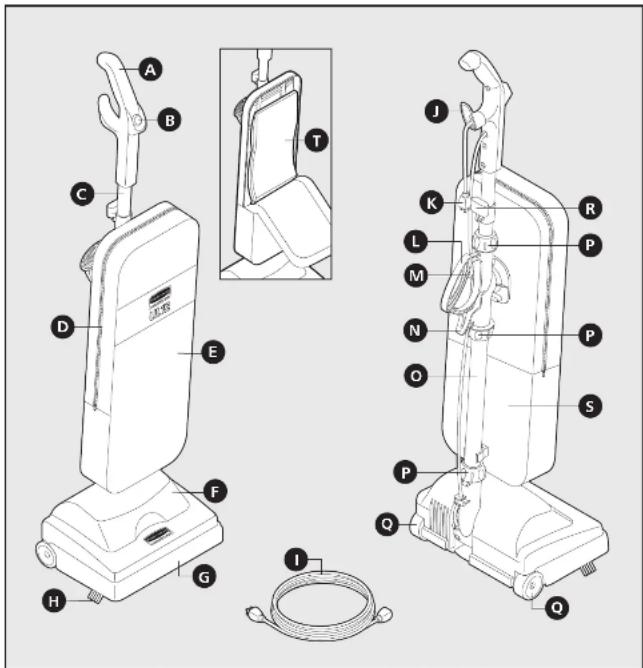
Technical diagram of a vacuum cleaner with labeled parts and exploded viewParts List
A handle grip
ON/OFF switch
C upper handle tube
D zipper
E cloth bag
F nozzle
G bumper
H edge-cleaning bristles
① extension cord
upper cord wrap
K power cord
L carry handle
M cord clip
N lower cord wrap
lower handle tube
P collars
Q wheels
R cord lock
5 bag pocket
T paper bag
Assembly
Note: To ensure proper operation of the vacuum cleaner, verify that the rubber O-rings are in place and all collars are tight.
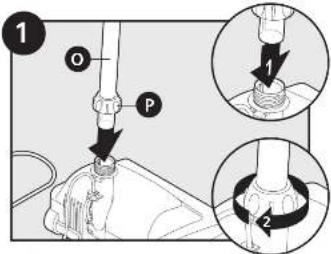
text_image
1 O P 1 2Align slot in lower handle tube with notch in nozzle opening. Push together firmly. Turn knob clockwise to tighten.
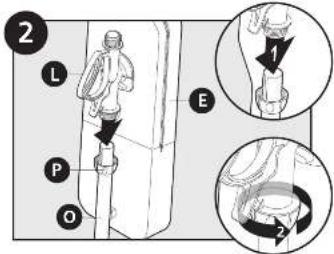
text_image
2 L P O E 1Align slot in top of lower handle tube with notch in carry handle. Push together firmly. Turn knob counter-clockwise to tighten.
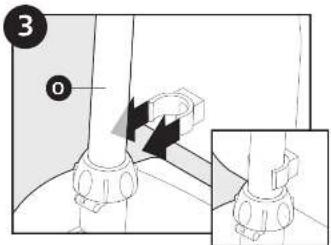
text_image
3 0Snap cloth bag clip onto lower handle tube.
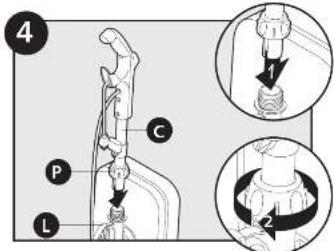
text_image
4 P C L 1 2Align slot in upper handle tube with notch in carry handle. Push together firmly. Tum knob dockwise to tighten.
text_image
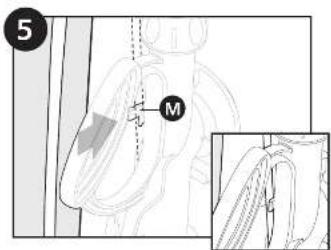
5 MTo keep the cord out of the way while vacuuming, snap it into the cord clip on the back of the carry handle.
natural_image
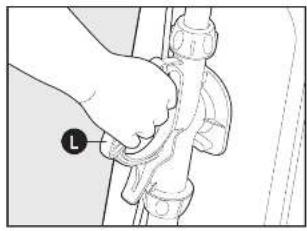
Illustration of a hand adjusting a pipe fitting with a labeled component (no text or symbols present)When not cleaning, use carry handle to transport vacuum cleaner.
ENGLISH
Operation
text_image
NOTE: Fully assemble before operating.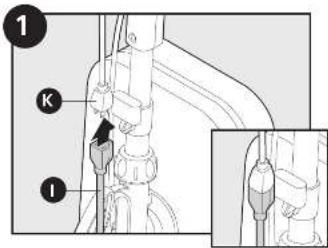
text_image
1 K IPlug extension cord into power cord.
natural_image
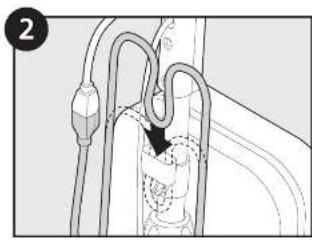
Diagram of a mechanical or electrical component with no visible text, numbers, or symbolsMake a loop in the extension cord below the power cord connection and slide through top of cord lock. The loop will fit around the notch below the cord lock.
natural_image
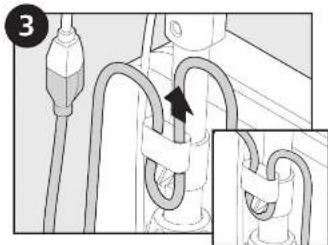
Diagram showing a pipe connection with a hook and a magnified inset of the cable (no text or symbols)Pull free end of extension cord up to take out slack.
text_image
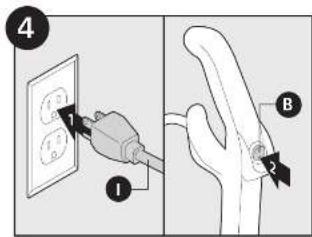
Diagram showing two electrical connections: one with a plug and labeled component 1, the other with a plug and labeled component 2.Plug extension cord into outlet. Turn power switch to "on".

natural_image
Illustration of a vacuum cleaner with a foot and legs, shown from front and side views (no text or symbols)To position vacuum cleanet, use your foot to hold base while tilting back.
Cord Storage

text_image
Diagram illustrating hair follicle structure with labeled parts and magnified views of hair folliclesWrap cord around upper and lower cord wraps.
Paper Bag Replacement
text_image
Diagram showing two steps of a device with directional arrows and labeled parts, likely illustrating a process or operation.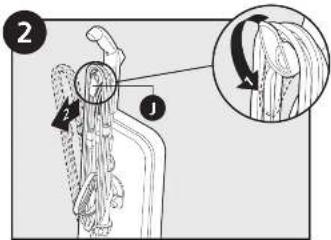
text_image
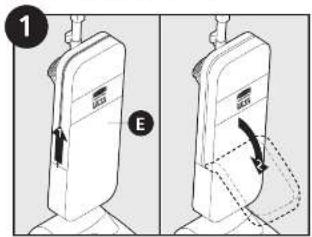
Diagram illustrating a mechanical or anatomical process with labeled parts and an inset showing a magnified view of a textured surface.To release cord, turn upper cord wrap 1/2 turn. Keep cord wrap in up or down position; do not leave rotated in-between.
text_image
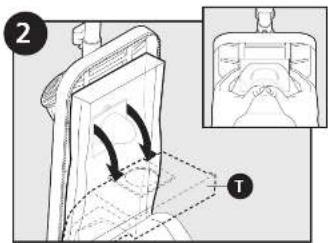
Technical diagram showing a device with rotating arrows and labeled component 'T', including a magnified inset view.Pull paper bag collar away from dirt tube.Unzip and open cloth bag.
text_image
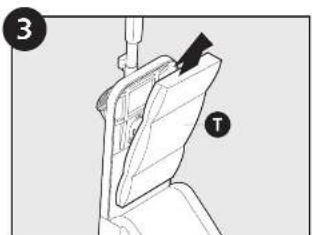
Technical diagram showing a mechanical assembly with labeled parts 3 and T, likely illustrating a component or assembly.Remove and dispose of old paper bag.
text_image
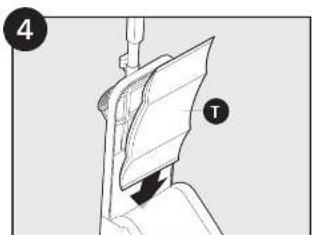
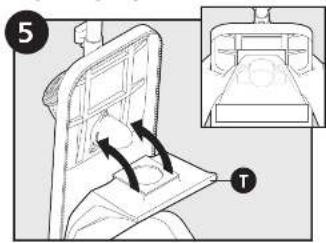
4 TInsert new paper bag into cloth bag, making sure paper bag is fully extended.
Paper Bag Replacement (cont.)
text_image
Diagram showing a mechanical device with labeled components and directional arrows, including a zoomed-in view of the component.Push paper bag collar onto dirt tube over lock tabs. Close and zip soft cloth bag.
Cloth Bag Replacement
text_image
1 E Tool needed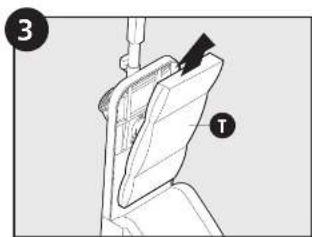
text_image
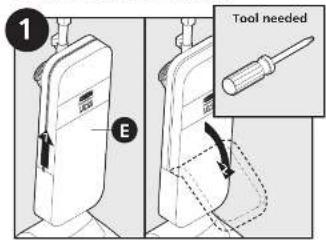
Technical diagram showing a mechanical component with labeled parts 3 and T, likely illustrating a assembly or assembly process.Remove paper bag. Remove screws to realease dirt tube from cloth bag plate.
text_image
6 E
text_image
Technical diagram showing a device with internal rotation arrows and a magnified view of the device's internal structure.Pull paper bag collar away from dirt tube. Unzip and open cloth bag.
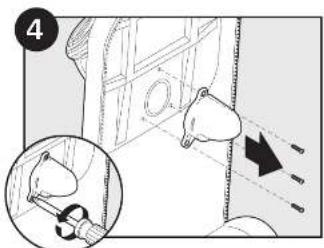
text_image
4Pull dirt tube off of cloth bag plate.

Cloth Bag Replacement (cont.)
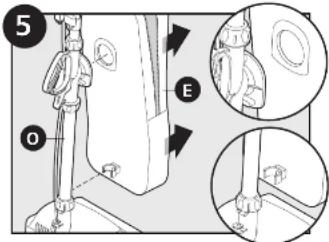
text_image
5 O EPull cloth bag off of carry handle and lower handle tube. Remove old cloth bag from unit.
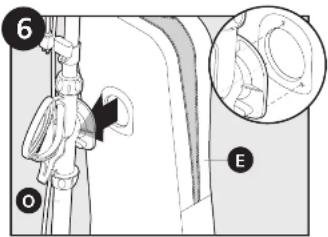
text_image
Diagram showing a climbing rope with labeled parts and an inset magnified view of the rope detailUsing NEW cloth bag, line up tabs and screw holes on cloth bag plate with corresponding slots and holes on carry handle.
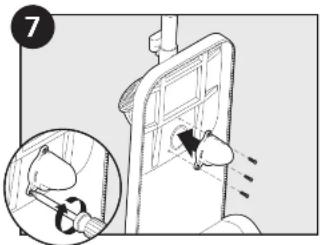
text_image
7Reinstall screws to secure dirt tube to cloth bag plate.
text_image
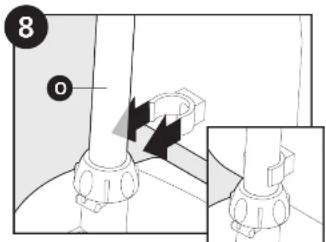
8 0Snap cloth bag clip back onto lower handle tube Align screw holes on dirt tube with holes emplothelgriservicing.
text_image
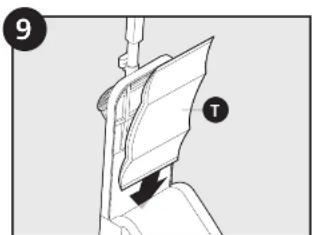
9 TInsert paper bag into cloth bag, making sure paper bag is fully extended.
text_image
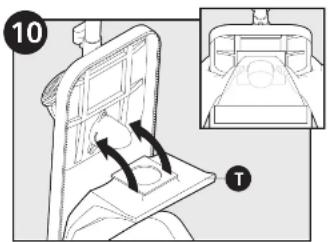
10 TPush paper bag collar onto dirt tube over lock tabs.
Cloth Bag Replacement (cont.)
text_image
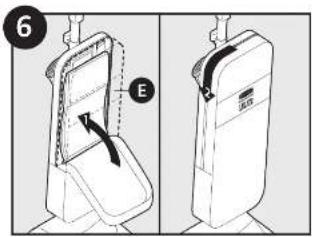
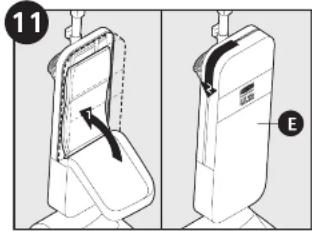
11 EClose and zip cloth bag.
Belt and Brush Roll Replacement
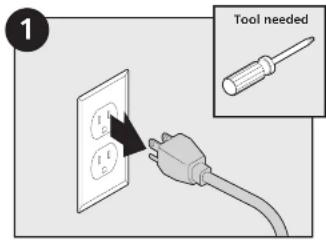
text_image
1 Tool needed I E I E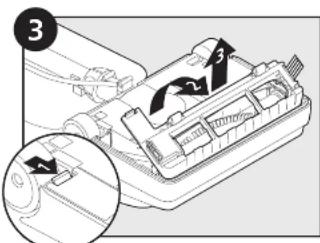
text_image
Diagram showing a mechanical component with numbered parts and an inset magnified view highlighting a specific section.Press tab below left wheel and lift nozzle guard. Pull nozzle guard up from base.
ENGLISH
text_image
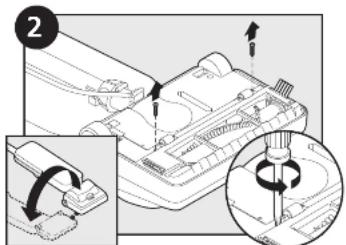
Diagram showing a mechanical assembly with labeled components and a magnified inset highlighting a rotating component.Turn vacuum cleaner over. With base lying flat and the bottom facing up, remove both screws near rollers.
natural_image
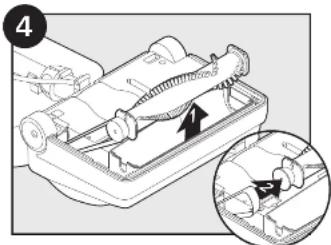
Mechanical assembly diagram showing a component being inserted into a tray, with an inset close-up highlighting the machining process (no text or symbols present)Lift brush roll out of nozzle opening. After removal, slide belt off of pulley.
Belt and Brush Roll Replacement (cont.)
natural_image
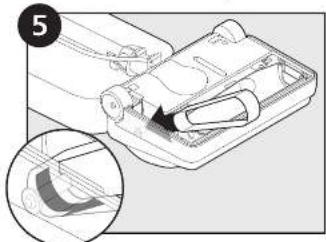
Technical illustration of a mechanical device with an inset showing a close-up view of a component (no text or symbols present)Loop belt around motor shaft. Slide belt onto pulley
text_image
6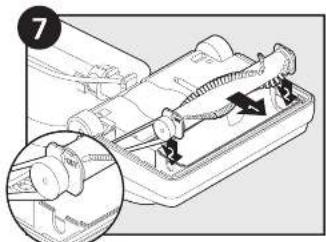
natural_image
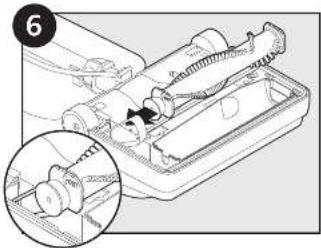
Mechanical assembly diagram showing a device with internal components and a magnified inset (no text or symbols)Orient brush roll endcaps. Align endcaps with slots in nozzle base while pulling brush roll towards the nozzle opening. Reinsert into slots.
text_image
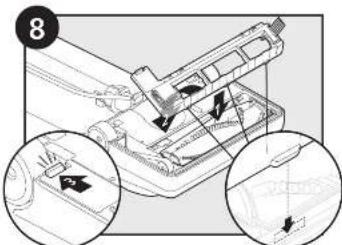
Diagram showing mechanical assembly with labeled parts and directional arrows, including a magnified inset view of a component detail.Align tabs on nozzle guard and pivot into position, making sure nozzle guard tab snaps into place.
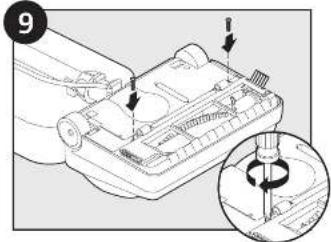
text_image
Diagram showing a hand operating a device with arrows indicating process steps, including a magnified inset of the component.Reinstall screws.
Edge Cleaning Bristles Replacement
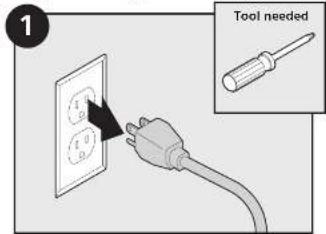
text_image
1 Tool needed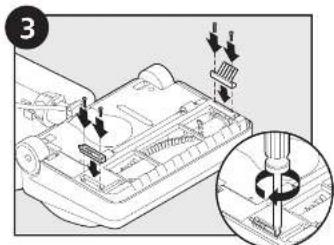
text_image
Technical diagram showing mechanical assembly with labeled components and a magnified inset of a screwdriver tool.Install new edge-cleaning bristles. Reinstall screws.

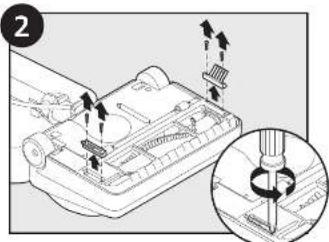
text_image
Diagram showing a mechanical device with arrows indicating motion and a magnified inset of the component's tip.Remove screws. Remove old edge-cleaning bristles. Unplug before servicing.


¡Felicitaciones!
Rubbermaid Commercial Products.
Vistas del armado
ESPAÑOL
text_image
Technical diagram of a vacuum cleaner with labeled parts and exploded viewLista de piezas
text_image
1 O P 1 2text_image
2 L P O E 1 2text_image
Technical diagram showing mechanical assembly with labeled components and directional arrows indicating movement or forcetext_image
4 P L C 1 2natural_image
Illustration of a hand holding a tool with a labeled component (no text or symbols present)natural_image
Diagram of a mechanical or electrical component with no visible text, numbers, or symbols
natural_image
Diagram showing a pipe connection with a valve and a magnified inset of the pipe (no text or symbols)natural_image
Line drawing of a vacuum cleaner with foot and legs, shown from front and side views (no text or symbols)text_image
Diagram illustrating hair follicle structure with labeled parts and magnified views of hair folliclestext_image
Diagram illustrating a biological or anatomical process with labeled parts and directional arrows, including numbered annotations.text_image
Technical diagram showing a mechanical component with labeled parts and directional arrows, including a zoomed-in inset view.natural_image
Technical diagram of a mechanical component with labeled parts (no readable text or symbols)text_image
Diagram showing a mechanical device with labeled parts and an inset view of the bed assemblytext_image
Diagram illustrating a mechanical or fluid system with labeled components and directional arrows, including a zoomed-in inset showing internal flow.text_image
Technical diagram showing mechanical assembly with labeled component and magnified detail viewtext_image
Diagram showing a mechanical device with labeled components and directional arrows, including numbered callouts.natural_image
Mechanical assembly diagram showing a motor with a spring and lever mechanism, plus a magnified inset of the component (no text or symbols)natural_image
Illustration of a mechanical device with a magnified inset showing a close-up of a component (no text or symbols)natural_image
Mechanical assembly diagram showing a component being inserted into a tray, with an inset close-up of the component (no text or symbols visible)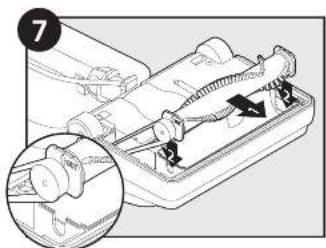
natural_image
Mechanical assembly diagram showing a component being inserted into a tray, with an inset close-up of the handle (no text or symbols visible)text_image
Diagram showing a hand holding a device with arrows indicating process steps, including a magnified inset highlighting the internal mechanism.text_image
Diagram illustrating a mechanical assembly with labeled components and an inset showing a screwdriver mechanism.text_image
Diagram showing a sewing machine with arrows indicating fabric or sewing process, including a magnified inset of the sewing needle.text_image
Technical diagram of a vacuum cleaner with labeled parts and exploded viewListe des pièces
text_image
2 L P O E 1 2text_image
4 P C L 1 2natural_image
Illustration of a hand holding a pipe fitting with a numbered label (no text or symbols present)natural_image
Diagram of a mechanical assembly with no visible text or symbolsnatural_image
Diagram showing a pipe connection with a hook and a magnified inset of the cable (no text or symbols)text_image
Diagram showing electrical connection with labeled components: plug, socket, and plug-in connectornatural_image
Illustration of a vacuum cleaner with a foot and legs, shown from front and side views (no text or symbols)text_image
Diagram illustrating hair follicle anatomy with labeled parts and magnified views of hair folliclestext_image
Diagram illustrating a mechanical or biological process with labeled parts and an inset showing a magnified view of a fiber-like structure.text_image
Diagram showing two steps of a device with directional arrows and labeled parts, likely illustrating a process or operation.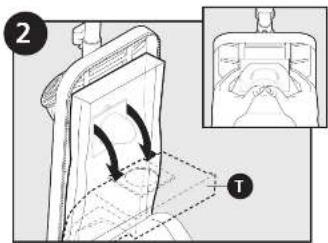
text_image
Diagram illustrating a medical procedure with labeled steps and directional arrows, including a magnified inset showing anatomical view.text_image
Technical diagram showing a mechanical assembly with labeled parts 3 and T, likely illustrating a component or assembly.text_image
Diagram showing a mechanical assembly with labeled parts and directional arrows, including a zoomed-in inset view.text_image
Technical diagram showing a mechanical assembly with labeled parts 3 and T, likely illustrating a component or assembly.text_image
Diagram illustrating a medical procedure with labeled steps and directional arrows, including a magnified inset showing hand placement.text_image
Technical diagram showing mechanical assembly with labeled component '2' and magnified detail viewtext_image
Diagram showing a mechanical component with numbered arrows and a magnified inset view of the component.natural_image
Mechanical assembly diagram showing a device with a spring and directional arrow, plus an inset close-up of a mechanical component (no text or symbols)natural_image
Technical illustration of a mechanical device with an inset showing a close-up view of a component (no text or symbols present)natural_image
Mechanical assembly diagram showing a component being inserted into a tray, with an inset close-up of the component (no text or symbols visible)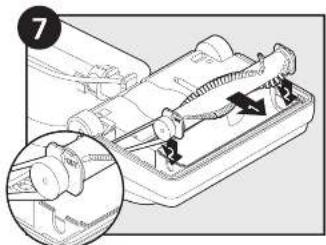
natural_image
Illustration of a mechanical device with a magnified inset showing internal components (no text or symbols)text_image
Diagram showing mechanical assembly with labeled parts and directional arrows, including a magnified inset view of a component detail.text_image
Diagram showing a hand operating a device with arrows indicating process and a magnified inset highlighting the component's rotation.Revissez.