280501W - Food Dehydrator Weston - Free user manual and instructions
Find the device manual for free 280501W Weston in PDF.
| Product Type | Food Dehydrator |
| Brand | Weston |
| Model | 280501W |
| Capacity | 160 liters (model 160-L) |
| Dimensions (approx.) | Height: ~80 cm, Width: ~60 cm, Depth: ~60 cm |
| Weight (approx.) | Approximately 40 kg |
| Power Supply | 120 V ~ 60 Hz, 20 A protected circuit |
| Temperature Range | 50 °F to 160 °F (10 °C to 71 °C) in 5 °F increments |
| Timer | 1 minute to 23 hours (5-minute increments) |
| Digital Display | Continuous cycle: programmed time, remaining time, programmed temperature, actual temperature |
| Interior Light | Replaceable LED bulb |
| Tray Material | Non-stick trays (not dishwasher safe) |
| Number of Trays | Multiple trays (not specified, but model 160-L can hold several) |
| Main Functions | Food dehydration (meat, fruits, vegetables, flowers); temperature and time programming; automatic shut-off |
| Safety | Grounding required; built-in circuit breaker; do not use outdoors; do not immerse |
| Cleaning | Unplug before cleaning; trays hand wash; interior and exterior wiped with a damp cloth; diffuser cleaned carefully |
| Replacement Parts | LED bulbs, trays, snack supports, legs/casters (repairs by authorized center) |
| Warranty | 2 years limited (registration required within 30 days) |
| Intended Use | Dehydration, not cooking; pre-cook meat before dehydrating |
Frequently Asked Questions - 280501W Weston
User questions about 280501W Weston
0 question about this device. Answer the ones you know or ask your own.
Ask a new question about this device
Download the instructions for your Food Dehydrator in PDF format for free! Find your manual 280501W - Weston and take your electronic device back in hand. On this page are published all the documents necessary for the use of your device. 280501W by Weston.
USER MANUAL 280501W Weston
natural_image
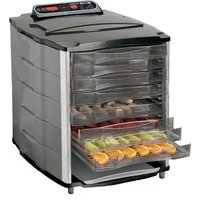
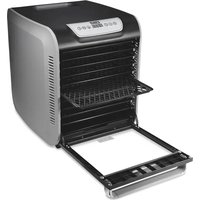
Two black industrial kitchen units with visible internal patterns and digital displays, no text or symbols present.FOOD DEHYDRATORS
PRO-1200 28-0301-W (80 L)
PRO-2400 28-0501-W (160 L)
IMPORTANT! 3
GENERAL SAFETY RULES 4
GROUNDING INSTRUCTIONS 5
COMPONENT LIST 6-7
ASSEMBLY INSTRUCTIONS 8
PRE-OPERATING INSTRUCTIONS 9
SET UP 9
PROGRAMMING 10
FUNCTION 10
POST OPERATION 11
OPERATING INSTRUCTIONS 11
CLEANING INSTRUCTIONS 12-13
TROUBLESHOOTING 13
LIGHT BULB REPLACEMENT 14
DRYING TIPS 15-16
MAKING JERKY 17-18
STORING JERKY 18
RECONSTITUTION 18
SUMMARY 19
DRYING FLOWERS 19
FOOD SAFETY 20
TWO-YEAR LIMITED WESTON WARRANTY .. 22
¡IMPORTANTE! 24
This appliance is a Dehydrator, not an oven. Its purpose is to dry, not cook. Dehydrator operation is not the same as that of an oven.
- BEFORE dehydrating, heat meat to an internal temperature of 160°F (71°C) and poultry to 165°F (74°C) in an oven to kill any bacteria that may be present.
- Heat the meat or poultry in an OVEN, not the Dehydrator.
- Ideally, Set Temperature is only the highest temperature reached during a heating cycle. Set Temperature is not maintained.
- Depending on a variety of factors including ambient conditions, state of food being dried and power supply, the Set Temperature may not be reached.
- For maximum performance: do not use extension cords; operate the Dehydrator in area where the temperature is above 70^ (21°C); remove other appliances from the electrical circuit to which you connect the Dehydrator; make sure the door is fully closed with no gaps in the seal; connect the Dehydrator to an electrical circuit protected by a 20-Amp circuit breaker.
- DO NOT use the Dehydrator outdoors.
- Read and fully understand all instructions and warning prior to using the Dehydrator.
GENERAL SAFETY RULES
READ AND FULLY UNDERSTAND ALL INSTRUCTIONS AND WARNINGS PRIOR TO USING THIS UNIT. YOUR SAFETY IS MOST IMPORTANT! FAILURE TO COMPLY WITH PROCEDURES AND SAFE GUARDS MAY RESULT IN SERIOUS INJURY OR PROPERTY DAMAGE. REMEMBER: YOUR PERSONAL SAFETY IS YOUR RESPONSIBILITY!
- ALWAYS DISCONNECT the Dehydrator from the power source before servicing, changing accessories or cleaning the unit.
- ALWAYS USE A SEPARATE DEDICATED ELECTRICAL CIRCUIT to supply power to this Dehydrator. The circuit should not be less than #12 wire and MUST be protected with a 20 amp circuit breaker. If you are unsure of your electrical system, contact a qualified electrician. Failure to verify your electrical system may result in fire, injury or property damage! The unit will not heat to the Set Temperature unless this step is done.
- NEVER LEAVE THE DEHYDRATOR UNATTENDED. Be safe, DISCONNECT the Dehydrator from power source before leaving the work area. Close supervision is necessary when any appliance is used near children. This appliance is NOT to be used by children.
- Reduce risk of unintentional starting. Make sure the Power Switch is in the "OFF" position before attaching to the power source. To disconnect, turn any control to off, then remove plug from wall outlet.
- DO NOT USE the Dehydrator if the Power Cord, Plug or any other parts are damaged. If the Power Cord or the Dehydrator is damaged, call Customer Service. DO NOT ATTEMPT TO REPLACE THE CORD. Be sure to not allow the Power Cord to drape into your work area. Check that all parts are operating properly, and perform the intended functions. Check for alignment of moving parts or any other conditions that may affect the operation.
- NEVER use any accessories or parts from other manufacturers. Doing so will VOID YOUR WARRANTY and may cause fire, electrical shock or injury.
- The Manufacturer declines any responsibility in the case of improper use of the Dehydrator. Improper use of the Dehydrator voids the warranty.
- Electrical repair must be done by your authorized dealer. Use only factory original parts and accessories. Modification of the Dehydrator voids the warranty.
- Be sure the Dehydrator is on a stable work surface. Be sure all the Dehydrator Feet are stable. Lock the Casters (if applicable) prior to use.
- DO NOT use outdoors.
-
This Dehydrator contains intake and exhaust vents on the rear of the unit. Keep all objects and walls at least 6" (15 cm) from all sides of the Dehydrator.
-
DO NOT run the Dehydrator on any flammable surfaces such as carpeting or wood floors! BE SAFE and use the Dehydrator on a cinder block or concrete floor.
-
TO PROTECT AGAINST RISK OF ELECTRICAL SHOCK: DO NOT SUBMERGE THE CORD, PLUGS, OR DEHYDRATOR INTO WATER OR LIQUID. BE SURE THE DEHYDRATOR IS DISCONNECTED FROM THE POWER SOURCE BEFORE CLEANING. Wash all parts by hand and thoroughly dry. Thoroughly clean all parts that will come in contact with food before using the appliance. NEVER rinse appliance Dehydrator with a hose or pouring water, only use a moist cloth to clean the Dehydrator. DO NOT use the Dehydrator with wet hands or bare feet. DO NOT use near water.
-
DO NOT allow water to drip inside of the Diffuser, damage to the Heating Element may occur. DO NOT remove the Diffuser from the Cabinet. Assembly integrity will be compromised and may void warranty. Follow the Diffuser cleaning instructions after EACH use.
-
After cleaning, make sure Dehydrator is completely dry before reconnecting to the power source – if not; ELECTRICAL SHOCK may result, and may result in personal injury.
-
Failure to follow cleaning and maintenance instructions will decrease the life span of your Dehydrator and may cause serious product malfunction, injury or property damage.
-
Do not place on or near a hot gas or electric burner, or in a heated oven. DO NOT allow the power cord to drape over the Dehydrator or hot surfaces.
-
BEWARE! Some surfaces of the Dehydrator may become very HOT during use! Serious injury may result! DO NOT touch these parts during operation or until they cool after use.
-
DO NOT attempt to operate the Dehydrator if the Dehydrator itself is cold. The Dehydrator temperature should be at least 45^ F ( 7^ C) before beginning.
-
DO NOT use the Dehydrator while under the influence of drugs, medications or alcohol.
-
Do not use appliance for other than intended use.
-
Extreme caution must be used when moving an appliance or part containing hot oil or other hot liquids.
SAVE THESE INSTRUCTIONS
GROUNDING INSTRUCTIONS
GROUNDING
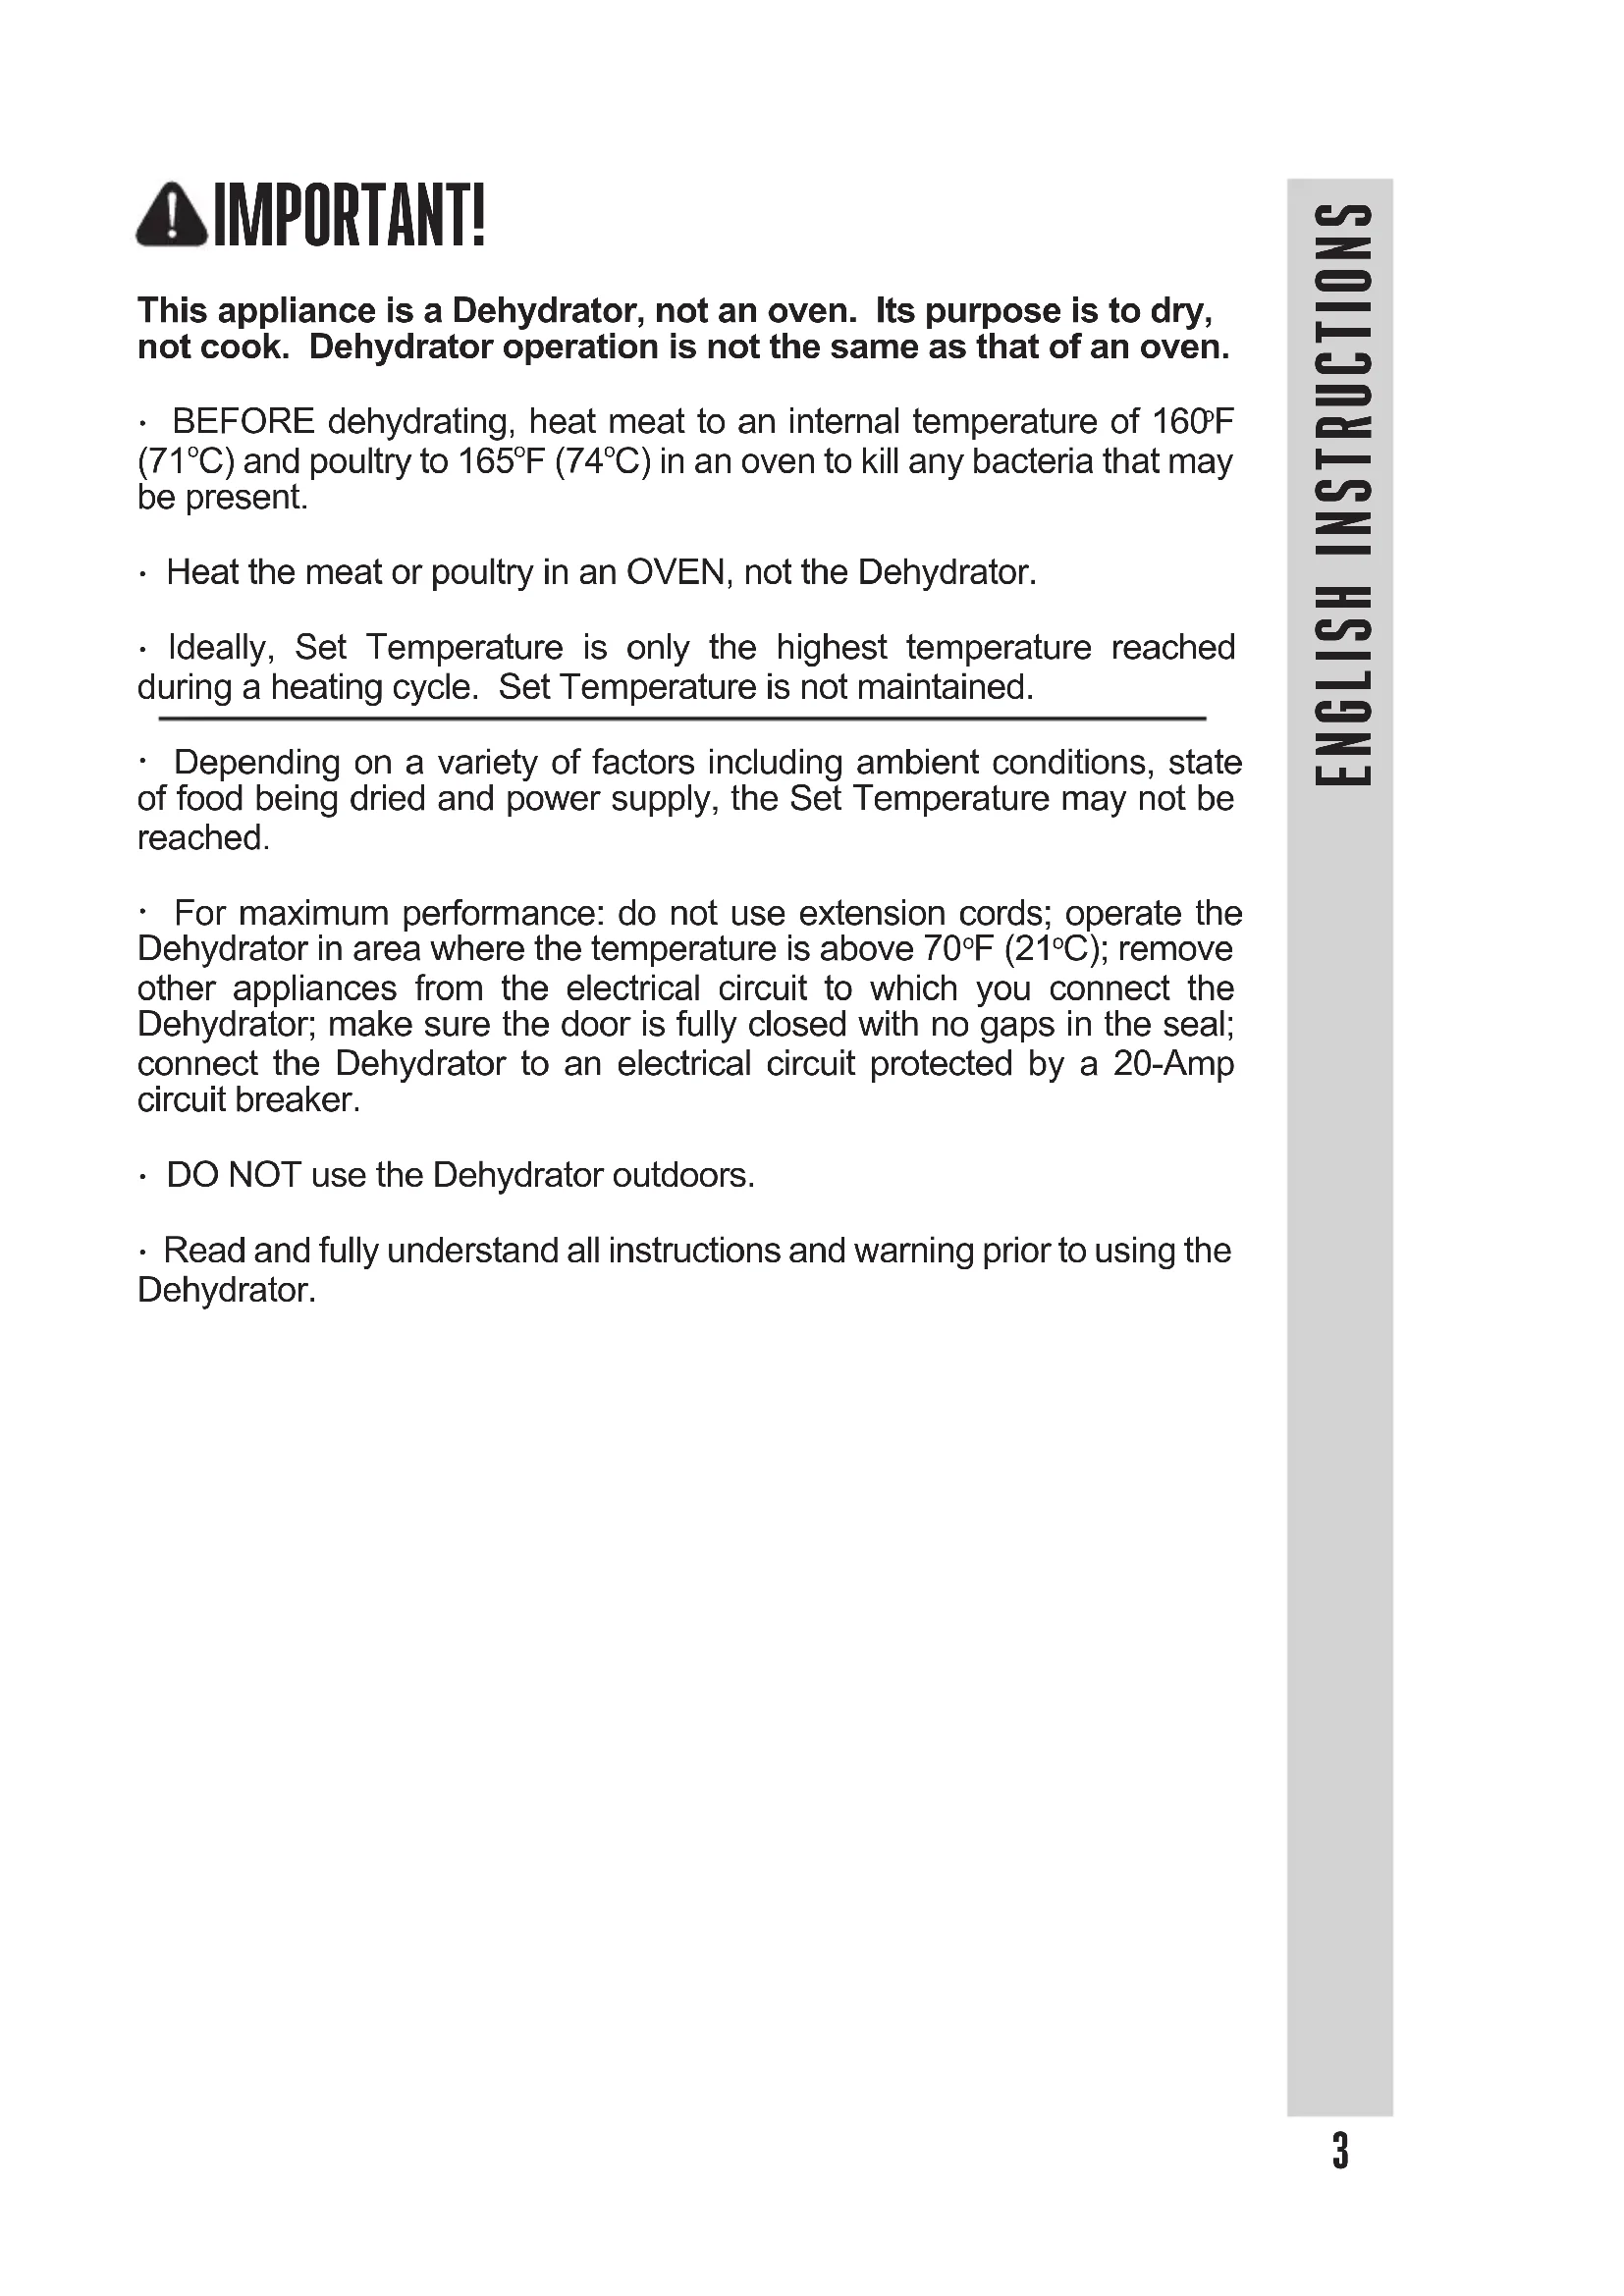
This appliance must be grounded while in use to protect the operator from electrical shock. The appliance is equipped with a 3-conductor cord and a 3-prong grounding type plug to fit the proper grounding-type receptacle. The appliance has a plug that looks like Figure A.
text_image
FIGURE A Grounding Prong Circuit Grounding ConductorWARNING! Before cleaning, assembling or disassembling the Dehydrator, make sure the PLUG IS REMOVED FROM THE OUTLET/POWER SOURCE! ALWAYS unplug the Dehydrator when not in use.
text_image
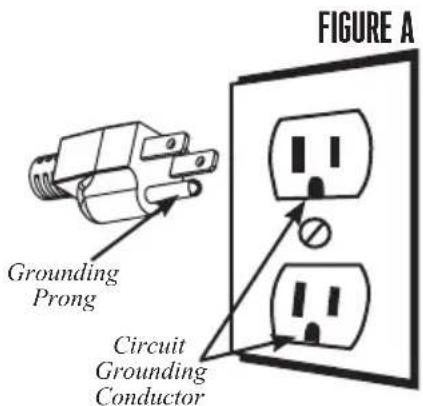
Exploded view diagram of a refrigerator with numbered parts for identificationBACK VIEW
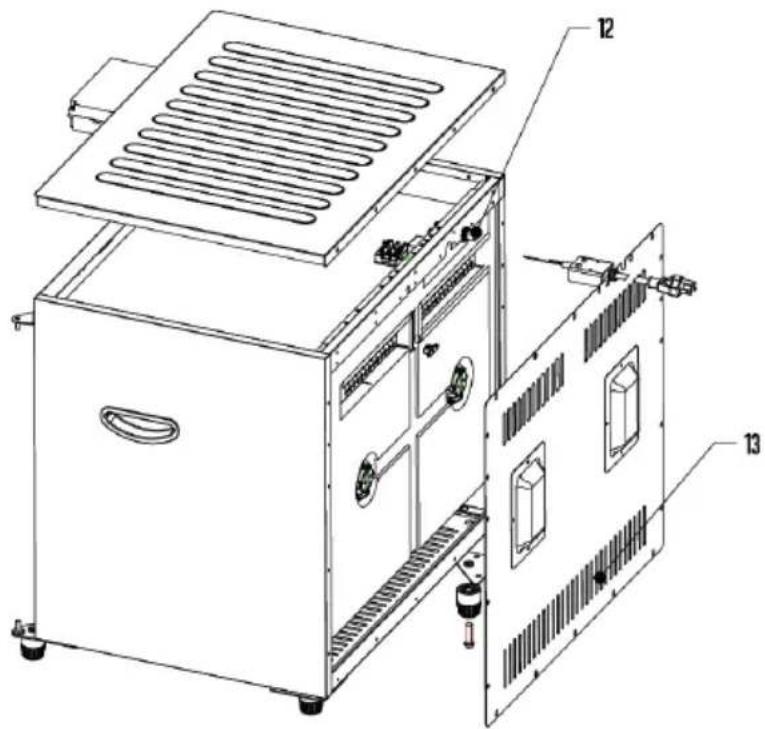
text_image
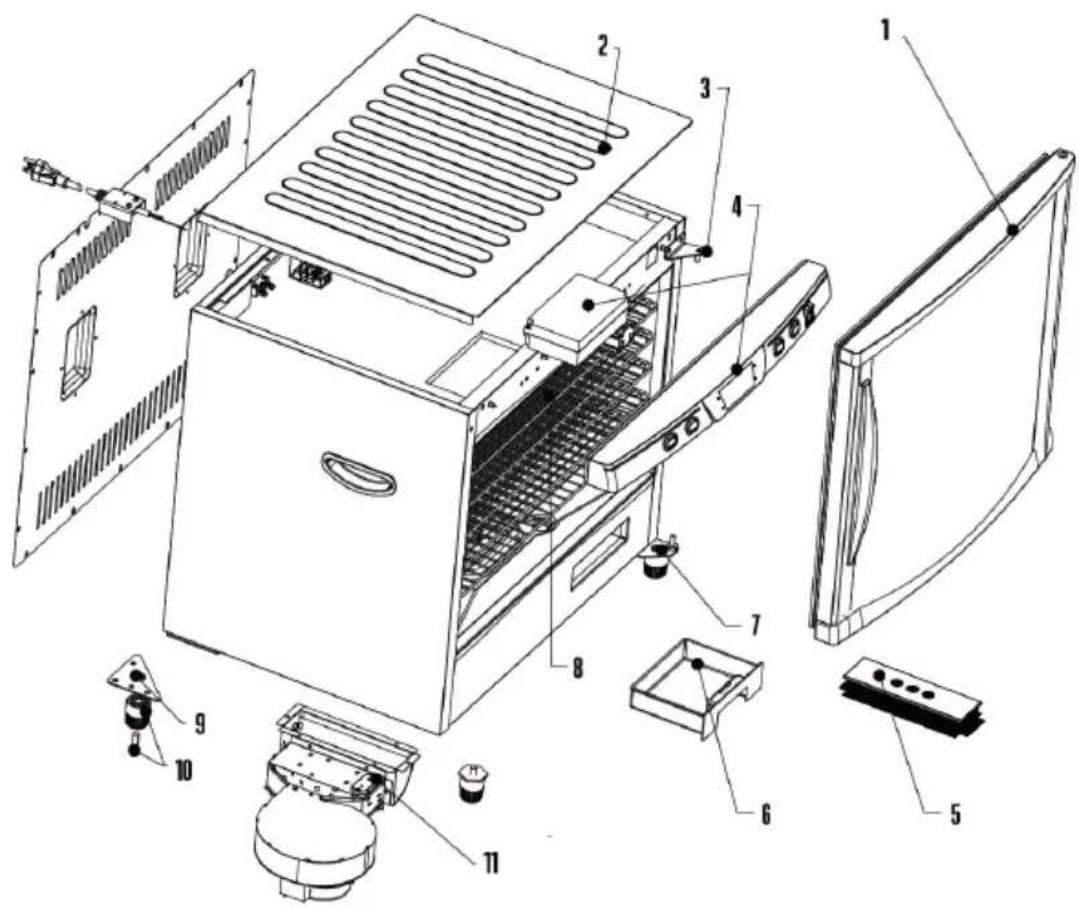
Technical diagram of an industrial machine with labeled components and internal structureCOMPONENT LIST
| DIAGRAM # PART DESCRIPTION 28-0301-W 28-0501-W | |||
| 1 DOOR 28-0404-W 28-0504-W | |||
| 2 TOP PANEL 28-0506 28-0506 | |||
| N/A BOTTOM PANEL (NOT SHOWN) 28-0307 28-0307 | |||
| 3 TOP DOOR HINGE 28-0333 28-0333 | |||
| 4 | COMPUTER BOARD& CONTROL PANEL | 28-0513 | 28-0513 |
| 5 | DIFFUSER | 28-0311 | 28-0331 |
| N/A | BACK PANEL DIFFUSER (NOT SHOWN) | N/A | 28-0330 |
| 6 | DRIP TRAY | 28-0519 | 28-0519 |
| 7 | BOTTOM DOOR HINGE | 28-0334 | 28-0334-N |
| 8 | NONSTICK RACK - SET OF 12 | 28-0313 | 28-0313(2 SETS INCLUDED) |
| 9 | REAR BOTTOM CORNER BRACKET (2) | 28-0336 | 28-0336-N |
| N/A | FRONT FOOT BRACKET (NOT SHOWN) | 28-0332 | 28-0332-N |
| 10 | FOOT KIT(INCLUDES ALL 4 FEET & BOLT) | 28-0308 | N/A |
| N/A | CASTER KIT(INCLUDES ALL 4 CASTERS & NUTS) | N/A | 28-0508 |
| 11 | FAN & HEATING ELEMENT | 28-0302 28-0302 | |
| 12 | CIRCUIT BREAKER | 28-0379 28-0379 | |
| 13 | BACK PANEL | 28-0305 28-0505 | |
| N/A | SNACK STICK HANGER (NOT SHOWN) | 28-0322 | 28-0322 |
If any components of this unit are broken, the unit does not operate properly or you need a replacement instruction manual, visit us on the web at
WestonProducts.com
Or call Weston Brands LLC Toll Free at 1-800-814-4895 Monday thru Friday 8:00am-5:00pm ET. Outside the U.S. call 001-216-901-6801
80 L ASSEMBLY INSTRUCTIONS
- Make sure the Dehydrator is turned off and unplugged.
- Remove the Racks and any other loose items from the interior and close the Door.
- Gently lay the Dehydrator onto its left side (when facing the Door) on a rug or other similar article to prevent scratching. DO NOT lay the Dehydrator onto its right side or front to avoid damaging the Door, Control Panel and/or Circuit Breaker.
- Insert the Foot Bolts into the holes at the bottom of the Feet until the Bolts threads protrude out. Thread the Bolts & Feet into the Front Foot Brackets.
- Tighten the Foot Bolts with a screwdriver.
- While holding the Door closed, carefully stand the Dehydrator upright onto the Feet.
160 L ASSEMBLY INSTRUCTIONS
- Follow steps 1-3 above.
- Screw a Caster Nut (attached to Caster for shipping) onto the threaded stem of each Caster until it stops.
- Screw the Swivel Casters into the Rear Bottom Corner Brackets until they stop. HINT: Hold the Caster frame with one hand and rotate the swivel with your other hand.
- Screw the Swivel Casters with Breaks into the Front Foot Brackets until they stop.
- Tighten each Caster Nut with a 12-mm (1/2") open-end wrench. Turn the Caster Nuts clockwise. You want to tighten them to the Dehydrator, not the Casters. DO NOT over-tighten.
- Inspect the gap between the Door and Front Left Foot Bracket to make sure the stem of the Caster does not contact the bottom of the Door. If there is contact, loosen the Caster Nut and move the Caster down. Screw the Caster Nut onto the stem of the Caster, but do not screw it all the way down. Leave a small gap to shorten the stem that protrudes through the Foot Bracket. Reinstall the Caster as described above.
- While holding the Door closed, carefully stand the Dehydrator upright onto the Casters.
PRE-OPERATING INSTRUCTIONS
- DO NOT operate the Dehydrator without the Feet / Casters installed.
- Locate the Dehydrator on a clean, level, dry, non-flammable, surface at least 6" (15 cm) away from any wall. Avoid carpeted surfaces.
- Set the brakes on the two front-mounted Swivel Casters (160-L model).
SET UP
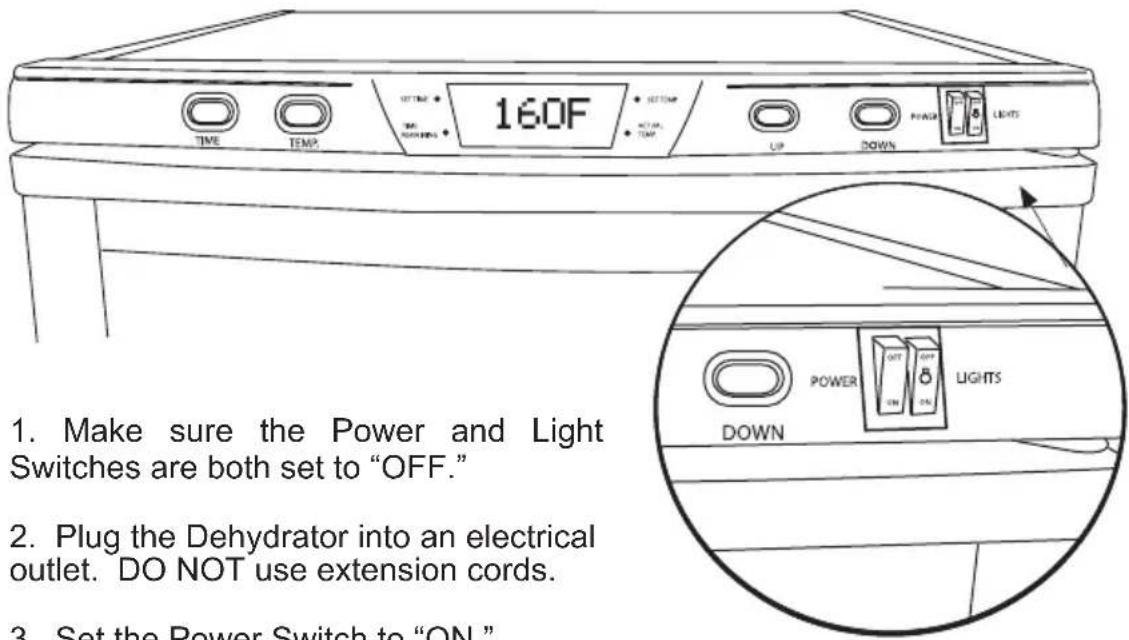
text_image
160F TIME TEMP OFF UP DOWN PULSE LIGHTS 1. Make sure the Power and Light Switches are both set to "OFF." 2. Plug the Dehydrator into an electrical outlet. DO NOT use extension cords. 3. Set the Power Switch to "ON."- Set the Power Switch to "ON."
- Fill the Racks with food or other items to be dried.
- Load the Racks in the Dehydrator. Push each Rack in until it stops.
IMPORTANT: There are three notched Racks. Place these Racks (with the notch to the back) on the top three Rack Supports. The notches prevent the Racks from touching the Temperature Sensor on the back inside wall near the top. Any contact between these parts may cause false temperature readings and/or cycle irregularities.
- Close the Door, firmly press on the Door to ensure a good seal.
PROGRAMMING
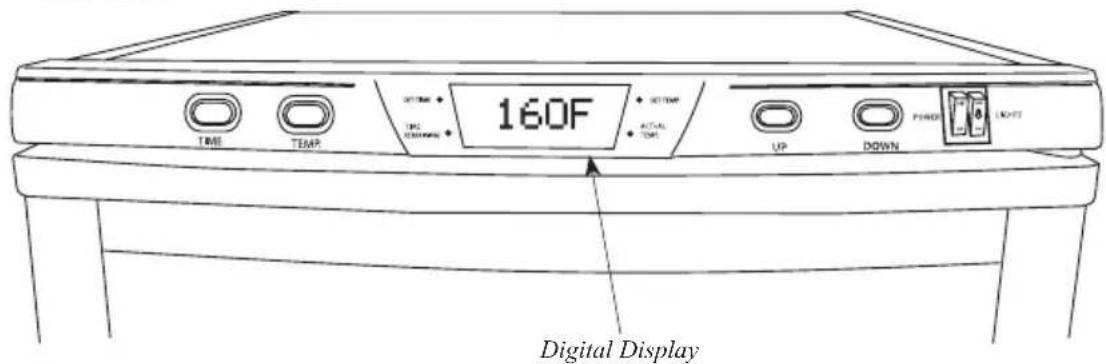
text_image
160F DIGITAL DISPLAY-
TO SET THE TIME: Press the "TIME" Button on the Control Panel one time. Use the "UP" & "DOWN" Buttons on the right side of the Control Panel to set the countdown timer hours (23 hour maximum). Press the "TIME" Button again to switch to minutes. Similarly set the minutes (5 minute increments).
-
TO SET THE TEMPERATURE: Press the "TEMP" Button one time. Use the "UP" & "DOWN" Buttons to set the temperature (160°F maximum, 50°F minimum, 5 degree increments).
NOTE: Set Temperature is the maximum temperature the Dehydrator could reach during operation.
- You do not need to push any other buttons. The Dehydrator will automatically start after a brief pause. NOTE: The Dehydrator will start while you're programming if you delay. Don't worry, this is normal. Just continue programming as instructed above.
FUNCTION
- The Digital Display on the Control Panel will continuously cycle while the unit is operating. It will alternately display: the preset drying time "SET TIME;" the remaining drying time "TIME REMAINING;" the preset temperature "SET TEMP;" and the actual current temperature inside the Dehydrator "ACTUAL TEMP" (measured by the Temperature Sensor on the back wall near the top).
NOTE: The "SET TEMP" is only the highest temperature reached during a heating cycle. The "SET TEMP" is NOT maintained.
-
The Dehydrator will emit 8 beeps at startup and when the interior temperature reaches the preset value.
-
The Dehydrator automatically stops (Fan & Heater) when the countdown timer reaches 0. Unit power will remain on, however.
POST OPERATION
- Set the Power Switch to "OFF" when you are done.
- Unplug the Dehydrator when not in use.
- Clean the Dehydrator after each use, especially the Diffuser. See the "CLEANING INSTRUCTIONS" section of this booklet.
OPERATING INSTRUCTIONS
- The purpose of this Dehydrator is to dry, not cook. It does not operate in the same manner as an oven. Its operation and performance should not be compared to that of an oven.
- The Dehydrator's “SET TEMP.” is only the highest temperature that will be reached during a heating cycle. It is the temperature at which the Heater turns off. The Fan will continue to operate. Heating resumes when the temperature falls 5 to 10 degrees below the “SET TEMP.”
- The maximum temperature to which you can set the Dehydrator is 160 °F (71°C). The Dehydrator may or may not reach Set Temperature depending on several factors including: the temperature in the area where the Dehydrator is operating; whether or not an extension cord is being used; whether or not the Dehydrator is sharing the electrical circuit with other appliances; food thickness, temperature and moisture content; the amount and position of food on the racks.
- For maximum Dehydrator performance: DO NOT use extension cords; operate the Dehydrator in an area where the temperature is above 70°F (21°C); remove all other appliances from the electrical circuit to which you connect the Dehydrator; make sure the door is fully closed with no gaps in the seal; connect the Dehydrator to an electrical circuit protected by a 20-Amp circuit breaker.
CLEANING INSTRUCTIONS
WARNING! Before cleaning, assembling or disassembling the Dehydrator, make sure the Dehydrator is OFF and the PLUG IS REMOVED FROM THE OUTLET/POWER SOURCE!
- IMPORTANT! Clean the Dehydrator after EACH use. Do not use abrasive cleansers. The Racks are NOT dishwasher safe.
- WARNING! DO NOT immerse the Dehydrator in water. DO NOT spray the Dehydrator with water. DO NOT let water drip into the Diffuser.
- DO NOT allow grease to build up inside the Dehydrator, especially on the Diffuser. Component damage or fire may result.
- Turn off and unplug the Dehydrator. Allow the Dehydrator to cool. Clean the Racks, interior and exterior Cabinet, Diffuser, Door and Drip Tray as described below.
NON-STICK RACKS
Wash the Racks by hand with a soft brush in warm soapy water. Rinse and towel dry. Make sure the Racks are completely dry before returning them to the Dehydrator.
CABINET INTERIOR
Wipe the Cabinet Interior and clean Rack Supports with a moderately damp cloth and soap if necessary. DO NOT use abrasive cleansers. Wipe off any residue if soap is used. CAUTION: DO NOT let water drip into the Diffuser. Electric shock or unit damage may result. If necessary, cover the Diffuser with a dry towel while cleaning the Cabinet Interior and Rack Supports.
CABINET EXTERIOR
Wipe the Cabinet Exterior with a moderately damp cloth and soap if necessary. Wipe off any residue if soap is used.
DIFFUSER
Wipe the top and sides of the Diffuser with a slightly damp cloth and soap if necessary. DO NOT use abrasive cleansers. Remove any residue if soap is used.
CAUTION: DO NOT let water drip into the Diffuser. Electric shock or unit damage may result.
Inspect the vent holes on the sides and top of the Diffuser. All the holes must be clean and fully open. Use a toothpick or other pointed object to remove any residue. Be careful not to push residue into the Diffuser.
Diffuser
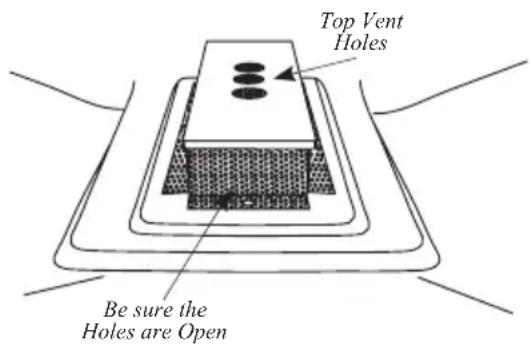
text_image
Top Vent Holes Be sure the Holes are OpenCABINET DOOR
Wipe the Door and Seal clean with a moderately damp cloth and soap if necessary. Wipe off any residue if soap is used. Wipe the glass clean with a rag or paper towels and glass cleaner.
DRIP TRAY
Empty then wash the Drip Tray in warm soapy water. Rinse and dry the Drip Tray before re-installing it in the Dehydrator.
TROUBLESHOOTING
The Dehydrator loses power and will not restart.
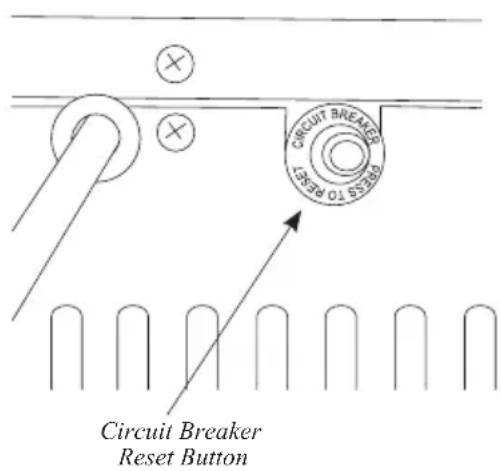
- Turn the Dehydrator off and disconnect the Power Cord from the electrical outlet. Press the button on the Circuit Breaker (located on the back of the Dehydrator near the top) to reset it.
- Check the household circuit breaker controlling the electrical outlet to which you connected the Dehydrator. Make sure that the breaker is rated 20 Amp and no other appliances are used at the same time. Reset it, if necessary.
text_image
CIRCUIT BREAKER RESET TO RESET Circuit Breaker Reset ButtonUneven or incomplete drying.
- Do not cover the center holes in the Racks.
- Rotate the Racks every 45 to 90 minutes depending on the food being dried. Move the top Rack to the bottom. Move all other Racks up one shelf. Turn the Racks around.
- Don't crowd food items. Space items 12 to 1" (1.3 to 2.5 cm) apart on the Racks.
- Increase the drying time and temperature.
- Do not block the vents on the bottom of the Dehydrator.
- Keep the Dehydrator at least 6" (15.2 cm) away from any wall.
If the above tips do not resolve the problem you are having with the Dehydrator, contact Customer Service at the number on the back of this manual for additional information and further troubleshooting.
LIGHT BULB REPLACEMENT
WARNING! Before cleaning, assembling or disassembling the Dehydrator, make sure the Dehydrator is OFF and the PLUG IS REMOVED FROM THE OUTLET/POWER SOURCE!
- Turn off the Dehydrator Lights. Turn off and disconnect the Dehydrator from the power outlet.
-
Let the Dehydrator cool. DO NOT attempt to replace a Light Bulb while the Dehydrator is hot. LED Light Wire
-
Remove all of the Racks.
-
Remove the Back Panel of the Dehydrator.
-
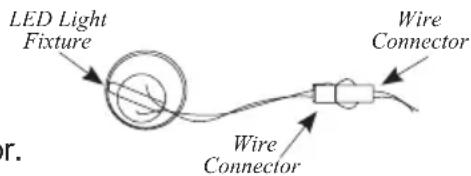
Locate the LED Light Fixture that you wish to replace, and disconnect the wires from the Light Fixture from the white Wire Connector on the unit by squeezing together the two clips on the Wire Connector.
-
Press together the two sides of the Metal Clip on the Light Fixture to release it from the body of the Dehydrator and then gently push the Light Fixture into the Cabinet of the unit, being sure to have a grip on the wires connected to the Light Fixture so it does
text_image
LED Light Fixture Wire Connector Wire Connector r.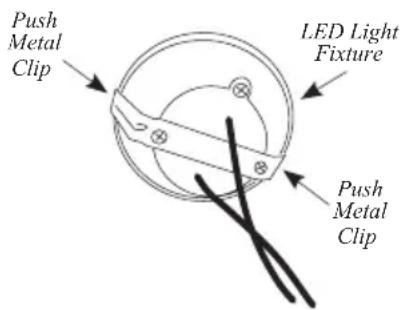
text_image
Push Metal Clip LED Light Fixture Push Metal Clipnot drop into the Dehydrator Cabinet. Discard the removed Light Fixture.
-
Insert the replacement Light Fixture into the vacant hole where the old Light Fixture was by first feeding the wire connected to the Light Fixture first.
-
Line up the Light Fixture with the hole and push it back until the Metal Clips on the back of the Light Fixture lock into place.
-
Re-connect the Wire Connector attached to the Light Fixture with the Wire Connector the old Light Fixture was connected to by pressing them together until they lock.
-
Line the Back Panel of the Dehydrator up and re-install the removed screws to mount the Back Panel.
DRYING TIPS
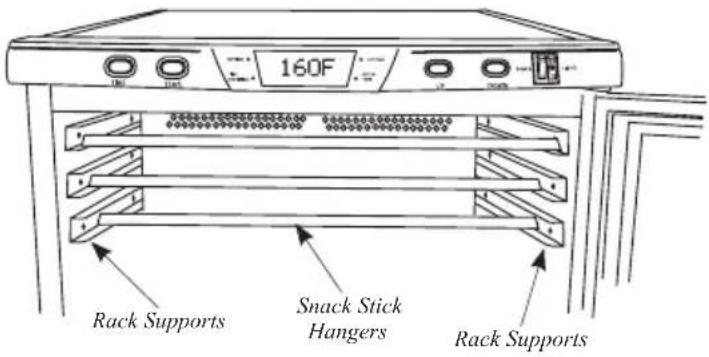
SAUSAGE OR SNACK STICKS: Use the Snack Stick Hangers to hang and dry sausage links and snack sticks. After removing all the Racks from your Dehydrator, simply drape the links over the Snack Stick Hangers and slide them into the top Rack Supports. Be sure not to
text_image
160F Rack Supports Snack Stick Hangers Rack Supportsallow the links to rest on the bottom of the Cabinet or on top of the Diffuser.
GROUND MEATS: Whenever making jerky from ground meats, you can use a jerky gun or such tool to create perfect strips of jerky as well as snack sticks.
BEEF: Choose Flank, Round or Sirloin Tip cuts, as they are the best beef cuts for making jerky.
WILD GAME: Venison makes excellent jerky because it does not contain marbleized fat. Flank or Round Cuts work best. Bear and Elk meat also make very good jerky.
POULTRY: Whether making chicken or turkey jerky, it is important that the meat be cooked heated to an internal temperature of 165^ F ( 74^ C) before dehydrating to kill disease-causing bacteria.
FISH: Drying fish into jerky requires a lot of attention. It must be cleaned and de-boned properly and rinsed thoroughly to ensure that all the blood is washed away. Steam or bake the fish at 200 °F (93°C) until flaky before dehydrating.
DRYING TIPS
As with most methods of cooking, good preparation is essential to success. Following a few basic guidelines will greatly increase the quality of the dehydrated product and decrease the time needed to make it.
NOTE: Before dehydrating, heat meat to an internal temperature of 160^ F ( 71^ C) and poultry to 165^ F ( 74^ C) to kill any bacteria that may be present. Heat the meat or poultry in an oven, not the Dehydrator.
- To prevent fruit from darkening, briefly soak slices in lemon or pineapple juice before drying. You also can soak fruit slices in ascorbic acid, which is sold in most pharmacies and health food stores in powder or tablet form. Prepare a solution of ascorbic acid according to the manufacturer's instructions. Soak fruit slices in the solution for 2 to 3 minutes before dehydrating.
- Water or steam blanch* vegetables before drying to stop enzymatic action. To water blanch, place vegetables directly into boiling water and cover. Remove after three minutes. To steam blanch, place vegetables in a steamer basket and steam for 3 to 5 minutes.
- Maintain a uniform thickness when slicing food items for dehydration. This will ensure the items dry at the same rate.
- Maximum slice thickness for fruits and vegetables should be 1/4" (0.7 cm) unless otherwise specified by a recipe.
- Maximum slice thickness for meats should be 3/16" (0.5 cm) unless otherwise specified by a recipe.
- Lean meat makes better product than fatty meat.
• Marinate meat before heating and dehydrating.
- Food shrinks by half or more during dehydration. A pound of meat, for example, will yield 1/2 to 1/3 lb (0.15 to 0.2 kg) of jerky. Don't cut pieces too small.
- Store dried foods in a closed container in a cool, dark, dry location. The best storage temperature is between 50^ and 60^ (10° and 16°C). Dried food should retain its freshness for months when stored this way.
- The actual time needed to dry a food depends on many factors including the food's moisture content, fat content, thickness and temperature as well as ambient humidity and temperature.
• Water droplets may form on the surface of meat and other items while drying. Occasionally blot the food items to remove the droplets.
*Blanching is not required for all vegetables. Check the recipe or a drying guide.
MAKING JERKY
Meat should be as lean as possible. Using lean meat will help the meat dry faster and aid in cleanup by decreasing fat drippings. Ground meat should be 80% to 90% lean. Ground turkey, venison, buffalo and elk are other excellent choices for Jerky.
Jerky seasonings are available for all tastes, or you can get creative and make your own. Whenever you make Jerky, you should cure the mixture with cure (sodium nitrite). The cure is used to help prevent botulism during drying at low temperatures. Follow the manufacturer's directions on the cure packet.
Keep raw meats and their juices away from other foods. Marinate meats in the refrigerator. Do not leave meats unrefrigerated. Prevent cross-contamination by storing dried jerky away from raw meat. ALWAYS wash hands thoroughly with soap and water before and after working with meat products. Use clean equipment and utensils.
Keep meat and poultry refrigerated at 40^ F ( 4.4^ C) or slightly below; use or freeze ground beef and poultry within 2 days; whole red meats, within 3 to 5 days. Defrost frozen meat in the refrigerator, not on the kitchen counter.
Special considerations must be made when using venison or other wild game, since it can become heavily contaminated during field dressing. Venison is often held at temperatures that could potentially allow bacteria to grow, such as when it is being transported. Refer to the USDA website for further information on food safety. (www.usda.gov or www.fsis.usda.gov/fact_sheets/index.asp)
When using a Dehydrator, check the temperature of the Dehydrator with a dial thermometer before drying jerky. The minimum recommended temperature for drying meats is 130^ F ( 54^ C). Temperatures below 130^ F ( 54^ C) are not recommended.
IMPORTANT: Before placing the meat in a Dehydrator, it is highly recommended to heat the meat to 160^ F ( 71^ C) BEFORE the dehydrating process. This step assures that any bacteria present will be destroyed by wet heat. After heating to 160^ F ( 71^ C), maintaining a constant Dehydrator temperature of 130-140^ F ( 54-60^ C) during the drying process is important because:
1.) the process must be fast enough to dry food before it spoils; and
2.) it must remove enough water so that microorganisms are unable to grow.
MAKING JERKY
If you are using a marinade, shake off excess liquid from the meat before spacing it evenly in single layers, approximately 1/4"-1/2" (0.6-1.5 cm) apart, on the Dehydrator Racks.
IMPORTANT NOTE: DO NOT place jerky over the center hole of the Racks. This will impede airflow to the center of the Cabinet and could result in uneven drying.
Dry meat at 145-150°F (62.7-65.6°F) for 4-7 hours. You may need to blot fat droplets from the surface of the meat occasionally, using a paper towel. Drying times may vary based on many circumstances including but not limited to: the relative humidity of the room, the temperature of the meat at beginning of drying process, the amount of meat in the dehydrator, leanness of meat, etc. Always allow jerky to cool before taste testing.
STORING JERKY
Wrap jerky/snack sticks in aluminum foil and store in a thick plastic food storage bag, or place jerky/snack sticks in a jar with a tight lid. Avoid storage in plastic containers or bags without wrapping in aluminum foil or wax paper first. Jerky/snack sticks should be stored in a dark, dry, place between 50-60°F (10-15.6°C). You can store properly dried jerky/snack sticks at room temperature for 1 to 2 months. To extend the shelf life to up to 6 months, store jerky/snack sticks in the freezer. Be sure to label and date all packages.
RECONSTITUTION
- While it is not necessary to reconstitute dried foods, it can be done with ease. Vegetables can be used as a side dish or in recipes very effectively after being reconstituted in the following way.
- Soak vegetables in cold, unsalted water for 3-7 minutes before cooking. If planning to soak the food any longer, it should be placed in the refrigerator while soaking. After soaking, it is best to cook the vegetables in the same water in which they soaked. Simply bring the water to a boil and cook the vegetables until tender.
- Generally 1 cup of dried vegetables will result in about 2 cups after reconstitution. Fruits reconstitute at a ratio of approximately 1:1-1/2 cups.
- Reconstitution time will vary depending on the thickness of the dried food and the temperature of the water used. Soaking the food in warmer water will speed up the process, however, it may result in loss of flavor.
SUMMARY
Remember drying food is as much an art as any other form of cooking. Once familiar with the basics, experiment to create unique dried foods.
Just remember the basics:
• The leaner the meat, the better the jerky
- Do not overlap food products on the drying racks
• Properly pre-treat fruits and vegetables
• Drying times will vary
- Blot excess moisture from surface of foods while drying
- Rotate racks if drying is uneven
• Always follow food safety guidelines for meats, poultry and fish to make sure the finished product is free of disease-causing bacteria
DRYING FLOWERS
- The flowers should be dry to start with, best if picked after the dew has dried and before the night damp sets in. Dry the flowers as soon as possible after picking.
- The best condition for drying flowers is a dry, warm, dark, clean and well ventilated area, which makes a dehydrator an ideal setting. Flowers will retain the best color and condition when dried quickly.
- A low temperature should be used to retain the natural oils.
- Strip off the leaves or if you prefer to keep the foliage. Discard any brown or damaged leaves.
- Place on the dehydrator Rack in a single layer, avoiding overlapping.
- Drying times will vary considerably depending on the size of the flower and the amount of foliage. Dry at 100^ (38°C).
FOOD SAFETY
There are basic rules to follow when handling food. They are COOK, SEPARATE, CLEAN, and CHILL.
COOK
It's crucial to cook food to a safe internal temperature to destroy bacteria that is present. The safety of hamburgers and other foods made with ground meat has been receiving a lot of attention lately, and with good reason. When meat is ground, the bacteria present on the surface is mixed throughout the ground mixture. If this ground meat is not cooked to at least 160^ to 165^ (71°C to 74°C), bacteria will not be destroyed and there's a good chance you will get sick.
Solid pieces of meat like steaks and chops don't have dangerous bacteria like E. coli on the inside, so they can be served more rare. Still, any beef cut should be cooked to an internal temperature of at least 145^ (63°C) (medium rare). The safe temperature for poultry is 165^ (75°C) and solid cuts of pork should be cooked to 145^ (63°C).
SEPARATE
Foods that will be eaten uncooked and foods that will be cooked before eating MUST ALWAYS be separated. Cross-contamination occurs when raw meats or eggs come in contact with foods that will be eaten uncooked. This is a major source of food poisoning. Always double-wrap raw meats and place them on the lowest shelf in the refrigerator so there is no way juices can drip onto fresh produce. Then use the raw meats within 1-2 days of purchase, or freeze for longer storage. Defrost frozen meats in the refrigerator, not on the counter.
When grilling or cooking raw meats or fish, make sure to place the cooked meat on a clean platter. Don't use the same platter you used to carry the food out to the grill. Wash the utensils used in grilling after the food is turned for the last time on the grill, as well as spatulas and spoons used for stir-frying or turning meat as it cooks.
Make sure to wash your hands after handling raw meats or raw eggs. Washing hands with soap and water, or using a pre-moistened antibacterial towelette is absolutely necessary after you have touched raw meat or raw eggs. Not washing hands and surfaces while cooking is a major cause of cross-contamination.
CLEAN
Wash your hands and work surfaces frequently when you are cooking. Washing with soap and warm water for at least 15 seconds, then dry with a paper towel.
CHILL
Chilling food is very important. The danger zone where bacteria multiply is between 40^ F and 140^ F ( 4^ C and 6^ C). Your refrigerator should be set to 40^ F ( 4^ C) or below; your freezer should be 0^ F (-17°C) or below. Simple rule: serve hot foods hot, cold foods cold. Use chafing dishes or hot plates to keep food hot while serving. Use ice water baths to keep cold foods cold. Never let any food sit at room temperature for more than 2 hours - 1 hour if the ambient temperature is 90^ F ( 32^ C) or above. When packing for a picnic, make sure the foods are already chilled when they go into the insulated hamper. The hamper won't chill food - it just keeps food cold when properly packed with ice. Hot cooked foods should be placed in shallow containers and immediately refrigerated so they cool rapidly. Make sure to cover foods after they are cool.
NOTE: Special considerations must be made when using venison or other wild game, since it can become heavily contaminated during field dressing. Venison is often held at temperatures that could potentially allow bacteria to grow, such as when it is being transported. Refer to the USDA Meat and Poultry Department for further questions or information on meat and food safety.
natural_image
Black-and-white photo of an outdoor food oven with multiple round food items on racks, surrounded by fresh vegetables and onions (no visible text or symbols)TWO-YEAR LIMITED WESTON WARRANTY
This warranty applies to products purchased and used in the U.S. and Canada, which have been properly registered within 30 days of the date of original purchase. This is the only express warranty for this product and is in lieu of any other warranty or condition. This product is warranted to be free from defects in material and workmanship for a period of two (2) years from the date of original purchase. During this period, your exclusive remedy is repair or replacement of this product or any component found to be defective, at our option.
To register your product: complete the online form at www.WestonProducts.com/Warranty.
This warranty does not cover unregistered products, unauthorized repairs or service to products, products sold “as-is” by retailers, glass, filters, wear from normal use, use not in conformity with the printed directions, or damage to the product resulting from accident, alteration, abuse, or misuse. This warranty extends only to the original consumer purchaser or gift recipient and is not transferrable. Keep the original sales receipt, as proof of purchase is required to make a warranty claim.
We exclude all claims for special, incidental and consequential damages caused by breach of express or implied warranty. All liability is limited to the amount of the purchase price. Every implied warranty, including any statutory warranty or condition of merchantability or fitness for a particular purpose, is disclaimed except to the extent prohibited by law, in which case such warranty or condition is limited to the duration of this written warranty. This warranty gives you specific legal rights. You may have other legal rights that vary depending on where you live. Some states or provinces do not allow limitations on implied warranties or special, incidental, or consequential damages, so the foregoing limitations may not apply to you.
Before returning the product for any repair or service: it must be clean and free from any food particles or other debris; otherwise, we will return it or impose a \$50 cleaning surcharge, at our option.
To make a warranty claim: go to www.WestonProducts.com/Contact; or call 1.800.814.4895 in the U.S. and 001.216.901-6801 outside the U.S., Monday – Friday, 8 am – 5 pm Eastern. You are responsible for all costs associated with shipping us the product freight prepaid. If the product qualifies for a warranty repair or replacement, we will bear the cost of returning it to you. We are not responsible for shipping damage.
For non-warranty work: call 1.800.814.4895 in the U.S. and 001.216.901.6801 outside the U.S., Monday – Friday, 8 am – 5 pm Eastern, to obtain a Return Merchandise Authorization Number (RMA Number). We will refuse all returns without an RMA Number. We charge US\$35/hour for all diagnostic, service, repair and processing work. We will not start any service or repair work without prior authorization. You are responsible for all costs associated with shipping us the product freight prepaid and our returning it to you.
natural_image
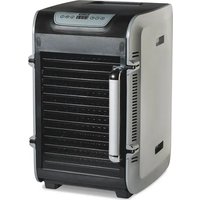
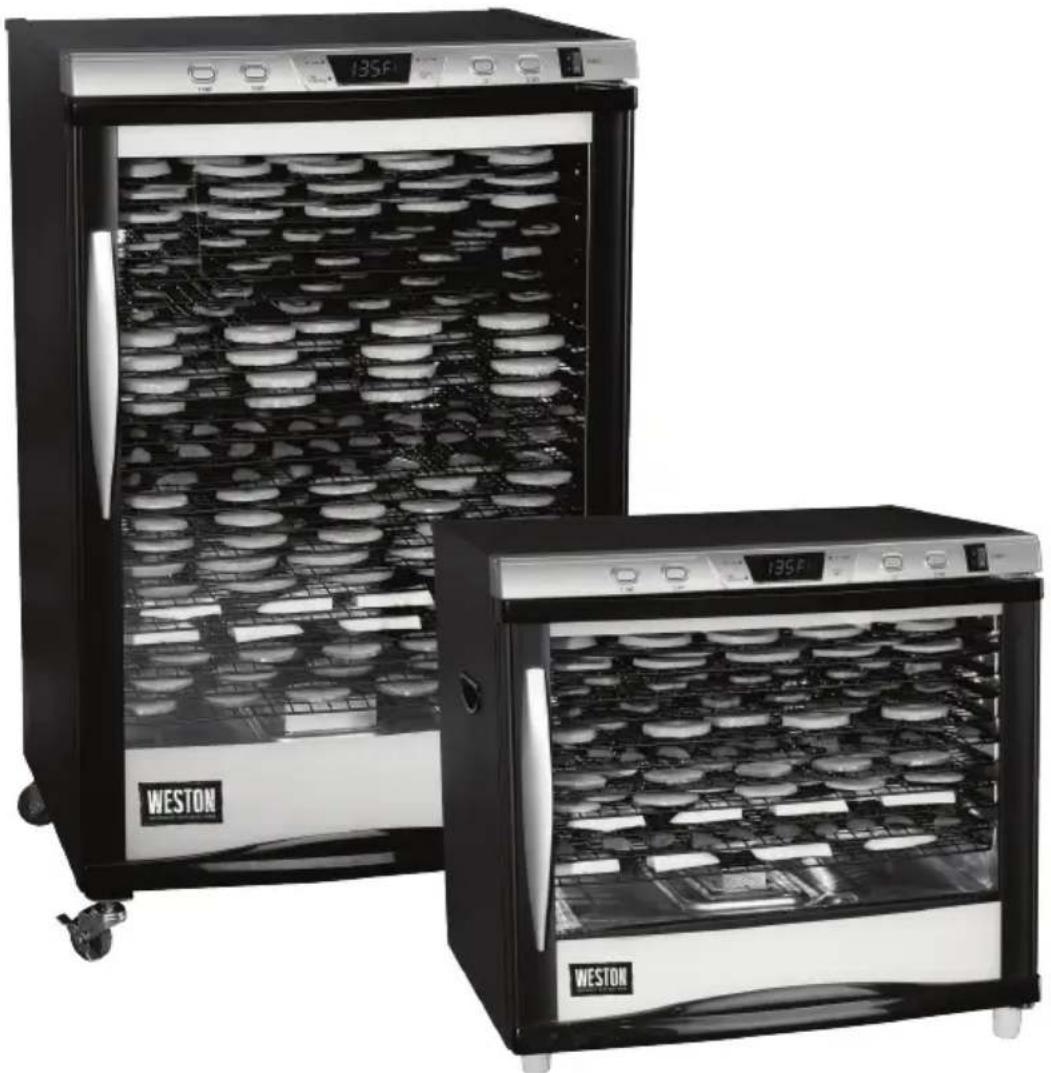
Exterior view of two Western-style commercial kitchen cabinets with digital display (no visible text or symbols)DESHIDRATADOR DE ALIMENTOS
PRO-1200 28-0301-W (80 L)
PRO-2400 28-0501-W (160 L)
DEBIDO A CONSTANTES MEJORAS EN LA FÁBRICA, EL PRODUCTO QUE SE MUESTRA PUEDE SER LIGERAMENTE DIFERENTE DEL PRODUCTO EN ESTA CAJA. 020416
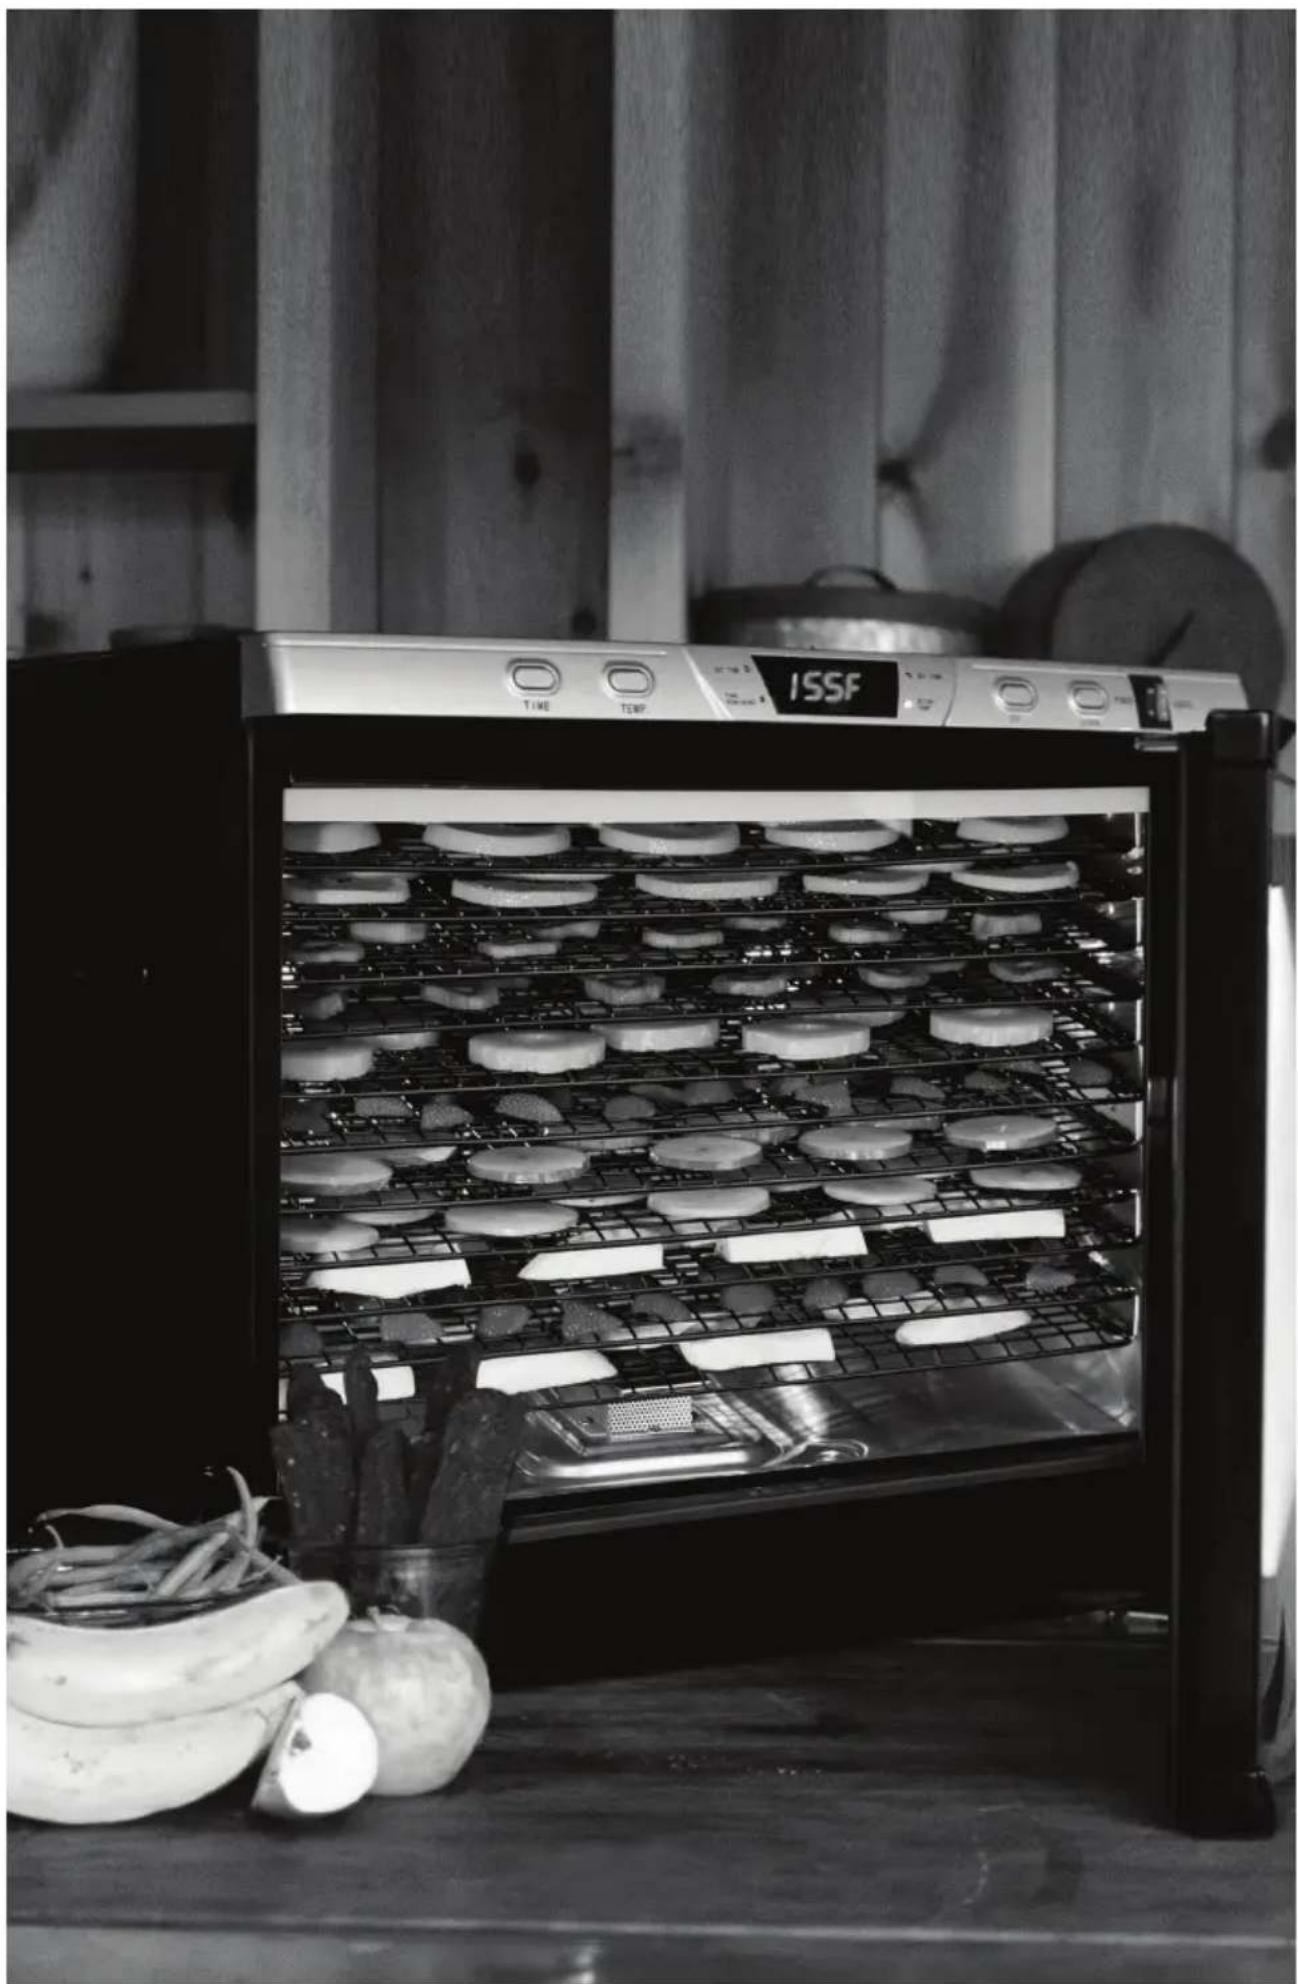
¡IMPORTANTE!
natural_image
Black-and-white photo of an outdoor food oven with rows of baked goods and a digital display showing 'ISSF' (no visible text on main subject)text_image
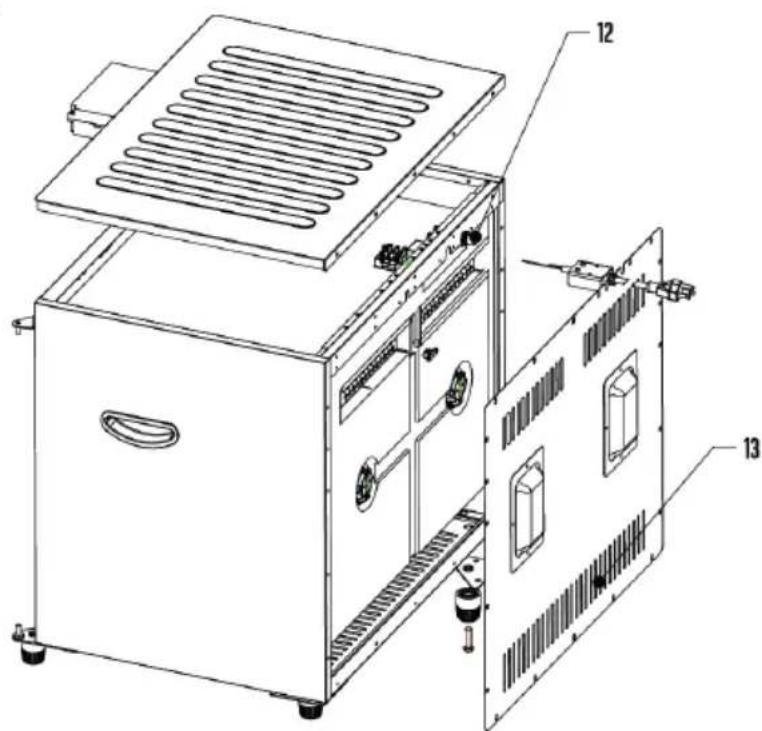
Exploded view diagram of a microwave oven with numbered components for identificationBACK VIEW
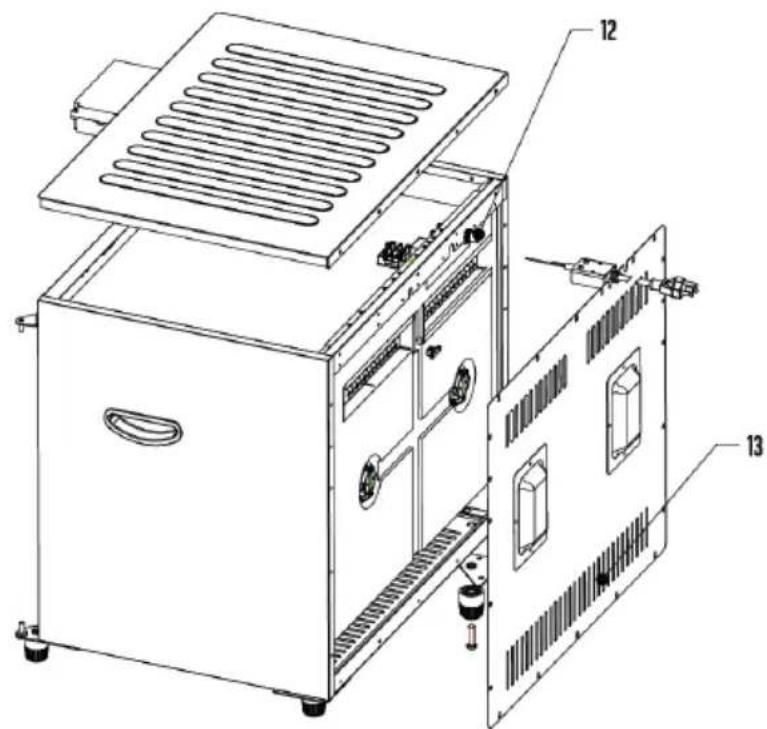
text_image
Technical diagram of an industrial machine with labeled components, showing internal structure and mounting parts.natural_image
Black-and-white photo of an outdoor oven with open lid and rows of food items, no visible text or symbolsDOS AÑOS DE GARANTÍA WESTON LIMITADA
natural_image
Two Western-style commercial kitchen units with drying trays, one labeled 'WESTON' and the other showing a single dish (no visible text or symbols on the main devices themselves)DÉSHYDRATEUR MODÉLA A
PRO-1200 28-0301-W (80 L)
PRO-2400 28-0501-W (160 L)
IMPORTANT!
text_image
Exploded view diagram of a refrigerator with numbered parts for identificationBACK VIEW
text_image
Technical diagram of an industrial machine with labeled components and internal structureDESCRIPTION DE LA PIÈCE
| NUMÉRO DESCHÉMA | DESCRIPTION DE LA PIÈCE 28-0301-W 28-0501-W | ||
| 1 PORTE 28 | -0404-W 28-0504-W | ||
| 2 PANNEAU | SUPÉRIEUR 28-0506 28-0506 | ||
| N/A PANNEAU | INFÉRIEUR 28-0307 28-0307 | ||
| 3 | CHARNIERE SUPÉRIEURE DE LAPORTE | 28-0333 28-0333 | |
| 4 | CARTE PRINCIPALE DE L'ORDINATEURET PANNEAU DE COMMANDE | 28-0513 28-0513 | |
| 5 DIFFUSEUR | 28-0311 28-0331 | ||
| N/A | DIFFUSEUR DU PANNEAU ARRIÈRE | N/A | 28-0330 |
| 6 | CUVETTE D'EGOUTTAGE | 28-0519 28-0519 | |
| 7 | CHARNIERE INFÉRIEURE DE LA PORTE | 28-0334 | 28-0334-N |
| 8 | GRILLE ANTIADHÉSIVE - ENSEMBLEDE 12 | 28-0313 | 28-0313(2 ENSEMBLES INCLUS) |
| 9 | SUPPORT EN CORNIÈRE INFÉRIEUREARRIÈRE (2) | 28-0336 | 28-0336-N |
| N/A SUPPORT | DE PIED AVANT 28-0332 | 28-0332-N | |
| 10 | SET DE PIEDS(AVEC 4 PIEDS ET BOULON) | 28-0308 N/A | |
| N/A | SET DE ROULETTE PIVOTANTES (AVEC 4ROULTETTES ET ÉCROU DE ROULETTE) | N/A 28-0508 | |
| 11 | VENTILATEUR ETÉLÉMENT CHAUFFANT | 28-0302 28-0302 | |
| 12 | DISJONCTEUR | 28-0379 28-0379 | |
| 13 | PANNEAU ARRIÈRE | 28-0305 28-0505 | |
| N/A | SUPPORT À COLLATIONS ENBÂTONNET (PAS MONTRÉ) | 28-0322 28-0322 | |
PLEASE INSPECT THIS PACKAGE THOROUGHLY FOR MISSING PARTS OR ANY PRODUCT DAMAGE. IF YOUR PRODUCT CONTAINS SHIPPING DAMAGE, PLEASE CONTACT RETAILER FOR ASSISTANCE.
For all other questions regarding product usage, missing parts, product damage, difficulty or warranty activation, please contact the Weston Brands Customer Service Team: 8:00 am to 5:00 pm ET, Monday thru Friday
CustomerService@WestonProducts.com
U.S. Residents Customer Service Line: 1-800-814-4895 (Outside U.S. Call: 001-216-901-6801)
Weston Brands LLC, Cleveland, Ohio 44149
WestonProducts.com
Please DO NOT return this item to the retailer before contacting Weston Brands Customer Service.
SAVE THESE INSTRUCTIONS!
Refer to them often and use them to instruct others.
ATTENTION!
VEUILLEZ INSPECTER CET EMBALLAGE AVEC SOIN POUR Y DÉTECTER TOUTE PIÈCE MANQUANTE OU ENDOMMAGÉE. SI DES PIÈCES ONT ÉTÉ ENDOMMAGÉES PENDANT LE TRANSPORT, VEUILLEZ COMMUNIQUER AVEC LE DÉTAILLANT POUR OBTENIR DE L'AIDE.