SCCB285NFX - Fridge SCHNEIDER - Free user manual and instructions
Find the device manual for free SCCB285NFX SCHNEIDER in PDF.

User questions about SCCB285NFX SCHNEIDER
0 question about this device. Answer the ones you know or ask your own.
Ask a new question about this device
Download the instructions for your Fridge in PDF format for free! Find your manual SCCB285NFX - SCHNEIDER and take your electronic device back in hand. On this page are published all the documents necessary for the use of your device. SCCB285NFX by SCHNEIDER.
USER MANUAL SCCB285NFX SCHNEIDER
natural_image
Simple line drawing of a refrigerator with no text or symbolsRÉFRIGÉRATEUR
SCCB285NFW, SCCB285NFX, SCCB285NFS NOTICE D'UTILISATION
text_image
Warning sign depicting a flame symbol in a triangular shape, indicating hazard or caution.natural_image
Technical line drawing of a screwdriver inserted into a workbench (no text or symbols)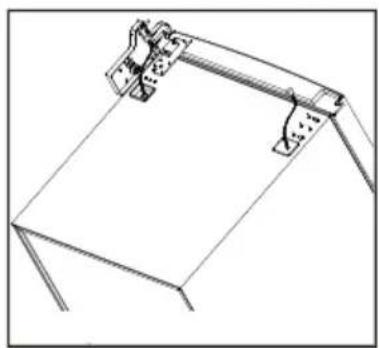
natural_image
Technical line drawing of a mechanical clamp or bracket assembly (no text or symbols)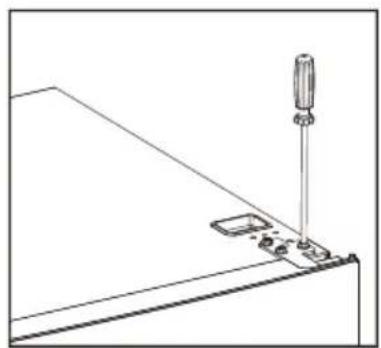
natural_image
Technical line drawing of a mechanical assembly with a screwdriver inserted, no text or symbols present
natural_image
Diagram of a mechanical device with a handle and two small components, showing an arrow indicating direction (no text or symbols present)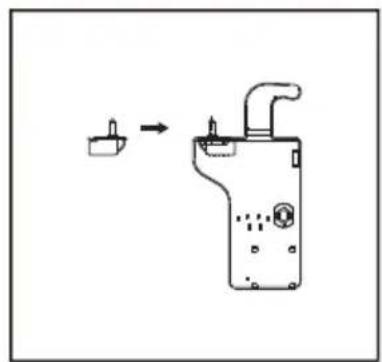
natural_image
Diagram showing a device with a plug and a valve, no text or symbols presentnatural_image
Line drawing of a mechanical clamp or bracket assembly (no text or symbols)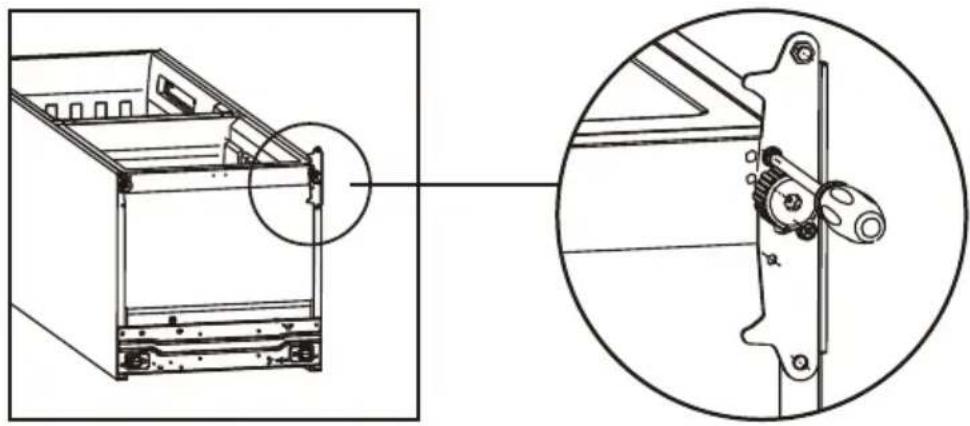
natural_image
Technical line drawing of a mechanical assembly with an inset close-up showing a gear mechanism (no text or symbols)natural_image
Technical line drawings of two mechanical clamp components, showing assembly steps (no text or symbols)natural_image
Technical line drawing of a mechanical assembly with an inset close-up showing a component detail (no text or symbols)natural_image
Simple line drawing of a rectangular frame with two small rectangular cutouts and a small letter 'D' at the bottom (no text or symbols)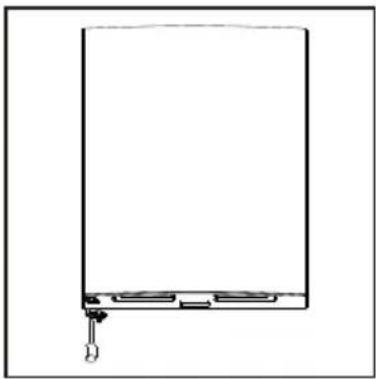
natural_image
Simple line drawing of a rectangular frame with a small labeled component 'D' at the bottom (no text or symbols on the frame itself)natural_image
Technical line drawing of a mechanical clamp or bracket assembly (no text or symbols)natural_image
Technical line drawing of a screwdriver inserted into a bracket with a base plate (no text or symbols)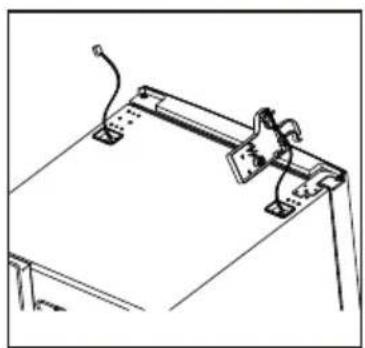
natural_image
Line drawing of a mechanical support structure with no text or symbols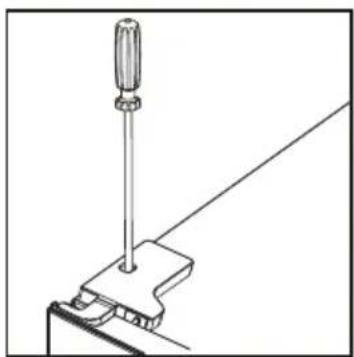
natural_image
Technical line drawing of a screwdriver inserted into a clamp bracket (no text or symbols)natural_image
Technical line drawing of a screwdriver inserted into a bracket (no text or symbols)Besoin d'espace
text_image
Diagram showing two labeled vertical bars with checkmark and cross symbols, likely indicating approval or rejection status.Positionnement
natural_image
Simple diagram of a vertical oval shape with a central circle and surrounding symbols (no text or labels)natural_image
Line drawing of a hand holding a shelf with shelves (no text or symbols)natural_image
Simple line drawing of a container with two upward arrows inside (no text or symbols)Conseils utiles
natural_image
Diagram of a mechanical or fluidic system with rotating components and directional arrows, no readable text or symbols present.natural_image
Line drawing of a double-door refrigerator with open doors and internal compartments (no text or symbols)natural_image
Symbol of a trash bin with crossed lines indicating no waste or restriction (no text or labels)Please read all instructions carefully before first use and keep them for future reference.
IMPORTANT SAFETY INSTRUCTIONS
Please read the following operating instructions carefully before connecting your new device, they contain important safety information, how to use, install and keep your device in working condition. Please keep these instructions for future use.
Important!
For the electrical connection, carefully follow the instructions given in specific paragraphs.
-
This device can be used by children from 8 years old and by people with reduced physical, sensory or mental capacities or a lack of experience and knowledge provided that they have been placed under supervision or that they have been instructed to use the device safely and understand the dangers involved. Children should not play with the device. Cleaning and user maintenance must not be carried out by children without supervision.
-
Unpack the device and check for damage. Do not connect the device if it is damaged. Report possible damage immediately to the place where you purchased it. In this case, keep the packaging.
-
Make sure there is adequate circulation around the device to avoid overheating. For sufficient ventilation, follow the installation instructions.
-
As far as possible, the product spacers should be against a wall to avoid directing or catching hot parts (compressor, condenser) to avoid any risk of burns.
-
The appliance must not be placed near radiators or cookers.
-
Make sure that the mains plug is accessible after installing the appliance.
-
Before connecting the appliance, make sure that the voltage of the electrical outlet in your home corresponds to that shown on the rating plate.
-
Do not damage the cooling system. This warning is only valid for devices whose cooling circuit is accessible by the user.
-
Make sure the appliance is unplugged before cleaning.
-
To clean this appliance, use a damp cloth or glass cleaner.
Never use detergent or thinner. -
Do not clean the device with metallic objects.
-
Regularly examine the drainpipe for defrosted water, which is located at the bottom of the refrigerator against the rear wall. If necessary, please clean it, otherwise water will collect and may spill into the refrigerator.
-
Frozen food should not be refrozen once thawed.
-
Popsicles can cause frost burns if consumed directly from the device.
-
Do not use sharp objects to remove frost from the appliance. Use a plastic scraper.
-
When defrosting has been completed, or when the refrigerator stops operating, clean the appliance to prevent the spread of odor.
Excess gel can affect refrigeration.
- It is recommended to use this appliance without an extension cord.
- Make sure the power plug is not crushed or damaged from the back of the device. A crushed or damaged outlet can overheat and cause a fire.
- To reduce electricity consumption, keep the air circulation around the appliance and discard the food packaging before putting it in the refrigerator as soon as possible.
- Do not store toxic materials such as ether, methanol.
- Do not place flammable materials in the refrigerator unless they have been authorized by the manufacturer.
- Close the door after use to avoid temperature loss.
- This product should not be used outdoors and should not be exposed to rain.
-
The device must be placed on a flat and stable surface.
-
The appliance must be placed so that the electrical outlet is easily accessible.
- Do not place heavy objects on the refrigerator and do not get it wet.
- To avoid the risk of electric shock, never use this appliance with wet hands or bare feet on a wet surface.
- Do not use the appliance outdoors or in a humid place.
- Do not move the appliance when it is full to avoid tipping over.
- The power cable must be plugged into a grounded outlet. Never pull on the cable to unplug the appliance, grasp the plug and pull it from the socket.
- Never lift the device by the power cable.
- Keep the power cable away from heated surfaces.
- Some accessories, such as drawers, can be removed to increase the
storage volume and reduce energy consumption.
- Do not try to repair, adjust or replace parts of this appliance yourself. In the event of a malfunction, contact the after-sales service.
- Children should be supervised to make sure that they do not play with the device.
- If the power cable is damaged, it must be replaced by the manufacturer, its after-sales service or by persons of similar qualifications in order to avoid any danger.
- It is recommended that the power cable be examined regularly for any signs of deterioration, and the device should not be used if the cable is damaged.
-
The appliance is equipped with an earth socket to protect you from possible electrical risks and must be connected to a socket outlet with an earth contact.
-
CAUTION: Do not damage the refrigeration circuit.
- CAUTION: Do not use mechanical devices or other means to accelerate the defrosting process, other than those recommended by the manufacturer.
- CAUTION: Do not use electrical devices inside the food storage compartment unless they are of the type recommended by the manufacturer.
- CAUTION: Do not use electrical appliances inside the food storage compartment unless they are of the type recommended by the manufacturer.
- WARNING: Do not place movable sockets of multiple sockets or portable power supplies at the rear of the device.
-
Children aged 3 to 8 years are allowed to load and unload refrigeration appliances.
-
To avoid contamination of food, please observe the following instructions:
- Prolonged opening of the door can lead to a significant increase in the temperature in the compartments of the appliance.
- Regularly clean surfaces that may come into contact with accessible food and drainage systems. Store raw meat and fish in suitable containers in the refrigerator so that they do not come into contact and do not drip onto other foods.
-The two-star compartments for frozen products are suitable for preserving frozen food, storing or making ice cream and for making ice cubes.
- The one, two- and three-star compartments are not suitable for freezing fresh food.
- If the refrigeration appliance remains empty for long periods, switch it off, defrost, clean, dry and leave the
door open to avoid the development of mold in the appliance.
-
Do not place food products directly against the rear wall.
-
If this appliance with magnetic door seals is to replace an old appliance with a spring lock on the door or the cover, make sure that the door of the old appliance cannot be locked before throwing it away. This will prevent it from becoming a death trap for a child.
-
Keep all packaging away from children. There is a risk of suffocation.
-
This refrigerating appliance is not intended to be used as a built-in appliance.
-
Recommended storage times of frozen food in the freezer compartment. These times vary depending on the type of food. The food that you freeze can be preserved from 1 months (minimum at -18°C).
| Food | Storage time |
| Bacon, casseroles, milk | 1 month |
| Bread, ice cream, sausages, pies, prepared shellfish, oily fish | Use by date |
| Non-oily fish, shellfish, pizza, scones and muffins | 3 months |
| Ham, cakes, biscuits, beef and lamb chops, poultry pieces | 4 months |
| Butter, vegetables (blanched), eggs whole and yolks, cooked crayfish, minced meat (raw), pork (raw) | 6 months |
| Fruit (dry or in syrup), egg whites, beef (raw), whole chicken, lamb (raw), fruit cakes | Use by date |
Never forget:
When you freeze fresh foods with a ‘use by /best before/best by/’ date, you must freeze them before this date expires.
Check that the food was not already frozen. Indeed, frozen food that has thawed completely must not be refrozen.
Once defrosted, food should be consumed quickly.
Recommended storage times of refrigerator compartment
To prevent food spoilage due to transfer of germs: Store unwrapped animal and vegetable products separate from one another in the drawers. This also applies to different sorts of meat. If food has to be stored together due to lack of space: wrap the food. Never store fruit and vegetables in a balcony with meat or fish.
| Storage time | |
| Butter | 90 days |
| Hard cheese | 110 days |
| Milk | 7 days |
| Sausage, cold meat | 9 days |
| Meat | 7 days |
Refrigerant
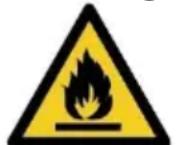
Danger: Risk of fire / flammable materials
DANGER: RISK OF FIRE / FLAMMABLE MATERIALS
The refrigerant gas in the circuit of this unit is isobutane (R600a), but slightly hazardous flammable gas.
During transportation and installation of the device, ensuring not to damage any part of the refrigeration circuit.
WARNING: When positioning the appliance, ensure the supply cord is not trapped or damaged.
WARNING: Do not locate multiple portable socket-outlets or portable power supplies at the rear of the appliance.

Suitable for food
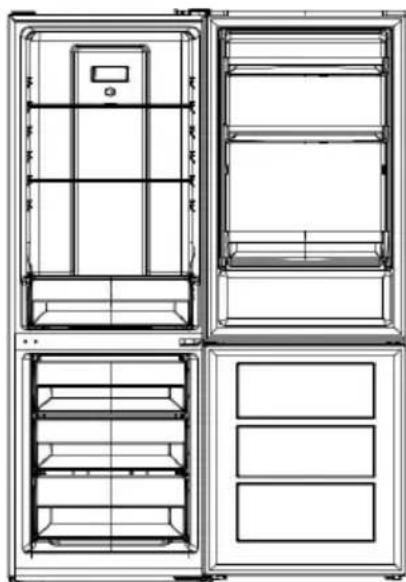
DESCRIPTION OF THE DEVICE

text_image
LED light Temperature control button Glass shelves Lid (s) of the vegetable container (s) Vegetable bins Drawers Adjustable feet Door shelvesINSTALLATION
Door reversal
Tool required: Screwdriver, flat screwdriver.
• Make sure the device is unplugged and empty.
- To remove the door, it is necessary to tilt the unit backwards. You must place the device on a solid support so that it does not slip while the door of the old device cannot be locked before throwing it away.
- All removed parts must be kept for the reinstallation of the door.
- Do not lay the appliance flat as this may damage the refrigeration system.
- It is recommended that 2 people hold the device during assembly.
Reversibility of the door
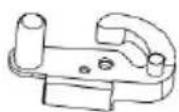
Before reversing the door, please be prepared below tools and materials: straight screwdriver, Phillips screwdriver, wrench and the components included in the poly bag:
Left door hinge cover x 1
Left aid closer on upper door x 1
Left door closer on the lower door x 1
-
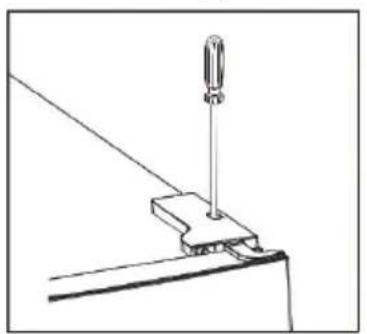
Unscrew the top hinge cover, then unscrew the top hinge. Then lift the top door and place it on a soft cushion to prevent scratches and damage.
-
Remove the upper left screw cover.
natural_image
Simple line drawing of a screwdriver inserted into a workbench (no text or symbols)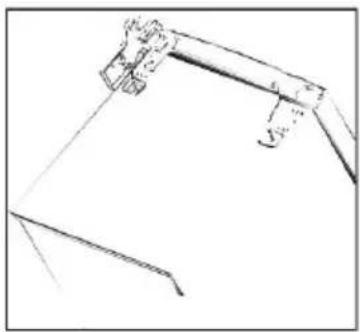
natural_image
Simple line drawing of a crane hook with no text or symbols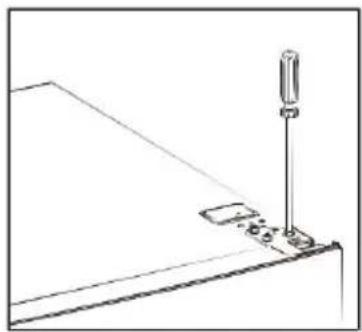
natural_image
Simple line drawing of a mechanical assembly with a screw and base (no text or symbols)
natural_image
Simple line drawing of a mechanical device with a valve and handle, showing an arrow pointing to a small component (no text or symbols)
natural_image
Diagram of a mechanical device with a valve and adjustment knob, showing no text or symbolsEN-15
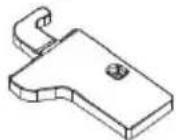
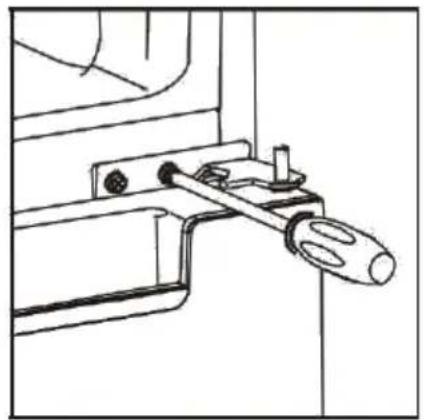
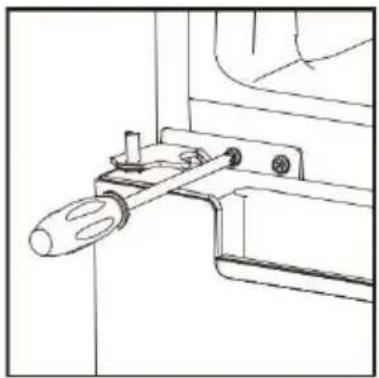
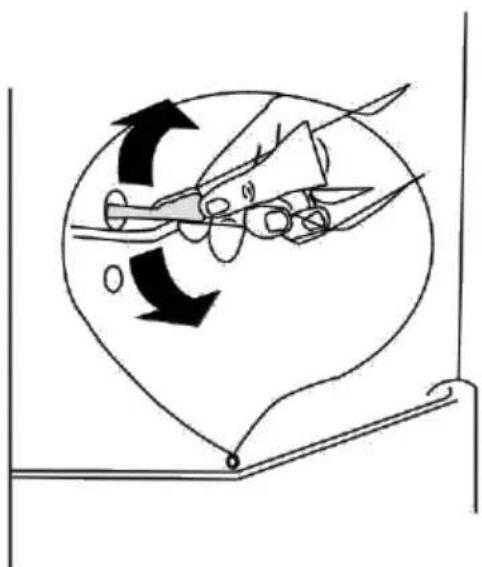
- Remove the upper door, remove the central hinge screw using a Phillips screwdriver, and then remove the lower door.
natural_image
Line drawing of a mechanical clamp or bracket with a screwdriver handle (no text or symbols)- Lay the refrigerator down, remove the adjustment feet as below, then remove the lower hinge using a Phillips screwdriver.
natural_image
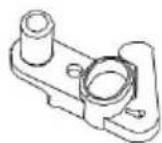
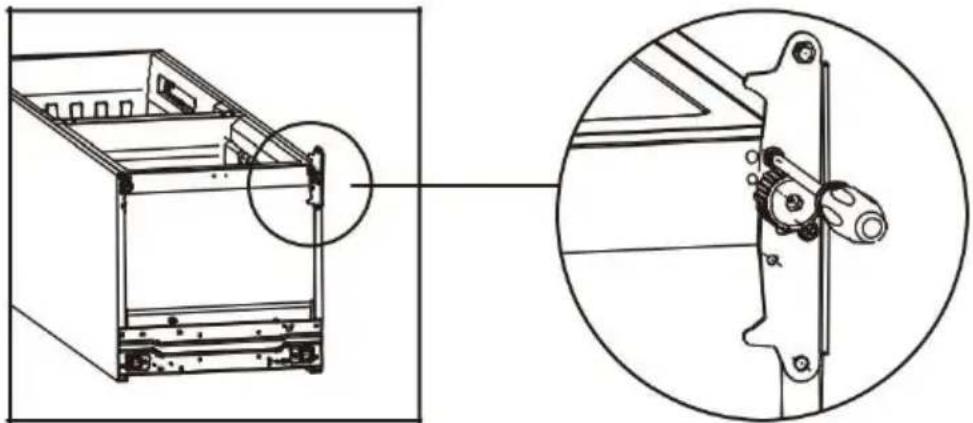
Technical line drawing of a mechanical assembly with an inset close-up showing a gear mechanism (no text or symbols)- Adjustment of the central position of the hinge of the lower hinge and the upper hinge to the opposite position.
natural_image
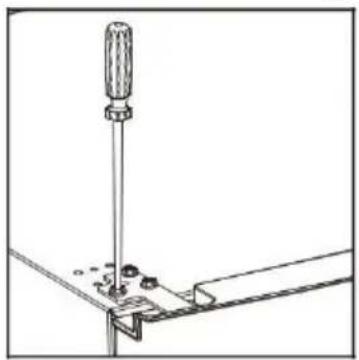
Technical line drawing showing three stages of mechanical assembly: disassembly, assembly, and cutting (no text or symbols)- Install the lower hinge under the refrigerator as below, by screwing the adjustment feet, make sure of the position on the horizon.
natural_image
Technical line drawing of a mechanical assembly with an inset close-up showing a component detail (no text or symbols)EN-16
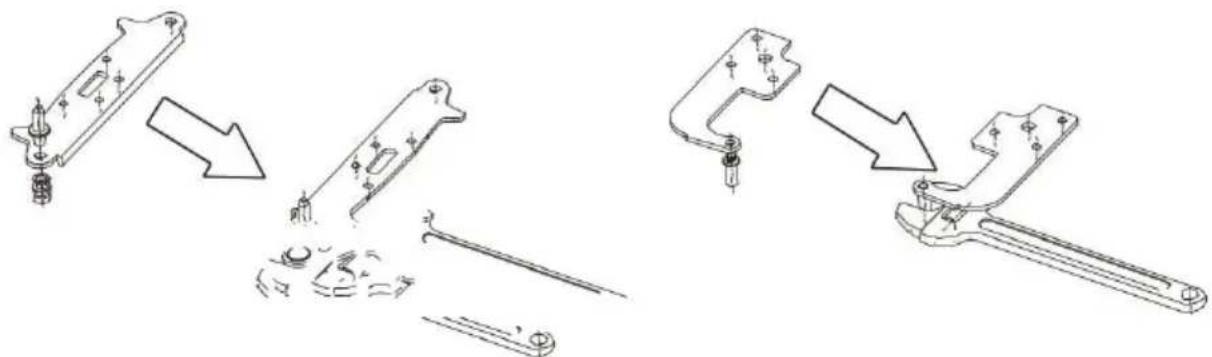
- Remove the original help closers from the upper and lower door, then install the help closers from the inner bag (with the instruction manuals) on the opposite side.
natural_image
Pure horizontal line with no text, numbers, or symbols
natural_image
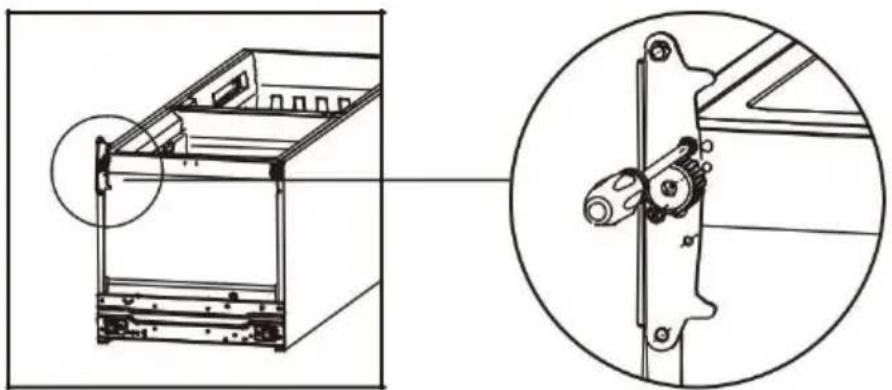
Simple line drawing of a rectangular object with two horizontal lines above it, no text or symbols present.- Install the lower door, adjust and fix the central hinge to the cabinet.
natural_image
Line drawing of a mechanical clamp or bracket with a handle and lever (no text or symbols)- Replace the upper door. Make sure the door is aligned horizontally and vertically so that the seal is closed on all sides before finally tightening the upper hinge. Then, inert the top hinge and screw it to the top of the unit, then secure the hinge cover (in the accessory bag) with screws.
natural_image
Technical line drawing of a screwdriver inserted into a bracket (no text or symbols)
natural_image
Line drawing of a mechanical setup with a lever and base plate (no text or symbols)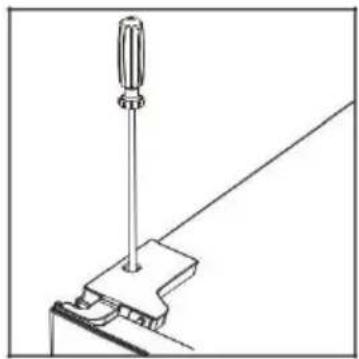
natural_image
Line drawing of a screwdriver on a clamp or clamping tool (no text or symbols)- Attach the screw cover.
natural_image
Technical line drawing of a screwdriver inserted into a bracket (no text or symbols)Need space
- Keep enough door space open.
- Keep a space of at least 50 mm on both sides and at the back.
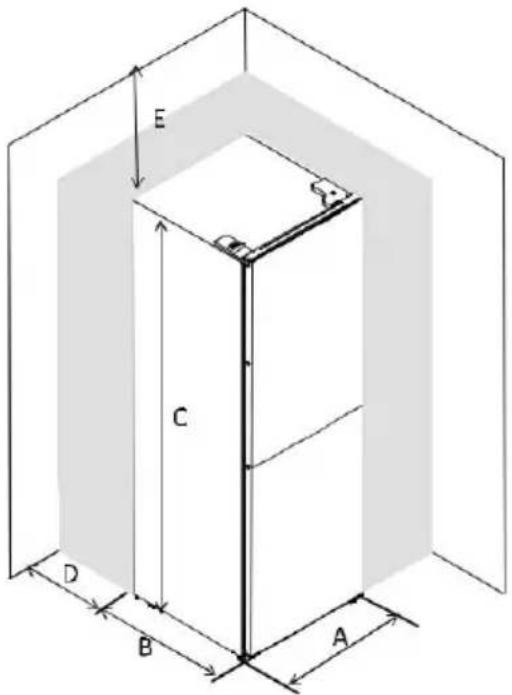
text_image
E C D B A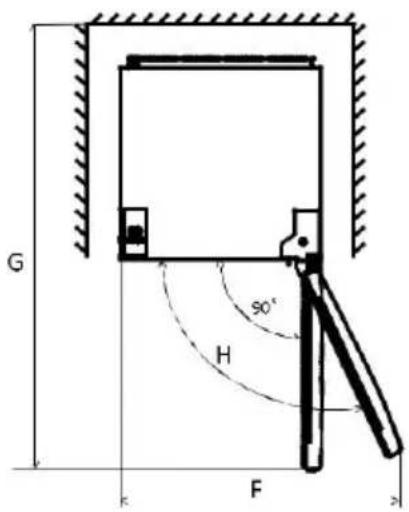
text_image
G 50° H F| A | 600 |
| B | 600 |
| C | 1858 |
| D | Min 90° |
| E | Min 90 |
| F | 1007 |
| G | 071 |
| H | 3 Σ |
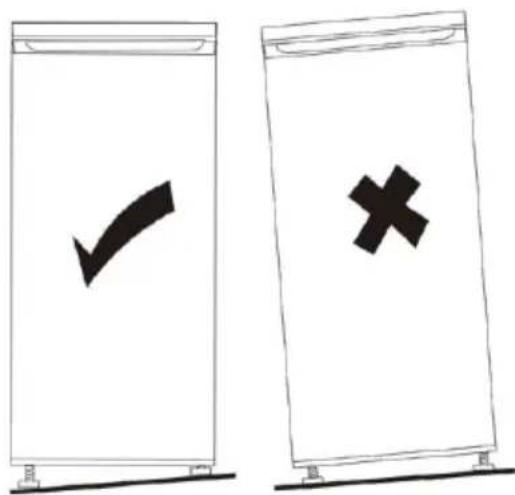
Refrigerator upgrade
To do this, adjust the two leveling feet at the front of the appliance.
If the unit is not level, the doors and alignments of the magnetic seal will not be covered properly.
text_image
Diagram showing two labeled containers with checkmarks and a cross symbol, likely indicating approval or cancellation.Positioning
Install this device in a place where the ambient temperature corresponds to the climatic class indicated on the nameplate of the device:
| Climate class Ambient temperature | |
| SN + 10 °C | to + 32 °C |
| N + 16 °C | to + 32 °C |
| ST + 16 °C | to + 38 °C |
| T + 16 °C | to + 43 °C |
Location
The device must be installed far enough from heat sources such as radiators, boilers, direct sunlight, etc.

Warning!
It must be possible to disconnect the device from the mains; the plug must therefore be easily accessible after installation.
Electrical connection
Before plugging in, make sure that the voltage and frequency indicated on the rating plate match your household electrical supply. The appliance must be earthed. The plug of the power cable is provided with a contact for this purpose. If the household power outlet is not grounded, connect the unit to a separate ground in accordance with applicable regulations, consulting a qualified electrician.
The manufacturer declines all responsibility if the above safety precautions are not observed.
This device complies with E.E.C. Directives.
INSTRUCTIONS FOR USE
Before first use
Interior cleaning
Before using the appliance for the first time, wash the interior and all internal accessories with lukewarm water and neutral soap to remove the typical smell of a new product, -
Important! Do not use detergents or abrasive powders, as they will damage the finish.
Control panel
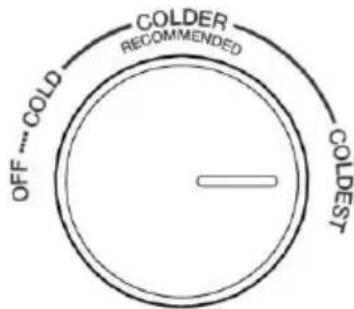
Adjusting the refrigerator compartment temperature Refrigerator temperature adjustment button
text_image
COLDER RECOMMENDED OFF .... COLD COLDEST\~ The button in the refrigerator compartment is used to adjust the temperature of the refrigerator compartment.
\~ The internal temperature is controlled by a sensor. There are 4 parameters: OFF, COLD, COLDER and COLDEST.
COLD is the warmest setting and COLDEST is the coldest setting.
\~ The appliance may not operate at the right temperature if it is particularly hot or if you open the door often.
\~ Neither the fridge nor the freezer works when the setting is OFF.
Adjusting the refrigerator compartment temperature
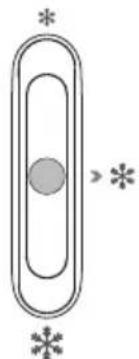
FREEZER CONTROL
Refrigerator temperature adjustment button
- This slider in the refrigerator compartment is used to adjust the temperature of the freezer compartment.
- The cursor is positioned towards ,*the temperature in the freezer compartment will be higher. On the contrary, the temperature in the freezer compartment will be lower if the cursor is moved to *
- The center position of the cursor is recommended for normal use.
- To obtain the lowest temperature in the freezer compartment, you can set the adjustment knob to the coldest and position the cursor on *
natural_image
Simple diagram of a vertical oval shape with a central circle and surrounding symbols (no text or labels)Adjusting the freezer compartment temperature
The freezer temperature control knob
FREEZER CONTROL
natural_image
Simple diagram of a vertical oval shape with a central circle and surrounding symbols (no text or labels)- This slider in the refrigerator compartment is used to adjust the temperature of the freezer compartment.
- The cursor is positioned towards , the temperature in the freezer compartment will be higher. On the contrary, the temperature in the freezer compartment will be lower if the slider is moved to .
- The center position of the cursor is recommended for normal use.
• To obtain the lowest temperature in the freezer compartment, you can set the adjustment knob to the coldest and position the cursor on ✦.
Recommended temperature setting
• The information to the right recommends users to set the optimum temperature.
- In winter or at temperatures below 16^ C , users should avoid placing the freezer in position and the refrigerator in COLD position.
• To save energy, the freezer in the ✿ position and the refrigerator in the COLDEST position only applies to special needs (such as quick freezing or ice making) and must be repositioned once the goal is achieved.
Door open alarm
The alarm sounds when the door remains open for 90 seconds and does not stop until the door is closed.
| Environment temperature | Freezer compartment | Refrigerator compartment | |
| Summer (above 38 °C) | 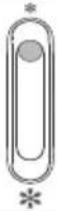 | Activate | 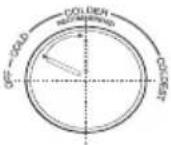 |
| cold~colder | |||
| Ordinary | 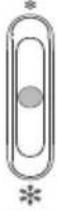 | Activate | 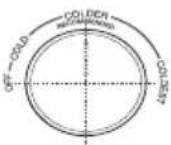 |
| colder | |||
| Winter (less than 16 °C) | 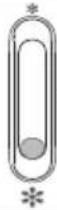 | Activate | 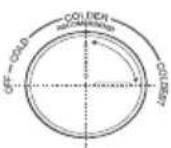 |
| colder~coldest | |||
Daily use
Freezing fresh food
- The freezer compartment is suitable for freezing fresh food and storing frozen and deep-frozen food for a long time.
- Place the fresh food to be frozen in the freezer compartment.
- The maximum quantity of food that can be frozen in 24 hours is indicated on the nameplate.
- The freezing process takes 24 hours: during this period, do not add other food to be frozen.
Storage of frozen food
When switching on for the first time or after a period of non-use, before putting the products in the compartment, let the appliance run for at least 2 hours at the highest level.
Important! In the event of accidental defrosting, for example if the power supply has been cut off for longer than the value indicated in the table of technical characteristics in the "rise time" section, thawed food must be eaten quickly or cooked immediately and then refrozen (after cooking them).
Defrosting
Before being used, frozen food can be thawed in the refrigerator compartment or at room temperature, depending on the time available for this operation. Small pieces can even be cooked while frozen, by removing them directly from the freezer. In this case, cooking will take longer.
Ice cube compartment
This appliance can be equipped with one or more ice compartments to produce ice.
ACCESSORIES
Movable shelves
The walls of the refrigerator are equipped with a series of slides so that the shelves can be positioned as desired.
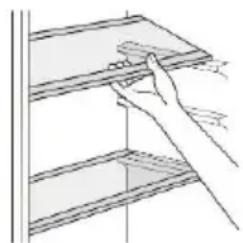
▶ Positioning of door shelves
To allow the storage of food packages of different sizes, the door shelves can be removed. To make these adjustments, proceed as follows: gradually pull the bin in the direction of the arrows until it is released.
natural_image
Line drawing of a hand holding a shelf with a ruler, no text or symbols present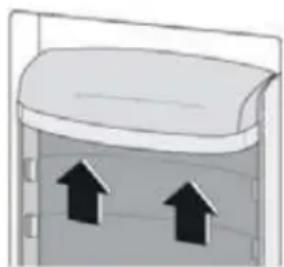
natural_image
Simple diagram of a container with two upward arrows inside, no text or symbols presentHelpful tips
To help you get the most out of the freezing process, here are some important tips:
- The maximum amount of food that can be frozen in 24 hours is indicated on the nameplate;
- The freezing process takes 24 hours. No other food to be frozen should be added during this period;
- Only freeze high quality food, fresh and thoroughly cleaned food;
- Prepare food in small portions so that it can be frozen quickly and completely and then allow only the required quantity to be thawed;
- Wrap food in aluminum foil or polyethylene and make sure the packaging is airtight;
- Do not allow fresh and unfrozen food to touch already frozen food, thus avoiding a rise in temperature of the latter;
- Lean foods keep better and longer than fatty foods; salt reduces the shelf life of food;
- Ice-water, if eaten immediately after being removed from the freezer compartment, may cause freezing burns to the skin;
- It is advisable to display the freezing date on each individual package to allow you to remove it from the freezer compartment, which can possibly cause freezing burns on the skin;
- It is advisable to display the date of freezing on each individual packaging to allow you to keep an eye on the duration of storage.
Tips for storing frozen food
To obtain the best performance from this appliance, you must:
- Ensure that commercially frozen food has been properly stored by the retailer;
- Make sure frozen food is moved from the food store to the freezer as soon as possible;
- Do not open the door frequently or leave it open longer than necessary.
- Once defrosted, food deteriorates quickly and cannot be refrozen.
- Do not exceed the storage period indicated by the food manufacturer.
Tips for refrigerating fresh food
To get the best performance:
- Do not keep hot food or evaporating liquids in the refrigerator
• Cover or wrap foods, especially if they have a strong flavor - Preparations (all types): wrap it in polyethylene bags and place it on the glass shelves above the vegetable drawer.
- For safety reasons, keep this way for a maximum of one or two days.
- Cooked food, cold dishes, etc.: these must be covered and can be placed on any shelf.
-
Fruits and vegetables: these must be thoroughly cleaned and placed in the special drawer (s) provided.
-
Butter and cheese: these must be placed in special airtight containers or wrapped in aluminum foil or polyethylene bags to exclude as much air as possible.
- Milk bottle: these must have a stopper and must be stored in the door balconies.
- Bananas, potatoes, onions and garlic, if not wrapped, should not be stored in the refrigerator.
TIPS FOR SAVING ENERGY
- Let the food cool before placing it in the appliance.
• Make sure that food does not touch the back of the compartment (s). - Make sure the device has enough space around it. This will help reduce energy consumption and reduce your electricity bills.
- Do not block air vents or grilles, for maximum energy efficiency.
- For efficient use of energy, respect the original position of all internal accessories (baskets, drawers, shelves).
• Do not open the doors frequently.
• Do not leave the doors open for too long.
• Do not set the thermostat too cold. - Place frozen products in the refrigerator to defrost them.
• Defrost the freezer when a thick layer of ice has collected.
natural_image
Technical line drawing of a double-door refrigerator with internal compartments and doors (no text or symbols)EN-24
TEMPERATURE INDICATOR
To help you set the right device, it is equipped with a temperature indicator placed in the coldest area.
For the good conservation of foodstuffs in your refrigerator and in particular in the coldest zone, take care that the temperature indicator displays « OK ».

text_image
OKThe symbol opposite indicates the location of the coldest area of your refrigerator. It defines the top of this area.
If "OK" does not appear, the average temperature of this zone is too high.
Set the thermostat to a cooler position. Each time the thermostat setting is changed, wait for the temperature inside the appliance to stabilize before making a new setting if necessary. Change the thermostat position only gradually and wait at least 12 hours before checking again.
NOTE:
After loading the appliance with fresh food or after repeated opening (or prolonged opening) of the door, it is normal for the inscription « OK » not to appear in the temperature indicator.
Wait at least 12 hours before readjusting the thermostat.
CLEANING AND MAINTENANCE
For hygienic reasons, the interior of the appliance, including the interior accessories, should be cleaned regularly.

Warning!
- The appliance must not be connected to the mains during cleaning.
- Risk of electric shock! Before cleaning, switch off the appliance and remove the plug from the mains. You can also cut or disable the circuit breaker or fuse.
- Never clean the device with a steam cleaner. Moisture can accumulate in the electrical components, risk of electric shock! Hot vapors can damage plastic parts.
- The device must be dry before putting it back into service.
Important!
Ethereal oils and organic solvents can attack plastic parts, for example lemon juice or juice obtained with orange peels, butyric acid, cleaning products that contain acetic acid.
Interior cleaning
(1) Do not allow these substances to come into contact with the parts of the appliance.
(2) Do not use abrasive cleaners.
(3) Remove food from the freezer. Keep them in a cool, well covered place.
(4) Switch off the appliance and remove the plug from the mains. You can also cut or disable the circuit breaker or fuse.
(5) Clean the appliance and the interior accessories with a cloth and lukewarm water. After cleaning, run clear water and scrub to dry.
(6) Once everything is dry, restart the appliance.
Cleaning the drain opening
To prevent defrost water from overflowing into the refrigerator, periodically clean the drain hole on the back of the refrigerator compartment.
Use a cleaner to clean the hole as shown in the image to the right.
natural_image
Diagram of a mechanical or electrical component with arrows indicating rotational motion, no text or symbols presentLamp replacement
If the LED lamp is damaged, it must be replaced by the manufacturer or an authorized technician.
Defrosting the freezer
The refrigerator compartment gradually becomes covered with frost. It must be removed. Never use sharp metal tools to scrape off the frost from the evaporator as this may damage it.
However, if the ice becomes very thick on the interior lining, a complete defrost must be carried out as follows:
- Remove the plug from the electrical outlet;
- Take out all the preserved food, wrap it in several layers of newspaper and put it in a cool place;
- Keep the door open and place a bowl under the appliance to collect the defrost water;
- When defrosting is complete, dry the interior completely
- Put the plug back in the socket to restart the appliance.
Important!
Noises are emitted during normal use (compressor, refrigerant circulation).
TROUBLESHOOTING
Warning!
Before any troubleshooting, disconnect the power supply. Only a qualified electrician or a competent person should carry out the troubleshooting operations not indicated in this manual.
| Problem | Possible cause | Solution |
| Device does not work | The device is turned off. | Press the "Adjustment" button for 5 seconds to switch on the appliance. |
| The mains plug is not connected or is loose. | Insert the mains plug. | |
| A fuse has tripped or is defective. | Check the fuse, replace it if necessary. | |
| The plug is defective. | Mains malfunctions must be corrected by an electrician. | |
| Food is too hot | The temperature is not set correctly. | Please see the section Setting the initial temperature. |
| The door has been left open for an extended period. | Do not open the door longer than necessary. | |
| A large quantity of hot food has been placed in the appliance at the last 24 hours. | Temporarily turn the temperature control to a colder setting. | |
| The appliance is next to a heat source. | Please refer to the installation location section. | |
| The appliance cools too much | The set temperature is too low. | Temporarily turn the temperature control knob to a warmer setting. |
| Unusual noises | The device is not plumb. | Adjust the wooden furniture if it is not plumb. |
| The device touches the wall or other objects. | Move the device slightly. | |
| An element, for example a pipe, located at the back of the device touches a other part of the device or the wall. | If necessary, gently remove the element. | |
| Water on the ground | The water drain hole is blocked. | See the Cleaning section. |
TECHNICAL DATA SHEET RELATING TO ENERGY LABELLING REGULATION: 1060/2010/EU
| Mark: | SCHNEIDER |
| Commercial code: | SCCB285NFW, SCCB285NFX 16&&%□□□1)6 |
| Model: | FN2-35-1 |
| Refrigerant category: | 7, Refrigerator-freezer |
| Energy efficiency class: | A+ |
| Energy consumption: | 272 kWh per year, calculated on the basis of the result obtained for 24 hours under standard conditions. The actual energy consumption depends on the conditions of use and location of the unit. |
| Useful capacity of the refrigerator (s) | 210 L |
| Useful capacity of the freezer (s) | 76 ✦*** |
| No Frost (Frost Free) | Yes |
| Climate class: | N/ST |
| Climate class: N / ST This device is intended to operate at a temperature room between 16 °C and 38 °C. | |
| Noise level in dB (A) re 1 pW : | 42 dB (A) |
| Type of installation: | Freestanding |
| Autonomy in the event of a power cut: | 13.5 h |
| Freezing capacity: | 3.5 kg/ 24h |
| Power supply: | 220-240V |
| Electric power: | 50Hz |
| Dimensions WxDxH: | 600 x 600 x 1858 mm |
| Net weight: | 58 kg |
The manufacturer and retailer cannot be held responsible for any accident or damage caused by improper use of the device, or if the instructions given in this manual have not been followed.
TECHNICAL SHEET RELATING TO THE REGULATION ON ENERGY LABELING: 2019/2016/EU
Product Information sheet according to EU Regulation No. 2019/2016 Energy labelling for Refrigerating appliance can be found be below URL or QR code indicated on Energy label
SCCB285NFW - URL: https://eprel.ec.europa.eu/qr/354686
SCCB285NFX - URL: https://eprel.ec.europa.eu/qr/352946
SCCB285NFS - URL: https://eprel.ec.europa.eu/qr/363229
Relationship between 1060/2010/EU Energy label & 2019/2016/EU new Energy label
Current 1060/2010/EU used A+++/D labelling scheme has become less effective. The mixed label scale involving many „+“ is no longer transparent and the majority of products are already in the 2 – 3 top classes today.
The European Union therefore has revised and optimised the label according to user needs. New Energy label 2019/2016/EU will only include the energy classes A to G. Levels for classes will be updated on a regular basis.
What are the main differences between the old and new label?
- A uniform A-G scale is used for all products. There will be no extension to A+ classes anymore
- In the upper right corner of the label a QR-Code is introduced which will provide a direct link to the label database of the European Commission supporting transparency and easier market surveillance by national authorities
- The energy consumption of the products is shown in a more prominent and uniform way in the middle section of the label
- The lower part of the label contains various pictograms which inform about selected product features. Several pictograms are the same as in the old label, some have been revised and a few have been newly introduced.
Why are the values differences between the old and new label?
- The measurement methods of volume, noise and energy consumption are changed in order to fit consumer habits and more accurate to reflect daily energy consumption use.
DISCLAIMER OF WARRANTY:
The warranty does not cover the wear parts of the product, nor the problems or damage resulting from:
(1) surface deterioration due to normal wear and tear of the product;
(2) defects or deterioration due to contact with liquids and corrosion caused by rust or the presence of insects;
(3) any incident, abuse, misuse, alteration, disassembly or unauthorized repair
(4) improper maintenance, improper use concerning the product or connection to an incorrect voltage;
(5) any use of accessories not supplied or not approved by the manufacturer.
The guarantee will be cancelled if the nameplate and / or serial number of the product are removed.
Product Guarantee & Spare part available
Under the terms of the manufacturer's warranty applicable to the location, the use of Customer Service
is free of charge .The minimum duration of the warranty (manufacturer's warranty for private consumers) in the European Economic Area is 2 years ) according to the terms of warranty applicable to the location. The
terms of warranty do not affect other rights or claims held by yourself under local legislation.
Detailed information about the warranty period and terms of warranty in your country are available from
Customer Service, your dealer or our website.
https://www.schneiderconsumer.com/en/
DISPOSAL
The European Directive 2012/19 / EU on Waste Electrical and Electronic Equipment (WEEE), requires that old appliances are not thrown in the normal municipal waste stream. Old appliances must be collected separately in order to optimize the rate of recovery and recycling of the materials they contain and reduce the impact on human health and the environment.
The symbol of the dustbin is marked on all products to remind the obligations of separate collection. Consumers should contact their local authority or retailer for information concerning the correct disposal of their device.
Information on the meaning of conformity marking

The CE mark indicates that the product meets the essential requirements of the European Directives 2014/35 / EU (Low Voltage), 2014/30 / EU (Electromagnetic Compatibility), 2011/65 / EU (Reduction of the use of certain hazardous substances in EEE).
SCHNEIDER
Importé par: SCHNEIDER CONSUMER GROUP 12 rue Jules Ferry - 93110 Rosny-Sous-Bois, FRANCE
CKSNR-L01-%