
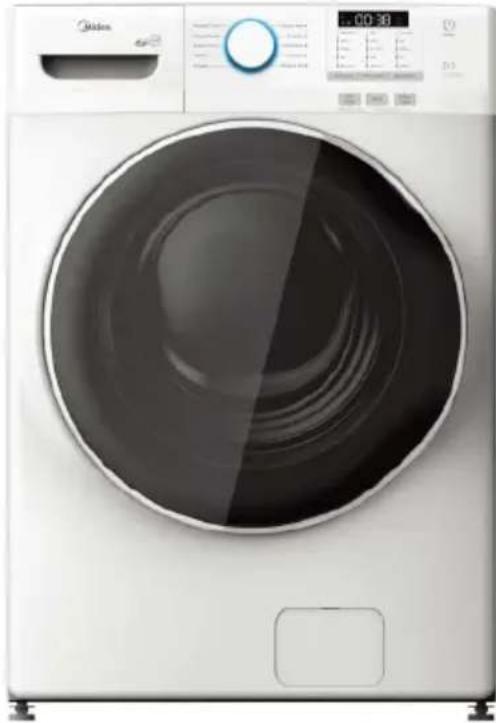
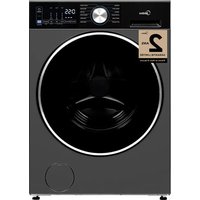
MLH52N5AWW - Washing machine MIDEA - Free user manual and instructions
Find the device manual for free MLH52N5AWW MIDEA in PDF.

| Product Type | Front Load Washer |
| Brand | Midea |
| Model | MLH52N5AWW |
| Power Supply | 120 V, 60 Hz, Single Phase, 16 A Circuit |
| Required Water Pressure | 10 to 120 psi |
| Drainage Capacity | 64.3 L/min |
| Wash Cycles | Normal/Colors, Bulky/Bedding, Heavy Duty, Whites, Towels, Quick Wash, Delicates, Activewear, Tub Clean, Rinse & Spin |
| Program Options | Soil Level (Extra Light to Heavy), Temperature (Cold to Hot), Spin Speed (No Spin to Extra High), Prewash, Extra Water, Extra Rinse, Delay Wash (up to 24h), Control Lock |
| Product Dispenser | Tiramisù dispenser with compartments for HE detergent, bleach, and fabric softener |
| Maintenance | Monthly tub cleaning with Tub Clean cycle, clean door gasket, pump filter, and dispenser drawer |
| Safety | Child Lock, Door Lock, Grounding Required, Water Leak Protection |
| Installation | Requires minimum clearance: top/sides 0 cm, rear 7.6 cm, front 5 cm (in closet) |
| Water Inlet Hoses | 2 hoses (hot and cold) 1.9 cm (3/4 in) with strainer washers |
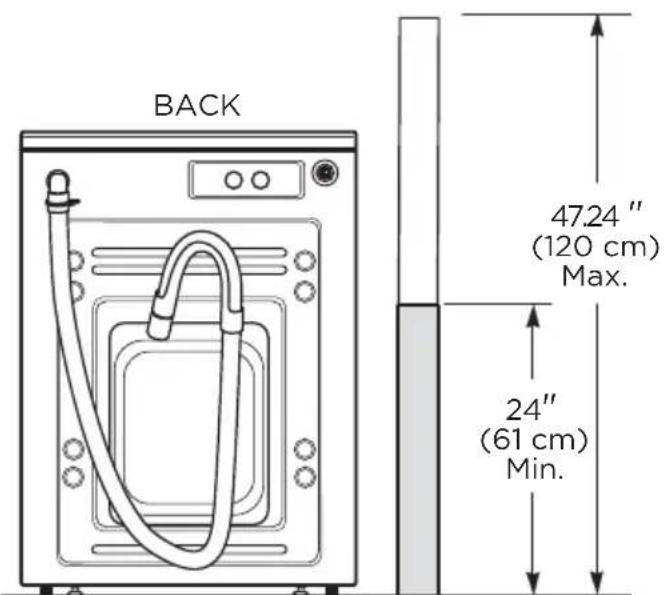
| Drain Hose | Min. diameter 3.18 cm (1 1/4 in), height 61 to 120 cm |
| Warranty | 2 years parts and labor (possible 3 month extension upon registration) |
Frequently Asked Questions - MLH52N5AWW MIDEA
User questions about MLH52N5AWW MIDEA
0 question about this device. Answer the ones you know or ask your own.
Ask a new question about this device
Download the instructions for your Washing machine in PDF format for free! Find your manual MLH52N5AWW - MIDEA and take your electronic device back in hand. On this page are published all the documents necessary for the use of your device. MLH52N5AWW by MIDEA.
USER MANUAL MLH52N5AWW MIDEA
Power supply: 120V-Circuit: 16-amp branch
Warning:
Before using this product, please read this manual carefully and keep it for future reference. The design and specifications are subject to change without prior notice for product improvement. Consult with your dealer or manufacturer for details.
USER MANUAL & INSTALLATION INSTRUCTIONS
Free 3 months
extension of the
original limited warranty period!* Simply text a picture of your proof of purchase to:
1-844-224-1614
*The warranty extension is for the three months immediately following.
the completion of the product's original warranty period. Individuals do not need to register the product in order to get all the rights and remedies of registered owners under the original limited warranty.
MODEL NUMBER
MLH52N5AWW
www.midea.com/ca
Dear user
THANK YOU and CONGRATULATIONS on your purchase of this high-quality Midea product. Your Midea washer is designed for reliable, trouble-free performance. Please take a moment to register your new washer.
Register your new washer at https://www.midea.com/ca/support/Product-registration
For future reference, record your product model and serial numbers located on the inside frame of the washer.
Model Number
Serial Number
WASHER SAFETY 3
Proper Installation 5
When Not in Use 5
Location of Your Washer 6
Electrical Requirements 6
Water Supply Requirements 7
Drain Requirements 7
INSTALLATION INSTRUCTIONS 8
Before You Begin 8
Tools Required 8
Parts Required (Obtain Locally) 9
Parts Supplied 9
Rough-In Dimensions 9
Unpacking the Washer 10
Installing the Washer 11
WASHER USE 14
Control Panel 14
Features 19
Loading and Using the Washer 22
WASHER CARE 23
Cleaning 23
Moving, Storage and Long Vacations 27
BEFORE YOU CALL FOR SERVICE 28
Error Codes 35
WARRANTY 36
WASHER SAFETY
YOUR SAFETY AND THE SAFETY OF OTHERS ARE VERY IMPORTANT
To prevent injury to the user or other people and property damage, the instructions shown here must be followed. Incorrect operation due to ignoring of instructions may cause harm or damage, including death.
The level of risk is shown by the following indications.

This symbol indicates the possibility of death or serious injury.

This symbol indicates the possibility of injury or damage to property.

This symbol indicates the possibility of dangerous voltage constituting a risk of electrical shock is present that could result in death or serious injury.
IMPORTANT SAFETY INSTRUCTIONS

WARNING
To reduce the risk of death, fire, explosion, electric shock, or injury to persons when using your vfd appliance, follow basic precautions, including the following:
- Read the instruction manual before using the appliance.
- DO NOT wash or dry articles that have been previously cleaned in, washed in, soaked in or spotted with gasoline, dry-cleaning solvents, or other flammable or explosive substances, as they give off vapors that could ignite or explode.
- DO NOT add gasoline, dry-cleaning solvents, or other flammable or explosive substances to the wash water. These substances give off vapors that could ignite or explode.
- Under certain conditions, hydrogen gas may be produced in a hot-water system that has not been used for 2 weeks or more. HYDROGEN GAS IS EXPLOSIVE. If the hot water system has not been used for such a period, before using a washing machine, turn on all hot-water faucets and let the water flow from each for several minutes. This will release any accumulated hydrogen gas. As the gas is flammable, DO NOT smoke or use an open flame during this time.
- DO NOT allow children to play on or in this appliance. Close supervision of children is necessary when this appliance is used near children. Before the washer is removed from service or discarded, remove the door or lid. Failure to follow these instructions may result in death or injury to persons.
- DO NOT reach into the appliance if the drum or other components are moving to prevent accidental entanglement.
- DO NOT install or store this appliance where it will be exposed to the weather.
- DO NOT tamper with controls, repair or replace any part of this appliance or attempt any servicing unless specifically recommended in the user maintenance instructions or in published user repair instructions that you understand and have the skills to carry out.
- Keep the area around your appliance clean and dry to reduce the possibility of slipping.
- DO NOT operate this appliance if it is damaged, malfunctioning, partially disassembled, or has missing or broken parts including a damaged cord or plug.
- Unplug the appliance or turn off the circuit breaker before servicing. Pressing the Power button DOES NOT disconnect power.
-
See "Electrical Requirements" located in the Installation Instructions for grounding instructions. This appliance is not intended for use by persons (including children) with reduced physical, sensory or mental capabilities, or lack of experience and knowledge, unless they have been given supervision or instruction concerning use of the appliance by a person responsible for their safety. Children should be supervised to ensure that they do not play with appliance.
-
If the supply cord is damaged, it must be replaced by the manufacture, its service agent or similarly qualified persons in order to avoid a hazard.
- The new hose-sets bought from the retailer where the product was purchased are to be used and that old hose-sets should not be reused.
- This appliance is for indoor use only.
SAVE THESE INSTRUCTIONS
PROPER INSTALLATION
- This washer must be properly installed and located in accordance with the Installation Instructions before it is used. Ensure the cold water hose is connected to the "C" valve.
- Install or store where it will not be exposed to temperatures below freezing or exposed to the weather, which could cause permanent damage and invalidate the warranty. Properly ground washer to conform with all governing codes and ordinances. Follow details in installation instructions.

WARNING

Electrical Shock Hazard
- Plug into a grounded 3 prong outlet.
- Do not remove the ground prong.
- Do not use an adapter.
- Do not use an extension cord.
- Failure to do so can result in death, fire or electrical shock.
WHEN NOT IN USE
Turn off water faucets to minimize leakage if a break or rupture should occur. Check the condition of the fill hoses; We recommend changing the hoses every 5 years.
State of California Proposition 65Warnings:

WARNING: Cancer and Reproductive Harm
- www.P65Warnings.ca.gov.
SAVE THESE INSTRUCTIONS
THIS APPLIANCE IS FOR HOUSEHOLD USE ONLY
- In an area exposed to dripping water or outside weather conditions. The ambient temperature should never be below 60^ (15.6°C) for proper washer operation.
- In an area where it will come in contact with curtains or drapes.
- On carpet. The floor MUST be a hard surface with a maximum slope of 1/2'' per foot (1.27 cm per 30 cm). To make sure the washer does not vibrate or move, you may have to reinforce the floor.
NOTE: If floor is in poor condition, use 3/4'' impregnated plywood sheet solidly attached to the existing floor covering.
IMPORTANT: MINIMUM INSTALLATION CLEARANCES
- When installed in alcove: Top and Sides = 0" (0 cm), Back = 3" (7.6 cm)
- When installed in closet: Top and Sides = 0" (0 cm), Front = 2" (5 cm), Back = 3" (7.6 cm)
- Closet door ventilation openings required: 2 louvers each 60 square in. (387 cm), located 3'' (7.6 cm) from top and bottom of door
ELECTRICAL REQUIREMENTS
Read these instructions completely and carefully.

WARNING
TO REDUCE THE RISK OF FIRE, ELECTRICAL SHOCK AND PERSONAL INJURY:
- DO NOT USE AN EXTENSION CORD OR AN ADAPTER PLUG WITH THIS APPLIANCE. Washer must be electrically grounded in accordance with local codes and ordinances.
CIRCUIT - Individual, properly polarized and grounded 16-amp branch circuit fused with 16-amp time -delay fuse or circuit breaker.
POWER SUPPLY - 2-wire with ground, 120V single-phase, 60Hz alternating current.
OUTLET RECEPTACLE - Properly grounded receptacle located so the power supply cord is accessible when the washer is in an installed position.

GROUNDING REQUIREMENTS
Improper connection of the equipment grounding conductor can result in a risk of electrical shock. Check with a licensed electrician if you are in doubt as to whether the appliance is properly grounded.
- The washer MUST be grounded. In the event of malfunction or breakdown, grounding will reduce the risk of electrical shock by providing a path of least resistance for electrical current.
- Since your washer is equipped with a power supply cord having an equipment-grounding conductor and a grounding plug, the plug MUST be plugged into an appropriate, copper-wired receptacle that is properly installed and grounded in accordance with all local codes. If in doubt, call a licensed electrician. DO NOT cut off or alter the grounding prong on the power supply cord. In situations where a two-slot receptacle is present, it is the owner's responsibility to have a licensed electrician replace it with a properly grounded grounding-type receptacle.
WATER SUPPLY REQUIREMENTS
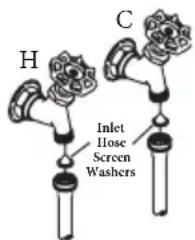
Hot and cold water faucet MUST be installed within 42^ (107 cm) of your washer's water inlet. The faucet MUST be 3 / 4'' (1.9 cm) garden hose-type so inlet hoses can be connected. Water pressure MUST be between 10 and 120 psi. Your water department can advise you of your water pressure.
DRAIN REQUIREMENTS
- Drain capable of eliminating 64.3 L per minute.
- A standpipe diameter of 1 - 1 / 4^ (3.18 cm) minimum.
- The standpipe height above the floor should be:
Minimum height: 24^ (61 cm)
Maximum height: 47.24^ (120 cm)
INSTALLATION INSTRUCTIONS
BEFORE YOU BEGIN
Read these instructions completely and carefully.
- IMPORTANT - Save these instructions for local inspector's use.
- IMPORTANT - Observe all governing codes and ordinances.
Note to Installer - Be sure to leave these instructions with the Consumer.
Note to Consumer - Keep these instructions for future reference. - Skill level - Installation of this appliance requires basic mechanical and electrical skills.
Completion time - 1-3 hours. - Proper installation is the responsibility of the installer.
- Product failure due to improper installation is not covered under the Warranty.
FOR YOUR SAFETY:

WARNING
- This appliance must be properly grounded and installed as described in these Installation Instructions.
- Do not install or store the appliance in an area where it will be exposed to water/weather. See the Location of Your Washer section.
- NOTE: This appliance must be properly grounded, and electrical service to the washer.
- Certain internal parts are intentionally not grounded and may present a risk of electric shock only during servicing. Service Personnel - Do not contact the following parts while the appliance is energized: Electrical Valve, Drain Pump, Heater and Motor.
TOOLS REQUIRED
- Adjustable wrench or 1/2'' (13mm) socket with ratchet
- Adjustable wrench or 9/16'' (14mm) open-end wrench
- Channel-lock adjustable pliers
Carpenter's level
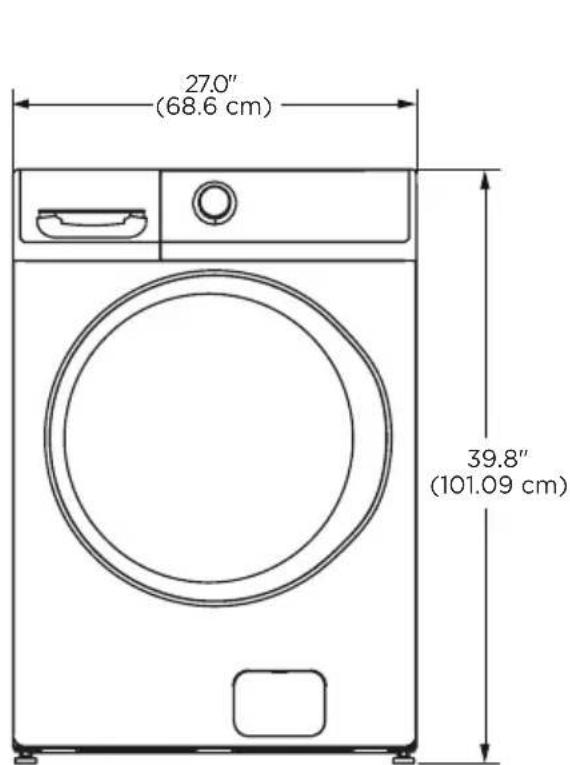
*NOTE: With pedestal, 52.6" Stacked, 84"
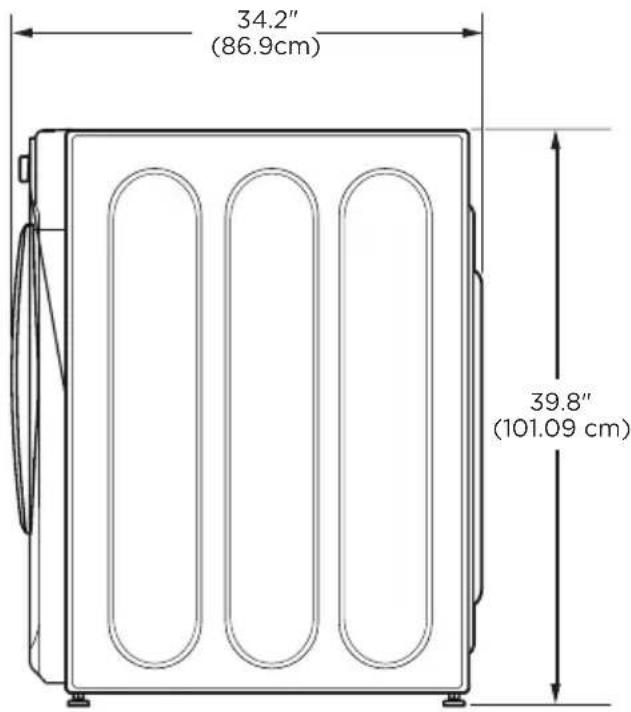
SIDE
34.2"
(86.9cm)
↓
1
| x - 2x| = 12| x| ^2 - 14x^2
| x - 2x| = 12| x| ^2 - 14x^2
| x - 2x| = 12| x| ^2 - 14x^2
| x - 2x| = 12| x| ^2 - 14x^2
| x - 2x| = 12| x| ^2 - 14x^2
| x - 2x| = 12| x| ^2 - 14x^2
| x - 2x| = 12| x| ^2 - 14x^2
| x - 2x| = 12| x| ^2 - 81 = 251
| x - 2x| = 12| x| ^2 - 14x^2
| x - 2x| = 12| x| ^2 - 14x^2
1
| x - 2x| = 12| x| ^2 - 14x^2
398"
6010102
(101.09a)
| x - 2x| = 12| x| ^2 - 14x^2
| x - 2x| = 12| x| ^2 - 14x^2
| x - 2x| = 12| x| ^2 - 14x^2
| x - 2x| = 12| x| ^2 - 14x^2
| x - 2x| = 12| x| ^2 - 14x^2
UNPACKING THE WASHER

WARNING:
-
Recycle or destroy the carton and plastic bags after the washer is unpacked. Make materials inaccessible to children. Children might use them for play. Cartons covered with rugs, bedspreads or plastic sheets can become airtight chambers causing suffocation.
-
Cut and remove the top and bottom packaging straps.
- While it is in the carton, carefully lay the washer on its side. DO NOT lay the washer on its front of back.
- Turn down the bottom flaps-remove all base packaging, including the cardboard, styrofoam base and styrofoam tub support (inserted in center of base).
NOTE: If you are installing a pedestal, proceed to the installation instructions that come with the pedestal.
- Carefully return the washer to an upright position and remove the carton.
- Carefully move the washer to within 4 feet (122 cm) of the final location.
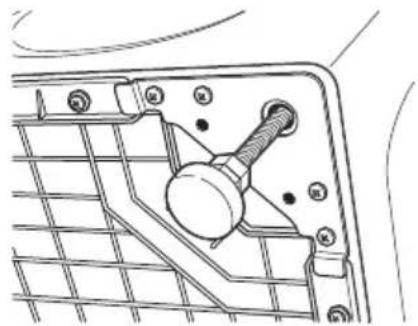
- Remove the following from the back side of the washer:
4 bolts
4 plastic spacers (including rubber grommets)
4 power cord retainers
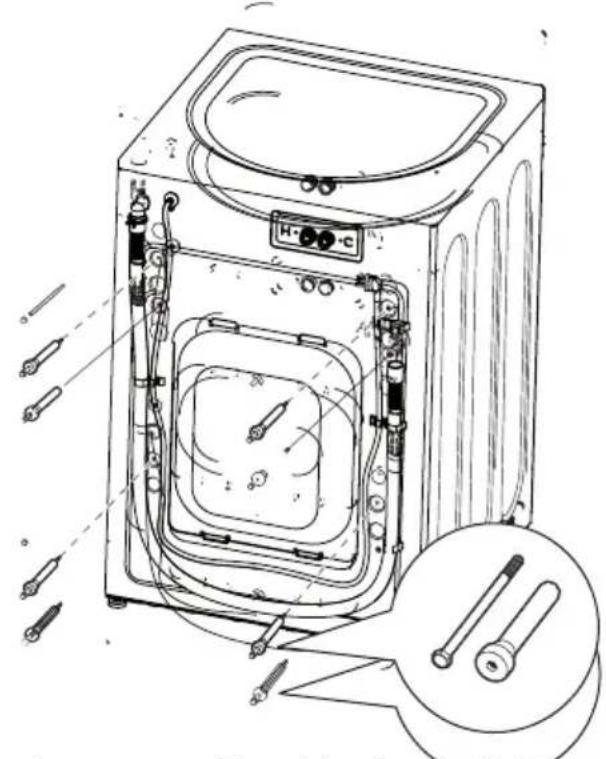
IMPORTANT: Failure to remove the shipping bolts* can cause the washer to become severely unbalanced.
Save all bolts for future use.
- Any damages from failure to remove the shipping bolts are not covered by the warranty.
NOTE: If you must transport the washer at a later date, you must reinstall the shipping support hardware to prevent shipping damage. Keep the hardware in the plastic bag provided.
INSTALLING THE WASHER
- Run some water from the cold faucet to flush the water lines and remove particles that might clog up the inlet hose.
- Ensure there is a rubber washer in the hoses. Reinstall the rubber washer into the hose fitting if it has fallen out during shipment. Carefully connect the inlet hose marked HOT to the rear "H" inlet of the water valve. Tighten by hand; then tighten another 2/3 turn with pliers. And COLD to the rear "C" inlet of the water valve. Tighten by hand; then tighten another 2/3 turn with pliers.
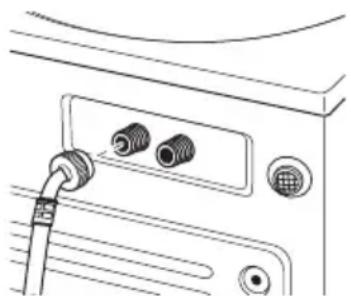
Do not crossthread or over-tighten these connections.
- Install the screen washers by inserting them into the free ends of the inlet hoses with protruded side facing the faucet.
- Connect the inlet hose ends to the HOT and COLD water faucets tightly by hand, then tighten another 2/3 turn with pliers. Turn the water on and check for leaks.
- Carefully move the washer to its final location. Gently rock the washer into position ensuring inlet hoses do not become kinked. It is important not to damage the rubber leveling legs when moving your washer to its final location. Damaged legs can increase washer vibration. It may be helpful to spray window cleaner on the floor to help move your washer into its final position.
NOTE: To reduce vibration, ensure that all four rubber leveling legs are firmly touching the floor. Push and pull on the back right and then back left of your washer.
NOTE: Do not use the dispenser drawer or door to lift the washer.
NOTE: If you are installing into a drain pan, you can use a 24-inch long 2x4 to lever the washer into place.
- With the washer in its final position, place a level on top of the washer (if the washer is installed under a counter, the washer should not be able to rock). Adjust the front leveling legs up or down to ensure the washer is resting solid. Turn the locknuts on each leg up towards the base of the washer and snug with a wrench.
NOTE: Keep the leg extension at a minimum to prevent excessive vibration. The farther out the legs are extended, the more the washer will vibrate.
If the floor is not level or is damaged, you may have to extend the rear leveling legs.
- Attach the U-shaped hose guide to the end of the drain hose. Place the hose in a laundry tub or standpipe and secure it with the cable tie provided in the enclosure package.
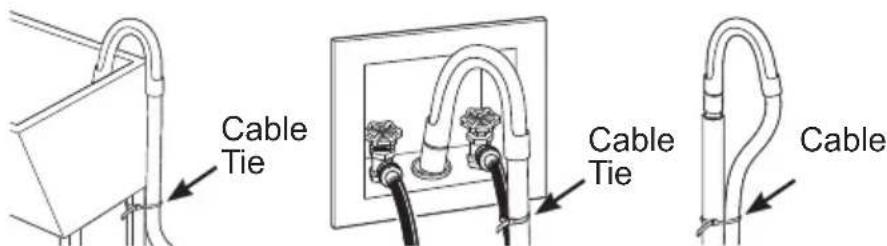
NOTE: Placing the drain hose too far down the drain pipe can cause a siphoning action. No more than 7 inch (17.78 cm) of hose should be in the drain pipe. There must be an air gap around the drain hose. A snug fit can also cause a siphoning action.
- Plug the power cord into a grounded outlet.
NOTE: Check to be sure the power is off at the circuit breaker/fuse box before plugging the power cord into an outlet.
-
Turn on the power at the circuit breaker/fuse box.
-
Read the rest of this Owner's Manual. It contains valuable and helpful information that will save you time and money.
-
Before starting the washer, check to make sure:
-
Main power is turned on.
- The washer is plugged in.
- The water faucets are turned on.
- The unit is level and all four leveling legs are firmly in the floor.
- The shipping support hardware is removed and saved.
-
The drain hose is properly tied up.
-
Run the washer through a complete cycle.
- If your washer does not operate, please review the Before You Call For Service section before calling for service.
- Place these instructions in a location near the washer for future reference.
WASHER USE CONTROL PANEL
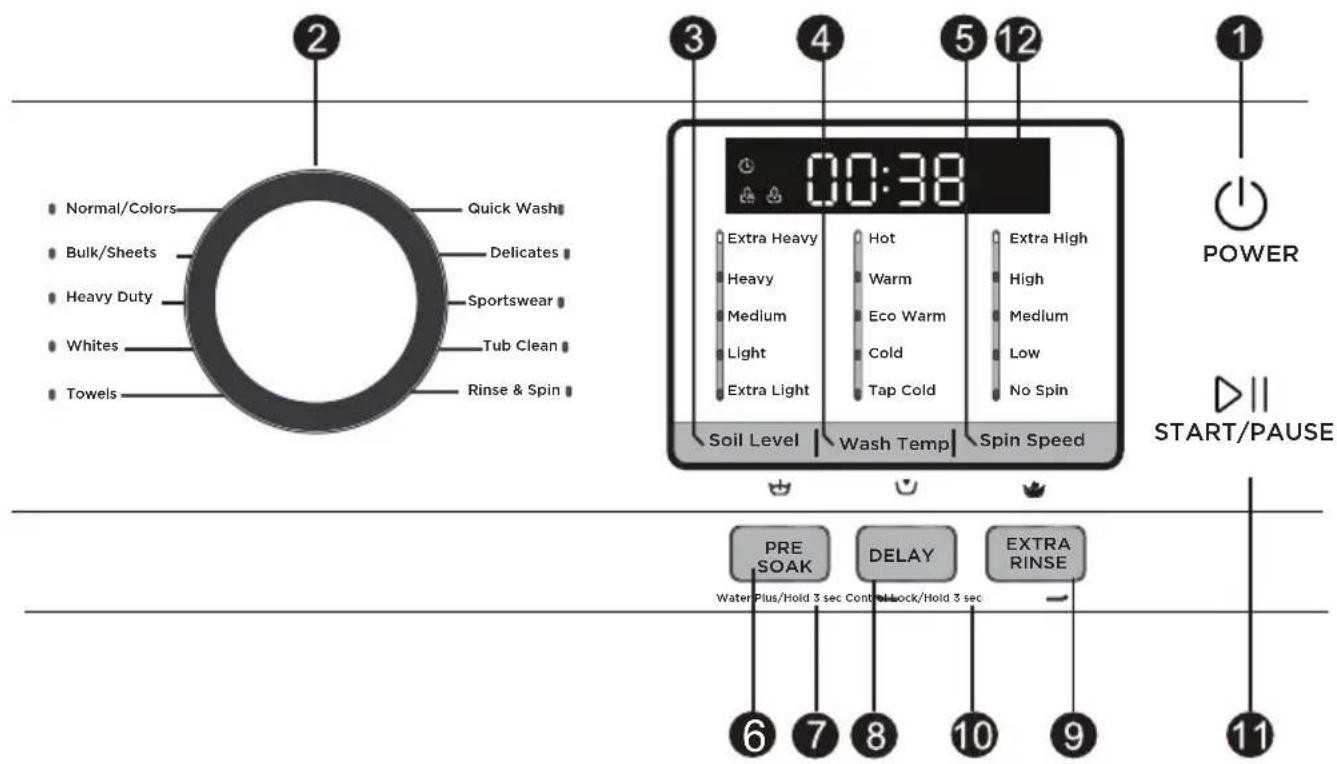
QUICK START
1 Press the Power button.
If the screen is dark, a press of the Power button will "wake up" the display.
2 Select a wash cycle. (Defaults are set for each cycle. These default settings can be changed. See Control setting for more information).
3 Press the START/PAUSE. II
CONTROL SETTING
1 Power Press to "wake up" the display. If the display is active, press do put the washer into standby mode.
NOTE: Pressing Power does not disconnect the appliance from the power supply.

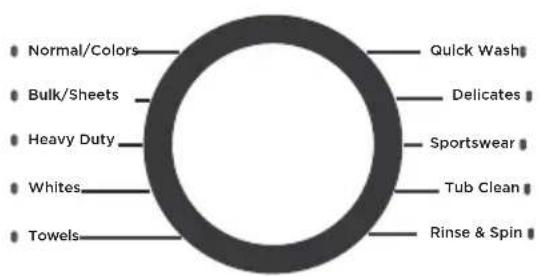
Wash Cycles
The wash cycles are optimized for specific types of wash loads. The chart below will help you match the setting with the loads.
| Normal/ Colors | For heavily to lightly soiled colorfast cottons, household linens, work and play clothes. NOTE: This is the most common cycle. |
| Bulky/ Sheets | For large items such as comforters, blankets, small rugs and similar bulky items. |
| Heavy Duty | Washing the large and heavy clothing, such as overcoats or towels. |
| Whites For heavily soiled white laundry, work and play clothes | |
| Towels For items such as towels, sheets, pillowcases and dish rags. | |
| Quick Wash | For lightly soiled items needed in a hurry. Cycle time is approximately 40 minutes, depending on selected options. |
| Delicates For delicate, washable textiles, e.g. made of silk, satin, synthetic fibers or blended fabrics. | |
| Sportswear | Washing the activewear. |
| Tub Clean Use | for cleaning the basket of residue and odor. Recommended use of at least once per month. NOTE: Never load laundry white using Tub Clean. The laundry may become damaged See the Care and Cleaning section. |
| Rinse & Spin | To quickly rinse and spin out any items at any time. |
| 3 | SOIL LEVEL | Change the Soil level to increase or decrease the wash time to remove different amounts of soil. | To change the Soil level, press the Soil level button until you have reached the desired setting. You can choose between Extra Light, Light, Medium, Heavy or Extra Heavy soil levels. |
| 4 | WASH TEMP | Adjust to select the proper main water temperature for the wash cycle. The PreWash rinse water is always cold to help reduce energy usage and reduce setting of stains and wrinkles. | To change the wash temperature, press the wash Temp button until you have reached the desired setting. |
| Tap Cold, Cold,Eco Warm, You can choose between Warm or Hot. | |||
| Follow the fabric manufacturer's care label when selecting the wash temperature. | By design, to protect fabrics, not all wash temperatures are available for certain wash cycles. | ||
| 5 | SPIN SPEED | Changing the Spin speed changes the final spin speed of the cycles. Always follow the garment manufacturer's care label when changing the Spin speed. | To change the Spin speed, press the Spin speed button until you have reached the desired setting. You can choose between No Spin, Low, Medium, High or Extra High. Higher spin speeds are not available on certain cycles, such as Delicates. Higher spin speeds remove more water from the clothes and will help reduce dry time, but may also increase the possibility of setting wrinkles on some fabrics. |
| 6 PRE SOAK | For soaking your garments prior to the wash cycle. This option begins with a brief tumble and then proceeds to soak the clothes with water and detergent for a specified period of time. Once complete, the cycle will begin automatically. Pre Soak must be selected prior to pressing button. | The Pre Soak time will add an additional 10-20 minutes to the overall wash time. High-efficiency detergent from the main wash compartment in the dispenser is used for the Pre Soak period and main wash cycle. |
| 7 WATER PLUS Hold 3 sec | Increases the water level of the main wash. Option is available on Normal/Colors,Bulky/Sheets,Heavy Duty,Whites, Towels, Delicates, Sportswear | To use: 1. Turn power ON and select a wash cycle. 2. Select the Add Water Plus button to activate water plus. 3. Press the button. |
| 8 DELAY | You can delay the start of a wash cycle for up to 24 hours. Press the Delay Wash button to choose the amount of time you want to delay the start of the wash cycle. Once the desired time is reached, press the button. The machine will count down and start automatically at the correct time. | NOTE: If you forget to close the door, a double beep will sound when pressing pause/add garment button. NOTE: If you open the door when the delay is counting down, the machine will enter the pause state. You must close the door and press again in order to restart the countdown. |
| 9 EXTRA RINSE | This option allows for an extra rinse during a cycle to remove excess dirt and detergent from soiled loads. |

DELAY and EXTRA RINSE
Control Lock/Hold 3 sec
You can lock the controls to prevent any selections from being made. Or you can lock or unlock the controls after you have started a cycle.
Children cannot accidentally start the washer by touching buttons with this option selected.
To lock the washer, press and hold the Delay and Extra Rinse buttons for 3 seconds.
To unlock the washer controls, press and hold Delay and Extra Rinse buttons for 3 seconds.
NOTE: The Power button can still be used when the machine is locked.


START/PAUSE
Press to start a wash cycle. If the washer is running, pressing it once will pause the washer. Press again to restart the wash cycle.
If you want add a garment, please press the button.
The washer will unlock the door. Press again to restart the cycle.
NOTE: In some cycles the washer will drain first, then unlock the door when it is paused.
NOTE: The washer performs automatic system checks after pressing the button
You may hear the door lock and unlock before water flows, this is normal.


Displays the approximate time remaining until the end of the cycle.
NOTE: The cycle time is affected by the water pressure in your home and the balance of the load in the washer. You may see the time remaining on the display increase to accommodate a slower spin speed to handle unbalanced loads.
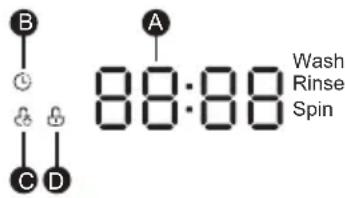
Cycle status is also displayed and certain features such as Delay Wash or Steam are shown indicating they have been selected.
A Display
Wash Time Delay Time 25 2H END Error End E30
B Remain-Delay
Child Lock
Door Lock
FEATURES
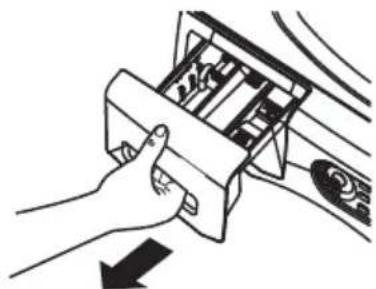
THE DISPENSER DRAWER
Slowly open the dispenser drawer by pulling it out until it stops.
After adding laundry products, slowly close the dispenser drawer. Closing the drawer too quickly could result in early dispensing of the bleach, fabric softener or detergent.
You may see water in the dispenser drawer at the end of the cycle. This is a result of the flushing/siphoning action and is part of the normal operation of the washer.
NOTE: Liquid detergent will drain into the washer drum as it is added.
- Detergent usage may need to be adjusted for water temperature, water hardness, size and soil level of the load. Avoid using too much detergent in your washer as it can lead to over sudsing and detergent residue being left on the clothes.
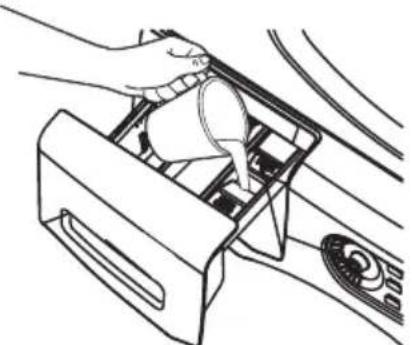
The Detergent Compartment

- High-efficient detergent is required for this washer. Use the detergent manufacturer's recommended amount.
- Add measured detergent to the front left detergent compartment of the dispenser drawer.

- Detergent is flushed from the dispenser at the beginning of the wash cycle. Either powdered or liquid detergent can be used.
- Powder Detergent-Remove the Detergent selection insert and place it in a safe location outside of the washer. Follow the detergent manufacturer's instructions when measuring the amount of powder to use.
- Detergent usage may need to be adjusted for water temperature, water hardness, size and soil level of the load. Avoid using too much detergent in your washer as it can lead to oversudsing and detergent residue being left on the clothes.
- Using more detergent than the recommended quantity can cause residue buildup on your washer.
- Liquid Detergent - Locate the concentration of your detergent on the bottle. Place the Detergent selection insert in the corresponding location depending on the concentration.
The Liquid Bleach Compartment
IMPORTANT: Be sure to identify the correct compartment for bleach before using.
If desired, measure out the recommended amount of liquid bleach, not to exceed 1/3 cup (80 ml), and pour into the right compartment labeled "LIQUID BLEACH".
Do not exceed the maximum fill line. Overfilling can cause early dispensing of the bleach which could result in damaged clothes.
NOTE: Do not use powdered bleach in the dispenser.
The Fabric Softener Compartment
IMPORTANT: Be sure to identify the correct compartment for fabric softener before using.
If desired, pour the recommended amount of liquid fabric softener into the compartment labeled "FABRIC SOFTENER".
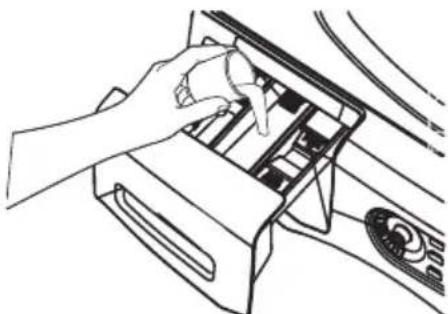
Use only liquid fabric softener in the dispenser.
Dilute with water to the maximum fill line.
Do not exceed the maximum fill line. Overfilling can cause early dispensing of the fabric softener which could stain clothes.
NOTE: Do not pour fabric softener directly on the wash load.
LOADING AND USING THE WASHER
Always follow fabric manufacturer's care label when laundering.
SORTING WASH LOADS
Sort laundry into loads that can be washed together.
COLORS SOIL FABRIC LINT
Whites
Lights
Darks
Heavy
Normal
Light
Delicates
Easy Care
Sturdy Cottons
Lint
Producers
Lint
Collectors
- Combine large and small items in a load. Load large items first. Large items should not be more than half the total wash load.
- Washing single items is not recommended. This may cause an out-of-balance load. Add one or two similar items.
- Pillows and comforters should not be mixed with other items. This may cause an out-of-balance load.

WARNING

Fire Hazard
- Never place items in the washer that are dampened with gasoline or other flammable liquids.
No washer can completely remove oil. - Do not dry anything that has ever had any type of oil on it (including cooking oils).
- Doing so can result in death, explosion, or fire.
PREPARING CLOTHES
To avoid snags during washing:
Follow these steps to maximize garment care.
- Close garment zippers, snaps, buttons and hooks.
Mend seams, hems, tears. - Empty all items from pockets.
-
Remove nonwashable garment accessories such as ornaments and nonwashable trim materials.
-
To avoid tangling, tie strings, draw ties and belt-like materials.
Brush away surface dirt and lint. - Promptly wash wet or stained garments to maximize results.
- Use nylon mesh garment bags to wash small items.
- Wash multiple garments at one time for best results.
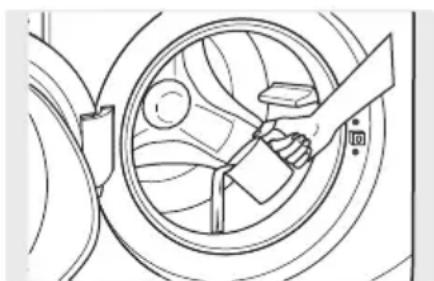
LOADING THE WASHER
Wash drum may be fully loaded with loosely added items. Do not wash fabrics containing flammable materials (waxes, cleaning fluids, etc.).
To add items after washer has started, press and wait until the door is unlocked. The washer may take up to 30 seconds to unlock the door after pressing depending on the machine conditions. Do not try to force open the door when it is locked.
After the door unlocks, open gently. Add items, close the door and press to restart.
WASHER CARE
CLEANING
EXTERIOR
Immediately wipe off any spills. Wipe with damp cloth. Do not hit surface with sharp objects.
INTERIOR
To clean the interior of the washer, select the Tub Clean feature on the control panel. This Tub Clean cycle should be performed, at a minimum, once per month. This cycle will use more water, in addition to bleach, to control the rate at which soils and detergents may accumulate in your washer.
NOTE: Read the instructions below completely before starting the Tub Clean cycle.
- Remove any garments or objects from the washer and ensure the washer basket is empty.
- Open the washer door and pour one cup or 250ml of liquid bleach or other washing machine cleaner into the basket.
- Close the door and select the Tub Clean cycle. Push the button.
-
When the Tub Clean cycle is working, the display will show the estimated cycle time remaining. The cycle will complete in about 90 minutes. Do not interrupt the cycle.
-
After the cycle is complete, leave the door open slightly for better ventilation.
If for any reason the cycle needs to be interrupted, the door will not open immediately. Forcing open the door at this stage may cause water to flood. The door will open after the water is drained to a level where it would not flood the floor.
Tub Clean may be interrupted by pressing button in between cycles. A power outage in the house might also interrupt the cycle. When the power supply is back, the Tub Clean cycle resumes where it had stopped. When interrupted, be sure to run a complete Tub Clean cycle before using the washer. If the Power pad is pressed during Tub Clean, the cycle will be lost.
IMPORTANT:
- Run Tub Clean with 1 Cup (250 ml) of bleach once a month.
After the completion of a Tub Clean cycle, the interior of your washer may have a bleach smell.
It is recommended to run a light color load after the Tub Clean cycle.
dispensers DRAWER AREA
Detergent and fabric softener may build up in the dispenser drawer. Residue should be removed once or twice a month.
Lock tab is visible only after drawer has been pulled open.
Remove the drawer by first pulling it out until it stops. Then reach back into the left rear corner of the drawer cavity and press down firmly on the lock tab, pulling out the drawer.

CLEANING THE PUMP FILTER
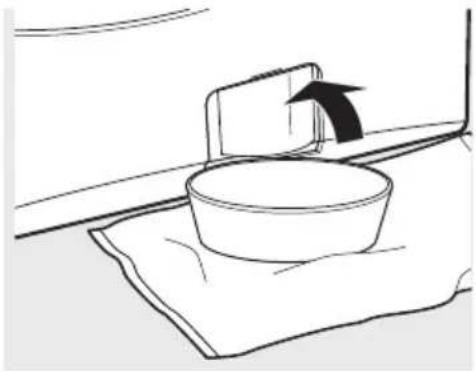
Due to the nature of the front-load washer, it is sometimes possible for small articles to pass to the pump. The washer has a filter to capture lost items so they are not dumped to the drain. To retrieve lost items, clean out the pump filter.
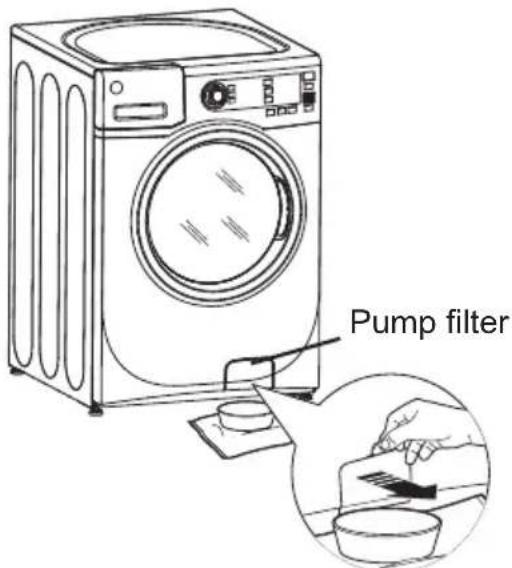
- Using a coin or flat screwdriver in the notch on the door, open the access door.
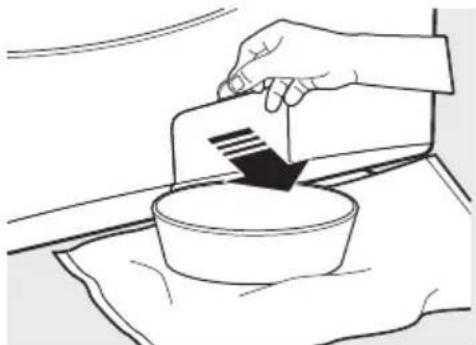
-
Place a shallow pan or dish under the pump access door and towels on the floor in front of the washer to protect the floor. It is normal to catch about a cup of water when the filter is removed.
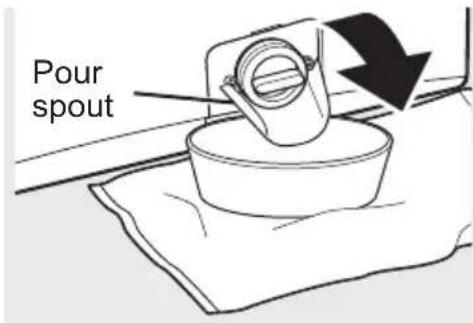
-
Pull down the pour spout.
- Turn the pump filter counterclockwise and remove the filter. Open slowly to allow the water to drain.
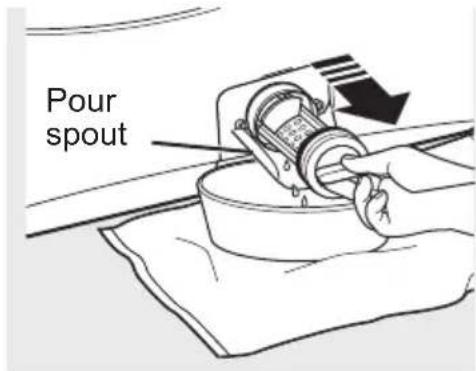
- Clean the debris from the filter.
- Replace the filter and turn clockwise. Tighten securely.
- Flip up the pour spout.
- Close the access door.
CLEANING THE DOOR GASKET
- Open the washer door. Using both hands, press down the door gasket. Remove any foreign objects if found trapped inside the gasket. Make sure there is nothing blocking the holes behind the gasket.
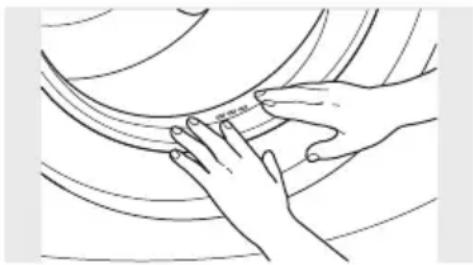
- While holding down the door gasket, inspect the interior gasket by pulling it down with your fingers. Remove any foreign objects if found trapped inside this gasket. Make sure there is nothing blocking the holes behind the gasket.
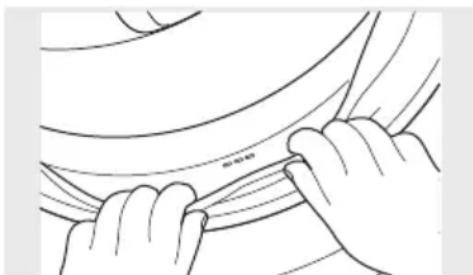
- When you are finished cleaning the door gasket, remove your hands and the gasket will return to the operating position.
MOVING, STORAGE AND LONG VACATIONS
Ask the service technician to remove water from drain pump and hoses. Do not store the washer where it will be exposed to the weather. When moving the washer, the tub should be kept stationary by using the shipping bolts removed during installation. See Installation Instructions in this book.
Be sure the water supply is shut off at the faucets. Drain all water from the hoses if the weather will be below freezing.
Certain internal parts are intentionally not grounded and may present a risk of electric shock only during servicing. Service Personnel - Do not contact the following parts while the appliance is energized: Electrical Valve, Drain Pump, Heater and Motor.
BEFORE YOU CALL FOR SERVICE…
Troubleshooting Tips
Save time and money! Review the charts on the following pages first and you may not need to call for service.
| Problem Possible Cause What To Do | ||
| Not draining Not spinning Not agitating | Load is out of balance | ·Redistribute clothes and run drain & spin or rinse & spin. |
| Pump clogged | ·Increase load size if washing small load containing heavy and light items. | |
| Drain hose is kinked or improperly connected | ·See page 25 on how to clean the Pump Filter. | |
| Household drain may be clogged | ·Straighten drain hose and make sure washer is not sitting on it. | |
| Drain hose siphoning; drain hose pushed too far down the drain | ·Check household plumbing. You may need to call a plumber. | |
| ·Ensure there is an air gap between hose and drain. | ||
| Leaking water | Door gasket is damaged | ·Check to see if gasket is seated and not torn. Objects left in pockets may cause damage to the washer (nails, screws, pens, pencils). |
| Door gasket not damaged | ·Water may drip from the door when the door is opened. This is a normal operation. | |
| ·Carefully wipe off rubber door seal. Sometimes dirt or clothing is left in this seal and can cause a small leak. | ||
| Check back left of washer for water | ·If this area is wet, you have over sudsing condition. Use less detergent. | |
| Leaking water (cont.) | Fill hoses or drain hose is improperly connected | ·Make sure hose connections are tight at washer and faucets and make sure end of drain hose is correctly inserted in and secured to drain facility. |
| Household drain may be clogged | ·Check household plumbing. You may need to call a plumber. | |
| Dispenser clogged | ·Powder soap may cause clogs inside the dispenser and cause water to leak out the front of the dispenser. Remove drawer and clean both drawer and inside of dispenser box. Please refer to Cleaning the Washer section. | |
| Incorrect use of detergent | ·Use HE and correct amount of detergent. | |
| Dispenser box crack | ·If new installation, check for crack on inside of dispenser box. | |
| Clothes too wet | Load is out of balance | ·Redistributes clothes and run drain & spin or rinse & spin. |
| ·Increase load size if washing small load containing heavy and light items. | ||
| ·The machine will slow the spin speed down to 400 rpm if it has a hard time balancing the load. This speed is normal. | ||
| Pump clogged | ·See page 25 on how to clean the Pump Filter. | |
| Overloading | ·The dry weight of the load should be less than suggested weight. | |
| Drain hose is kinked or improperly connected | ·Straighten drain hose and make sure washer is not sitting on it. | |
| Clothes too wet (cont.) | Household drain may be clogged | ·Check household plumbing. You may need to call a plumber. ·Ensure there is an air gap between hose and drain. |
| Drain hose siphoning; drain hose pushed too far down the drain | ||
| Incomplete cycle or timer not advancing | Automatic load redistribution | ·Timer adds 3 minutes to cycle for each rebalance. 11 or 15 rebalances maybe done. This is normal operation. Do nothing; the machine will finish the wash cycle. ·See page 25 on how to clean the Pump Filter. ·Straight drain hose and make sure washer is not sitting on it. ·Check household plumbing. You may need to call a plumber. ·Ensure there is an air gap between hose and drain. |
| Pump clogged | ||
| Drain hose is kinked or improperly connected | ||
| Household drain may be clogged | ||
| Drain hose siphoning; drain hose pushed too far down the drain | ||
| Loud or unusual noise; vibration or shaking | Cabinet moving | ·Washer is designed to move 1/4" to reduce forces transmitted to the floor. This movement is normal. ·Push and pull on the back right and then back left of your washer to check if it is level. If the washer is uneven, adjust the rubber leveling legs so they are all firmly touching the floor and locked in place. Your installer should correct this problem. ·Open door and manually redistribute load. To check machine, run rinse and spin with no load. If normal, unbalance was caused by load. ·See page 25 on how to clean the Pump Filter. |
| All rubber leveling legs are not firmly touching the floor | ||
| Unbalanced load | ||
| Pump clogged | ||
| No power/washer not working or dead | Washer is unplugged • Make sure cord is plugged securely into a working outlet. Water supply is turned off Circuit breaker/fuse is tripped/blown Automatic self system checks | Turn cold faucet fully on. Check house circuit breaker/fuses. Replace fuses or reset breaker. Washer should have separate outlet. First time the washer is plugged in, automatic checks occur. It may take up to 2 minutes before you can use your washer. This is normal operation. |
| Snags, holes, tears, rips or excessive wear | Overloaded Pens, pencils, nails, screws or other objects left in pockets Pins, snaps, hooks, sharp buttons, belt buckles, zippers and sharp objects left in pockets | The dry weight of the load should be less than suggested weight. Remove loose items from pockets. Fasten snaps, hooks, buttons and zippers. |
| Control time wrong or changes | This is normal | During spin the washer may need to rebalance the load sometimes to reduce vibrations. When this happens, the estimated time is increased causing time left to increase or jump. |
| Not enough water | This is normal | Horizontal washers do not require the tub to fill with water like top-load washers. |
| Washer pauses or has to be restarted, or washer door is locked and will not open | Pump clogged • See page 25 on how to clean the Pump Filter. | |
| Door unlocks or press大门 and machine doesn't operate | This is normal | ·Front-load washers startup differently than top-load washers, and it takes 30 seconds to check the system. The door will lock and unlock. ·Simply open and close the door firmly; then press大门. |
| Incorrect operation | ||
| Water does not enter washer or enters slowly | Automatic self system checks | ·After大门 is pressed, the washer does several system checks. Water will flow 60 seconds after大门 is pressed. |
| Water supply is turned off | ·Turn on water supply. | |
| Water valve screens are stopped up | ·Turn off the water source and remove the water connection hoses from the upper back of the washer. Use a brush or toothpick to clean the screens in the machine. Reconnect the hose and turn the water back on. | |
| Wrinkling Improper sorting | ·Avoid mixing heavy items (like work clothes) with light items (like blouses). | |
| Overloading | ·Load your washer so clothes have enough room to move freely. | |
| Incorrect wash cycle | ·Match cycle selection to the type of fabric you are washing (especially for easy care loads). | |
| Repeated washing in water that is too hot | ·Wash in warm or cold water. | |
| Grayed or yellowed clothes | Not enough detergent • Use correct amount of detergent. Not using HE (high-efficiency) detergent Hard water | Use HE detergent. Use hottest water safe for fabric. Use a water conditioner like Calgon brand or install a water softener. Try a liquid detergent. Sort clothes by color. If fabric label states wash separately unstable dyes may be indicated. |
| Detergent is not dissolving | ||
| Dye transfer | ||
| Colored spots | Incorrect use of fabric softener | Check fabric softener package for instructions and follow directions for using dispenser. |
| Dye transfer | Sort whites or lightly colored items from dark colors. Promptly remove wash load from washer. | |
| Slight variation in metallic color | This is normal appearance | Due to the metallic properties of paint used for this unique product, slight variations of color may occur due to viewing angles and lighting conditions. |
| Smell inside your washer | Washer unused for a long time, not using recommended quality of HE detergent or used too much detergent | ·Run a Tub Clean cycle once a month. ·In the case of strong smell, you may need to run the Tub Clean cycle more than once a month. ·Use only the amount of detergent recommended on the detergent container. ·Use only HE (high-efficiency) detergent. ·Always remove wet items from the washer promptly after machine stops running. ·Leave the door slightly open for the water to air dry. Close supervision is necessary if this appliance is used by or near children. Do not allow children to play on, with or inside this or any other appliance. |
| Detergent leak | Incorrect placement of detergent insert | Make sure detergent insert is properly located and fully seated. Never put detergent above max line. |
| Improper dispensing of softener or bleach | Dispenser clogged | Monthly clean the dispenser drawer to remove build up of chemicals. |
| Softener or bleach is filled above the max line | Make sure to have the correct amount of softener or bleach. | |
| Softener or bleach cap issue | Make sure softener and bleach cap for dispenser are seated or they will not work. | |
ERROR CODES
| Description Reason Solution | ||
| E30 | Door is not closed properly | Restart after the door is closed. Check if the clothes is stuck. |
| E10 | Water injecting problem while washing | Check if the water pressure is too low. Straighten the water hoses. Check if the inlet valve filter is blocked. |
| E21 | Overtime water draining Check if the drain hose is blocked, clean drain filter. | |
| E12 | Water overflow Restart the | washer. |
| EXX | Others | Please try again first, call up service line if there are still troubles. |
MIDEA LAUNDRY WASHER LIMITED WARRANTY
ATTACH YOUR RECEIPT HERE. PROOF OF PURCHASE IS REQUIRED TO OBTAIN WARRANTY SERVICE.
Please have the following information available when you call the Customer Service Centre:
Name, address and telephone number
Model number and serial number
A clear, detailed description of the problem
Proof of purchase including dealer or retailer name and address, and date of purchase
IF YOU NEED SERVICE:
- Before contacting us to arrange service, please determine whether your product requires repair. Some questions can be addressed without service. Please take a few minutes to review the Troubleshooting section of the User Manual, or visit http://us.Midea.com/support
- All warranty service is provided exclusively by our authorized Midea Service Providers, in the U.S. and Canada.
Midea Customer Service
In the U.S.A. or Canada, call 1-866-646-4332.
If outside the 50 States of the United States or Canada, contact your authorized Midea dealer to determine whether another warranty applies.
LIMITED WARRANTY
WHAT IS COVERED
TWO YEAR LIMITED WARRANTY (PARTS AND LABOR)
For two years from the date of purchase, if this major appliance is installed, operated and maintained according to instructions attached to or furnished with the product, Midea America Corporation (hereafter "Midea") will pay for factory specified replacement parts and repair labor to correct defects in materials or workmanship that existed when this major appliance was purchased, or at its sole discretion replace the product. In the event of product replacement, your appliance will be warranted for the remaining term of the original unit's warranty period.
YOUR SOLE AND EXCLUSIVE REMEDY UNDER THIS LIMITED WARRANTY SHALL BE PRODUCT REPAIR OR REPLACEMENT AS PROVIDED HEREIN. Service must be provided by a Midea designated service company. This limited warranty is valid only in the 50 States of the United States or Canada and applies only when the major appliance is used in the country in which it was purchased. This limited warranty is effective from the date of original consumer purchase. Proof of original purchase date is required to obtain service under this limited warranty.
LIMITED WARRANTY
WHAT IS NOT COVERED
- Commercial, non-residential or multiple-family use, or use inconsistent with published user, operator or installation instructions.
- In-home Instruction on how to use your product.
- Service to correct improper product maintenance or installation, installation not in accordance with electrical codes or correction of household electrical system (i.e. house wiring, fuses, etc.).
- Consumable parts (i.e. light bulbs, batteries, air or water filters, etc.).
- Defects or damage caused by the use of non-genuine Midea parts or accessories.
- Damage from accident, misuse, abuse, fire, floods, electrical issues, acts of God or use with products not approved by Midea.
- Repairs to parts or systems to correct product damage or defects caused by unauthorized service, alteration or modification of the appliance.
- Cosmetic damage including scratches, dents, chips, and other damage to appliance finishes unless such damage results from defects in materials and workmanship and is reported to Midea within 30 days.
- Routine maintenance of the product.
- Products that were purchased "as is" or as refurbished products.
- Products that have been transferred from its original owner.
- Discoloration, rust or oxidation of surfaces resulting from caustic or corrosive environments including but not limited to high salt concentrations, high moisture or humidity or exposure to chemicals.
- Pick-up or delivery. This product is intended for in-home repair.
- Travel or transportation expenses for service in remote locations where an authorized Midea servicer is not available.
- Removal or reinstallation of inaccessible appliances or built-in fixtures (i.e. trim, decorative panels, flooring, cabinetry, islands, countertops, drywall, etc.) that interfere with servicing, removal or replacement of the product.
- Service or parts for appliances with original model/serial numbers removed, altered or not easily identified.
The cost of repair or replacement under these excluded circumstances shall be borne by the customer.
DISCLAIMER OF IMPLIED WARRANTYES
IMPLIED WARRANTY, INCLUDING ANY IMPLIED WARRANTY OF MERCHANTABILITY OR IMPLIED WARRANTY OF FITNESS FOR A PARTICULAR PURPOSE, ARE LIMITED TO TWO YEAR OR THE SHORTEST PERIOD ALLOWED BY LAW. Some states and provinces do not allow limitations on the duration of implied warranties of merchantability or fitness, so this limitation may not apply to you. This warranty gives you specific legal rights, and you also may have other rights that vary from state to state or province to province.
DISCLAIMER OF REPRESENTATIONS OUTSIDE OF WARRANTY
Midea makes no representations about the quality, durability, or need for service or repair of this major appliance other than the representations contained in this warranty. If you want a longer or more comprehensive warranty than the limited warranty that comes with this major appliance, you should ask Midea or your retailer about buying an extended warranty.
LIMITATION OF REMEDIES; EXCLUSION OF INCIDENTAL AND CONSEQUENTIAL DAMAGES
YOUR SOLE AND EXCLUSIVE REMEDY UNDER THIS LIMITED WARRANTY SHALL BE PRODUCT REPAIR AS PROVIDED HEREIN. MIDEA SHALL NOT BE LIABLE FOR INCIDENTAL OR CONSEQUENTIAL DAMAGES. Some states and provinces do not allow the exclusion or limitation of incidental or consequential damages, so these limitations and exclusions may not apply to you. This warranty gives you specific legal rights, and you also may have other rights that vary from state to state or province to province.
Laveuse
Alimentation electrique:120V-Circuit:derivation 16 A
Avertissement:
INSTALLATION ADEQUATE
Compartment de javellisant liquide
make yourself at home
- Warning:
- USER MANUAL & INSTALLATION INSTRUCTIONS
- Dear user
- WASHER SAFETY 3
- INSTALLATION INSTRUCTIONS 8
- WASHER USE 14
- WASHER CARE 23
- BEFORE YOU CALL FOR SERVICE 28
- WARRANTY 36
- WASHER SAFETY
- YOUR SAFETY AND THE SAFETY OF OTHERS ARE VERY IMPORTANT
- IMPORTANT SAFETY INSTRUCTIONS
- WARNING
- PROPER INSTALLATION
- Electrical Shock Hazard
- WHEN NOT IN USE
- SAVE THESE INSTRUCTIONS
- THIS APPLIANCE IS FOR HOUSEHOLD USE ONLY
- IMPORTANT: MINIMUM INSTALLATION CLEARANCES
- ELECTRICAL REQUIREMENTS
- GROUNDING REQUIREMENTS
- WATER SUPPLY REQUIREMENTS
- DRAIN REQUIREMENTS
- INSTALLATION INSTRUCTIONS
- BEFORE YOU BEGIN
- FOR YOUR SAFETY:
- TOOLS REQUIRED
- UNPACKING THE WASHER
- Save all bolts for future use.
- INSTALLING THE WASHER
- Do not crossthread or over-tighten these connections.
- WASHER USE CONTROL PANEL
- QUICK START
- CONTROL SETTING
- Wash Cycles
- DELAY and EXTRA RINSE
- FEATURES
- THE DISPENSER DRAWER
- The Detergent Compartment
- The Liquid Bleach Compartment
- The Fabric Softener Compartment
- LOADING AND USING THE WASHER
- SORTING WASH LOADS
- COLORS SOIL FABRIC LINT
- Fire Hazard
- PREPARING CLOTHES
- To avoid snags during washing:
- LOADING THE WASHER
- WASHER CARE
- CLEANING
- EXTERIOR
- INTERIOR
- IMPORTANT:
- dispensers DRAWER AREA
- CLEANING THE PUMP FILTER
- CLEANING THE DOOR GASKET
- MOVING, STORAGE AND LONG VACATIONS
- BEFORE YOU CALL FOR SERVICE…
- ERROR CODES
- MIDEA LAUNDRY WASHER LIMITED WARRANTY
- ATTACH YOUR RECEIPT HERE. PROOF OF PURCHASE IS REQUIRED TO OBTAIN WARRANTY SERVICE.
- IF YOU NEED SERVICE:
- Midea Customer Service
- LIMITED WARRANTY
- WHAT IS COVERED
- TWO YEAR LIMITED WARRANTY (PARTS AND LABOR)
- WHAT IS NOT COVERED
- DISCLAIMER OF IMPLIED WARRANTYES
- DISCLAIMER OF REPRESENTATIONS OUTSIDE OF WARRANTY
- LIMITATION OF REMEDIES; EXCLUSION OF INCIDENTAL AND CONSEQUENTIAL DAMAGES
- INSTALLATION ADEQUATE
- Compartment de javellisant liquide
Brand : MIDEA
Model : MLH52N5AWW
Category : Washing machine