
RDV995 - DVD player ROTEL - Free user manual and instructions
Find the device manual for free RDV995 ROTEL in PDF.
| Product Type | DVD Player |
| Brand | Rotel |
| Model | RDV-995 |
| Compatible Disc Formats | DVD Video, Video CD, CD Audio (CD-R/RW audio) |
| Region Code | 2 (Europe) |
| Composite Video Output | 1 V p-p (75 ohms) via RCA jack |
| S-Video Output | Y: 1 Vp-p (75 ohms), C: 286 mVp-p (75 ohms) |
| Component Video Output | Y: 1 Vp-p (75 ohms), PB/PR: 0.7 Vp-p (75 ohms) |
| Analog Audio Output | 2 V RMS (10 kΩ) on RCA jacks (L/R) |
| Optical Digital Audio Output | -21 to -15 dBm (peak) |
| Coaxial Digital Audio Output | 0.5 Vp-p (75 ohms) |
| Mains Power | 230 V ~ 50 Hz (Europe) |
| Standby Power Consumption | 3 W |
| Special Features | Strobe, Digest, Angle, Zoom, 3D Phonic (VSS), OSD Display, Program, A-B Repeat, Time Search, Parental Control |
| Remote Control | RR-DV92 with TV programming capability |
| Maintenance and Cleaning | Clean with a dry cloth or vacuum cleaner. Do not use solvents. |
| Safety | Class 1 LASER product. Do not open. Risk of electric shock. Disconnect before cleaning. |
| Spare Parts and Repairability | No user-serviceable parts. Contact authorized service. |
| General Information | Dolby Digital and DTS compatible. Optical and coaxial digital audio outputs. Multiple video outputs (Composite, S-Video, Component). Automatic standby function. |
Frequently Asked Questions - RDV995 ROTEL
User questions about RDV995 ROTEL
0 question about this device. Answer the ones you know or ask your own.
Ask a new question about this device
Download the instructions for your DVD player in PDF format for free! Find your manual RDV995 - ROTEL and take your electronic device back in hand. On this page are published all the documents necessary for the use of your device. RDV995 by ROTEL.
USER MANUAL RDV995 ROTEL
natural_image
Close-up of a printed circuit board with various electronic components and traces (no readable text or symbols)
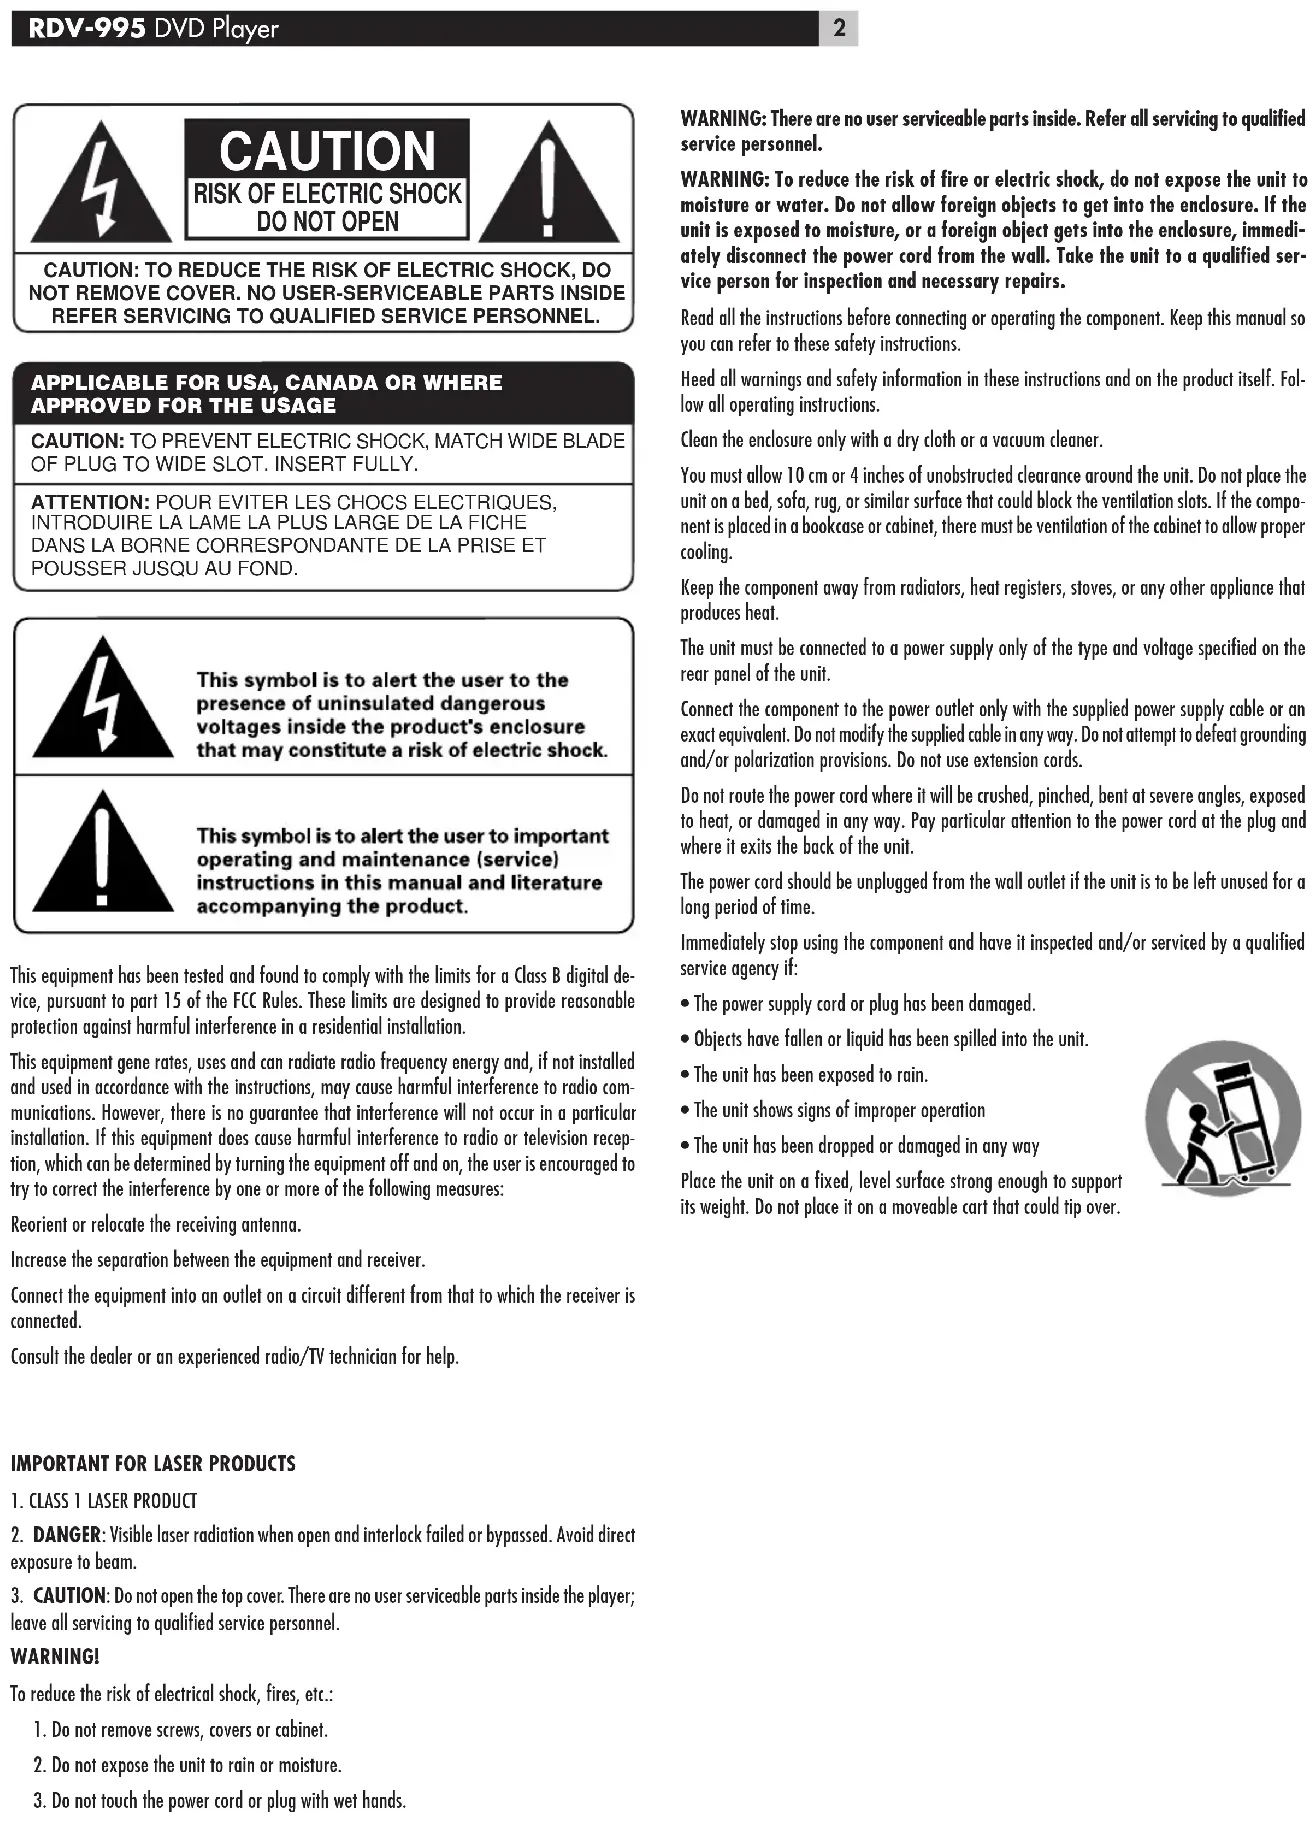
This symbol is to alert the user to the presence of uninsulated dangerous voltages inside the product's enclosure that may constitute a risk of electric shock.

This symbol is to alert the user to important operating and maintenance (service) instructions in this manual and literature accompanying the product.
This equipment has been tested and found to comply with the limits for a Class B digital device, pursuant to part 15 of the FCC Rules. These limits are designed to provide reasonable protection against harmful interference in a residential installation.
This equipment gene rates, uses and can radiate radio frequency energy and, if not installed and used in accordance with the instructions, may cause harmful interference to radio communications. However, there is no guarantee that interference will not occur in a particular installation. If this equipment does cause harmful interference to radio or television reception, which can be determined by turning the equipment off and on, the user is encouraged to try to correct the interference by one or more of the following measures:
Reorient or relocate the receiving antenna.
Increase the separation between the equipment and receiver.
Connect the equipment into an outlet on a circuit different from that to which the receiver is connected.
Consult the dealer or an experienced radio/TV technician for help.
IMPORTANT FOR LASER PRODUCTS
- CLASS 1 LASER PRODUCT
- DANGER: Visible laser radiation when open and interlock failed or bypassed. Avoid direct exposure to beam.
- CAUTION: Do not open the top cover. There are no user serviceable parts inside the player; leave all servicing to qualified service personnel.
WARNING!
To reduce the risk of electrical shock, fires, etc.:
- Do not remove screws, covers or cabinet.
- Do not expose the unit to rain or moisture.
- Do not touch the power cord or plug with wet hands.
WARNING: There are no user serviceable parts inside. Refer all servicing to qualified service personnel.
WARNING: To reduce the risk of fire or electric shock, do not expose the unit to moisture or water. Do not allow foreign objects to get into the enclosure. If the unit is exposed to moisture, or a foreign object gets into the enclosure, immediately disconnect the power cord from the wall. Take the unit to a qualified service person for inspection and necessary repairs.
Read all the instructions before connecting or operating the component. Keep this manual so you can refer to these safety instructions.
Heed all warnings and safety information in these instructions and on the product itself. Follow all operating instructions.
Clean the enclosure only with a dry cloth or a vacuum cleaner.
You must allow 10 cm or 4 inches of unobstructed clearance around the unit. Do not place the unit on a bed, sofa, rug, or similar surface that could block the ventilation slots. If the component is placed in a bookcase or cabinet, there must be ventilation of the cabinet to allow proper cooling.
Keep the component away from radiators, heat registers, stoves, or any other appliance that produces heat.
The unit must be connected to a power supply only of the type and voltage specified on the rear panel of the unit.
Connect the component to the power outlet only with the supplied power supply cable or an exact equivalent. Do not modify the supplied cable in any way. Do not attempt to defeat grounding and/or polarization provisions. Do not use extension cords.
Do not route the power cord where it will be crushed, pinched, bent at severe angles, exposed to heat, or damaged in any way. Pay particular attention to the power cord at the plug and where it exits the back of the unit.
The power cord should be unplugged from the wall outlet if the unit is to be left unused for a long period of time.
Immediately stop using the component and have it inspected and/or serviced by a qualified service agency if:
- The power supply cord or plug has been damaged.
- Objects have fallen or liquid has been spilled into the unit.
• The unit has been exposed to rain. - The unit shows signs of improper operation
- The unit has been dropped or damaged in any way
Place the unit on a fixed, level surface strong enough to support its weight. Do not place it on a moveable cart that could tip over.

Figure 1: RR-DV92 Remote Control
1 VSS button
Turn on/off the simulated Virtual Surround Sound system.
2 OPEN/CLOSE button
Opens and closes the disc tray.
3 SUBTITLE - DIGEST button
Used to activate the on-screen subtitle selection display and to turn the subtitle on or off (for DVD VIDEO).
Pressing this button while holding down the SHIFT button displays beginning scenes of each title, chapter or track on the TV screen (for DVD VIDEO/Video CD).
4 AUDIO - STROBE button
Used to activate the on-screen Audio display to select the audio options (for DVD VIDEO/Video CD).
Pressing this button while holding down the SHIFT button activates the Strobe function, which displays nine continuous still pictures (for DVD VIDEO/Video CD).
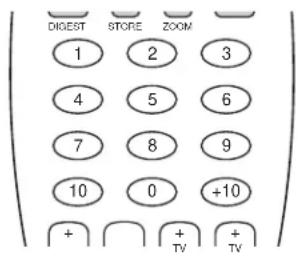
5 Numeric buttons
Used to select a title or track number, to enter a time for the Time search, and a chapter number for the Chapter search.
Also used to select a TV channel in conjunction with the SHIFT button.
6 SLOW button
Used for slow-motion video playback functions (for DVD VIDEO/Video CD).
7 SHIFT button
Used together with other buttons to activate their second functions.
8 PLAY MODE - CANCEL button
Displays an on-screen display for controlling the advanced playback functions.
Pressing this button while holding down the SHIFT button cancels the last selection of the program.
9 Back SKIP - SEARCH button
Skips back a chapter, title or track. Also used for the page selection of a menu screen (for DVD VIDEO/Video CD).
Holding down this button during playback reverses playback rapidly.
Pressing the button while holding down the SHIFT button during playback also reverses playback rapidly. If you press the button while holding down the SHIFT button during rapid reverse playback, the speed increases.
10 II (PAUSE) button
Pauses playback.
11 TITLE button
Displays the title menu of a DVD Video disc on the TV screen.
12 ▲/▼/►/◀ Cursor buttons
Used to select an item from a menu or on-screen display, or to change the setting of an item in the on-screen display.
13 Infrared signal-emitting window
Point this window toward the remote sensor on the front panel when pressing buttons.
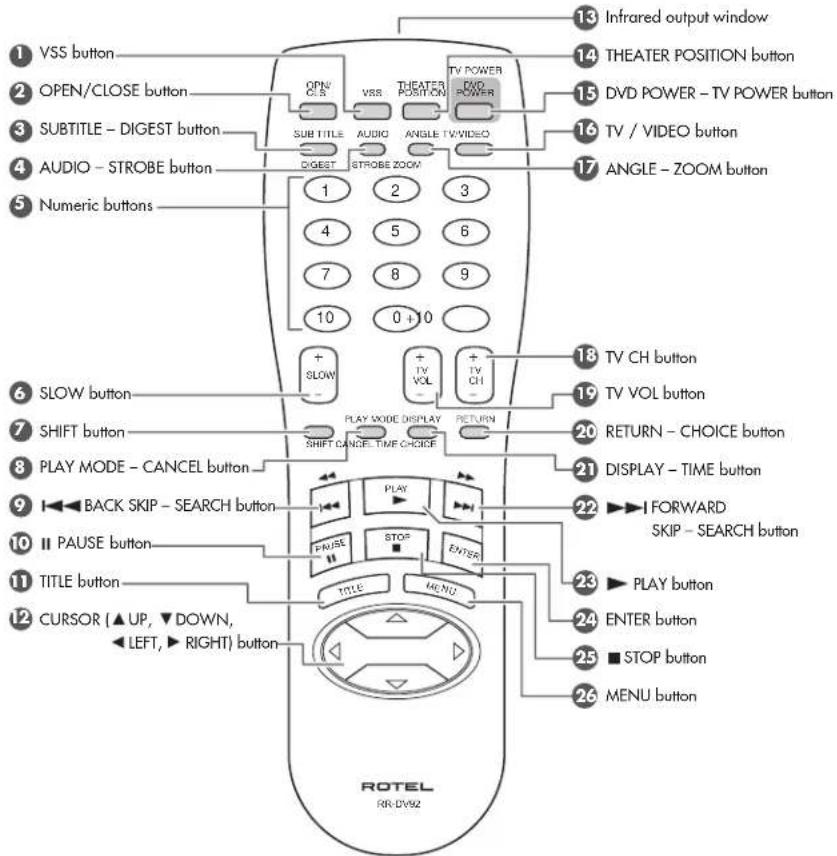
14 THEATER POSITION button
Activates an on-screen display to select from one of four picture character options (for DVD VIDEO/Video CD).
15 DVD POWER - TV POWER button
Turns the RDV-995 on or off (standby).
Pressing this button while holding down the SHIFT button turns the TV on or off.
16 TV/VIDEO button
Switches the TV input mode.
17 ANGLE - ZOOM button
Changes camera angles during playback of a DVD VIDEO disc containing multiple camera angles.
Pressing this button while holding down the SHIFT button zooms in the picture (for DVD VIDEO/Video CD).
18 TV CH button
Changes the TV channels.
19 TV VOL button
Adjusts the TV volume.
20 RETURN - CHOICE button
Returns to the previous menu (for DVD VIDEO/Video CD).
Pressing this button while holding down the SHIFT button activates the on-screen Preference display.
21 DISPLAY - TIME button
Displays the status information (only for DVD disc) or the time information (for any disc types). When the time information appears, pressing this button while holding the SHIFT button changes the time mode.
22 ▶▶▶I FORWARD SKIP - SEARCH
button
Skips forward a chapter, title or track. Also used for the page selection of a menu screen (for DVD VIDEO/Video CD).
Holding down this button during playback advances playback rapidly.
Pressing the button while holding down the SHIFT button during playback also reverses playback rapidly. If you press the button while holding down the SHIFT button during rapid reverse playback, the speed increases.
23 ▶ PLAY button
Starts playback. Also used as a SELECT button for PBC of Video CDs.
24 ENTER button
Used to select functions or controls a menu or on-screen display.
25 ■ (STOP) button
Stops playback. Also used to erase all the programmed tracks for the program play.
26 MENU button
Displays a DVD menu on the TV screen.
Figure 2: Front Panel Controls
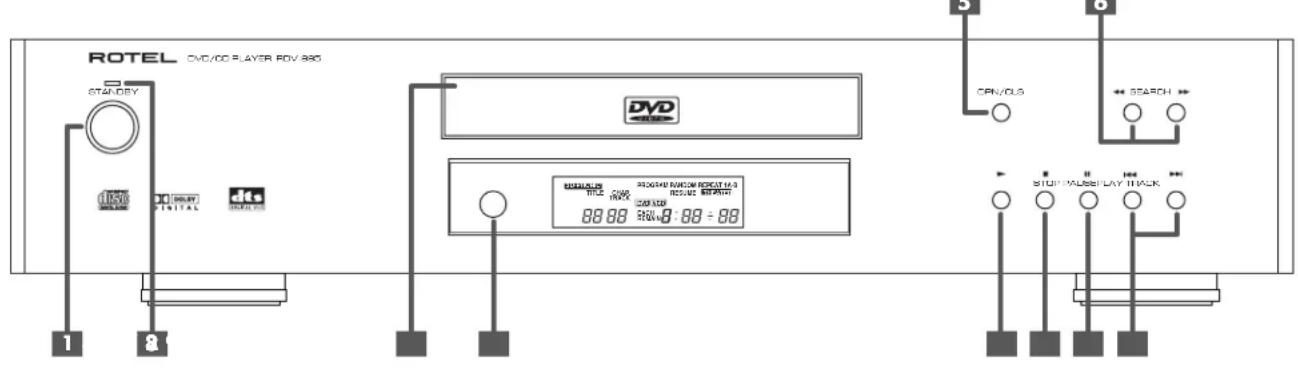
1 STANDBY button
Turns the unit on or off (standby).
2 STANDBY indicator
Lights when the power cord is connected and the unit is on standby. When the unit is turned on, the STANDBY indicator goes off.
3 Disc tray
Used to load discs.
4 Remote sensor
Receives the signal from the remote control unit.
5 (OPEN/CLOSE) button
Opens and closes the disc tray.
6 ←→(SEARCH) buttons
Pressing ◀ during playback reverses or advances playback rapidly. Each press of the button during rapid playback increases playback speed.
Also used for slow motion playback of a picture (for DVD Video/Video CD).
7 ▶ (PLAY) button
Starts playback. Also, used as a SELECT button for PBC of Video CDs.
8 ■ (STOP) button
Stops playback.
Also used to erase all programmed tracks for the program play.
9 II (PAUSE) button
Pauses playback.
10 ◀◀▶(SKIP) buttons
Used to skip a chapter, title or track. Also used for the page selection of a menu screen (for DVD Video/Video CD).
Holding down ◀◀▶ during playback reverses or advances playback rapidly.
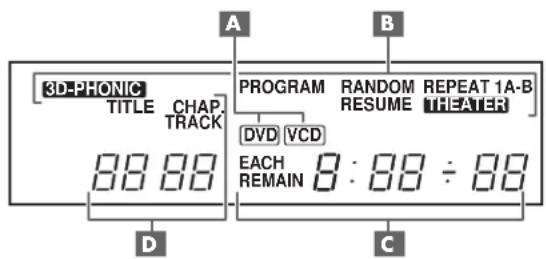
Figure 3: Display Window
A Disc Indicators
Light to indicate the type of disc loaded into the disc tray. There is no indicator when an Audio CD is loaded
B Multi-Information Display
One or more of these indicators light when the corresponding function is activated.
c Time Display
Shows the cumulative or remaining time of the track or disc, or the total disc time.
D Chapter, Title, Track Indicator
Displays chapter, title, or track number.
Contents
About Rotel 5
About This Manual 5
About the RDV-995.... 5
Precautions 6
Audio/Video Connections...... 6
Connecting the Power Cord 9
RR-DV92 Remote Control 9
On Screen Displays 10
On Screen Icons 11
Using Numeric Buttons.... 11
About discs 11
DVD Disc Structure 12
Getting Started 12
Disc Play Basics.... 12
Advanced Operations.... 13
Special Playback Features 15
Changing the Track Order 16
Repeat Play 17
Multiple Angle Viewing 18
Subtitle Language Selection...... 18
Audio Language Selection...... 18
Selecting Picture Quality 19
Using 3D Phonic
Virtual Surround Sound (VSS) 19
Disc/Time Display 20
Checking the DVD Function Status ..... 20
Setting Preferences 20
Parental Lock 24
Care and Handling of Discs...... 25
Troubleshooting 26
Appendix A: ...Table of languages and their abbreviations .... 27
Appendix B: Country Code List for Parental Lock.... 28
Specifications 29
About Rotel
A family whose passionate interest in music led them to manufacture high fidelity components of uncompromising quality founded Rotel 40 years ago. Over the years that passion has remained undiminished and has expanded to include the goal of providing exceptional equipment for audio/video systems as well as dedicated audio systems.
The engineers work as a close team, listening to, and fine tuning each new product until it reaches their exacting performance standards. They are free to choose components from around the world in order to make that product the best they can.
Rotel's reputation for excellence has been earned through hundreds of good reviews and awards from the most respected reviewers in the industry. Their comments keep the company true to its goal – to supply equipment that provides exceptional performance, reliability and affordability.
All of us at Rotel thank you for buying this product and hope it will bring you many hours of enjoyment.
About This Manual
Throughout this manual the controls and components of the RDV-995 are identified with numbers and letters in dark gray circles and squares.
Numbers in circles such as ⑨ identify items on the RR-DV92 remote control. (To help you remember this think of "round equals remote".)
Numbers in squares such as 9 identify items on the front and rear panel of the unit.
Letters in squares such as A identify items in the front panel display window.
In the operation section of the manual some function descriptions apply only to certain kinds of discs. The types of discs to which the information applies are indicated with symbols such as DVD.
About the RDV-995
Thank you for purchasing the Rotel RDV-995. It will provide years of enjoyment when used in a high-quality home theater system.
The RDV-995 is one of the most flexible components you can add to your audio/video system. In addition to DVD Video discs, the RDV-995 can play Video and audio CD discs. It provides a full range of operating features and control functions.
Strobe function
The unit can display nine continuous still pictures on the TV screen.
Digest function
You can select the desired title from the opening scenes displayed on the TV screen.
Angle function\*
You can select a desired angle from multiple camera angles recorded on the DVD disc.
Zoom function
You can view scenes close-up.
Parental lock\*
You can restrict the playback of DVD discs with scenes which you do not want your child to see, such as adult or violent films.
Theater position
You can select the picture character according to the lighting of your room.
High quality digital sound
You can enjoy high quality sound with Dolby Digital or Linear-PCM.
Surround function\*
The unit is compatible with Dolby Digital surround and DTS surround.
3D Phonic (VSS) function
You can enjoy surround sound with your 2-channel system.
Multi-language subtitles and sound\*
You can select a subtitle or sound language from those recorded on the DVD disc.
Multi-disc playback
The RDV-995 can play Audio CDs and Video CDs as well DVD Video discs.
On-screen display
User-friendly on-screen displays allow you to operate the unit easily.
* Functions only with DVD discs.
Precautions
Please read this manual carefully. In addition to basic installation and operating instructions, it provides valuable information on various system configurations as well as general information that will help you get the most from your system. Please contact your authorized Rotel dealer for answers to any questions you might have. In addition, all of us at Rotel welcome your questions and comments.
Save the RDV-995 shipping carton and all enclosed packing material for future use. Shipping or moving the RDV-995 in anything other than the original packing material may result in severe damage.
Be sure to keep the original sales receipt. It is your best record of the date of purchase, which you will need in the event warranty service is ever required.
Placement
Place the RDV-995 on a surface that is level, dry and neither too hot nor too cold (between 5^ C and 35^ C, 41^ F and 95^ F). Do not place the unit where it will be exposed to direct sunlight. Avoid locations that are dusty. Do not place the unit too close to the television set. Do not place the RDV-995 where it will be exposed to vibrations, such as near a subwoofer. To ensure proper ventilation observe the minimum clearance specifications listed in the safety information on page 2.
Audio/Video Connections
IMPORTANT NOTE
FOR 5.1 CHANNEL OPERATION:
Before using the RDV-995 in a 5.1 channel system see the instructions on page 8 regarding the correct setting of the Digital Audio Output preferences.
NOTE: Do not plug in the power cable until all audio/video signal connections are complete. Do not change any audio/video cable connections until the RDV-995 has been unplugged from the power outlet.
Carefully read the instructions supplied with the component you are going to connect to the RDV-995 to be sure they are compatible. If you have questions, contact your authorized Rotel dealer.
NTSC/PAL Switch 15
Set the NTSC/PAL switch to the proper setting for your TV. Television systems in North America use the NTSC standard. Set the NTSC/PAL switch before the RDV-995 is turned on. It cannot be changed when the unit is on.
NOTE: Connect VIDEO OUT of the unit directly to the video input of your TV. Connecting VIDEO OUT to a TV via a VCR may result in unacceptable video quality because many discs are copy-protected.
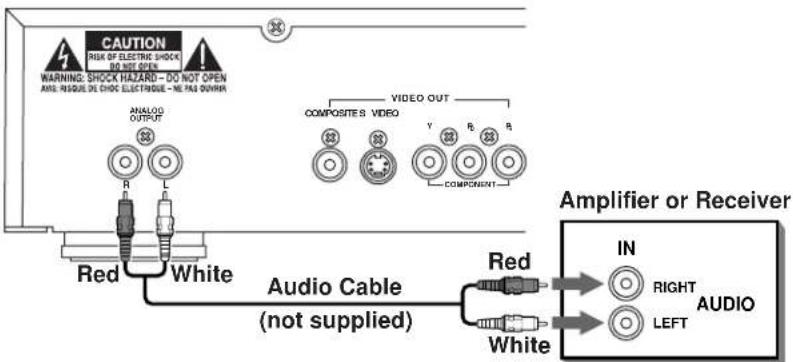
Figure 4: Rear Panel Connections
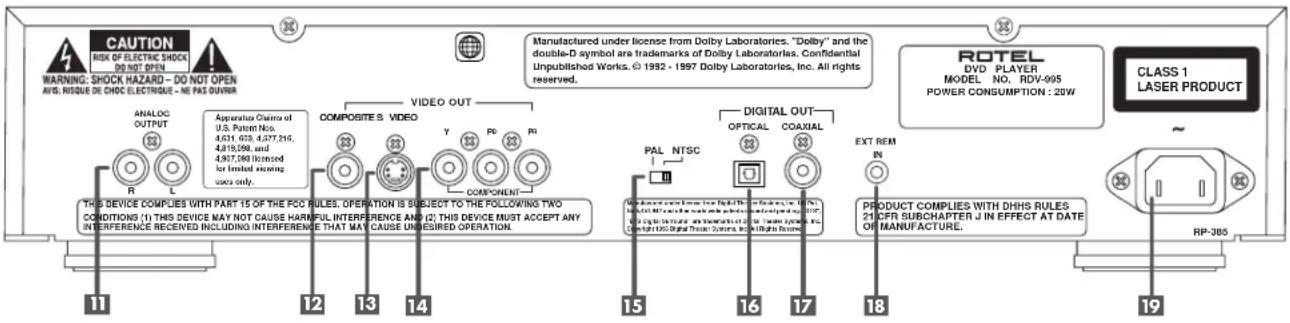
11 Audio ANALOG OUTPUT jacks Left and right channel analog audio outputs.
12 VIDEO OUT - COMPOSITE jack Outputs a composite video signal.
13 VIDEO OUT - S VIDEO jack Outputs an S-video signal.
14 COMPONENT VIDEO OUT jacks Outputs component video signals.
15 NTSC/PAL Output Switch Switches the video output signal between NTSC and PAL formats.
16 DIGITAL OUT - OPTICAL jack 17 DIGITAL OUT - COAXIAL jack Provide digital output signals. The output you use (Optical or Coaxial) must be set in the "Preference" on-screen menu.
18 External Remote Input ("Ext Rem In") This feature is useful when the unit is installed in a cabinet and the front panel IR sensor is blocked.
19 AC power cord receptacle For the power cord connected to the wall outlet.
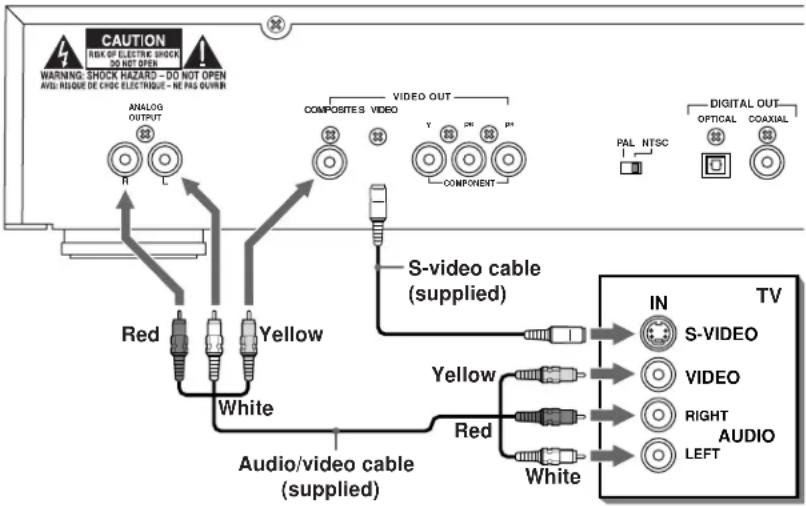
Composite Input TV Connection
Connect the COMPOSITE VIDEO 10 output to the composite video input of your TV. Connect the ANALOG AUDIO 11 outputs to the audio inputs of your TV. A cable for these connections is supplied.
If your TV has a single monaural audio input instead of a pair of stereo inputs, you need to use a "Y" cable adapter to connect the two output channels of the RDV-995 to the single input.
You can improve the sound quality of the system by connecting the audio outputs to a separate hi-fi audio system. (See the following section.)
If your TV has an S-video input, you should connect it with the S-VIDEO 13 output of RDV-995 using the supplied S-video cable in addition to the standard video cables. This will produce better picture quality.
flowchart
graph TD
    A["CAUTION"] --> B["ANALOG OUTPUT"]
    B --> C["Red"]
    B --> D["Yellow"]
    B --> E["White"]
    F["VIDEO OUT"] --> G["COMPOSITES VIDEO"]
    G --> H["COMPONENT"]
    H --> I["S-video cable (supplied)"]
    I --> J["IN"]
    I --> K["TV"]
    L["VIDEO"] --> M["RIGHT"]
    L --> N["AUDIO"]
    O["LEFT"] --> P["White"]
    Q["DIGITAL OUT"] --> R["OPTICAL COAXIAL"]
    S["PAL NTSC"] --> T["Component"]
    U["WARNING: SHOCK HAZARD - DO NOT OPEN\nADI: NOQUE DE CHOC ELECTRIGUE - HE PAS OUTRUN"] --> V["Warning: SHOCK HAZARD - DO NOT OPEN\nADI: NOQUE DE CHOC ELECTRIGUE - HE PAS OUTRUN"]
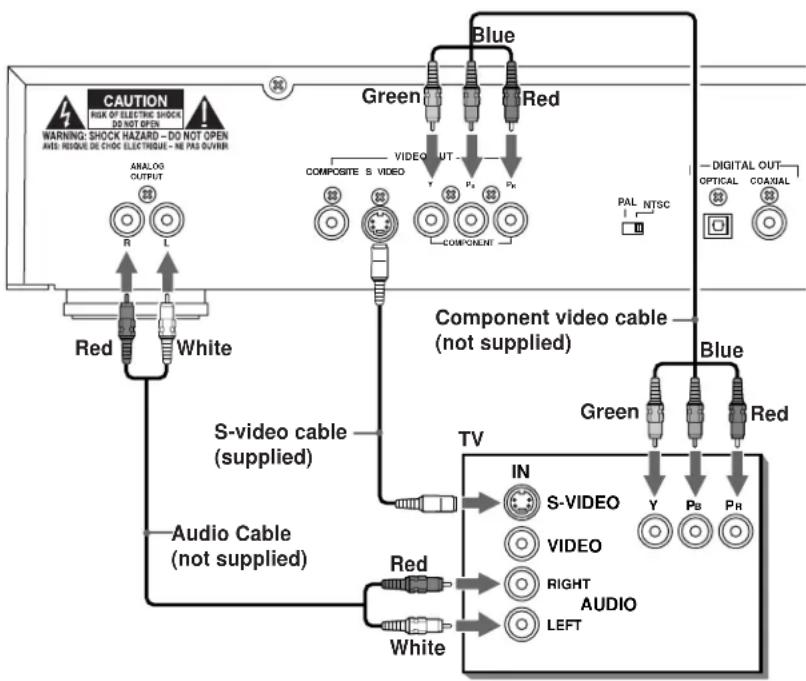
Component Input TV Connection
For use with NTSC televisions. Do not use with PAL televisions.
If your TV has component video signal input jacks you will get better video performance by using the COMPONENT VIDEO 14 output jacks of the RDV-995. The required cable is not provided. Be sure to connect the "Y" output to the "Y" input, "PB" output to the "PB" input, and the "PR" output to the "PR" input.
If your TV has an S-video input, you should connect it with the S-VIDEO 13 output of RDV-995 using the supplied S-video cable in addition to the standard video cables. This will produce better picture quality.
NOTE: If you do not connect the S-Video cable between the two components some functions of your TV may not work.
You can improve the sound quality of the system by connecting the audio outputs to a separate hi-fi audio system. (See the following section.)
NOTE: The component signal inputs on some TV's have BNC type connectors. (BNC connectors are coaxial connectors that have keyed locking collars.) In such instances adapters or a special cable may be needed.
flowchart
graph TD
    A["CAUTION"] --> B["WARNING: SHOCK HAZARD - DO NOT OPEN"]
    B --> C["ANALOG OUTPUT"]
    C --> D["R"]
    D --> E["White"]
    E --> F["Red"]
    F --> G["S-video cable (supplied)"]
    G --> H["Audio Cable (not supplied)"]
    H --> I["Red"]
    I --> J["White"]
    J --> K["Component video cable (not supplied)"]
    K --> L["TV"]
    L --> M["IN"]
    M --> N["S-VIDEO"]
    N --> O["VIDEO"]
    O --> P["AUDIO"]
    P --> Q["LEFT"]
    Q --> R["RIGHT"]
    R --> S["Video"]
    S --> T["IN"]
    T --> U["S-VIDEO"]
    U --> V["VIDEO"]
    V --> W["AUDIO"]
    W --> X["LEFT"]
    X --> Y["RIGHT"]
    Y --> Z["Video"]
    Z --> AA["IN"]
    AA --> AB["S-VIDEO"]
    AB --> AC["VIDEO"]
    AC --> AD["AUDIO"]
    AD --> AE["LEFT"]
    AE --> AF["RIGHT"]
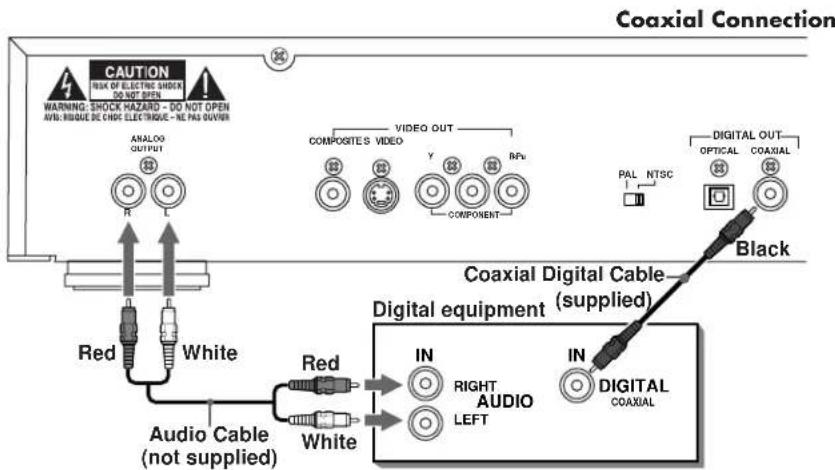
Connecting to Audio Equipment with a Digital Input
You can enhance the sound quality by connecting the OPTICAL DIGITAL OUTPUT 16 or COAXIAL DIGITAL OUTPUT 17 of the RDV-995 to the digital input of an amplifier, DAT or MD by using an optional digital cable. The digital stereo audio signal from a disc is directly transferred. If you connect the unit to a Dolby Digital or DTS decoder or an amplifier with built-in decoder by using an optional digital cable, you can enjoy high-quality surround sound.
When you make the digital connection, also make the analog connection, because, depending on the disc type, no audio may be reproduced from the DIGITAL OUTPUT.
With the digital connection, the Preference menu settings for COMPRESSION and DOWN MIX are disabled. Settings for these items must be made from the decoder.

flowchart
graph TD
    A["Optical Connection"] --> B["Red"]
    A --> C["White"]
    A --> D["Audio Cable (not supplied)"]
    A --> E["Digital equipment"]
    E --> F["IN"]
    E --> G["RIGHT AUDIO LEFT"]
    E --> H["IN"]
    E --> I["DIGITAL OPTICAL"]
    B --> J["R"]
    C --> K["L"]
    D --> L["Composites"]
    D --> M["VIDEO"]
    D --> N["Y"]
    D --> O["Cooperent"]
    E --> P["IN"]
    E --> Q["RIGHT AUDIO LEFT"]
    E --> R["IN"]
    E --> S["DIGITAL OPTICAL"]
    T["CAUTION"] --> U["WARNING: SHOCK HAZARD - DO NOT OPEN\nABS: RHQUE DE CHOIC ELECTRIQUE - BE PAS OWAR"]
    U --> V["ANALOG OUTPUT"]
    V --> W["R"]
    V --> X["L"]
    Y["VIDEO OUT"] --> Z["COMPOSITES VIDEO"]
    Y --> AA["Cooperent"]
    AB["PAL NTSC"] --> AC["Optical Digital Cable (not supplied)"]
    AC --> AD["DIGITAL OUT\nOPTICAL COAXIAL"]
IMPORTANT NOTE FOR 5.1 CHANNEL OPERATION:
If the "DIGITAL AUDIO OUTPUT" is not set correctly, loud noise may be generated from speakers, possibly damaging them. Before using the RDV-995 in a 5.1 channel system, be sure the proper type of Digital Audio Output has been selected. Use the following procedure.
While the RDV-995 is stopped or no disc is loaded press RETURN-CHOICE 20 while holding down SHIFT 7 to access the Preference display screen. Use the ◀/► Cursor Buttons 12 to move ☑ to select "SYSTEM". Use the ▲/▼ Cursor Buttons to select DIGITAL AUDIO OUTPUT. Use the ◀/► Cursor Buttons to select "STREAM/PCM". To close the Preferences display screen press RETURN-CHOICE while holding down SHIFT, or move ☑ to Exit. See page 24 for more information.
Connecting to an Audio Amplifier or Receiver
You will get better sound quality if you connect the audio outputs of the RDV-995 to a high quality amplifier or receiver and use component loudspeakers, rather than those built in to the television.
Connect the ANALOG OUTPUTS 11 of the RDV-995 to any high level input (such as AUX, DVD, CD, etc.) of an amplifier or receiver.
Connecting the Power Cord
AC Input
Your RDV-995 is configured at the factory for the proper AC line voltage in the country where you purchased it (USA: 115 volts/60Hz AC or CE: 230 volts/50Hz AC). The AC line configuration is noted on a decal on the back of your unit.
After all the audio/video connections have been made, plug the supplied power cord into the AC INPUT receptacle on the back of the unit. Then insert the power plug into an AC wall outlet. The STANDBY indicator lights and setup is complete. Note that a small amount of power (3 watts) is always used while the power cord is connected to the wall outlet.
Observe the following precautions:
- Do not connect or disconnect the power cord with wet hands.
- Disconnect the power cord if you are not going to use the unit for a long time.
- When unplugging the player from the wall outlet, always pull the plug, not the power cord.
- Disconnect the power cord before cleaning the unit.
- Disconnect the power cord before moving the unit.
- Do not damage, alter, twist, or pull the power cord, as this may damage the cord and cause fire, electric shock, or other accidents. Contact a dealer and get a new power cord if the cord is damaged.
- Do not put anything heavy, on the unit, or the power cord, as this may cause fire, electric shock, or other accidents.
RR-DV92 Remote Control
Installing the Batteries
The battery compartment is located on the back of the remote control unit.
1 Press down on the point shown by the arrow at the top of the compartment cover, and pull up the cover to open the compartment.
2 Place the two accessory R6P (SUM-3)/AA(1.5F) batteries in the remote control according to the polarity markings ("+" and "-") inside the compartment and on the batteries.
3 Place the cover over the compartment, and press down lightly.
The batteries will last about six months with normal use. If the functions of the remote control become erratic, replace the batteries.
Precautions for the safe use of batteries
Observe the following precautions for the safe use of batteries. If they are used improperly their life will be shortened, they may burst or their contents may leak.
- Remove the batteries from the remote control if it is not going to be used for a long period of time.
- Remove dead batteries and dispose of them properly.
- Never leave dead batteries lying around, take them apart, mix them with other refuse, or throw them into an incinerator.
- Never touch liquid that has leaked out of a battery.
- Do not mix new and old batteries, or batteries of different types, when replacing them.
Programming the RR-DV92 Remote to Control a TV
You can operate your TV from the remote control unit. The remote must first be programmed to operate your TV set.
1 Press and hold down the TV/VIDEO button. Then enter the manufacturer code of your TV listed in the next column using the numeric buttons (0 - 9). Do not release TV/VIDEO. Keep holding it until the next step is completed. (Example: To enter code "01" press and release the "0" button, then press and release the "1" button.
| No. | Manufacturer | |
| 01 | JVC | 09 Zenith |
| 02 | Magnavox | 10 Hitachi |
| 03 | Mitsubishi | 11 Panasonic |
| 04 | Panasonic | 12 Samsung |
| 05 | RCA | 13 Sanyo |
| 06 | Sharp | 14 Sanyo |
| 07 | Sony | 15 Samsung |
| 08 | Toshiba |
2 Press the STOP button, then release the TV/VIDEO button.
3 Test the program setting by pressing the TV POWER button to see if it turns your set on. If there is more than one code listed for the manufacturer of your TV, try them one by one until you succeed.
Remote Control TV Operation
The following buttons can be used for operating the TV (The numbers in brackets are those shown on figure 1 on page 3.)
TV POWER
Turns the TV on or off when the SHIFT button is also pressed.
TV CH
Changes the TV channels.
TV VOL
Adjusts the TV volume.
0 - 9 (Numeric Buttons)
Selects the TV channels (while holding down the SHIFT button). Note: For some TVs, pressing "+10" while holding down SHIFT functions as the "+100". "+10" functions as ENTER if your TV requires pressing the ENTER after selecting a channel number.
TV/VIDEO
Switches input mode (either TV or VIDEO).
External Remote In
The 3.5mm mini-jack (labeled EXT REM IN) receives command signals from an industry standard infrared receiver. This feature is useful when the unit is installed in a cabinet and the front panel sensor is blocked. Consult your authorized Rotel dealer for information on external receivers and the proper wiring of a jack to fit the mini-jack receptacle.
NOTE: The IR signals from the External Remote In jack can be relayed to source components using IR emitters or hardwired connections from the IR Out jacks.
On Screen Displays
The unit provides several on-screen displays. With some displays, you can set or select preferences or functions, while the others are display-only.
Opening Displays
The Opening display appears automatically in some conditions. The following information may appear at the bottom of the screen, depending on the unit's status.
- NOW READING: The unit is now reading the disc information (TOC).
- REGION CODE ERROR!: The DVD VIDEO disc loaded cannot be played because the region code of the disc does not match the unit.
• OPEN: The disc tray is now opening. - CLOSE: The disc tray is now closing.
Screen Saver
A television monitor screen may be burned out if a static picture is displayed for a long time. To prevent this, the unit automatically activates the screen saver function if a static picture, such as an on-screen display or menu, is displayed for over 5 minutes.
- Pressing any button on the unit or the remote control unit will release the screen saver function and return to the previous display.
- You can select one of several screen saver modes available (see page 23).
- The screen saver function is not activated during Audio CD playback or after stopping Audio CD playback.
Preference Displays
When the unit is stopped, pressing the RETURN-CHOICE 20 button while holding the SHIFT 7 button accesses the preference display.
There are four pages: LANGUAGE, AUDIO, DISPLAY and SYSTEM.
See page 20-23 for detailed information.
Language
Audio

Display
System

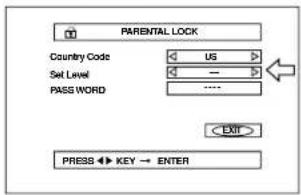
PARENTAL LOCK Displays
When no disc is inserted or a DVD VIDEO disc is stopped, pressing the ENTER 24 button while holding down the SHIFT 7 button accesses the PARENTAL LOCK display in which you can set the level for limiting playback.
See page 24 for detailed information.
Parental Lock
On-Screen Display Operation
When appears in the on-screen display, you can move it using ▲/▼/▶/◀ 12 cursor buttons to select items you want to work with.
With an item like 1/3, you can change the setting by using the ▶/▶ cursor buttons when □ is on the item.
To operate on-screen items such as REPEAT place the on the item and press ENTER 24.
The information in the on-screen display message box changes depending on the function selected with the ☑.
Numbers are entered using the NUMERIC BUTTONS 5.
Some functions are operated by pressing ENTER 24 after you have made a selection with the 📊 or with the numeric buttons.
To turn off an on-screen display and return to the normal screen, press the RETURN-CHOICE 20 button while holding down the SHIFT 7 button.
Play Mode Displays
Pressing the PLAY MODE 8 button accesses
display in which you can control playback functions.
Different displays appear depending on the disc type and the unit's status.
While stopped
During DVD Video playback
During Audio CD playback
During Video CD playback

Status Displays
Pressing the DISPLAY-TIME 21 button during playback accesses the status display.
For a DVD VIDEO disc, pressing the DISPLAY-
TIME button toggles between the DVD VIDEO function status display, and the disc/time display and off.
For a Video CD or Audio CD disc, pressing the DISPLAY-TIME button switches the disc/time display on and off.
DVD VIDEO function status
Disc/time (DVD VIDEO)
Disc/time (Audio CD/Video CD without PBC)
Disc/time
(Video CD with PBC)
On Screen Icons
During DVD playback, you may see icons displayed over the picture. These have the following meanings.
- Is displayed at the beginning of a scene recorded from multiple angles. For more information see page 18.
- Is displayed at the beginning of a scene recorded with multiple audio languages. For more information see page 18.
- Is displayed at the beginning of a scene recorded with multiple subtitle languages. For more information see page 18.
You can set the unit not to display on-screen icons above via the preference settings described on page 23.
About Invalid Operation Icon
If you try to do an operation that is not allowed, or select an option that is not available, ☑ appears on your television screen. Operations are occasionally unacceptable even if ☑ is not displayed. Note that some operations may not be accepted. For example, some discs may not allow rapid forward/reverse or slow-motion playback.
Using Numeric Buttons 5
Selecting Track/Title Numbers
- To select a number between "1" and "10" press the corresponding button for the number.
- To select a number higher than 10 use the "+10" button.
Examples:
To select 13 +10 → 3
To select 34 +10 → +10 → +10 → 4
To select 40 +10→+10→+10→10
Entering a Time or Chapter Number
The method for entering a time for Time search or chapter number for Chapter search is different from above. See the corresponding sections in this manual for the details.
To select a TV channel.
Press the corresponding numeric buttons (between 0 and 9) while holding down the SHIFT button 7.
About discs
playable Disc Types
This unit can play the following types of discs:

Video CD

Audio CD

- CD-R and CD-RW discs recorded with the audio CD format can be played, though some may not play because of the disc characteristics or recording conditions.
All DVD players and DVD discs have a Region Code number. This unit only can play back DVD discs whose Region Code numbers include the unit's Region Code, which is indicated on the region code symbol on the rear panel.
Examples of playable DVD discs for a unit with Region Code "1"


NOTE: With some DVD and Video CD discs, you may not be able to control them according to the instructions described in this manual, because of the contents of the disc.
Non-Playable Discs
DVD-ROM, DVD-RAM, DVD Audio, DVD-R, DVD-RW, CD-R, CD-ROM, PHOTO CD, CD-RW, CD-EXTRA, CD-G, CD-TEXT.
NOTE: Do not play non-standard shape discs. Do not play a disc with tape, seals or stickers on it. It may damage the player.
This unit can play back audio recorded on CD-G, CD-EXTRA and CD-TEXT discs.
NOTE: Playing back discs listed as "Non-playable discs" in the table above may generate noise and damage speakers.
DVD Disc Structure
A DVD disc is comprised of "titles," while an Audio CD, Video CD or SVCD is comprised of "tracks." Each title may be divided into some "chapters." For example, if a DVD disc contains some movies, each movie may have its own title number, and each movie may be divided into some chapters. In a DVD karaoke disc, each song usually has its own title number and does not have chapters.
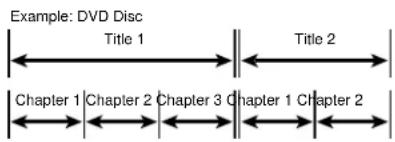
Example: Audio CD / Video CD / SVCD Disc

Getting Started
Most of the time you will be operating the RDV-995 with the RR-DV92 remote control. The front cover of this manual folds out so you can see the control identification diagram on page 3 while reading the operating information on the following pages.
Power On/Off
Press DVD ON/OFF 15 on the remote or the STANDBY 1 button on the front panel.
You can also turn on the unit by pressing the PLAY button on the front panel 7 or the Remote control 23. If a disc is loaded the RDV-995 will start playing. If a disc is not loaded, the disc tray opens.
You can also turn on the unit by pressing the OPEN/CLOSE button on the front panel 5 or the remote control 2. In this case, the disc tray opens.
NOTE: When you turn off the RDV-995 it is not disconnected from the AC power source. It goes into a standby state. In this state, the unit consumes a very small quantity (3 watts) of power.
Loading Discs
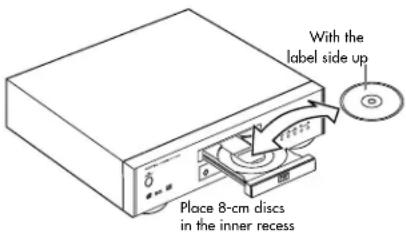
Press the OPEN/CLOSE button on the front panel 5 or the remote control 2. Place a disc in the disc tray with the label side up.
Press one of the OPEN/CLOSE buttons to close the tray.
NOTE: When loading a disc in the tray, be sure to center the disc in the tray recess. Otherwise, the disc may be damaged when the tray is closed, and the disc may not be removed from the unit. Do not use any stabilizer when playing back a disc.
NOTE: Use only the type of discs listed on the preceding page.
Disc Play Basics

Playing a Disc
Press the ▶ (PLAY) button on the remote control 23 or on the front panel 7 the disc starts playing from the beginning. The display window shows the title/chapter or track number being played.
With Video CD with PBC (Play Back Control), or some DVD discs, the menu display may appear on the TV screen after pressing PLAY. In such a case, select an item to be played back from the menu.
With some DVD discs playback starts automatically after a disc is loaded.
Stopping Disc Play
Press the ■ (STOP) button on the remote control 25 or on the front panel 8
Pausing Disc Play
Press the Ⅱ (PAUSE) button on the remote control ⑩ or on the front panel ⑨ to resume disc play at the point where it was paused press the ▶ (PLAY) button on the remote control ⑳ or on the front panel ⑦
Forward or Reverse Scanning
When a disc is playing you can quickly scan forward or backward while monitoring the output of the disc.
Using the Remote Control
Press and hold down the ▶▶1 9 or ◀◀22 button. The ▶button scans forward. The ◀◀button scans backward. Release the button to return to normal play.
If you hold down the SHIFT button 7 while you press the ◀◀ or ▶Button, the forward or reverse playback speed increases, from 2x to 60x normal play speed, each time you press the button. To return to normal playback, press ▶ (PLAY) 23.
Using the Front Panel Buttons
Press the ◀◀ or ▶SEARCH) button. The forward or reverse playback speed increases, from 2x to 60x normal play speed, each time you press the button. To return to normal playback, press ▶ (PLAY) 23.
You can also search the disc by pressing and holding the front panel ◀◀ or ▶▶ button.
Skipping to the Beginning of a Song or Scene
You can skip to the beginning of another chapter, title, or track.
Using the Remote Control
Press ▶▶1 22 to skip to the beginning of the next or song or scene. Press ◀◀ 9 to skip to the beginning of the previous song or scene. Press the buttons once to skip one chapter, title, or track. Press the button repeatedly to skip more than one chapter, title, or track.
Using the Front Panel Buttons
Press the ▶▶▶ or Hidoton on the front panel. These buttons work the same way as those on the remote control.
NOTE: When you play a Video CD with the PBC function or a DVD disc, the unit may not always skip to the beginning of the title or chapter or track.
Resume Playback Function

The RDV-995 can store a location on a disc and then return to that location and resume playback at a later time.
To Store a Location on a Disc
Using the System Preference on-screen display, set the Resume function to On. See page 25 for detailed information on how to do this.
While a disc is playing the disc location you want to store, press the STOP button 25 or the DVD-TV POWER button 15 on the remote control. The front panel STANDBY button 2 may also be used. The current location on the disc is stored and the Resume indicator appears in the display window.
Resuming Playback at a Stored Location
While the same disc is loaded, press PLAY or The RDV-995 starts playing the disc where playback was interrupted last time.
To Clear The Stored Location
- Remove the disc from the tray.
- Press STOP 25 or while disc play is stopped.
- Turn the unit on with the remote control DVD-TV POWER button 15 or the front panel STANDBY button 1.
Notes About Resume Playback
- Pressing the front panel STANDBY button or the remote control DVD-TV POWER button clears the resume position memory.
- The resume function does not work with Audio CD discs.
- The Resume function must be turned On with the System Preference on-screen display.
- In the case of a Video CD disc with PBC function, the unit may resume playback from a point slightly earlier than the disc location you stored.
- The Resume function does not work in the program or random mode.
Advanced Operations
Selecting a Scene From a Menu

DVD discs generally have menus which show the disc contents. These menus contains various items such as titles of a movie, names of songs, or artist information, which can be displayed on the TV screen. You can locate a desired scene by using the menu.
Insert the DVD disc. Press the TITLE button 11 or MENU button 26. The menu appears on the TV screen.
Use the CURSOR buttons ▲/▼/▶/▲ 12 to select a desired item, then press ENTER 24. The RDV-995 starts playing the selected item.
With some discs, you can also select items by entering the corresponding number using the Numeric Buttons 5. This may cause the RDV-995 to automatically start playing the selected item.
About menus
Normally, a DVD disc which contains more than one title will have a "title" menu which is displayed when you press the TITLE button. Some DVD discs may also have a different menu which appears by pressing the MENU button. See the instructions of each DVD disc for its particular menu.
NOTE: When ☑ appears on the TV screen when you press TITLE button it indicates the disc does not have a menu listing the titles. When ☑ appears on the TV screen when you press MENU button it indicates the disc does not have a menu.
Selecting a Scene From the Menu of a Video CD with PBC (Playback Control)

Some Video CD and SVCD discs are compatible with the PBC ("Play Back Control") function. A Video CD or disc recorded with PBC has menus which list the items recorded on the disc. You can select specific items by using this menu.
When a Video CD disc with PBC is stopped press PLAY 23. A disc menu appears on the TV screen (The PBC function is activated). "Pbc" is indicated in the display window on the front panel. Use the Numeric Buttons to select the desired number of the item. Playback starts from the selected item.
You can return to the menu by pressing RETURN-CHOICE 20.
When "NEXT" or "PREVIOUS" appears on the TV screen, the unit generally works as follows:
- Pressing ▶▶ advances to the next page.
- Pressing ◀◀ returns to the previous page.
* Depending on the disc, this method of the operation may not work exactly as described.
Other PCB Operations Information
To activate the PBC function when a PBC-compatible Video CD disc is being played back without the PBC function, press STOP 25 then press PLAY 23.
You can also activate the PBC function using the play mode menu display as follows.
- Press PLAY MODE - CANCEL 8.
- Use the CURSOR ◀/▶ 12 to move ← to [PBC CALL], then press ENTER 24.
If you want to playback a PBC-compatible Video CD disc without activating the PBC function, start playback by using the Numeric Buttons 5 instead of the PLAY button. See the next section.
Selecting a Scene or Track With the Numeric Buttons


You can select a scene or track by number using the Numeric Buttons 5. Whether or not the disc can be playing when you start to select the track or scene depends on the type of disc. DVD Discs: Play is stopped
Audio CD: During playback
or while stopped
Video CD/SVCD: During playback without PBC function or while stopped
Use the numeric buttons to select the title or track number. (See page 11 for information about how to use the numeric buttons.) The selected title or track number appears in the indicator D in the front panel display window on the front panel. The selected track begins playing.
NOTE: If the symbol appears on the screen when you make a selection with the numeric buttons, the selected track is not on the disc.
This function does not work with Video CD playback with PBC function.
Selecting a Scene or Track With the 1 or Buttons


You can select a scene or track by number using the Back Skip/Search button 9 or Forward Skip/Search button 22. This feature can be used at any time while playing DVD or Audio CD discs. (This function may not work with some DVD Video discs.) It can also be used when playing a Video CD when the PCB fuction is not being used.
With an Audio CD or Video CD, pressing these buttons skips a track. With a DVD VIDEO disc, pressing these button skips a chapter or title depending on the disc configuration. The selection number appears in the display window on the front panel.
To locate a subsequent selection, press ▶▶▶ 22 once or repeatedly until the desired selection number appears in the display.
To locate the beginning of the current selection, press 9 once. To locate a former selection, press repeatedly until the desired selection number appears in the display.
DVD Chapter Search

If the current title of a DVD disc being played is divided into chapters, you can skip to an other chapter using the on-screen display.
While the disc is playing press the PLAY MODE - CANCEL 8 button. The DVD play mode menu appears on the TV screen.
Use the CURSOR 12 buttons ◀/▶ to move to [CHAP. SEARCH], then press ENTER 24. "GO TO CHAPTER_" appears under the menu.
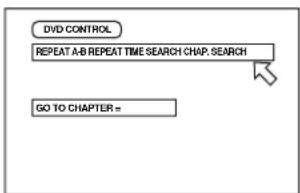
Use the Numeric Buttons (0 - 9) 5 to enter a chapter number.
Example:
To select chapter number 8:
Press "8" → ENTER.
To select chapter number 37:
Press "3" → "7" → ENTER.
Press the ENTER button 24. The RDV-995 starts playing the selected chapter.
With some discs the RDV-995 will automatically start playing after you enter the chapter number.
To return to the regular screen, press the PLAY MODE - CANCEL 8 button again.
NOTE: If the Ⓧ symbol appears when you press ENTER you have selected a chapter that is not on the disc, or chapter search does not work on the disc.
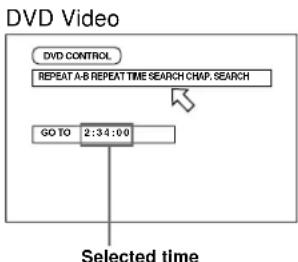
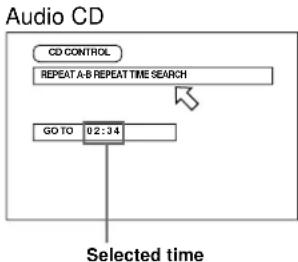
Time Search

With the TIME SEARCH function you can specify the place on the disc you play. (Note that some DVD discs do not contain time information, and the TIME SEARCH function cannot be used.)
This feature can be used at any time while playing DVD or Audio CD discs. It can also be used when playing a Video CD when the PCB fuction is not being used.
Press the PLAY MODE - CANCEL 8 button. The play mode menu appears on the TV screen.
Use the CURSOR 12 buttons ◀/▶ to move ☐ to [TIME SEARCH], then press ENTER 24. "GO TO" appears under the menu.
flowchart
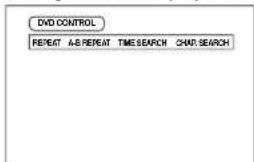
graph TD
    A["DVD CONTROL"] --> B["REPEAT A-B REPEAT TIME SEARCH CHAP. SEARCH"]
    C["GO TO 2:34:00"] --> D["Selected time"]
flowchart
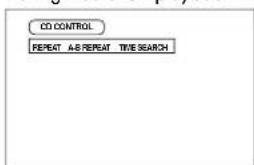
graph TD
    A["CD CONTROL"] --> B["REPEAT A-B REPEAT TIME SEARCH"]
    C["GO TO 02:34"] --> B
    B --> D["Selected time"]
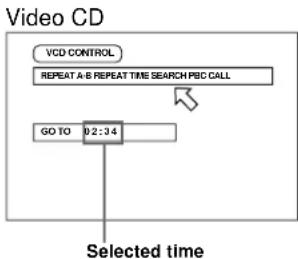
flowchart
graph TD
    A["Selected time"] --> B["VCD CONTROL"]
    B --> C["REPEAT A-B REPEAT TIME SEARCH PBC CALL"]
    C --> D["GO TO 02:34"]
Use the Numeric Buttons (0 - 9) 5 to enter the elapsed time of the current title or track at which you want playback to start. (See examples below.)
Press ENTER 24. Playback starts at the selected time.
Time Entry Examples
The "10" and "+10" buttons are not used in this function.
Example (for DVD):
To playback from 2(H):34(M):00(S)
GO TO _ :: Press "2"
GO TO 2:3_:__Press "4"
GO TO 2:34:__Press "ENTER"
It is not necessary to specify the "seconds" part of the time you want to select, although you may if you wish.
If you make a mistake when enter a time selection digit, use the Cursor Buttons ◀/▶ 12 to re-enter a new number.
Example – to change 2:35 to 2:34:
GO TO 2:35:_ _ Press
GO TO 2:35:_ _ Press "4"
GO TO 2:34:_ _ Press "ENTER"
To return to the regular screen, press the PLAY MODE - CANCEL 8 button again.
NOTE: If the Ⓞ symbol appears the time you have selected is not contained on the disc, or the time search function does not work on the disc.
Also note that the time search function does not work during Video CD playback with the PBC function.
Selecting a Scene From the Digest Display

The RDV-995 can display the opening scene of each title on a DVD or each track of a Video CD. You can then select a title or track.
The Display Digest function can be used when a disc is playing or when it is stopped. The PBC function must be turned off when playing a Video CD.
Press the SUBTITLE-DIGEST button 3 while holding down the SHIFT button 7. The first nine opening scenes are displayed.
- While a DVD Video disc is stopped: The opening scene of each title appears on the TV screen.
- During DVD Video disc playback: The opening scene of each chapter in the current title appears on the TV screen.
- When a Video CD disc is loaded: The opening scene of each track appears on the TV screen.
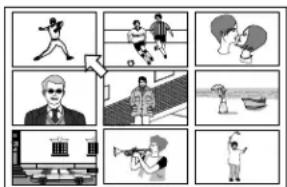
Use the Cursor Buttons ▲/▼/▶/◀ 12 to move the ➕ to the scene you want. Then press ENTER 24. The selected scene will begin playing.
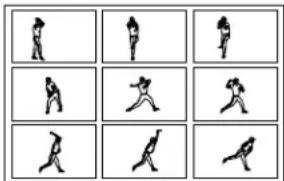
natural_image
Grid of nine black-and-white illustrations showing various activities including running, playing badminton, basketball, and others (no text or symbols)If the scene you want is not one of the first nine, press ▶▶▶ 22 to display the next nine scenes. You may also press ◀◀◀ 9 to display the previous nine scenes.
When the lower right scene is selected, pressing CURSOR ▶ advances to the next page if available. Similarly, when the upper left scene is selected, pressing CURSOR ◀ returns to the previous page (if available).
NOTE: With some discs, depending on the content, it may take some time until all the scenes appear on the screen.
Special Playback Features
The RDV-995 provides several special picture playback functions including Frame-by-Frame, Strobe, Slow-motion and Zoom.

Frame-by-Frame Viewing
While a disc is playing press PAUSE 10. A still picture of the frame that was playing is shown on the screen. Each time you press PAUSE again the still picture advances to the next frame. Press PLAY 23 to resume normal playback.
Multiple Still Frame ("Strobe") Viewing
While a disc is playing press PAUSE 10. A still picture of the frame that was playing is shown on the screen. Then press the AUDIO-STROBE button 4 while holding down the SHIFT button 7. Nine consecutive still frames are shown.
Press the PAUSE button to show the next nine frames. To resume normal play, press the AUDIO-STROBE button 4 while holding down the SHIFT button 7.
Options
Pressing and holding PAUSE for more than 1 second also activates the Strobe function. If you press AUDIO-STROBE 4 during play-back, nine still pictures also appear but they advance in real time.
Slow Motion Playback
Using the Remote Control
While a disc is playing press the SLOW 6 button.
- To play forward slow-motion, press SLOW "+".
- To play reverse slow-motion (for DVD Video discs only), press SLOW “-”.
First, the unit plays the slowest speed, and each time you press the button, the playback speed increases.
To return to normal play press ▶ PLAY 23. To pause slow motion play press ■ PAUSE 10.
NOTE: Sound is muted during slow motion playback
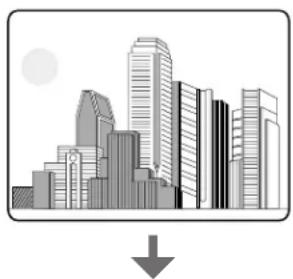
Zoom In Feature
While a disc is playing, or while paused, press the ANGLE-ZOOM button 17 while holding down the SHIFT button 7. "ZOOM" appears on the TV screen and the center part of the image on the screen is enlarged to twice normal size.
natural_image
Illustration of a city skyline with skyscrapers and a downward arrow (no text or symbols)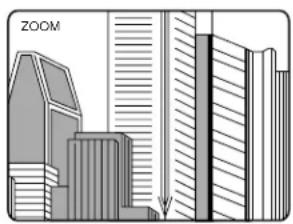
natural_image
Illustration of modern skyscrapers with a vertical arrow pointing downward (no text or symbols)You can use the Cursor Buttons ▲/▼/▶/◀ 12 to move the part of the enlarged scene you can see to a different area.
natural_image
Illustration of two modern skyscrapers with a 'ZOOM' label (no other text or symbols)The Pause feature work as previously described while the Zoom feature is being used.
To return to normal playback press the press the ANGLE-ZOOM button 17 while holding down the SHIFT button 7.
NOTE: When using the Zoom in feature with some discs the picture may be garbled or noisy.
Changing the Track Order

You can program the RDV-995 to play tracks on a DVD Video Disc, Audio CD or Video CD in a specific order or in random order.
Programming For Playback in a Specified Order
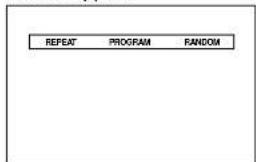
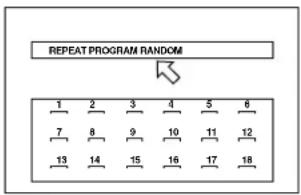
While play is stopped press the PLAY MODE-CANCEL button 8. The play mode menu appears on the TV screen.
Use the Cursor Buttons ◄/▶ 12 to move to [PROGRAM] and press ENTER 24. The Program Table appears in the on-screen menu and "PROGRAM" appears in the front panel display window.
flowchart
graph TD
    A["1"] --> B["2"]
    B --> C["3"]
    C --> D["4"]
    D --> E["5"]
    E --> F["6"]
    G["7"] --> H["8"]
    H --> I["9"]
    I --> J["10"]
    J --> K["11"]
    K --> L["12"]
    M["13"] --> N["14"]
    N --> O["15"]
    O --> P["16"]
    P --> Q["17"]
    Q --> R["18"]
    S["REPEAT PROGRAM RANDOM"] --> T["Arrow pointing to row 1"]
Select the tracks in the desired order using the Numeric Buttons 5. Up to 16 tracks can be programmed. You may select the same track more than once.
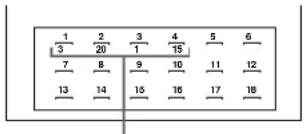
The programmed title/track number is shown under each program number.
If you make a mistake press the PLAY MODE-CANCEL button 8 while holding down the SHIFT button 7. The last track programmed is erased.
Press ▶ PLAY 23 to begin playing the programmed tracks. When all of the programmed tracks have finished playback, the RDV-995 stops. The selected tracks remain programmed.
To Clear the Programmed Tracks
Press ■ STOP 25 to stop playback, then press STOP again. The "PROGRAM" indicator in the display window turns off and the program is cleared.
To Quit Program Playback
Press ENTER 24 when points to [PROGRAM] on the on screen display. [PROGRAM] returns to its original color.
(When playing back a Video CD or SVCD, you have to press STOP and then press ON SCREEN to display the on-screen display.)
Other Program Play Information
- You can exit the programming mode without playing the programmed tracks by using the Cursor Buttons ◄/▶ 12 to move □ to [PROGRAM] and pressing ENTER 24. Note that the program remains.
- Some DVD Video discs may not be played back correctly in program mode.
- During program playback, press ▶▶▶ 22 to skip to the next selection of the program. Press ◀◀◀ 9 to return to the beginning of the current selection. You cannot skip back to the previous selection.
- By pressing PLAY MODE - CANCEL 8 during program playback, the program table is displayed on the TV screen and the current program number is indicated in yellow.
Random Track Playback
While disc play is stopped press the PLAY MODE - CANCEL 8 button. The on-screen display appears on the TV screen.
Use the Cursor Buttons ◀/▶ 12 to move to [RANDOM]. The "RANDOM" indicator in the display window appears.
Press the ENTER 24 button. Random play starts. After playing all the titles/tracks on the disc, random play ends. The same titles/tracks will not be played more than once.
To Quit Random Play Before All Titles/Tracks Have Been Played
Press ■ STOP 25 to stop disc play. The RDV-995 is still in Random Play mode so pressing PLAY resumes Random Play. To quit Random Play, press STOP again while play is stopped. The "RANDOM" indicator in the display window turns off.
NOTE: Some DVD Video disc may not play back correctly in Random Play mode.
Repeat Play


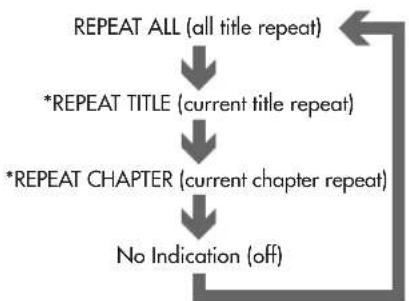
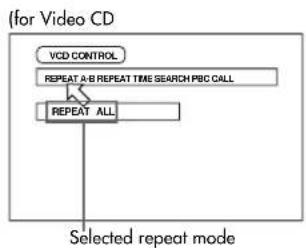
You can repeat playback of the current selection or all disc contents. You can also repeat playback of a desired part.
To Repeat the Current Selection or All Disc Contents
At any time (except when playing a Video CD playback with PBC):
Press PLAY MODE - CANCEL 8. The play mode menu appears on the TV screen.
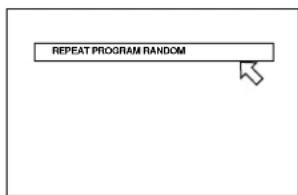
Use the Cursor ◀/▶ 12 to move to [RE-PEAT], then press ENTER. Each time you press ENTER, the repeat mode changes as follows:
- For DVD Video
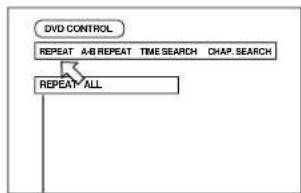
flowchart
graph TD
    A["DVD CONTROL"] --> B["REPEAT A/B REPEAT TIME SEARCH CHAP. SEARCH"]
    B --> C["REPEAT ALL"]
The selected repeat mode appears on the TV screen.
flowchart
graph TD
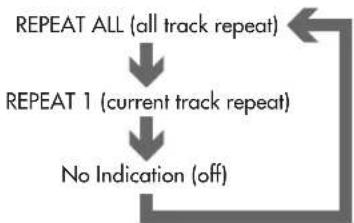
A["REPEAT ALL (all title repeat)"] --> B["*REPEAT TITLE (current title repeat)"]
B --> C["*REPEAT CHAPTER (current chapter repeat)"]
C --> D["No Indication (off)"]
*While stopped Repeat Title and Repeat Chapter cannot be selected.
- For Audio/Video CD
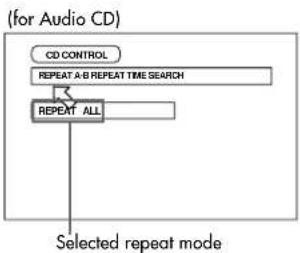
flowchart
graph TD
    A["Selected repeat mode"] --> B["CD CONTROL"]
    B --> C["REPEAT A-B REPEAT TIME SEARCH"]
    C --> D["REPEAT ALL"]
flowchart
graph TD
    A["VCD CONTROL"] --> B["REPEAT A-B REPEAT TIME SEARCH PBC CALL"]
    B --> C["REPEAT ALL"]
    C --> D["Selected repeat mode"]
flowchart
graph TD
    A["REPEAT ALL (all track repeat)"] --> B["REPEAT 1 (current track repeat)"]
    B --> C["No Indication (off)"]
Press ■ STOP 25 to stop Repeat Play.
- If you press STOP in Repeat All mode, the unit stops playback but remains in the mode.
- If you press STOP in Repeat1, Title Repeat or Chapter Repeat mode, the unit stops playback and quits the mode.
To Quit Repeat Playback
Use the Cursor buttons ◀/▶ 12 to move to [REPEAT], then press ENTER repeatedly until the mode is set to off.
Other Repeat Play Information
- Some DVD VIDEO discs do not allow the title repeat or/and chapter repeat.
• Some DVD VIDEO discs automatically stops playback in the middle of the disc. - Repeat playback function cannot be used during Video CD playback with PBC function.
- To turn off the play mode menu display the press PLAY MODE - CANCEL 8 button.
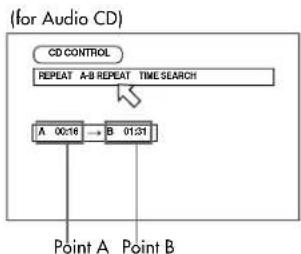
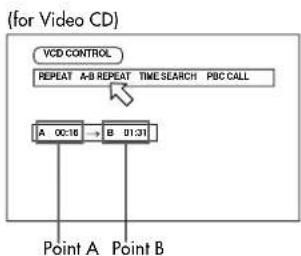
Repeat Play of a Specified Part of a Disc
While playing a disc, press PLAY MODE - CANCEL 8. The on-screen play mode menu appears.
Use the Cursor ◀/▶ 12 to move ☐ to [REPEAT]. Then press ENTER 24 at the beginning of the part you want to repeat (point A). Make sure that Repeat mode is off. If any one of the Repeat modes is selected, you cannot move ☐ to [A-B REPEAT].
Press ENTER at the end of the part you want to repeat (point B). The RDV-995 locates "A" and starts repeat playback between "A" and "B."
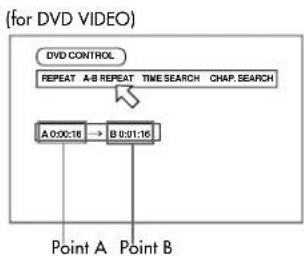
flowchart
graph TD
    A["Point A"] --> B["A 0:00:16"]
    C["Point B"] --> D["B 0:01:16"]
    E["DVD CONTROL"] --> F["REPEAT A-B REPEAT TIME SEARCH CHAP. SEARCH"]
flowchart
graph TD
    A["CD CONTROL"] --> B["REPEAT A-B REPEAT TIME SEARCH"]
    B --> C["A 00:16 → B 01:31"]
    C --> D["Point A"]
    C --> E["Point B"]
flowchart
graph TD
    A["Point A"] --> B["Point B"]
    C["VCD CONTROL"] --> D["REPEAT A/B REPEAT TIME SEARCH PBC CALL"]
    E["A 00:16"] --> F["B 01:31"]
To Quit A-B Repeat Play
Press STOP 25. The unit stops playback and quits the A-B repeat mode.
Other A-B Repeat Play Information
- During playback, pressing ENTER 24 when is pointed at [A-B REPEAT] quits the A-B repeat mode and continues playback.
- You can also quit the A-B repeat mode by pressing 9 or 22.
- To turn off the play mode menu press the PLAY MODE - CANCEL 8 button.
- If appears when pressing ENTER in step 2 during DVD playback, you cannot repeat the selected portion because of the disc contents.
- The A-B REPEAT function cannot be used during program playback.
Multiple Angle Viewing
DVD
Some DVD discs contains "multi-angle" parts, where multiple cameras were used to shoot the same scene from different angles. You can select one of these viewing angles from the normal screen or on-screen display.
At the beginning of a "multi-angle" scene, appears on the TV screen.
Selecting a Scene Angle From the Normal Screen
While the disc is playing press the ANGLE - ZOOM 17 button. The Angle Selection display appears on the screen.
Then press ANGLE - ZOOM 17 button again, or the Cursor Buttons ◀/▶ 12. Each time you press one of these buttons the scene angle changes.
The Angle selection display will automatically disappear if you do not change the angle for 10 seconds.
To turn off the Angle selection display manually, press the ENTER 24 button.
When ⊙ appears on the TV screen, the current scene is not recorded from multiple angles.
Selecting a Scene Angle From the Angle Display List
While the disc is playing press and hold the ANGLE - ZOOM 17 button for more than 1 second. Up to nine camera angles recorded on a disc appear on the TV screen.
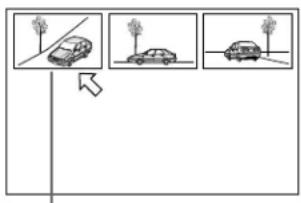
flowchart
graph TD
    A["Car at tree"] --> B["Car at tree"]
    B --> C["Car at tree"]
The selected camera angle
Use the Cursor Buttons ▲/▼/▶/◀ 12 to select a scene angle. Press ENTER 24. The selected angle appears on the TV screen.
When selecting a scene angle the sound is muted.
If ⊙ appears when you try to select a scene angle it indicates the current scene is not recorded with multiple angles.
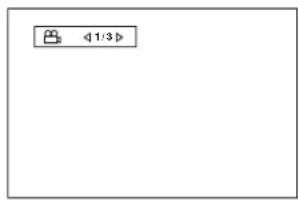
Subtitle Language Selection
DVD Super VCD
For DVD discs, you can select the subtitle language, as well as the audio language/sound included on a disc. For Video CD discs, you can select from the available audio channel(s).
Selecting the Subtitle Language
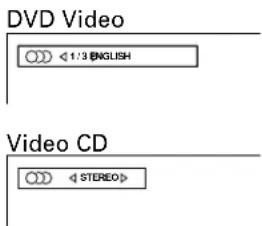
While DVD disc is playing press the SUBTITLE button ③. The Subtitle Selection display appears on the TV screen.
To turn the subtitle on or off, press the Subtitle button again.
Use the ◀/▶ 12 to cycle among the sub-titles recorded on the disc.
Example:
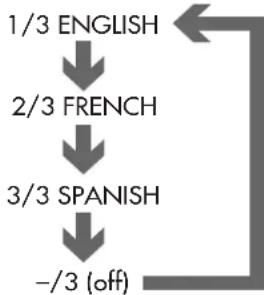
flowchart
graph TD
    A["1/3 ENGLISH"] --> B["2/3 FRENCH"]
    B --> C["3/3 SPANISH"]
    C --> D["-/3 (off)"]
To turn off the Subtitle selection display manually, press ENTER 24. The Subtitle selection display will automatically disappear if you do not change the subtitle for 10 seconds.
When Ⓧ appears on the TV screen, you cannot select the subtitle.
For DVD VIDEO, the selected language may be abbreviated on the TV screen. See "Appendix A: Table of languages and their abbreviations" at the end of this manual.
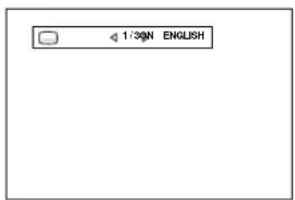
Audio Language Selection
DVD Video CD
You can choose the audio language of video discs recorded with multiple language tracks movies, or play a karaoke disc with or without the vocal track.
While a disc is playing, press the AUDIO-STROBE 4 button. The Audio Selection display appears on the TV screen.
Press the AUDIO-STROBE button again or use the Cursor Buttons ◀/▶ 12 to select the language or audio you want.
For DVD Discs
Each time you press the AUDIO-STROBE button or the Cursor Buttons ◀/► the language changes.
Example:
flowchart
graph TD
    A["1/3 ENGLISH"] --> B["2/3 FRENCH"]
    B --> C["3/3 SPANISH"]
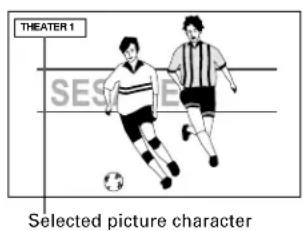
While a disc is playing, press the THEATER POSITION button 14. A window showing the selected Theater Position setting appears on the screen.
Each time you press the VSS button the next mode is selected. The available modes are ACTION, DRAMA, THEATER and OFF.
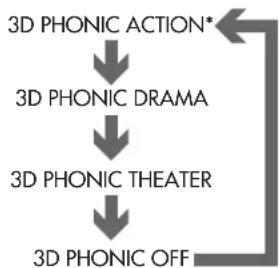
flowchart
graph TD
    A["3D PHONIC ACTION*"] --> B["3D PHONIC DRAMA"]
    B --> C["3D PHONIC THEATER"]
    C --> D["3D PHONIC OFF"]
For Video CD
Each time you press the AUDIO-STROBE 4 button or the Cursor Buttons ◀/▶ 12 the playback audio changes.
Example:
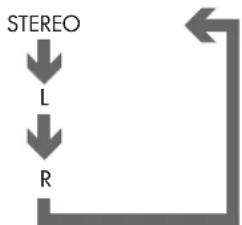
flowchart
graph TD
    A["STEREO"] --> B["L"]
    B --> C["R"]
Each time you press the THEATER POSITION button again the next option is selected.
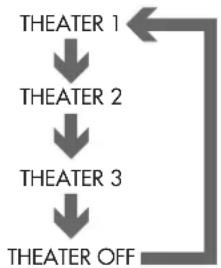
flowchart
graph TD
    A["THEATER 1"] --> B["THEATER 2"]
    B --> C["THEATER 3"]
    C --> D["THEATER OFF"]
To turn off the Audio selection display manually, press ENTER 24. The Audio selection display will automatically disappear if you do not change the audio for 10 seconds.
When ⊙ appears on the TV screen (for a DVD VIDEO disc) you cannot select the audio.
For DVD VIDEO, the selected language may be abbreviated on the TV screen. See "Appendix A: Table of languages and their abbreviations" at the end of this manual.
Selecting Picture Quality

You can select the quality of the image from among four options. You may prefer one setting over another depending on the type of programming, picture tone or personal preferences.
THEATER OFF is the normal setting. Selecting a higher number tones down the picture quality.
Using 3D Phonic Virtual Surround Sound (VSS)

The VSS button activates the 3D Phonic Virtual Surround Sound (VSS) system. This feature produces a simulated surround sound effect through an audio system connected to the RDV-995.
While a disc is playing press the VSS 1 button. A window appears on the screen showing the currently selected setting.
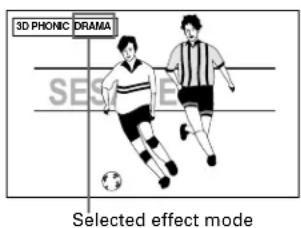
* When playing a DVD disc recorded in Dolby Digital with more than 2 channels, the "ACTION" mode option does not appear.
- ACTION: Suitable for action movies and sports programs in which sounds dynamically move.
- DRAMA: Natural and warm sound. You can enjoy movies in a relaxed mood.
• THEATER: You can enjoy sound effects like in a major theater in Hollywood.
Press the ENTER button 24 to turn off the 3D PHONIC (VSS) on screen display. The display screen turns off automatically if no adjustments are made over a 10 second span of time.
Other 3D Phonic Virtual Surround Sound System Information
- With a Video CD disc, if the AUDIO setting is set to L or R, you cannot activate the 3D Phonic function (i.e. the 3D Phonic mode is fixed to OFF). Conversely, when the 3D Phonic function is active, changing the AUDIO setting to L or R from STEREO cancels the 3D Phonic function.
- The 3D phonic function works correctly when playing back discs recorded in the Dolby Surround or Dolby Digital 5.1-CH format. It also works when playing back discs other than those above, but does not provide the correct effect.
- The 3D Phonic function does not affect the DTS or Dolby Digital bitstream signal from the DIGITAL OUT jack.
- The sound effect will not be set or operate, even if 3D PHONIC is pressed, for the sound of DVD VIDEO discs recorded in Linear PCM.
- When you set the 3D PHONIC function to on, the DOWN MIX and COMPRESSION settings in the AUDIO page of the preference display are disabled.
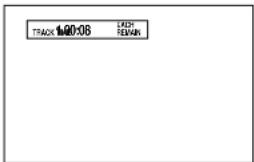
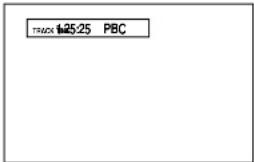
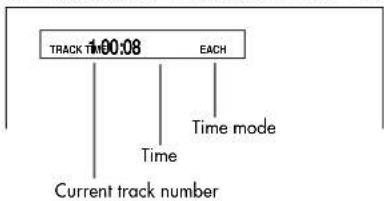
Disc/Time Display

While Playing a Disc
Press the DISPLAY-TIME button 21 once for an Audio CD or a Video CD, or twice for a DVD Video disc. The disc/time display appears on the TV screen. (When playing a DVD Video disc, you can also hold down the SHIFT 7 button while pressing the DISPLAY-TIME button to display the disc/time.)
for DVD VIDEO
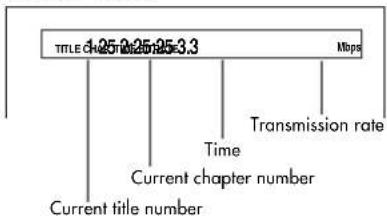
for Audio CD or Video CD without PBC
flowchart
graph TD
    A["Current track number"] --> B["Time"]
    B --> C["TRACK TIME 100:08"]
    C --> D["Time mode"]
    D --> E["EACH"]
for Video CD with PBC
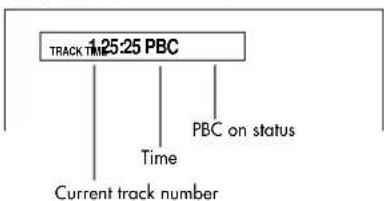
flowchart
graph TD
    A["1:25:25 PBC"] --> B["Track Time"]
    A --> C["PBC on status"]
    B --> D["Current track number"]
    C --> D
To change the time display mode (only for Audio CD or Video CD without PBC), press DISPLAY-TIME 21 while holding down SHIFT 7. The time display mode cycles in the following sequence.
For Audio CD:
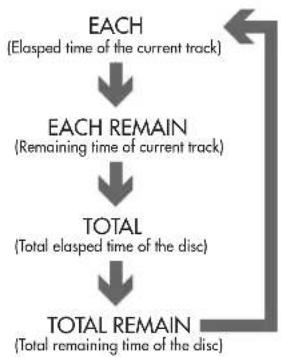
flowchart
graph TD
    A["Each (Elapsed time of the current track)"] --> B["Each REMAIN (Remaining time of current track)"]
    B --> C["TOTAL (Total elapsed time of the disc)"]
    C --> D["TOTAL REMAIN (Total remaining time of the disc)"]
For Video CD without PBC:

flowchart
graph TD
    A["ELASPED TIME OF THE CURRENT TRACK"] --> B["EACH"]
    B --> C["EMERAIN"]
    C --> D["Remaining TIME OF THE CURRENT TRACK"]
The selected time information is displayed on the TV screen, as well as the in the front panel display window.
While stopped:
You can check the total disc time and current (selected) track time of an Audio CD/Video CD only from the front panel display window.
Press DISPLAY-TIME 21 while holding down SHIFT 7. When EACH and REMAIN are indicated, the current (selected) track time appears. When only REMAIN is indicated, the total disc time appears. You can change the current (selected) track by pressing 9 or 22.
To turn off the disc/time display press DISPLAY-TIME.
Checking the DVD Function Status

While a DVD Video is playing press the DISPLAY-TIME button 21. The DVD function status display appears on the TV screen.

The current selections of the camera angle, audio language and subtitle language are displayed.
To turn off the DVD function status display press the DISPLAY-TIME button twice.
Setting Preferences
The Preference selection function allows you to set a number of preferences for playback via four dedicated displays.
Using the Preferences Display
While a DVD disc is loaded but not playing, or while no disc is loaded, press the RETURN-CHOICE 20 button while holding down the SHIFT 7 button. One of the Preference pages appears on the screen.
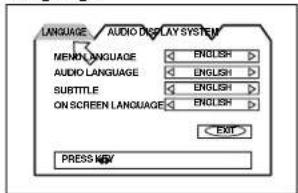
There are four Preference pages: Language, Audio, Display and System. To select a different page, use the Cursor Buttons ◄/▶ 12 to move □ to the tab for that page.
Language
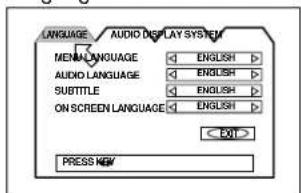
Audio
Display

System
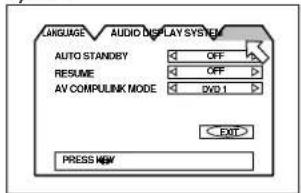
Once you are on the Preference screen you want, use the ▲/▼ Cursor Buttons 12 to move to the item you want to adjust.
Then use Use the Cursor Buttons ◀/▶ 12 to change the preference settings.
To turn off the Preference display press the RETURN-CHOICE 20 button while holding down the SHIFT 7 button or move ① and press ENTER 24.
See the following sections for details about the various settings.
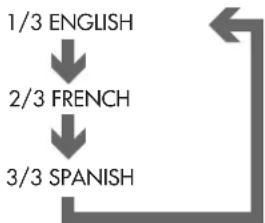
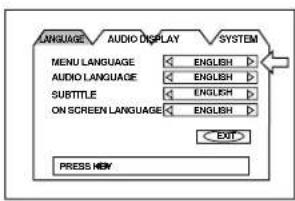
Language Page
Menu Language
You can select the default "display" language to be displayed if it is contained on the disc. (If the selected language is not recorded, the disc's default display language is displayed.)
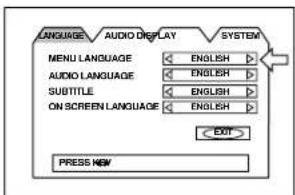
Each time you press CURSOR ▶ 12, the language setting changes in the following order:
ENGLISH ♦ SPANISH ♦ FRENCH ♦ CHINESE ♦ GERMAN ♦ ITALIAN ♦ JAPANESE ♦ language code from AA to ZU
(See “Table of languages and their abbreviations” at the end of this manual.)
Pressing CURSOR ◀ 12 changes the language setting in the reverse order of the above.
Audio Language
You can select the default audio language to be played if it is contained on the disc. (If the selected language is not recorded, the disc's default audio language will be played.)
Each time you press CURSOR ▶ 12, the language setting changes in the following order:
ENGLISH ♦ SPANISH ♦ FRENCH ♦ CHINESE ♦ GERMAN ♦ ITALIAN ♦ JAPANESE ♦ language code from AA to ZU
(See "Table of languages and their abbreviations" at the end of this manual.)
Pressing CURSOR ▶ 12 changes the language setting in the reverse order of the above.
Subtitle
You can select the default subtitle language to be displayed if it is contained on the disc. (If the selected language is not recorded, the disc's default display language is displayed.)
Each time you press CURSOR ▶ 12, the language setting changes in the following order:
ENGLISH ♦ SPANISH ♦ FRENCH ♦ CHINESE ♦ GERMAN ♦ ITALIAN ♦ JAPANESE ♦ language code from AA to ZU
(See "Table of languages and their abbreviations" at the end of this manual.)
Pressing CURSOR ▶ 12 changes the language setting in the reverse order of the above.
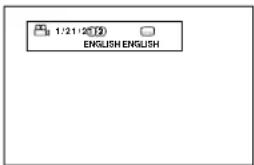
On Screen Language
You can select the on-screen display language to be displayed.
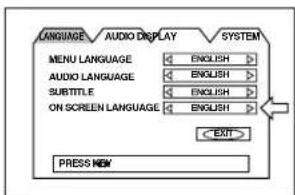
Each time you press CURSOR ▶ 12, the language setting changes as follows:
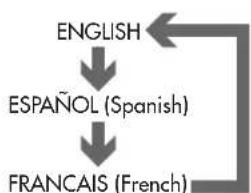
flowchart
graph TD
    A["ENGLISH"] --> B["ESPAÑOL (Spanish)"]
    B --> C["FRANCAIS (French)"]
    C --> A
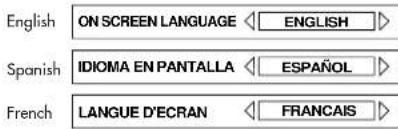
Pressing CURSOR ▶ 12 changes the language setting in the reverse order of the above.
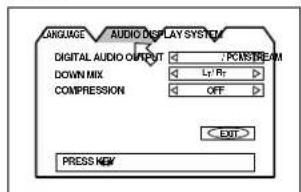
Audio Page
The factory default settings of the Audio Page controls are: Digital Audio Output-Stream/PCM; Down Mix-LT/RT; Compression-Off. These are the appropriate settings for when the unit is connected to an external surround sound processor.
Digital Audio Output
To connect the unit's digital output to an external device equipped with a digital input, this item must be set correctly.
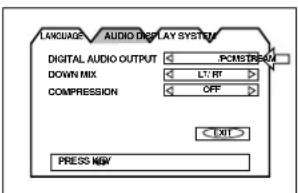
- PCM ONLY – When you connect the DIGITAL OUT jack of the unit to the linear PCM digital input of other audio equipment.
- STREAM/PCM – When you connect to the digital input of an amplifier to a built-in DTS, Dolby Digital, or MPEG multichannel decoder.
- DOLBY DIGITAL/PCM – When you connect to the digital input of a Dolby Digital decoder, or an amplifier with a built-in Dolby Digital decoder.
The following chart shows the relationship between types of playback discs and output signals.
| Playback discs | Output | ||
| STREAM/PCM | DOLBY DIGITAL/PCM | PCM ONLY | |
| DVD with 48-kHz, 16-bit linear PCM | 48-kHz, 16-bit linear PCM | - | - |
| DVD with 48-kHz, 20/24-bit linear PCM | 48-kHz, 20-bit linear PCM | - | - |
| DVD with 96-kHz, linear PCM | No output | - | - |
| DVD with DTS | DTS bitstream | No output | - |
| DVD with Dolby Digital | Dolby Digital bitstream | - | 48-kHz, 16-bit linear PCM |
| DVD with MPEG audio | MPEG bitstream | 48-kHz, 16-bit linear PCM | - |
| Video CD SVCD | 44.1-kHz, 16-bit linear PCM | - | - |
| Audio CD | 44.1-kHz, 16-bit linear PCM | - | - |
| Audio CD with DTS | DTS bitstream | - | - |
NOTES:
The unit does not provide the DTS decoding function.
When playing a DVD VIDEO or Audio CD disc with DTS, use a DTS decoder to get correct signals from your speakers. Never use the unit's analog output jacks, which output incorrect signals that may damage your speakers.
If you connect the analog outputs and digital outputs simultaneously, be sure to select the source of the amplifier correctly, or set the level control of the amplifier connected to the analog outputs to minimum.
Down Mix
To playback a DVD VIDEO disc recorded with surround multichannel audio correctly, the DOWN MIX setting must be properly made according to your audio system. Note that this setting affects the output signal from the ANALOG output jacks when playing back a DVD VIDEO disc recorded with surround multichannel audio.
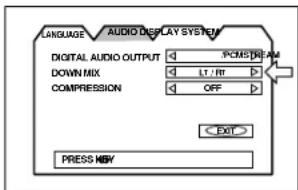
- Lt/Rt – When you enjoy multichannel surround audio by connecting the unit's ANALOG output to a surround decoder.
- Lo/Ro – When you enjoy conventional 2-channel stereo audio by connecting the unit's ANALOG output to a stereo amplifier/receiver or television set, or when you duplicate audio of a DVD VIDEO disc recorded with surround audio to your MD, cassette, etc.
NOTE: The Down mix function does not work when the 3D PHONIC function is activated.
Compression
You can compress the dynamic range of the sound if needed. Using this function, you can listen to sound at low volumes easily.
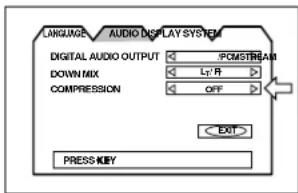
- ON – Audio is played back with the dynamic range compressed.
- OFF – Audio is played back as it was recorded.
NOTES:
The Compression function works only when playing back a disc recorded with DOLBY DIGITAL 1CH or 2CH. The setting is not effective for other discs.
The Compression function does not work when the 3D PHONIC function is activated.
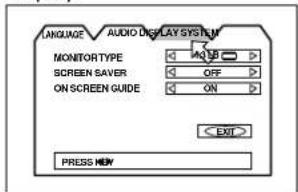
Display Page
Monitor Type
You can select the monitor type to match your TV when you playback DVD Video discs recorded for wide screen televisions.
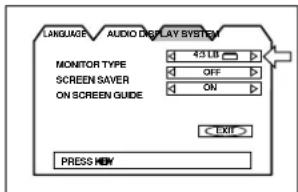
4:3 LB □ (Letter Box Conversion)
When you connect a normal TV to the unit. When you play a wide picture recorded on
a DVD VIDEO disc, the picture is displayed with bands across the upper and lower portions of the screen.
natural_image
Illustration of a person holding an umbrella standing by the sea with a small boat nearby (no text or symbols)4:3 PS (Pan Scan Conversion)
When you connect a normal TV to the unit. When you play a wide picture recorded on a DVD Video disc, a portion of the picture is automatically cut off from the left and right sides of the image. Depending on the disc, it
may not be possible to playback in this mode. In that case, the picture is played back as in 4:3 LB
natural_image
Illustration of a person in traditional attire standing by the sea with an umbrella and a small boat nearby (no text or symbols)mode.
16:9 WIDE (Wide Television screen)
When you connect a wide-screen TV to the unit.
natural_image
Illustration of a person holding an umbrella standing by the sea with a small boat nearby (no text or symbols)Screen Saver
A television monitor screen may be burned out if a static picture is displayed for a long time. To prevent this, the unit automatically activates the screen saver function if a static picture, such as an on-screen display or menu, is displayed for over 5 minutes.
- MODE 1 – The current picture gets dark.
- MODE 2 – The "screen saver" picture appears and its brightness changes.
- OFF – The screen saver function is off.
NOTES:
The monitor screen of a projector or projection TV is easily burned out if the screen saver mode is set to OFF and a static picture is displayed for a long time.
The screen saver function is not activated when the selected disc is an Audio CD.
On Screen Guide
The unit can display "on-screen guide" icons or characters on the picture, which show what is happening to the disc or the unit.
ON – The on-screen guide will be displayed.
OFF – The on-screen guide will not be displayed.
Examples of "on-screen guide" icons or characters include the Multi-Angle icon 📄, the Multiple Subtitle icon 🐃the Multiple Audio Language icon 🌐 and the Invalid Command icon 🔒.
System Page
Auto Standby
When the unit is stopped for more than 30 minutes or 60 minutes, it enters standby mode automatically.
60 - Time is set to 60 minutes.
30 - Time is set to 30 minutes.
OFF – The auto standby function is off.
Resume
You can select the resume function to be on or off. See page 13.
ON - Pressing PLAY while stopped or on standby starts playback from the resume point if it is memorized.
OFF – Pressing PLAY while stopped or on standby starts playback from the beginning of the disc.
AV Compulink Mode
This operation does not function on the RDV-995
Parental Lock
This function restricts playback of DVD VIDEO discs which contain violent (and other) scenes according to the level set by the user. For example, if a movie which includes violent scenes supports the parental lock feature, such scenes which you do not want to let children view can be cut or replaced with other scenes.
Initial Parental Lock Setting
While a DVD VIDEO disc is stopped or no disc is inserted press ENTER 24 while holding down SHIFT 7. The Parental Lock on-screen display appears on the TV screen. The ← points to the [Country Code] selector.
While points to the [Country Code] selector, use CURSOR / 12 to select "US" for country code.
Press ENTER. The moves to [Set Level]. While points to [Set Level], use CURSOR / 12 to select the parental lock level.
Each time you press CURSOR ◀/▶, the parental level changes as follows:
“-” means no restriction. “1” is the highest level of restriction. “8” is the lowest level of restriction. Discs rated higher than the selected level are restricted.
Press ENTER. The moves to [PASSWORD].
Enter your 4-digit password using the Numeric Buttons 5 (0 to 9).
Press ENTER. The parental level and password are set. ← moves to [EXIT].
Pressing ENTER again returns to the opening display. If you enter an undesired password in the preceding step, reenter the password before pressing ENTER.
Changing Parental Lock Setting
While a DVD Video disc is stopped or no disc is inserted press ENTER 24 while holding down SHIFT 7. The Parental Lock on-screen display appears on the TV screen. ← points [PASSWORD].
Enter your current 4-digit password using the Numeric Buttons (0 to 9) 5 and press ENTER. moves to [Country Code] if you enter the correct password. If you enter the wrong password, "WRONG! RETRY......" appears on the TV screen, and you cannot go to next step.
To change the country code, use CURSOR ◀/▶ 12 to select the desired country code and press ENTER 24. moves to [Set Level]. When you change the country code, you must select the parental level.
To change the set level, use CURSOR ◀/▶ to select the desired level while ←→ points to [Set Level], and then press ENTER. ←→ moves to [PASSWORD].
Enter the password using the numeric buttons (0 to 9) and press ENTER. ← moves to [EXIT]. The password entered in the above step becomes the new password. If you do not change the password, re-enter the same password you had previously.
Even if you want to change only the country code and/or parental level, do not forget to enter the password after changing the country code and/or parental level. Otherwise, the new country code and/or parental level will not become effective.
Pressing ENTER again returns to the opening display.
NOTES:
- When you enter the wrong password more than 3 times, moves to [EXIT] automatically and CURSOR ▲/▼ does not work.
- If you forget your password in step 2 enter "8888."
Temporary Parental Lock Release
When you set the parental level strictly, some discs may not be played back at all. When you insert such a disc and try to play it, the following Parental Lock on-screen display appears on the TV screen, asking you whether you want the parental lock to be temporarily released or not.
Use the CURSOR ◀/▶ 12 to move to [YES], then press ENTER 24. moves to the PASSWORD field. When selecting [NO], press OPEN/CLOSE 2 to remove the disc.
Enter your 4-digit password using the Numeric Buttons (0 to 9) 5. If you enter the wrong password, "WRONG! RETRY..." appears on the TV screen, and you cannot go to next step. When the correct password is entered, the Parental lock is released, and the unit starts playback.
NOTE: When you enter the wrong password more than 3 times, moves to [NO] automatically and the / CURSOR buttons 12 will not work.
Care and Handling of Discs
How to Handle Discs
When handling a disc, do not touch its surface.
natural_image
Two hand-drawn diagrams showing a device being placed on a base, with no visible text or symbols.Since discs are made of plastic, they are easily damaged. If a disc gets dirty, dusty, scratched or warped, the images and sound will not be picked up correctly. A damaged disc may cause the player to malfunction.
Label side
Do not damage the label side, stick paper to or use any adhesive on its surface.
Storage
Make sure that discs are kept in their cases. If discs are piled on top of one another without their protective cases, they can be damaged. Do not put discs in a location where they may be exposed to direct sunlight, or in a place where the humidity or temperature is high. Avoid leaving discs in your car!
Maintenance of discs
If there are fingerprints or other dirt adhering to a disc, wipe with a soft dry cloth, moving from the center outwards. If a disc is difficult to clean, wipe with a cloth moistened with water. Never use record cleaners, petroleum products, alcohol or any anti-static agents.
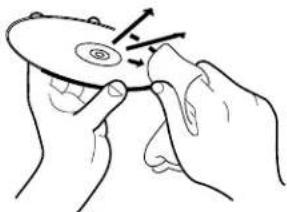
natural_image
Illustration of two hands holding a circular object with a spiral pattern, no text or symbols presentNOTE: Sometimes during play you may hear noise, or the screen image may be garbled. This is sometimes due to the disc, which may not be up to industry standards. These problems are caused by the disc, not the unit.
Troubleshooting
What appears to be a malfunction may not always be serious. Please go through the following list before requesting service.
| Symptom | Possible case | Remedy |
| Power does not come on. | Power plug is not inserted securely. | Plug in securely. |
| Remote control does not work. | Too far from the unit. | Move closer to the unit. |
| The tip of the remote unit is not pointed in the right direction. | Point the infrared light-emitting window toward the remote sensor on the front panel. | |
| Batteries are exhausted. | Replace the batteries with new ones. | |
| Battery polarity is incorrect. | Take out the batteries and insert them again in the correct direction. | |
| No picture is displayed on the monitor. | Connection of video cable is incorrect. | Connect the cable correctly. |
| Input selection of TV is incorrect. | Select correctly. | |
| Disc is not playable. | Use a playable disc. (See page 11.) | |
| Picture is noisy. | The unit is connected to a VCR directly and the copyguard function is activated. | Connect the unit so that the picture signal flows directly to the TV. |
| No audio is reproduced. | Connection is incorrect. | Check the connections. |
| Input selection of amplifier is incorrect. | Select correctly. | |
| No audio is reproduced when playing back a DVD disc recorded with 96-kHz, linear PCM audio. | The audio signal derives from the unit's DIGITAL OUT. | Use the AUDIO OUT when playing back such discs. |
| Sound is distorted or noise is generated. | Disc is dirty. | Wipe the disc surface. |
| Picture is garbled. | The screen saver mode is set to MODE 1, and the screen saver function is activated. | Set the screen saver mode to the other mode. |
| Picture does not fit the television screen. | MONITOR TYPE is not correctly set. | Select monitor type correctly. (See page 22.) |
| Television is not correctly set. | Set the television correctly. | |
| Operation is not possible. | Microcomputer malfunctions due to lightning or static electricity. | Turn off the power and unplug the power cord, then connect the power cord again. |
| Moisture condensation occurs by a sudden change of temperature or humidity. | Turn off the power, then turn it on a few hours later. |
Appendix A: Table of languages and their abbreviations
When you select the subtitle language or sound, the languages shown below are displayed as abbreviations. To select the desired language, select the abbreviation corresponding the language you want to.
| AA Afar | IK Inupiak | RN Kirundi |
| AB Abkhazian | IN Indonesian | RO Rumanian |
| AF Afrikaans | IS Icelandic | RU Russian |
| AM Ameharic | IW Hebrew | RW Kinyarwanda |
| AR Arabic | JI Yiddish | SA Sanskrit |
| AS Assamese | JW Javanese | SD Sindhi |
| AY Aymara | KA Georgian | SG Sangho |
| AZ Azerbaijani | KK Kazakh | SH Serbo-Croatian |
| BA Bashkir | KL Greenlandic | SI Singhalese |
| BE Byelorussian | KM Cambodian | SK Slovak |
| BG Bulgarian | KN Kannada | SL Slovenian |
| BH Bihari | KO Korean (KOR) | SM Samoan |
| BI Bislama | KS Kashmiri | SN Shona |
| BN Bengali, Bangla | KU Kurdish | SO Somali |
| BO Tibetan | KY Kirghiz | SQ Albanian |
| BR Breton | LA Latin | SR Serbian |
| CA Catalan | LN Lingala | SS Siswati |
| CO Corsican | LO Laothian | ST Sesotho |
| CS Czech | LT Lithuanian | SU Sundanese |
| CY Welsh | LV Latvian, Lettish | SV Swedish |
| DA Danish | MG Malagasy | SW Swahili |
| DZ Bhutani | MI Maori | TA Tamil |
| EL Greek | MK Macedonian | TE Telugu |
| EO Esperanto | ML Malayalam | TG Tajik |
| ET Estonian | MN Mongolian | TH Thai |
| EU Basque | MO Moldavian | TI Tigrinya |
| FA Persian | MR Marathi | TK Turkmen |
| FI Finnish | MS Malay (MAY) | TL Tagalog |
| FJ Fiji | MT Maltese | TN Setswana |
| FO Faroese | MY Burmese | TO Tonga |
| FY Frisian | NA Nauru | TR Turkish |
| GA Irish | NE Nepali | TS Tsonga |
| GD Scots Gaelic | NL Dutch | TT Tatar |
| GL Galician | NO Norwegian | TW Twi |
| GN Guarani | OC Occitan | UK Ukrainian |
| GU Gujarati | OM (Afan) Oromo | UR Urdu |
| HA Hausa | OR Oriya | UZ Uzbek |
| HI Hindi | PA Panjabi | VI Vietnamese |
| HR Croatian | PL Polish | VO Volapuk |
| HU Hungarian | PS Pashto, Pushto | WO Wolof |
| HY Armenian | PT Portuguese | XH Xhosa |
| IA Interlingua | QU Quechua | YO Yoruba |
| IE Interlingue | RM Rhaeto-Romance | ZU Zulu |
Appendix B: Country Code List for Parental Lock
AD Andorra
AE United Arab Emirates
AF Afghanistan
AG Antigua and Barbuda
Al Anguilla
AL Albania
AM Armenia
AN Netherlands Antilles
AO Angola
AQ Antarctica
AR Argentina
AS American Samoa
AT Austria
AU Australia
AW Aruba
AZ Azerbaijan
BA Bosnia and Herzegovina
BB Barbados
BD Bangladesh
BE Belgium
BF Burkina Faso
BG Bulgaria
BH Bahrain
BI Burundi
BJ Benin
BM Bermuda
BN Brunei Darussalam
BO Bolivia
BR Brazil
BS Bahamas
BT Bhutan
BV Bouvet Island
BW Botswana
BY Belarus
BZ Belize
CA Canada
CC Cocos (Keeling) Islands
CF Central African Republic
CG Congo
CH Switzerland
CI Côte d'Ivoire
CK Cook Islands
CL Chile
CM Cameroon
CN China
CO Colombia
CR Costa Rica
CU Cuba
CV Cape Verde
CX Christmas Island
CY Cyprus
CZ Czech Republic
DE Germany
DJ Djibouti
DK Denmark
DM Dominica
DO Dominican Republic
DZ Algeria
EC Ecuador
EE Estonia
EG Egypt
EH Western Sahara
ER Eritrea
ES Spain
ET Ethiopia
FI Finland
FJ Fiji
FK Falkland Islands (Malvinas)
FM Micronesia (Federated States of)
FO Faroe Islands
FR France
FX France, Metropolitan
GA Gabon
GB United Kingdom
GD Grenada
GE Georgia
GF French Guiana
GH Ghana
GI Gibraltar
GL Greenland
GM Gambia
GN Guinea
GP Guadeloupe
GQ Equatorial Guinea
GR Greece
GS South Georgia and the South Sandwich Islands
GT Guatemala
GU Guam
GW Guinea-Bissau
GY Guyana
HK Hong Kong
HM Heard Island and McDonald Island
HN Honduras
HR Croatia
HT Haiti
HU Hungary
ID Indonesia
IE Ireland
IL Israel
IN India
IO British Indian Ocean Territory
IQ Iraq
IR Iran (Islamic Republic of)
IS Iceland
IT Italy
JM Jamaica
JO Jordan
JP Japan
KE Kenya
KG Kyrgyzstan
KH Cambodia
KI Kiribati
KM Comoros
KN Saint Kitts and Nevis
KP Korea, Democratic People's Republic of
KR Korea, Republic of
KW Kuwait
KY Cayman Islands
KZ Kazakhstan
LA Lao People's Democratic Republic
LB Lebanon
LC Saint Lucia
LI Liechtenstein
LK Sri Lanka
LR Liberia
LS Lesotho
LT Lithuania
LU Luxembourg
LV Latvia
LY Libyan Arab Jamahiriya
MA Morocco
MC Monaco
MD Moldova, Republic of
MG Madagascar
MH Marshall Islands
ML Mali
MM Myanmar
MN Mongolia
MO Macau
MP Northern Mariana Islands
MQ Martinique
MR Mauritania
MS Montserrat
MT Malta
MU Mauritius
MV Maldives
MW Malawi
MX Mexico
MY Malaysia
MZ Mozambique
NA Namibia
NC New Caledonia
NE Niger
NF Norfolk Island
NG Nigeria
NI Nicaragua
NL Netherlands
NO Norway
NP Nepal
NR Nauru
NU Niue
NZ New Zealand
OM Oman
PA Panama
PE Peru
PF French Polynesia
PG Papua New Guinea
PH Philippines
PK Pakistan
PL Poland
PM Saint Pierre and Miquelon
PN Pitcairn
PR Puerto Rico
PT Portugal
PW Palau
PY Paraguay
QA Qatar
RE Réunion
RO Romania
RU Russian Federation
RW Rwanda
SA Saudi Arabia
SB Solomon Islands
SC Seychelles
SD Sudan
SE Sweden
SG Singapore
SH Saint Helena
SI Slovenia
SJ Svalbard and Jan Mayen
SK Slovakia
SL Sierra Leone
SM San Marino
SN Senegal
SO Somalia
SR Suriname
ST Sao Tome and Principe
SV El Salvador
SY Syrian Arab Republic
SZ Swaziland
TC Turks and Caicos Islands
TD Chad
TF French Southern Territories
TG Togo
TH Thailand
TJ Tajikistan
TK Tokelau
TM Turkmenistan
TN Tunisia
TO Tonga
TP East Timor
TR Turkey
TT Trinidad and Tobago
TV Tuvalu
TW Taiwan, Province of China
TZ Tanzania, United Republic of
UA Ukraine
UG Uganda
UM United States Minor Outlying Islands
US United States
UY Uruguay
UZ Uzbekistan
VA Vatican City State (Holy See)
VC Saint Vincent and the Grenadines
VE Venezuela
VG Virgin Islands (British)
VI Virgin Islands (U.S.)
VN Vietnam
VU Vanuatu
WF Wallis and Futuna Islands
WS Samoa
YE Yemen
YT Mayotte
YU Yugoslavia
ZA South Africa
ZM Zambia
ZR Zaire
ZW Zimbabwe
Specifications
General
Readable Discs: DVD VIDEO, Audio CD, Video CD
Video Format: PAL or NTSC selectable
Video Output
Pin Jack 1.0 Vp-p (75 ohms)
Component (pin jack):
Y Output: 1.0 Vp-p (75 ohms)
P_B/P_R Output:
0.7 Vp-p (75 ohms)
S-VIDEO OUT (S jack):
Y Output: 1.0 Vp-p (75 ohms)
C Output: 286 mVp-p (75 ohms)
Horizontal Resolution: 500 Lines
Signal to Noise Ratio: 65 dB
Audio Output
ANALOG OUT (pin jack): 2.0 Vrms (150 ohms)
DIGITAL OUT
Optical: -21 to -15 dBm (peak)
Coaxial: 0.5Vp-p (75 ohm termination)
Audio Characteristics
Frequency Response:
CD: (sampling frequency 44.1 kHz): 2 Hz to 20 kHz
DVD (sampling frequency 48 kHz): 2 Hz to 22 kHz
DVD (sampling frequency 96 kHz): 2 Hz to 44 kHz
Dynamic Range:
16 bit: More than 98 dB
20 bit: More than 106 dB
24 bit: More than 106 dB
Wow and Flutter: Unmeasurable (less than ± 0.002%)
Total Harmonic Distortion: Less than 0.002%
Physical
Power Requirements:
USA Version: AC 115V, 60 Hz European Version: AC 230V, 50 Hz
Power Consumption: 20 W (POWER ON), 3 W (STANDBY mode)
Weight: 5.8 kg (12.8 lbs)
Dimensions (W x H x D): 440 x 92 x 314 mm 17^15/16 × 3^5/8 × 12^3/8 inch
* Specifications and appearance subject to change without prior notice.
Rotel and the Rotel HiFi logo are registered trademarks of The Rotel Co, Ltd., Tokyo, Japan.
DTS is a registered trademark of Digital Theater Systems. Manufactured under license from Dolby Laboratories Licensing Corporation. "Dolby" and the double-D symbol are trademarks of Dolby Laboratories Licensing Corporation. Confidential unpublished works © 1992–1997 Dolby Laboratories, Inc. All rights reserved.

ATTENTION
POUR RÉDUIRE LE RISQUE D'ÉLECTROCUTION, NE PAS RETIRER LE CAPOT

ATTENTION : POUR RÉDUIRE LE RISQUE D'ÉLECTROCUTION, NE PAS RETIRER LE CAPOT. IL N'Y A À L'INTÉRIEUR AUCUNE PIÈCE SUSCEPTIBLE D'ÊTRE MODIFIÉE PAR L'UTILISATEUR. EN CAS DE PROBLEME, ADRESSEZ-VOUS À UN RÉPARATEUR AGREE.

1 Touche VSS (Virtual Surround Sound)
5 Touche (OPEN/CLOSE)
Images multi-angles 46
11 Prises audio ANALOG OUTPUT
natural_image
Illustration of a hand holding a small object with an arrow indicating rotation (no text or symbols)Mode ralenti (Slow motion)
Via la télécommande
natural_image
Stylized line drawing of a city skyline with multiple skyscrapers and a sun in the sky (no text or symbols)↓
natural_image
Illustration of modern skyscrapers with a vertical arrow indicating a drop or elevation (no text or symbols)natural_image
Illustration of modern skyscrapers with a 'ZOOM' label (no other text or symbols)flowchart
graph TD
    A["THEATER 1"] --> B["THEATER 2"]
    B --> C["THEATER 3"]
    C --> D["THEATER OFF"]
Mode sélectionné
for Video CD with PBC
natural_image
Illustration of a person holding an umbrella standing by a boat on a cloudy day (no text or symbols)natural_image
Illustration of a person standing by the seaside with an umbrella and a small boat nearby (no text or symbols)natural_image
Illustration of a person holding an umbrella standing on the ground near a small boat, with waves in the background (no text or symbols)natural_image
Two-step illustration showing hands holding a device with a knob, no text or symbols presentnatural_image
Illustration of two hands performing a circular motion or manipulation task on a disc (no text or symbols present)Consommation: 20_W (mode Standby: 3_W)
Poids: 5,8 kg
Dimensions (L x H x P) : 440 x 92 x 314 mm
natural_image
Close-up of a printed circuit board with various electronic components and connectors (no readable text or symbols)
The Rotel Co. Ltd.
10-10 Shinsen-Cho
Shibuya-Ku
Tokyo 150-0045
Japan
Phone: +81 3-5458-5325
Fax: +81 3-5458-5310
Rotel of America
54 Concord Street
North Reading, MA 01864-2699
USA
Phone: +1 978-664-3820
Fax: +1 978-664-4109
Rotel Europe
Meadow Road
Worthing, West Sussex BN11 2RX
England
Phone: +44 (0)1903 524 813
Fax: +44 (0)1903 524 831
Rotel Deutschland
Kleine Heide 12

- IMPORTANT FOR LASER PRODUCTS
- WARNING!
- VSS button
- OPEN/CLOSE button
- SUBTITLE - DIGEST button
- AUDIO - STROBE button
- Numeric buttons
- SLOW button
- SHIFT button
- PLAY MODE - CANCEL button
- Back SKIP - SEARCH button
- II (PAUSE) button
- TITLE button
- ▲/▼/►/◀ Cursor buttons
- Infrared signal-emitting window
- THEATER POSITION button
- DVD POWER - TV POWER button
- TV/VIDEO button
- ANGLE - ZOOM button
- TV CH button
- TV VOL button
- RETURN - CHOICE button
- DISPLAY - TIME button
- ▶▶▶I FORWARD SKIP - SEARCH
- button
- ▶ PLAY button
- ENTER button
- ■ (STOP) button
- MENU button
- SEARCH
- STANDBY button
- STANDBY indicator
- Disc tray
- Remote sensor
- (OPEN/CLOSE) button
- ←→(SEARCH) buttons
- ▶ (PLAY) button
- ■ (STOP) button
- II (PAUSE) button
- ◀◀▶(SKIP) buttons
- A Disc Indicators
- B Multi-Information Display
- c Time Display
- D Chapter, Title, Track Indicator
- Contents
- About Rotel
- About This Manual
- About the RDV-995
- Strobe function
- Digest function
- Angle function\*
- Zoom function
- Parental lock\*
- Theater position
- High quality digital sound
- Surround function\*
- 3D Phonic (VSS) function
- Multi-language subtitles and sound\*
- Multi-disc playback
- On-screen display
- Precautions
- Placement
- Audio/Video Connections
- IMPORTANT NOTE
- FOR 5.1 CHANNEL OPERATION:
- NTSC/PAL Switch 15
- Composite Input TV Connection
- Component Input TV Connection
- Connecting to Audio Equipment with a Digital Input
- Connecting to an Audio Amplifier or Receiver
- Connecting the Power Cord
- AC Input
- RR-DV92 Remote Control
- Precautions for the safe use of batteries
- Programming the RR-DV92 Remote to Control a TV
- Remote Control TV Operation
- External Remote In
- On Screen Displays
- Opening Displays
- Screen Saver
- Preference Displays
- PARENTAL LOCK Displays
- On-Screen Display Operation
- Play Mode Displays
- Status Displays
- On Screen Icons
- About Invalid Operation Icon
- Using Numeric Buttons 5
- Selecting Track/Title Numbers
- Examples:
- Entering a Time or Chapter Number
- To select a TV channel.
- About discs
- playable Disc Types
- Video CD
- Audio CD
- Non-Playable Discs
- DVD Disc Structure
- Getting Started
- Power On/Off
- Loading Discs
- Disc Play Basics
- Playing a Disc
- Stopping Disc Play
- Pausing Disc Play
- Forward or Reverse Scanning
- Using the Remote Control
- Using the Front Panel Buttons
- Skipping to the Beginning of a Song or Scene
- Resume Playback Function
- To Store a Location on a Disc
- Resuming Playback at a Stored Location
- To Clear The Stored Location
- Notes About Resume Playback
- Advanced Operations
- Selecting a Scene From a Menu
- About menus
- Selecting a Scene From the Menu of a Video CD with PBC (Playback Control)
- Other PCB Operations Information
- Selecting a Scene or Track With the Numeric Buttons
- Selecting a Scene or Track With the 1 or Buttons
- DVD Chapter Search
- Time Search
- Time Entry Examples
- Selecting a Scene From the Digest Display
- Special Playback Features
- Frame-by-Frame Viewing
- Multiple Still Frame ("Strobe") Viewing
- Options
- Slow Motion Playback
- Zoom In Feature
- Changing the Track Order
- Programming For Playback in a Specified Order
- To Clear the Programmed Tracks
- To Quit Program Playback
- Other Program Play Information
- Random Track Playback
- To Quit Random Play Before All Titles/Tracks Have Been Played
- Repeat Play
- To Repeat the Current Selection or All Disc Contents
- To Quit Repeat Playback
- Other Repeat Play Information
- Repeat Play of a Specified Part of a Disc
- To Quit A-B Repeat Play
- Other A-B Repeat Play Information
- Multiple Angle Viewing
- DVD
- Selecting a Scene Angle From the Normal Screen
- Selecting a Scene Angle From the Angle Display List
- Subtitle Language Selection
- DVD Super VCD
- Selecting the Subtitle Language
- Audio Language Selection
- DVD Video CD
- For DVD Discs
- For Video CD
- Selecting Picture Quality
- Using 3D Phonic Virtual Surround Sound (VSS)
- Other 3D Phonic Virtual Surround Sound System Information
- Disc/Time Display
- While Playing a Disc
- Checking the DVD Function Status
- Setting Preferences
- Using the Preferences Display
- Language
- Audio
- Display
- System
- Language Page
- Menu Language
- Audio Language
- Subtitle
- On Screen Language
- Audio Page
- Digital Audio Output
- NOTES:
- Down Mix
- Compression
- Display Page
- Monitor Type
- 4:3 LB □ (Letter Box Conversion)
- 4:3 PS (Pan Scan Conversion)
- 16:9 WIDE (Wide Television screen)
- On Screen Guide
- System Page
- Auto Standby
- Resume
- AV Compulink Mode
- Parental Lock
- Initial Parental Lock Setting
- Changing Parental Lock Setting
- Temporary Parental Lock Release
- Care and Handling of Discs
- How to Handle Discs
- Label side
- Storage
- Maintenance of discs
- Troubleshooting
- Appendix A: Table of languages and their abbreviations
- Appendix B: Country Code List for Parental Lock
- Specifications
- General
- Video Output
- Component (pin jack):
- S-VIDEO OUT (S jack):
- Audio Output
- DIGITAL OUT
- Audio Characteristics
- Frequency Response:
- Dynamic Range:
- Physical
- Power Requirements:
- ATTENTION
- Touche VSS (Virtual Surround Sound)
- Touche (OPEN/CLOSE)
- Prises audio ANALOG OUTPUT
- Mode ralenti (Slow motion)
- Via la télécommande
Brand : ROTEL
Model : RDV995
Category : DVD player