RDV-03 - DVD player ROTEL - Free user manual and instructions
Find the device manual for free RDV-03 ROTEL in PDF.


| Product Type | DVD Player |
| Brand | Rotel |
| Model | RDV-03 |
| Dimensions (W x H x D) | 435 mm x 92 mm x 316 mm (17.14" x 3.62" x 12.45") |
| Weight | 4.0 kg (8.8 lbs) |
| Power Requirements | Asia model: AC 110-240 V, 50/60 Hz; Euro model: AC 230 V, 50 Hz |
| Power Consumption | 12 W (On), 2 W (Standby) |
| Playable Discs | DVD VIDEO, DVD-R (Video format), DVD-RW (Video format), SVCD, Video CD, Audio CD (CD-DA), CD-R/RW (CD-DA, SVCD, VCD, MP3/WMA, JPEG) |
| Video Outputs | Composite (RCA), S-Video, Component (Y Pb Pr), SCART (Euro model), RGB (Euro model) |
| Audio Outputs | Analog stereo (RCA), Digital coaxial (RCA), Digital optical (Toslink) |
| Horizontal Resolution | 500 lines |
| Video Signal-to-Noise Ratio | 65 dB |
| Audio Frequency Response | CD: 2 Hz – 20 kHz; DVD (48 kHz): 2 Hz – 22 kHz; DVD (96 kHz): 2 Hz – 44 kHz |
| Dynamic Range | 16-bit: >98 dB; 20/24-bit: >100 dB |
| Total Harmonic Distortion | <0.008% (16-bit and 20/24-bit) |
| Key Features | Progressive scan, zoom (up to 64x), multi-angle, multi-language subtitles and audio, parental lock, virtual surround sound |
| Supplied Accessories | Audio/video cable, S-video cable, 75 ohm coaxial digital audio cable, remote control (RR-DV97), 3 AAA batteries, AC power cord, owner's manual |
| Safety and Compliance | Double insulated (Class II), FCC Class B, ICES-003, CE, licensed under Dolby and DTS |
Frequently Asked Questions - RDV-03 ROTEL
Note: Progressive scan only works with HDTV monitors via Component Video outputs.
- Incorrect video connection (use only one type: composite, S-Video, component, or SCART).
- Progressive scan enabled on a non-HDTV. Turn off progressive scan using the rear panel switch or remote.
- If using Euro model with SCART, progressive scan is not available; use Component Video instead.
A disc rated higher than the set level will require entry of the password to play.
Set the digital audio output in the Audio menu according to your receiver's capabilities (PCM, Dolby Digital, or bitstream).
User questions about RDV-03 ROTEL
0 question about this device. Answer the ones you know or ask your own.
Ask a new question about this device
Download the instructions for your DVD player in PDF format for free! Find your manual RDV-03 - ROTEL and take your electronic device back in hand. On this page are published all the documents necessary for the use of your device. RDV-03 by ROTEL.
USER MANUAL RDV-03 ROTEL
natural_image
Close-up of a printed circuit board with various electronic components and traces (no readable text or symbols)
Owner's manual
RDV-03
DVD Player


CAUTION
RISK OF ELECTRIC SHOCK DO NOT OPEN

CAUTION: TO REDUCE THE RISK OF ELECTRIC SHOCK, DO NOT REMOVE COVER. NO USER-SERVICEABLE PARTS INSIDE. REFER SERVICING TO QUALIFIED SERVICE PERSONNEL.

This symbol is to alert the user to the presence of uninsulated dangerous voltages inside the product's enclosure that may constitute a risk of electric shock.
This symbol is to alert the user to important operating and maintenance (service) instructions in this manual and literature accompanying the product.
APPLICABLE FOR USA, CANADA OR WHERE APPROVED FOR THE USAGE
CAUTION: TO PREVENT ELECTRIC SHOCK, MATCH WIDE BLADE OF PLUG TO WIDE SLOT. INSERT FULLY.
ATTENTION: POUR EVITER LES CHOCS ELECTRIQUES, INTRODUIRE LA LAME LA PLUS LARGE DE LA FICHE DANS LA BORNE CORRESPONDANTE DE LA PRISE ET POUSSER JUSQU AU FOND.
This Class B digital apparatus complies with Canadian ICES-003.
This symbol means that this unit is double insulated. An earth or ground connection is not required.

CE
Important Safety Instructions
WARNING: There are no user serviceable parts inside. Refer all servicing to qualified service personnel.
WARNING: To reduce the risk of fire or electric shock, do not expose the unit to moisture or water. Do not expose the unit to dripping or splashing. Do not place objects filled with liquids, such as vases, on the unit. Do not allow foreign objects to get into the enclosure. If the unit is exposed to moisture, or a foreign object gets into the enclosure, immediately disconnect the power cord from the wall. Take the unit to a qualified service person for inspection and necessary repairs.
Read all the instructions before connecting or operating the component.
Keep this manual so you can refer to these safety instructions.
Heed all warnings and safety information in these instructions and on the product itself. Follow all operating instructions.
Clean the enclosure only with a dry cloth or a vacuum cleaner.
Do not use this unit near water.
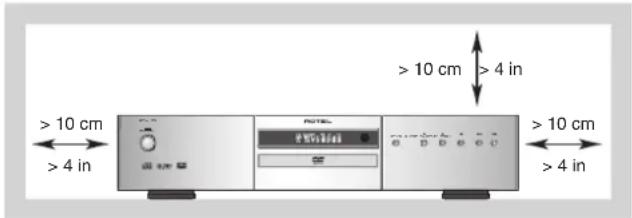
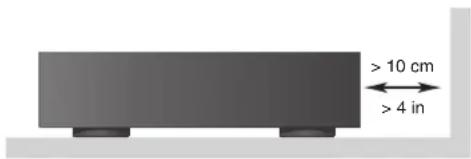
You must allow a minimum 10 cm or 4 inches of unobstructed clearance around the unit. Do not place the unit on a bed, sofa, rug, or similar surface that could block the ventilation openings. If the unit is placed in a bookcase or cabinet, there must be ventilation of the cabinet to allow proper cooling.
Keep the component away from radiators, heat registers, stoves, or any other appliance that produces heat.
The unit must be connected to a power supply only of the type and voltage specified on the rear panel:
Asia model: AC 110-240 V, 50/60 Hz
Euro model: AC 230 V, 50 Hz
Connect the component to the power outlet only with the supplied power supply cable or an exact equivalent. Do not modify the supplied cable. A polarized plug has two blades, with one wider than the other. A grounding plug has two blades plus a third grounding prong. These are provided for your safety. Do not defeat grounding and/or polarization safety provisions. If the supplied plug does not fit your outlet, please consult an electrician for replacement of the obsolete outlet. Do not use extension cords.
The main plug of the power cordset is a disconnect device of the apparatus. In order to completely disconnect the apparatus from the supply mains, the main plug of the power cordset should be unplugged from the mains (AC) outlet. The stand-by LED indicator will not be lit up to show the power cord is unplugged.
Do not route the power cord where it will be crushed, pinched, bent, exposed to heat, or damaged in any way. Pay particular attention to the power cord at the plug and where the cord exits the back of the unit.
The power cord should be unplugged from the wall outlet during a lightning storm or if the unit is to be left unused for a long period of time.
Use only accessories specified by the manufacturer.
Use only with a cart, stand, rack, bracket or shelf system recommended by Rotel. Use caution when moving the unit in a stand or rack to avoid injury from a tip-over.
Immediately stop using the component and have it inspected and/or serviced by a qualified service agency if:
- The power supply cord or plug has been damaged.
- Objects have fallen or liquid has been spilled into the unit.
- The unit has been exposed to rain.
- The unit shows signs of improper operation
- The unit has been dropped or damaged in any way
FCC Information
This equipment has been tested and found to comply with the limits for a Class B digital device, pursuant to Part 15 of the FCC Rules. These limits are designed to provide reasonable protection against harmful interference in a residential installation. This equipment generates, uses and can radiate radio frequency energy and, if not installed and used in accordance with the instruction, may cause harmful interference to radio communications.
However, there is no guarantee that interference will not occur in a particular installation. If this equipment does cause harmful interference to radio or television reception, which can be determined by turning the equipment off and on, the user is encouraged to try to correct the interference by one or more of the following measures:
- Reorient or relocate the receiving antenna.(TV, radio, etc.)
- Increase the separation between the equipment and receiver
- Connect the equipment to an outlet on circuit different from that to which the receiver is connected.
- Consult the dealer or an experienced radio/TV technician for additional help.
Caution
This device complies with part 15 of the FCC Rules operation is subject to the following to conditions: (1) This device may not cause harmful interference, and (2) this device must accept any interference received, including interference that may cause undesired operation.
1: Controls and Connections

Asia Model

Euro Model

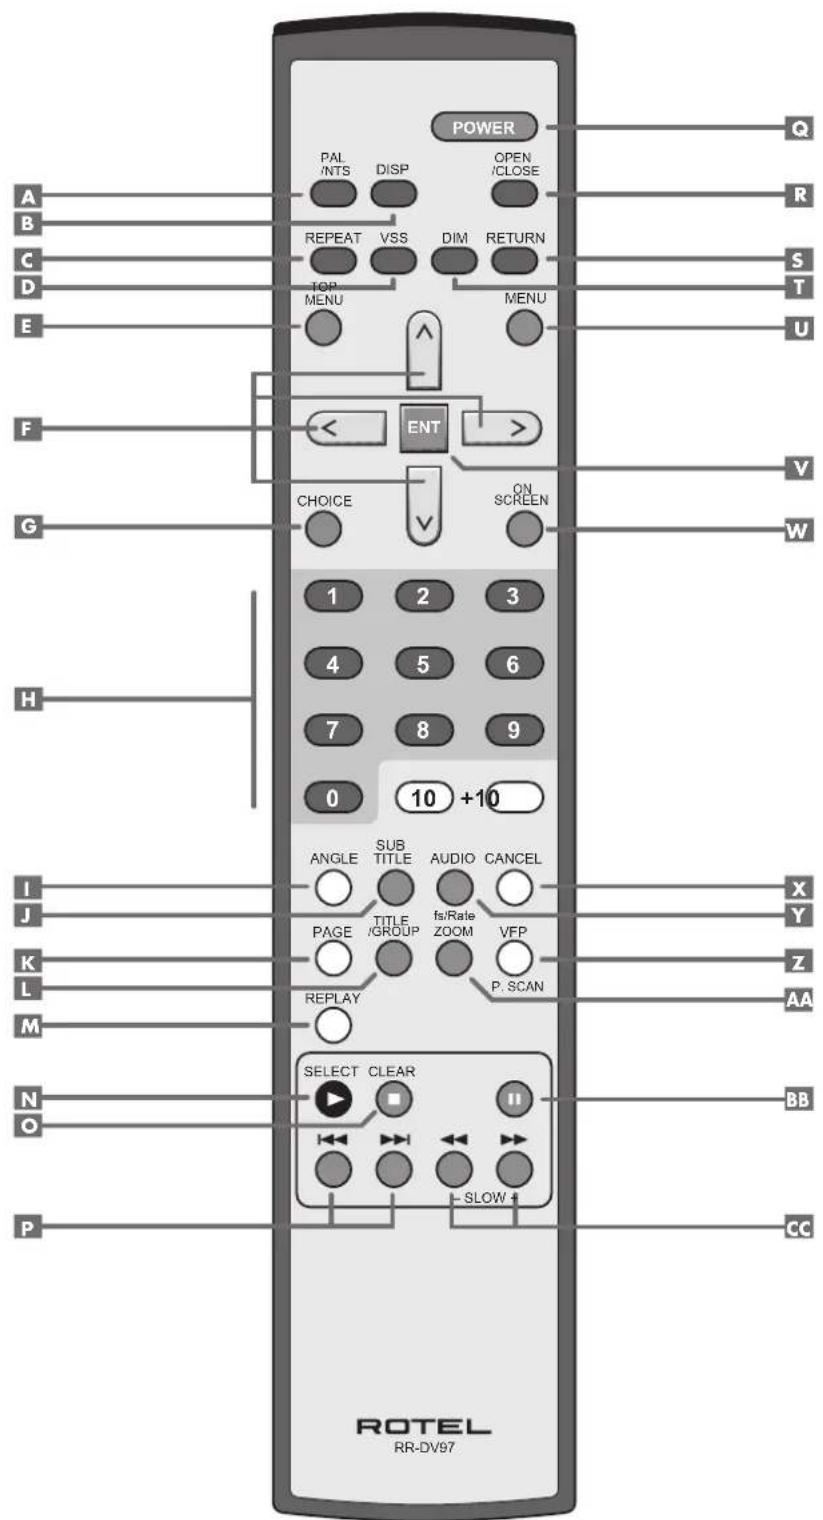
2: RR-DV97 Remote Control
3: Analog Audio Connections

4: Digital Audio Connections

5: Video Connections

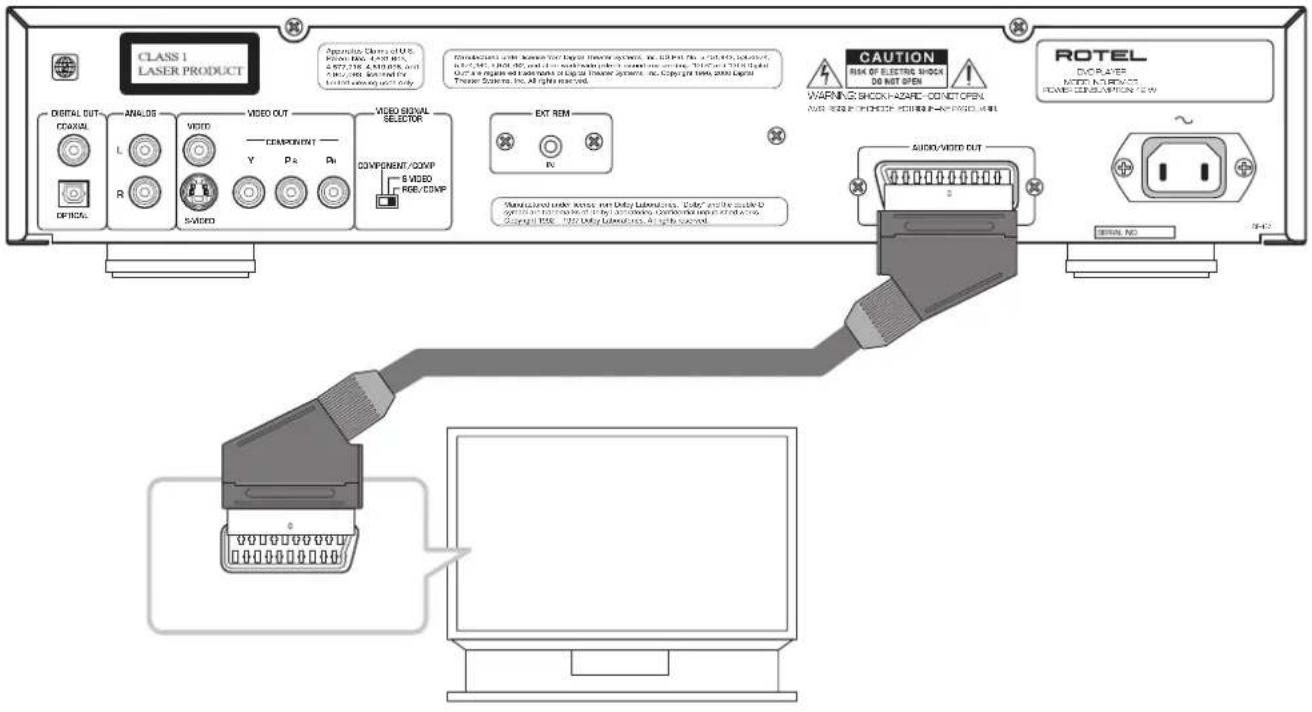
6: SCART Connection (Euro model)
7: Country/Language Codes
| AD Andorra | |
| AE United Arab Emirates | |
| AF Afghanistan | |
| AG Antigua and Barbuda | |
| AI Anguilla | |
| AL Albania | |
| AM Armenia | |
| AN | Netherlands Antilles |
| AO | Angola |
| AQ | Antarctica |
| AR | Argentina |
| AS | American Samoa |
| AT | Austria |
| AU Australia | |
| AW Aruba | |
| AZ Azerbaijan | |
| BA Bosnia and Herzegovina | |
| BB Barbados | |
| BD Bangladesh | |
| BE Belgium | |
| BF Burkina Faso | |
| BG Bulgaria | |
| BH Bahrain | |
| BI Burundi | |
| BJ | Benin |
| BM Bermuda | |
| BN Brunei Darussalam | |
| BO | Bolivia |
| BR Brazil | |
| BS Bahamas | |
| BT Bhutan | |
| BV Bouvet Island | |
| BW Botswana | |
| BY Belarus | |
| BZ Belize | |
| CA Canada | |
| CC Codos (Keeling) Islands | |
| CF Central African Republic | |
| CG | Congo |
| CH Switzerland | |
| CI Côte d'Ivoire | |
| CK Cook Islands | |
| CL | Chile |
| CM Cameroon | |
| CN China | |
| CO Colombia | |
| CR Costa Rica | |
| CU Cuba | |
| CV Cape Verde | |
| CX Christmas Island | |
| CY Cyprus | |
| CZ Czech Republic | |
| DE Germany | |
| DJ Djibouti | |
| DK | Denmark |
| DM | Dominica |
| DO Dominican Republic | |
| DZ Algeria | |
| EC | Ecuador |
| EE Estonia | |
| EG Egypt | |
| EH Western Sahara | |
| ER Eritrea | |
| ES | Spain |
| ET | Ethiopia |
| FI | Finland |
| FJ Fiji | |
| FK Falkland Islands(Malvinas) | |
| FM Micronesia(Federated States of) | |
| FO Faroe Islands | |
| FR France | |
| FX France, Metropolitan | |
| GA Gabon | |
| GB | United Kingdom |
| GD | Grenada |
| GE Georgia | |
| GF | French Guiana |
| GH Ghana | |
| GI | Gibraltar |
| GL Greenland | |
| GM | Gambia |
| GN | Guinea |
| GP | Guadeloupe |
| GQ | Equatorial Guinea |
| GR | Greece |
| GS | South Georgia and the South Sandwich Islands |
| GT | Guatemala |
| GU | Guam |
| GW | Guinea-Bissau |
| GY | Guyana |
| HK | Hong Kong |
| HM | Heard Island and McDonald Islands |
| HN | Honduras |
| HR | Croatia |
| HT | Haiti |
| HU | Hungary |
| ID | Indonesia |
| IE | Ireland |
| IL | Israel |
| IN | India |
| IO | British Indian Ocean Territory |
| IQ | Iraq |
| IR | Iran (Islamic Republic of) |
| IS | Iceland |
| IT | Italy |
| JM | Jamaica |
| JO | Jordan |
| JP | Japan |
| KE | Kenya |
| KG | Kyrgyzstan |
| KH | Cambodia |
| KI | Kiribati |
| KM | Comoros |
| KN | Saint Kitts and Nevis |
| KP | Korea, Democratic People's Republic of |
| KR | Korea, Republic of |
| KW | Kuwait |
| KY | Cayman Islands |
| KZ | Kazakhstan |
| LA | Lao People's Democratic Republic |
| LB | Lebanon |
| LC | Saint Lucia |
| LI | Liechtenstein |
| LK | Sri Lanka |
| LR | Liberia |
| LS | Lesotho |
| LT | Lithuania |
| LU | Luxembourg |
| LV | Latvia |
| LY | Libyan Arab Jamahiriya |
| MA | Morocco |
| MC Monaco | |
| MD | Moldova, Republic of |
| MG Madagascar | |
| MH | Marshall Islands |
| ML | Mali |
| MM | Myanmar |
| MN | Mongolia |
| MO | Macau |
| MP Northern Mariana Islands | |
| MQ | Martinique |
| MR Mauritania | |
| MS | Montserrat |
| MT | Malta |
| MU | Mauritius |
| MV | Maldives |
| MW | Malawi |
| MX | Mexico |
| MY | Malaysia |
| MZ | Mozambique |
| NA Namibia | |
| NC | New Caledonia |
| NE | Niger |
| NF | Norfolk Island |
| NG | Nigeria |
| NI | Nicaragua |
| NL | Netherlands |
| NO | Norway |
| NP | Nepal |
| NR | Nauru |
| NU Niue | |
| NZ | New Zealand |
| OM | Oman |
| PA | Panama |
| PE | Peru |
| PF | French Polynesia |
| PG | Papua New Guinea |
| PH | Philippines |
| PK | Pakistan |
| PL | Poland |
| PM | Saint Pierre and Miquelon |
| PN | Pitcairn |
| PR | Puerto Rico |
| PT | Portugal |
| PW | Palau |
| PY | Paraguay |
| QA Qatar | |
| RE | Runion |
| RO | Romania |
| RU | Russian Federation |
| RW | Rwanda |
| SA | Saudi Arabia |
| SB | Solomon Islands |
| SC | Seychelles |
| SD | Sudan |
| SE | Sweden |
| SG | Singapore |
| SH | Saint Helena |
| SI | Slovenia |
| SJ | Svalbard and Jan Mayen |
| SK | Slovakia |
| SL | Sierra Leone |
| SM | San Marino |
| SN | Senegal |
| SO | Somalia |
| SR | Suriname |
| ST | Sao Tome and Principe |
| SV | El Salvador |
| SY | Syrian Arab Republic |
| SZ | Swaziland |
| TC | Turks and Caicos Islands |
| TD | Chad |
| TF | French Southern Territories |
| TG | Togo |
| TH | Thailand |
| TJ | Tajikistan |
| TK | Tokelau |
| TM | Turkmenistan |
| TN | Tunisia |
| TO | Tonga |
| TP | East Timor |
| TR | Turkey |
| TT | Trinidad and Tobago |
| TV | Tuvalu |
| TW | Taiwan, Province of China |
| TZ | Tanzania, United Republic of |
| UA | Ukraine |
| UG | Uganda |
| UM | United States Minor Outlying Islands |
| US | United States |
| UY | Uruguay |
| UZ | Uzbekistan |
| VA | Vatican City State (Holy See) |
| VC | Saint Vincent and the Grenadines |
| VE | Venezuela |
| VG | Virgin Islands (British) |
| VI | Virgin Islands (U.S.) |
| VN Vietnam | |
| VU | Vanuatu |
| WF Wallis and Futuna Islands | |
| WS | Samoa |
| YE | Yemen |
| YT | Mayotte |
| YU | Yugoslavia |
| ZA | South Africa |
| ZM | Zambia |
| ZR | Zaire |
| ZW Zimbabwe | |
Contents
Boxed numbers refer to RDV-03 illustration. Boxed letters refer to RR-DV97 illustration.
Important Safety Instructions ....3
1: Controls and Connections ....4
2: RR-DV97 Remote Control ....5
3: Analog Audio Connections ......6
4: Digital Audio Connections ......6
5: Video Connections ....7
6: SCART Connection (Euro model) 7
7: Country/Language Codes 8
About Rotel 12
Getting Started 12
Video Features 12
Audio Features 12
Other Features 12
Supplied Accessories 12
A Few Precautions ......13
Placement 13
CONNECTIONS 1 3
Cable selection 13
Audio Connections ......13
Analog Audio Outputs 15....13
Digital Outputs 10 14....14
Video Connections 14
Video Selector Switch Asia Version 18 Euro Version 20....14
Connect to a TV with Composite Video Input 11....14
Connect to a TV with S-Video Input 16....15
Connecting to a TV with Component Video Inputs 17....15
Connecting to a TV with a SCART input (Euro model only) 21....15
PAL/NTSC switch (Asia model only) 19....15
Other Connections 15
AC Power Input 13....15
EXT REM IN 12....15
OVERVIEW 1 6
On-Screen Display 16
Status Indicators 16
Selection Indicators 16
Menu Screens 16
Screen Saver 16
Front Panel Overview 16
STANDBY Button and LED 1....16
Front-Panel Display 3....16
Disc Drawer 2....16
OPN/CLOSE Button 5....16
Remote Sensor 4....16
PLAY Button 6....16
STOP Button 7....16
PAUSE Button 8....16
TRACK Buttons 9....16
Remote Control Overview ......17
Remote Control Batteries 17
Using the Remote 17
POWER Button 17
OPN/CLOSE Button R 17
PLAY/SELECT Button N 17
STOP/CLEAR Button 17
PAUSE Button BB 17
TRACK Buttons P 17
SEARCH/SLOW Buttons 17
Numeric Buttons H....17
MENU Button U 17
TOP MENU Button E 17
CURSOR Buttons F 17
ENTER Button V 17
CHOICE Button G 17
DISP Button B 17
ANGLE Button 1 17
SUBTITLE Button 17
AUDIO Button Y 17
ZOOM Button AA 18
REPEAT Button C 18
VFP/P.SCAN Button Z 18
TITLE/GROUP Button 18
RETURN Button \$ 18
ON-SCREEN Button W 18
VSS Button D 18
DIM Button T 18
CANCEL Button X 18
REPLAY Button M....18
PAL/NTS button A
PAGE Button K 18
USING THE RDV-03 18
About Discs ......19
Disc Formats 19
DVD Region Codes 19
Disc Structure 19
Digital Audio Formats 20
Basic Features ....20
Power On/Off 1 Q 20
Changing Display Brightness T 20
Inserting a Disc 2 5 R....20
Playing a Disc 6 N 20
Stopping Disc Playback 7.0....20
Pause/Still Frame 8 BB 20
Skip forward/back 9 P 20
High Speed Play CC 21
Slow Speed Play 8 CC 21
Front Panel Display Options 3.B....21
On-Screen DisplayStatus Bars W 21
Time Display Options v w 21
Advanced Features ......22
Progressive Scan Z 22
Zoom F AA 22
Selecting Scene Angles F I V 22
Selecting Subtitles F J V 22
Selecting Audio Tracks F V Y 23
Setting Video Fine Picture Adjustments (VFP)
F V Z 23
Virtual Surround Sound D F 24
Playing Specific Selections ......24
Selecting a Title/Group
H L P 24
Select Chapters from DVD Menu
E F U V 24
Select Tracks from a Video CD/SVCD Menu
E H N P S 24
Entering a Chapter or Track Number
F H V W 25
Find a Location with Time Search
F H V W 25
Repeat Play C F O V W .25
Random Play F O V W 26
Program Play F H N O W 26W
Playing MP3/WMA discs 27
Control Menu F N P V 27
Direct Selection of Groups and Tracks
H L 27
Repeat Play CFOVW..27
Playing JPEG discs 27
Control Menu FNOPV28
Slide Show H L N O BB....28
Zoom F CC 28
SETUP 28
Choice Menus F G V 28
Language Menu 29
Menu Language 29
Audio Language 29
Subtitle 29
On Screen Language 29
Picture Menu 29
Monitor Type 29
Picture Source 30
Screen Saver 30
MP3&WMA/JPEG 30
Audio Menu 30
Digital Audio Output 30
Analog Down Mix ....31
Dynamic Range Control 31
Output Level 31
Others Menu 31
Resume 31
On-Screen Guide 31
Auto Standby 31
Parental Lock 32
To Change Parental Lock Settings 32
Playback with Parental Lock F H V 32
TROUBLESHOOTING 33
Power 33
Operation 33
Picture 33
Audio 33
MP3/WMA 33
JPEG 33
SPECIFICATIONS 34
General 34
Other 34
Video output 34
Audio output 34
Audio characteristics ....34
About Rotel
A family whose passionate interest in music leads them to manufacture high fidelity components of uncompromising quality founded Rotel 40 years ago. Through the years that passion has remained undiminished and the family goal of providing exceptional value for audiophiles and music lovers regardless of their budget, is shared by all Rotel employees.
The engineers work as a close team, listening to, and fine tuning each new product until it reaches their exacting musical standards. They are free to choose components from around the world in order to make that product the best they can. You are likely to find capacitors from the United Kingdom and Germany, semi conductors from Japan or the United States, while toroidal power transformers are manufactured in Rotel's own factory.
Rotel's reputation for excellence has been earned through hundreds of good reviews and awards from the most respected reviewers in the industry, who listen to music every day. Their comments keep the company true to its goal – the pursuit of equipment that is musical, reliable and affordable.
All of us at Rotel, thank you for buying this product and hope it will bring you many years of enjoyment.
Getting Started
Thank you for purchasing the Rotel RDV-03 DVD. With its precision transport, comprehensive digital processing, and Rotel's Balanced Design, the RDV-03 ensures the highest level of audio performance. When used in a high-quality audio system, your DVD player will provide years of enjoyment.
The RDV-03 is a multipurpose player equipped to handle video and audio discs in a wide range of formats including DVD-Video, Audio CD, Video CD, SVCD, MP3, WMA, and JPEG.
Video Features
- Asia version supports both NTSC and PAL TV monitors (selectable with back panel switch. Euro version supports PAL TV monitors. Both versions can play both PAL and NTSC discs, converting the signal to the appropriate output.
- Progressive scan for both PAL and NTSC systems, optimized for both video and film sources.
- Special playback functions such as frame-by-frame, zoom, and variable slow-motion and high-speed play.
- DVD-Video features include Multi-angle, Multi-language subtitles, and Multi-language audio.
Audio Features
- Supported audio formats include sampling frequencies up to 96 kHz, linear PCM en coding, up to 24-bit resolution. DVD-Video supports 2 channels at sample rates of 48 and 96 kHz at 16, 20, or 24 bit resolution. Audio CD/Video CD is limited to 2 channels, 44.1 kHz at 16 bits.
- Supports the following digital audio formats:
Dolby Digital®
DTS® (Digital Theater Systems)
MP3 (MPEG 1, Layer 3)
WMA (Windows ^ Media Audio) MPEG multichannel Linear PCM - Virtual surround sound simulates surround sound with the conventional 2-channel (stereo) audio system.
- Audio outputs include stereo analog outputs plus both coaxial and optical digital audio outputs.
Other Features
- User-friendly On-Screen Displays.
• Full-featured remote control. - Parental lock.
Supplied Accessories
• Audio/video cable with stereo analog audio and composite video cable (1)
- S-Video cable (1)
• 75 ohm coax digital audio cable (1)
- Remote Control Unit (1)
• RO3(LRO3)/AAA batteries (3)
• Instruction manual (1)
- AC Power Cord (1)
Manufactured under license from Dolby Laboratories. "Dolby", "Pro Logic", and the double-D symbol are trademarks of Dolby Laboratories.
Manufactured under license from Digital Theater System, Inc. US Pat. No. 5,451,942 and other world-wide patents issued and pending. "DTS" and "DTS 2.0+Digital Out", are trademarks of Digital Theater Systems, Inc."
This product incorporates copyright protection technology that is protected by method claims of certain U.S. patents and other intellectual property rights owned by Macrovision Corporation and other rights owners. Use of this copyright protection technology must be authorized by Macrovision Corporation, and is intended for home and other limited viewing uses only unless otherwise authorized by Macrovision Corporation. Reverse engineering or disassembly is prohibited.
A Few Precautions
Please read this manual carefully. In addition to installation and operating instructions, it will help you get optimum performance from your new DVD Player. Please contact your authorized Rotel retailer for answers to any questions you might have. In addition, all of us at Rotel welcome your questions and comments.
Save the RDV-03 shipping carton and all enclosed packing material for future use. Shipping or moving the RDV-03 in anything other than the original packing material may result in damage that is not covered by the warranty.
Placement
Place the RDV-03 on a solid, level surface away from sunlight, heat, moisture, or vibration. Make sure that the shelf can support the weight of the unit.
Place the RDV-03 close to the other components in your system and, if possible, on its own shelf. This will make initial hookup, and subsequent system changes easier.
The RDV-03 can generate heat during normal operation. Do not block ventilation openings. Allow a minimum of 10 cm or 4 inches of unobstructed space around the unit. If installed in a cabinet, make sure that there is adequate ventilation.
Don't stack other components or objects on top of the RSX-03. Don't let any liquid fall into the unit.
CONNECTIONS
This section describes the back-panel connections and settings that must be made during installation of the RDV-03. These include the power connection, audio output connections to the surround processor or TV, video output connections, selecting of the video standard for your TV, and optional external IR remote connections.
These instructions cover two different versions of the RDV-03, the Asia model and the Euro model. Most of the connections are the same for both models. However, there are two important differences. The setting of back-panel switches to match the unit with the type of TV set differs and the Euro version has a additional SCART connection that is not available on the Asia version. These differences are described as necessary in the following instructions.
NOTE: To prevent loud noises, make sure the DVD player and the rest of the system is turned off when making connections.
Cable selection
Use standard audio cables with RCA connectors for analog audio connections. Use the following color code:
Left channel audio: white Right channel audio: red
You can choose among three different types of video cables. For composite video, use a single 75 ohm video cable with an RCA connector at each end. For S-Video, use an S-Video cable with a special multi-pin connector at each end. For component video, use a set of three matching 75 ohm video cables with RCA connectors at each end. Use the following standard color code:
Composite video: yellow
Component video (Y): green Component video (Pb): blue Component video (Pr): red
NOTE: Do not use standard audio cables in place of 75 ohm video cables. Audio cables will usually pass the signal, but will degrade the quality.
Use standard optical digital cables for optical digital signals. Be sure to remove the protective covers from the ends of the cable. Use 75 ohm digital audio cables with an RCA connector on each end for coax digital audio.
Coax digital: orange
NOTE: You can substitute a 75 ohm video cable for a coax digital cable, but do not substitute conventional audio interconnect cables for digital signals.
When making signal connections, follow the color codes carefully at both ends of each cable.
Use a standard high-quality SCART connector for the Euro version.
Audio Connections
Analog audio outputs supply two channels (left and right) of decoded analog audio. These outputs take advantage of the RDV-03's ability to decode and down mix many audio formats including Dolby Digital and DTS as well as the Virtual Surround Sound feature. Use these connections when connecting the RDV-03 to a stereo receiver or TV set that does not have digital audio inputs.
Digital audio outputs supply unprocessed digital audio signal for use with the surround processor's decoding and D/A converters. This is the preferred option when using the DVD-03 with a Dolby Digital and or DTS surround processor.
Analog Audio Outputs 15
See Figure 3
Two RCA jacks, labeled ANALOG L/R, send two channels of analog audio from the RDV-03 to the analog audio inputs of an audio surround processor, preamplifier, integrated amplifier, receiver or TV set.
NOTE: These connections are the same for both versions of the RDV-03.
Connect the ANALOG L output to the left audio input of the TV or receiver and the ANALOG R output to the right audio input using the red and white connectors of the supplied combination audio/video cable.
NOTE: On the Euro version of the RDV-03, you do not need to make these audio connections when using a SCART cable.
Typically, the STEREO outputs send a matrix en coded stereo signal to the surround processor. This can be changed to provide a 2-channel down mix stereo signal. See the Audio Menu in the Setup section of this manual. You can also use the Virtual Surround Sound feature to simulate the spaciousness of a surround sound with a 2-channel system
NOTE: The analog audio outputs are typically used only with stereo systems or TV sets that do not have Dolby Digital or DTS processing. When connecting to a digital surround receiver, you will not need to make these analog audio connections; instead making just one digital connection (described in the following section).
Digital Outputs 10 14
See Figure 4
The RDV-03 provides digital outputs (with both optical and coaxial connectors). These digital outputs provide a digital audio bitstream, which must be used with a processor that accepts a digital signal and has its own Dolby Digital and/or DTS decoding.
NOTE: These connections are the same for both versions of the RDV-03.
The RDV-03 provides two types of outputs for the digital audio signal: an optical output and a coaxial output. Use whichever you prefer.
Connect the cable of your choice (optical or coaxial) from one of the DIGITAL OUT connectors of RDV-03 to the matching digital input on the surround processor. A coax digital audio cable (orange connectors) is supplied with the unit.
The optical output connector has a built-in plastic shutter to keep dust out when not in use. The shutter retracts automatically when you insert the optical digital connector.
You will probably need to select the correct digital input on your surround processor, using its setup menus.
NOTE: See the Audio Menu in the Setup section of this manual for information on selecting the right type of digital output signal for your processor.
Video Connections
Video outputs send the video signal from the DVD player to the surround processor or TV set. Three types of video output connections are provided – RCA composite video, S-Video, and Component Video. On the Euro model, a SCART output is also provided.
Choose the type of video output connection that best matches the inputs on your TV or surround processor. Component Video connections must be used with HDTV television monitors to take advantage of the RDV-03's high quality progressive scan signal. On standard televisions, the S-Video output provides better picture quality than the composite video output.
NOTE: In most systems, only one video connection should be made.
Video Selector Switch Asia Version 18 Euro Version 20
There are now many video standards and types of televisions in use throughout the world, including standard "interlaced" TV signals and "progressive" scanning signals suitable for enhanced or high definition TV monitors. The RDV-03 is capable of outputting many of these signal types, depending on the type of TV monitor and video connection.
Both versions of the RDV-03 have a rear panel video selector switch which must be set correctly to match the type of video connection and the TV set.
The Asia version has a switch with three options:
- INTL: for use with standard definition televisions requiring interlaced video signals.
- PSCN: for use with enhanced or high definition television sets that accept progressive scan video signals.
- REMOTE: selection of interlaced or progressive scan video using the P. SCAN button on the remote.
The Euro version has a switch with three options:
- COMPONENT/COMP: for use with TVs accepting component video or composite video signals.
- S-VIDEO: for use with TVs accepting S-Video or Y/C signals.
- RGB/COMP: for use with TVs accepting RGB or composite video signals.
Details about the proper switch settings for both versions are provided with the following instructions for each type of video connection.
Connect to a TV with Composite Video Input 11
See Figure 5
If you choose the composite video connection, connect the VIDEO OUT output (labelled VIDEO) to the corresponding composite video input on your TV or surround processor, using the yellow connectors of the supplied combination audio/video cable.
On the Asia model, set the VIDEO SELEC TOR switch to the INTL position for interlaced video output. Do not connect an S-Video cable when using composite video cables.
On the Euro model, set the VIDEO SELECTOR switch to the COMPONENT/COMP or RGB/COMP position. Do not connect an S-Video or SCART cable.
Connect to a TV with S-Video Input 16
See Figure 5
If you choose the S-Video (Y/C) video connection, connect the S-VIDEO output to the S-Video input on your TV or surround processor, using the supplied S-Video cable.
On the Asia model, set the VIDEO SELECTOR switch to the INTL position for interlaced video output. Do not connect component video or composite video cables when using S-Video.
On the Euro model, set the VIDEO SELECTOR switch to the S-VIDEO position. Do not connect composite video, component video, or SCART cables.
Connecting to a TV with Component Video Inputs 17
See Figure 5
To connect to an HDTV monitor capable of displaying progressive scan video signals, connect the RDV-03 to the TV using a set of three Component Video cables from the COMPONENT VIDEO OUT jacks to the corresponding Component Video inputs on your TV or surround processor. Make sure that you connect the Y output to the Y input on the TV, the PB output to the PB input, and the PR output to the PR input.
On the Asia model, set the VIDEO SELECTOR switch to the PSCN position for progressive video output. If you wish to switch between progressive scan and interlaced video, put the switch in the REMOTE position. You can then press and hold the P.SCAN button on the remote for a few seconds to toggle between progressive scan and interlaced output. Do not connect an S-Video cable when using the Component Video outputs.
On the Euro model, set the VIDEO SELECTOR switch to the COMPONENT/COMP position. Do not connect S-Video, or SCART cables. To turn on or off progressive scan video, press and hold the P.SCAN button on the remote for a few seconds.
Connecting to a TV with a SCART input (Euro model only) 21
See Figure 6
The Euro version of the RDV-03 has a 21-pin SCART output. The SCART output carries stereo (left/right) analog audio, composite video, or RGB video signals. If you are connecting the RDV-03 directly to a SCART equipped TV, this should be the only video and analog audio connection you make. Simply plug a SCART cable into the output on the RDV-03 and into an input on your TV.
Do not make any other type of video connection (composite, S-Video, or Component Video) when using the SCART connection.
NOTE: For 5.1 channel Dolby Digital/DTS surround, you will also need to use the DIGITAL OUTPUT connection from the RDV-03 to your surround processor.
If your TV requires composite video signals, set the VIDEO SELECTOR switch to the COMPOSITE/COMP or RGB/COMP position.
If your TV accepts S-VIDEO (Y/C) video signals, set the the VIDEO SELECTOR switch to the S-VIDEO position.
If your TV accepts RGB video signals (or if it accepts Y/C and RGB signals), set the VIDEO SELECTOR switch to the RGB/COMP position.
PAL/NTSC switch (Asia model only) 19
There are two different standards for video monitors: NTSC in US and Japan, PAL in Europe. The output of the Asia RDV-03 must be set to match the standard your TV accepts. Put the switch in the NTSC position for use with NTSC video equipment. Put it in the PAL position for the use with PAL equipment.
The Euro version of the RDV-03 is designed to only work with PAL standard TV sets. Therefore, there is no PAL/NTSC switch.
NOTE: This switch only relates to the hardware configuration of your TV set and other components. Regardless of the setting, the RDV-03 can play DVD discs encoded in either format, converting the signal to the format selected with the PAL/NTSC switch.
Other Connections
AC Power Input 13
Your RDV-03 is designed for operation in the countries where it was purchased. The Euro version should be used with 230 V, 50 Hz AC line voltage. The Asia version can be used with AC line voltages ranging from 110 volts to 240 volts at 50/60Hz. No setting is required to match the unit to your local voltage.
Plug the supplied cord into the AC INPUT receptacle on the back of the unit. After all connections have been made, plug the cord) into an appropriate AC wall outlet.
NOTE: If you are away from home for an extended period of time, it is a sensible precaution to unplug your audio/video components.
EXT REM IN 12
The EXT REM IN receives IR command codes relayed from an infrared receiver or from the matching EXT REM OUT connector on Rotel surround processors. This feature may be useful when the unit is installed in a cabinet and its front-panel IR sensor is blocked, preventing reception of infrared signals from the remote control. Consult your authorized Rotel dealer for information on IR receivers and the proper wiring of a cable with 3.5 mm plugs to fit the connector.
OVERVIEW
Basic controls for the RDV-03 are on the front panel. These controls are duplicated on the remote control along with many more.
To guide you through the operation of the RDV-03, this section of the manual starts with explaining the basic layout and function of the front panel and the remote control. In the following section, Using the RDV-03, we explain the features of the unit and how to operate them.
Throughout this manual, numbers in gray boxes refer to the RDV-03 illustration (Figure 1) at the front of this manual. Letters refer to the RR-DV97 remote illustration (Figure 2). When both appear, the function is found on both the RDV-03 and the remote. When only one appears, that function is found only on the RDV-03 or the remote.
On-Screen Display
The RDV-03 displays icons, status indicators, and interactive menus on the TV monitor. Many of these screens are used to set up preferences and activate advanced features of the unit. Others offer information and choices useful during normal operation of the unit.
NOTE: The default language for all RDV-03 On-Screen Displays can be changed. See the Initial Setup topic or the Language menu in the Setup section of this manual.
Status Indicators
During operation of the unit, various status indicators appear on screen such as NO DISC, LOADING, PLAY, PAUSE, etc. These information displays are self-explanatory.
Selection Indicators
When using specific features during playback (such as Language selection, Time Display, Repeat Mode, etc.), status bars appear in the On-Screen Display showing the current status of that feature as you make changes.
Menu Screens
Several different menu screens can appear during configuration of the RDV-03 such as the sample below:

The menu screens provide access to various settings and features described in the Setup section of this manual. The menu system appears when the CHOICE button is pressed, except when a JPEG, or MP3/WMA disc is inserted.
Screen Saver
To prevent damage to a TV monitor during prolonged display of a static image, the screen Press to open or close the Disc Drawer. automatically darkens after five minutes.
The screen saver display returns to normal when any front-panel or remote button is pressed.
Front Panel Overview
The following is a brief overview of the controls and features on the front panel of the RDV-03. Details concerning the use of these controls are provided in subsequent sections of this manual describing various tasks.
STANDBY Button and LED 1
The front panel STANDBY button works as a power switch, activating the unit (ON) or putting it into a standby mode (OFF).
NOTE: Pressing the OPN/CLOSE or PLAY buttons also turn the unit on.
Front-Panel Display 3
A lighted display on the front-panel of the RDV-03 provides information about the status of the unit, activation of special features, and Track/Time information.
Disc Drawer 2
A motor-driven disc drawer, located in the center of the RDV-03, slides out to accept a disc and retracts for playback.
OPN/CLOSE Button 5
Press to open or close the Disc Drawer.
Remote Sensor 4
The remote sensor receives infrared signals from the remote control. Do not cover or block the sensor.
PLAY Button 6
Press the PLAY ▶ button to start playing the disc from the beginning or to resume play if playback is paused.
STOP Button 7
Press the STOP button to stop disc play-back.
PAUSE Button 8
Press the PAUSE button to temporarily suspend play or to advance the still picture frame by frame when playback is paused.
TRACK Buttons 9
The TRACK buttons skip forward or back to the beginning of the next selection.
Remote Control Overview
See Figure 2
The RDV-03 is supplied with an RR-DV97 remote control that duplicates the front-panel functions and provides additional features.
Remote Control Batteries
Three R03(LR03)/AAA size batteries (supplied) must be installed before the remote can be used. Remove the cover on the back of the RR-DV97. Install the batteries following the polarity symbols, then replace the cover.
NOTE: Remove the batteries from the remote if it will not be used for a long period of time. Do not leave run down batteries in the remote control; they can leak corrosive chemicals which will damage the unit.
Using the Remote
To use the remote, aim it at the remote sensor on the front-panel of the RDV-03. The operation of the remote sensor can be affected if it is blocked or exposed to bright infrared light. In addition, remote control functions may not work reliably if the batteries in the RR-DV97 are weak.
POWER Button Q
This button duplicates the front panel STAND-BY button. Press the POWER button to activate the unit or put it in standby mode.
OPN/CLOSE Button R
Pressing this button opens or closes the Disc Drawer. If in standby mode, pressing the button activates the unit.
PLAY/SELECT Button N
The PLAY/SELECT ▶ button duplicates the function of the front panel PLAY ▶ button and is used to confirm selections in menus. We refer to this button simply as the PLAY button in this manual.
Press this button to start playing the disc from the beginning or to resume play if playback is paused or to return to normal play from any of the slow motion or fast play modes. If in standby mode, pressing the button activates the unit.
STOP/CLEAR Button
Press the STOP/CLEAR button to stop a disc that is playing. If playback is restarted after one press of the button, the disc will resume playing from the current position on the disc. Press the button twice to cancel the resume feature. Subsequent play will restart from the beginning of the disc. Playback will also stop when the POWER button on the remote is pressed.
We refer to this button as the STOP button throughout this manual.
PAUSE Button BB
Press the PAUSE button to temporarily suspend play or to advance the still picture frame by frame after playback is paused.
TRACK Buttons P
The TRACK ◀◀▶▶buttons skip forward/back to the beginning of the next selection.
SEARCH/SLOW Buttons CC
During playback, press the SEARCH/SLOW ◀◀▶▶ buttons to begin high-speed play, either forward or reverse, at 1.5X, 5X, 20X, or 60X speed, increasing with each additional press. Press the PLAY ▶ button to resume normal speed playback.
Press the SEARCH/SLOW ◀◀▶▶ buttons while play is paused, to begin slow motion play, forward or reverse, at 1/32, 1/16, 1/8, 1/4, or 1/2 speed. Press PLAY ▶ to resume normal playback.
These buttons are also used for the zoom feature when displaying JPEG still images.
Numeric Buttons H
These buttons (1–0, 10, and +10) are used for direct entry of specific Chapters, Titles, and times. Two digit numbers are typically entered by pressing +10 followed by the next digit, as detailed in operating steps.
MENU Button U
Press the MENU button to activate the menu on the disc.
TOP MENU Button E
Press this button to access the top-level menu on a DVD-Video disc. On most DVD-Video
discs, pressing TOP MENU or MENU will display the same menu.
CURSOR Buttons F
Use the four CURSOR ▶/▶/▲/▼ buttons to navigate the on-screen display status bar options and Choice menus. The cursor buttons also move the video display during ZOOM mode.
ENTER Button V
This button (labeled ENT) is used to confirm many selections in operating the RDV-03. We refer to this button as the ENTER button throughout this manual.
CHOICE Button G
Press this button to access the Choice menus used in the setup of the RDV-03.
DISP Button B
The DISP button on the remote toggles between a time display and Title and Chapter information in the front panel display.
ANGLE Button
Press the ANGLE button to select an alternate angle view (if available for the current scene).
NOTE: An inhibit symbol on screen indicates that this feature is not available for the current scene.
SUBTITLE Button J
Press the SUBTITLE button to select a subtitle language (if available on the disc).
NOTE: An inhibit symbol on screen indicates that this feature is not available on the current disc.
AUDIO Button Y
Press the AUDIO button to select alternate audio tracks (if available on the disc).
NOTE: An inhibit symbol on screen indicates that this feature is not available on the current disc.
ZOOM Button AA
Press the ZOOM button to magnify the image on the TV. Each press of the ZOOM button changes the size of the picture: 1.8x, 4x, 8x, 16x, 32x, 64x, and back to normal size. While zoomed, video image can be moved up, down, left, or right by pressing the CUR SOR ◀/▶/▲/▼ buttons on the remote.
REPEAT Button G
Press the REPEAT button to repeat the currently playing Chapter (usually the current scene). Press the button a second time to repeat the current Title (usually the entire disc). Press a third time to cancel repeat play.
NOTE: The repeat function varies with different kinds of discs. See the detailed instructions in the Using the RDV-03 section.
VFP/P.SCAN Button Z
Press this button quickly to display the Video Fine Parameters menu, which allows you to customize the picture quality.
Press and hold the VFP/P.SCAN button for several seconds to activate the progressive scan video output to an HDTV monitor. Press and hold the button a second time to revert to standard definition.
On the Asia version of the RDV-03, the VFP/P.SCAN button only works when the rear panel video selector switch is set to the REMOTE position. In the other two positions, the unit is locked into either the interlaced or progressive output modes.
NOTE: Do not use progressive scan with conventional analog TV sets. Do not activate the progressive scan feature on PAL systems when the SCART setting as the active video output in the setup menus; progressive scan signals can only be used with the Component Video (Y PR PB) output setting.
TITLE/GROUP Button L
Press the TITLE/GROUP button for directly selecting a Title or Group using the NUMERIC buttons on the remote.
RETURN Button S
Press the RETURN button to cancel a menu and return to the previous menu.
ON-SCREEN Button W
Press the ON SCREEN button to display a status bar on the TV monitor, showing current playback information. Press the button a second time to add drop down menu items to the status bar.
VSS Button D
Press this button to activate the Virtual Surround Sound feature or change its settings.
DIM Button T
Press the DIM button to step through four brightness settings for the front panel display: bright, medium, dim, and off.
CANCEL Button X
This button is used to cancel the initial setup procedure or to remove Tracks when setting up Program Play lists.
REPLAY Button M
Press this button to skip back to a point 10 seconds earlier and resume disc play.
PAL/NTS button A PAGE Button K
These two buttons on the remote control are not used in the operation of the RDV-03.
USING THE RDV-03
This section of the manual provides detailed instructions for operating the RDV-03. It is divided into several topics, starting with basic information needed to get started watching a DVD, followed by information about more advanced features and operations:
- Initial setup
• Information about the types of discs that can be played - Basic operating features
- Advanced operating features
• Finding specific locations on a disc - Playing MP3 or WMA files
- Displaying JPEG images
Initial Setup
The first time the RDV-03 is turned on, a simple initial setup sequence is presented with three basic configuration options. More complete setup options are available using the Choice menu system described later in Setup section of this manual.
- When you turn the RDV-03 on for the first time, the following message appears on the TV monitor:
EXECUTE DVD PLAYER SETUP? BASIC PICTURE /AUDIO SETTING YES - PRESS ENTER NO - PRESS CANCEL
- Press the CANCEL button to skip the initial setup, if you would prefer to do the more comprehensive setup. Press the ENTER button on the remote to proceed with the initial setup. The following menu appears.
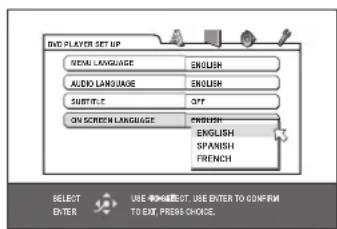
-
This menu selects a language for the On Screen messages and menus. Press the CURSOR 🔊 buttons on the remote to select the desired language.
-
Press the ENTER button. A second menu screen appears.

- This menu configures the RDV-03 for a standard 4:3 aspect ratio TV or a wide screen TV. Press the CURSOR buttons to select the desired setting from the popup window. More detail on these options is available in the Setup section of this manual, but to get started, select one of the two most common settings:
* 16:9 AUTO: Select this setting if you have a wide screen TV monitor.
• 4:3 LB: Choose this setting if you have a standard aspect ratio TV monitor.
You can go back and make a different selection later when you do the comprehensive setup, but one of these two settings should work with every TV monitor.
- Press the ENTER button to confirm the new setting and bring up the final menu:
-
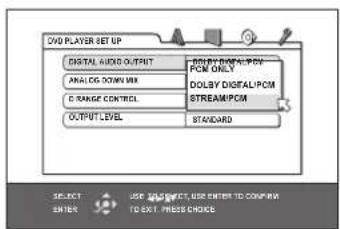
This menu tells the RDV-03 what kind of digital surround sound processor, if any, is receiving the digital output signal. This setting has no effect if you have not connected the digital audio output to an audio system. Press the CURSOR/Buttons on the remote to make a selection:
-
PCM ONLY: Use this setting if your receiver or surround processor does not have Dolby Digital decoding.
-
DOLBY DIGITAL/PCM: Use this setting if your surround processor has Dolby Digital decoding, but does not have DTS or MPEG decoding.
-
STREAM/PCM: Use this setting if your surround processor has Dolby Digital, DTS, and MPEG decoding.
- Press the ENTER button to complete the initial setup and return to the normal display on the TV monitor.
NOTE: You can return to these and other setup Choice menus by pressing and holding the CHOICE button on the remote control. See the Setup section of the manual.
About Discs
This section covers basic information on the types of discs that can be played in the RDV-03.
Disc Formats
The RDV-03 can automatically detect and play several different types of disc formats.
Look for the standard logo on the packaging for each of the following types of disc the RDV-03 can play:

The RDV-03 can also play:
- DVD-R and DVD-RW discs written in the DVD-Video format and finalized.
- CD-R and CD-RW discs written in the SVCD, Video CD or Audio CD format and finalized.
- CD-R and CD-RW discs written with MP3 or WMA or JPEG files in accordance with the "ISO 9660" format.
DVD Region Codes
DVD-Video discs are encoded with region codes which also appear on the packaging:

A disc can only be played if its region code matches the code printed on the back-panel of the RDV-03.
The RDV-03 can play discs encoded in either the NTSC or PAL video formats, outputting the correct video signal in PAL format (Euro model) or as set by the back-panel PAL/NTSC switch (Asia model).
Disc Structure
Each type of disc has its own organization, allowing you to locate various portions of the program recorded on the disc. Depending on the type of disc, these may be called Titles, Groups, Chapters, or Tracks:
DVD-Video:
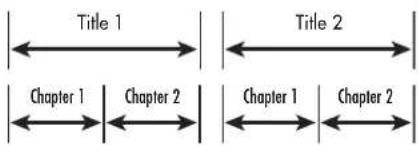
A DVD-Video disc is comprised of Titles and each Title may be divided into Chapters. For example, a DVD-Video disc may contain several movies, each with its own Title number, and each movie may be divided into several Chapters. In a DVD-Video karaoke disc, each song usually has its own Title number and does not have Chapters.
Audio CD:

An Audio CD, Video CD or SVCD simply contains Tracks.
Digital Audio Formats
DVD and CD discs can be encoded with several different digital audio formats. Generally, the type of digital audio encoding is indicated on the disc packaging.
- Dolby Digital. A digital surround format that may contain as many as five discrete audio channels plus an LFE (low frequency effects) channel (referred to as 5.1 channel surround). Particularly for older sound tracks, Dolby Digital may be used for a 2.0 channel stereo sound track with Dolby Surround matrix encoding.
- DTS (Digital Theater Systems). Another 5.1 channel digital surround format similar to Dolby Digital, but somewhat different encoding characteristics. Also plays DTS 96/24 used on DTS music discs.
- MPEG. Another compressed digital format.
- LPCM (Linear PCM). Uncompressed digital audio, the format used on CDs and most studio masters.
- MP3 (MPEG 1, Layer 3). Compressed 2-channel digital audio, a format often used for music on recordable CD-R and CD-RW discs.
- WMA (Windows® Media Audio). Another compressed 2-channel digital audio format developed by Microsoft Corporation.
Basic Features
This section of the manual covers the basic commands and features need to play a disc in the RDV-03. Additional features are described in later sections.
Power On/Off 1 Q
The RDV-03 has a STANDBY button on the front panel and a POWER button on the remote. Press either button to turn the unit on. The front panel LCD display lights up.
Press either button again to turn the unit off. When turned off, the RDV-03 remains in a low current standby mode. The LED above the STANDBY button on the front panel lights when the unit is in standby mode.
NOTE: To completely power off the RDV-03 when away from home for a long period of time, unplug the unit from the AC wall outlet.
There is an auto standby function that can automatically turn the unit off either 30 or 60 minutes after the disc is stopped. See the Others Menu in the Setup section for selecting the time option or disabling this feature.
Changing Display Brightness T
There are four brightness settings for the front panel display: bright, medium, dim, and off. Press the DIM button on the remote repeatedly to step through the four options.
NOTE: If the display is turned off, press the DIM button one time to restore the display to the bright setting.
Inserting a Disc 2 5 R
A disc drawer slides out to accept a disc and retracts for playback. Place the disc in the drawer label-side up. Make sure the disc is properly centered in the tray. The OPN/CLOSE button on the front panel or the remote opens or closes the drawer.
Playing a Disc 6 N
Press the PLAY▶ button on the remote to start playing the disc from the beginning. If the disc drawer is open, it will close automatically.
NOTE: Many DVDs either begin playing automatically or display a start-up menu as soon as the disc is inserted.
The PLAY ▶ button usually starts play from the beginning of the disc, except after the PAUSE ▶ button has been pressed. In this case, the disc will resume playing from the current location. The RDV-03 also has a resume feature that restarts play at the current location after pressing the STO ▶ button one time during playback.
Stopping Disc Playback 70
Press the STOP button to stop a disc that is playing.
The first press of the STOP button memorizes the point at which the disc stopped playing as indicated by RESUME appearing in the front panel display. Resume play at that point by pressing the PLAY▶ button. This stored position remains in memory until the disc drawer is opened, or the top menu is selected.
The second press of the STOP button clears the RESUME position.
NOTE: The resume feature described above is the default setting. It is also possible to disable the resume feature entirely or to have the RDV-03 memorize the resume position for the most recently played 30 discs. See the Others Menu in the Setup section for details.
Pause/Still Frame 8 BB
Press the PAUSE■ button to temporarily suspend play. To resume playing the disc from the current location, press the PLAY▶ button.
Still-Frame: When playing a video disc, a still-frame picture remains on the TV screen with no sound when the PAUSE II button is pressed. Press the PAUSE III button again to advance to the next still-frame picture. Each button press advances one frame.
Skip forward/back 9 P
The TRACK ◀◀▶▶▶buttons skip forward/back to the beginning of the next selection. While a disc is playing, pressing the right TRACK ◀◀▶▶▶ button once advances to the beginning of the next Chapter or Track. Pressing the left button returns to the beginning of the current scene or song. Pressing twice in quick succession returns to the beginning of the previous Chapter or Track.
Press the button as many times as necessary to find the desired scene or selection.
For a DVD-Video disc: During playback, this feature usually skips to the next Chapter, although it may skip to the next Title on some discs, depending on the disc configuration.
For a SVCD/Video CD disc: During play back without PBC function, this feature skips to the next Track.
For an Audio CD disc: While the disc is playing or stopped, this feature skips to the next Track.
NOTE: There are other methods of locating specific selections on a disc, including direct access with the NUMERIC buttons and using the On-Screen Menu features. See Playing Specific Selections for details.
High Speed Play CC
The SEARCH ← buttons (remote only) allow you to activate high speed play, either forward or reverse.
During playback, press and release the SEARCH ◀◀▶▶ buttons to begin video and audio playback at 1.5x normal speed, back wards or forwards. Each time you press the button again, the playback speed increases from to 5x, 20x, or 60x normal speed. Press PLAY▶ to resume normal playback.
Alternatively, you can press and hold the TRACK ◀◀▶▶▶ buttons to increase speed to 5x normal. Release the button to return to normal playback.
NOTE: When playing a DVD-Video or Video CD disc, the sound will be heard at the 1.5x speed, but muted at all other high speeds. When playing an Audio CD, sound will be heard intermittently.
Slow Speed Play 8 cc
For slow motion play, press the PAUS button. Then, press the SEARCH◀◀▶ buttons on the remote to begin slow motion play, in either the forward or reverse direction. Each press of the button steps through additional speed options (1/32 speed, 1/16 speed, 1/8 speed, 1/4 speed, 1/2 speed). Press PLAY▶ to resume normal playback.
NOTE: The sound is muted during slow-motion play. Slow-motion is not available on Audio CDs. Slow motion reverse play is only available on DVD-Video discs.
Front Panel Display Options 3 B
The main portion of the front panel display can either show a time display or the current Title and Chapter information. To toggle between the two display modes, press the DISP button on remote:

There are several options for the time display described in the Time Display Options section that follows.
On-Screen Display Status Bars W
- When the DVD input is active, press the ON SCREEN button on the remote to display a status bar on the TV that varies slightly depending on the type of disc. Shown here are the status bars for DVD-Video and audio CD discs.

The status bar, from left to right, shows the type of disc being played, the data rate (for DVD-Video), the Title and Chapter or Track info, a time indicator, and the current transport status (Play, Pause, etc.).
- Press the ON SCREEN button a second time to add drop down menu items. The menu items differ slightly for four types of discs: DVD-Video, SVCD, VCD, or CD.

-
Select a menu item by pressing the CURSOR ◀/▶ buttons to move the selection arrow to highlight the desired option.
-
Once a drop down menu is selected, adjustments can be made using the CURSOR ▲/▼ buttons to step through the available options.
-
Press the ON SCREEN button again to cancel the status bar display
Many of the features of the RDV-03 can be activated either by using the status bar menu items or by pressing short-cut buttons on the remote control. The instructions for each feature describe both methods when applicable.
Time Display Options v w
The disc time indicators in the front panel display and the On-Screen status bar can show several different types of information for DVD-Video, Audio CD, Video CD, or SVCD discs. Options include elapsed time or remaining time for a single selection (Chapter or Track) or entire disc (or Title for DVD-Video). To change the time display, use the on-screen status bar as follows:
-
Press the ON SCREEN button on the remote twice. A display window appears on the TV screen with the TIME field highlighted.
-
Press the ENTER button repeatedly until the desired time format is displayed:
TOTAL: Elapsed disc (or Title) time
T. REM: Remaining disc (or Title) time
TIME: Elapsed Chapter/Track time
REM: Remaining Chapter/Track time
Advanced Features
The RDV-03 provides several advanced features for controlling the audio/video content displayed during playback. These include progressive scan, zooming, changing the scene angle on DVD-Video discs, selecting alternate languages for the audio portion of DVD programs, and selecting subtitle languages on DVD programs.
Progressive Scan Z
When used with a high definition TV monitor connected with Component Video cables, the RDV-03 can display either interlaced or progressive scan video, depending on the setting of the VFP/P. SCAN button on the remote.
NOTE: Progressive Scan only works with HDTV monitors. Do not activate the Progressive Scan feature with analog TV monitors. The Progressive Scan feature is only available when using the Component Video (Y PR PB) outputs.
To activate progressive scan: Press and hold the VFP/P.SCAN button on the mode for several seconds to toggle between interlaced and progressive scan video modes. The letter P appears in the front panel display when the unit is in progressive scan mode.
On the Asia version, the video selector switch on the back panel must be set to the REMOTE position to switch between the two video modes from the remote. With the switch in the INTL position, the video output is locked to the interlaced mode. With the switch in the PSCN position, output is locked to the progressive scan mode. The ability to switch back and forth from the remote control could be useful when the RDV-03 is connected to two different TV monitors. Otherwise, most users will simply choose the appropriate mode for their TV monitor.
On the Euro version, the video selector switch on the back panel must be set to the COMPONENT/COMP position to activate progressive scan.
Zoom F AA
When playing a video disc, the RDV-03 can zoom in to enlarge a section of the picture up to 64 times its original size. The zoom feature is available for full-motion video during playback or for still-frame pictures while the unit is paused. While zoomed, you can move the displayed image up, down, left, or right to view the desired portion of the full image.
To zoom in, press the ZOOM button the remote. Each press of the ZOOM button changes the size of the picture: 1.8x, 4x, 8x, 16x, 32x, 64x, and back to normal size. An icon at the top left of the screen shows the current magnification.
To move the zoomed-in video image, press the CURSOR ◀/▶/▲/▼ buttons on the remote in the desired direction. The zoomed image moves up, down, left, or right to show the desired portion of the full image.
Press the ENTER button to resume normal playback.
NOTE: It is typical for a zoomed video image to look coarse or blurry.
Selecting Scene Angles F I V
Some DVD-Video discs have scenes that can be viewed from multiple camera angles. Unless the On-Screen Display is turned off, an angle icon appears during a scene with multiple angles.
Discs with multiple angles may provide menu screens for angle selection. Or, to select different angles (if available) from the remote:
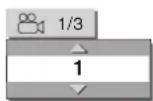
- Press the ANGLE button on the remote. A pop-up menu appears on screen indicating which angle is selected and how many angles are available.
-
Press the CURSOR buttons or the ANGLE button on the remote repeatedly to step through the available angles, selecting your favorite.
-
Press the ENTER button on the remote to close the pop-up angle menu. If no selection is made within a few seconds, the pop-up disappears automatically.
From the status bar:
You can also select angles from the status bar menus. Press the ON SCREEN button twice to display the status bar menus, then use the CURSOR ◀/▶ buttons to move the selection arrow to highlight the ANGLE field:

Press the ENTER button to display the pop-up angle menu. Follow the above instructions starting with Step 2 to select an angle.
Selecting Subtitles F J V
Some DVD-Video, Video CD, and SVCD discs can display subtitles in various languages during playback. Typically, you select these subtitles with the disc's setup menus. In addition, you can change the subtitles during playback:
- Press the SUBTITLE button on the remote. A pop-up menu appears on screen indicating which subtitle language is selected and how many languages are available.

- Press the CURSOA/Buttons or the SUB-TITLE button on the remote repeatedly to step through the available languages.
- Press the ENTER button on the remote to close the pop-up subtitle menu. If no selection is made within a few seconds, the pop-up disappears automatically.
NOTE: An SVCD disc may have up to four subtitle languages, each of which can be selected from the menu, whether or not the subtitles are actually available. On a DVD disc, on the available options will appear as menu choices.
From the status bar:
You can also select subtitles from the status bar menus. Press the ON SCREEN button twice to display the status bar menus, which are slightly different for DVD-Video and SVCD discs. Use the CURSOR/▶ buttons to move the arrow to highlight the SUBTITLE field:
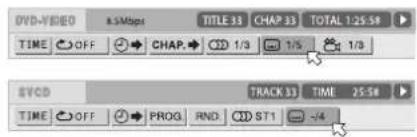
Press the ENTER button to display the pop-up SUBTITLE menu. Follow the above instructions starting with Step 2 to select a subtitle language.
Selecting Audio Tracks F V Y
Some DVD-Video, Video CD, and SVCD discs have audio tracks recorded in alternate languages, alternate audio formats (such as Dolby Digital 2.0, Dolby Digital 5.1, or DTS) or with alternate content (such as director's commentary). Typically, these audio tracks are selected with the disc's setup menus, which appear when you insert the disc or which can be accessed during playback by pressing the MENU button. In addition, you can change to an alternate audio track during playback:
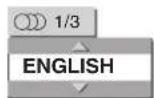
- Press the AUDIO button on the remote. A pop-up menu shows the current audio track number, its description, and the total number of available audio tracks.
-
Press the CURSOR LEDs or the AUDIO button on the remote repeatedly to step through the available languages.
-
Press the ENTER button on the remote to close the pop-up audio menu. If no selection is made within a few seconds, the pop-up disappears automatically.
NOTE: On an SVCD disc the options are Stereo 1, Stereo 2, Left 1, Right 1, Left 1, and Right 2. On a Video CD disc, the options are Stereo, Left, and Right.
From the status bar:
You can also select audio tracks from the status bar menus. Press the ON SCREEN button twice to display the status bar menus, which are slightly different for DVD-Video, SVCD, and VCD discs. Use the CURSOR
◀/▶ buttons to move the arrow to highlight the AUDIO field:

Press the ENTER button to display the pop-up AUDIO menu. Follow the above instructions starting with Step 2 to select an audio track.
Setting Video Fine Picture Adjustments (VFP) F V Z
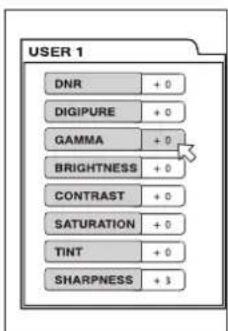
The VFP function allows you to select one of four picture modes: Normal, Cinema, User 1, and User 2. Each mode stores several picture settings:
- DNR: Dynamic Noise Reduction reduces noise along sharp edges in digitally compressed video. Can be turned off (0) or on (+1).
• DIGIPURE: Enhances the vividness or clarity of digital images. Can be adjusted from 0 (off) to +3 (maximum).
- GAMMA: Adjusts the brightness of mid-tone colors without changing bright or dark colors. Can be adjusted from -4 (darkest) to +4 (brightest).
- BRIGHTNESS: Adjusts the black level, the darkness of blacks. Can be adjusted from -16 (darkest) to +16 (brightest).
- CONTRAST: Adjusts the white level, the brightness of white and near white colors. Can be adjusted from -16 (darkest) to +16 (brightest).
- SATURATION: Adjusts the amount color saturation. Can be adjusted from -16 (muted colors) to +16 (vivid colors).
- TINT: Adjusts the color balance. Can be adjusted from -16 (darkest) to +16.
- SHARPNESS: Increases the sharpness of the picture at the expense of making noise in the picture more apparent. Can be adjusted from 0 (off) to +3 (maximum).
Select the Normal mode for general viewing. Select the Cinema mode for movie viewing. Select one of the two User modes if you wish to define, save, and use two custom viewing modes.
NOTE: These adjustments only change the picture quality when playing a DVD or other disc. In general, picture adjustments should first be optimized using the TV's controls.
To select a picture mode:
- Press the VFP button on the remote to display the current VFP settings on the TV screen.
-
Press the CURSOR buttons repeatedly to select the desired picture mode: Normal, Cinema, User 1, or User 2.
-
Press the VFP button again to cancel the menu or it will disappear after 10 seconds.
To change picture settings:
- Repeat steps above, selecting either USER 1 or USER 2 modes to modify.
- Use the CURSOR ▲/▼ buttons to select the parameter you wish to adjust. Press the ENTER button. A pop-up window for that parameter appears.

- Press the CURSOR▲buttons to adjust the selected parameter. Changes are saved automatically.
- Press the VFP button again to cancel the menu or it will disappear after 10 seconds.
Virtual Surround Sound D F
In many cases, the RDV-03 will be used with multichannel surround sound systems that take full advantage of Dolby Digital, DTS, or multichannel MPEG sound tracks. However, the RDV-03 provides a special Virtual Surround Sound mode that simulates the added spaciousness of surround sound when connected to a conventional 2-channel audio system or TV monitor.
NOTE: The VSS feature has no effect on the digital output of the RDV-03. When the VSS feature is activated, the Analog Down Mix option in the Setup menu is not available.
To use Virtual Surround Sound:
- During playback, press the VSS button on the remote control. A pop-up menu appears on the TV monitor:

- Press the CURSOR◀buttons to select the type of virtual surround effect on the left side of the pop-up menu from one of four choices:
• ACTION: suitable for sound tracks with a great deal of motion.
- DRAMA: a more subtle effect, suitable for sound tracks with dialog.
• THEATER: a spacious effect, simulating a movie theater experience.
• NONE: no virtual surround effect.
- Press the CURSOR▲/buttons to adjust the intensity of the surround effect on the right side of the pop-up menu. A setting of 1 is the most subtle effect. A setting of 5 is the most exaggerated effect.
- Press the VSS button again to close the menu or it will disappear after 10 seconds.
NOTE: The VSS feature can be activated with other types of discs, but is designed to produce the optimum results with Dolby Digital DVD sound tracks. When the VSS feature is activated, the Analog Down Mix option in the Setup menu is not available.
Playing Specific Selections
The RDV-03 provides several methods for locating specific selections from a disc. The simplest method, using the TRACK1◀◀▶▶▶ buttons, is covered in the Basic Features topic. This section details additional methods, such as finding a selection with the disc menu. Also covered is the use of NUMERIC buttons to specify selections along with advanced features like random, program, and repeat play functions.
Please review the About Discs section of this manual to learn how various types of discs are divided into Titles, Chapters, and Tracks. Finding selections on various disc formats may require slightly different procedures as noted in the following instructions.
Selecting a Title/Group H L P
DVD-Video discs:
This feature is usually available on DVD-Video discs that contain multipleTitles. When playing one of these discs, this feature is available at any time, except when a menu screen is being displayed on the TV screen.
- Press the TITLE/GROUP button on the remote. Information appears on the front panel display.
- Press the TRACK◀◀▶▶I buttons repeatedly to select desired Title
- Or, enter the new Title number using the NUMERIC buttons, For example, to select the 5th Title, press 5. To select the 15th Title, press +10, then 5. To select the 30th Title, press +10 twice, then 10.
NOTE: When a DVD-Video disc is stopped, it is not necessary to press the TITLE/GROUP button first. Entering a number with the NUMERIC buttons will select a Title.
Select Chapters from DVD Menu E F U V
DVD-Video discs usually have scene selection menus that display the selections on the disc on the TV screen.
To select from a disc menu:
- Press the MENU or TOP MENU button on the remote if the disc's menu is not already displayed.
- Press the CURSOR ◀/▶/▲/▼ buttons to highlight the Chapter selection option and press the ENTER button.
- Use the CURSOR/▶/▲/▼ buttons to find the desired scene, then press the ENTER button to begin playback.
Select Tracks from a Video CD/SVCD Menu E H N P S
Some Video CD/SVCD discs have a feature called PBC (Playback Control) which provides a menu system similar to the DVD menus. With a PBC-enabled disc in the player, the PBC menu appears on the TV screen automatically when the PLAY▶ button is pressed.
To use the PBC menus:
- Press the PLAY▶ or TOP MENU button. A display window appears on the TV screen, showing the available selections.
- Press the NUMERIC buttons on the remote to select a scene. To select item 1, press the 1 button. To select item 24, press the +10 button twice and then the 4 button. To select item 10, press the +10 button twice and then the 10 button. Playback of the selected scene begins automatically.
- Press the RETURN button on the remote to display the menu again.
- If NEXT or PREVIOUS appear on screen during playback, use the TRACK◀◀▶◀1 buttons to move to the next or previous scene. This feature may differ on some discs.
To disable the PBC feature, start play by entering the scene number using the NUMERIC buttons instead of pressing PLAY▶. See the next topic for direct access selection using the NUMERIC buttons.
To reactivate the PBC feature: If you have disabled the PBC feature and want to reactivate it, press STOP■ to halt playback, then PLAY▶ to display the PBC menu.
Entering a Chapter or Track Number F H V W
You can directly access a Chapter or Track by entering the number using the NUMERIC buttons on the remote. To select Chapter 2, press the 2 button. To select item 24, press the +10 button twice and then the 4 button. To select item 30, press the +10 button twice and then the 10 button. Playback of the selected scene begins automatically.
On DVD-Video discs, this feature selects a Chapter number when the disc is playing or a Title number when the disc is stopped.
On SVCD and Video CD discs, this feature selects a Track number when the disc is stopped or playing in non-PBC mode.
On Audio CD discs, this feature selects a Track number, whether the disc is playing or stopped.
From the status bar menus:
When playing a DVD-Video disc, you can also directly access a Chapter from the status bar menus:
- Press the ON SCREEN button on the remote twice. A display window appears on the TV screen.
- Press the CURSOR◀/▶ buttons to select the CHAP⇨ field.

-
Enter the new selection number using the NUMERIC buttons, For example, to select the 4th Chapter, press 4. To select the 10th Chapter, press 1, then 0.
-
Press the ENTER button to begin play at the selected point.
Find a Location with Time Search F H V W
You can play a DVD-Video, Video CD, SVCD, or Audio CD disc from a desired location by specifying the elapsed time from the beginning of the current Title using the Time Search function. This direct access feature is available any time a menu screen not displayed on the TV screen.
- Press the ON SCREEN button on the remote twice. The status bar menus appear, varying slightly depending on the type of disc.

-
Press the CURSOR button to select the ⏻ field. Then, press the ENTER button.
-
In the pop-up time window, enter the desired time in HOURS:MINUTES:SECONDS (for DVD-Video) or MINUTES:SECONDS (for SVCD, Video CD, or Audio CD) using the NUMERIC buttons (0 - 9).
DVD-Video example: to start play at 2 hours, 34 minutes, press 2, 3, then 4:
TIME 2:34:_
SVCD, VCD, CD example: To start play at 23 minutes, 40 seconds on an SVCD, VCD, or Audio CD, press 2, 3, then 4:
TIME 23:4_
It is not necessary to enter trailing zeros. They will fill in automatically. If you make an error, use the CURSOR ◀/▶ buttons to move back to the incorrect digit and make changes.
- Press the ENTER button begin play at the selected point.
Repeat Play C F O V W
The Repeat Play feature is available for DVD-Video, Audio CD, Video CD, and SVCD discs. The feature continuously repeats a single selection or all of selections until you stop play.
On a DVD-Video disc, you can repeat a single Chapter or the all of the Chapters in an entire Title. On other discs, repeat a single Track or the entire disc.
Repeat play is not available on Video CD/SVCD discs with the PBC feature active.
To begin Repeat Play:
Press the REPEAT button on the remote control. Each press of the button advances to the next REPEAT mode (ALL, SINGLE SELECTION, OFF) as follows:
DVD-Video:
ALL (TITLE) ⇔ CHAPTER ⇔ OFF
CD and Video CD/SVCD:
ALL ↩ TRACK ↩ OFF
The repeat indicator 📊 appears in the front panel display in the REPEAT ALL mode and 🔒1 appears in the REPEAT SINGLE mode. In addition, an On Screen display shows the current repeat mode on the TV screen.
To stop Repeat play:
Press STOP ■ to stop playback. On a DVD-Video disc, the repeat mode is cancelled entirely. On all other discs, playback stops but repeat mode remains active. To cancel repeat mode, press the REPEAT button until the OFF mode is selected.
From the status bar menus:
You can also activate the REPEAT modes from the status bar menus:
- Press the ON SCREEN button on the remote twice. A display window appears on the TV screen.
- Press the CURSOR◄/► buttons to select the REPEAT field.

- Press the CURSOR▲ buttons to select the REPEAT mode from the drop down menu. The options are same as described above (ALL, SINGLE, OFF) with an added choice (A-B REPEAT).
- Press the ENTER button after selecting a repeat mode. Repeat play of the desired selection begins and continues indefinitely.
For A-B Repeat:
A-B Repeat Play is available for all discs. During playback, you specify a starting point (Point A) and an ending point (Point B). The unit will continuously repeat the marked passage.
To use A-B Repeat, follow the above steps, selecting A-B Repeat mode. Then, press the ENTER button at the starting point where A-B play should begin and press the ENTER button a second time at the stopping point where A-B repeat should end. To cancel A-B repeat, press the ENTER button twice in succession or choose a different repeat mode from the status bar menus.
NOTE: Some discs do not allow the repeat play feature to work.
Random Play F O V W
The Random Play feature is available for Audio CD, Video CD, and SVCD discs. The feature plays all of the tracks on the disc once in random order.
To begin Random Play:
- Press the ON SCREEN button on the remote twice. The status bar menus appear on the TV screen, varying slightly depending on the type of disc.
- Press the CURSOR◀/▶ buttons to select the RND. field.

- Press the ENTER button to begin Random Play on an Audio CD. Random play begins immediately on a SVCD or VCD disc without pressing the ENTER button.
- Press STOP■ to stop play and cancel the Random play feature.
NOTE: Random play is not available on DVD-Video discs.
Program Play F H N O V W
The Program Play feature is available for Audio CD, Video CD, and SVCD discs. The feature allows you to play up to 99 Tracks in any desired order
To begin Program Play:
- Press the ON SCREEN button on the remote twice. The status bar menu appears on the TV screen, varying slightly depending on the type of disc.

- Press the CURSOR◀buttons to select the PROG field. Press the ENTER button. The PROG indicator lights in the front panel display and the Program Table appears on the TV monitor.

- Enter the first Track number in the top box on the right hand column using the NUMERIC buttons on the remote. To enter the 4th Track, press 4. To enter the 24th Track, press +10 twice, then 4. To enter the 30th Track, press +10 twice, then 10. The total time of the stored selections appear in the upper right corner of the Program Table.
- Press the CURSOR▲/▼ buttons to move to the next field and enter the second selection. Continue programming up to 99 selections.
- To change a Track, use the CURSOR▼ buttons to move to the incorrect field and change it. Or, press the CANCEL button on the remote to delete the entry. The remaining Tracks move up one position. Press STOP ■ to clear all entries.
- Press PLAY▶ to begin Program play. The Program Table disappears (except on an Audio CD) and the Tracks are played one time in order. You can check the contents of the Program Table during playback from the status bar, but you cannot edit the program while playing.
- Press STOP■ to stop Program Play. The Program Table reappears. Press STOP■ again to clear the Program Table.
- After clearing the Program Table, press the ON SCREEN button to exit Program play mode.
Playing MP3/WMA discs
The RDV-03 can play MP3 or WMA, from most CD-R and CD-RW discs. These discs, often recorded on computer drives, have a file structure similar to computer discs, with files stored in folders.
Here are few tips when recording your own discs:
- Select "ISO 9660" as the disc format.
- Record MP3 files at a 44.1 kHz sampling rate, using the 128 kbps data transfer rate. Files must have an .MP3 file extension.
- Record WMA files with the copyright feature off with a bit rate of 64 kbps or higher. Files recorded at less than 48 kbps cannot be played. Files must have a .WMA file extension.
- The player does not support "packet writing (UDF file)" discs.
- The player does not support the ID3 tag and WMA tag.
- The player supports discs recorded with multiple sessions.
- Some discs may not play due to disc characteristics or recording conditions.
Selecting files for playback and other features are made using a special Control menu.
Control Menu F N P V
Whenever a disc containing MP3, MPEG or JPEG files is inserted in the RDV-03 or when the PLAY▶ button is pressed, the CONTROL menu appears.
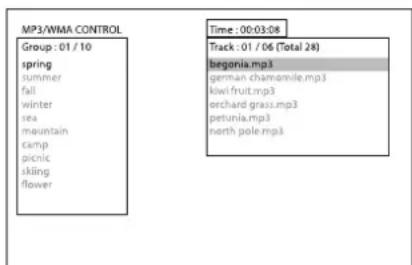
On the left side of the menu is a list of Groups on the disc. When a Group is selected, the list of Tracks in that folder is displayed down the right side of the screen.
To move between the two sides of the screen (Group list, Track list), repeatedly press the CURSOR ◀/▶ until the selection highlight is in the desired area.
To select a Group: Use the CURSOR/▶ buttons to move to the left side of the screen. Then, use the CURSOR▲/▼ buttons to select the desired Group.
To select a Track: Press the TRACK▶▶buttons repeatedly to move the highlight in the right column until the desired Track is selected. Or, use the CURSOR◀/▶ buttons to move to the left side of the screen. Then, use the CURSOR ▲/▼buttons to select the desired Track.
To start playback from the selected Track: Press the ENTER or PLAY▶ buttons.
NOTE: Pressing PLAY▶ during playback begins the current Track from the beginning. High speed forward or reverse play using the SEARCH ◀◀▶▶ buttons (or pressing and holding the TRACK ◀◀▶▶▶ buttons) is not available on MP3/WMA discs.
Direct Selection of Groups and Tracks H L
You can directly select a Group and Tracks within that Group using the NUMERIC buttons on the remote.
To select a Group:
- Press the TITLE/GROUP button.
- Within a few seconds, enter the Group number using the NUMERIC button. To select Group 2, press the 2 button. To select Group 24, press the +10 button twice and then the 4 button. To select Group 30, press the +10 button twice and then the 10 button.
- Playback of the selected Group begins automatically, starting with the first Track in the Group.
- Select a Track within the current Group by entering the Track number without first pressing the TITLE/GROUP button.
Repeat Play C F O V W
When playing an MP3/WMA disc, you can repeat a single Track, all the Tracks in the current Group, or all of the Tracks on the disc.
To begin Repeat Play: Press the REPEAT button on the remote control. Each press of the button advances to the next REPEAT mode as follows:
TRACK → GROUP → DISC → OFF
The repeat indicator 📊 appears in the front panel display in the two REPEAT ALL mode and ⏻1 appears in the REPEAT TRACK mode. In addition, the Control Menu shows the current repeat mode on the TV screen.
To stop Repeat play: Press STOP ■ to stop playback. Playback stops but repeat mode remains active. To cancel repeat mode, press the REPEAT button until the OFF mode is selected.
Repeat using the On-Screen menu: The Repeat mode can also be changed by pressing the ON SCREEN button, using the CURSOR ▲/▼ buttons to select the desired mode in the pop-up menu, and then pressing the ENT button to confirm the change.
Playing JPEG discs
The RDV-03 can display JPEG files from most CD-R and CD-RW discs. These discs, often recorded on computer drives, have a file structure similar to computer discs, with files stored in folders. Here are few tips when creating your own discs:
- Select "ISO 9660" as the disc format.
- Save your files in the baseline JPEG format with a .JPG extension.
- We recommend sizing your images at 640 x 480 pixels. Larger images take longer to display. The maximum horizontal resolution is 2400 pixels.
- The player does not support "packet writing (UDF file)" discs.
- The player supports discs recorded with multiple sessions.
- Some discs may not play due to disc characteristics or recording conditions.
Selecting images for display is done using a special Control menu.
Control Menu F N O P V
Whenever a disc with JPEG files is inserted in the RDV-03 or when the PLAY▶ button is pressed, the CONTROL menu appears.
| JPEG CONTROL | |
| Group: 01 / 10 | File: 01 / 06 (Total 28) |
| spring | begonia.jpg |
| summer | german chamomile.jpg |
| fall | kawi fruit.jpg |
| winter | archyard grass.jpg |
| sea | petunia.jpg |
| mountain | netth pole.jpg |
| camp | |
| pictic | |
| skling | |
| flower | |
On the left side of the menu is a list of folders on the disc. When a folder is selected, the list of files in that folder is displayed down the right side of the screen.
To move between the two sides of the screen (folder list, Track list), repeatedly press the CURSOR until the selection highlight is in the desired area.
To select a Group: Use the CURSOR/▶ buttons to move to the left side of the screen. Then, use the CURSOR▲/Buttons to select the desired folder.
To select a file: Press the TRACK◀◀▶▶ button repeatedly to move the highlight in the right column until the desired file is selected. Or, use the CURSOR ◀/▶ buttons to move to the left side of the screen. Then, use the CURSOR ▲buttons to select the desired file.
To view from the selected file: Press the ENTER or PLAY▶ buttons.
To skip forward or back to the next file: Press the TRACK◀◀▶▶buttons.
To cancel the display and return to the Control Menu, press the STOP ■ or the MENU button on the remote.
Slide Show H L N O BB
Press PLAY▶ to begin a slide show, displaying each JPEG photo for 3 seconds. You can pause the slide show by pressing the PAUSE ▪ button. Stop the slide show and return to the Control Menu by pressing he STOP■ or the MENU button.
You can select the starting point for the slide show from the Control Menu as described previously. Or you can Direct Select a new starting point while the slide show is playing or stopped using the NUMERIC buttons on the remote.
To select a Group:
- Press the TITLE/GROUP button on the remote.
- Within a few seconds, enter the Group number using the NUMERIC button. To select Group 2, press the 2 button. To select Group 24, press the +10 button twice and then the 4 button. To select Group 30, press the +10 button twice and then the 10 button.
- Playback of the selected Group begins automatically, starting with the first Track in the Group.
- Select a File within the current Group by entering the File number without first pressing the TITLE/GROUP button.
REPEAT: Press the REPEAT button while to cycle through REPEAT ALL (all files on disc), REPEAT GROUP (all files in current folder), and REPEAT OFF modes.
Zoom F CC
To zoom a displayed image, press the ZOOM button. Then, press the SEARCH◀◀▶buttons repeatedly to make the image progressively smaller or larger. In zoom mode, the CURSOR◀buttons move the image in any direction to show the desired area of the image.
SETUP
The Choice menu system provides a number of setup and configuration options. The menus are available at any time, except when an MP3/WMA or JPEG disc is inserted. There are four main Choice menus, identified by four icons at the top of the menus:
LANGUAGE: default language options for menus, DVD subtitles, sound tracks.
PICTURE: video options
AUDIO: audio options
OTHERS: miscellaneous settings
Choice Menus F G V
This section provides general instructions for using the Choice menus to configure the RDV-03.
- Press the CHOICE button on the remote. The LANGUAGE Choice menu appears on the TV.

-
Press the CURSOR◀buttons in the remote control to select the desired Choice menu. Each button press changes to the next menu as shown in the row of icons at the top of the menu.
-
Press the CURSOR ▲/▼ buttons to select the item you wish to adjust on the menu. In this example, the ON SCREEN LANGUAGE item is selected on the LAN - GUAGE menu.

- Press the ENTER button and a pop-up window appears with the available settings for the item.

- Press the CURSOR ▲/▼ buttons to select the desired setting from the pop-up window. 7. Press the ENTER button to confirm the new setting.
- Repeat steps 3 through 7 to make additional settings or press the CHOICE button again to exit the menu system and return to normal operation.
The following sections describe the settings on each of the Choice menus.
Language Menu

There are four items on the Language Menu which determine default languages for DVDs and on-screen menus.
Menu Language
Select a language as the preferred language for DVD menus when it is available on the disc.
Options include ENGLISH, SPANISH, FRENCH, CHINESE, GERMAN, ITALIAN, JAPANESE, or other language codes (see the list at the front of this manual). When a disc does not have menus in the selected language, the menus are displayed in the disc's default language.
Audio Language
Select a language as the default audio language for DVD sound tracks when it is available on the disc. You can still select a different language when playing a specific disc.
Options include ENGLISH, SPANISH, FRENCH, CHINESE, GERMAN, ITALIAN, JAPANESE, or other language codes (see the list at the front of this manual). When a disc does not have menus in the selected language, the menus are displayed in the disc's default language.
Subtitle
Select a language as the default subtitle language for DVDs when it is available on the disc. You can also select OFF so that DVDs are played without subtitles as the default. You can still select a different language when playing a specific disc.
Options include ENGLISH, SPANISH, FRENCH, CHINESE, GERMAN, ITALIAN, JAPANESE, or other language codes (see the list at the front of this manual). When a disc does not have menus in the selected language, the menus are displayed in the disc's default language.
On Screen Language
Select the language displayed in the Choice menus and other on-screen status screens displayed by the RDV-03. Options may include ENGLISH, SPANISH, FRENCH, and GERMAN (depending on the version).
NOTE: Some On-Screen messages are shown in English, regardless of the setting.
Picture Menu
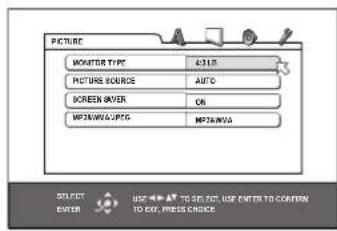
There are four items on the Picture Menu which set various video options for DVD playback.
Monitor Type
There are two types of TVs: standard 4:3 aspect ratio and new wide-screen 16:9 aspect ratio monitors. Use this preference item to configure the video output to match the aspect ratio of your TV.
With a standard aspect ratio TV, you also need to tell the RDV-03 how to adjust wide-screen video images to fit.
• 16:9 NORMAL (Wide Screen Stretch)

natural_image
Close-up of an acoustic guitar fretboard showing six strings and fret lines (no text or symbols)Select this option for a wide-screen TV that always displays a wide-screen image regardless of the aspect ratio of the incoming video signal. The RDV-03 automatically adjusts the aspect ratio to match the wide-screen TV. If you play a normal 4:3 aspect program in this mode, the RDV-03 stretches the picture to fill the wide-screen.
NOTE: Almost all wide-screen TV monitors have their own stretch modes. Usually you would choose the next option below and allow the TV to stretch standard 4:3 aspect ratio programs.
• 16:9 AUTO (Wide Screen)
Select this option for a wide-screen TV that senses and adjusts the aspect ratio. All stretch modes are handled by the TV. 4:3 aspect ratio programs may be displayed with black bars on the sides, depending on the setting of the TV's stretch mode.
NOTE: This is the typical setting for use with wide screen TV monitor with stretch modes.
• 4:3 LB (Letter Box)

natural_image
Close-up of a guitar fretboard and strings (no text or symbols visible)Select this option for a standard aspect ratio TV. 4:3 aspect ratio programs fill the screen. Wide-screen video images are displayed full-width with black letter box masks inserted top and bottom.
• 4:3 PS (Pan/Scan)

natural_image
Close-up of a guitar fretboard showing fret lines and fret position (no text or symbols)Select this option for a standard aspect ratio TV. 4:3 aspect ratio programs fill the screen. Wide-screen video images enlarged to fill the screen vertically, cutting off portions of the left and right sides.
• 4:3 MULTI LB
• 4:3 MULTI PS
• 16:9 MULTI AUTO
• 16:9 MULTI NORMAL
These options are the same as those listed above, except that they are selected for a TV monitor that accepts either an NTSC or a PAL video signal. The RDV-03 sends an NTSC or a PAL signal depending on the format of the disc, regardless of the setting of the back-panel PAL/NTSC switch.
NOTE: The four MULTI settings are only available on the Asia model.
Picture Source
This setting optimizes the Progressive Scan de-interlacing/line doubling for different types of film or video source material.
- VIDEO (Normal): Optimized for video source material without rapid motion. It uses "weave" de-interlacing that preserves as much detail as possible at the expense of jagged lines during fast motion.
- VIDEO (Motion): Optimized for video source material with rapid motion. It uses a "bob" line doubling that reduces jagged lines during fast motion at the expense of fine detail.
- FILM: Activates reverse 3:2 pull down de-interlacing and is optimized for film source images.
- AUTO: Automatically recognizes film or video source material and uses the best possible de-interlacing. This is the default mode and provides the best overall performance for the widest range of DVD material.
Screen Saver
TV Monitors can be easily damaged if a static image is displayed for a long time. The Screen Saver feature automatically darkens the screen when a still image (such as a DVD menu) is displayed for five minutes.
- ON: Activates the automatic screen saver function.
- OFF: Disables the screen saver function.
MP3&WMA/JPEG
Some discs contain both MP3/WMA audio files and JPEG images. This setting determines which of the two is played when a disc contains both types. A disc containing only one type of file can be played regardless of the setting.
- MP3&WMA: Select this option to play MP3 or WMA files.
• JPEG: Select this to play JPEG files
Audio Menu
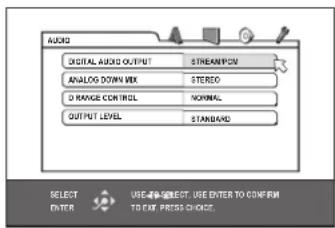
There are five items on the Audio Menu to tailor the audio performance of the system. These adjustments can also be made from the front panel and/or remote control as described in the Comprehensive Setup and Sound Settings sections of the manual.
Digital Audio Output
This setting determines which kind of signals are sent from the RDV-03's coax or optical digital outputs to a digital input on the surround sound receiver or processor from each type of disc. Signals can be sent as a raw digital bitstream that must be decoded by a surround sound processor or as a fully decoded PCM digital bitstream like the output of a CD player.
- PCM ONLY: Use this setting to decode all digital formats (Dolby Digital, DTS, MPEG) to a PCM bitstream. Use this option if your receiver or surround processor does not have Dolby Digital decoding.
- DOLBY DIGITAL/PCM: Use this setting deliver a raw Dolby Digital bitstream, but convert all other digital formats to a PCM bitstream. Use this option if your surround processor has Dolby Digital decoding, but does not have DTS or MPEG decoding.
- STREAM/PCM: Use this setting to deliver a raw unprocessed digital bitstream from all digital sources. Use this option if your surround processor has Dolby Digital, DTS, and MPEG decoding.
NOTE: Digital recordings with 96 kHz or higher sampling rate will be output as a 48kHz digital PCM bitstream. Some DVD-Video discs without copy protection will be output as a 20 bit or 24 bit digital bitstream.
Analog Down Mix
This setting determines how multichannel surround sound recordings (Dolby Digital, DTS, MPEG) are down mixed to two channels for output from the analog audio jacks on the RDV-03. This setting does not alter the digital outputs at all.
- DOLBY SURROUND: Use this setting when connecting the RDV-03 to a surround sound system with Dolby Pro Logic or Pro Logic II decoding.
- STEREO: Use this setting when connecting the RDV-03 to a conventional 2-channel stereo system or TV monitor or if you want to record the audio from a DVD VIDEO disc to MiniDisc, cassette, etc.
NOTE: This setting has no effect when the VSS function is activated. VSS outputs a virtual surround sound signal that simulates surround sound from a two-channel system.
Dynamic Range Control
Dolby Digital recordings are capable of wide dynamic range (the difference between the softest and loudest sounds). In some cases, this may the audio system. In other cases, you may want to reduce the dynamic range when listening at low volume levels.
This setting has no impact on the digital output of the RDV-03. It only changes the dynamic range of the analog signal from the left/right RCA audio outputs.
- WIDE RANGE: full dynamic range; no compression.
- NORMAL: slightly reduced dynamic range, comparable to the signal from a compact disc. Use this setting with a med est audio system.
- TV MODE: more heavily reduced dynamic range, comparable to the signal from a typical VHS Hi-Fi recording. Use this setting when connecting the RDV-03 to a TV monitor's internal speakers or to a modest low-power audio system.
NOTE: The Dynamic Range Compression feature ONLY affects Dolby Digital signals.
Output Level
This setting is used to reduce the output level of the analog audio outputs. It has no impact on the digital output of the RDV-03. It only changes the dynamic range of the analog signal from the left/right RCA audio outputs.
- NORMAL: The standard setting, suitable for use with most audio systems and TV monitors.
- LOW: This setting reduces the level of the analog audio outputs. Select this if the analog signal is overloading the inputs of your stereo system or TV and causing distortion.
Others Menu
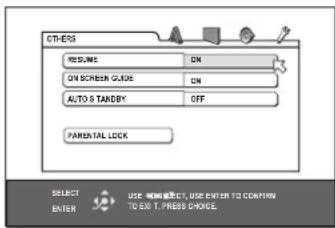
There are miscellaneous convenience items and extra features on the Other Menu.
Resume
The Resume feature stores the current location when DVD playback is stopped; allowing playback to be resumed from that point.
- ON: Select to enable the resume feature. The resume point is stored until the disc drawer is opened.
- OFF: Select to disable the resume feature. Playback will always resume at the beginning of the disc.
- DISC RESUME: Select to store the resume points of the last 30 discs that have been played. The next time any of these discs is inserted, playback resumes at the memorized point.
On-Screen Guide
The DVD player can display icons and status indicators for several features on the TV set. These icons alert you to the availability of multi-view angles, multilingual subtitles, and multilingual sound tracks on a DVD. Status indicators show the play mode, rapid play speed, etc. Generally, these icons are useful; however, you may wish to turn them off when recording a DVD. The ability to display the On-Screen status bar at any time is not affected by this selection.
- ON: Select to enable the Guide feature.
- OFF: Select to disable the Guide feature.
Auto Standby
The RDV-03 can automatically turn off when DVD playback has finished and no additional commands are received for a specified time. This prevents a DVD from returning to a static menu screen if it is left unattended. There are three settings:
- 60: Auto Standby turns off the unit after 60 minutes of inactivity.
• 30: Auto Standby turns off the unit after 40 minutes of inactivity. - OFF: Disables the Auto Standby feature.
Parental Lock
The RDV-03 has a Parental Lock feature to prevent children from watching inappropriate DVD Video discs. The feature relies on ratings systems (specific to each country) that set a rating level for discs starting from material suitable for viewing by children and increasing as the subject matter becomes more inap appropriate. The Parental Lock feature sets the restriction anywhere from Level 1 to Level 8. A disc with a higher numerical rating than the specified level requires entry of a password for playback. Thus, if you specify a Level 4 restriction, discs rated Level 1, 2, 3, or 4 play without a password. Discs rated 5, 6, 7, or 8 require a password.
Setting the Parental Lock
- With playback stopped, select the PAREN TAL LOCK item on the Others Menu. The Parental Lock sub-menu appears.
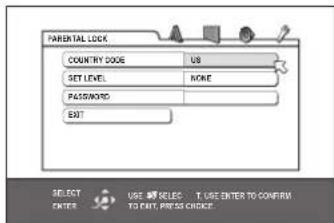
- Select the COUNTRY CODE field on sub-menu and press the ENTER button. A pop-up window appears with the list of country codes (see the front of this manual for a list of codes).

- Press the CURSOR ▲buttons to scroll though the list of country codes and high light a selection.
4 Press the ENTER button. The highlight cursor moves to the SET LEVEL field.

- Press the CURSOR ▲buttons to scroll though the list of setting levels and make a selection. The available options are:
NONE: no restriction
LEVEL 8: the least restrictive
LEVELS 2-7: progressively more restrictive as the number decreases
LEVEL 1: the most restrictive
- Press the ENTER button. The highlight cursor moves to the PASSWORD field.

-
Enter a 4-digit password using the NUMERIC (0-9) buttons on the remote. If you make a mistake, you can reenter a different password. Write down your password for safe keeping!
-
Press the ENTER button. The highlight cursor moves to the EXIT field. Press ENTER again to exit the Parental Lock screen and return to the Others Menu.
To Change Parental Lock Settings
Changing the Parental Lock settings follows the same procedure, except that you must first enter your 4-digit password before making any changes on the Parental Lock sub-menu.
If you enter the wrong password, you cannot proceed. If you enter it wrong more than three times, the cursor jumps to EXIT field.
NOTE: If you forget your password, enter the master password "8888".
Playback with Parental Lock F H V
When you play a disc that has a rating less than or equal to your specified Level, playback proceeds normally. If you attempt to play a disc that is rated above your specified Level, the following display appears on the TV screen asking if you want to temporarily override the Parental Lock and play the disc:

-
To eject the disc, use the CURSOR ▲/▼ buttons on the remote to highlight the NOT RELEASE field, then press the ENTER button. Eject the disc.
-
To play the disc, use the CURSORV buttons to highlight the TEMPORARY RELEASE field, then press the ENTER button.
-
Enter the 4-digit password using the NU MERIC buttons on the remote. If you enter the correct password, the parental lock is temporarily removed and playback begins. If you enter the wrong password three times, playback is prohibited. Eject the disc.
TROUBLESHOOTING
Power
Power does not come on.
- Check that the power plug is inserted securely.
Operation
Region Code Error.
- Make sure the Region Code of the inserted disc matched the code shown on the back of the unit.
Unit will not work or operates er - ratically.
- Microprocessor malfunction due to lightning or static electricity. Turn off the power and unplug the power cord. Connect the power cord again.
- Moisture condensation caused by a sudden change of temperature or humidity. Turn off the power, then turn it on a few hours later.
- If only one specific disc will not play, the disc may be defective.
LOCK appears in the display and the disc tray does not open.
- Pressing the OPEN/CLOSE button while pressing down STO button on the player in standby mode locks the disc tray. Turn the unit off, and press both buttons simultaneously to release the disc tray lock.
Setting cannot be changed in the LANGUAGE Setup menu.
- Stop playback before trying to change the setting.
The audio language and subtitle can not be changed.
- Only one language is recorded on the disc currently being played.
No subtitle is displayed.
- No subtitle is recorded on the disc currently being played.
- Subtitle may not be displayed correctly during A-B repeat play.
Picture
Picture is noisy.
- The player is connected to a VCR directly and the copy guard function is activated. Connect the player directly to the TV.
- With some discs, the picture may be blurred when the PICTURE SOURCE setting is FILM or AUTO. Set to VIDEO (NORMAL) or VIDEO (ACTIVE).
Cannot get correct picture on TV.
- Connect only one type of cable to the jack(s) you want to use on this player, either the VIDEO jack, S-VIDEO jack, COMPONENT VIDEO OUT jacks, or SCART connector (Euro Model).
No picture is displayed on the TV screen or the screen is blurred or divided into two parts.
- Not all high-definition TVs are compatible with the progressive scanning mode. Try turning off progressive scan using the rear panel switch or the remote control P.Scan button.
Unit freezes after activating progressive scan in systems:
- On the Euro model, progressive scan can not be used with the SCART video output. If the unit freezes, turn the power off. Turn the unit on and disable progressive scan. To use progressive scan, make sure that the Component Video outputs are connected, not the SCART outputs.
Audio
DVD-VIDEO playback sound level is lower than TV broadcast.
- Set the D.RANGE CONTROL preference to TV MODE
- Set the analog OUTPUT LEVEL preference to NORMAL.
Analog audio output is distorted.
- Set the OUTPUT LEVEL preference to LOW
MP3/WMA
No sound.
- MP3/WMA disc is recorded with the packet writing (UDF file) and cannot be played.
Files (Tracks) are not played in the recorded order.
- This player plays the files in the alphabetic order. The playback order can vary.
WMA files cannot be played back.
• The file is copy protected.
- The file is recorded with a bit rate under 48 kbps.
JPEG
No picture is played back, or the screen turns black.
- JPEG files must be the baseline JPEG format to play on the RDV-03.
The Choice menus cannot be seen.
- You cannot turn on the preference display when an MP3/WMA or JPEG disc is inserted.
SPECIFICATIONS
General
Readable discs:
DVD VIDEO, DVD-R (Video format), DVD-RW (Video format), SVCD, Video CD, Audio CD (CD-DA), CD-R/RW (CD-DA, SVCD, Video CD, MP3/WMA format, JPEG)
TV monitor compatibility:
Asia version: NTSC or PAL (selectable) Euro version: PAL
Disc compatibility:
Asia version: NTSC or PAL discs Euro version: NTSC or PAL discs
Video mode:
Asia version: interlaced or progressive scan Euro version: interlaced or progressive scan
Other
Power requirements:
Asia model: AC 110-240 V, 50/60 Hz Euro model: AC 230 V, 50 Hz
Power consumption:
12 W (Power On) 2W (Standby)
Weight:
4.0 kg (8.8 lbs)
Dimensions (W x H x D):
435 mm x 92 mm x 316 mm 17.14" x 3.62" x 12.45"
Front Panel Height
(feet removed/for rack mount) 80 mm/3.15"
Video output
COMPONENT (pin jack): Y Output: 1.0 Vp-p (75 ohm) PB/PR Output: 0.7 Vp-p (75 ohm)
VIDEO OUT (pin jack): 1.0 Vp-p (75 ohm)
S-VIDEO OUT (S jack): Y Output: 1.0 Vp-p (75 ohm) C Output: 286 mVp-p (75 ohm)
RGB OUT (Euro model only): Output: 0.7 Vp-p (75 ohm)
Horizontal resolution: 500 Lines
Signal to noise ratio: 65 dB
Audio output
Analog Out (pin jack): 2.0 Vrms (10 k ohms)
Digital Out:
Optical: -21dBm to -15dBm (Peak) Coaxial: 0.5 Vp-p (75 ohm)
Audio characteristics
Frequency response:
CD (at 44.1 kHz): 2 Hz to 20 kHz DVD (at 48 kHz): 2 Hz to 22 kHz DVD (at 96/88.2 kHz): 2 Hz to 44 kHz DVD (at 96 kHz): 2 Hz to 44 kHz
Dynamic range:
16 bit: more than 98 dB 20 bit: more than 100 dB 24 bit: more than 100 dB
Wow and flutter:
Unmeasurable (less than ± 0.002%)
Total harmonic distortion:
16 bit: less than 0.008% 20/24 bit: less than 0.008%
All specifications are accurate at the time of printing. Rotel reserves the right to make improvements without notice.
Rotel and the Rotel HiFi logo are registered trade marks of The Rotel Co, Ltd., Tokyo, Japan.
- RDV-03
- CAUTION
- APPLICABLE FOR USA, CANADA OR WHERE APPROVED FOR THE USAGE
- Important Safety Instructions
- FCC Information
- 1: Controls and Connections
- 3: Analog Audio Connections
- 4: Digital Audio Connections
- Contents
- Important Safety Instructions ....3
- About Rotel 12
- Getting Started 12
- CONNECTIONS 1 3
- Audio Connections ......13
- Video Connections 14
- Other Connections 15
- OVERVIEW 1 6
- On-Screen Display 16
- Front Panel Overview 16
- Remote Control Overview ......17
- USING THE RDV-03 18
- About Rotel
- Getting Started
- Video Features
- Audio Features
- Other Features
- Supplied Accessories
- A Few Precautions
- Placement
- CONNECTIONS
- Cable selection
- Left channel audio: white Right channel audio: red
- Composite video: yellow
- Component video (Y): green Component video (Pb): blue Component video (Pr): red
- Coax digital: orange
- Audio Connections
- Analog Audio Outputs 15
- Digital Outputs 10 14
- Video Connections
- Video Selector Switch Asia Version 18 Euro Version 20
- The Asia version has a switch with three options:
- The Euro version has a switch with three options:
- Connect to a TV with Composite Video Input 11
- Connect to a TV with S-Video Input 16
- Connecting to a TV with Component Video Inputs 17
- Connecting to a TV with a SCART input (Euro model only) 21
- PAL/NTSC switch (Asia model only) 19
- Other Connections
- AC Power Input 13
- EXT REM IN 12
- OVERVIEW
- On-Screen Display
- Status Indicators
- Selection Indicators
- Menu Screens
- Screen Saver
- Front Panel Overview
- STANDBY Button and LED 1
- Front-Panel Display 3
- Disc Drawer 2
- OPN/CLOSE Button 5
- Remote Sensor 4
- PLAY Button 6
- STOP Button 7
- PAUSE Button 8
- TRACK Buttons 9
- Remote Control Overview
- Remote Control Batteries
- Using the Remote
- POWER Button Q
- OPN/CLOSE Button R
- PLAY/SELECT Button N
- STOP/CLEAR Button
- PAUSE Button BB
- TRACK Buttons P
- SEARCH/SLOW Buttons CC
- Numeric Buttons H
- MENU Button U
- TOP MENU Button E
- CURSOR Buttons F
- ENTER Button V
- CHOICE Button G
- DISP Button B
- ANGLE Button
- SUBTITLE Button J
- AUDIO Button Y
- ZOOM Button AA
- REPEAT Button G
- VFP/P.SCAN Button Z
- TITLE/GROUP Button L
- RETURN Button S
- ON-SCREEN Button W
- VSS Button D
- DIM Button T
- CANCEL Button X
- REPLAY Button M
- PAL/NTS button A PAGE Button K
- USING THE RDV-03
- Initial Setup
- About Discs
- Disc Formats
- DVD Region Codes
- Disc Structure
- Digital Audio Formats
- Basic Features
- Power On/Off 1 Q
- Changing Display Brightness T
- Inserting a Disc 2 5 R
- Playing a Disc 6 N
- Stopping Disc Playback 70
- Pause/Still Frame 8 BB
- Skip forward/back 9 P
- High Speed Play CC
- Slow Speed Play 8 cc
- Front Panel Display Options 3 B
- On-Screen Display Status Bars W
- Time Display Options v w
- Advanced Features
- Progressive Scan Z
- Zoom F AA
- Selecting Scene Angles F I V
- From the status bar:
- Selecting Subtitles F J V
- Selecting Audio Tracks F V Y
- Setting Video Fine Picture Adjustments (VFP) F V Z
- To select a picture mode:
- To change picture settings:
- Virtual Surround Sound D F
- To use Virtual Surround Sound:
- Playing Specific Selections
- Selecting a Title/Group H L P
- DVD-Video discs:
- Select Chapters from DVD Menu E F U V
- To select from a disc menu:
- Select Tracks from a Video CD/SVCD Menu E H N P S
- To use the PBC menus:
- Entering a Chapter or Track Number F H V W
- From the status bar menus:
- Find a Location with Time Search F H V W
- Repeat Play C F O V W
- To begin Repeat Play:
- DVD-Video:
- CD and Video CD/SVCD:
- To stop Repeat play:
- For A-B Repeat:
- Random Play F O V W
- To begin Random Play:
- Program Play F H N O V W
- To begin Program Play:
- Playing MP3/WMA discs
- Control Menu F N P V
- To start playback from the selected Track: Press the ENTER or PLAY▶ buttons.
- Direct Selection of Groups and Tracks H L
- To select a Group:
- Playing JPEG discs
- Control Menu F N O P V
- Slide Show H L N O BB
- Zoom F CC
- SETUP
- Choice Menus F G V
- Language Menu
- Menu Language
- Audio Language
- Subtitle
- On Screen Language
- Picture Menu
- Monitor Type
- • 16:9 AUTO (Wide Screen)
- • 4:3 LB (Letter Box)
- • 4:3 PS (Pan/Scan)
- Picture Source
- MP3&WMA/JPEG
- Audio Menu
- Digital Audio Output
- Analog Down Mix
- Dynamic Range Control
- Output Level
- Others Menu
- Resume
- On-Screen Guide
- Auto Standby
- Parental Lock
- Setting the Parental Lock
- To Change Parental Lock Settings
- Playback with Parental Lock F H V
- TROUBLESHOOTING
- Power
- Power does not come on.
- Operation
- Region Code Error.
- Unit will not work or operates er - ratically.
- LOCK appears in the display and the disc tray does not open.
- Setting cannot be changed in the LANGUAGE Setup menu.
- The audio language and subtitle can not be changed.
- No subtitle is displayed.
- Picture
- Picture is noisy.
- Cannot get correct picture on TV.
- No picture is displayed on the TV screen or the screen is blurred or divided into two parts.
- Unit freezes after activating progressive scan in systems:
- Audio
- DVD-VIDEO playback sound level is lower than TV broadcast.
- Analog audio output is distorted.
- MP3/WMA
- No sound.
- Files (Tracks) are not played in the recorded order.
- WMA files cannot be played back.
- JPEG
- No picture is played back, or the screen turns black.
- The Choice menus cannot be seen.
- SPECIFICATIONS
- General
- Readable discs:
- TV monitor compatibility:
- Disc compatibility:
- Video mode:
- Other
- Power requirements:
- Power consumption:
- Weight:
- Dimensions (W x H x D):
- Front Panel Height
- Video output
- VIDEO OUT (pin jack): 1.0 Vp-p (75 ohm)
- RGB OUT (Euro model only): Output: 0.7 Vp-p (75 ohm)
- Audio output
- Digital Out:
- Audio characteristics
- Frequency response:
- Dynamic range:
- Wow and flutter:
- Total harmonic distortion:
Brand : ROTEL
Model : RDV-03
Category : DVD player