Harmony V100 - Processor TC HELICON - Free user manual and instructions
Find the device manual for free Harmony V100 TC HELICON in PDF.

| Product Type | Vocal and guitar processor with harmony |
| Brand | TC Helicon |
| Model | Harmony V100 |
| Power Supply | Mains via provided cord, on/off switch |
| Phantom Power | Switchable for microphone (48V) |
| Inputs | 1x MIC IN (XLR/6.35mm Jack), 1x GUITAR IN (6.35mm Jack), 1x AUX INPUT (3.5mm stereo mini-jack) |
| Outputs | 2x XLR (MIC/LEFT OUT, GUITAR/RIGHT OUT), 1x PHONES (3.5mm stereo mini-jack) |
| USB | Type B, for recording and firmware update |
| Footswitch | Included, 4 configurable switches |
| Vocal Effects | Harmony (8 types), Reverb (Room/Club/Hall), Echo (Tape/Digital/Slap), Adaptive Tone, Chromatic Correction |
| Guitar Effects | Chorus (Detune/Silk/Corona), Reverb, Echo, Bodyrez (3 modes), 3-band EQ |
| Looper | Built-in, with recording, overdub, undo/redo, level adjustment |
| Tuner | Built-in chromatic tuner for guitar, with LED |
| Anti-feedback | Yes, for microphone and guitar |
| Maintenance | Clean with a dry cloth, do not expose to humidity |
| Safety | Do not open, repair by qualified personnel, unplug during storms |
| Warranty | Limited warranty, see Music Tribe website |
| Firmware Update | Via VoiceSupport application (Windows/Mac) |
Frequently Asked Questions - Harmony V100 TC HELICON
User questions about Harmony V100 TC HELICON
0 question about this device. Answer the ones you know or ask your own.
Ask a new question about this device
Download the instructions for your Processor in PDF format for free! Find your manual Harmony V100 - TC HELICON and take your electronic device back in hand. On this page are published all the documents necessary for the use of your device. Harmony V100 by TC HELICON.
USER MANUAL Harmony V100 TC HELICON
natural_image
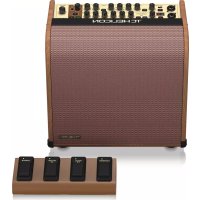
Illustration of a TCHELICON audio amplifier with control buttons and external components (no text or symbols on the device body)HARMONY V100/V60
100/60 Watt 2-Channel Acoustic Amplifier with Vocal Processing, Looper, Tannoy Dual Concentric Speaker, Top Firing Tweeter and 4-Button Footswitch
2 | HAWON' V100' 560 Quick Start Guide 3
EN
ES
Important Safety Instructions
Terminals marked with this symbol carry electrical current of sufficient magnitude to constitute risk of electric shock. the only high quality professional speaker tables with 15" TS or twist locking plugs pre installed. All other installation or modification should be performed only by qualified personnel.
This symbol, wherever it appears, alerts you to the presence of uninsulated dangerous voltage inside the enclosure - voltage that may be sufficient to constitute a risk of shock.
This symbol, wherever it appears, alerts you to important operating and maintenance instructions in the accompanying literature. Please read the manual.
Caution To reduce the risk of electric shock, do not remove the trip over (or the rear section). No user serviceable parts include. Refer servicing to qualified personnel.
Caution To reduce the risk of fire or electric shock, do not expose this appliance to rain and moisture. The apparatus shall not be exposed to dripping or splashing liquids and no objects filled with liquids, such as wares, shall be plated on the apparatus.
Caution These service instructions are for use by qualified service personnel only. To reduce the risk of electric shock do not perform any servicing other than that contained in the operation instructions. Repairs have to be performed by qualified service personnel.
- Read these instructions.
- Keep these instructions
- Head all warnings.
- Followall instructions.
- Do not use this apparatus near water.
- Clean only with dry cloth
- Do not block any ventilation openings install in
accordance with the manufacturer's instructions -
Do not install near any heat sources such as radiators, heat registers, stores, or other apparatus (including amplifiers) that produce heat.
-
Do not defeat the safety purpose of the polarized or grounding-type plug. A polarized plug has two blades with one wider than the other. A grounding-type plug has two blades and a third grounding proog. The wide blade or the third proog are provided for your safety. If the provided plug does not fit into your outlet, consult an electrician for replacement of the obese outlet.
-
Protect the power cord from being walked on or pinched particularly at plugs, convenience receptacles, and the point where they eat from the apparatus.
-
Use only attachments/accessories specified by the manufacturer.

- Use only with the cart, stand, tripod, bracket, or table specified by the manufacturer, or sold with the apparatus. When a cart is used, use caution when moving the cart/apparatus combination to avoid
injury from tip-over.
-
Unplug this apparatus during lightning storms or when unused for long periods of time.
-
Refer all servicing to qualified service personnel. Servicing is required when the apparatus has been damaged in any way, such as power supply cord or plug in damaged, liquid has been spilled or objects have fallen into the apparatus, the apparatus has been exposed to rain or moisture, does not operate normally, or has been dropped.
-
The apparatus shall be connected to a MANG socket outlet with a protective earthing connection.
-
Where the MAINS plug or an appliance coupler is used as the disconnect device, the disconnect device shall remain nearly operable.

- Correct disposal of this product: This symbol indicates that this product must not be disposed of with household waste, according to the WEE Directive (2012/19/EU) and
should be taken to a collection center formed for the recycling of waste electrical and electronic equipment (EEL). The misunderstanding of this type of waste could have a possible negative impact on the environment and human health due to potentially hazardous substances that are generally associated with EEL, at the same time, your corporation in the correct disposal of this product will contribute to the efficient use of natural resources. For more information about where you can take your waste equipment for recycling, please contact your local city office, or your household waste collection service. 18. Do not install in a confined space, such as a book case or similar unit.
-
Do not place naked flame sources, such as lighted candles, on the apparatus.
-
Please keep the environmental aspects of battery disposal in mind. Batteries must be disposed-of at a battery collection point.
-
Use this apparatus in tropical and/or moderate climates.
LEGAL DISCLAIMER
Music Tribe accepts liability for any loss which may be suffered by any person who relies either wholly or in part upon any description, photograph, or statements contained herein. Technical specifications, appearances and other information are subject to change without notice. All trademarks are the property of their respective owners: Midas, Klark Technik, Lab Gruppen, Lake, Tannoy, Torboound, TC Electronic, TC Helkun, Beldinger, Bugera, Hurstone and Conlaudio are trademarks or registered trademarks of Music Tribe Global Brands Ltd. © Music Tribe Global Brands Ltd. 2020. All rights reserved.
LIMITED WARRANTY
For the applicable warranty terms and conditions and additional information regarding Music Tribe's Limited Warranty, please see complete details online at musictribe.com/warranty.
ES
BESCHRÄNKTE GARANTIE
HARMONY V100/V60 Hook-up
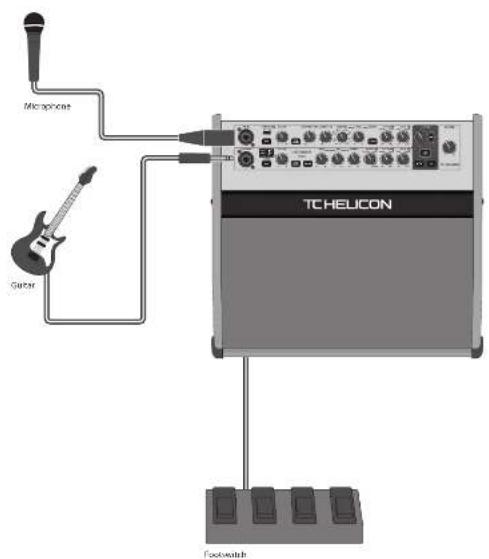
EN Step 1: Hook-Up
ES Paso 1: Conexión
FR Etape 1 : Connexions
DE Schritt 1: Verkabelung
PT Passo 1: Conexões
IT Passo 1: Allacciare
Drask system Indemapore malada seprinacose/ulamata Indemapore maladose Biloxin - Indemopore Indemapore Malon/ulamata Inermoplasmolase

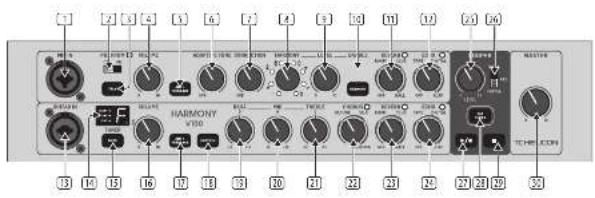
HARMONY V100/V60 Controls
EN Step 2: Controls
4
"Note: Controls marked" below are capable of being operated by the footswitch. See the footswitch section for more details
Microphone Section
(1) MIC IN - this input accepts XLR and 34+ TRS connections from microphone as
PHANTOM - if your microphone requires phantom power, select OK. Caution: some microphones can be damaged by phantom power.
① TALK® - bypasses all DSP (except Adaptive Tone), when unprocessed speech is required.
(4) VOLUME - adjust the microphone volume level.
☑ ANTI-FEEDBACK - automatically silences feedback from the mlc. This is illuminated green when pressed and blue when anti-feedback is working.
3 ADAPTIVE TONE - offers automatic EQ and dynamic processing, so your vocals sound studio-produced. In the OFF position, all tone algorithms are disabled including compression, de-essing, gate, and adaptive EQ. When this knob is turned clockwise, then compression, de-essing and gate are enabled, and adaptive EQ can be increased up to full at the maximum setting
(7) CORRECTION - enables chromatic pitch correction, that varies from OFF (no correction) to maximum effect.
6 HARMONY® - select from 8 Vocal Harmony effects:
Unison (doubling)
High
high and high low and high
Lower and higher
Low
love
Bass and high
④ LEVEL - adjust the Harmony effect level.
(13) ENABLE – enable/disable Harmony.
(1) REVERB® - adjust the reverb effect from OFF (no reverb) through various venue sizes from ROOM, CLUB, and HALL.
(12) ECHO ^® - adjust the echo effect from OFF (no effect) through TAPE, DIGITAL, and SLAP.
Guitar Section
(9) GUITAR IN - this input accepts XLR and 34" TRS connections from guitars and instruments.
TUNER - shows the tuning of the incoming guitar signals A-G, with LEDs for sharp, tuned, and flat.
MUTE™ - mates the guitar input when tuning or taking a break.
[13] VOLUME - adjust the guitar level.
12 ANTI-FEEDBACK - automatically silences feedback from the guitar. This is illuminated green when pressed and blue when anti-feedback is engaged.
BODYREZ - restores natural tone when using guitars with piezo pickups. There are four selections:
CFF: (no effect)
Rest [Bodyrez 1]
Blue [Bodyrez 2]
Green: (Body)
BASS-adjust the level of the bass frequency range +/- 12 dB.
X: MID - adjust the level of the mid frequency range +/- 12 dB.
TREBLE adjust the level of the higher frequency range +/- 12 dB.
[2] CHORUS ^4 - adjust the chorus effect from OFF (no chorus) through various styles: DETUNE, SILK, and CORONA.
21 REVERB ^X - adjust the reverb effect from OFF (no reverb) through various venue sizes from ROOM, CLUB, and HALL
[N]: ECHO ^ - adjust the echo effect from OFF (no echo) through TAPE, DIGITAL, and SLAP.
Looper Section
[2] LEVEL - adjust the playback level of the currently-recorded loop, relative to the performance.
☑ VOICE/ALL/GUITAR - select which source can be looped: just vocals, vocals and guitar, or just guitar.
PLAY/RECORD® play the current loop and this switch is illuminated in green, or in red when recording or dubbing.
TAP TEMPO ^® - sets the delay tempo, and flashes the current tempo. If a loop is recorded, the tempo is derived from the loop length. Holding this switch will toggle between tempo derivation from the loop length and manually tapped.
[8] STOP^ - stop the loop playback or recording.
Master Section
MASTER - adjust the main volume. Turn this down when making any connections and when turning the unit on or off.
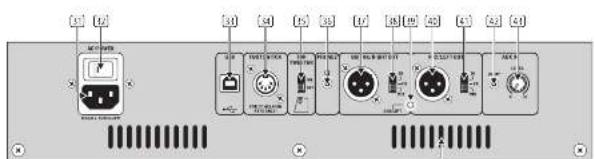
Rear Panel
AC INPUT - securely connect the supplied power cord here. Caution: Use only the supplied power cord.
[3] AC POWER SWITCH - use this switch to turn the unit on or off. This switch shall remain readily operable.
USB - connect the unit to a computer to allow recording and playback to and from the computer.
☒ FOOTSWITCH - connect the supplied footswitch to allow foot control of many features. Use only the supplied footswitch.
TOP TWEETER - turn the internal top tweeter on or off.
☑ PHONES - connect this stereo 3.5 mm TRS connection to headphones. Caution: to prevent hearing damage, turn down the Master volume level before connecting and putting on headphones.
[2] GUITAR/RIGHT OUT - this male XLR connector outputs the guitar/right main audio output to the PA system.
[18] DI/FX/MIX SWITCH - allows selection between unprocessed guitar DI, guitar with processing, or full mix right channel for the guitar, right audio output.
[3] GROUND LIFT - this lifts the audio ground from the left and right XLR outputs. This is useful in situations where a ground loop hum can be reduced. It does not affect the power supply safety ground.
MIC/LEFT OUT - this male XLR connector outputs the microphone/left main audio output to the PA system.
DI/FX/MIX SWITCH - allows selection between the unprocessed mic DI, mic with processing, or full mix left channel for the mic/left audio output.
E AUX INPUT - this 3.5 mm TRS input allows the use of an auxiliary external source such as an MP3 player, or a computer's headphone output.
41 AUX LEVEL - this adjusts the input level of the incoming auxiliary audio source.
(4) VENTILATION SLOTS – these allow ventilation of the main power amplifiers and power supply. Caution: Always keep the vent, clear from obstruction, and allow adequate airflow to prevent the unit overheating.
12 | LAMMON* V100* 60 Quick Star Guide 13
HARMONY V100/V60 Controls
EN Step 2: Controls
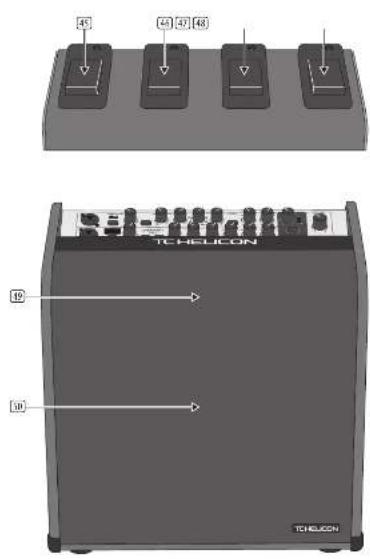
Footswitches
The footswitch is customizable, and any switch can be easily set to control any available function (see Getting Started for more details). The default settings are marked on the unit:
HARMONY - enable/disable vocal Harmony.
(4) VOCAL FX - enable/disable vocal REVERB and ECHO.
GUITAR FX - enable/disable guitar CHORUS, REVERB and ECHO.
(43) LOOPER - control the Looper functions.
Loudspeakers
[3] Top Tweeter location
④ Dual-Concentric Loudspeaker location
HARMONY V100/V60 Controles
ES Paso 2: Controles
HARMONY V100/V60 Réglages
HARMONY V100/V60 Controles
PT Passo 2: Controles
HARMONY V100/V60 Controlli
HARMONY V100/V60 Getting Started
EN Step 3: Getting Started
OVERVIEW
This "getting started" guide will help you set up the unit and briefly introduce its capabilities.
CONNECTION
To connect the unit to your system, please consult the connection examples shown earlier in this document.
SOFTWARE SETUP
The USB connection allows your unit to send 2 channels of audio to your computer for recording onto a DAW for example, and to receive 2 channels of computer audio playback.
The unit requires a Windows driver to be installed onto PC computers. No driver is required for connections to Mac OS computers.
Please check our website for the latest version of the Windows driver. Follow the installation instructions supplied with the driver
With the unit connected to your computer via the USB cord, and powered on, it should be recognized as a USB audio device.
Choose the unit as an input device for recording, and as an output device for playback. The USB computer connection is only required to update the firmware, or to playback from the computer and/or to record onto the computer.
The recording to the computer will include all the processing by the Harmony V50/V100 unit. The playback from your computer is not affected by the processing, just the Master Volume control.
HARDWARE SETUP
Make all the connections in your system, including the footswitch.
For a simple system, connect a microphone to MIC IN, a guitar to GUITAR IN.
Check if your microphone requires Phantom Power. Be careful, as some microphones may be damaged by Phantom Power.
Turn down the Mic input and Guitar input volume controls, and the Master Volume.
Connect AC power to the unit using the supplied power cord only. Ensure your external sound system (if used) is turned down.
Footswitch operation
Assign a footswitch by holding it down while turning/pressing the desired control.
Some controls can be also selected as a group, for example, while holding down the footswitch press.
REVERB and ECHO
CHORUS, REVERB and ECHO
MUTE and TALK
Notes:
HARMONY: Hold down any footswitch, press HARMONY, or rotate selector, and the footswitch will enable/disable that voicing.
ECHO: After a footswitch is assigned, adjust the TAPE and DIGITAL repeat rates at any time, by holding down the footswitch, and then tapping at the desired tempo.
MICROPHONE SECTION
The following steps will help you get started making vocals.
-
Turn on the rear panel power switch.
-
Turn up the VOLUME a small amount and talk or sing into the microphone. Adjust the MASTER volume to a reasonable level.
-
Press ANTI-FEEDBACK to reduce the chance of vocal feedback.
-
Press TALK if you want to listen to your voice with no processing added.
-
With the HARMONY switch off, and the REVERB, and ECHO controls both in the OFF position, listen to the effect of the ADAPTIVE TONE and CORRECTION controls on your vocals.
Vocal Harmony
-
HARMONY can be engaged by pressing the HARMONY ENABLE switch or the HARMONY footswitch. Turn up the Harmony LEVEL control and listen to the effect on your vocals of the eight different vocal harmonies.
-
Note: If the HARMONY switch is held down during power-up, then any footswitches used for HARMONY will become momentary switches.
Vocal Reverb
- Adjust the REVERB control to add reverb to your vocals, with increasing amounts of delay time and venue size simulation from OFF (no reverb) to ROOM, CLUB, and HALL. Listen to its effect on your vocals.
Vocal Echo
-
Adjust the ECHO control to add echo to your vocals, from OFF (no echo) and TAPE, DIGITAL, and SLAP styles. Listen to its effect on your vocals.
-
The repeat rates for the TAPE and DIGITAL styles can be adjusted by pressing the TAP TEMPO switch. It flashes at the current tempo.
GUITAR SECTION
The following steps will help you get started using your guitar.
-
Tum on the rear panel power switch of the unit.
-
Turn up the VOLUME a small amount and play the guitar. Adjust the MASTER volume to a reasonable level.
Guitar Tuning
-
Press the MUTE switch to prevent the guitar being heard while tuning.
-
Carefully tune your guitar using the display of the built-in chromatic tuner.
-
When tuning is complete, disengage the MUTE switch.
-
Press the ANTI-FEEDBACK switch to reduce the chance of feedback.
-
If your guitar uses a Piezo pickup, press the BODYREZ switch to help restore the natural tone. There are four selections, each with its own LED color:
OFF: {no effect}
Red: (Bodgrez 1)
Blue: (Bodyrez 2)
Green: (Bodyrez 3)
- Adjust the BASS, MID, and TREBLE controls to suit. Although the level range is quite large, try to use small adjustments to the EO, using out more than boost.
Guitar Chorus
- Adjust the CHORUS control to add chorus to your guitar, with various styles from OFF (no chorus), DETUNE, SILK, and CORONA. Listen to its effect on your guitar.
Guitar Reverb
- Adjust the REVERB control to add reverb to your guitar, with increasing amounts of delay time and venue size simulation from OFF (no reverb) to ROOM, and CLUB, to HALL. Listen to its effect on your guitar.
Guitar Echo
-
Adjust the ECHO control to add echo to the guitar, from OFF (no echo) and TAPE, DIGITAL, and SLAP styles. Listen to its effect on the guitar.
-
The repeat rates for the TAPE and DIGITAL styles can be adjusted by pressing the TAP TEMPO switch at the desired tempo.
LOOPER SECTION
-
Use the MIC/ALL/GUITAR switch to select the source to LOOP, either microphone, microphone and guitar, or guitar.
-
By default, the LOOPER footswitch will operate the PLAY/RECORD switch.
-
Note: The PLAY/RECORD switch will turn red during initial recording or overdubbing, as will the footswitch LED. During playback, they will be green.
-
The TAP TEMPO switch is used to set the tempo, and it flashes at the current tempo. This allows you to synchronise the ECHO delay time to prevent the echoes from being out of step with your current song.
The tempo can also be changed using the footswitch as follows: press and hold either the VOCAL FX or GUITAR FX footswitch until its LED begins flashing at the current tempo. Tap the footswitch at the desired tempo. After a few seconds of inactivity, the footswitch will return to normal operation.
When a loop is created, the tempo is automatically derived from the loop length. Holding the TAP TEMPO switch (on the unit only) will disable the tempo derivation from the loop length for future recording and overdubs. Hold it again to return to tempo derivation from loop length.
Note: If both ECHO controls are further clockwise than the "DIGITAL" setting, then the TAP TEMPO switch will be off (not needed for SLAP ECHO settings).
-
Begin playing and/or singing the sequence you would like to loop.
-
At an appropriate time while playing, press PLAY/RECORD or the assigned footswitch to begin recording.
-
When finished, press PLAY/RECORD to stop the recording. The recorded loop will begin playing.
-
If you are happy with the loop, press PLAY/RECORD twice to stop the playback, or press the STOP switch once. The STOP switch will turn red, and the footswitch LED will flash green as a reminder that a loop is recorded.
-
Press PLAY/RECORD once to play the loop at any time, and then twice to stop.
-
Use the LOOPER LEVEL control to adjust the loop playback level, compared to live play
Overdubbing
-
While playing a loop, begin playing and/or singing the sequence you would like to add to the loop.
-
At the appropriate time, press the PLAY RECORD to enter overdubbing mode and record your additional track on top of the current loop (not taking its place, but adding to it).
-
Press PLAY/RECORD once to stop the overdub recording, and it will begin playback.
-
Repeat steps 1 to 3 to add more overdubs if required.
Undo/Redo
-
While playing back, you can hold down PLAY! RECORD to mute the latest overdub (an UNDD).
-
Hold it down again to un-mute the latest overdub (a RED0). (This can be used to create interesting musical performances, not just to remove a poor overdub.)
-
Press PLAY;RECORD twice to stop playback, or press the STOP switch once. Press the STOP switch again to erase the loop if required.
-
To erase a loop using PLAY/RECORD, play the loop, and then press the footswitch twice, but make sure to hold down the second press.
LOOPER OPERATION
(with LOOPER Footswitch assigned to PLAY/RECORD)
| Record | Tap the LOOPER footswitch once |
| Switch to playback Tap the LOOPER footswitch again | |
| Undo/Redo last recording | Press and hold the LOOPER footswitch |
| Stop Double-top the | LOOPER footswitch or Tap Stop |
| Stop and clear the loop | Double-top and hold the LOOPER footswitch or Tap and hold Stop |
Resume playback Tap the LOOP
tootswitch again
FIRMWARE UPDATE
Firmware updates are available through VoiceSupport. For PC, check our website for the latest Windows driver then download and install VoiceSupport 2.0 for Microsoft Windows or Mac. Connect the Harmony V60-V100 via USB then run VoiceSupport to see if your firmware is up to date. The Harmony LEDs cycle during the firmware update. Do not turn off the unit until the firmware update is successful.
| Audio inputs | |
| Carrier input %" TRS balanced/XLR corncio | |
| Input impedance: 2 MΩ balanced*1 MΩ unbalanced | |
| Microphone input % TRS balanced*20.8 corncio | |
| Input impedance: 3UR: 2.9x1 balanced: 5*1 | CMQ TRS balanced*5% TS unbalanced |
| Max Input: 3.5 mm TRS stereo | |
| Input impedance: 19x2 | |
| Audio outputs | |
| Gustaining out and Clockoff out: ALR balance, female | |
| Output impedance: 400 Ω | |
| Flux output level | 0 dBu |
| Switches | DL, FL, FLX |
| Headphones out | 3.5 mm TRS stereo |
| Output impedance | 10 Ω |
| Max output level | 8 dBu |
| Total section controls | |
| Kinds | Volume (1 to 10) |
| Adaptive tone (off to max) | |
| Correction roll to mask | |
| Harmony selector, 8 precision | |
| Harmony level (10 to 10) | |
| Reverse (off, press, club, half) | |
| Echo (off, tape, digital, tape) | |
| Switches | Phantom on/off |
| Talk on/off | |
| Anti-feedback on/off | |
| Harmony enabled/stable | |
| LEDs | Phantom tired; Reverse (green); Echo (green); Harmony voice (green, & selections) |
| Backlit switches | Talk (green); anti-feedback (green, or blue when operating); Harmony (green) |
| Suitar section controls | |
| Kinds | Volume (0 to 10) |
| Boss, shooting (-12 to 12 dB) | |
| Mid, peaking (12 to 12 dB) | |
| Trestle, peaking (12 to 12 dB) | |
| Chorus (picture, silk, corona) | |
| Reverse (off, press, club, half) | |
| Echo (off, tape, digital, tape) | |
| Switches | Mute sn/off |
| Anti feedback on/off | |
| Bodyzex-off, Bodyzex-1, Bodyzex-2, Bodyzex-3 | |
| Harmony enabled/stable | |
| Display | Turner note II segment, red |
| LEDS | Chrome (green), reverse (green), echo (green) |
| Finger shamp/loch-in-tune red | |
| Backlit switches | Mute (red); anti-feedback (green, or blue when operating); bodyzex (red, green, blue selections) |
Harmony ¥100 Harmony ¥60
| Footswitchable controls | ||
| Microphone Section | Talk on/off | |
| Harmony on/off at the current setting | ||
| Rewerb on/off | ||
| Echo on/off | ||
| Guitar section | Blute on/off | |
| Chronic on/off | ||
| Rewerb on/off | ||
| Echo on/off | ||
| Harmony on/off at a selected setting | ||
| Looper section | Tap Tempa | |
| Play/record | ||
| Stop | ||
| LEDs | Green when footswitch engaged, red when recording | |
| Looper controls | ||
| Kinds | Level (9 to 10) | |
| Switches | Voice/Aff/guitar | |
| Tap Tempa | ||
| Play/record | ||
| Stop | ||
| Basis switches | Tap tempa/flash red at tempat, play/record (green play, red record), stop red? | |
| Rear panel section | ||
| Connections | AC input EC | |
| USB E-type | ||
| Foot switch, 5-pin DIN (for FSI only) | ||
| Guitar/night out, ALR male | ||
| Mix/left out, ALR male | ||
| Abit in, 3.5 mm | ||
| Switches | AC power on/off toggle | |
| Top tweeter on/off | ||
| Guitar/night out, DIF/AMR selector | ||
| Mix/left out, DIF/AMR selector | ||
| Ground/Bit, XLR audio | ||
| Kinds | Abit input level (10-10) | |
| USB | ||
| Type | Class compliant USB 2.5, type 8 | |
| Supported Operating Systems | Windows 7 or higherMac OS X 10.6 & or higher | |
| Windows driver | Required driver is supplied | |
| Audio Input and output | 2 channels, 24 bit, 4bit/ke | |
| Amplifier | ||
| Output power | 110 V | 50 V |
| Type | Class 5 | |
| Protection | Short circuit, thermal | |
Harmony V100 Harmony V60
Loudspeakers
| Type 10" dual concentric, Tanney 8" dual concentric, Tanney | ||
| Impedance 4 Ω | ||
| Power handling 400'W | 240 V | |
| Top twister (switchable on toll) | 1" | |
| Impedance 4 Ω | ||
| Overall frequency response | 80 Hz: 20 kHz (+/- 3 dB) 45 Hz: 24 kHz (- 10 dB) | 90 Hz: 20 kHz (+/- 3 dB) 60 Hz: 24 kHz (- 10 dB) |
| Maximum SPL | 118 db SPL | 115 db SPL |
Footswitch (supplied) (any switch can operate any footswitchable control)
| Type | FST4 |
| Switches | Harmony on/off (with LED) |
| Vocal FX on/off (with LED) | |
| Gear FX on/off (with LED) | |
| Looper on/off (with LED) |
Power Supply
| Mains Voltage | 100-240 V~50/60 Hz | |
| Power consumption | 40 W | 35 W |
| Mains connection | Standard IEC receptacle | |
| Power Switch | Rocker, rear panel | |
Dimensions/Weight
| Dimensions (H x W x D) | 377 x 408 x 311 mm (14.8 x 16.1 x 12.2") | 333 x 383 x 287 mm (13.1 x 15.1 x 11.3") |
| Weight | 13.3 kg (29.3 lbs) | 11.2 kg (24.6 lbs) |
Other important information

Important information

Informations importantes

Responsible Party Name: Music Tribe Commercial NV Inc.
Address: 5270 Procyon Street
Las Vegas, NV 89118
USA
Phone Number: +1 702 800 8290
HARMONY V100/V60
complies with the FCC rules as mentioned in the following paragraph:
This equipment has been tested and found to comply with the limits for a Class B digital device, pursuant to part 15 of the FCC Rules. These limits are designed to provide reasonable protection against harmful interference in a residential institution. This equipment is not yet clearly labeled.
Installation. This equipment generally, uses and can handle radio frequency energy and, if not installed and used in accordance with the instructions, may cause harmful interference to radio communications. However, there is no guarantee that interference will not occur in a particular installation. If this equipment does cause harmful interference to radio or television reception, which can be determined by turning the equipment off and on, the user is encouraged to try to correct the interference by one or more of the following measures:
- Reorient or relocate the receiving antenna
- Increase the separation between the equipment and receiver
- Connect the equipment into an outlet on a circuit different from that to which the receiver is connected
- Consult the dealer or an experienced radio/TV technician for help
This device complies with Part 15 of the FCC rules. Operation is subject to the following two conditions:
[1] this device may not cause harmful interference, and
(2) this device must accept any interference received, including interference that may cause undesired operation.
Important information:
Changes or modifications to the equipment not expressly approved by Music Tribe can void the user's authority to use the equipment.