Harmony V60 - Processor TC HELICON - Free user manual and instructions
Find the device manual for free Harmony V60 TC HELICON in PDF.

| Type | Vocal and Guitar Processor |
| Brand | TC Helicon |
| Model | Harmony V60 |
| Power Supply | Mains (100-240 V AC) via included power cord |
| Dimensions (approx.) | Width 250 mm x Depth 150 mm x Height 60 mm |
| Weight (approx.) | 1.2 kg |
| Microphone Input | Balanced XLR/6.35 mm Jack connector with phantom power |
| Guitar Input | Balanced 6.35 mm Jack connector (Hi-Z) |
| Audio Outputs | XLR (MIC/LEFT OUT and GUITAR/RIGHT OUT), 3.5 mm headphone jack |
| Additional Connectivity | USB type B, AUX input (3.5 mm stereo jack), footswitch input (6.35 mm jack) |
| Microphone Functions | Harmony (3 types), Chromatic Correction, Adaptive Tone, Anti-feedback, Reverb, Echo, Talk |
| Guitar Functions | Chromatic Tuner, BodyRez (3 modes), 3-band EQ, Chorus, Reverb, Echo, Anti-feedback |
| Looper | Recording, overdub, playback, stop, undo/redo, tempo control |
| Included Footswitch | 4 assignable footswitches |
| Firmware Update | Via USB and VoiceSupport software (Windows/Mac) |
| Maintenance | Clean with a dry cloth; do not use liquids |
| Safety | Do not expose to water, follow ventilation instructions, use only the included power cord |
| Warranty | Limited manufacturer warranty (refer to tc-helicon.com) |
| Optional Accessories | TC Helicon FS-6 or FS-7 footswitch |
Frequently Asked Questions - Harmony V60 TC HELICON
User questions about Harmony V60 TC HELICON
0 question about this device. Answer the ones you know or ask your own.
Ask a new question about this device
Download the instructions for your Processor in PDF format for free! Find your manual Harmony V60 - TC HELICON and take your electronic device back in hand. On this page are published all the documents necessary for the use of your device. Harmony V60 by TC HELICON.
USER MANUAL Harmony V60 TC HELICON
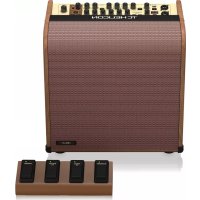
100/60 Watt 2-Channel Acoustic Amplifier with Vocal Processing, Looper, Tannoy Dual Concentric Speaker, Top Firing Tweeter and 4-Button Footswitch
2 HONP VTOO 60 Cuck Star Guide 3
EN Important Safety Instructions
Terminals marked with this symbol carry electrical current of sufficient magnitude to constitute risk of electric shock. The term is used when lacking plugs are pre installed. All other installation or modification should be performed only by qualified personnel.
This symbol, wherever it appears, shorts you to the presence of uninsulated dangerous voltage inside the enclosure - voltage that may be sufficient to constitute a risk of shock.
This sboe, whereas it appears, stte you to important operating and maintenance instructions in the accompanying literature. Please read the manual.
Caution To reduce the risk of electric shock, do not remove the top cover (or the wear section). No user serviceable parts include. Refer to following to qualified personnel.
Caution To reduce the risk of fire or electric sheeps, do not expose this apparatus to radiant and moisture. The apparatus shall not be exposed to drying or splashing liquids and no objects filled with liquids such as warts, shall be placed on the apparatus.
Caution These content instructions are for use by qualified service personnel only. To reduce the risk of electric shock do not perform any servicing other than that contained in the operation instructions. Repairs have to be performed by qualified service personnel.
-
Read these instructions.
-
Keep these instructions
3.400157
-
Hsowal mukchur
-
Do not use the apparatus near water.
-
Clean only with dry cloth.
-
Do not import any ventilation openings, install it in accordance with the manufacturer's instructions.
-
Do not treat any new sources such as the same species of bacteria, including ampicillin; that produces heat.
-
Do not defeat the safety purpose of the polarized or grounding-type plug. A polarized plug has two blades with one water than the other. A grounding-type plug has two blades and a third grounding plug. The wide blade or the thin plug are provided for your safety. If the provided plug does not connect to your outlet, consult an electronic repair or replacement of the oblique outlet.
-
Project the power coil from being waked on an unpaired partially at plug, convert resonance frequencies, and the point where they exit from the apparatus.
-
Use only attachment/accessories specified by the manufacturer.

- Use only with the cart stand, tripod bracket, or table specified by the manufacturer, or sold with the apparatus. When a cart is used, use caution when moving the cart/apparatus combination to avoid
Injury from lip-over
- Unligible this apparatus during lightning storms or when unshared for long periods of time.
-
Refer all servicing to qualified service personnel. Servicing is required when the apparatus has been damaged in any way, such as power supply could be损坏, liquid has been spilled or objects have fallen into the apparatus, the apparatus has been exposed to rain or moisture, does not operate normally, or has been damaged.
-
The apparatus shall be converted to a MAVS strikes outfit with a protective vesting connection.
-
Where the MARS plug or an appliance outlet is used as the disconnect device, the disconnect device shall remain mostly opseite.

- Correct disposal of this product. This symbol indicates that this product must not be disposed at with household waste, according to the WEEE Directive 20/19/8 EU and/or the ENI.
should be taken to a collection center (flews) for the recycling of waste electrical and electronic equipment (IEE), the misappropriing of this type of waste could have a possible negative impact on the environment and human health due to potentially hazardous substances that are generally associated with EIE, at the same time, your cooperation in the correct disposal of this product will contribute to the efficient use of natural resources. For more information about where you can take your waste equipment for recycling, please contact us your local city office, or your household waste collection service. 18. Do not install in a confined space, such as a book case or similar unit. 19. Do not place placed flame sources, such as lighted candles, on the apparatus.
-
Please keep the environmental aspects of battery disposal in line. Vehicles must be disposed of at a battery collection point.
-
Use this apparatus in tropical and/or moderate climates.
LEGAL DISCLAIMER
Music: Tribe accepts on liability for any loss which may be suffered by any person who relies either wholly or in part upon any description, photograph, or statement contained herein. Technical specifications, appearances and other information are subject to change without notice. All trademarks are the property of their respective owners. Mids, Klink Teknik, Lab-Gruppen, Laite, Tanovos, Turbosound, T Electronic, TC Helkon, Behringer, Europe, Astraetron and Coandaio are trademarks or registered trademarks of Music. Tribe Global Brands Ltd., O Music: Tribe Global Brands Ltd. 2020 All rights reserved.
LIMITED WARRANTY
For the applicable warranty term and conditions, and additional information regarding Music Title's Limited Warranty, please see complete details online at www.musictable.com/

Instrucciones de
seguridad

La terminale menarcaion con this esbilico transportare corrente eletrode in umiputul sotuate con oam quin corteil un esque de escargue aie, Ulhe sele celules de alusu cemalizues de y atia called con comectones 15s d.63 m2do basometra prefjado, Cugulqla ceta insturacion o modification de les revolts unicumpiente por un service qualificado.
Ete samblo, smpere que aparae, la inaetive de la presece de voitei priguna en asalar dente de la taje: est eutaine pue supefisicoe para cosuitir un rige de destang. Ete samblo, smpere que aparae, la inaetive uter inactrare operatioe, a meo meioe peaoe omeo nee
manner normally has a reasonable goup to be done. 15. An unconsidered unit is said to be of communicative electronics as necessary due to the condition disponda de una union a thema.
- Solid楔one: a cemented rod with nine pins made in medico-cond. 17. Dete dupe sur acropactif finement
11.1. Bifurcation enrichment of classes and ideals
apparatus supplements recommend parts to fabricant

BESCHRANKTE GARANTIE
species is a combination of carboxypropionic peroxide and nitric acid of tribrominated.
-
Sotengues que como antes durante temporale o se quan su利用率 per kunchi periodico tema.
-
Per tute le regulatione ouveignes a personale qualificatla la manternation e occesseau ci-dessus appearechise a darrageato in quialis meo, comedamagiamment de cado alimentazione o del sappio, versamento di liquido o oggetto du nappiechise, se appearechise a state esposte a pioggia o unitifita, se manfino normalmente o est diluent.
-
L'approbation de creer collège a un jour de corrente elliptica sans merra de protection.
-
Sa钍 opa o una casa del disposito e utilizeaza como dispositao di discriminazioni, dire esere facilemente usilazabile.

- Simultaneous correction of questions produced by question numbers indicates the question in question on does have been made (in the case of a question in question on a third moment), seconded by the Dutree RAE (2012/19/19) and the UAE (a further correction).
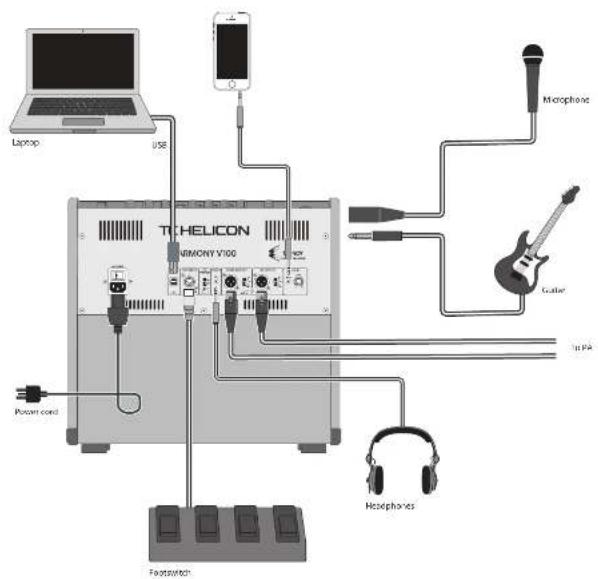
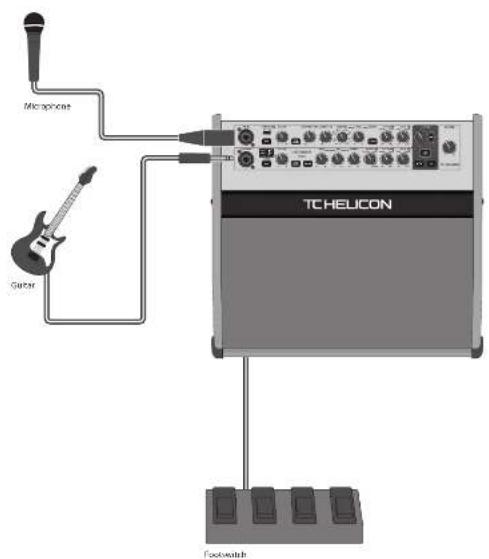
HARMONY V100/V60 Hook-up
EN Step 1: Hook-Up
[5] Paso 1: Conexión
FR Etape 1: Connexions
DE Schritt 1:Verkabelung
PT Passo 1: Conexões
Passo 1: Allacciare
Brts pcrce
Bnnsppnnepe aepnnnneepnnnne
bnnpnneepnneepnne
bneepnneepnneepnne
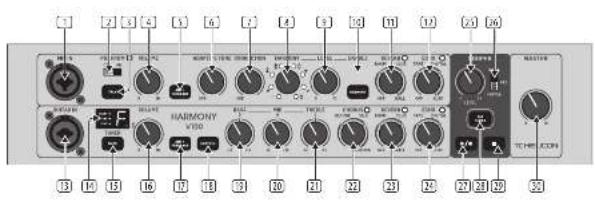
HARMONY V100/V60 Controls
EN Step 2:Controls
图
Quick Start Guide
11

"Hotels: Controls marked" below are capable of being operated by the footswitch. See the footswitch section for more details
Microphone Section
MICIN- this input accepts XII B and MIC TFRS connections from microphones.
PHANTOM if your microphone requires phantom power, select OK. Confirm some microphones can be damaged by phantom power.
TAUK: bypasses all 3SP (except Adaptive Tone), when unprocessed speech is required.
(4) VOLUME-adjust the microphone volume level.
ANTI-FEEDBACK automatically Silences feedback from the mix. This is illuminated green when pressed and blue when anti-feedback is working.
ADAPTIVE TONE: alters automatic 10 and dynamic processing, toys vocal sounds static-produced. In the DIF position, all tone algorithms are disabled including compression, dc switching, gate, and adaptive EC. When this knob is turned clockwise, then compression, dc-switching and gate are enabled, and adaptive EC can be increased up to full at the maximum setting
CORRECTION - enables chromatographic pitch correction, that varies from Off (no correction) to maximum effect.
HARMONY* select from a Vocal harmony effects:
Unison (doubling).
High
high and high low and high
Lower and higher
Low
Bass and high
LEVEL-adjust the harmony effect level.
(10) ENABLE - enable/disable Harmony.
(1) REVERSE ^ 喜 adjust the reeves effect from DFF (no revery) through various venue sizes from RDW,CLUB,and HALL.
(1) ECHO ^+ adjust the echo effect from OTT [no effect] through TAPE, DIGITAL, and SLAP.
Guitar Section
(9) GUITAR IN - this input accepts XLI and YI TFRS connections from guitars and instruments.
TUNER shows the tuning of the incoming guitar signals A - C with LEDs for sharp, tuned, and flat.
MUTE" mutes the guitar input when tuning or taking a break.
VOLUME-adjust the guitar level.
ANTI-FEEDBACK - automatically silences feedback from the guitar. This is illuminating green when pressed and blue when antifeedback is engaged.
BODYZRE restores natural bone when using gauzes with geo-pickings. There are four selections:
OFF: [no effect]
Bret [Budryez]
Plat (P. platanus)
B
A
1234567890123456789012345678901234567890123456789012345678901234567890123456789012345678901234567890123456789
BC MID- adjust the level of the mid frequency range +1 / 2 dB.
3 TREBLE adjust the level of the higher frequency range +1 12 dB.
301 CHORUS* - adjust the chorus effect from OFF (no chorus) through various styles: DETUNE SIL, and CORONA.
[28] REVERB ^+ -adjust the recessor effect from OFF (no reverber) through various venue sizes from ROOM, C10B, and FALL
NECHOP: - adjust the echo effect from OFF [no echo through TAPE, DIGITAL, and SLAP].
Looper Section
[25] LEVEL - adjust the playback level of the currently-recorded loop, relative to the performance.
V. VOICE/ALL/GUITAR - select which source can be looped, just vocals, vocals and guitar, or just guitar.
PLAYRECORDs play the current loop and this switch is illuminated in green, or in red when recording or dubbling.
TAP TEMP - sets the delay temp, and flashes the current temp. If a loop is recorded, the temp is derived from the loop length. Holding this switch will toggle between temp derivation from the loop length and manually tapped.
STOP\~stop the loop playbacc or recording Master Section
[30] MASTER - adjust the main volume. Tam this down when making any connections and when turning the unit on or off.
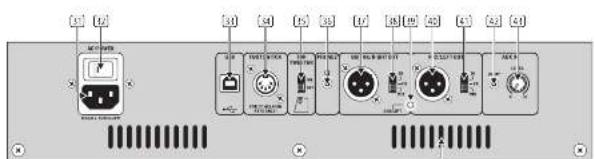
Rear Panel
AC INPUT - securely connect the supplied power cord here. Caution: Use only the supplied power cord.
[4] AC POWER SWITCH - use this switch to turn the unit on or off. This switch shall remain ready openable.
USB- connect the unit to a computer to allow recording and playback to and from the computer.
2. FOOTSWITCH - connect the supplied footswitch to allow foot control of many features. Use only the supplied footswitch.
TOP TWEETER:Turn the internal top trower on or off.
PHONES-connect this stereo 3.5mm TBS connection to headphones. Caution: to prevent hearing damage, turn down the Master volume level before connecting and putting on headphones.
D: GUITAR/RIGHT OUT - this make ALR connector output the guitar/right main audio output to the PA system.
DEF: DUTFEM SWITCH - allow selection between unprocessed guitar EI, guitar with processing, or full mix right channel for the guitar/right audio output.
GROUND LIFT - this lifts the audio ground from the left and right ALS outputs. This is useful in situations where a ground loop hum can be reduced. It does not affect the power supply safety ground.
1. MIC/LEFT OUT - this male LUR conceptor outputs the microphonectin left main audio output to the PA system.
DUF/MEX SWITCH - allows selection between the unprocessed mix Di, mix with processing, or full mix left channel for the mix left audio output.
AUX INPUT: this 3.5mm TRS input allows the use of an auxiliary external source such as an MP3 player, or a computer's headphones output.
AUX LEVEL This adjusts the input level of the incoming auxiliary audio source.
VENTILATION SLOTS - these allow ventilation of the main power amplifiers and power supply. Always keep the vents clear from obstruction, and allow adequate airflow to prevent the unit overheating.
1211111111111111111111111111111
HARMONY V100/V60 Controls
EN Step 2: Controls
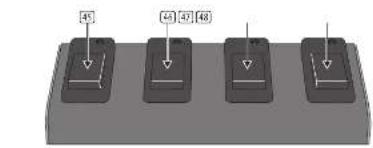
Footswitches
The footswitch is customizable, and any switch can be easily set to control any available function (see Getting Started for more details). The default settings are marked on the unit:
HARMONY enable/disable vocal harmony.
(4) vocal FX - enable/disable vocal REVERSE and ECHO.
GUITARFXehedbeideiguiCHORUS, REVERB and ECHO.
(39) LOOPER - control the Looper functions.
Loudspeakers
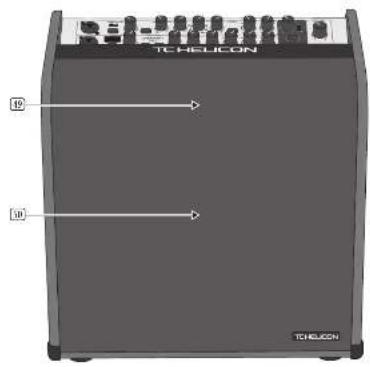
[3] Top 2000 Weather location
Dual Concentric Loudspeaker location
HARMONY V100/V60 Controles
[5] Paso 2: Controles
HARMONY V100/V60 Controles
Passo 2: Controles
HARMONY V100/V60 Controlli
Passo 2:Controlli
HARMONY V100/V60 Getting Started
EN Step 3:Getting Started
OVERVIEW
This "getting started" guide will help you set up the unit and briefly introduce its capabilities.
CONNECTION
To connect the unit to your system, please consult the connection examples shown earlier in this document.
SOFTWARE SETUP
The USB connection allows your unit to send
2 channels of skills to your computer for recording and sharing with and to receive 2 channels computer audio playback.
The unit requires a Windows driver to be installed onto PC computers. No driver is required for connections to主板 PCs.
Please check our website for the latest version of the Windows driver. Follow the Installation Instructions supplied with the driver
With the unit connected to your computer via the USB port, and powered on, It should be recognized as a USB audio device.
Choose the unit as an input device for recording, and as an output device for playback. The USB computer connection is only required to update the firmware, or to playback from the computer and/or to record onto the computer.
The rewarding to the computer will include all the processing by the Harmony V50/V100 unit. The playback from your computer is not affected by the processing, just the Master Volume control.
HARDWARE SETUP
Make all the connections in your system, including the footwidth.
Far a simple system, connect a microphone to MIC IN, a guitar to GUITAS IN.
Check if your microphone requires Phantom Power. Be careful, as some microphones may be damaged by Phantom Power.
Turn down the Mio input and Guitar input volume controls, and the Master Volume.
Connect AC power to the unit using the supplied power cord only. Ensure your external sound system (if used) is turned down.
Footswitch operation
Assign a footswitch by holding it down while turning suppress the desired control.
Some controls can be also selected as a group, for example, while holding down the footswitch press R/FFB and F/CDD.
CHORUS, REVERB and ECHO MUTE and TALK
Notes:
HARMONY: hold down any footswitch, press HARMONY, or rotate selector, and the footswitch will enable/disable that voicing.
ECHO: After a footswitch is assigned, adjust the TAPE and DIGITAL repeats at any time, by holding down the footswitch, and then tapping at the desired tempo.
MICROPHONE SECTION
The following steps will help you get started making vocal.
1. Turn on the rear panel power switch.
-
Turn up the VOLUME a small amount and talk or sing into the microphone. Adjust the MASTER volume to a reasonable level.
-
Press ALT-FEEBACK to reduce the chance of your feedback.
-
Press TALK if you want to listen to your voice with no processing added.
-
When the HARMONY switch off, and the REVERS, and ECHO controls both in the OFF position, listen to the effect of the AOA/PIVE TONE and CORRECTION controls on your vocalis
Vocal Harmony
-
PRIMARCHY can be engaged by pressing the HARMONY ENABLE switch or the HARMONY footswitch. Turn up the HARMONY LEVEL control and listen to the effect on your vocal of the eight different vocal harmonies.
-
Note: If the HARMONY switch is held down during power up, any two footswitches used for HARMONY will become momentary switches.
Vocal Reverb
- Adjust the RE/ERS control to add revisit to your vocals, with increasing amounts of delay time and venue size simulation from OFF (no revisit) to BROOM, CLUB, and HALL. Listen to its effect on your vocals.
Vocal Echo
-
Adjust the ECHO control to add echo to your vocals from OFF (no echo), and TAPE, DIGITAL, and SLAP styles. Listen to its effect on your vocals.
-
The repeat rates for the TAPE and DIGITAL styles can be adjusted by pressing the TAP TEMPo switch. It flashes at the current tempera.
GUTIAR SELECTION
The following steps will help you get started using your guitar.
-
Tum on the rear panel power switch of the unit.
-
turn up the VOTAGE a small amount and play the guitar. Adjust the MAster STER volume to a reasonable level.
Guitar Tuning
-
Press the MUE switch to prevent the guitar being heard while tuning.
-
Carefully tune your guitar using the display of the built-in chromatic tuning.
-
When tuning is complete, disengage the MUTE switch.
-
Press the Anti-FEEBACK switch to reduce the chance of feedback.
-
If your guitar uses a Piano keyboard, press the BIDYREX Switch to help restore the natural tone. There are four selections, each with its own LED color:
OFF: [no effect]
Red: [Budprez 1]
Blue: [Bodcrz 2]
Green: (Bodyne 3)
- Adjust the RASS, MID, and TRESI controls to suit. Although the level range is quite large, try to use small adjustments in the EQ, using cut more than twice.
Guitar Chorus
- Adjust the CHIRUS control to add chorus to your guitar, with various styles from DFT [no chorus], DETUNE, SILK, and COGNORA, Listen to its effect on your guitar.
Guitar Reverb
- Adjust the REVERS control to add revisit to your guitar, with increasing amounts of delay time and venue size simulation from OFF (no effect) to ROOM, and CUS, to EALI. Listen to its effect on your guitar.
Guitar Echo
-
Adjust the ECHO control to add echo to the guitar, from OFF [no echo] and TAPE, DIGITAL, and SLAP styles. Listen to its effect on the guitar.
-
The repeat rates for the TAPE and DIGITAL styles can be adjusted by pressing the TAPE/TEMPO switch at the desired tempo.
LOOPER SECTION
the IMC/ALL/GUITAR switch to select the source to LOOP, either microphone microphone and guitar, or guitar.
-
By default, the IOPER fork switch will operate the PLAY/RECORD switch.
-
Note: The PLAY/RECOG.Switch will turn during initial recording or overreducing, as will the footswitch LED. During playback, they will be green.
-
The TAP TEMPO switch is used to set the tempo, and it flashes at the current tempo. This allows you to synchronize the ECH2 delay time to prevent the echoes from being out of step with your current song.
The tempo can also be changed using the footswitch as follows: press and hold either the VOCAL FX or GUITAR FX footswitch until it is LED begins flashing at the current tempo. Tap the footswitch at the desired tempo. After a few seconds of inactivity, the footswitch will return to normal operation.
Overlubbing
When a loop is created, the tempo is automatically derived from the loop length. Holding the TAP TEMP switch (an unit only), will disable the tempo derivation from the loop length for future recording and overdrafts. Hold it again to return to tempo derivation from loop length. Note: if both ECHO controls are further clockwise than the "DIGITAL" setting, then the TAP TEMP switch will be off (not needed for SIAP TEMP settings):
3. Begin playing and/or singing the sequence you would like to loop.
6. At an appropriate time while playing, press PLAY/RECORD or the assigned footswitch to begin recording.
7. When finished, press PLAY/RECORD to stop the recording. The recorded loop will begin playing.
8. If you are happy with the loop, press PLAY/RECORD twice to stop the playbook, or press the STOP switch once. The STOP switch will turn red, and the robotswitch ID will flash green as a reminder that a loop is reconnected.
9. Press PLAY/RECORD once to play the loop at any time, and then twice to stop.
10. Use the LOOPER LEVEL control to adjust the play trackysk level, compared to live play
1. While playing a loop, begin playing and/or singing the sequence you would like to add to the loop.
2. At the appropriate time, press the PLAY/RECORD to enter overabutting mode and record your additional track on top of the current loop (not taking its place, but adding to it).
3. Press PLAY/RECO once to stop the interrupt.
4. It will begin playback.
4. Repeat steps 1 to 3 to add more overhead if required.
Undo/Redo
- While playing back, you can hold down PLAY: RECORD to mute the latest overburd (an iDHD)
- Hold it down again to un-mute the latest overbind (a RED). This can be used to create interesting musical performances, not just to remove a poor overbind.)
- Press PLAY/RECODOT twice to stop playback, or press the STOP switch once. Press the STOP switch again to erase the loop if required.
- To erase a loop using PLAYRECORD, play the loop, and then press the footswitch twice, but make sure to hold down the second press.
LOOPER OPERATION
(with LooperFootswitch assigned to PLV/RECORDS)
| Recruit | Tag the LOOPER footswitch once |
| Switch to playback | Tag the LOOPER footswitch again |
| Ulead/Rechn last recording | Press and hold the LOOPER footswitch |
| Stop Double-tap one | LOOPER footswitch or Tap Step |
| Stop and clear the loop | Double-tap and hold the LOOPER footswitch or Tap and hold Step |
| Resume playback | Tag the LOOPER footswitch again |
FIDELINEURDATTE
Firmware updates are available through VoiceSupport. For PC, check our website for the latest Windows drivers then download and Install VoiceSupport 2.0 for Microsoft Windows or Mac. Connect the Harmony 960V/100 via USB then run VoiceSupport to see if your firmware is up to date. The Harmony LEDs cycle during the firmware update. Do not turn off the unit until the firmware update is successful.
A. 3.2.1.2.4. Appropriate use of the following definitions:
Here Seas get married to their System members, entreat them. She bitte daon Ansonssbriepieiems vete doen in this document.
SOFTWARE EINRICHTEM
Taur veizirce noo sife da pate oer a vcerso malstut do dir driverWindows. Siga as instruetions of instalacion formocdo car driver.
As segnities elgam an adjubirbe a comaecar a murcar o voicals.
-
Ligue o botao power do paimel traseiro.
-
Accumée o volume um poux ou faite ou cantre au microscore. Ajuste o volume Mster 3te um nivil raoi-eel.
-
Aperte ANTIE FEEDBACK para reduir a possiblidade de feedback vocal.
A. Apére FALK « qués ouro la� sao remèn : procumbens accroscadien,
- Mantendo a biau HARMONY designado, o ambos o contrats REVIERE e ECHO na posicao OFF, ouca e esgotao dos contrats ADAPTIVE TONE e CORRECTION do sous vocais.
Vocal Harmony
Harmony V100 Harmony V60
| Audio inputs | |
| Cutter input 9" TBS balanced/KLR control | |
| Input impedance: 2 MΩ balanced/1 KΩ unbalanced | |
| Microphone input: 4" TBS balanced/KLR control | |
| Input impedance: 3.0Ω, 2.9MΩ balanced/1" | CM2 TBS balanced/6×75 unbalanced |
| Aux input: 3.5 mm TBS stereo | |
| Input impedance: 10kΩ | |
| Audio outputs | |
| Output right out and left out: ALR balance, Female | |
| Output impedance: 400 Ω | |
| Max. output level | 0 dBu |
| Switches | DL, DL, Mix |
| Headphones out | 3.5 mm TBS stereo |
| Input impedance | 10Ω |
| Max. output level | 8 dBu |
| Total section controls | |
| Knobs | Volume (1 to 10) |
| Adaptive tone (-10 to max) | |
| Correction (off to max) | |
| Harmony selective, 8 positions | |
| Harmony level (10 to 10) | |
| Heaviness (-10, room, dui, hall) | |
| Echo (off, tape, digital, sdp) | |
| Switches | Phantom scuff |
| Talk on/off | |
| Anti-feedback on/off | |
| Harmony enable/disable | |
| LEO | Phantom (red), Heaviness (green), Locomotion, Harmony voice (green, B selections) |
| Backlit switches | Talk on/off, anti-feedback (green, or blue when operating), harmony (green) |
| Sutter section controls | |
| Knobs | Volume (0 to 10) |
| Bass, shearing (-2 to 12 dB) | |
| Mid, peaking (12 to 12 dB) | |
| Tilt, shearing (-12 to 12 dB) | |
| Chron (picture, film, camera) | |
| Flower (off, mem, dui, hall) | |
| Echo (off, tape, digital, sdp) | |
| Switches | Mute on/off |
| Anti feedback on/off | |
| Bodypress off, Bodypress-1, Bodypress-2, Bodypress-3 | |
| Harmony enable/disable | |
| Display | Turner note & segment, red |
| LEO | Chroma (green), reverse (green), echo (green) |
| Fusion sharp/dark-tone (red) | |
| Backlit switches | Mute (red), anti-feedback (green, or blue when operating), Bodypress (red, green, blue selection) |
Quick Stat Guide
37

| Harmony Y100 Harmony V60 | ||
| Footswitchable controls | ||
| Microphone section | Task on/off | |
| Harmony on/off at the current setting | ||
| Rewar on/off | ||
| Echo on/off | ||
| Guitar section | Mute on/off | |
| Cramon on/off | ||
| Reewar on/off | ||
| Echo on/off | ||
| Harmony on/off at a selected setting | ||
| Loopers section | Tap tempo | |
| Play/record | ||
| Stop | ||
| LEDs | Green when footswitch engaged, red when recording | |
| Lopper controls | ||
| Knobs | Leve (9 to 10) | |
| Switches | Voice/Altiguitar | |
| Tap tempo | ||
| Play/record | ||
| Stop | ||
| Baccio switches | Tap tempo (with red at tempol, play/record [green play, red record], stop red) | |
| Rear panel section | ||
| Contraction | MC input TC | |
| USB type | ||
| Foot switch, 5-pin BIN (for S34 only) | ||
| Guitaristight out, KLRR male | ||
| Michielt out, KLRR male | ||
| Auto in, 3.5 mm | ||
| Switches | AC power on/off toggle | |
| Tap treacher on/off | ||
| Guitaristight out, DHF/MIR selector | ||
| Michielt out, DVF/MIR selector | ||
| Ground Hit, X/R audio | ||
| Knobs | Aux input level [0-10] | |
| USB | ||
| Type | Class compliant USB 2.0, type 8 | |
| Supported Operating Systems | Windows 7 or higher Mac OS 8.10.6.8 or higher | |
| Window driver | Required driver is supplied | |
| Audio input and output | 2 channels, 24 bit, 4Mb/s | |
| Amplifier | ||
| Output power | 110 W | 80 W |
| Type | Class 0 | |
| Protection | Short circuit, thermal | |
38 HAIOMONYV00V60
Quick Start Guide
39
EN
Harmony V100 Harmony V60
| Iussubpriests | ||
| Type 10" dual concentric, Tensory 8" dual concentric, Tensory | ||
| Impedance 4Ω | ||
| Power handling 400V | 240V | |
| Top waterer (withchable on/off) | 1" | |
| Impedance 4Ω | ||
| Overall frequency response | 82 kHz - 70 kHz (+/- 3 dB) 46 kHz - 74 kHz (- 10 dB) | 95 kHz - 30 kHz (+/- 3 dB) 60 kHz - 74 kHz (- 10 dB) |
| Maximum SPL | 118 dB SPL | 115 dB SPL |
| Footswitch [supply] (any switch can operate any footswitchable control) | ||
| Type | FST4 | |
| Switches | Harmony on/off (with LED) | |
| Voice FX on/off (with LED) | ||
| Guitar FX on/off (with LED) | ||
| Looper on/off (with LED) | ||
| Power Supply | ||
| Mains Voltage | 100-740V - 50V/60Hz | |
| Power consumption | 40 W | 35 W |
| Mains connection | Standard IEC receptacle | |
| Power Switch | Rocker, near panel | |
| Dimensions/Weight | ||
| Dimensions [H×W×U] | 377×408×311 mm (16.8×16.1×12.2") | 383×383×287 mm (18.3×15.3×11.5") |
| Weight | 13.3 kg (23.3 lbs) | 11.2 kg (24.6 lbs) |
Other important information

Important information

Informations important
Responsible Party Name: Music Tribe Commercial NV Inc.
Address: 5270 Procyon Street
as Vegas,NV 89118
Phone Number: +1 702 800 8290
HARMONY V100/V60
complies with the FCC rules as mentioned in the following paragraph:
This equipment has been tested and found to comply with the limits for a Class B digital device, pursuant to part 15 of the FCC Rules. These limits are designed to provide reasonable protection against harmful interference in a residential installation. This equipment generates, uses and can radiate radio frequency energy and, if not installed and used in accordance with the instructions, may cause harmful interference to radio communications. However, there is no guarantee that interference will not occur in a particular installation. If this equipment does cause harmful interference to radio or television reception, which can be determined by turning the equipment off and on, the user is encouraged to try to connect the interference by one or more of the following measures:
-
Recipient or relocate the receiving antenna
-
Increase the separation between the equipment and receivers
-
Connect the equipment into an outlet on a circuit different from that to which the
roocnrs
- Consult the dealer or an experienced radiyTV technician for help
This device complies with Part 15 of the FCC rules. Operation is subject to the
1000000000000000
[1] this device may not cause harmful interference, and
[2] this device must accept any interference received, including interference that may cause undesired operation.
Important information:
Changes or modifications to the equipment not expressly aspcayed by Music Trib
can void the user's authority to use the equipment.