
BM7200 - Microphone Renkforce - Free user manual and instructions
Find the device manual for free BM7200 Renkforce in PDF.

| Product type | UHF wireless microphone system |
| Brand | Renkforce |
| Model | BM7200 |
| Radio frequency | 863 – 865 MHz |
| Number of channels | 21 channels per audio channel |
| Transmission power | 10 mW |
| Maximum range | 25/30 m (open field) |
| Power supply receiver station | 12 V/DC, 500 mA via power adapter 100-240 V/AC |
| Power supply wireless microphone | 2 x AA 1.5 V batteries |
| Power supply beltpack transmitter | 2 x AA 1.5 V batteries |
| Dimensions microphone (Ø x H) | approx. 55 x 286 mm |
| Weight microphone (without batteries) | approx. 320 g |
| Dimensions beltpack transmitter (L x H x D) | 63 x 105 x 30 mm |
| Weight beltpack transmitter (without batteries) | approx. 100 g |
| Main functions | LCD screen, per-channel volume adjustment, XLR and Jack outputs, channel search, IR coupling, mute function, auto shut-off |
| Maintenance and cleaning | Clean with a soft, dry cloth; do not use harsh chemicals |
| Safety | Indoor use only; avoid moisture; do not open or modify |
| Package contents | Receiver station, wireless microphone, beltpack transmitter, headset, power adapter, 6.35 mm audio cable, rack mounts, screws, AA batteries (x4), instruction manual |
Frequently Asked Questions - BM7200 Renkforce
User questions about BM7200 Renkforce
0 question about this device. Answer the ones you know or ask your own.
Ask a new question about this device
Download the instructions for your Microphone in PDF format for free! Find your manual BM7200 - Renkforce and take your electronic device back in hand. On this page are published all the documents necessary for the use of your device. BM7200 by Renkforce.
USER MANUAL BM7200 Renkforce
natural_image
Abstract geometric star-like pattern with five petal-like shapes and dot patterns (no text or symbols)renkforce
GB Operating Instructions
BM-7200 Wireless microphone set
Item No. 1491921 Page 21 - 39
© Notice d'emploi
Set - microphone sans fil BM-7200
www.business.conrad.at
text_image
1 2 3 4567 8910111213 ANT-A VOL A ON B ON A ON C ON D ON E ON F ON G ON H ON I ON J ON K ON L ON M ON N ON O ON P ON Q ON R ON S ON T ON U ON V ON W ON X ON Y ON Z ON A ON B ON C ON D ON E ON F ON G ON H ON I ON J ON K ON L ON M ON N ON O ON P ON Q ON R ON S ON T ON U ON V ON W ON X ON Y ON Z1 Taste SET
2 Taste UP
3 Ein-/Ausschalter POWER
4 Lautstärkeregler VOLUME.A/ VOLUME.B
5 IR Sensor iR
6 Taste DOWN
7 LCD-Anzeige
natural_image
Technical line drawing of a mechanical bracket with mounting holes and a handle (no text or symbols)text_image
Medical illustration showing correct and incorrect eye movements with checkmark and X symbols indicating correct and incorrect statestext_image
MUTE LO HI CH 0 17 86460 M- Introduction....22
- Description of symbols....22
- Intended use....23
- Delivery content....23
- Features and functions....24
- Safety instructions ....24
a) General....24
b) Electrical devices....25
c) Power adapter 25
d) Setting up 26
e) Batteries 26
f) Volume....26
- Operating elements ......27
a) Receiver station....27
b) Wireless microphone....28
c) Pocket transmitter....28
-
Installation and rack mounting 29
-
Connection and preparation 29
a) Connecting the receiver station....29
b) Mains connection....30
c) Pocket transmitter....30
d) Headset 30
- Inserting batteries ....31
a) Wireless microphone....31
b) Pocket transmitter....31
- Operation....31
a) Receiver station....32
b) Wireless microphone....34
c) Pocket transmitter....34
d) Pairing wireless microphone/pocket transmitter with receiver station 35
e) Audio playback....35
- Troubleshooting 36
- Cleaning and care....37
- Declaration of Conformity (DOC)....38
- Disposal 38
a) Product....38
b) (Rechargeable) batteries....38
- Technical data....39
1. Introduction
Dear customer,
Thank you for purchasing this product.
This product complies with the statutory national and European requirements.
We kindly request the user to follow the operating instructions, to preserve this condition and to ensure safe operation!

These operating instructions relate to this product. They contain important notices on commissioning and handling. Please take this into consideration when you pass the product on to third parties. Please keep these operating instructions for further reference!
If there are any technical questions, please contact:
International: www.conrad.com/contact
United Kingdom: www.conrad-electronic.co.uk/contact
2. Description of symbols
The symbol with a flash in a triangle indicates health risks e.g. due to electric shock.

The symbol with an exclamation mark in a triangle indicates important instructions contained in these operating instructions that must be followed.

The product may be set up and used only in dry, closed indoor spaces. The product must not get moist or wet. There is a risk of fatal electric shock!
3. Intended use
The wireless microphone set is intended for transforming acoustic signals (sound waves) into electric signals and for transmitting these signals over a certain wireless distance.
The low-level audio output signal of the receiver station must only be connected to suitable audio inputs of audio devices.
The receiver station has been approved for connection to 100 – 240 V/AC, 50/60 Hz alternating current only, using the power adapter provided.
It is intended for indoor use only. Do not use it outdoors. Contact with moisture, e.g. in bathrooms, must be avoided under all circumstances.
When using this product, observe all national regulations for radio operation applicable in your country.
For safety and approval purposes, you must not rebuild and/or modify this product. If you use the product for purposes other than those described above, the product may be damaged. In addition, improper use can cause hazards such as short circuiting, fire, electric shock etc. Read the instructions carefully and keep them. Make this product available to third parties only together with its operating instructions.
All company names and product names are trademarks of their respective owners. All rights reserved.
4. Delivery content
• Receiving station with antennas
- Wireless microphone
- Headset microphone
- Pocket transmitter
- Power adapter
- 6.35 mm audio cable
- 2x mounting bracket
- 5x screws
- 4x 1.5 V batteries, type AA
- Operating instructions
Up-to-date operating instructions
Download the latest operating instructions from our website www.conrad.com/downloads or scan the printed QR code. Follow the instructions on the website.

5. Features and functions
- LC display
- Separate volume adjustment for audio channels
- Separate XLR outputs for each microphone
- 21 channels
• Channel search function
6. Safety instructions

Read the operating instructions carefully and especially observe the safety information. If you do not follow the safety instructions and information on proper handling in this manual, we assume no liability for any resulting personal injury or damage to property. Such cases will invalidate the warranty/guarantee.
a) General
- The device is not a toy. Keep it out of the reach of children and pets.
- Do not leave packaging material lying around carelessly. These may become dangerous playing material for children.
- Protect the product from extreme temperatures, direct sunlight, strong jolts, high humidity, moisture, flammable gases, vapours and solvents.
- Do not place the product under any mechanical stress.
-
If it is no longer possible to operate the product safely, take it out of operation and protect it from any accidental use. Safe operation can no longer be guaranteed if the product:
-
is visibly damaged,
- is no longer working properly,
- has been stored for extended periods in poor ambient conditions or
- has been subjected to any serious transport-related stresses.
- Please handle the product carefully. Jolts, impacts or a fall even from a low height can damage the product.
- Also observe the safety and operating instructions of any other devices which are connected to the product.
- Never operate the device while unattended.
- Consult an expert when in doubt about operation, safety or connection of the device.
- Maintenance, modifications and repairs are to be performed exclusively by an expert or at a qualified shop.
- If you have questions which remain unanswered by these operating instructions, contact our technical support service or other technical personnel.
b) Electrical devices
- Never pour any liquids over electrical devices or put objects filled with liquid right next to the device. If liquid or an object enters the interior of the device nevertheless, first power down the respective socket (e.g. switch off circuit breaker) and then pull the mains plug from the mains socket. Do not operate the product anymore afterwards, but take it to a specialist workshop.
- Never use the product immediately after it has been brought from a cold room into a warm one. The condensation generated could destroy the product. The power adapter also involves danger to life by electric shock! Allow the device to reach room temperature before connecting and using it. This may take several hours.
c) Power adapter
- The adapter corresponds to protection class II. Only a proper mains socket (100 - 240 V/AC, 50/60 Hz) of the public electricity supply may be used as voltage source.
- If the power adapter is visibly damaged, do not touch it. Risk of fatal injury due to electric shock! First turn off the power supply to the power outlet that the power adapter is connected to (flip off the fuse and then turn off the residual current operated circuit breaker to disconnect the power outlet at all phases). Now unplug the device from the power outlet. Dispose of the power adapter in an environmentally friendly fashion, discontinue use of it immediately. Replace it with an identical power adapter.
- The mains outlet must be located near to the device and be easily accessible.
- Only use the supplied mains adapter as a power supply.
- Only connect the power adapter to a normal mains socket connected to the public supply. Before plugging in the power adapter, check whether the voltage stated on the power adapter complies with the voltage of your electricity supplier.
- Disconnect the mains adapter from the wall socket after use.
- Never connect or disconnect power adapters if your hands are wet.
- Never unplug the power adapter from the mains socket by pulling on the cable; always use the grips on the plug.
- For safety reasons, disconnect the power adapter from the mains socket during storms.
d) Setting up
- When setting up the product, make sure that the cables are not pinched, kinked or damaged by sharp edges.
• Always lay the cables so that nobody can trip over or become entangled in them. This poses a risk of injury. - Do not place sources of open fire, such as candles, on or next to the device.
- Use the device in moderate climate zones only. Do not use in tropical climate zones.
- Do not block the air circulation around the device by objects such as magazines, tablecloths, drapes, or similar. Those could prevent heat dissipation from the product and cause overheating (risk of fire).
- Do not drill any holes into the housing for mounting the device, as such could damage the device and affect the safety.
- Ensure stability and select a stable surface when installing the device. The receiver station falling down could cause injuries.
- Check the product for damages before use. Do not operate the product and contact a professional or our customer service if the product is damaged in any way.
- All persons operating, installing, setting up or starting up this product must be properly trained or qualified and observe these operating instructions.
e) Batteries
- Correct polarity must be observed while inserting the batteries.
- Batteries should be removed from the device if it is not used for a long period of time to avoid damage through leaking. Leaking or damaged batteries might cause acid burns when in contact with skin, Therefore use suitable protective gloves to handle corrupted batteries.
- Batteries must be kept out of reach of children. Do not leave batteries lying around, as there is risk, that children or pets swallow them.
- All batteries should be replaced at the same time. Mixing old and new batteries in the device can lead to battery leakage and device damage.
- Do not disassemble, short-circuit or throw batteries into fire. Never recharge non-rechargeable batteries. There is a risk of explosion!
f) Volume
- Do not listen to excessively loud music over an extended period of time. This may damage your hearing.
7. Operating elements
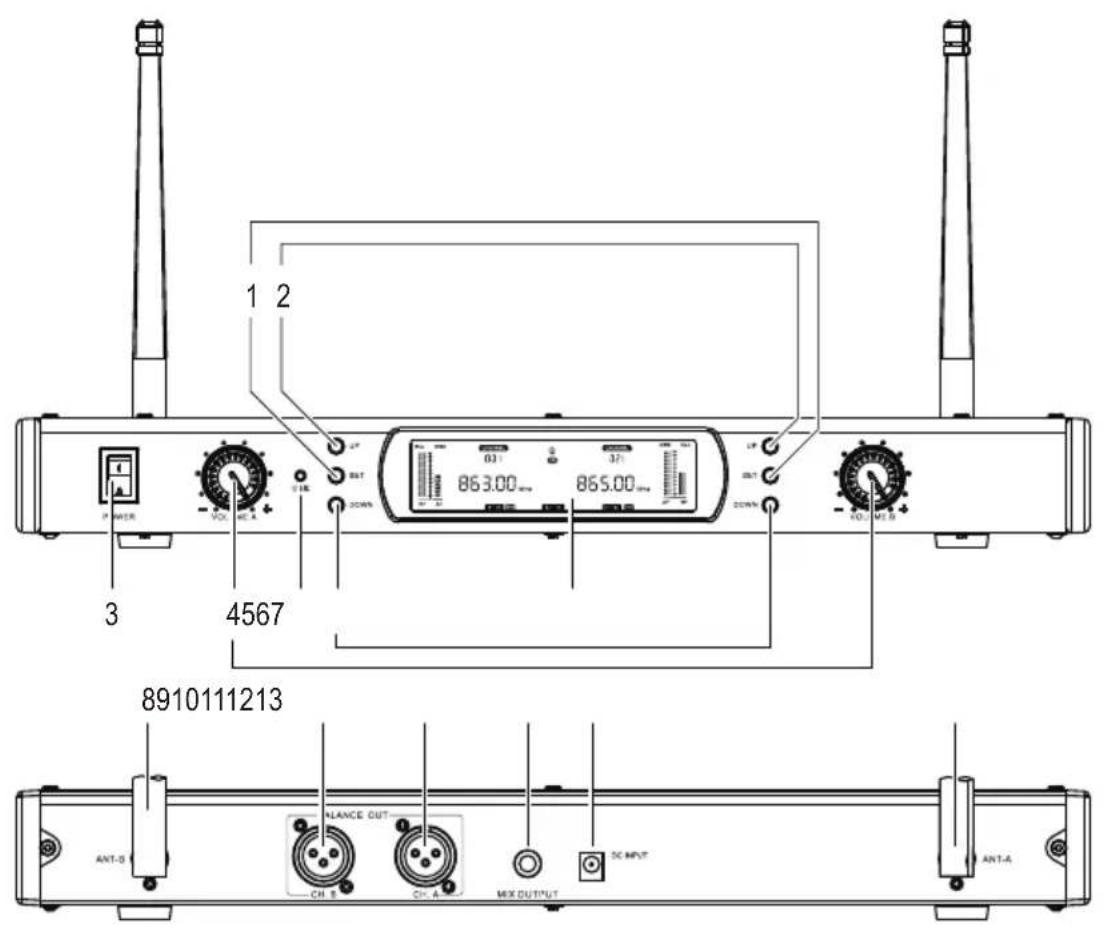
a) Receiver station
text_image
1 2 3 4567 8910111213 ANT-0 CN B CN A MX OUTPUT DC INPUT ANT-A1 SET button
2 UP button
3 On/off switch POWER
4 VOLUME.A/ VOLUME.B control
5 IR sensor iR
6 DOWN button
7 LC display
8 Antenna ANT-B
9 XLR socket CH.B
10 XLR socket CH.A
11 Jack socket MIX OUTPUT
12 Mains socket DC INPUT
13 Antenna ANT-A
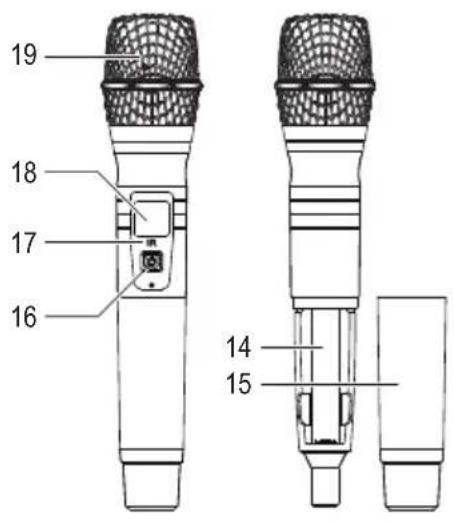
b) Wireless microphone
text_image
19 18 17 16 14 1514 Battery compartment
15 Sleeve
16 On/off button
17 IR sensor IR
18 LC display
19 Grille
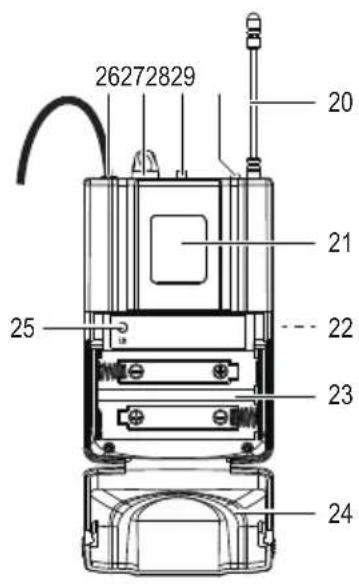
c) Pocket transmitter
text_image
26272829 20 21 25 22 23 2420 Antenna
21 LC display
22 Belt clip
23 Battery compartment
24 Battery compartment lid
25 IR sensor iR
26 Jack socket
27 Volume control VOL
28 On/off switch
29 Power indicator
8. Installation and rack mounting

Do not install the receiver station on a soft surface such as carpets or beds, etc.
Make sure there are no other devices with strong electric or magnetic fields in the near proximity, such as transformers, engines, wireless telephones, radio equipment, etc. They could affect the device.
The product might also be affected by interferences (radiation) caused by tuners, TV sets, etc. Keep a distance as big as possible to such devices. Metal surfaces, reinforced concrete walls, etc. located within the transmission range can also reduce the range.

Never place the device on valuable or sensitive furniture surfaces without using sufficient protection.

Please make sure to install the receiver station with an optimum clearance of at least 100 cm to all sides.
- Place the device on a stable, clean, dry, flat surface.
- The delivery scope includes two mounting brackets with screws for rack mount installation. Screw one bracket onto each side, as illustrated in the adjacent picture.
- Rotate the bracket by 180^ if needed.
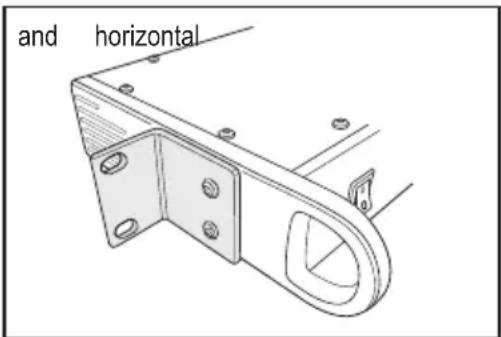
text_image
and horizontal9. Connection and preparation
a) Connecting the receiver station

Only use suitable, isolated XLR or jack cables for connecting the outputs. Using other cables could cause malfunction.
In order to avoid distortion or mismatch, only use suitable and matching cables. It is important to read and observe all instructions in the user manuals of the devices to be connected.
- Turn off the receiver station (POWER on/off button (3) to 0 position) and disconnect the mains adapter from the mains.
- Turn off the audio device (mixer, or similar) to be connected to the receiver station, and disconnect it from the mains.
-
Connect the audio input/s of your audio device to the audio outputs of the receiver station:
-
In order to separately transmit the signals of both transmitters, connect the XLR sockets CH.A (10) and CH.B (9) to two inputs of the audio device (e.g. mixer).
- In order to jointly transmit the signals of both transmitters, connect the 6.35 mm audio cable to the MIX OUTPUT jack socket (11) and to a suitable input of the audio device.
b) Mains connection

In case of failure, it must be possible to disconnect the mains adapter from the mains quickly and easily.
Do not let the mains adapter cable touch other cables.
Take care when handling mains cables and mains sockets. Mains voltage can cause fatal electric shocks.
- Turn off the receiver station (POWER on/off button to 0 position).
- Connect the round plug of the mains adapter connection cable to the DC INPUT mains socket (12) on the receiver station.
- Connect the mains adapter to a proper wall socket.
c) Pocket transmitter

It is possible to connect an electric guitar or a clip-on microphone to the pocket transmitter (via jack socket (26)) using a suitable jack cable. Observe all information in the user manuals of the guitar or clip-on microphone regarding this matter.
- In order to use the pocket transmitter in combination with the provided headset, connect the jack plug of the headset connection cable to the jack socket (26) of the pocket transmitter. Screw the plug into the socket in order to ensure a secure connection.
- The pocket transmitter can be attached to a belt using the belt clip (22).
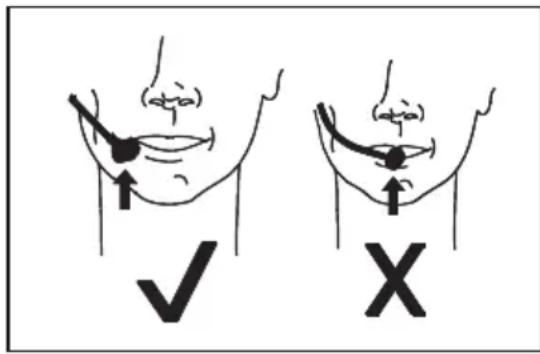
d) Headset
- Wear the headset on your head. Refer to the adjacent pictures with illustrations of correct and incorrect wearing position.
- Adjust the volume of the headset directly with the VOL control (27) on the pocket transmitter.
text_image
Medical illustration showing correct and incorrect eye movements with labeled arrows and checkmark symbols10. Inserting batteries
→ When inserting the batteries, observe the polarity markings inside the battery compartment.
Replace the batteries by new ones of the same type, once the device does not function or turn on anymore.
Remove the batteries from the battery compartment when not using the device for a longer period of time, in order to prevent leaking.
The □ symbol indicates that the batteries in the wireless microphone and pocket transmitter are discharged. Replace discharged batteries by new ones.
a) Wireless microphone
- Turn the sleeve (15) anticlockwise to uncover the battery compartment.
- Insert two batteries of type AA into the battery compartment (14).
- Reattach the sleeve and tighten it slightly.
b) Pocket transmitter
- The battery compartment (23) is integrated in the front of the transmitter.
- Slightly press the two lateral grip surfaces on the battery compartment lid (24) marked with ◀, and then and pull the lid towards the front. The battery compartment is open.
- Insert two batteries of type AA into the battery compartment.
→ Remember the position of the IR sensor iR (25) that you will need later for facilitating the connection.
- Close the lid. Make sure the lid locks into place.
11. Operation

Set the volume controls of all devices to zero before connecting the receiver station to the mains and turning latter one on. Non-observance of this instruction can cause damage.
- It is possible to play back both the wireless microphone and pocket transmitter (with headset) at the same time.
- Channels CH.A and CH.B are required for that purpose.
- In doing so, two separate channels will be allocated to the wireless microphone and pocket transmitter.
- The audio channels CH.A and CH.B feature independent volume control settings each.
- Pairing the wireless microphone and pocket transmitter (with headset) with the receiver station can be achieved by using the IR sensors iR.

Before disconnecting audio devices, set all volume controls to zero and turn off the receiver station.
a) Receiver station
- Erect the ANT-A (13) and ANT-B (8) antennas vertically (90°). Depending on the position of the receiver station, angling the antennas might be useful for improving reception.
- Set the POWER on/off button to I position to turn on the station. The LC display (7) lights up. The receiver station is ready for use.
- Set the POWER on/off button to 0 position to turn off the receiver station.
- Adjust the volume for audio channel A (CH.A) and audio channel B (CH.B) using the respective volume controls VOLUME.A (4) and VOLUME.B (4).
• Audio channel A and audio channel B can be adjusted independently. Refer to below description of the LCD.
LCD:
Audio channel A (left) Audio channel B (right)
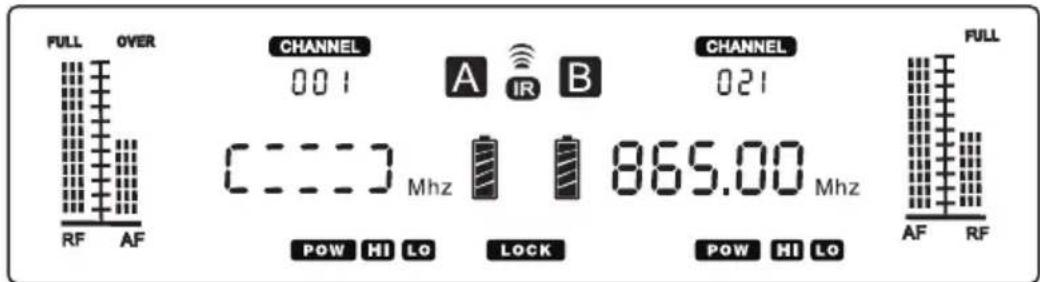
text_image
FULL OVER RF AF CHANNEL 001 A IR B CHANNEL 021 [---] Mhz 865.00 Mhz POW HI LO LOCK POW HI LO FULL AF RF | RF: Radio signal strengthAF: Audio signal strength | 865.00 MHz | Frequency displayin MHz |
 | Channel and channel number | Battery charge status of the paired device | |
 | Identification symbol of an audio channelAppears, when a transmitter is paired | POWHI LO | Transmission powerlow (LO) / high (HI) |
| [SWHW] | Pairing symbol: Flashes during pairing | LOCK | Control buttons locked(preventing incorrect inputs) |
| [KTKA] | Displayed when searching free frequencies | ||
Locking/unlocking buttons
- Press and hold the SET button (1) until CHANNEL starts flashing. It is then possible to use the buttons for making adjustments.
- If there is no input for approx. 6 seconds, all buttons will be locked automatically.
- The LOCK symbol lights up in the LCD when the buttons are locked.
Setting up channels:
- Press and hold the SET button until ⓂA/ASINES.
- Use the UP (2) and DOWN (6) buttons to set the desired frequency. Every frequency is allocated to a channel.
- There are a total of 21 channels available for each audio channel.
- It is not possible to operate two devices with different frequencies (allocated channels) simultaneously using the same audio channel (A or B).
- It is possible to allocate the same frequency to both the wireless microphone (e.g. to audio channel A) and pocket transmitter (e.g. to audio channel B).
For example:
Wireless microphone to audio channel A: Channel 005, 863.40 MHz
Pocket transmitter to audio channel B: Channel 005, 863.40 MHz
In this scenario, however, it is not possible to operate the wireless microphone and pocket transmitter at the same time. The channel will be allocated to the device switched on first.
Searching free channels:
- Use the frequency scan function to search free channels.
- Press and hold the SET button until CHANNEL starts flashing.
- Press the SET button repeatedly until [---] starts flashing.
- Press the UP or DOWN button to search the next free channel.
- The automatic channel search stops at the next free frequency, and both the channel and the frequency will be displayed on the LCD.
Selecting the signal strength:
- There are two signal strength settings available – (strong), (wealer)
- When using microphones simultaneously, the LO setting can reduce interferences.
- Press and hold the SET button until CHANNEL starts flashing.
- Press the SET button repeatedly until POW starts flashing.
- Use the UP and DOWN button to select HI or LO
When changing the signal strength setting, it must be retransmitted to the wireless microphone or pocket transmitter using the IR sensor iR (5).
When pairing, the signal strength setting is also being transmitted to the wireless microphone or pocket transmitter.
b) Wireless microphone
- The on/off switch (16) on the wireless microphone features the following functions:
- Turning on: Press until the LCD (18) lights up
- Turning off: Press and hold until the LCD shows "Off".
- Turn off the wireless microphone when not in use, in order to prevent discharging the battery.
LCD:
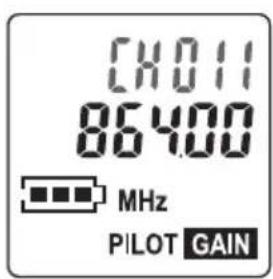
text_image
CH011 86400 MHz PILOT GAIN| CXO11 | Channel and channel number | Battery status | |
| 86460 | Frequency display in MHz |
c) Pocket transmitter
- The positions of the on/off switch (28) on the pocket transmitter feature the following functions:
- ON: Turning on (LCD (21) and power indicator (29) light up)
- OFF: Turning off (LCD and power indicator turn off)
- Center position (between ON and OFF): Muting the pocket transmitter
- Use the VOL control (27) to adjust the volume.
- Turn off the pocket transmitter when not in use, in order to prevent discharging the battery.
LCD:
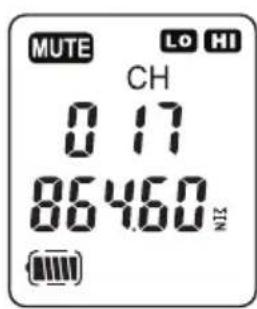
text_image
MUTE LO HI CH 0.17 86460 NIZ| CH017 | Channel number Battery status | |
| 86460 | Frequency display in MHz Transmitter muted. | |
| HI LO | Transmission powerlow (LO) / high (HI)Setting will be adoptedfrom the receiver station. |
d) Pairing wireless microphone/pocket transmitter with receiver station

Set all volume controls to zero before connecting the receiver station to the mains and turning on latter one. Non-observance of this instruction can cause damage.
- Turn on the receiver station.
Wireless microphone
- Turn on the wireless microphone
- Decide whether to transmit the wireless microphone to audio channel A (CH.A) (left side of the receiver station's display) or audio channel B (CH.B) (right side of receiver station's display).
- Press and hold the SET button until CHANNEL starts flashing.
- Use the UP and DOWN buttons to select the desired channel.
- Press and hold the SET button until IR lights up and starts flashing in the display of the receiver station.
- Pairing signals will be transmitted for approx. 8 seconds. After that, ⚙️ turns off and the operation must be repeated.
- Hold the IR sensor IR (17) of the wireless microphone close to the IR sensor iR (5) of the receiver station. The channel will be transmitted to the microphone.
- Check in the display, whether microphone and receiver station show the same channel.
- If yes, pairing has been completed.
- If not, repeat the operation.
- After successful pairing, A or B lights up in the LCD of the receiver station.
- When turning off the microphone and receiver station, both devices will be paired automatically after turning them on again. This requires the receiver station to be set on the same channel as the microphone.
Pocket transmitter:
- Open the battery compartment to uncover the IR sensor iR (25).
- Pair the pocket transmitter the same way as the wireless microphone.
→ You may pair additional microphones that are compatible.
e) Audio playback
- Turn on the connected audio device.
- Use the VOLUME.A (4) and VOLUME.B (4) volume controls on the receiver station and the volume control on the connected audio device to adjust the volume as desired.
- A paired wireless microphone will transmit signals to the receiver station. Latter one will then transmit the signals to the connected audio device. Observe the applicable ranges in regard to the signal strength setting:
- Setting HI: max. 30 m, Setting LO: max. 25 m
- Turn off the wireless microphone and pocket transmitter after use, and set the POWER on/off button on the receiver station to 0 position.
Wireless microphone/pocket transmitter (with headset):
Observe some notes on using the wireless microphone and the pocket transmitter (with headset):

Do not bring the activated microphone close to a paired speaker, in order to avoid feedback.
- Do not hold the wireless microphone by the grille (19) when in use, but place your hand on the sleeve (15).
- When using the wireless microphone, the distance to the mouth should not exceed 15 cm.
- Do not hold or bring two activated microphones close to each other.
12. Troubleshooting
| Problem Possible cause Possible solution | ||
| No function after the POWER on/off button on the receiver station has been turned on. | The power adapter is not properly connected to the wall socket.The connection cable of the mains adapter is not properly connected to the mains socket DC INPUT.No power supply at the wall socket. | Check the connections and make sure the receiver station is supplied with electricity. |
| The receiver station is turned on, but there is no sound. | The receiver station is not properly connected to the downstream audio device.The wrong input has been selected on the downstream device. | Check all sockets for correct connection and allocation. |
| Wrong channel on the receiver station. Turn on a transmitter. | ||
| Volume adjusted improperly.Volume control of the receiver station or other volume controls set to zero. | Adjust the volume properly. | |
| Audio distortions Improper setting | of the signal amplification on the connected audio device. | Adjust the amplifier or mixer properly. |
| No sound temporarily. Dead spot | prevents reception. Avoid walking into such a spot when using the microphone. | |
| Noise/signal distortion Another wireless device affects the transmission. | Avoid operating other devices on the same frequency band. | |
| Wireless microphone or pocket transmitter is not received. | Batteries are empty. Replace the batteries. | |
| There is interference or no reception during wireless transmission. Antennas are not properly aligned. | Try to readjust the antennas. | |
| There are obstacles (e.g. metal surfaces, reinforced concrete walls, etc.) inside the transmission path interfering with the sound waves.The range of the system has been exceeded.There are interfering sources (radio devices, computers, strong electronic engines, etc.) located in the proximity of the transmitter or receiver station. | Change the location or reduce the distance between transmitter and receiver station. | |
13. Cleaning and care

Under no circumstances use aggressive cleanings agents, cleaning alcohol or other chemical solutions since these can penetrate the housing or impair functionality.
- Turn off the device to be cleaned and disconnect it from any connected devices and the mains.
- Do not immerse the devices into water.
- Clean the exterior of the device with a soft, dry cloth or brush only.
14. Declaration of Conformity (DOC)
Conrad Electronic SE, Klaus-Conrad-Straße 1, D-92240 Hirschau hereby declares that this product conforms to the 2014/53/EU directive.

Click on the following link to read the full text of the EU declaration of conformity: www.conrad.com/downloads
Select a language by clicking on a flag symbol and enter the product order number in the search box. You can then download the EU declaration of conformity in PDF format.
15. Disposal
a) Product

Electronic devices are recyclable waste and must not be disposed of in the household waste. At the end of its service life, dispose of the product in accordance with applicable regulatory guidelines. Remove any inserted (rechargeable) batteries and dispose of them separately from the product.
b) (Rechargeable) batteries

You as the end user are required by law (Battery Ordinance) to return all used (rechargeable) batteries. Disposing of them in the household waste is prohibited.
Contaminated (rechargeable) batteries are labeled with this symbol to indicate that disposal in the domestic waste is forbidden. The designations for the heavy metals involved are: Cd = Cadmium, Hg = Mercury, Pb = Lead (name on (rechargeable) batteries, e.g. below the trash icon on the left).
Used (rechargeable) batteries can be returned to collection points in your municipality, our stores or wherever (rechargeable) batteries are sold.
You thus fulfill your statutory obligations and contribute to the protection of the environment.
16. Technical data
General:
Radio frequency 863 - 865 MHz
Transmission power....10 mW
Channels ....21 channels
Range....max. 25/30 m (in open area)
Operating conditions....-10 to +40 °C, 20 – 90 % RH
Storage conditions....-10 to +40 °C, 20 – 90 % RH
Receiver station:
Operating voltage/current....12 V/DC, 500 mA
Dimensions (W x H x D) 420 x 45 x 210 mm
Weight 1260 g
Power adapter:
Input voltage/current....100 – 240 V/AC, 50/60 Hz, max. 0.18 A
Output voltage/current....12 V/DC, max. 500 mA
Wireless microphone:
Operating voltage....2 x 1.5 V batteries, type AA
Frequency range 40 - 15000 Hz
Sensitivity (at 1 kHz).....>10 dBu (SINAD = 30 dB)
Signal to noise ratio.....>90 dB
Directivity......dynamic
Dimensions (∅ x H)....approx. 55 x 286 mm
Weight ....approx. 320 g (without batteries)
Pocket transmitter with headset:
Operating voltage 2 x 1.5 V batteries, type AA
Frequency range 40 – 15000 Hz
Sensitivity (at 1 kHz).....>10 dBu (SINAD = 30 dB)
Signal to noise ratio.....>90 dB
Directivity....condenser
Dimensions (W x H x D)....transmitter: 63 x 105 x 30 mm
Weight ......transmitter with headset: approx. 100 g (without batteries)
Page
France (email): technique@conrad-france.fr
text_image
1 2 4567 8910111213 ANT-A VOL A ON B ON A ON C ON D ON E ON F ON G ON H ON I ON J ON K ON L ON M ON N ON O ON P ON Q ON R ON S ON T ON U ON V ON W ON X ON Y ON Z ON AER VOL A ON B ON C ON D ON E ON F ON G ON H ON I ON J ON K ON L ON M ON N ON O ON P ON Q ON R ON S ON T ON U ON V ON W ON X ON Y ON Znatural_image
Technical line drawing of a mechanical bracket with mounting holes and a curved handle (no text or symbols)text_image
Medical illustration showing correct and incorrect eye anatomy with checkmark and X symbols indicating alignment or measurement.10. Insertion des piles
Dimensions (L x H x P)....420 x 45 x 210 mm
Poids....1260 g