KV571XN1 - Cooker BRANDT - Free user manual and instructions
Find the device manual for free KV571XN1 BRANDT in PDF.
Download the instructions for your Cooker in PDF format for free! Find your manual KV571XN1 - BRANDT and take your electronic device back in hand. On this page are published all the documents necessary for the use of your device. KV571XN1 by BRANDT.
USER MANUAL KV571XN1 BRANDT
GUIDE FOR INSTALLATION AND USE
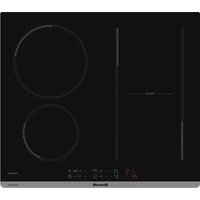
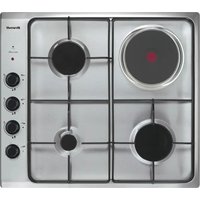
ELECTRIC COOKERS WITH STANDARD OR CERAMIC HOB
LIST OF CONTENTS
1/SAFETYGUIDELINES 3
Child safety 4
- Environmental protection 4
2 / INSTALLING YOUR COOKER
Fitting recommendations 5
- Electrical connections 5
- Connections 6
- Using the radiant and halogen rings 7
- Using the cast-iron hob 9
3 / USING YOUR COOKER
- Using the oven 10
- Accessories 12
4 / HOW TO LOOK AFTER YOUR COOKER 14
5 / MINOR MAINTENANCE BY THE USER
- Height adjustable base 18
- Adjustable feet 20
- Replacing the oven lamp 20
- Replacing the catalytic panels 21
6/MINOR TROUBLESHOOTING 22
7/ AFTER SALES SERVICE 24
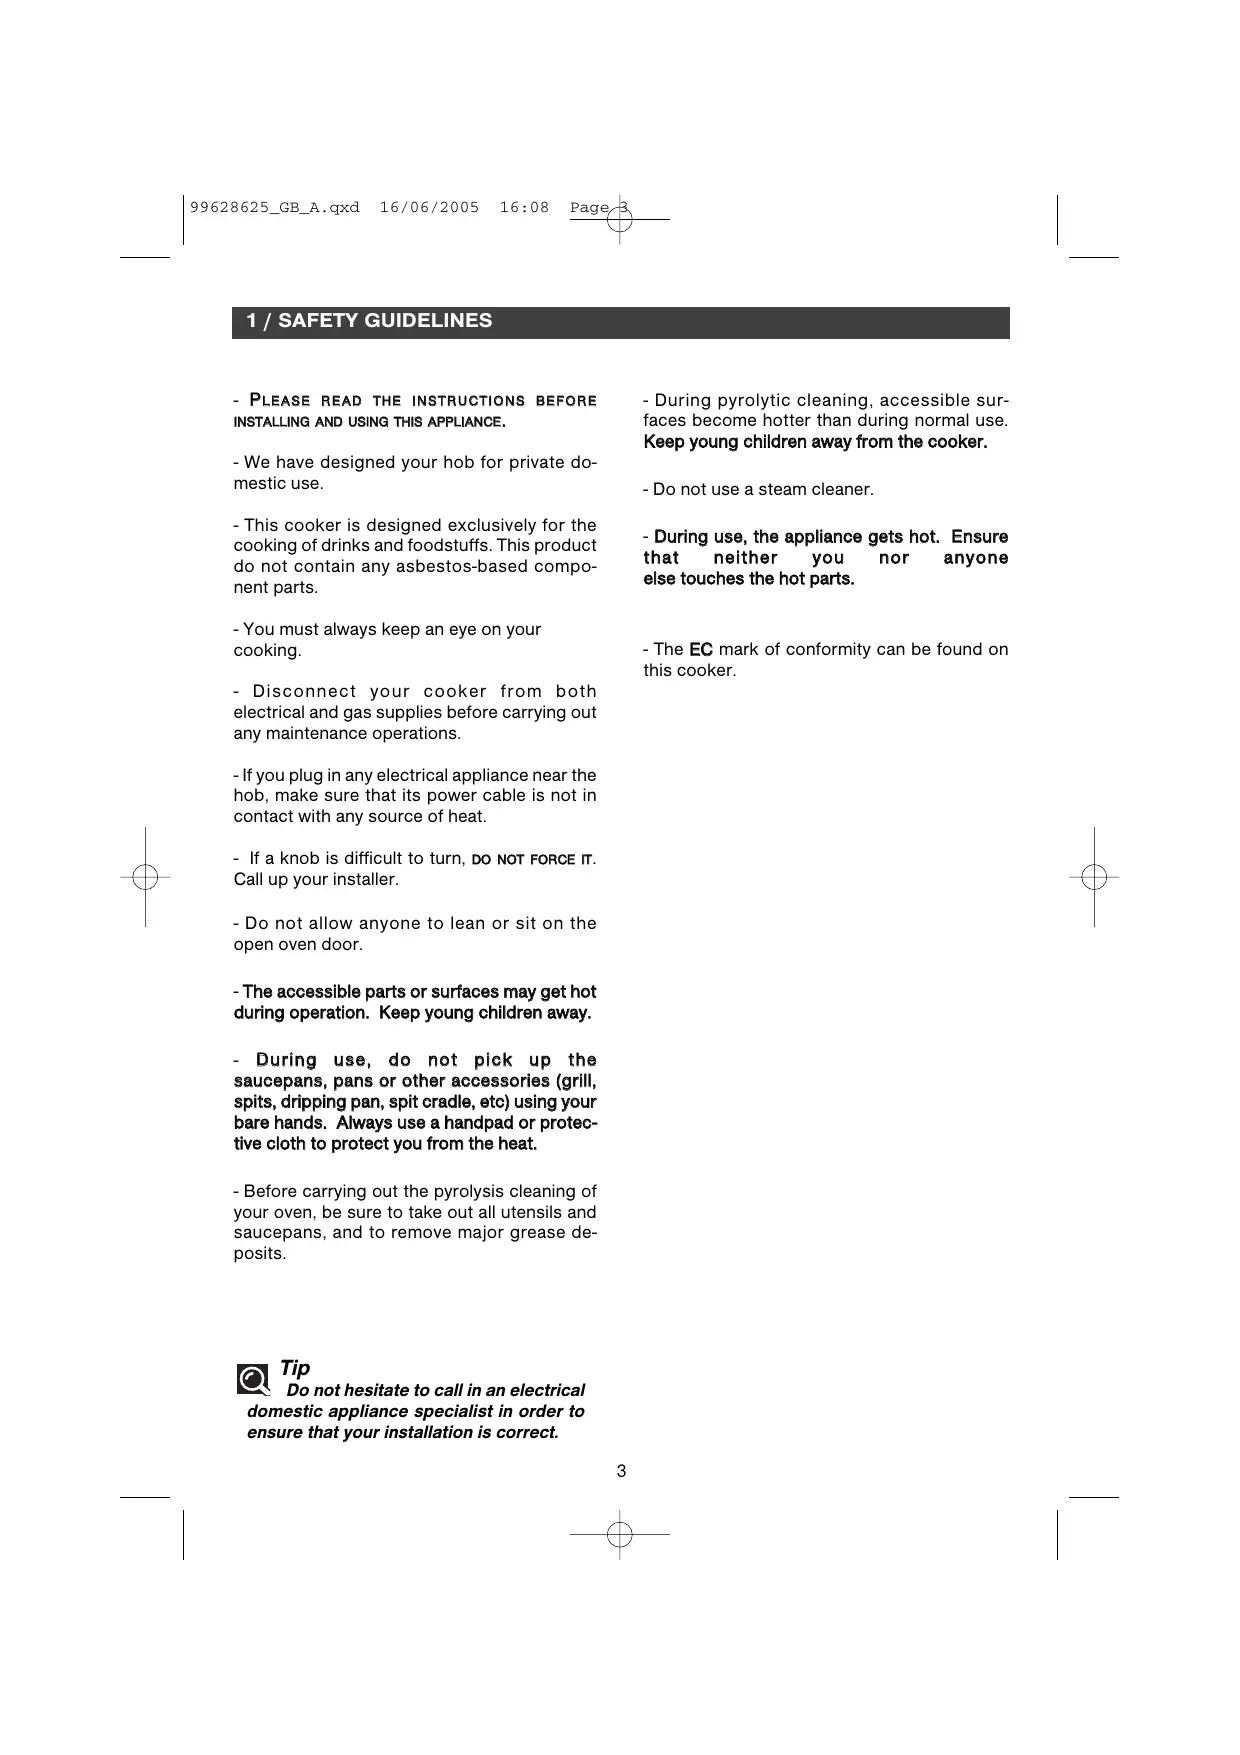
1/ SAFETY GUIDELINES
- PLEASE READ THE INSTRUCTIONS BEFORE INSTALLING AND USING THIS APPLIANCE.
- We have designed your hob for private domestic use.
- This cooker is designed exclusively for the cooking of drinks and foodstuffs. This product do not contain any asbestos-based component parts.
- You must always keep an eye on your cooking.
- Disconnect your cooker from both electrical and gas supplies before carrying out any maintenance operations.
- If you plug in any electrical appliance near the hob, make sure that its power cable is not in contact with any source of heat.
- If a knob is difficult to turn, DO NOT FORCE IT. Call up your installer.
- Do not allow anyone to lean or sit on the open oven door.
- The accessible parts or surfaces may get hot during operation. Keep young children away.
- During use, do not pick up the saucepans, pans or other accessories (grill, spits, dripping pan, spit cradle, etc) using your bare hands. Always use a handpad or protective cloth to protect you from the heat.
-
Before carrying out the pyrolysis cleaning of your oven, be sure to take out all utensils and saucepans, and to remove major grease deposits.
-
During pyrolytic cleaning, accessible surfaces become hotter than during normal use. Keep young children away from the cooker.
- Do not use a steam cleaner.
- During use, the appliance gets hot. Ensure that neither you nor anyone else touches the hot parts.
- The EC mark of conformity can be found on this cooker.

Tip
Do not hesitate to call in an electrical domestic appliance specialist in order to ensure that your installation is correct.
1/ SAFETY GUIDELINES
CHILD SAFETY
(dependently on model)
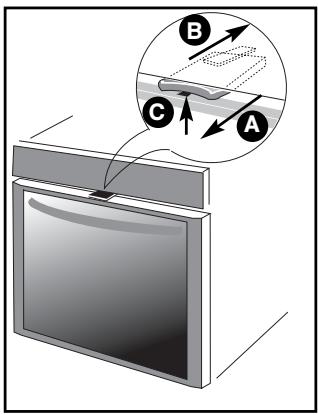
SAFETY MODE
A To activate safety mode: Pull the catch towards you.
To deactivate safety mode: Push the catch back. USING IN SAFETY MODE
When the security catch is in use: open the door and lift the catch at the same time. When the safety mode is not activated: the door opens normally.
ENVIRONMENTAL PROTECTION
This appliance's packaging material is recyclable. Help recycle it and protect the environment by dropping it off in the municipal receptacles provided for this purpose.
Your appliance also contains a great amount of recyclable material. It is marked with this label to indicate the used appliances that should not be mixed with other waste. This way, the appliance recycling organised by
your manufacturer will be done under the best possible conditions, in compliance with European Directive 2002/96/EC on Waste Electrical and Electronic Equipment. Contact your town hall or your retailer for the used appliance collection points closest to your home.
We thank you doing your part to protect the environment.
2 / INSTALLING YOUR COOKER
FITTING RECOMMENDATIONS
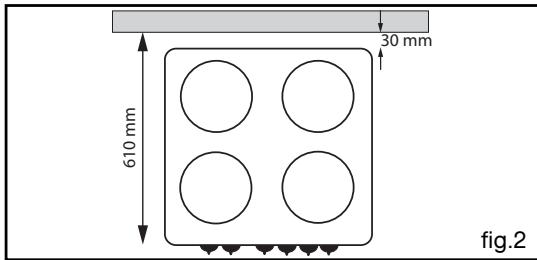
When installing the appliance you should leave the following minimum gaps between it and its surroundings (fig. 1 and 2):
- 10 mm between the sides of the appliance and the walls or furniture.
- 30 mm between the wall and the back of the appliance, with the cover closed.
- The total distance between the front of the appliance and the wall behind the appliance: 610 mm (please see the view from above in fig.2).
- If the cooker is placed on a plinth, make sure it is securely mounted so that it cannot slip off.
ELECTRICAL CONNECTIONS
The appliances are delivered without a power cable.
Connection to the network is done using an H05RRF-type cable and an all-pole switch that conforms to installation regulations in force. The guard wire must be linked to the appliance's and the installation's ground tab terminals. If the cable is damaged, it should be replaced by a similar cable.
Before making the connection, check that the section of the electrical installation wires is big enough to supply the cooker correctly.
Use a mains cable with a cross section suited to the connection (complying with the chart below).
Fixed appliances including a power cable and a mains power plug must be positioned in such a manner as to ensure that the power plug is accessible.

Warning
We shall not be held responsible in
the event of an accident resulting from an
installation that ha incorrectly earthed.

3 possible insertion methods
NOMINAL SECTION OF FLEXIBLE MAINS CABLE
(TYPE H 05 RRF) AND SIZE OF FUSE TO USE
ACCORDING TO YOUR APPLIANCE
| Connection Supply voltage | Monophase | Triphase 3 ph + neutral | Biphasep 2 ph + neutral | |
| 220-240 V~ | 400 V~ | 400 V~ | ||
| All-electric or ceramic cooker | *Cable section | 3 x 6 mm² | 5 x 1,5 mm² | 4 x 2,5 mm² |
| Fuse | 32 A | 16 A | 20 A | |
- Taking into account the simultaneity coefficient in compliance with standard EN 60 335.2.6.
| Connection Supply voltage | Monophase | Triphase 3 ph + neutral | Biphasep 2 ph + neutral | |
| 220-240 V~ | 400 V~ | 400 V~ | ||
| 2-generator induction cooker and electric oven | Cable section | 3 x 6 mm² | 5 x 1,5 mm² | 4 x 4 mm² |
| Fuse | 40 A | 16 A | 30 A | |
2 / INSTALLING YOUR COOKER
- CONNECTIONS
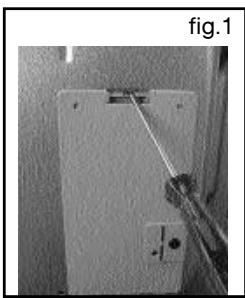
- Open the plastic trap door located in the lower right hand corner of the rear casing. To do this:
- stick a screw driver between the metal casing and the trap door then pivot the trap door (fig. 1).
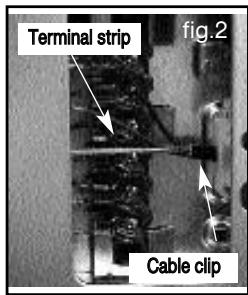
- Undo the cable clips (fig. 2)
- Put the mains cable through the side of the casing, into the cable tensioner located to the right of the terminal strip (Refer to previous chart to find the cable section required) (fig.2).
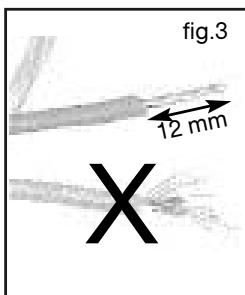
- Strip 12mm off each mains cable wire and carefully twist the strands (fig. 3).
-
Unscrew the screws on the terminal strip
-
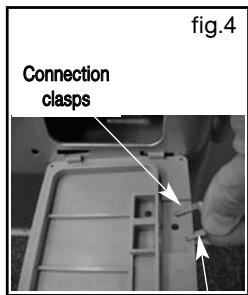
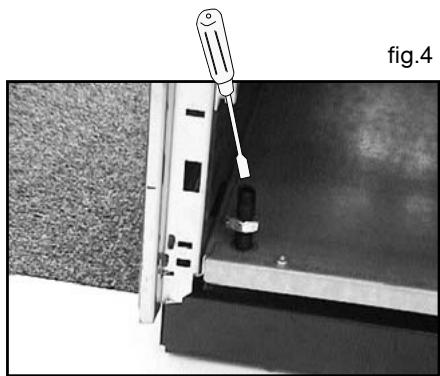
Remove the connection clasps on the cover by removing the black clip (fig.4).
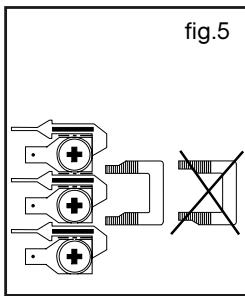
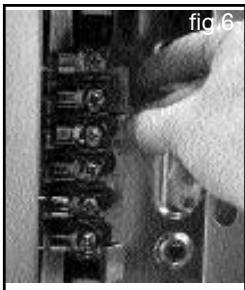
- Position them in the direction shown in (fig. 5). Refer to the diagram etched on the cover for fitting the connection clasp(s) (fig.6).
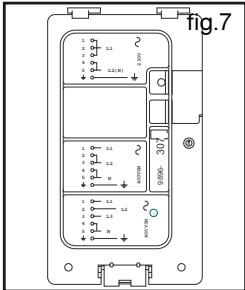
- Connect the cable wires according to the diagram on the cover (fig. 7) and the type of supply. All the strands of the supply wires must be firmly held under the screws. The green/yellow earth wire must be connected to the earth terminal 12 .
- Before tightening, check that the terminal screw is not biting into the insulating sheath around the wires.
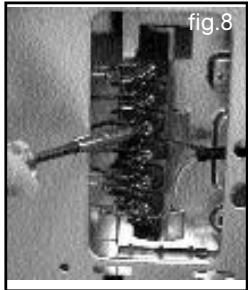
- Tighten the screws on the terminal strip and check that the wires are correctly connected by pulling each one (fig.8).
- Attach the cable by tightening the cable clip.
- Replace the connection clasps not used in the cover. Replace the black clip and close the cover.

Tips
If you observe a problem when you turn on the appliance, carry out a check to ensure a satisfactory connection and satisfactory connection and satisfactory positioning of the strips.

Warning
Be sure to follow the above instructions carefully in order to ensure a good connection. A faulty connection could lead to dangerous overheating of your cable.
3 / USING YOUR COOKER
- USING THE RADIANT AND HALOGEN RINGS
- Useful tips to cook economically on radiant and halogen rings
-
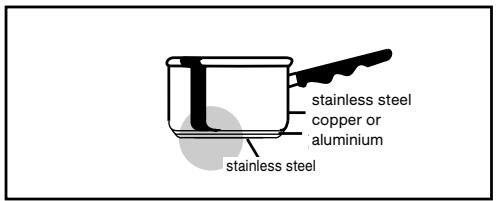
Pans must be designed for cooking with electricity. They can be made of stainless steel with a triple base (steel, aluminium or copper sandwich), of aluminium, whether Teflon-coated or not, ceramic, "vision" glass, thick enamelled steel or cast iron (for these, select a pan with a base designed for ceramic hobs, e.g.: VITROBASE).
-
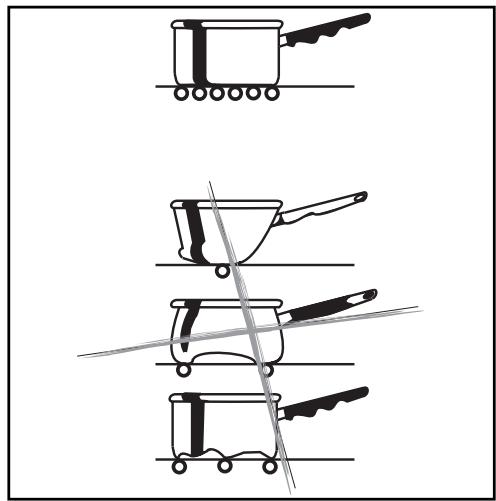
It is important that the base is thick and properly flat so that it is in contact with the whole heating surface. A pan with a concave or dented base will give poor results, with hot points which may burn, and is more likely to leave traces of metal on the hob.
-
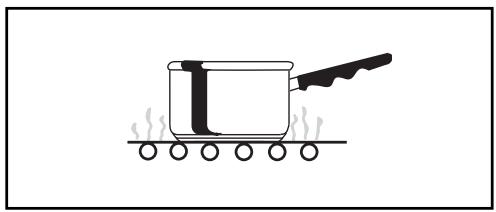
Best results and the guarantee of quality over time are obtained by using saucepans in which the diameter of the base corresponds to the design representing each heating zone on the ceramic hob.
-
A smaller pan can be used without damaging the hob, but energy will be wasted. If it is larger, it will take longer to heat up.
Automatic regulation of the rings:
The radiant ring regulates itself automatically. It turns on and off in order to maintain the selected power setting. In this way, the temperature remains constant and tailored to cooking your dishes.
The regulation frequency varies according to the power setting selected.
3 / USING YOUR COOKER
- USING THE RADIANT AND HALOGEN RINGS
- Energy efficiency: to finish cooking, switch to position "0", and leave the saucepan or pan in place to use the accumulated heat to best effect. (This helps you save energy). Use lidded pans as often as possible to avoid heat losses through evaporation.
- The ceramic surface heats up inside the areas marked out by the screen printing on top of the heating elements. There is virtually no dispersion of heat outside these areas.
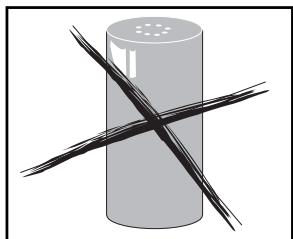
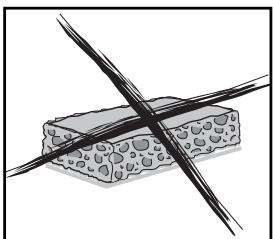
- Avoid using the hob as a cutting board.
- Cooking food directly on the hob is not recommended. Never place plastic items on the hob when it is still hot.
- Never leave an empty enamelled or aluminium saucepan or pan on a cooking surface.
- Never use aluminium paper or place items wrapped in aluminium directly on the cooking surface. This may permanently damage your appliance.
- The hob may get scratched by materials which are harder than it, (such as grains of sand for example), which are carried by vegetables or on the bottoms of saucepans.
- The bases of oversized utensils may trap and carry materials which cause staining on the hop.
- Avoid spillages of sugar, liquid sugar or jam, and should these occur remove them immediately as they can be the cause of tiny surface blemishes.
The indicator lights
- An indicator lights up on the cooker control panel when a ring begins operating.
- If the surface temperature exceeds a certain limit, the excess heat indicator lights up on the ceramic hob even after the radiant ring has cut off. Take great care as this means the cooking zone is still hot.
Warning - Never s
-
Never stare directly at a halogen ring when it is operating.
-
Items should not be placed on the gas hob of your cooker, particularly plastic ustensils or sheets of aluminium placed on a surface when it is still warm.
-
If a crack appears on the surface, immediately disconnect the cooker from the power source to avoid any risk of electric shocks.
Contact your installer immediately. Do not use the hob until it has been repaired.
3 / USING YOUR COOKER
- USING THE CAST-IRON HOB
There are two types of controls for the hobs (depending on the model):
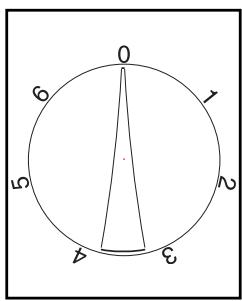
Rapid cast-iron hob including temperature limiting device, with control switches numbered from 0 to 6.
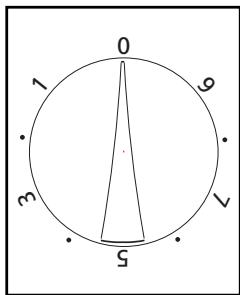
Rapid cast-iron hob controlled by an energy regulator with switches numbered from 0 to 9.
- Tips for using your cast-iron hob (depending on model)
- Before using the hobs for the very first time, allow the hobs to heat up with nothing on them at maximum temperature for 3 minutes to harden the coating.
- A "Power on" light comes on when a hob is operating.
-
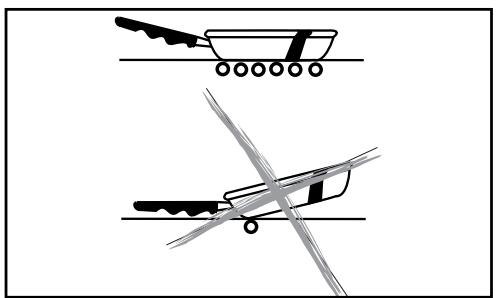
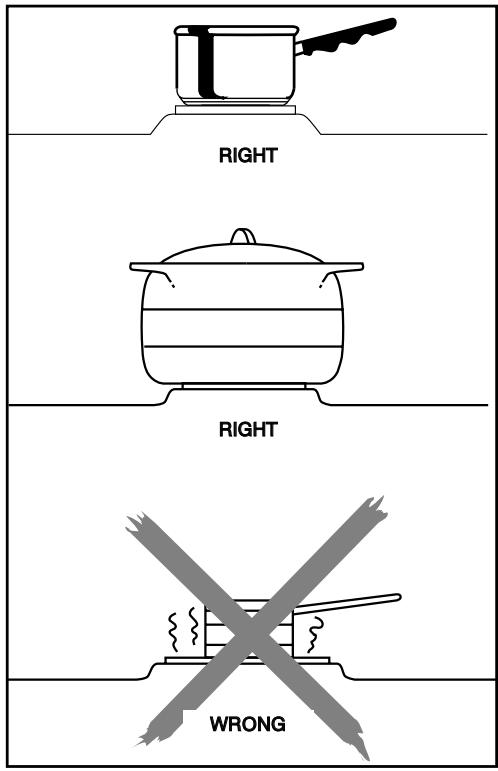
You should use flat bottomed recipients which sit perfectly on the surface of the ring:
-
Made from stainless steel with a thick or sandwich base.
-
Made from aluminium with a thick base
-
Made from enamelled steel (thick sheet metal).
-
You should select a saucepan or pan of a size suited to your actual needs. The base diameter of the pan should be equal or superior to that of the ring used. Use a lid as often as possible to reduce losses through evaporation.
- When your preparation reaches boiling point, there is no point in allowing it to boil with huge bubbles. The food will not cook more quickly. It will cook better on a lower light which will maintain gentle boiling.
- You can turn the hotplate off by setting it to 0 before the cooking is finished; you will use the heat accumulated in the hotplate and therefore save on electricity.
- Use recipients with a dry base in order to avoid the hobs rusting.
3 / USING YOUR COOKER
- USING THE OVEN
- Tips for using oven
- Using the oven for the first time: Before using your oven for the first time, heat it up empty with the door closed for approximately 15 minutes on the maximum setting. The protection which surrounds the oven cavity may at first produce a particular smell, which is due to its composition. You may also notice that some smoke it produced the first time the oven is heated.
- Before beginning cooking, consult the user instructions to find the most appropriate heat setting and the oven level to be used for the cooking accessories.
- The cooking guide for your appliances provides the necessary information to create a certain number of popular dishes.
-
The adjustment settings for the oven thermostat in the cooking guide are provided for information purposes only. Consequently, in order to avoid excess smoke being produced by a cooking temperature which is too high, it is preferable to reduce the oven power setting.
-
By turning off the oven 5 to 10 minutes before the end of your cooking session, you can benefit from the accumulated heat and save energy.
- Child safety (depending on model)
An additional protection device making it possible to avoid contact with the oven door is available from your distributor under the following reference: WHITE GRID. This device should be fitted if young children are present.
| WHITE GRID | |
| Cooker width and door type | Sales Ref. |
| 50 cm sheet metal door | KK360WE1 |
| 60 cm sheet metal door | |
Warning - Ensure th
Warning
-
Ensure that your oven door is securely closed, to ensure that the door seal can play its effectively.
-
Cooking in the oven and on the grill should be carried out with the cooker cover opened in order to facilitate the removal of hot gases at the back of the work top.
- Do not cover the inside of your oven with aluminium sheet. Otherwise, this will result in a buildup of heat which will have a harmful effect upon the cooking or roasting and will damage the enamel.
- During operation, do not leave the oven door open for more than three minutes in order to avoid excessive temperature at the knobs.
- During use, the appliance gets hot. Take care that neither you nor anyone else touches the heating elements.
99628625_GB_A.qxd 16/06/2005 16:08 Page 11
NOTES
3 / USING YOUR COOKER
- ACCESSORIES
(depend on model)
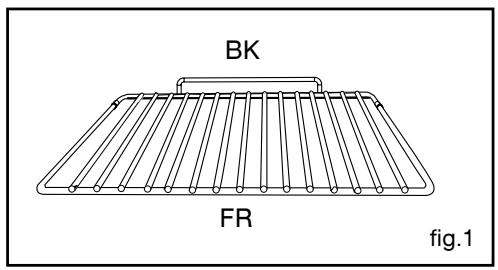
- Anti-drop safety shelf fig.1
The shelf can be used to support all dishes and tins containing foodstuffs to be cooked or browned.
It can also be used for grilling meat (with the meat placed directly upon it).
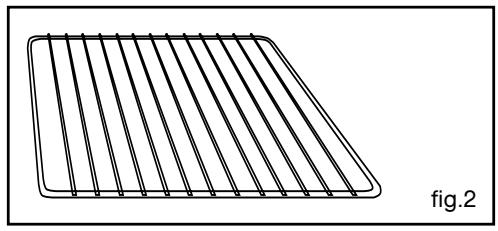
- Flat shelf fig.2
The flat shelf can be used for all dishes and tins containing food to be cooked or browned, as well as for grilling.
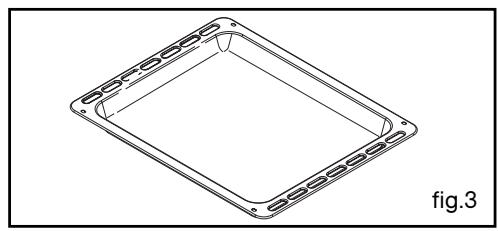
- Multi-purpose dripping pan fig.3
This can be used as a baking tray and has sloping sides. It can be used for cooking choux buns, meringues, small cakes, flaky pastry, etc.
Inserted into the runners under the shelf, it collects the juices and fat produced when grilling. It can also be used, half-filled with water, as a bain marie.
Do not roast joints of meat in the dripping pan as this will inevitably result in fat splashes on the sides of the oven.
Never place this tray directly on the floor of the oven, except on the GRILL setting.
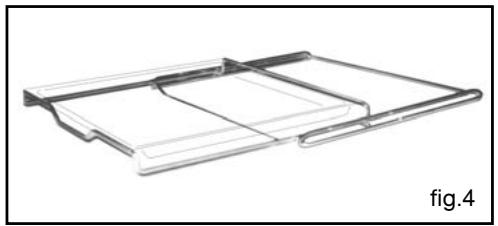
- Removal of dishes using a sliding oven removal system fig.4
Fitted with a cake plate holder, this makes it possible to completely remove the dish from the oven enclosure, enabling you to intervene easily during cooking.
The system has a anti-drop safety system enabling it to bear a weight of 5kg spread uniformly.
3 / USING YOUR COOKER
- ACCESSORIES
(depend on model)
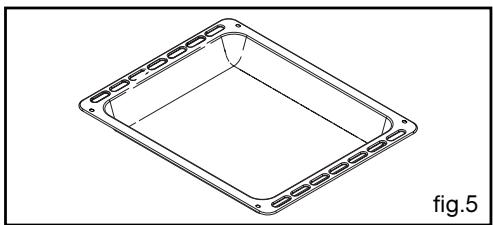
- The dripping pan fig.5
This is used to collect juices and fat from cooking on the high grill and the pulsed grill (according to model).
It can be used as a cooking dish according to the size of the item to be cooked (for example poultry surrounded by vegetables, at medium temperature).
Avoid placing small roasts or meat joints in it and cooking them at high temperatures as you will automatically have problems of fat and juices spattering up the walls of the oven.
Never place this dish directly on the bottom.
- Rotisserie (depending on model) fig.6
Cooking on a rotisserie is very effective and results in flavourful and evenly cooked joints. To use:
- engage the spit cradle in the 3rd shelf position from the bottom (check the direction)
- slide one of the forks onto the spit, then the meat for roasting, slide on the second fork, centre them and twist the forks to tighten them,
- place the spit on its cradle,
- push gently to engage the point of the spit in the square bit drive at the back of the oven,
- place the multi-purpose dripping pan on the lower shelf position to collect the cooking juices.

Warning
If the spit has an insulated handle, unscrew and remove it before reclosing the door.
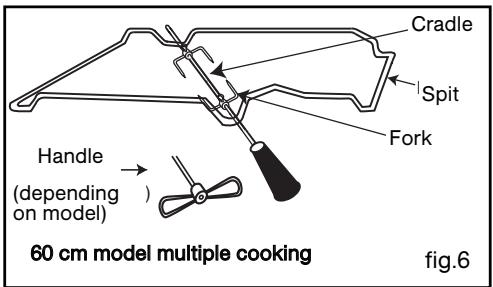


Warning
Cradle direction : you should place the cradle in such a manner that the hole for the spit is fully visible.

4 / HOW TO LOOK AFTER YOUR COOKER?
| WHAT TO DO? | |
| Casing | - Sponge the top with soapy water. In the event of spills, use a standard non abrasive paste cleaner for enamel. Shine with a dry cloth, or even better with a shammy-leather. Do not allow acidic liquids (lemon juice, vinegar...) to lay on the enamel for long. Before opening the cover, remove all soiling or spattering from this. Do not close it again while the cooker is still warm. For polished metal surfaces, use commercial products designed for the upkeep of polished metal. |
| Oven door window | - After a particularly messy cooking session, we recommend that you clean the inner window with soapy water on a damp sponge. |
| Control knobs | - Use soapy water on a damp sponge. |
| Cast-iron hob | The electric hotplate is protected by a black surface coating. Therefore, avoid using any abrasive products. After use, wipe it clean with an oily cloth. Keep it perfectly dry or slightly oiled if it is not used for long periods. If ever a electric hotplate starts to rust, remove the rust with (with emery paper or similar) and re-coat the electric hotplate with a high-temperature renovating product to be found at your local distributor. |

Warning
Before cleaning, allow the appliance to cool down and check that all the knobs are in FF position.
As a general rule, abrasive powders and metallic sponges should not be used.

Warning
-
Do not use high-pressure steam cleaners.
-
Never splash or spray the cooker with water.
4 / HOW TO LOOK AFTER YOUR COOKER?
| WHAT TO DO? | ACCESSORIES EMPLOYED | |
| Radiant and halogen rings | STAIN MINOR : - Soak the area to be cleaned with hot water, then wipe it. | - Clean sponges. |
| ACCUMULATED BURNT-ON STAINS : - Soak the area to be cleaned with hot water, use a special ceramic hob scraper to remove the worst, finish off with the rough side of a cleaning sponge, then wipe it clean. | - Clean sponges. - special ceramic hob scraper. | |
| RINGS AND TRACES OF LIMESCALE : - Apply hot white spirit vinegar on the stain, leave to act then wipe off with a soft cloth. - Use a commercial cleaner. | - Special ceramic hob cleaner. | |
| BURNT-ON STAINS FOLLOWING SUGAR SPILLAGE, MELTED ALUMINIUM OR PLASTIC : - Apply a special ceramic hob cleaner on the surface, preferably one which contains silicone (protective action). | - Special ceramic hob cleaner. | |
Scouring powder
Abrasive-baked sponge
Cream
Ordinary sponge or special sponge for delicate items
To keep your appliance in good working order, we recommend that you use Clearit household products.

Professional expertise for the general public
Clearit offers you professional products and adapted solutions for the daily upkeep of your household and kitchen appliances.
You may find them in conventional retail out lets, along with a complete line of by-products and consumables.
4 / HOW TO LOOK AFTER YOUR COOKER?
- OVEN WITH STANDARD ENAMEL
- Clean the walls with a cloth soaked in very hot soapy water, to remove fat splashes. We advise frequent cleaning.
When a large spillage has occurred, wipe it up if possible with a damp sponge or a soft brush. Otherwise, take a sponge or a cloth soaked in hot soapy water or cream cleaner (for enamel or stainless steel) and cover the remaining stains. Leave it there overnight; the deposits will be easily removed the next day.
- OVEN WITH CATALYTIC ENAMEL (self-cleaning)
- This oven, which has a continuous cleaning system, consists of 3 panels coated with a special microporous enamel which makes them self-cleaning. As soon as stains appear they are dispersed and diffused across the microporous surface. They are oxidised from both sides and gradually disappear. The self-cleaning enamel is particularly effective on grease, but not on sugar: for this reason, the floor, which is more likely to have sugar spilled on it, is not coated.

Tips
-
That these panels are not scratched with a metal brush, or sharp or pointed instruments.
-
That you do not try to clean them with scouring products.
-
When cooking under the grill, a large amount of fat is splashed on to the walls, where the temperature is not high enough for it to be eliminated completely during cooking. When this occurs, after cooking keep the oven on for 20 to 30 minutes, at maximum heat. If traces remain, they will be reduced during subsequent cooking and in this way you will prevent the production of excessive smoke.

Danger
- When using this cleaning system, the oven door becomes hotter than in normal use, keep young children away.
4 / HOW TO LOOK AFTER YOUR COOKER?
- OVEN WITH PYROLYTIC ENAMEL
-
This type of oven is cleaned via the high-temperature destruction of stains and soiling caused by splashing or spills during cooking.
-
The smoke given off is cleaned as it passes through a catalyst. Do not wait until the oven is too full of grease before carrying out cleaning.
When should you carry out pyrolysis cleaning?
- When your oven starts giving off smoke during preheating or gives off a great deal of smoke during cooking.
- When your oven gives off an odour when cold, following the cooking of various dishes (lamb, fish, grilled meat, etc.).
It is not necessary to carry out pyrolysis cleaning after each cooking session, but only if the degree of soiling and spattering justifies this.
| Low spatter cooking | Sponge cakes, vegetables, pastries, quiches, soufflés, etc. | Cooks without spitting: Pyrolysis cleaning is unnecessary. |
| Medium spatter cooking | Meat, fish, (in a dish), stuffed vegetables. | Pyrolysis cleaning every three cooking sessions. |
| High spatter cooking | Large pieces of spit roasted meat.. | Pyrolysis cleaning can be carried out after cooking something of this type, if major spattering has occurred. |
Before starting the pyrolysis cleaning process, remove all accessories from inside the oven, including all pots and pans, etc. Remove any major grease deposits which may have built up in order to avoid the risk of fire or excessive smoking.
The cleaning can be carried out at any time and even at night (if you want to take advantage of "off-peak" electricity prices) using the auto timer equipped with the delayed start function (according to model).
When opening the door after the pyrolysis cleaning session, you will notice a little whitish residue on the walls of the oven. When the oven is completely clean, simply wipe this with a damp sponge to remove it.
In order to avoid excessive spitting or splashing during cooking always check:
- That the correct cooking positions recommended in the instructions are
observed at all times.
- The correct oven level height setting is used.
- The correct temperature is used.
If, despite all this, a large piece of meat still leads to spitting and smoking, you should reduce the power of the oven.

Danger
-
During the pyrolysis cleaning process, the surfaces get hotter than during normal use and the oven should be kept well away.
-
Regardless of the oven type, never place flammable products (rags, towels, paper, household cleaning products, instructions, etc.) in the pan and accessory compartment of your oven. You run the risk of a fire for which we cannot be held liable.
- Do not cover the interior of the oven with aluminium paper to reduce cleaning. This will lead to overheating and will damage the enamel.
5 / MINOR MAINTENANCE BY THE USER
Your cooker is equipped with a height adjustable base which allows you to adjust the height of the appliance.
- You wish to raise the cooker less than 2,5 cm (1 inch):
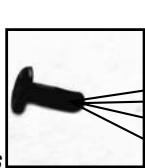
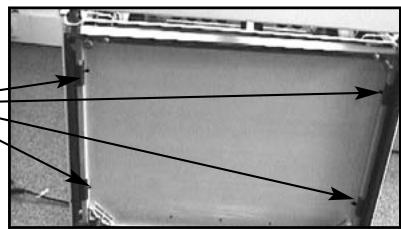
fig.1
- Disconnect the cooker from the power supply and lay it on its rear wall.
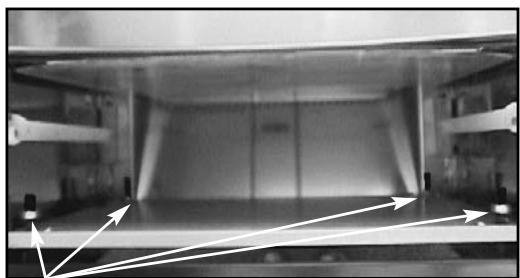
- Remove the 4 pins (fig.1) inside the storage compartment.
- Disassemble the 2 painted frames (fig.2).
- Put the cooker upright.
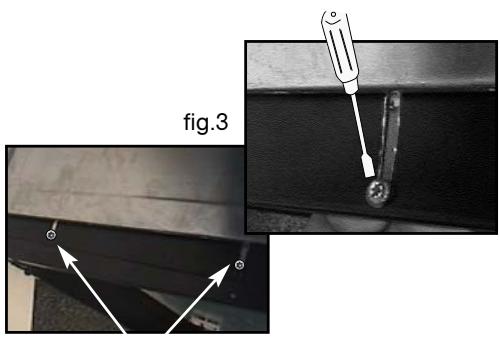
- Open the hatch under the door or take out the drawer according to the cooker model, and loosen the 4 nuts located in the bottom of the appliance (fig.3).
- Adjust the 4 screws that regulate the height of the cooker (fig.4).
-
When the height of the cooker suits you, tighten the 4 nuts again and reinstall the drawer or the hatch under the door (according to the model).
-
You wish to raise the cooker between 2,5 and 4 cm (between 1 and 1^1/2 inches):
-
Open the hatch under the door or take out the drawer according to the cooker model, and loosen the 4 nuts located in the bottom of the appliance (fig.3).
- Adjust the 4 screws that regulate the height of the cooker (fig.4).
- When the height of the cooker suits you, tighten the 4 nuts again and reinstall the drawer or the hatch under the door (according to the model).
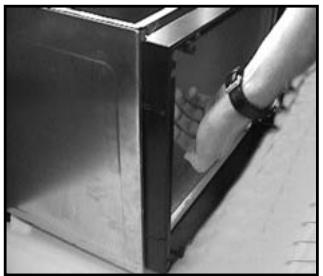
fig.2

nuts
fig.3
5 / MINOR MAINTENANCE BY THE USER
- You wish to raise the cooker between 4 and 7 cm (between 1/2 inches):
- Open the hatch under the door or take out the drawer according to the cooker model, and loosen the 4 nuts located in the bottom of the appliance (fig.1).
- Screw down the 4 screws that regulate the height of the cooker (fig.2).
- When the height of the cooker suits you, tighten the 4 nuts again and reinstall the drawer or the hatch under the door (according to the model).
-
Unscrew the 4 screws located on the base - 2 on each side of the appliance - and remove them (fig.3).
-
Screw each screw into the above hole (fig.4) without locking them. The 2 frames should be able to slide with respect to each other.
nuts
fig.1
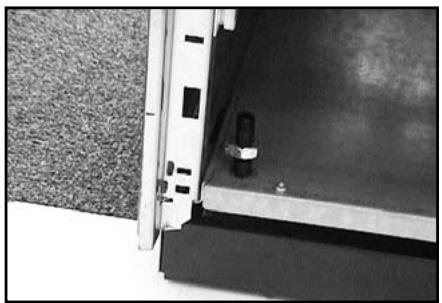
fig.2
screws
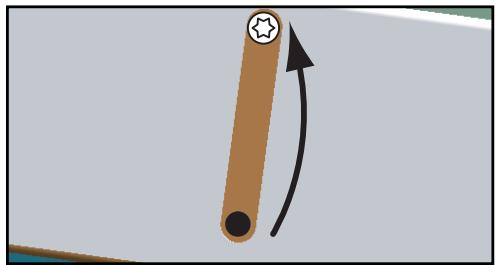
fig.4
5 / MINOR MAINTENANCE BY THE USER
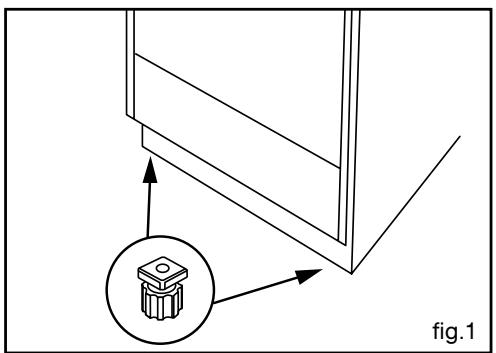
ADJUSTABLEFEET
(depend on model) fig.1
Certain appliances have adjustable feet at the front making it possible to obtain a flush fit on any floor surface, by screwing or unscrewing them.
- REPLACING THE OVEN LAMP
The lamp is accessible (according to the model):
At the back of the appliance for the 50 cm model (figure 2):
Bulb information:
- Spherical type, diameter 45 mm, -40 W,
- 220/240 V
- E14 base with screw fitting.
To remove the lamp, it is necessary to dismantle the rear cover.
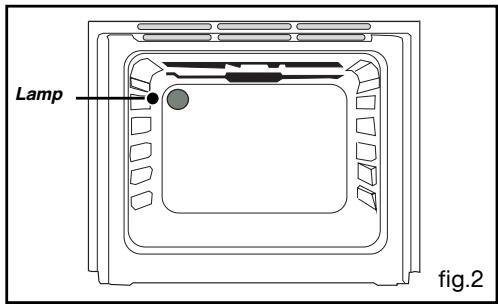
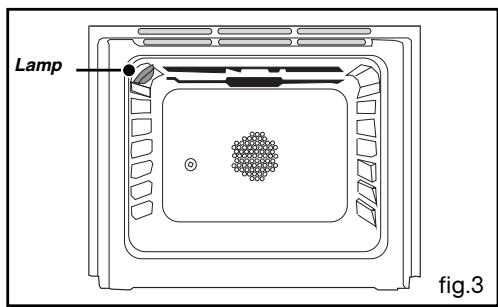
Inside the oven for the 60~cm model (fig. 3):
The bulb is located on the ceiling of the oven cavity.
- Unscrew the bulb anti-clockwise.
Characteristics of bulb :
- 15 W.
- 220/240 V
- 300^
-
E14 base with screw fitting.
-
Change the bulb then put back the lamp cover and plug the oven back in.
Danger Unplug t
Unplug the cooker before carrying out work on the bulb in order to avoid any risks of electric shocks and only carry out this work when the appliance is cold.

Tips
To make it easier to unscrew the
lamp cover put on a rubber glove.
5 / MINOR MAINTENANCE BY THE USER
- REPLACING THE CATALYTIC PANELS
Before carrying out any dismantling work, allow the appliance to cool and check that the cooking selector knob is in the "Off" position.
Modèle 60
- Slotted side liners
Turn the screw a quarter of a turn in order to remove the slotted catalytic liners (Fig.1). Move it towards the front in order to unlock the two tabs inserted into the oven chamber (Fig.2).
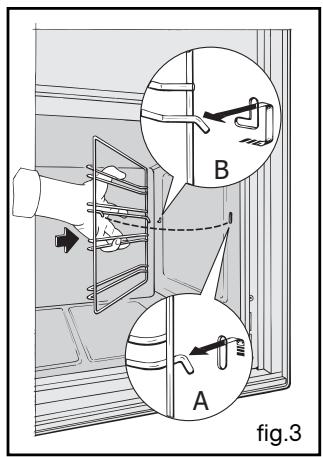
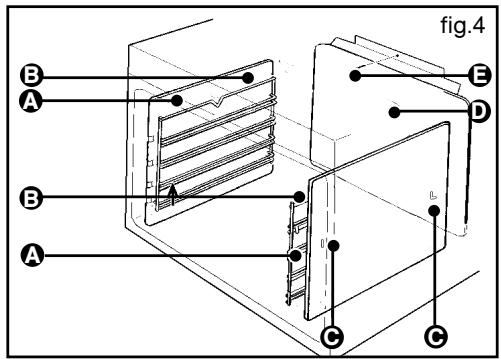
- Side liners with wire slots
Unhook the wire runner (B Fig.4) at the front by lifting it (diagram A Fig.3). Pull the whole slot towards you, lift it to unhook the back fastener (diagram B Fig.3). Pull it out of the 2 holes (C Fig.4) in the Catalytic liner and the oven muffle (A Fig.4). Install the new elements (liners and/or runners) by carrying out the above operations in reverse order.
- Replacing the base liner
Completely unscrew the screw (E Fig.4) located at the top of the base liner (D Fig.4). Tilt the liner towards the front in order to remove it from the oven chamber. Fit the new liner by carrying out the above operations in reverse order.
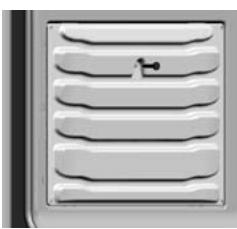
fig.1
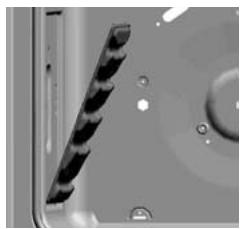
fig.2
Warning For all of
Warning
For all cleaning work in the oven
cavity, the oven must be switched off.
6 / MINOR TROUBLESHOOTING
You have doubts about whether your cooker is working correctly; this does not necessarily mean there is a breakdown. Nevertheless, check the following points:
| IF YOU REALIZE THAT | POSSIBLE CAUSES | WHAT SHOULD YOU DO? |
| Your oven does not heat. | - Your hob is connected incorrectly. -The temperature selector (thermostat) is in position 0.Autotimer not initialised. | → Set your thermostat to the desired cooking temperature → Check that the timer or minute minder (depending on model) is at manual setting. (see instruction book). |
| -The display is blocked. -The programmer is not ini-tialised | → Unplug for 5 minutes and then plug again. → Check your electrical connection (take care not to screw into the elec-trical cable sheath). | |
| Your oven produces too much smoke du-ring cooking or you notice that major odours are being gi-ven off. | - This is normal the first time the appliance heats up. - Cooking temperature too high. - Major soiling. - Household cleaning pro-duct on the walls of the oven. | → Use the thermostat to lower the cooking temperatures; these are gi-ven in the cooking guide for informa-tion only. → Proceed to clean your oven by rinsing the cleaning product with water. NB: You are reminded not to use the multi-purpose dripping pan as a roasting tin |
| Condensation on the windows. | - Food is wet or too cold. | → When cooking food with a high water content (e.g. stuffed toma-oes), it is advisable to pre-heat the oven to the cooking temperature; this prevents condensation forming on the cold glass surfaces. |
| Craks un the ceramic top. | - Falling objects. | → Immediately disconnect the ap-pliance from the power supply. → Do not use the hob again. Contact your installer. |
6 / MINOR TROUBLESHOOTING
You have doubts about whether your cooker is working correctly; this does not necessarily mean there is a breakdown. Nevertheless, check the following points:
| IF YOU REALIZE | POSSIBLE CAUSES | WHAT SHOULD YOU DO? |
| The pyrolysis cleaning cycle does not work (depending on model) | - Has the start-up of the pyrolysis cleaning cycle been carried out correctly? | Check the electrical connectionCheck that the door is properly closedCheck the selector is in the right positionDo not stop the pyrolysis cleaning cycle underway |
| - Electricity switch cut-off during the pyrolysis cleaning cycle? | Restart the cycle | |
| The door will not open (pyrolytic models) | - Following a pyrolysis cleaning cycle, the oven temperature is still too high. Access is denied for your safety. | In all cases, your oven must be turned on at the mains.During a pyrolysis cycle, the door is locked ; it cannot be opened until the oven temperature falls below 275°C. |
| Your new cooker keeps tripping out the electric system | -Poor connection- Several electrical appliances are running at the same type. | Switch off the electricity supply to the other devices Check the electrical connections. |
| Marks on the ceramic surface | - The cleaning product used is unsuitable. | Please see the “How to look after your cooker” chapter in the instructions. |

Tips
In all cases, if you are unable to solve the problem, contact the After-Service tment right away.
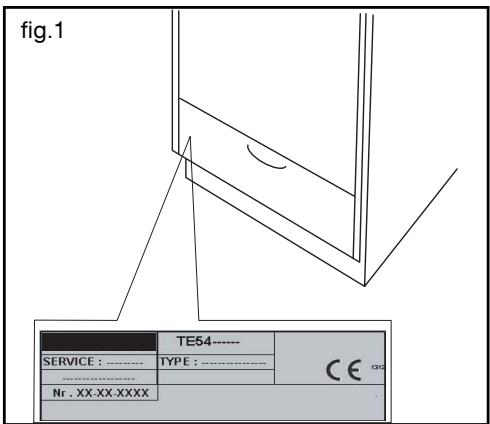
7 / AFTER SALES SERVICE
Any maintenance on your equipment should be undertaken by:
- either your dealer,
- or another qualified mechanic who is an authorized agent for the brand appliances.
When making an appointment, state the full reference of your equipment (model, type and serial number). This information appears on the manufacturer's nameplate attached to your equipment (fig.1).