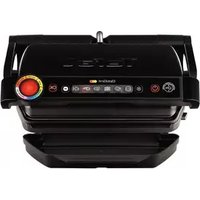
Ultra Compact Grill GC3001 - Griddle TEFAL - Free user manual and instructions
Find the device manual for free Ultra Compact Grill GC3001 TEFAL in PDF.
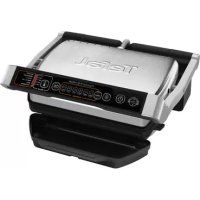
| Product Type | Plancha / electric grill |
| Brand | Tefal |
| Model | Ultra Compact Grill GC3001 |
| Cooking Functions | Grill (contact), barbecue (open plates at 180°), mini-oven (depending on model, adjustable spacing) |
| Cooking Plates | 2 removable plates, non-stick coating, dishwasher safe |
| Drip Tray | 2 removable drip trays, dishwasher safe, MAX level indicator |
| Temperature Control | Adjustable thermostat (positions Mini, 2, 3, Max) |
| Indicator Lights | Red light (heating), green light (ready) |
| Power | 2000 W (standard estimate for this type of appliance) |
| Power Supply | 220-240 V, plug with integrated ground |
| Power Cord | Removable (depending on model) or fixed, with storage clip |
| Dimensions (W x D x H) | Approximately 35 x 25 x 12 cm (closed, estimate) |
| Weight | Approximately 3 kg (estimate) |
| Safety | Hot surfaces, do not immerse, do not use without plates, do not plug in empty |
| Maintenance and Cleaning | Plates and trays dishwasher safe; appliance and cord do not immerse; do not use metal sponge |
| Spare Parts and Repairability | Replacement plates available at Authorized Service Center; power cable replaceable by professional |
| General Information | Domestic use only; complies with European standards; possible vertical storage |
Frequently Asked Questions - Ultra Compact Grill GC3001 TEFAL
User questions about Ultra Compact Grill GC3001 TEFAL
0 question about this device. Answer the ones you know or ask your own.
Ask a new question about this device
Download the instructions for your Griddle in PDF format for free! Find your manual Ultra Compact Grill GC3001 - TEFAL and take your electronic device back in hand. On this page are published all the documents necessary for the use of your device. Ultra Compact Grill GC3001 by TEFAL.
USER MANUAL Ultra Compact Grill GC3001 TEFAL
natural_image
Exterior view of a modern stainless steel grater with black and silver casing (no visible text or symbols)F
NL
D
I
E
P
TR
GR
DK
S
N
FIN
ARA
FAR
GB
natural_image
Diagram showing a person using a tool to cut a component with red arrows indicating direction (no text or symbols present)1
natural_image
Illustration of a hand holding a grid device with red downward arrows indicating compression or disassembly (no text or symbols present)2
natural_image
Hand pressing a component with a red upward arrow (no text or symbols)3
natural_image
Illustration of a hand using a tool to adjust a component with numbered parts (no text or symbols visible)4
text_image
power ready power ready5a
natural_image
Diagram showing two hands adjusting a mechanical component with red arrows indicating rotation (no text or symbols present)6

text_image
Diagram illustrating three steps of garment styling: opening, cutting, and rolling, with red arrows indicating direction of movement.7
natural_image
Illustration of a medical device with a red diamond marker indicating a specific area (no text or symbols present)8
natural_image
Three-step diagram showing a person using a flip-flop to lift a seat, with red arrows indicating the motion (no text or symbols present)9*
natural_image
Illustration of a hand pressing down on a textured surface with red arrows indicating direction (no text or symbols)10
natural_image
Illustration of a person using a hose to lift a cylindrical device, enclosed in a circle (no text or symbols)11
* selon modèle
* afhankelijk van model
*Je nach Modell
* secondo i modelli
* según modelo
* consoante o modelo
* tipine göre
* σύμφωνα με τον τύπο
^ afhængig af modellen
* beroende på modell
* avhengig av modell
* mallista riippuen
* in accordance with the model
F
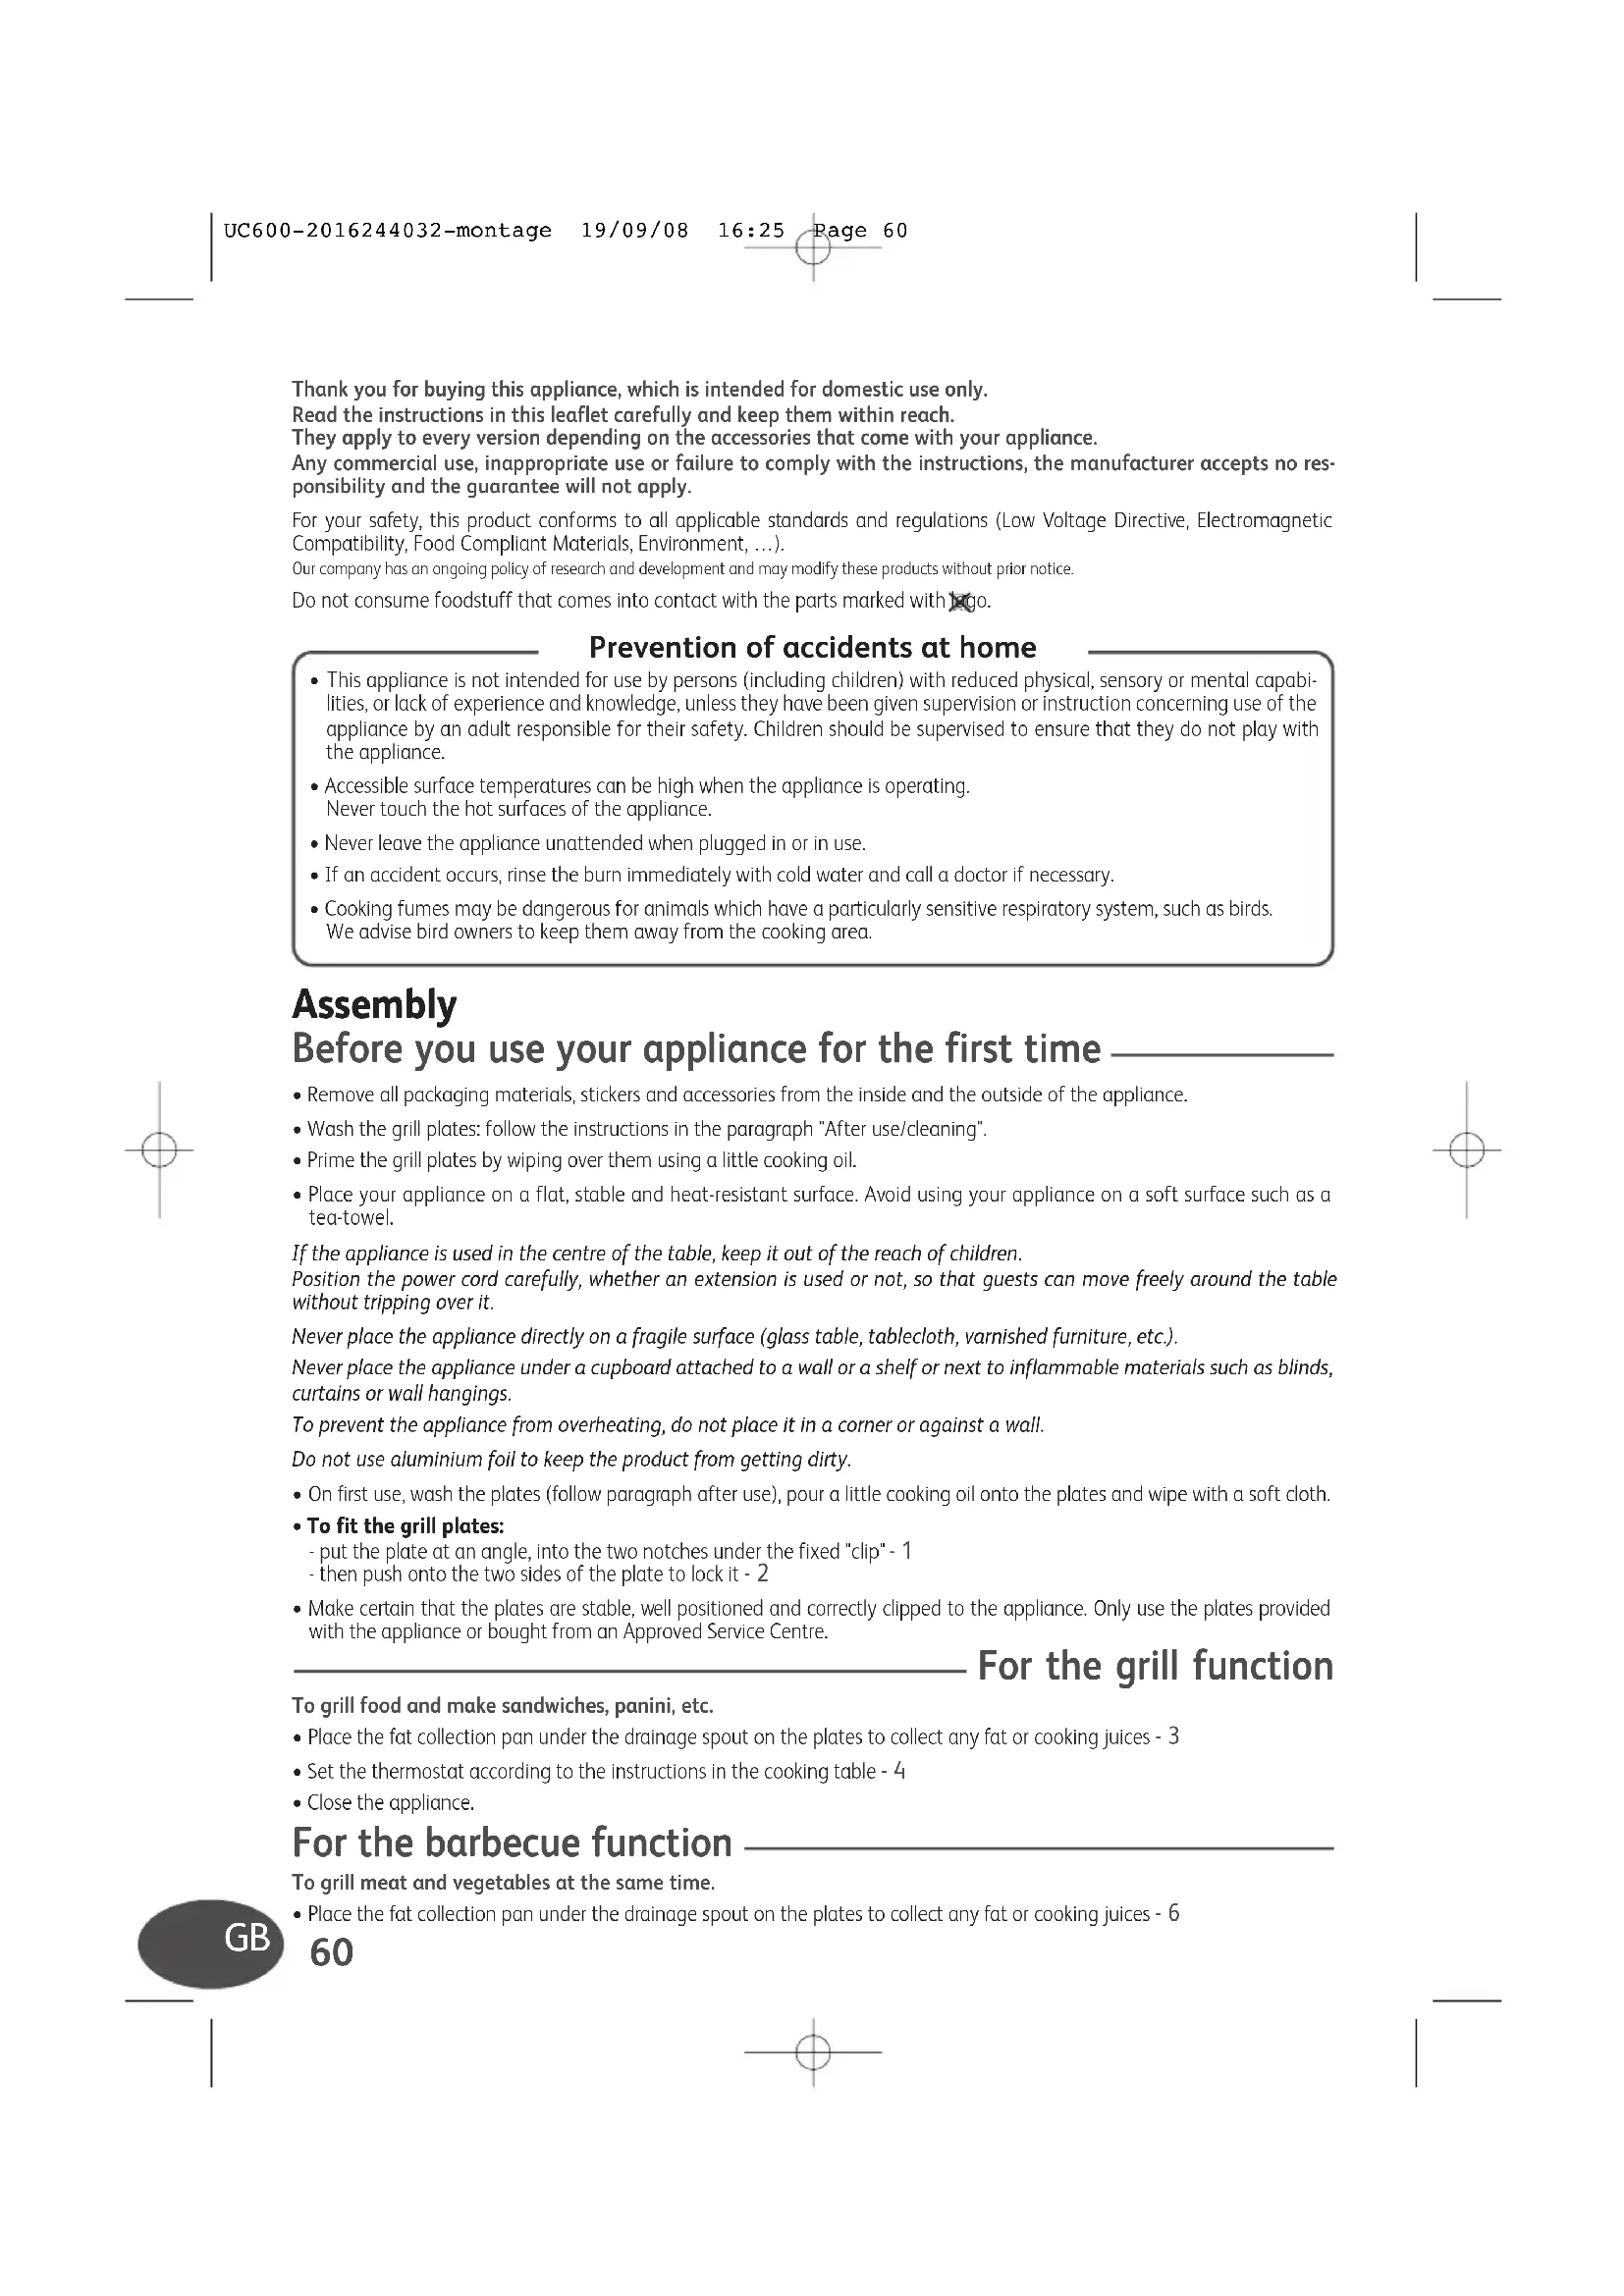
Thank you for buying this appliance, which is intended for domestic use only.
Read the instructions in this leaflet carefully and keep them within reach.
They apply to every version depending on the accessories that come with your appliance.
Any commercial use, inappropriate use or failure to comply with the instructions, the manufacturer accepts no responsibility and the guarantee will not apply.
For your safety, this product conforms to all applicable standards and regulations (Low Voltage Directive, Electromagnetic Compatibility, Food Compliant Materials, Environment, ...).
Our company has an ongoing policy of research and development and may modify these products without prior notice.
Do not consume foodstuff that comes into contact with the parts marked with logo.
Prevention of accidents at home
- This appliance is not intended for use by persons (including children) with reduced physical, sensory or mental capabilities, or lack of experience and knowledge, unless they have been given supervision or instruction concerning use of the appliance by an adult responsible for their safety. Children should be supervised to ensure that they do not play with the appliance.
- Accessible surface temperatures can be high when the appliance is operating. Never touch the hot surfaces of the appliance.
- Never leave the appliance unattended when plugged in or in use.
- If an accident occurs, rinse the burn immediately with cold water and call a doctor if necessary.
- Cooking fumes may be dangerous for animals which have a particularly sensitive respiratory system, such as birds. We advise bird owners to keep them away from the cooking area.
Assembly
Before you use your appliance for the first time
- Remove all packaging materials, stickers and accessories from the inside and the outside of the appliance.
- Wash the grill plates: follow the instructions in the paragraph "After use/cleaning".
- Prime the grill plates by wiping over them using a little cooking oil.
- Place your appliance on a flat, stable and heat-resistant surface. Avoid using your appliance on a soft surface such as a tea-towel.
If the appliance is used in the centre of the table, keep it out of the reach of children.
Position the power cord carefully, whether an extension is used or not, so that guests can move freely around the table without tripping over it.
Never place the appliance directly on a fragile surface (glass table, tablecloth, varnished furniture, etc.).
Never place the appliance under a cupboard attached to a wall or a shelf or next to inflammable materials such as blinds, curtains or wall hangings.
To prevent the appliance from overheating, do not place it in a corner or against a wall.
Do not use aluminium foil to keep the product from getting dirty.
- On first use, wash the plates (follow paragraph after use), pour a little cooking oil onto the plates and wipe with a soft cloth.
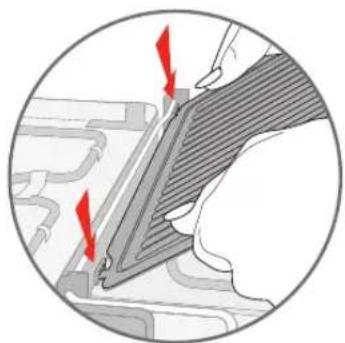
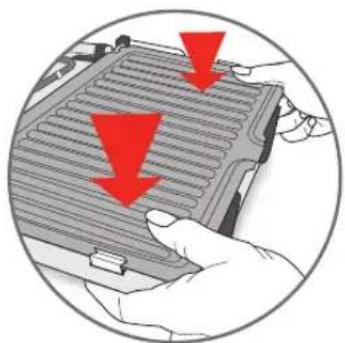
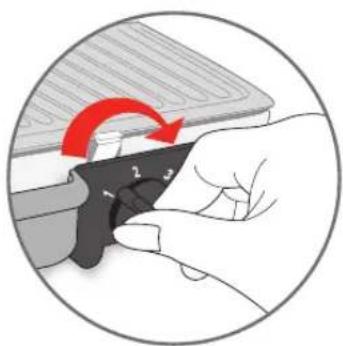
• To fit the grill plates:
- put the plate at an angle, into the two notches under the fixed "clip" - 1
- then push onto the two sides of the plate to lock it - 2
- Make certain that the plates are stable, well positioned and correctly clipped to the appliance. Only use the plates provided with the appliance or bought from an Approved Service Centre.
For the grill function
To grill food and make sandwiches, panini, etc.
- Place the fat collection pan under the drainage spout on the plates to collect any fat or cooking juices - 3
- Set the thermostat according to the instructions in the cooking table - 4
- Close the appliance.
For the barbecue function
To grill meat and vegetables at the same time.
- Place the fat collection pan under the drainage spout on the plates to collect any fat or cooking juices - 6
- Open the grill.
- Grasp the handle, pull up firmly on the upper section of the appliance, then open to form a 180^ : the appliance is wide open - 7
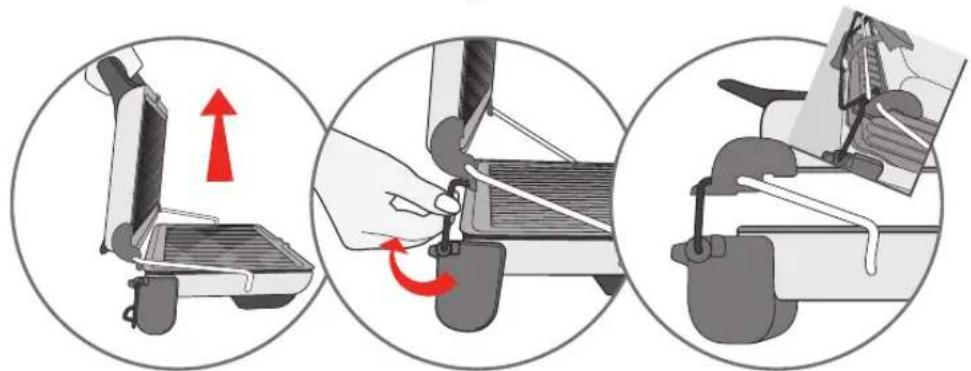
— For the mini-oven function (in accordance with the model)
To reheat fresh or frozen ready meals (quiche, pancakes, pre-topped sandwiches, etc.) and to grill fragile foods (e.g.: fish, kebabs...), without crushing them.
- Open the grill: take the handle (insulated, depending on the model), pull the top part upwards - 9
- Lift the base up to the 2 stops - 9
- Place the top gently on top of the base until the mini-oven position is reached - 9
- Release the handle. The 2 plates are held as far apart as possible.
Connection and pre-heating
- Fully unwind the power cord.
- Make sure that the electric power supply is compatible with the power rating and voltage indicated on the bottom of the appliance.
• Always plug the appliance into an earthed socket. - If an extension cord is used:
- make sure to choose an extension lead of equivalent diameter with an earthed socket;
- take all necessary precautions to prevent anyone tripping over an extension cord.
If your appliance is fitted with a removable power cord: if the power cord is damaged, it must be replaced by a special cable or unit available from the manufacturer or its after-sales service.
If your appliance is fitted with a fixed power cord: if the power supply cord is damaged, it must be replaced by the manufacturer or its service agent or a similarly qualified person in order to avoid a hazard.
This appliance is not intended to be operated by means of an external timer or separate remote-control system.
- Set the thermostat to the position indicated in the cooking table - 4
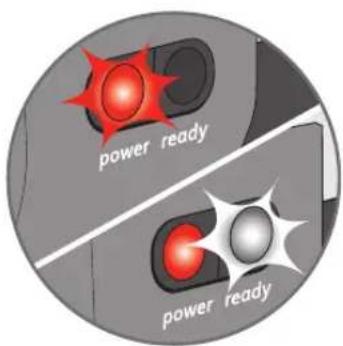
The position of the thermostat during pre-heating is the same as that used for cooking. - Plug the power cord into the appliance (depending on the model), then plug the cord into the mains: the red indicator light comes on and the appliance starts to heat up - 5a
Never leave the appliance plugged in when not in use.
Never plug the appliance in without putting the 2 cooking plates in place.
Never run the appliance empty.
- Pre-heat the appliance for about 5 minutes. Pre-heating has finished when the green indicator light comes on - 5b
To preserve the non-stick properties of the coating, avoid excessive pre-heating with the appliance empty.
On first use, there may be a slight odour and a little smoke during the first few minutes.
Never leave the appliance unattended when in use.
Cooking
• After pre-heating, the appliance is ready for use.
To preserve the non-stick properties of the coating:
- as a preference, use a wooden spatula to turn the food over,
- never cut food directly on the plates,
- do not cook food in aluminium foil.
To prevent damage to the plates, only use them on the appliance for which they were designed (e.g., do not place in an oven, on the gas ring or electric hot-plate, etc.).
Do not use aluminium foil or other objects between the plate or the grill and the food being cooked.
Do not put any cooking utensils on the appliance to heat up.
Do not touch the metal parts of the appliance when it is heating or operating, as they are very hot: use the handle and wear oven gloves if necessary.
Do not move the appliance when in use.
- Do not remove the fat recovery drawer during cooking. At the end of cooking of each batch of meat, check that the juice has not reached the MAX. level. If the MAX. level is reached, wait for the appliance to cool down completely then empty the fat recovery drawer(s) before cooking a new batch of meat.
For the grill function
- Place the food on the lower grill plate.
- Close the appliance.
- Let the food cook according to the instructions in the cooking table.
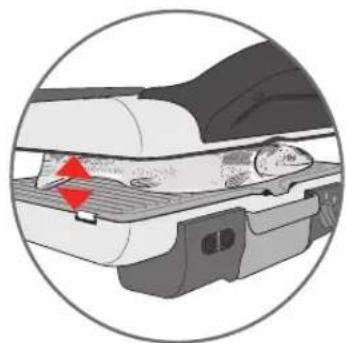
- The space between the two grill plates is adjusted automatically (0 cm to 3.5 cm) depending on the thickness of the food to be cooked - 8
When you cook meats containing bones, use the barbecue position to ensure the meat is cooked uniformly.
For the barbecue function
- Spread the food evenly on the two grill plates.
- When only one cooking surface is used, as a preference use the upper grill plate.
- Let the food cook according to the instructions in the cooking table.
For the mini oven function (in accordance with the model) —
- Place the food on the lower grill tray.
- Fragile foods can be grilled without being crushed.
- It is possible to reheat fresh or frozen ready meals (quiches, pancakes, pre-topped sandwiches, etc.).
Note: this appliance cannot be used to make gratin toppings (pizzas or other dishes).
After use/cleaning
- Set the thermostat to the min. position.
- Unplug the appliance. Open the appliance.
- Let the appliance cool down (approximately 1 hour) in the open position.
- Empty the juice collection pans. Be careful never to move the appliance when the pans are full.
- Once cooled down, close the appliance.
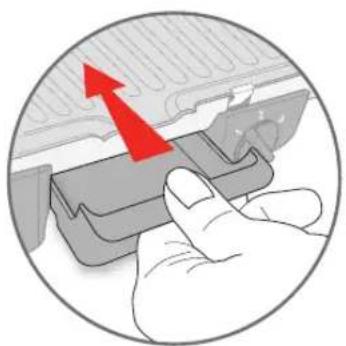
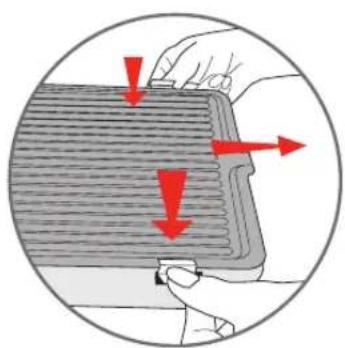
• To remove the grill plates:
- press on the two side hooks on the cooking plate to release it, then remove it by lifting it at an angle - 10
- The fat tank and plates can be washed in the dishwasher or be cleaned with a sponge, hot water and washing up liquid.
- The appliance and its power supply cord must not be put in the dishwasher.
Do not place the hot plate under water or on a fragile surface.
Do not use a metallic sponge or scouring powder as these could damage the cooking surface (e.g., non-stick coating, etc.).
- If washed regularly in a dishwasher we recommend that the plates are seasoned by wiping with a little cooking oil from time to time to maintain their non-stick performance.
- The heating coil is not to be cleaned. If it is really dirty, wait until it has cooled down and wipe with a dry cloth.
Over time the non-stick of the grill plates may discolour slightly - this is normal.
- Clean the juice collection pans after each use.
Do not immerse the appliance in water.
Never immerse the appliance or power supply cord in water.
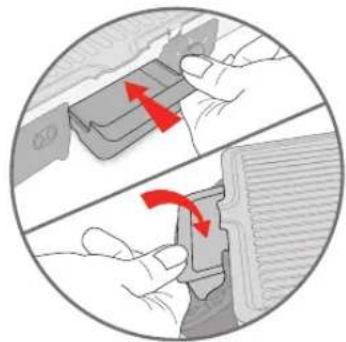
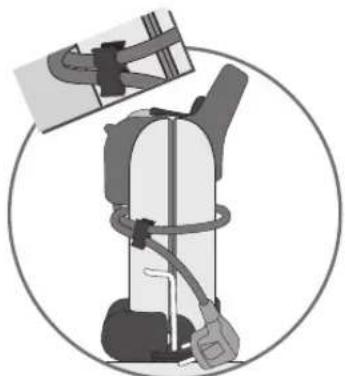
- Connect the power cord to the appliance (in accordance with the model) then wind it around the appliance and secure with the cord clip.
- For products with an oven wire: close the product, swivel the oven wire upwards, then place the product vertically.
• The product can be stored in the vertical position - 11
Do not carry the appliance by the handle or metallic wires.
Cooking tables
Cooking times are given as an indication only: they can vary according to quantity, personal taste, size of the pieces and type of food.
Meat and skewered kebabs
Thermostat 3 Function Cooking time
| Beef rib steaks grill 9-11 min | |
| Beef fillets grill 3-4 min | |
| Tournedos grill 4-5 min | |
| Veal rib steaks barbecue 8-9 min/side | |
| Lamb chops barbecue 7-8 min/side | |
| Rump steak grill 3-4 min | |
| Hamburger patties grill 4 min | |
| Sausages grill 7-9 min | |
| Lamb skewered kebabs Liver/kidney | barbecue 20-22 min |
| skewered kebabs | barbecue 20-25 min |
| Chicken skewered kebabs | barbecue 20-25 min |
| Cocktail sausages | barbecue 7-9 min |
Reheating cooked dishes
(in accordance with the model) —
| Thermostat Max Function Cooking time |
| Frozen dishes(about 500g) oven 30-45 min |
| Fresh products(about 500g) oven 20-30 min |
Fish
Thermostat 3 Function Cooking time
| Sole | barbecue 6-7 min/side |
| Sardine fillets | barbecue 4-5 min/side |
| Salmon steaks | barbecue 5-6 min/side |
Vegetables
Thermostat 3 Function Cooking time
| Mushrooms barbecue 5-7 min/side | |
| Tomatoes | barbecue 5-7 min/side |
| Courgettes | barbecue 5-10 min/side |
| Aubergines | barbecue 5-10 min/side |
Sandwiches
Thermostat 2 Function Cooking time
| Panini | grill 7-9 min |
| Pre-toasted sandwich | grill 4-5 min |
For any product problems or queries, please contact our Customer Relations Team on:
0845 602 1454 - UK
(01) 401 8448 - Ireland

Environment protection first!
Your appliance contains valuable materials which can be recovered or recycled.
Leave it at a local civic waste collection point..
F 4-7
NL 8 - 11
D 12 - 15
I 16 - 19
E 20 - 23
P 24 - 27
TR 28 - 31
GR 32 - 35
DK 36 - 39
S 40 - 43
N 44 - 47
FIN 48 - 51
ARA 52 - 55
FAR 56 - 59
GB 60 - 63