
MultiSync LCD3735WXM - Television NEC - Free user manual and instructions
Find the device manual for free MultiSync LCD3735WXM NEC in PDF.
| Product Type | Multifunction LCD TV |
| Brand | NEC |
| Model | MultiSync LCD3735WXM |
| Screen Size | 37.0 inches (940.3 mm) |
| Resolution | 1366 x 768 pixels (WXGA) |
| Brightness | 500 cd/m² (typical) |
| Contrast Ratio | 800:1 (typical) / 1600:1 (with AI) |
| Viewing Angle | 89° (up/down/left/right, CR>10) |
| Dimensions (with stand) | 977.5 x 697.5 x 356.5 mm (WxHxD) |
| Weight (with stand) | 29.5 kg |
| Power Supply | 100-240 V AC, 50/60 Hz |
| Power Consumption | 160 W (typical) / <2 W (standby) |
| Input Connectors | Analog RF, D-SUB 15-pin, DVI-D, Composite, S-Video, YPbPr, Audio (RCA and mini-jack) |
| Outputs | SPDIF, Line (RCA), Speakers (10W + 10W) |
| Main Functions | PIP, remote control, multilingual OSM, parental lock, subtitles, VESA DPMS power management |
| Maintenance and Cleaning | Unplug before cleaning; use a damp cloth, no solvents |
| Safety | Do not expose to rain/humidity; do not open the casing; use on a stable support |
| Spare Parts and Repairability | Repairs by qualified technician; no user-replaceable parts |
| General Information | FCC Class B; VESA 200x100 mm compatible for wall mounting |
Frequently Asked Questions - MultiSync LCD3735WXM NEC
User questions about MultiSync LCD3735WXM NEC
0 question about this device. Answer the ones you know or ask your own.
Ask a new question about this device
Download the instructions for your Television in PDF format for free! Find your manual MultiSync LCD3735WXM - NEC and take your electronic device back in hand. On this page are published all the documents necessary for the use of your device. MultiSync LCD3735WXM by NEC.
USER MANUAL MultiSync LCD3735WXM NEC
natural_image
Illustration of a desktop computer monitor with a circular base and stand (no visible text or symbols)USER'S MANUAL
MANUEL D'UTILISATION
MANUAL DEL USUARIO
MultiSync ^® LCD 3735WXM ^TM
To learn about other special offers, register online at www.necdisplay.com.
FEDERAL COMMUNICATIONS COMMISSION (FCC) WARNING
Instruction to Users
This equipment has been tested and found to comply with the limits for a Class B digital device, pursuant to part 15 of the FCC rules.
These limits are designed to provide reasonable protection against harmful interference in a residential installation. This equipment generates, uses and can radiate radio frequency energy and, if not installed and used in accordance with the instructions, may cause harmful interference to radio communications. However, there is no guarantee that interference will not occur in a particular installation.
If this equipment does cause harmful interference to radio and television reception, which can be determined by turning the equipment off and on, the user is encouraged to try to correct the interference by one or more of the following measures.
- Reorient or relocate the receiving antenna.
- Increase the distance between the equipment and the receiver.
- Connect the equipment into an outlet on a circuit different from that to which the receiver is connected.
- Consult the dealer or an experienced radio/TV technician for help.
This equipment has been certified to comply with the limits for a Class B computing device, pursuant to part 15 of the FCC rules. Only peripherals (computer input / output devices, terminals, printers etc.) certified to comply to the Class B limits may be attached to this computer. Operation with non-certified peripherals is likely to result in interference to radio and TV reception.
Remarks
To meet FCC requirement, shielded cables are required to connect the device to a personal computer or other Class B certified device.
Information to Users
The unit is for office equipment use.
Any change or modifications not expressly approved by the party responsible for compliance could void the user's authority to operate this equipment.
DOC NOTICE
This product conforms to Canadian Class B emissions regulations.
NEC LCD Series
PROPRIETARY NOTICE AND LIABILITY DISCLAIMER
The information disclosed in this document, including all designs and related materials, is the valuable property of NEC Display Solutions of America, Inc. and/or its licensors, as appropriate, reserve all patent, copyright and other proprietary rights to this document, including all design, manufacturing, reproduction, use and sales rights thereto, except to the extent said rights are expressly granted to others.
The NEC Display Solutions of America, Inc. product(s) discussed in this document are warranted in accordance with the terms of the Limited Warranty Statement accompanying each product. However, actual performance of each such product is dependent upon factors such as system configuration, customer data and operator control. Since implementation by customers of each product may vary, the suitability of specific product configurations and applications must be determined by the customer and is not warranted by NEC Display Solutions of America, Inc.
To allow for design and specification improvements, the information in this document is subject to change at any time without notice. Reproduction of this document or portions thereof without prior approval of NEC Display Solutions of America, Inc. is prohibited.
DECLARATION OF CONFORMITY
This device complies with Part 15 of FCC Rules. Operation is subject to the following two conditions. (1) This device may not cause harmful interference, and (2) this device must accept any interference received, including interference that may cause undesired operation.
| U.S. Responsible Party: | NEC Display Solutions of America, Inc. |
| Address: | 500 Park Blvd, Suite 1100Itasca, Illinois 60143 |
| Tel. No.: | (630) 467-3000 |
| Type of Product: | Display Monitor |
| Equipment Classification: | Class B Peripheral |
| Model: | MultiSync LCD3735WXM (L375GB) |

We hereby declare that the equipment specified above conforms to the technical standards as specified in the FCC Rules.
Windows is a registered trademark of Microsoft Corporation. NEC is a registered trademark of NEC Corporation. All other brands and product names are trademarks or registered trademarks of their respective owners.
| Declaration of the Manufacturer |
| We hereby certify that the color monitorMultiSync LCD3735WXM (L375GB)is in compliance withCouncil Directive 73/23/EEC:– EN 60950-1 |
| Council Directive 89/336/EEC:– EN 55022– EN 631000-3-2– EN 631000-3-3– EN 55024 |
| and marked withCENEC Display Solutions, Ltd.4-13-23, Shibaura,Minato-KuTokyo 108-0023, Japan |
Disposing of your old NEC Products
Within the European Union
EU-wide legislation, as implemented in each Member State, requires that waste electrical and electronic products carrying the mark (left) must be disposed of separately from normal household waste. This includes monitors and electrical accessories, such as signal cables or power cords. When you need to dispose of your NEC display products, please follow the guidance of your local authority, or ask the shop where you purchased the product, or if applicable, follow any agreements made between yourself and NEC. The mark on electrical and electronic products only applies to the current European Union Member States.
Outside the European Union
If you wish to dispose of used electrical and electronic products outside the European Union, please contact your local authority so as to comply with the correct disposal method.
WARNING: TO REDUCE THE RISK OF FIRE OR ELECTRIC SHOCK, DO NOT EXPOSE THIS PRODUCT TO RAIN OR MOISTURE.


The lightning flash with arrowhead symbol, within an equilateral triangle, is intended to alert the user to the presence of uninsulated dangerous voltage within the product enclosure that may be of sufficient level to constitute a risk of electric shock to persons.
The exclamation point within a triangle is intended to alert the user to the presence of important operating and maintenance (servicing) instructions in the literature accompanying the product.
WARNING: FCC Regulations state that any unauthorized changes or modifications to this equipment not expressly approved by the manufacturer could void the user authority to operate this equipment.
CAUTION: TO PREVENT ELECTRIC SHOCK, PLACE THE WIDE BLADE OF THE PLUG INTO THE WIDE SLOT OF THE POWER OUTLET. FULLY INSERT PLUG INTO OUTLET.
IMPORTANT:
To aid reporting in case of loss or theft, please record the monitor model and serial numbers in the space provided. The numbers are located at the rear of the monitor.
Model no.:
Serial No.:
Electricity is used to perform many useful functions, but it can also cause personal injuries and property damage if improperly handled. This product has been engineered and manufactured with the highest priority on safety. However, improper use can result in electric shock and / or fire. In order to prevent potential danger, please observe the following instructions when installing, opening and cleaning the product. To ensure your safety and prolong the service life of your LCD monitor product, please read the following precautions carefully before using the product.
- Read instructions - All operating instructions must be read and understood before the product is operated.
- Keep this manual in a safe place - These safety and operating instructions must be kept in a safe place for future reference.
- Observe warnings - All warnings on the product and in the instructions must be observed closely
- Follow instructions - All operating instructions must be followed.
- Attachments - Do not use attachments that are not recommended by the manufacturer. Use of inadequate attachments can result in accidents.
- Entering of objects and liquids - Never insert an object into the product through vents or openings. High voltage exists in the product, inserting an object can cause electric shock and / or short internal parts. For the same reason, do not spill water or liquid on the product.
- Servicing - Do not attempt to service the product by yourself. Removing covers can expose you to high voltage and other dangerous conditions. Request a qualified service person to perform servicing.
- Repair - If any of the following conditions. unplug the power cord from the AC outlet, and request a qualified service person to perform repairs.
a. When a liquid was spilled on the product or when objects have fallen into the product. b. When the product has been exposed to rain or water.
IMPORTANT SAFETY PRECAUTIONS (Continued)
- Cleaning - Unplug the power cord from the AC outlet before cleaning the product. Use a damp cloth to clean the product. Do not use liquid cleaners or aerosol cleaners.
- Water and moisture - Do not use the product near water, such as bathtub, washbasin, kitchen sink and laundry tub, swimming pool and in a wet basement.
- Stand - Do not place the product on an unstable cart, stand, tripod or table. Placing the product on an unstable base can cause the product to fall, resulting in serious personal injuries as well as damage to the product. Use only a cart, stand, tripod, bracket or table recommended by the manufacturer or sold with the product. When mounting the product on a wall, be sure to follow the manufacturers instructions. Use only the mounting hardware recommended by the manufacturer.
- When using a cart to transport the product, use utmost care to move the cart. Sudden stops, excessive force and uneven floor surfaces can cause the product to fall from the cart.
- Ventilation - The vents and other openings in the cabinet are designed for ventilation. Do not cover or block these vents and openings since insufficient ventilation can cause overheating and / or shorten the life of the product. Do not place the product on a bed, sofa, rug or other similar surface since they can block ventilation openings. This product is not designed for built-in installation; do not place the product in an enclosed place such as a bookcase or rack, unless proper ventilation is provided or the manufacturers instructions are followed.
- The LCD panel used in this product is made of glass. Therefore, it can break when the product is dropped or applied with impact. Be careful not to be injured by broken glass pieces in case the LCD panel breaks.
- Heat sources - Keep the product away from heat sources such as radiators, heaters, stoves and other heat - generating products (including amplifiers).
- The LCD panel is a very high technology product with many thin-film-transistors, giving you fine picture details. Occasionally, a few non-active pixels may appear on the screen as a fixed point of blue, green or red. Please note that this does not affect the performance of your product.
- Do not place any heavy object on the power cord. Damage to the cord may cause shock or fire.
- Do not bend, crimp or otherwise damage the power cord.
IMPORTANT SAFETY PRECAUTIONS (Continued)
- If an outside antenna is connected to the LCD equipment, be sure the antenna system is grounded so as to provide enough protection against voltage surges and built-up static charges. Section 810 of the National Electrical Code provides information with respect to proper grounding of the mast and supporting structure, grounding of the lead-in wire to an antenna discharge unit, size of grounding conductors, location of antenna-discharge unit, connection to grounding electrodes, and requirements for the grounding electrode.
- For added protection to this LCD equipment during a lightning storm, or when it is left unattended and unused for long periods of time, unplug it from the wall outlet and disconnect the antenna. This will prevent damage to the equipment due to lightning and power-line surges.
- An outside antenna system should not be located in the vicinity of overhead power lines or other electric light or power circuits, or where it can fall into such power lines or circuits. When installing an outside antenna system, extreme care should be taken to keep from touching such power lines or circuits as contact with them might be fatal.
- Do not place any objects onto the monitor and do not use the monitor outdoors.
- The inside of the fluorescent tube located within the LCD monitor contains mercury. Please follow the bylaws or rules of your municipality to dispose of the tube properly.
- Do not use monitor in very hot, humid, dusty, or oily areas.
- If monitor or glass is broken, handle with care. Do not come in contact with the liquid crystal.
- Rest your eyes periodically
- Do not move or transport the display with the speaker attached.
English
CONTENTS
Package contents ...... E-1
Power cord E-2
Attaching the speakers ...... E-2
Installing batteries in the remote control ...... E-3
Using the remote control.... E-3
Power connection ...... E-4
Rear connectors ...... E-4
Antenna connection E-6
VESA wall mount procedure ...... E-7
Control options E-8
Power management system ...... E-9
Timing mode E-9
OSM function key operation E-10
Main menu operation E-10
VIDEO1, VIDEO2, VIDEO3 modes ...... E-10
DVD/HD1 and DVD/HD2 modes E-14
TV modes E-15
DTV modes E-15
DVI modes ...... E-16
VGA modes E-17
Basic operation ...... E-19
Specifications E-24
Troubleshooting E-27
Warranty E-28
Package contents
The package contains:
- LCD Multi-Function Monitor

natural_image
Line drawing of a flat-screen computer monitor with a blank screen and stand (no text or symbols)- Setup sheet
- User manual
- Remote control and AAA Batteries

natural_image
White NEC remote control with multiple ports and buttons, next to two black vinyl record units (no visible text or symbols)- Power cord
natural_image
Coiled electrical plug with two terminal connectors (no text or symbols visible)- 15 Pin D-Sub cable
natural_image
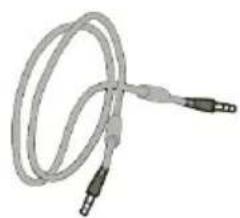
Coiled cable with two connectors (no text or symbols visible)- Audio to Audio Cable with mini jack connector

natural_image
Coiled medical or laboratory probe device with metallic connectors (no visible text or symbols)- Speakers and Screws

natural_image
Technical line drawing of two cylindrical mechanical components with mounting holes and mounting holes (no text or symbols)- Speaker cables

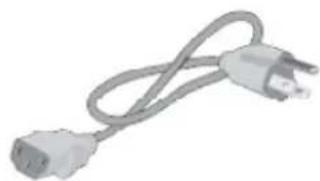
Power cord
- Make sure that the power cord you use is the correct type required for your area.
- This monitor has a universal power supply that allows operation in either 100/120V AC or 220/240V AC voltage area. No user-adjustment is required.
- First connect the power cord into your monitor power input socket, and then plug the other end into a 3-pin AC outlet. The power cord may be connected to either a wall socket or the power output socket on your PC, depending on the type of power cord supplied with your monitor.
- For units to be used at 120V AC:
Use a UL Listed Cord Set consisting of a min. No.18 AWG, Type SVT or SJT three-conductor a maximum of 10 ft. in length and a parallel blade, grounding type attachment plug rated 10A, 125V. - For units to be used at 220/240V AC (outside of U.S.):
Use a Cord Set consisting of a min. 0.75mm ^2 , 3G, Type H05VV-F cord and grounding type attachment plug rated 10-16A, 250V. The cord set should have the appropriate safety approvals for the country in which the equipment will be installed and marked HAR.
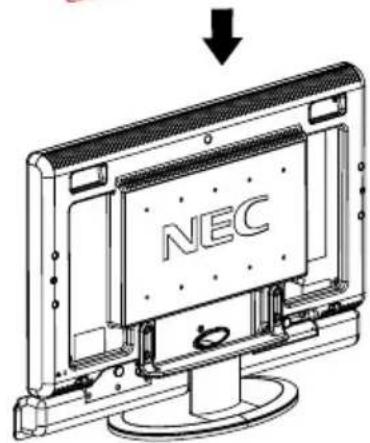
Attaching the speakers


natural_image
Technical line drawing of a NEC device mounted on a stand (no text or symbols visible)
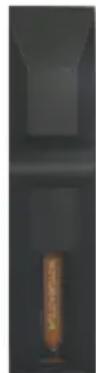
Installing batteries in the remote control
If the remote control fails to operate the LCD color TV functions, replace the batteries.
1. Open the battery cover.
Slide back and remove the battery cover.
2. Installing the batteries.
Install two size AAA batteries (included).
Align the +, - on the batteries to the +, - on the remote.
3. Close the battery cover.
Replace the battery cover in the direction of the arrow and snap it back into place.


+
Cautions regarding batteries
Improper use of batteries can result in a leakage of chemicals and / or explosion. Be sure to follow the instructions below.
- Place battery with their terminals corresponding to the (+) and (-) as marked on the remote control. If inserted in the wrong direction, the batteries could explode or leak, resulting in fires, physical injury, or stains.
- Different types of batteries have different characteristics. Do not mix batteries of different types.
- Do not mix new and old batteries together. The batteries could explode or leak, resulting in fires, physical injury, or stains.
- Remove batteries when they become weak.
- The battery supplied with the product may have a shorter life expectancy due to storage conditions.
- If the remote control is not used for an extended period of time, remove the batteries.
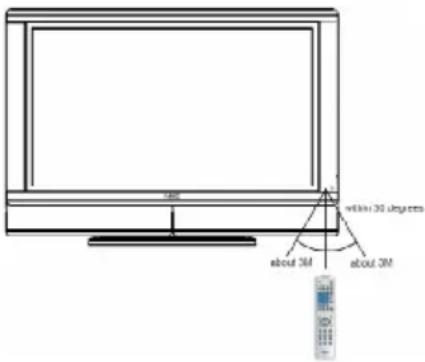
Using the remote control
Point the remote control toward the sensor on the front of the monitor when pressing buttons.
Use the remote control within a distance of about 7m/23ft. from the front of the LCD monitor's remote control sensor and at a horizontal and vertical angle of within 30 degrees within a distance of about 3m/10ft.
Cautions regarding use of remote control
- Do not expose the remote control to shock.
In addition, do not expose the remote control to liquids, and do not place in an area with high humidity. - Do not install or place the remote control under direct sunlight. The heat may cause deformation of the unit.
- The remote control may not work properly if the remote sensor window of the LCD unit is under direct sunlight or strong lighting. In such a case, change the angle of the lighting or LCD, or operate the remote control closer to the remote sensor window.
Power connection

Notes:
- Use provided AC power cord to connect to the wall outlet.
● Always turn the main POWER switch of the LCD off when connecting the AC cord.
● Always unplug the AC cord from the product and power outlet when not using for a long period of time.
Rear connectors

A

A1*. Speaker out which connected with "RIGHT" speaker output
A2. Power switch
A3. AC inlet
A4. DVI connector
A5. Analog RF input
A6. VGA (D-SUB) connector
A7*. Speaker out which connected with "LEFT" speaker output * Do not use these connectors unless specified.
B
B1 UP
B2. DOWN
B3. MENU
B4. LEFT
B5. RIGHT
B6. EXIT
B7. INPUT
B8. AUTO ADJUST
B9. POWER

C
C1. SPDIF out
C2. AV out (Analog tuner out)
C3. Line out (R/L)
C4 DTV RF input
C5. Audio in-VGA
C6. Audio in-DVI
C7-1.L/R (YPbPr1)
C7-2.L/R (YPbPr2)
C8-1.YPbPr1
C8-2. YPbPr2
C9-1.L/R (Composite video)
C9-2.L/R (S-video)
C10. Video (S-video)
C11. Video (Composite video)

D Quick Access (Slide cover to open)
D1 HEADPHONES
D2. AUDIO-L
D3. AUDIO-R
D4. S-VIDEO (S-Terminal priority)
D5. VIDEO (Composite video)

Antenna connection
ANTENNAS
- Antenna requirements for color television reception are more critical than the antenna requirements for black and white television reception. For this reason, a good quality outdoor antenna is strongly recommended. The following is a brief explanation of the type of connections that are provided with the various antenna systems.
- A 75-ohm system is generally a round cable with a F-type connector that can easily be attached to a terminal without tools (not supplied).

OUTDOOR ANTENNA CONNECTION
- Connect the outdoor antenna cable lead-in to the analog RF input on the rear of the TV set.

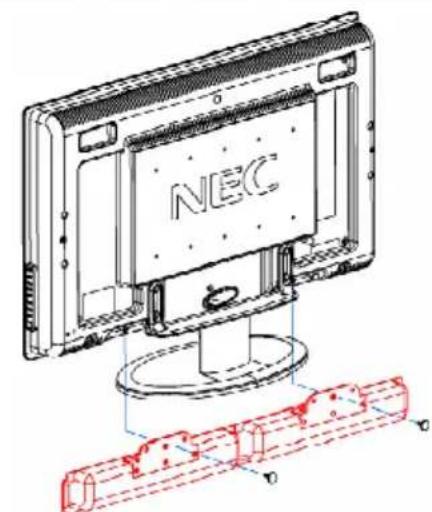
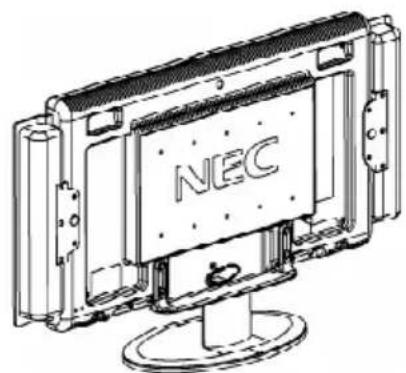
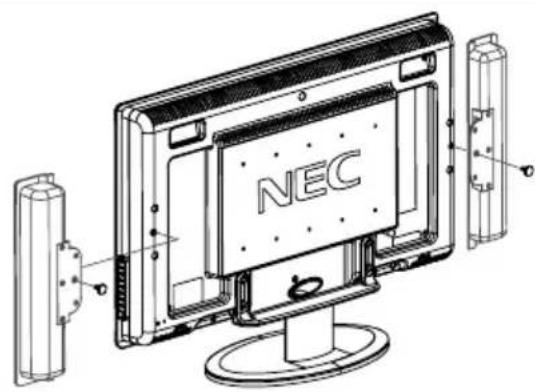
VESA wall mount procedure

- Disconnect all cables.
- Place monitor face down on a non-abrasive surface
- Remove the 4 screws connecting the stand to the monitor.
- Lift up the stand to unlatch the upper hooks and remove the stand.
- Use the 10 screws to attach the arm to the monitor.
Note: The LCD monitor should only be used with an approved arm (e.g. GS mark). To meet the safety requirements, the monitor must be mounted to an arm which guarantees the necessary stability under consideration of the weight if the monitor.
Control options

Note:
- UP, DOWN, MENU, LEFT, RIGHT, EXIT, INPUT, AUTO ADJUST, and POWER on the main unit have the same functions as the corresponding buttons on the remote control. Descriptions in this manual are based on use with the remote control, but will work with the buttons on the monitor.
Power management system (FOR PC mode only)
The LCD is equipped with a power management function which automatically reduces the power consumption by using one of three power saving modes when not in use.
| LCD STATE | LED COLOR | POWER | Horizontal SYNC. | Vertical SYNC. |
| ON | Green | < 170W | ON | ON |
| STANDBY | Amber | < 2W | OFF | ON |
| OFF | Amber | < 2W | OFF | OFF |
Timing mode
| PC-VGA / DVI Preset Timing Chart | ||||
| Mode | Resolution | H. Freq. | V. Freq. | |
| 1 | 720 x 400 | 31.469 KHz | 70.087 Hz | |
| 2 | 640 x 480 | 31.469 KHz | 59.940 Hz | |
| 3 | 640 x 480 | 37.860 KHz | 72.810 Hz | |
| 4 | 640 x 480 | 37.500 KHz | 75.000 Hz | |
| 5 | 800 x 600 | 37.880 KHz | 60.320 Hz | |
| 6 | 800 x 600 | 48.080 KHz | 72.190 Hz | |
| 7 | 800 x 600 | 46.875 KHz | 75.000 Hz | |
| 8 | 1024 x 768 | 48.363 KHz | 60.004 Hz | |
| 9 | 1024 x 768 | 56.476 KHz | 70.069 Hz | |
| 10 | 1024 x 768 | 60.023 KHz | 75.029 Hz | |
| 11 | 1152 x 864 | 67.500 KHz | 75.000 Hz | |
| 12 | 1280 x 768 | 47.800 KHz | 60.000 Hz | |
| 13 | 1280 x 768 | 60.289 KHz | 74.893 Hz | |
| 14 | 1280 x 1024 | 63.980 KHz | 60.020 Hz | |
| 15 | 1280 x 1024 | 79.970 KHz | 75.020 Hz | |
| 16 | 1360 x 768 | 47.712 KHz | 60.015 Hz | |
| DVI-HD Preset Timing Chart | ||||
| Mode | Resolution | H. Freq. | V. Freq | |
| 1 | DTV | 720 x 576 | 31.250 KHz | 50.000 Hz |
| 2 | DTV | 720 x 480 | 31.469 KHz | 59.940 Hz |
| 3 | DTV | 1280 x 720 | 45.000 KHz | 60.000 Hz |
| 4 | DTV | 1920 x 1080 | 33.716 KHz | 59.940 Hz |
OSM function keys operation:
- Use the "INPUT" function key to change the display mode. There are nine display modes available with this product: DTV, TV, VIDEO1, VIDEO2, VIDEO3, DVD/HD1, DVD/HD2, VGA, DVI.
Main menu operation:
- Use the menu key to access the menu, and use the "RIGHT" and "LEFT" function keys to select the desired items (System page for TV & DTV input only. Parent page for TV, VIDEO1,VIDEO2 &VIDEO3 input only. Color page for DVI & VGA input only. Image page, OSM page, Audio page, Setup page, PIP page for all input types)
- Use the "DOWN" key to enter the sub categories, after the desired item has been selected, use the "RIGHT" or "LEFT" keys to execute the function or adjust the value.
- When in the OSM menu, press the EXIT key to return one level up of the directory. Pressing the EXIT key when initial OSM is displayed closes the OSM menu.
VIDEO1, VIDEO2, VIDEO3 modes:
Image Page:
| DV Mode | Selects the best setting for Video, Photos, Text, etc. (Standard, Movie, Sport, Vivid). |
| Brightness | Adjusts the overall image and background screen brightness. |
| Contrast | Adjusts the image brightness in relation to the background. |
| Sharpness | Adjust the image to get as distinct or as soft a picture as is preferred. |
| Color | Adjusts the intensity. |
| Hue | Adjusts the hue (tint). |
OSM Page:
| Language | The OSM menu is available in 3 languages (English, French, Spanish). |
| Timeout | The OSM control menu will stay on as long as it is use. In the OSM timeout submenu, the user can select how long the monitor waits after the last touch of a button to shut off the OSM control menu. Time can be set between 5 to 60 seconds, in 5 second increments. |
| H-Position | You can choose the horizontal location where the OSM appears on the screen. |
| V-Position | You can choose the vertical location where the OSM appears on the screen. |
| Transparency | User could set the transparency level of the OSM. |
Audio Page:
| Volume | Adjusts the volume level. |
| Treble | Adjusts the level of the high frequencies. |
| Bass | Adjusts the level of the low frequencies. |
| Balance | Adjusts the level of output between right and left speakers. |
Setup Page:
- Closed Caption Select the Closed Caption mode (OFF, CC1, CC2, TT1, TT2)
| Closed Captioning (CCD) Mode | |
| OFF | Disable closed caption function. |
| CC1, CC2, TT1, TT2 | [Captions] is for the program you are viewing.[Text] is for additional information such as news reports or a TV program guide.This information covers the entire screen and viewing the TV program is not possible.Text may not be available with every [CC] program.Closed Captioning and Text modes may vary by region. |
- Sleep timer LCD will automatically power down after a user determined length of time. (OFF, 30, 60, 90, 120 min)
- Noise Reduce Removes the noise in the picture by applying temporal and spatial noise reduction filters to the video data. There are five levels (OFF, Weak, Medium, Strong, Adaptive)
- AI function Analyzes scenes and automatically adjusts peak brightness according to the brightness of the images. (When “Standard” or “Movie” is chosen as the DV mode, the AI function is off.)
- Recall default Allows the user to reset most of the OSM control settings back to the factory settings.
Parent Page:
Parents can block certain types of programming based on the content rating.
- Parent Lock Press "DOWN" key to access parent lock option. Using the number keypads on your remote control, you must now enter your password. Then the Parent Lock option can be turned ON or OFF. Default password is 8888.
- TV rating Select the type of programming to block based on the chart below. Parents can choose to ALLOW or BLOCK certain types of programming based on content ratings that may contain the following: Fantasy Violence, Moderate Violence, Sexual Situations, or Coarse Language, Suggestive Dialog.
| TV Parental Guide Ratings Chart | |
| TV-Y | All children. The themes and elements in this program are specifically designed for a very young audience, including children from ages 2 to 6. |
| TV-Y7 | Directed to older children. Themes and elements in this program may include mild physical or comic violence, or may frighten children under the age of 7. |
| TV-G | General audience. Contains little or no violence, no strong language, and little or no sexual dialogue or situations. |
| TV-PG | Parental guidance suggested. May contain infrequent coarse language, limited violence, some suggestive sexual dialogue and situation. |
| TV-14 | Parents strongly cautioned. Contains some material that many parents would find unsuitable for children under 14 years of age.May contain intense violence (V), intense sexual situations (S), strong coarse language (L), or intensely suggestive dialogue (D). |
| TV-MA | Mature audience only. May contain mature themes, indecent language, graphic violence and explicit sexual content. |
- Movie rating Select the type of programming to block based on the chart below.
| Video Parental Guide Ratings Chart | |
| G | General audiences. All ages are permitted to watch. |
| PG | Parental guidance suggested. Some material may not be suitable for children. |
| PG-13 | Parents strongly cautioned. Some material may be inappropriate for children under 13. |
| R | Restricted. Under 17 requires an accompanying parent or adult guardian. |
| NC-17 | No one under 17 permitted to watch. |
| X | Adults only. |
- Change password This option could allows the user to change the parent lock password
When you are finished making your selection, press "EXIT" on your remote control to return to normal viewing.
PIP Page:
- PIP Mode
There are two modes to choose from the PIP window (OFF, PIP, Side by Side).
- PIP Source
| Picture in Picture Source (√ Available / × Unavailable) | |||||||||
| DTV | TV V | DEO1 | VIDEO2 | VIDEO3 | DVD/HD1 | DVD/HD2 | VGA | DVI | |
| DTV | × | × | × | × | × | × | × | × | √ |
| TV | × | × | × | × | × | × | × | × | √ |
| VIDEO1 | × | × | × | × | × | × | × | × | √ |
| VIDEO2 | × | × | × | × | × | × | × | × | √ |
| VIDEO3 | × | × | × | × | × | × | × | × | √ |
| DVD/HD1 | × | × | × | × | × | × | × | × | √ |
| DVD/HD2 | × | × | × | × | × | × | × | × | √ |
| VGA | × | × | × | × | × | × | × | × | √ |
| DVI | √ | √ | √ | √ | √ | √ | √ | √ | × |
- PIP SWAP
Swap main picture source and sub picture source.
- Position
Select where the PIP window appears on the screen. (PIP only)
There are four locations to choose from "Upper right", "Lower right", "Upper left", "Lower left"
DVD/HD1 and DVD/HD2 modes:
Setup Page
- Sleep timer
LCD will automatically power down after a user determined length of time. (OFF, 30, 60, 90, 120 min)
- Noise Reduce
Removes the noise in the picture by applying temporal and spatial noise reduction filters to the video data. There are five levels. (OFF, Weak, Medium, Strong, Adaptive)
- AI Function
Analyzes scenes and automatically adjusts peak brightness according to the brightness of the images. (When “Standard” or “Movie” is chosen as the DV mode, the AI function is off.)
- Recall default
Allows the user to reset most of the OSM control settings back to the factory settings.
Image Page, OSM Page, Audio Page, PIP Page
These functions are the same as they are in video mode.
TV modes:
System Page
- Antenna / Cable Select TV connection type [AIR TV/CATV (FCC)/CATV (IRC)/CATC (HRC)] (Item selection should be corresponding to country or location)
- Channel Search Automatically stores available channels in TV mode.
- Channel Edit Manually add or remove channels from TV mode.
- Favorite Edit Set up to 4 favorite channels for remote control
- Fine Tuning Manually fine tune channels from TV mode.
- Clear Memory Clear TV settings which are stored in the memory.
Image Page, OSM Page, Audio Page, Setup Page, Parent Page, PIP Page
These functions are the same as they are in video mode.
DTV modes:
System Page
DTV Setting
Select YES / NO. When YES is selected the following options appear.
Channel Setup
Using the following item to setup the DTV channels.
- Edit Manually add or remove channels from DTV mode.
- Auto Scan Automatically stores available channels in DTV mode.
- Manual Scan Manually setup available channels in DTV mode.
CC (Close Captioning)
Subtitle setup for DTV
- Font Size There are three font sizes (Default, Small, Large)
- Font Style There are seven styles of fonts (Style 1 to Style 7)
- Font Color There are eight font colors to choose from (Black, White, Red, Green, Blue, Yellow, Magenta, Cyan) in background or foreground.
- Font Opacity There are four levels of font opacity. (Solid, Transparent, Translucent, Flashing) in background or foreground.
- Edge Style There are five styles of Edge (None, Raised, Depressed, Uniform, Drop Shadow) in background or foreground.
- Edge Color There are eight Edge colors to choose from (Black, White, Red, Green, Blue, Yellow, Magenta, Cyan) in background or foreground.
Setup
- Time zone Select your location time zone.
• EA Emergency Alert, there are two modes (Medium, Low) to turn On / Off. - About Show the DTV system information.
Password
- Rating Select the type of programming to block.
- Password User could set or change parent lock password and this password will associate with the password in TV Video setting modes.
Image Page, OSM Page, Audio Page, PIP Page
These functions are the same as they are in video mode.
DVI modes:
Image Page
- Brightness Adjusts the overall image and background screen brightness.
- Contrast Adjusts the image brightness in relation to the background.
Color Page
- Color Temp. There are four modes available: 6500K, 7500K, 9300K, USER
- User R Use the "RIGHT" and "LEFT" keys to increase or decrease the Red level. The change in color will be shown on the screen and the adjustment level will be shown by the bars.
- User G Use the "RIGHT" and "LEFT" keys to increase or decrease the Green level. The change in color will be shown on the screen and the adjustment level will be shown by the bars.
- User B Use the "RIGHT" and "LEFT" keys to increase or decrease the Blue level. The change in color will be shown on the screen and the adjustment level will be shown by the bars.
Setup Page
- DVI Mode There are two DVI modes to choose from. It is recommended to use "DVI-PC" when connecting to a PC and "DVI-HD" when connecting to a DVD player.
- Back Light Use "RIGHT" and "LEFT" keys to adjust the backlight level
- Sharpness Adjust the image to get as distinct or as soft a picture as is preferred.
- Noise Reduce It could remove the noise in the picture by applying temporal and spatial noise reduction filters to the video data. There are four level (OFF, Weak, Medium, Strong).
- Recall Default Select this function will allow the user to reset the settings back to the factory settings.
VGA modes:
Image page
| ● Brightness | Adjusts the overall image and background screen brightness. |
| ● Contrast | Adjusts the image brightness in relation to the background. |
| ● H-Size | Adjusts the horizontal and vertical position of the picture.If the "Auto Adjust" function does not give you a satisfactory picture setting, further tuning can be performed manually using the "H-Size" function. |
| ● Phase | Manually adjust the phase if the "Auto Adjust" function does not give you a satisfactory picture setting. |
| ● H-Position | Manually adjust the picture's horizontal position if the "Auto Adjust" function does not give you a satisfactory picture setting. |
| ● V-Position | Manually adjust the picture's vertical position if the "Auto Adjust" function does not give you a satisfactory picture setting. |
Setup Page
| ● Auto Adjust | Automatically adjusts the Image Position setting, H-Size settings and fine settings. (Depending on the type of signal used, Auto Adjust may not fully optimize the display. Adjust the settings manually to achieve desired level of performance.) |
| ● Back Light | Use "LEFT" and "RIGHT" keys to adjust the backlight level |
| ● Sharpness | Adjust the image to get as distinct or as soft a picture as is preferred. |
| ● Noise Reduce | It could remove the noise in the picture by applying temporal and spatial noise reduction filters to the video data. There are four level (OFF, Weak, Medium, Strong). |
| ● Recall Default | Allows the user to reset the settings back to the factory settings. |
OSM Page, Audio Page, PIP Page
These functions are the same as they are in video mode.
Color Page
This function is the same as it is in DVI mode.
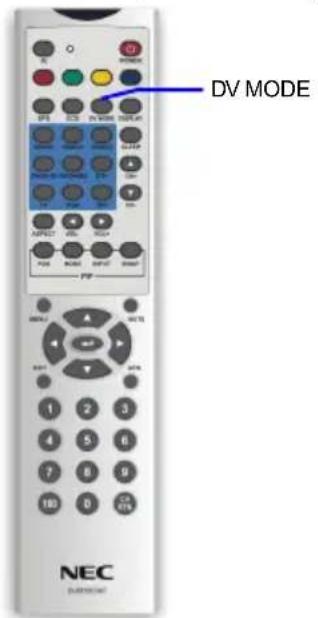
Remote control names and functions
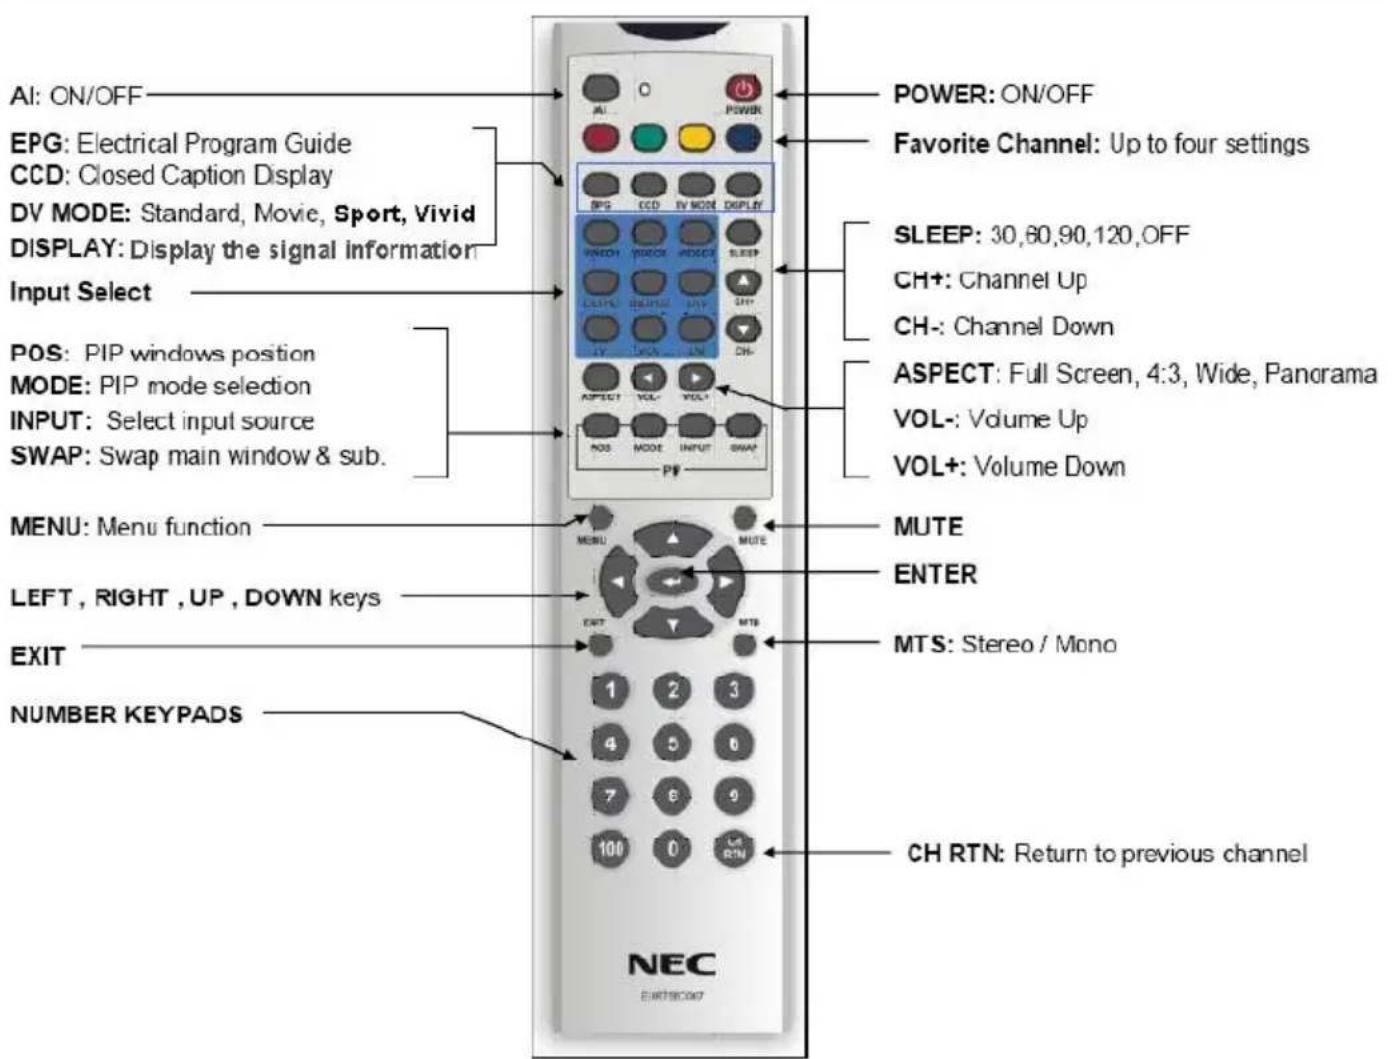
Remote control names and functions
- POWER: Turn the TV LCD ON / OFF
- AI: AI Function
- Red, Green, Yellow, Blue buttons: In TV mode, use these keys to go to one of 4 favorite channels as determined by the user. In DTV mode, any of these keys will bring up a list of favorite channels as determined in the DTV channel setup menu.
• EPG: Electronic Program guide - CCD: Closed Caption Display. For DTV the CCD options are: OFF, CS1, CS2, CS3, CS4, CS5, CS6, CC1, CC2, CC3, CC4, TT1, TT2, TT3, TT4. For all other inputs the CCD options are OFF/CC1/CC2/TT1/TT2
- DV Mode: Selects brightness settings. There are four choices for TV Mode. Standard / Movie / Sport / Vivid
- Display: Display the signal information.
Input Select
• VIDEO1: Select composite source
• VIDEO2: Select S-Video source
• VIDEO3: Quick access (Composite or S-Video)
• DVD/HD1: Select YPbPr 1 source
• DVD/HD2: Select YPbPr 2 source
• DTV: Select ATSC / Digital TVsource
• TV: Select NTSC / Analog TV source
• VGA: Select D-SUB source
• DVI: Select DVI source
- Sleep: Turn on the sleep timer (30, 60, 90, 120, OFF)
- CH+: Push to view the next channel
- CH-: Push to view the previous channel
• Vol+: Increase the volume - Vol-: Decrease the volume
- ASPECT: Select one of four choices for the aspect ratio of the display. (Full Screen / 4:3 / Wide / Panorama)
PIP Function
- POS: Changes the position of the PIP window
- MODE: Enter and exit PIP mode
- INPUT: Select PIP input source
- SWAP: Swap main picture source and sub picture source
- MENU: Enter the OSM main menu
Remote control names and functions (Continued)
- MTS: Select audio program, including "Stereo / Mono" in TV mode. Select different audio language in DTV mode.
- EXIT: Use "EXIT" key to exit out of the selected component's menu.
- UP/DOWN/LEFT/RIGHT keys: When not using OSM, use the UP/DOWN keys to change channels(TV, DTV only), LEFT/RIGHT keys to controls Volume.
When using OSM, use the cursor keys to move the cursor in a program guide or in menu screens. - Enter: Select or accepts when in OSM or input select menu.
• Number keypads: Press to select a channel. - CHRTN: Change to the last channel viewed.
Basic operation
Volume (Direct control) or control

- Press ▶ to raise the sound volume. The control bar of the indicator increases.
- Press ◀ to lower the sound volume. The control bar of the indicator decreases.
To mute the sound
- Press MUTE to temporarily turn off the sound.
- Press MUTE to return sound back to the previous level.
ON / OFF control

To turn off the LCD Monitor
Press ⏻ on the remote control.
To turn the LCD Monitor back on
Press ⏻ again.
Basic operation (Continued)
Changing the channels on TV
Change channels by using Channel Select on the remote control.
- This LCD allows you to select up to 125 channels (1 to 125). To select a channel, enter a 1- or 2- or 3 -digit number or use ▲ channel up and ▼ channel down.
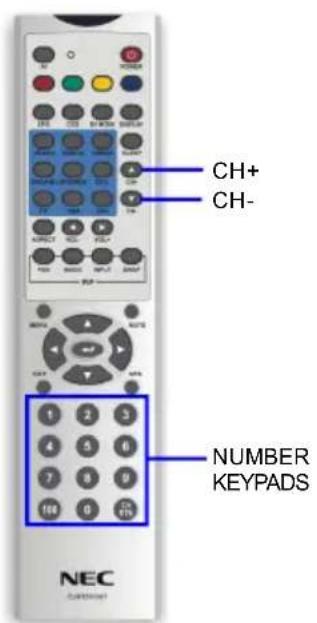
To select a 1- or 2-digit channel number (e.g., channel 5):
- Press the Ⓞ button.
- Press the ⑤ button.
* or press ⑤ button only.
To select a 3-digit channel number (e.g., channel 115):
Complete the following procedure within 4 seconds.
- Press the ⑩ button.
- Press the ① button.
- Press the ⑤ button.
Note:
- The 3-digit channel number can be selected only when the receiving mode is set to CABLE in CH-SETTING. (For details on setting the receiving mode see page E-15.)
Basic operation (Continued)
Adjusting the DV mode settings
Press "DV MODE" Selects Brightness setting. The "DV MODE" includes four different settings ("Standard / Movie / Sport / Vivid").
Standard: Fixed brightness for normal viewing conditions.
Movie: Enhanced dark level detail and decreased brightness for seeing a movie.
Sport: Enhanced green and blue for watching sports programs.
Vivid: Enhanced red, green and blue for a vivid picture.
Adjusting the LANGUAGE settings
The language for the On-Screen Display can be ENGLISH, FRENCH, or SPANISH.

- Press to display the OSM MAIN MENU page.
- Press ▶ key to select OSM page.
- Press ▼ key to select LANGUAGE sub category.
- Press to enter Language selection.
- Press ▲ or ▼ to select LANGUAGE.
- Press 3 times, the OSM menu closes.
Note:
Parents can block certain types of programming based on the content rating.
- Press the "DOWN" key to access parent lock. Using the number keypads on your the remote control, enter your the password. Then you could choose to turn ON / OFF this option.
- Default password: 8888
Specifications (United States)
| Item | Specification | ||
| Analog Input | Digital Input | ||
| Size | 37.0" (940.3mm) | ||
| Active Display Area | 819.6(H) x 460.8(V) mm | ||
| Resolution | 1366 x 768 dots (WXGA) | ||
| Pixel Pitch | 0.200mm x 0.600mm x RGB | ||
| Color Depth | 16.7M color (8 bits) | ||
| Luminance | 500 cd/m2 (Center 1 point Typical) | ||
| Viewing Angle(Typical, CR>10) | Up 89 / Down 89 / Left 89 / Right 89 (Typical) | ||
| Contrast Ratio | 800 : 1 (Typical)1600 : 1 (Typical)(With AI ON) | ||
| PC Input Signals | Horizontal Frequency | 22.1KHz - 81KHz | |
| Vertical Frequency | 56Hz - 61Hz | ||
| Video Signal | Analog RGB | Digital RGB | |
| Sync. Signal | Separate Sync (TTL)Composite SyncSync on Green video | DVI | |
| Pixel Clock | 25.2MHz - 135MHz | ||
| Input Connector | Mini D-sub 15 pin | DVI-D | |
| Preset Timings | 16 + 16 Timings | ||
| TV Input | Input Connector | F-terminal / 75 Ohm unbalanced | |
| Receiving CH | VHF / UHF (2ch-69ch)CATV[FCC/HRC/IRC] (1ch-125ch) | ||
Specifications (United States)
| Video Input | Input Connector | VIDEO1: RCA pin jack x 1VIDEO2: S-Terminal x 1VIDEO3: RCA pin jack x 1 and S-Terminal x 1DVD/HD1 : RCA pin jack x 3DVD/HD2 : RCA pin jack x 3 |
| Audio System | Audio Input | VIDEO1, 2, 3, DVD/HD1, 2 : RCA pin jack L/R (5input)VGA, DVI : Stereo mini jack (2input) |
| Built-in Speakers | 10W + 10W | |
| SPDIF Output | RCA pin jack x 1 / 75 Ohm | |
| Line Out | RCA pin jack L/R x 2 | |
| Functions | Side Control | Power (DC), Auto Adjust, Input, Exit, Menu, Direction (4 direction key) |
| Back Side | Power (AC) | |
| OSM | TV: System / Image / OSM / Audio / Setup / Parent / PIP PageDTV: System / Image / OSM / Audio / Setup / PIP PageDVI: Image / Color / OSM / Audio / Setup / PIP PageVIDEO1,2,3: Image / OSM / Audio / Setup / Parent / PIP PageDVD/HD1,2: Image / OSM / Audio / Setup / Parent / PIP Page | |
| Regulations | Safety | UL, c-UL, CE, NOM, IRAM |
| EMC | CE, FCC Class B, Canadian DoC Class B, VCCI Class B | |
| Power Management | VESA DPMS, EPA |
Specifications (United States)
| Regulations | Ergonomics | TUEV-Ergonomie, Energy Star Ver4.0 Tier2 (VGA Only) | |
| Plug and Play | VESA DDC-CI | ||
| Others | US Mercury Regulation | ||
| Environment Condition | Temperature | 0 – 35 degree C | |
| Humidity | 10 – 80% (without condensation) | ||
| Storage Environment | Temperature | -20 – 60 degree C | |
| Humidity | 10 – 90%(without condensation) | ||
| Power Supply | Input Voltage | AC 100 - 240V , 50/60Hz | |
| Power Consumption : Typical | 160W Typ (1.0A@100-120V, 0.78A@220-240V) | ||
| Power Consumption : Power Saving | <2W | ||
| Input Connector | 3P IEC Type | ||
| Weight | With Stand | 29.5Kg | |
| Without Stand | 24Kg | ||
| Gross weight | 35.2Kg | ||
| Dimension | (L*H*D) =977.5*697.5*356.5 (w stand)(L*H*D) =977.5*580.5*113.2 (w/o stand) | ||
| VESA Compatible arm mounting interface | 200mm x 100mm | ||
| Accessories | AC Power Cord | 3.0 m | |
| Signal Cable | 3.0 m :Mini D-sub 15 pin to Mini D-Sub 15 pin | ||
| Others | 3.0 m : Audio cableUser's manual, Remote Controller, AAA battery x 2Speaker cable x 2, Screw x 2, Setup sheet | ||
Troubleshooting
| Problem | Check item |
| There is no picture or sound | Make sure the Power cord is properly inserted in the power outlet.Unit is picking up interference from something other than a broadcast source. Place antenna away from devices that can cause interference. Make sure the input mode is correctly set for the desired input type.Make sure the main power switch of the main unit is on. |
| There is no sound. | Make sure the volume is not set to minimum.Make sure the sound is not set to mute.Make sure that headphones are not connected.Make sure input source is connected correctly. |
| There is no picture or sound, just noise. | Make sure the antenna cable is properly connected.Consider whether TV/PC/AV/S-V/Y,Cb,Cr signals are being properly received. |
| Picture is not clear. | Make sure the antenna cable is properly connected.Consider whether TV signals are being properly received. |
| Picture is light or improperly tinted. | Check color adjustment.Check tint setting. |
| The picture is too dark. | Check the Brightness setting.Fluorescent lamp may have reached the end of service life. |
| Remote control does not work. | Check the batteries in the remote controller.Make sure the remote sensor window is not under strong fluorescent lighting.Make sure there is nothing blocking the remote sensor on the unit. |
| The picture is not sharp. | The reception may be weak.Make sure the antenna is facing the right direction.Check the sharpness function. |
| The picture is doubled or tripled. | Make sure the antenna is facing the right direction.There may be reflected electric waves from mountains or buildings causing interference. |
| The picture is spotted. | There may be interference from automobiles, trains, high voltage lines, neon lights, etc.There may be interference between the antenna cable and power cable. Try positioning them further apart. |
| There are stripes on the screen or colors fade. | Is the unit receiving interference from other devices?Transmission antennas of radio broadcasting stations and transmission antennas of amateur radios and cellular phones may also cause interference.Use the unit as far as possible from devices that may cause possible interference. |
Warranty
NEC Display Solutions of America, Inc. (hereinafter “NEC DISPLAY SOLUTIONS”) warrants this Product to be free from defects in material and workmanship and, subject to the conditions set forth below, agrees to repair or replace (at NEC DISPLAY SOLUTIONS’ sole option) any part of the enclosed unit which proves defective for a period of one (1) year from the date of first consumer purchase. Spare parts are warranted for ninety (90) days. Replacement parts or unit may be new or refurbished and will meet specifications of the original parts or unit. This warranty gives you specific legal rights and you may also have other rights, which vary from state to state. This warranty is limited to the original purchaser of the Product and is not transferable. This warranty covers only NEC DISPLAY SOLUTIONS-supplied components. Service required as a result of third party components is not covered under this warranty. In order to be covered under this warranty, the Product must have been purchased in the U.S.A. or Canada by the original purchaser. This warranty only covers Product distribution in the U.S.A. or Canada by NEC DISPLAY SOLUTIONS. No warranty service is provided outside of the U.S.A. or Canada. Proof of Purchase will be required by NEC DISPLAY SOLUTIONS to substantiate date of purchase. Such proof of purchase must be an original bill of sale or receipt containing name and address of seller, purchaser, and the serial number of the product.
It shall be your obligation and expense to have the Product shipped, freight prepaid, or delivered to the authorized reseller from whom it was purchased or other facility authorized by NEC DISPLAY SOLUTIONS to render the services provided hereunder in the original package. All Products returned to NEC DISPLAY SOLUTIONS for service MUST have prior approval, which may be obtained by calling 1-800-632-4662. The Product shall not have been previously altered, repaired, or serviced by anyone other than a service facility authorized by NEC DISPLAY SOLUTIONS to render such service, the serial number of the product shall not have been altered or removed. In order to be covered by this warranty the Product shall not have been subjected to displaying of fixed images for long periods of time resulting in image persistence (afterimage effects), accident, misuse or abuse or operated contrary to the instructions contained in the User's Manual. Any such conditions will void this warranty.
NEC DISPLAY SOLUTIONS SHALL NOT BE LIABLE FOR DIRECT, INDIRECT, INCIDENTAL, CONSEQUENTIAL, OR OTHER TYPES OF DAMAGES RESULTING FROM THE USE OF ANY NEC DISPLAY SOLUTIONS PRODUCT OTHER THAN THE LIABILITY STATED ABOVE. THESE WARRANTIES ARE IN LIEU OF ALL OTHER WARRANTIES EXPRESS OR IMPLIED, INCLUDING, BUT NOT LIMITED TO, THE IMPLIED WARRANTIES OF MERCHANTABILITY OR FITNESS FOR A PARTICULAR PURPOSE. SOME STATES DO NOT ALLOW THE EXCLUSION OF IMPLIED WARRANTIES OR THE LIMITATION OR EXCLUSION OF LIABILITY FOR INCIDENTAL OR CONSEQUENTIAL DAMAGES SO THE ABOVE EXCLUSIONS OR LIMITATIONS MAY NOT APPLY TO YOU.
This Product is warranted in accordance with the terms of this limited warranty. Consumers are cautioned that Product performance is affected by system configuration, software, the application, customer data, and operator control of the system, among other factors. While NEC DISPLAY SOLUTIONS Products are considered to be compatible with many systems, specific functional implementation by the customers of the Product may vary. Therefore, suitability of a Product for a specific purpose or application must be determined by consumer and is not warranted by NEC DISPLAY SOLUTIONS.
For the name of your nearest authorized NEC Display Solutions of America, Inc. service facility, contact NEC Display Solutions of America, Inc. at 1-800-632-4662.
AVERTISSEMENT FCC (FEDERAL COMMUNICATIONS COMMISSION)
natural_image
Line drawing of a flat-screen monitor with a blank screen and stand (no text or symbols)natural_image
White NEC remote control with multiple ports and buttons, alongside two black vinyl records (no visible text or symbols)natural_image
Coiled electrical plug with two terminal connectors (no text or symbols visible)natural_image
Coiled cable or wire with two connectors, no visible text or symbolsnatural_image
Coiled medical or laboratory probe device with two connectors and a separate connector (no visible text or symbols)natural_image
Technical line drawing of two cylindrical mechanical components with mounting holes and mounting holes (no text or symbols)natural_image
Technical line drawing of a NEC device mounted on a stand (no text or symbols beyond the label)A

Parents can block certain types of programming based on the content rating.
- Verrouillage Parental
Page Image, Page OSM, Page Audio Page, Page PIP
Page Image, Page OSM, Page Audio Page, Page PIP
Page Image, Page OSM, Page Audio Page, Page PIP
Page OSM, Page Audio, Page PIP
Page OSM, Page Audio, Page PIP
NEC Display Solutions, Ltd.
4-13-23, Shibaura,
Minato-Ku
Tokyo 108-0023, Japan
natural_image
Line drawing of a flat-screen monitor with a blank screen and stand (no text or symbols)- Hoja de instalación

- Manual del usuario
natural_image
White NEC remote control with multiple function keys and a separate black-and-white image of two vintage cables (no text or symbols visible on the main device)natural_image
Coiled electrical plug with two terminal connectors (no text or symbols visible)- Cable D-Sub de 15 contactos

natural_image
Coiled cable or wire with two connectors, no visible text or symbols- Cable Audio a Audio con mini conector
natural_image
Coiled medical or laboratory probe with two connectors and a separate connector (no text or symbols visible)natural_image
Technical line drawing of two cylindrical mechanical components with mounting holes and mounting holes (no text or symbols)ACOPLAR LOS ALTAVOCES


natural_image
Technical line drawing of a NEC device mounted on a stand (no text or symbols beyond the label)
A

A5. Conector VGA (D-SUB)
- Brillo (Brightness)
- Nitidez (Sharpness)


- MultiSync ® LCD 3735WXM TM
- FEDERAL COMMUNICATIONS COMMISSION (FCC) WARNING
- Instruction to Users
- Remarks
- Information to Users
- DOC NOTICE
- NEC LCD Series
- PROPRIETARY NOTICE AND LIABILITY DISCLAIMER
- DECLARATION OF CONFORMITY
- IMPORTANT:
- IMPORTANT SAFETY PRECAUTIONS (Continued)
- English
- CONTENTS
- Package contents
- Power cord
- Attaching the speakers
- Installing batteries in the remote control
- Open the battery cover.
- Installing the batteries.
- Close the battery cover.
- Cautions regarding batteries
- Using the remote control
- Cautions regarding use of remote control
- Power connection
- Notes:
- Rear connectors
- Antenna connection
- ANTENNAS
- OUTDOOR ANTENNA CONNECTION
- VESA wall mount procedure
- Control options
- Note:
- Power management system (FOR PC mode only)
- OSM function keys operation:
- Main menu operation:
- VIDEO1, VIDEO2, VIDEO3 modes:
- Setup Page:
- Parent Page:
- PIP Page:
- DVD/HD1 and DVD/HD2 modes:
- Setup Page
- Image Page, OSM Page, Audio Page, PIP Page
- TV modes:
- System Page
- Image Page, OSM Page, Audio Page, Setup Page, Parent Page, PIP Page
- DTV modes:
- DTV Setting
- Channel Setup
- CC (Close Captioning)
- Setup
- Password
- DVI modes:
- Image Page
- Color Page
- VGA modes:
- OSM Page, Audio Page, PIP Page
- Remote control names and functions
- Input Select
- PIP Function
- Remote control names and functions (Continued)
- Basic operation
- Volume (Direct control) or control
- To mute the sound
- ON / OFF control
- To turn off the LCD Monitor
- To turn the LCD Monitor back on
- Basic operation (Continued)
- Changing the channels on TV
- Adjusting the DV mode settings
- Adjusting the LANGUAGE settings
- Warranty
- AVERTISSEMENT FCC (FEDERAL COMMUNICATIONS COMMISSION)
- Page Image, Page OSM, Page Audio Page, Page PIP
- Page OSM, Page Audio, Page PIP
- ACOPLAR LOS ALTAVOCES
Brand : NEC
Model : MultiSync LCD3735WXM
Category : Television