
Simply Smart FF1035 - Deep fryer TEFAL - Free user manual and instructions
Find the device manual for free Simply Smart FF1035 TEFAL in PDF.
| Product Type | Electric Deep Fryer |
| Brand | Tefal |
| Model | Simply Smart FF1035 |
| Power Supply | 120 V ~, 15 A (US model) |
| Oil Capacity | Between 2 L (8 cups) and 2.2 L (9 cups); for solid fat: 1750 g to 2000 g |
| Maximum Fresh Fries Capacity | 1200 g |
| Maximum Frozen Fries Capacity | 750 g |
| Temperature Range | From 150 °C to 190 °C (adjustable) |
| Tank Type | Fixed tank with aluminum or non-stick coating (depending on model) |
| Odor Filter | Removable carbon filter (to be replaced after 80 uses); some models with permanent metal filter |
| Basket Handle | Raises and lowers with rotating function to shake food |
| Timer | Adjustable timer (depending on model) with audible signal |
| Temperature Indicator Light | Light indicator showing that temperature is reached |
| Power Cord | Detachable magnetic cord (US model) |
| Maintenance and Cleaning | Basket dishwasher safe; tank and lid clean with sponge; do not immerse appliance; do not put lid in dishwasher |
| Safety | Polarized plug, carrying handles, hot surfaces indicated, basket unlock, thermostat shut-off |
| Repairability | Spare parts available (odor filter XA500031, basket); authorized service center |
| Weight and Dimensions | Not specified in manual; estimate: approx 4-5 kg, dimensions 35x30x25 cm |
Frequently Asked Questions - Simply Smart FF1035 TEFAL
User questions about Simply Smart FF1035 TEFAL
0 question about this device. Answer the ones you know or ask your own.
Ask a new question about this device
Download the instructions for your Deep fryer in PDF format for free! Find your manual Simply Smart FF1035 - TEFAL and take your electronic device back in hand. On this page are published all the documents necessary for the use of your device. Simply Smart FF1035 by TEFAL.
USER MANUAL Simply Smart FF1035 TEFAL
* depending on model
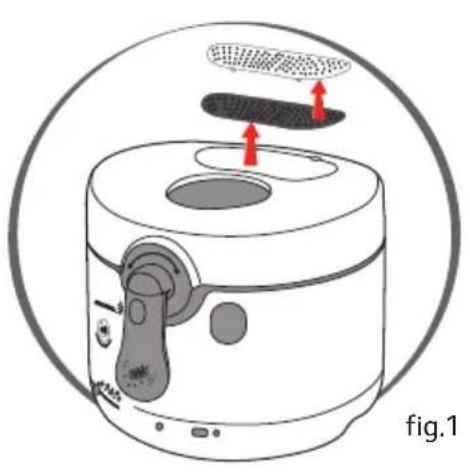
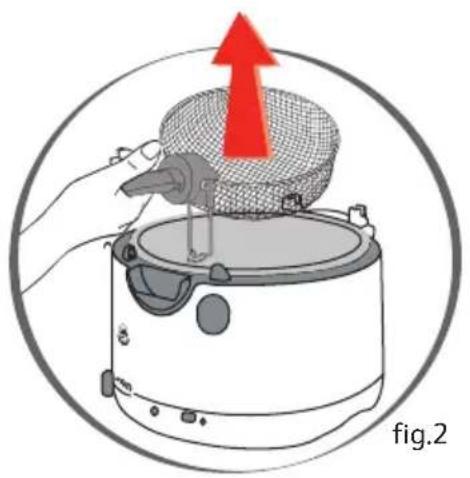
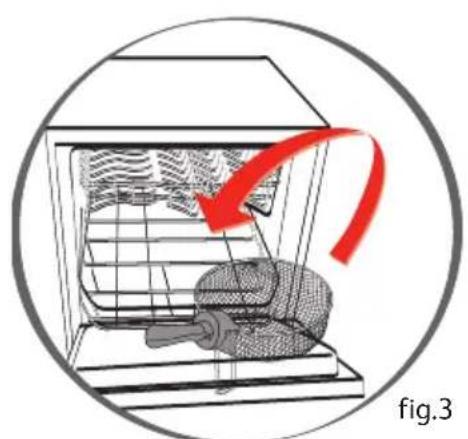
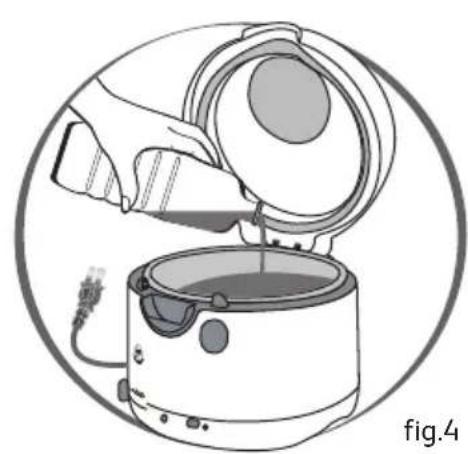
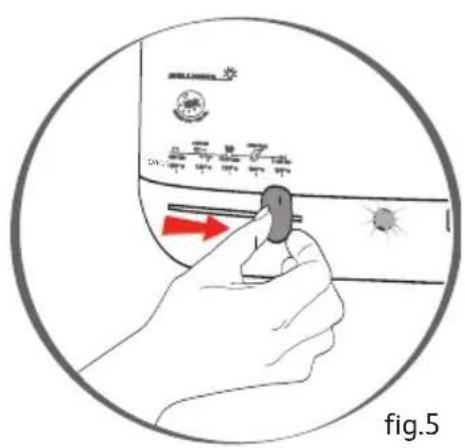
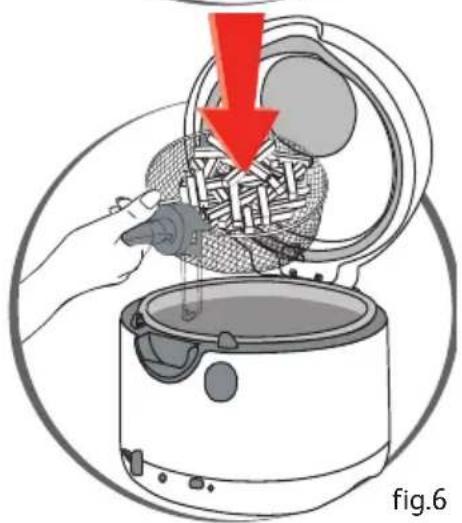
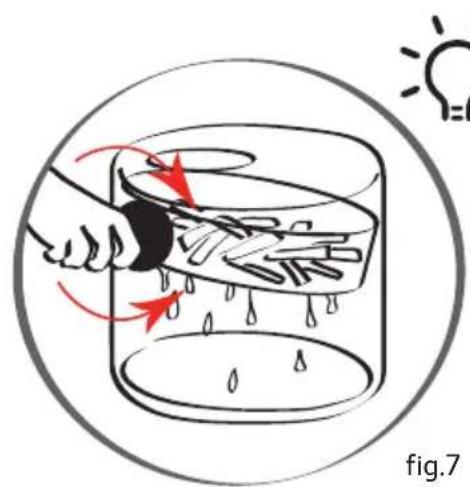
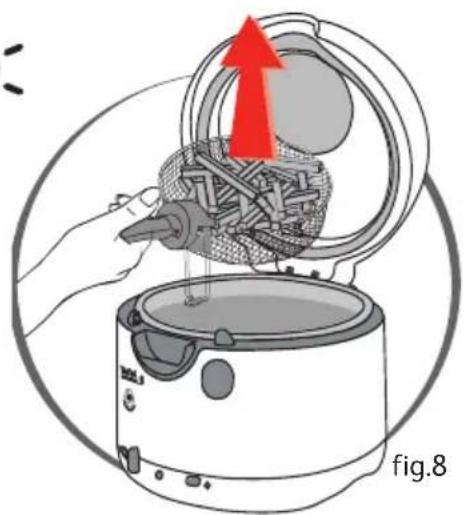
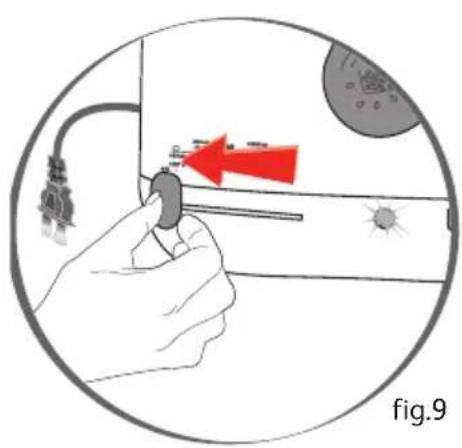
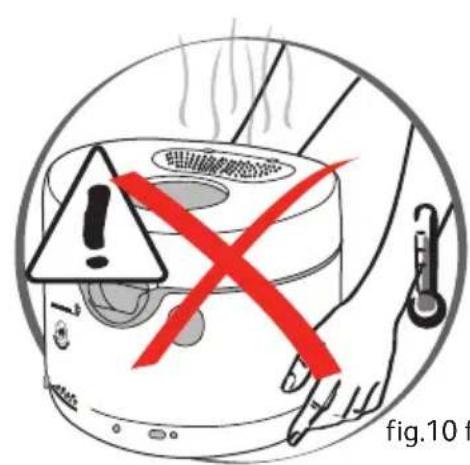

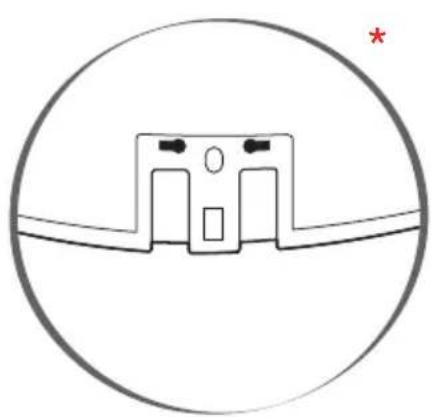
fig.10 fig.11 fig.12
IMPORTANT SAFEGUARDS
When using electrical appliances, basic safety precautions should always be followed, including the following:
- Read all instructions before using.
- Do not touch hot surfaces. Use handles or knobs.
- To protect against electric shock, do not immerse cord, plugs or fryer in water or other liquid.
- Close supervision is necessary when any appliance is used by or near children.
- Unplug from outlet when not in use and before cleaning. Allow to cool before putting on or taking off parts, and before cleaning the appliance.
- Do not operate any appliance with a damaged cord or plug or after the appliance malfunctions, or has been damaged in any manner. Return appliance to the nearest authorized service facility for examination, repair or adjustment.
- The use of accessory attachments not recommended by the appliance manufacturer may cause injuries.
- Do not use outdoors.
- Do not let cord hang over edge of table or counter, or touch hot surfaces.
- Do not place on or near a hot gas or electric burner, or in a heated oven.
- Extreme caution must be used when moving an appliance containing hot oil or other hot liquids.
- Always attach plug to appliance first (depending on model), then plug cord in the wall outlet. To disconnect, turn any control to "off", then remove plug from wall outlet.
13.Do not use appliance for other than intended use. - Extreme caution must be used when moving an appliance containing hot oil or other hot liquids.
15.Be sure handles are properly assembled to basket and locked in place. See detailed assembly instructions.
SAVE THESE INSTRUCTIONS. FOR HOUSEHOLD USE ONLY
16.Before use, check that your local mains voltage corresponds with the specifications shown on the appliance nameplate located under the appliance.
17. Only connect the appliance to electrical sockets which have a minimum load of 15A. If the sockets and the plug on the appliance should prove incompatible, get a professionally qualified technician to replace the socket with a more suitable one.
18. This electrical equipment operates at high temperatures which may cause burns. Do not touch the filter, window, metal walls (depending on model), other apparent metal parts.
19.To ensure safe operation, oversized foods must not be inserted into the appliance.
20. Ensure that the lid and tank are completely dry after washing and before use.
21.Never immerse the fryer basket into the hot oil - or drain it - without the fryer lid in place.
22. The oil level must always be between the Min. and Max. markings.
23.Do not overload the basket. For safety reasons never exceed the maximum quantity.
24.Never operate your fryer without any oil.
25.The cooking times are given as guidelines only.
26.The oil must be filtered regularly and changed after 8 to 12 uses.
27.Do not mix different types of oil.
28.If you use solid vegetable shortening, cut it into pieces and melt it over low heat in a separate pot beforehand, then slowly pour it into the deep fryer pot. Never put solid shortening directly into the deep fryer pot or basket, as his will lead to deterioration of the appliance.
29.If the fryer has a removable pot, never remove it while the deep fryer is on.
30.If the fryer has a removable anti-odor filter, change it after every 10 - 15 uses (foam filter) or after 30 - 40 uses (cartridge with saturation indicator), or 80 uses (carbon filter). Some models are equipped with a permanent metallic filter, which does not need to be changed.
31.If you have any problems, contact the authorized after-sales service center or the internet address www.t-fal.com.
Polarization instructions (USA)
If this appliance has a polarized plug (one blade is wider than the other), it is to reduce the risk of electric shock. This plug is intended to fit into a polarized outlet only one way. If the plug does not fit fully into the outlet, reverse the plug. If it still does not fit, contact a qualified electrician. Do not attempt to modify the plug in any way.
Short Cord instructions
Do not use with an extension cord; a short power supply cord is provided to reduce the risks resulting from being tangled in, or tripping over, a long cord.
Magnetic connector (USA)
The cord is equipped with a detachable magnetic connector. The magnetic connector should be attached directly to the fryer. THIS SHOULD BE DONE PRIOR TO PLugging THE CORD INTO THE WALL OUTLET.
Environment protection first!
1 Your appliance contains valuable materials which can be recycled.
- When you decide to replace your appliance, leave it at a local civic waste collection point.
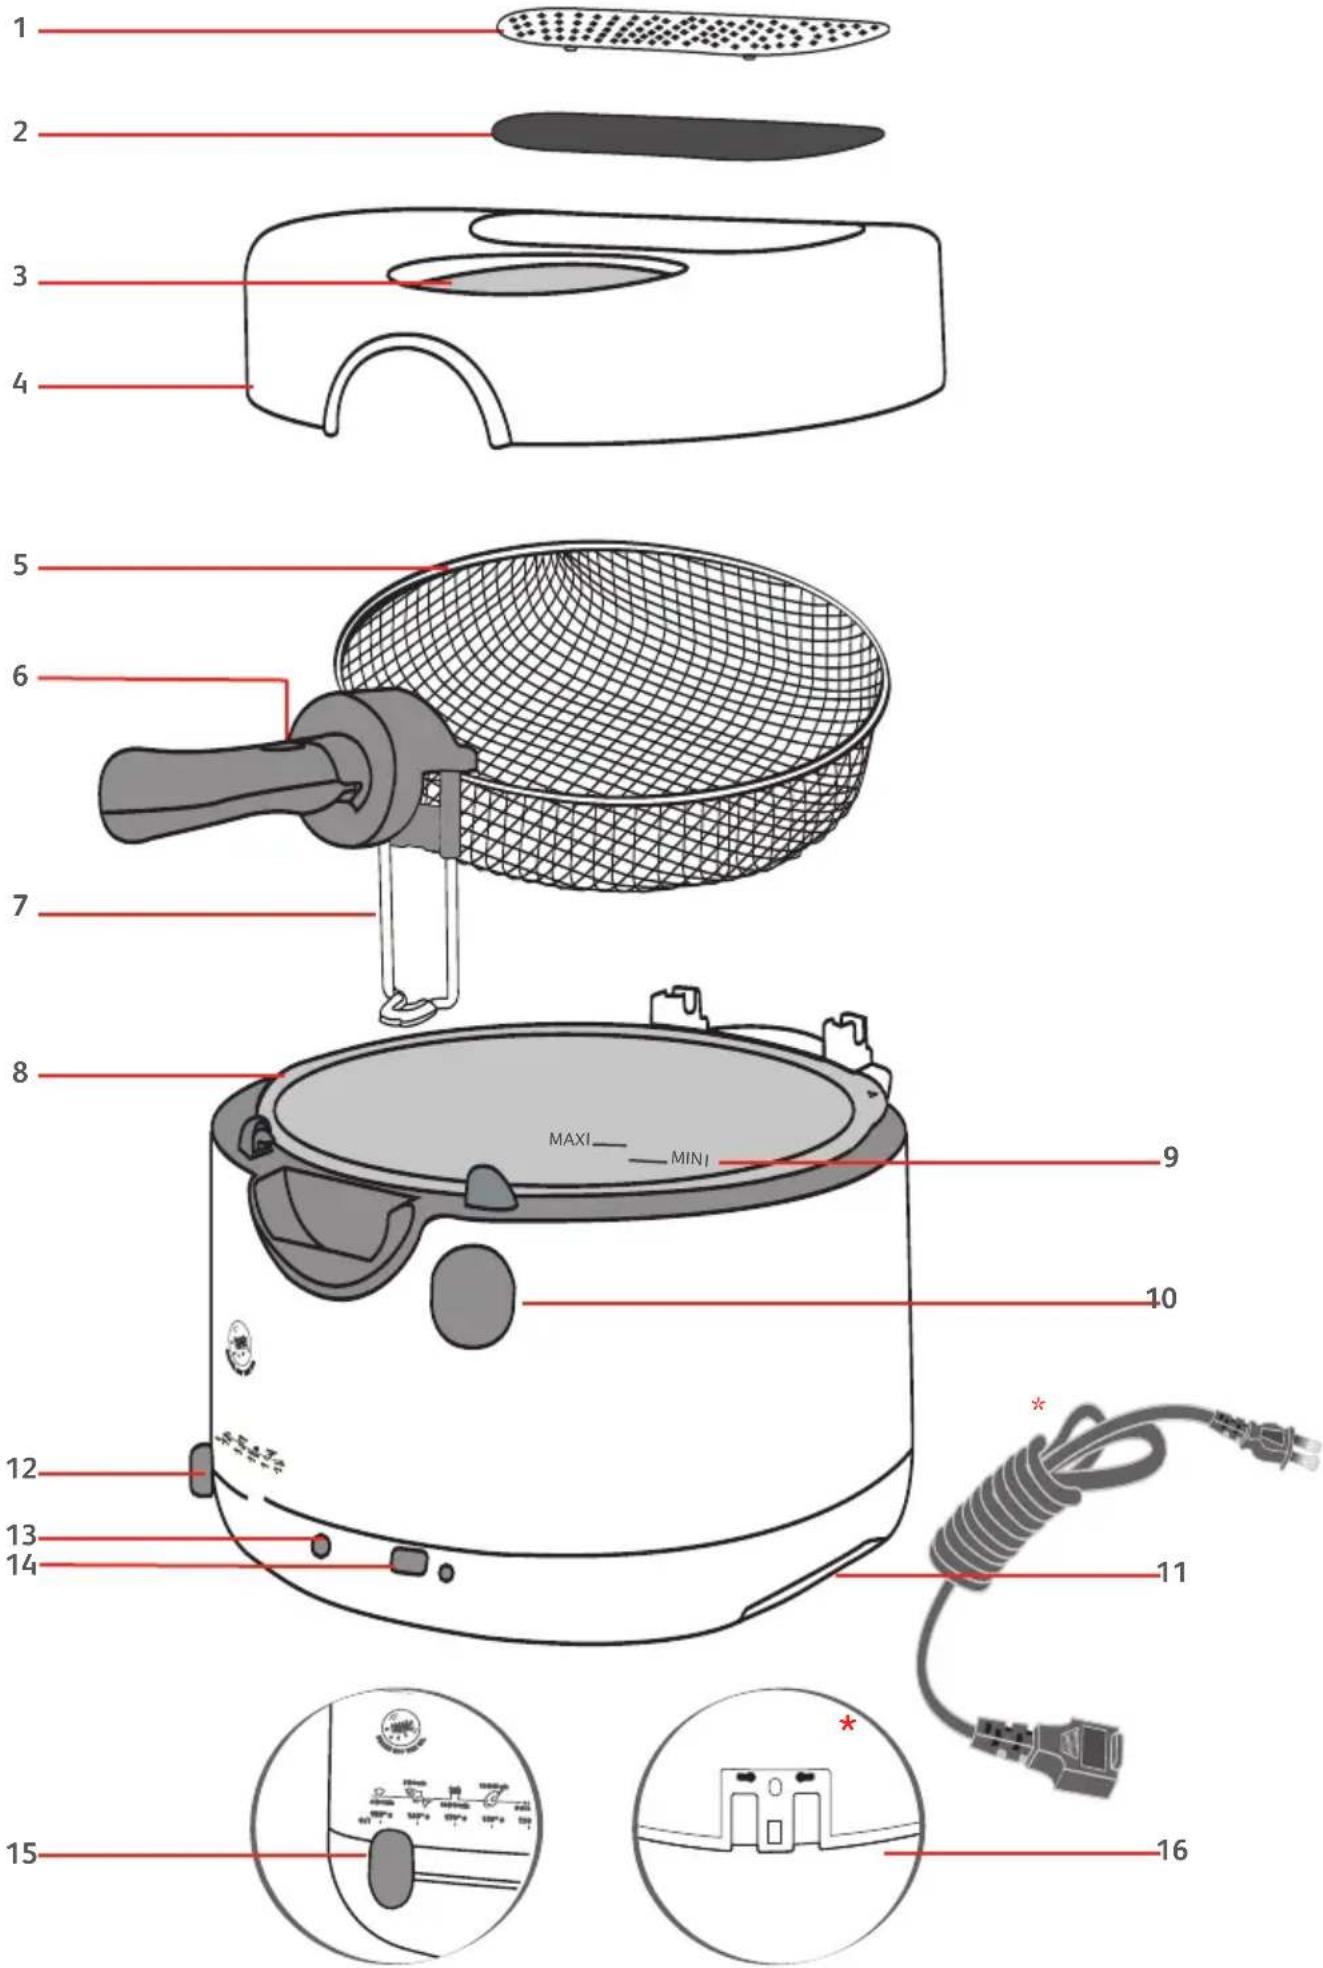
Description
- Filter cover
- Anti-odor charcoal foam filter
- Viewing window
- Removable lid
- Basket "rise and fall" and rotating handle to lift and shake the basket with lid closed
- Handle unlocking button
- Slide of the basket
-
Aluminium or non-stick fixed bowl (depending on model)
-
Min. and Max. oil level markers
- Lid opening button
- Carrying handles
- Adjustable thermostat
- Temperature indicator light
- Timer (depending on model)
- On/Off controlled by the thermostat button (O/I)
- Plug storage (only on plastic models)
Preparation
Before using for the first time
- Remove the filter cover then the filter - fig 1. Do not wash or wet the anti-odor filter.
- Press on the lid opening button and remove the lid from the fryer.
- Lift the basket handle horizontally until you hear a « click » as it locks, then remove the basket - fig 2.
The basket can be washed in the dishwasher - fig 3 or with a sponge and soapy water. - Clean the lid and the bowl with a sponge and soapy water.
- Rinse and dry all parts thoroughly.
- Place the lid back on the fryer.
- Put the anti-odor filter and the filter cover into place.
Never immerse the appliance in water.
Never wash the lid in the dishwasher.
Always remove the anti-odor filter prior to washing the lid.
Do not mix different types of oil as this may cause the oil to overflow.
The oil level must always be between the min. and max. markers, stamped inside the bowl - fig. 4. Check this each time prior to cooking and add some of the same type of oil if necessary.
- Fill the bowl with oil - fig 4.
- Never exceed the maximum level indicated in the bowl.
- Use oil recommended for deep frying: vegetable oil, corn oil, canola oil, etc.
- If you use solid vegetable shortening, cut it into pieces and melt it in a separate pan then pour it inside the fryer (do not melt the blocks of shortening in the basket, nor in the bowl).
- Never exceed 150^ / 302^ to melt the vegetable shortening, always follow the cooking instructions (see cooking tables p. 5 and p.6).
- Animal dripping should NOT be used under any circumstances and may cause overflowing, smoking or risk of fire.
| OIL | SOLID SHORTENING | |
| MIN. | 8 cups / 2 | 3,85 lbs / 17 | 50 g |
| MAX. | 9 cups / 2,2 | 4,4 lbs / 2000 g | |
Preheating
- After the bowl has been filled with oil, close the lid and plug in the appliance without the frying basket.
- Set the thermostat according to the food you are frying (see cooking tables p. 5 and p.6) - fig 5.
- The fryer heats up and the temperature indicator light comes on.
Place the fryer:
-on a flat, stable, heat
resistant surface,
-
away from water splashes or heat sources,
-
out of the reach of children.
Never operate your fryer without any oil.
Loading the basket
Never exceed the maximum capacity.
Food must be dried thoroughly before frying. This will prevent the oil from splattering and/or overflowing and will extend the life of the oil.
- Remove excess moisture (water and ice) from the food.
- Fill the basket away from the deep fryer.
- Do not overfill the basket.
- Reduce the quantity for frozen food.
- After the light goes off, place the basket in position on the edge of the bowl and leave the handle in the horizontal position.
- Close the lid.
- Cooking tip: Cut food into similar-sized pieces so that they cook evenly. Avoid using pieces that are too thick.
Lowering the basket
- When the oil has reached the correct temperature, the temperature light goes out.
- Press the handle unlocking button and fold the handle very slowly into its housing to lower the basket into the oil - fig 6. Plunging the basket too rapidly in the oil may cause it to overflow.
Set the cooking time (depending on model):
For models with a timer, press on the timer button to set the time minute by minute.
Release the button. The selected time is displayed and the countdown starts.
During cooking, it is normal for the temperature light to cycle on and off.
Never place your hand above the filter, or on the window.
The steam and the glass window are extremely hot. Do not touch the walls of the fryer, they can also be hot.
During cooking, you have the opportunity, without opening the lid, to raise the basket and shake the food by turning the handle from left to right, resulting in a more even cooking.
At the end of cooking time
The timer (depending on model) signals the end of the cooking time, but does not stop the appliance.
For crispy fried food, open the lid as soon as you have finished cooking to prevent steam from softening the food.
- The timer sounds (depending on model), indicating the selected cooking time has elapsed.
- Lift the basket handle horizontally to raise the basket until you hear a "click" as it locks.
- Then turn the handle from left to right to shake the food and drain the excess of oil - fig 7.
- Move the thermostat down to the lowest setting "O/I".
- Open the lid.
- Remove the basket, making sure that the slide of the basket comes completely out of the bowl - fig 8.
- Serve the food.
- Close the lid while not in use.
- To fry a second time, correct the oil level if necessary, set the thermostat to the desired temperature again then wait for the temperature indicator light to go out before lowering food into the oil.
Switching off the deep fryer
- Unplug the deep fryer.
- When you have finished frying, move the thermostat down to the Off setting "O/I" - fig 9.
- Allow the oil to cool completely in the fryer (2 to 3 hours).
- Move the fryer using the carrying handles.
Never move the fryer while the oil is still hot - fig.10.
Never move the fryer with the lid opened.
Table of cooking times
Take great care when handling the food and use tongs. Gradually place the food into the hot oil, submerging it an inch at a time to prevent it from sinking immediately.
The cooking times are a guide only; they may vary depending on the size of the food, the amount of food, individual preferences and the voltage.
Cooking tips: For best results, use the traditional French method of frying homemade French fries:
-first frying at 160^ / 320^
- second frying at 190^ / 374^
When cooking battered food and donuts, remove the wire basket to prevent food sticking to it and use tongs to slowly lower the food into the hot oil.
| FRESH FOOD QUANTITY TEMPERATURE COOKING TIME | |||
| French fries (maximum quantity) | 1200 g* / 2,65 lbs | 1) 160°C / 320°F | 11-13 min. |
| 2) 190°C / 374°F | 7-9 min. | ||
| French fries | 1000 g / 2,2 lbs 190° | °C / 374°F 16-18 min. | |
| French fries (quantity recommended for best results) | 600 g / 1,3 lbs 190° | °C / 374°F 11-16 min. | |
| Fried chicken (leg portion) | 2 180 | °C / 356°F | 14-16 min. |
| Battered fish fillets | 1-2 160 | °C / 320°F | 6-8 min. |
| Fried onion rings 6 160°C / 320°F | 3-4 min. | ||
| Fried whole mushrooms 8 150°C / 302°F 5-7 min. | |||
| Fried calamari / shrimp 8-10 180°C / 356°F 5-6 min. | |||
| Vegetables fritters | 10-12 170 | °C / 338°F | 11-13 min. |
| Apple fritters 4 170°C / 338°F 5-6 min. | |||
| Donuts | 4 170°C / 338°F 6-8 min. | ||
| FROZEN FOOD | QUANTITY | TEMPERATURE | COOKING TIME |
| French fries (maximum quantity) | 750g/1.65lbs | 190°C / 374°F | 9-11 min. |
| French fries (quantity recommended for best results) | 450 g / 1 lb | 190°C / 374°F 7-9 min. | |
| Breaded fish fillets | 2 190°C / 374°F 5-7 min. | ||
| Chicken nuggets | 1000g/2.2 lbs | 190°C / 374°F | 4-5 min. |
| Fried onion rings | 12 | 190°C / 374°F | 3-4 min. |
Cleaning
Filtering the oil
We recommend changing the oil - You may store the oil in the fryer, or in a separate airtight container.
after a maximum of 8 to 12 uses. Do not pour used oil into the sink. Leave it to cool, and throw it away with the household waste - according to the local community regulations.
Leave the Hryer (and the oil) within) to cool completely before. Crumbs that break away from foods tend to burn and alter the quality of the oil filtering (2 to 3 hours). more rapidly. Over time, this increases the risk of catching fire. For this reason, filter the oil regularly.
Cleaning the fryer
- Do not handle the appliance without having it unplugged and allowing it to cool (2 to 3 hours) beforehand.
- Remove the filter cover then the filter. Do not wash or wet the anti-odor filter.
- Open and remove the lid from the fryer.
- Remove the basket.
- The basket can be washed in the dishwasher or immersed in soapy water.
Clean the lid and the bowl with a sponge and soapy water- fig 11.
Clean the body of the fryer with a damp cloth. - Dry all parts thoroughly before putting them back together.
- Place the lid back on the fryer.
- Put the anti-odor filter and the filter cover into place.
- Store the plug in its place - fig 12 (depending on model).
Never immerse the appliance in water and never wash it under running water.
Never wash the lid in the dishwasher. Always remove the anti-odor filter prior to washing the lid.
Do not use aggressive or abrasive cleaning products.
Do not store your deep fryer outside. Store it in a dry and well ventilated area.
BOWL WITH NON-STICK COATING (depending on model) :
Browning and scratches that may appear after prolonged use do not cause any problems. We guarantee that the non-stick coating complies with regulations regarding materials coming into contact with foodstuffs.
If your deep fryer does not work properly
| PROBLEMS AND POSSIBLE CAUSES | SOLUTIONS |
| The deep fryer does not work. | |
| The fryer is not plugged in. Plug-in the fryer. | |
| The thermostat is set to the Off setting "0/1". Set the thermostat to the desired temperature. | |
| The temperature indicator light does not come on. Contact your nearest approved Service Center. | |
| Unpleasant odors | |
| The anti-odor filter is saturated. | Replace the anti-odor filter after 15 uses.The model number for the replacement filter isXA500031 |
| The oil has deteriorated. Replace the oil after 8 to 12 uses. | |
| Unsuitable oil has been used. Use a good quality blended vegetable oil. | |
| Vision through the viewing window is not clear. | |
| The window is not cleaned often enough or is not cleaned the right way. | To ensure good visibility, clean the viewing window by wiping it with a sponge and lemon juice. Allow the window to dry at room temperature or dry with a clean cotton cloth. Clean as often as necessary. |
| Steam escapes from around the lid. | |
| The lid is not closed properly. Check that the lid is properly locked closed. | |
| The seal is defective. Contact your nearest approved service center. | |
| Food is wet or contains too much water (frozen food). | Remove any ice and dry the food thoroughly. Lower the basket slowly (see p.5). |
| The frying oil overflows. | |
| The Max. marker for filling the bowl has been exceeded. | Check the oil level (Max.), and remove the excess. |
| The frying basket has been overfilled with food. Check that the basket is not too full. | |
| The basket is misshappen. | Change your basket. Contact your nearest approved service center. |
| The oil is unsuitable. Use a good quality blended vegetable oil (see p.4 for advice on oil to use). | |
| Different oils and fats have been mixed. | Empty and clean the bowl. Refill the bowl with the appropriate type of oil. |
| Food is wet or contains too much water (frozen food). | Remove as much ice from the frozen food as possible before frying and dry the food thoroughly. Lower the basket very slowly. |
| The oil has not been changed often enough. The wrong oil has been used. | Only use vegetable oil/fats. |
| 2,6 lbs of fresh French fries have been fried in one fry. | Always cook them in two fries:1st fry 13 min. at 320°F, 2nd fry 9 min. at 374°F. |
| Food does not become golden, and remains soft. | |
| Pieces are too thick and contain water. | Experiment by lengthening the cooking time or by slicing food into smaller and thinner pieces. |
| Too much food is being cooked at the same time and the cooking oil is not at the right temperature. | Fry food in small quantities (especially when frozen). |
| The temperature of the frying oil may not be high enough: the temperature is set incorrectly. | Set the thermostat control to the recommended temperature. |
| French fries stick together. | |
| Unwashed food immersed in hot oil. | Rince and cut potatoes well to remove excess starch, and dry them thoroughly. |
| The timer no longer works (depending on model) | |
| The battery is low. | Have it replaced by an approved Service Center. |
