
Filtra One FF1628 - Deep fryer TEFAL - Free user manual and instructions
Find the device manual for free Filtra One FF1628 TEFAL in PDF.

| Product Type | Electric Deep Fryer |
| Brand | Tefal |
| Model | Filtra One FF1628 |
| Oil Capacity | 2.1 L (max), 1.9 L (min) |
| Solid Fat Capacity | 1910 g (max), 1660 g (min) |
| Power Rating | 1800 W |
| Adjustable Thermostat | Yes |
| Timer | Yes (depending on model) |
| Permanent Metal Filter | Yes, in the filtration area |
| Viewing Window | Yes |
| Basket Handle | With locking |
| Removable Tank | No, fixed tank |
| Magnetic Power Cord | Yes, detachable |
| Polarization | Polarized plug |
| Materials | Stainless steel, heat-resistant plastic |
| Cleaning | Lid, basket, and filter strainer dishwasher safe |
| Maintenance | Filter oil regularly, change every 8-12 uses |
| Safety | Auto-off (not specified), overheat protection |
| Power Supply | 120 V ~ 60 Hz (standard North American plug) |
| Country of Origin | China (estimated) |
Frequently Asked Questions - Filtra One FF1628 TEFAL
User questions about Filtra One FF1628 TEFAL
0 question about this device. Answer the ones you know or ask your own.
Ask a new question about this device
Download the instructions for your Deep fryer in PDF format for free! Find your manual Filtra One FF1628 - TEFAL and take your electronic device back in hand. On this page are published all the documents necessary for the use of your device. Filtra One FF1628 by TEFAL.
USER MANUAL Filtra One FF1628 TEFAL
natural_image
Black Ultra One Elbow air fryer with control panel and side buttons (no visible text or symbols on device body)User Guide
Guide de l'utilisateur
Guía del usuario
www.t-fal.com
* Depending on model. Selon modèle. Según modelo
RM. NC00026838-02 - 6/2012
ESPACE GRAPHIQUE
FECHA DE COMPRA :
| CANADA | GROUPE SEB CANADA345 Passamort AvenueToronto, ONMtV 3186 | MEXICO | Groupe Sab MexicoS.A de Cv.Godarnith 3a Desp.401 Cai, PalancoDeozana Miguel Hidalgo11 560 Mexico D-EMEXICO | U.S.A. | GROUPE SEB USA2121 Ezen RoadMilville,NJ 08332 |
| 1-800-418-3325 | (01 800) 112 83 25 | 800-526-5377 |
IMPORTANT SAFEGUARDS
EN
- When using fryer, basic safety precautions should always be followed, including the following:
- Read all instructions before using.
- Do not touch hot surfaces. Use handles or knobs.
- To protect against electric shock, do not immerse cord, plugs or fryer in water or other liquid.
- Close supervision is necessary when the fryer is used by or near children.
- Unplug from outlet when not in use and before cleaning. Allow to cool before putting on or taking off parts, and before cleaning the fryer.
- Do not operate the fryer with a damaged cord or plug or after the fryer malfunctions, or has been damaged in any manner. Return the fryer to the nearest authorized service facility for examination, repair or adjustment.
- The use of accessory attachments not recommended by the fryer manufacturer may cause injuries.
- Do not use outdoors.
- Do not let cord hang over edge of table or counter, or touch hot surfaces.
- Do not place on or near a hot gas or electric burner, or in a heated oven.
- Extreme caution must be used when moving fryer containing hot oil.
- Always attach plug to the fryer first (depending on model), then plug cord in the wall outlet. To disconnect, turn any control to “off”, then remove plug from wall outlet.
- Do not use the fryer for other than intended use.
- Be sure handles are properly assembled to basket and locked in place. See detailed assembly instructions. Ensure the two metallic parts of the basket handle are correctly positioned before locking the handle on the basket.

- Before use, check that your local voltage corresponds with the specifications shown on the appliance nameplate located under the fryer.
- Only connect the appliance to electrical sockets which have a minimum load of 15A. If the sockets and the plug on the appliance should prove incompatible, get a professionally qualified technician to replace the socket with a more suitable one.
- This electrical equipment operates at high temperatures which may cause burns. Do not touch the filter, window, metal walls (depending on model), or other apparent metal parts.
- To ensure safe operation, oversized foods must not be inserted into the fryer.
- Ensure that the lid and bowl are completely dry after washing and before use.
- Never immerse the fryer basket into the hot oil - or drain it - without the fryer lid in place.
- The oil level must always be between the Min. and Max. markings.
- Do not overload the basket. For safety reasons never exceed the maximum quantity.
- Never operate your fryer without any oil.
- The cooking times are given as guidelines only.
- The oil must be filtered regularly and changed after 8 to 12 uses.
- Do not mix different types of oil.
- If you use solid vegetable shortening, cut it into pieces and melt it over low heat in a separate pot beforehand, then slowly pour it into the deep fryer pot. Never put solid shortening directly into the deep fryer pot or basket, as this will lead to deterioration of the fryer.
- If the fryer has a removable pot, never remove it while the deep fryer is on.
-
This model is equipped with a permanent metallic filter, which does not need to be changed.
-
If you have any problems, contact the authorized after-sales service center or the internet address www.t-falusa.com.

SAVE THESE INSTRUCTIONS For household use only.
Polarization instructions
If this appliance has a polarized plug (one blade is wider than the other), it is to reduce the risk of electric shock.
This plug is intended to fit into a polarized outlet only one way. If the plug does not fit fully into the outlet, reverse the plug. If it still does not fit, contact a qualified electrician. Do not attempt to modify the plug in any way.
Short Cord instructions
Do not use with an extension cord. A short power supply cord is provided to reduce the risks resulting from being tangled in, or tripping over, a long cord.
Magnetic connector
The cord is equipped with a detachable magnetic connector. The magnetic connector should be attached directly to the fryer. THIS SHOULD BE DONE PRIOR TO PLUGGING THE CORD INTO THE WALL OUTLET.
Environment protection first!
① Your appliance contains valuable materials which can be recycled.
When you decide to replace your appliance, leave it at a local civic waste collection point.
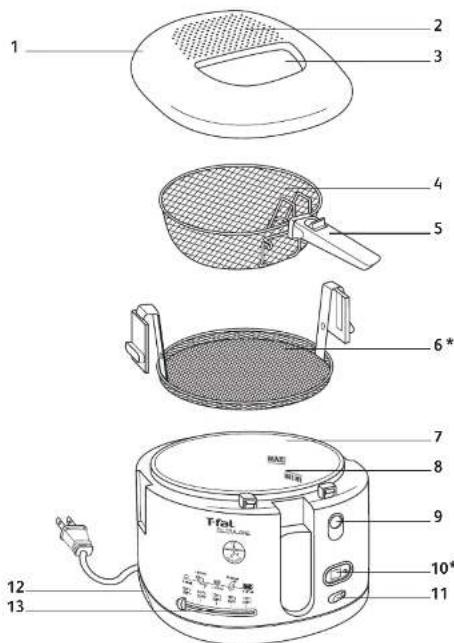
Description
- Lid
- Filter system
- Viewing window
- Basket
- Basket handle
-
Detachable filter screen (depending on model)
-
Frying bowl
- Min. and Max. filling levels
- Lid open button
- Timer (depending on model)
11.On/Switch with light
12.Carry handles
13.Adjustable thermostat
Preparation
Before first use
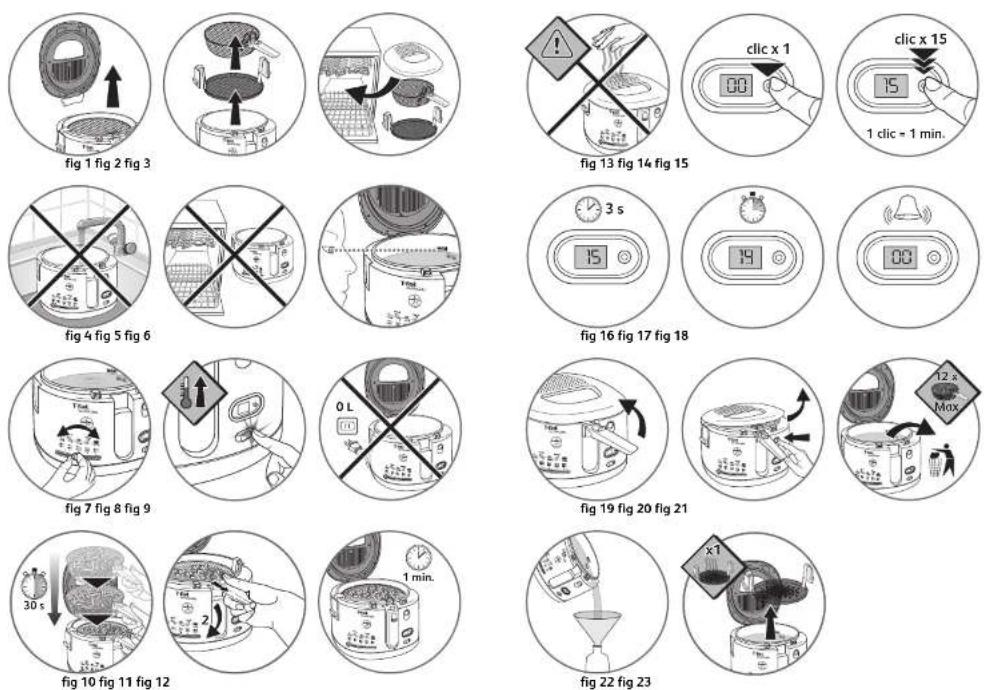
- Press the button to unlock the lid and the lid will open.
- Remove the lid from the fryer - fig 1, the basket and the filter screen (depending on model) - fig 2.
- Wash the basket and filter screen (depending on model) in the dishwasher - fig 3 or with a sponge and soapy water.
- Wash the lid and pot with a sponge and soapy water.
- Carefully rinse and dry all items.
- Replace the filter screen (depending on model), the basket and the fryer lid.
Never immerse this appliance in water - fig 4.
Never put this appliance in the dishwasher - fig 5. Your fryer should always be used indoors.
Filling the pot
Never mix different types of fats because this could cause the fryer to overflow; the level of fat should always be between the Min. and Max. levels shown on the pot – fig. 6.
Check before each use and add the same type of fat as required.
- Fill the pot with oil.
- Never fill the pot above the maximum level shown on the pot - fig 6.
| Oil Solid fat | ||
| Max. 9 | 24 cups / 2.1 L 4.2 lbs / 1910 g | |
| Min. 8 | 36 cups / 1.9 L 3.7 lbs / 1660 g | |
- Use food standard fat recommended for frying: vegetable oil, corn oil, rapeseed oil, etc.
-
If you use solid fat, chop it into pieces and then melt it separately before pouring it into the pot (never melt solid fat in the basket or in the pot).
-
Never exceed 302°F / 150°C to melt the fat that has solidified in the pot. For the cooking temperature follow the instructions (see cooking charts p.10).
- NEVER use animal fat as this could cause overflow, smoke or a fire hazard.
EN
Pre-heating
- After filling the pot with the fat, close the lid and plug in your fryer without the basket
- Adjust the thermostat - fig 7 depending on the food to be fried (see cooking charts p. 10).
- Press the On/Off switch. The pilot will light up - fig 8.
- When the temperature indicator switches off, press the lid unlock button to open the lid and allow the steam to escape.
Place the fryer:
- on a secure surface
- out of the reach of children
- away from any sources of spatter or heat.
Never plug the fryer in when it is empty (without any fat)
- fig 9.
Preparing the basket
Never exceed the maximum safety limit – fresh products 2.65 lbs, frozen 1.98 lb. To avoid overflow and extend the life of the oil, wipe the food carefully before cooking it.
- Wipe the food to remove any excess water or ice.
- Fill the basket before placing it in the fryer.
- Do not overfill the basket.
- Reduce quantities for frozen food.
- Tip: Cut food to the same size so that it cooks evenly. Avoid pieces that are too thick.
Cooking
Immersing the basket
- Place the basket in the pot and lower it gently into the oil - fig 10. Lowering it too quickly could cause the fryer to overflow.
-
Pull down the handle - fig 11, wait for one minute - fig 12 then close the lid.
-
Set the cooking time (depending on model): for models with time, press the button to adjust the time minute by minute. Release. The selected time is displayed and the countdown begins - fig 14 to fig 18.
- During cooking, it is normal for the temperature light to switch on and off.
Do not place your hand above the filter system – fig. 13, or over the viewing window.
The steam and the glass will be hot. Do not touch the fryer walls which may also be hot.
At the end of cooking
The timer (depending on model) signals the end of the cooking time, but does not stop the appliance. For crispy fried food, open the lid as soon as you have finished cooking to prevent steam from softening the food.
- The timer emits a sound (depending on model), indicating that the programmed cooking time has ended.
- Set the thermostat to the minimum position.
- Press the Start/Stop button.
- Raise the handle - fig 19, then press the lid unlock button to open and allow the steam to escape for around 15 seconds - fig 20.
- Drain your food.
- Remove the basket and serve.
- Close the lid when the fryer is not in use.
- To cook more food, add fat as required, set the thermostat to the required temperature, press the On/Off switch and then wait until the temperature light comes on before placing the new food in the oil.
Table of cooking times-
- The cooking times are a guide only; they may vary depending on the size of the food and the amount of food and individual preferences.
- Cooking tips: For best results, use the traditional French method of frying homemade French fries:
- first frying at 338°F / 170 °C
- second frying at 374°F / 190 °C
- When cooking battered food and donuts, remove the wire basket to prevent food sticking to it and use tongs to slowly lower the food into the hot oil.
Take great care when handling the food and use tongs. Gradually place the food into the hot oil, submerging it an inch at a time to prevent it from sinking immediately.
| Fresh food | Number of serving | Quantity Temperature Cooking time | ||
| French fries | 0.77/0.88 lbs | 374°F / 190°C +/- | 6-8 minutes | |
| 1.32 lbs 37 | 4°F / 190°C +/- 9- | 11 minutes | ||
| 2.2 lbs 37 | 4°F / 190°C +/- 15- | 17 minutes | ||
| 2.65 lbs | 1) 338°F / 170°C | +/- 12-14 minutes | ||
| 2) 374°F / 190°C | +/- 5-7 minutes | |||
| Fried chicken 8 3 | 56°F / 18 | 0°C +/- 14-16 | minutes | |
| Breaded fish fillets | 3 338°F / | 170°C +/- 6-7 | minutes | |
| Fried whole mushrooms | 0.44 lbs 30 | 2°F / 150°C +/- 8- | 10 minutes | |
| Vegetable fritters / Fried shrimp | 7-8 35 | 6°F / 180°C +/- 11-13 minutes | ||
| Apple fritters 6 3 | 56°F / 18 | 0°C +/- 6-8 min | utes | |

| Frozen food | Number of serving | Quantity | Temperature Cooking time |
| French fries | 0.99 lbs 37 | 4°F / 190°C +/- 7-9 minutes | |
| 1.65 lbs 37 | 4°F / 190°C +/- 10-12 minutes | ||
| Breaded fish fillets | 10 | 37 | 4°F / 190°C +/- 6-8 minutes |
| Fried chicken 8 | 374°F / 190°C +/- 13-15 | minutes | |
| Chicken nuggets | 1.98 lbs 37 | 4°F / 190°C +/- 7-9 minutes | |
| Fried onion rings | 0.66 lbs 37 | 4°F / 190°C +/- 5-6 minutes | |
- You may store the oil in the fryer, or in a separate airtig container.
- Do not pour used oil/fat into the sink. Leave it to cool, and throw it away with household waste-according to the local community regulations.
- If you use solid shortening, we advise you to store it separately from the fryer - fig 22.
- Crumbs that break away from foods tend to burn and alter the quality of the oil more rapidly. Over time, this increases the risk of catching fire. For this reason, filter the oil regularly.
Leave the fryer with the oil in the bowl to cool completely before filtering the oil (2 hours). We recommend changing the oil/fat after a maximum of 10 to 12 uses. – fig.21. If using sunflower oil, ensure the oil is changed after every 5 uses.
Cleaning the fryer
You cannot remove the metallic filter located in the lid when washing the lid.
Never immerse your appliance and the lid in water and never wash it under running water.
Never wash the appliance in the dishwasher.
Do not use aggressive or abrasive cleaning products.
Do not store your deep fryer outside, store it in a dry and well-ventilated area.
- Always unplug your fryer and leave it to cool completely before cleaning it (approx. 2 hours).
- Remove the lid and the basket.
- Next remove the filter screen (depending on model), the dispose of any residue – fig.23.
- Put the lid, basket and filter screen in the dishwasher or wash them with a sponge and soapy water.
- Dry all items carefully before replacing them.
- Put the lid back on the fryer for storage.
- If you do not keep the oil in your fryer, you can store the filter screen (depending on model) and the basket inside the fryer.
Problems and solutions
EN
| Problems and possible causes | Solutions |
| The deep fryer does not work. | |
| The appliance is not plugged in. Plug in the appliance. | |
| Unpleasant odors. | |
| The oil/fat has deteriorated. | Replace the frying oil/fat (after 12 uses max.), or more frequently depending on the type of oil/fat used. |
| The oil/fat is unsuitable. | Use a good quality blended vegetable oil/fat. (see p.8). |
| Steam escapes from around the lid. | |
| The lid is not closed properly. | Check that the lid is properly locked closed. |
| Food is wet or contains too much water (frozen food). | Remove any ice and dry the food thoroughly. Lower the basket slowly (see p.9). |
| Different types of oil have been mixed. | Empty and clean the bowl. Refill the bowl with one type of oil. |
| Vision through the viewing window is not clear. | |
| The Max. marker for filling the bowl has been exceeded. | Check the level (Max.) and remove the excess of oil after the fryer is cool. |
| The frying oil overflows. | |
| The Max. marker for filling the bowl has been exceeded. | Check the level (Max.) and remove the excess of oil after the fryer is cool. |
| The frying basket has been overfilled with food. | Check that the basket is not too full. |
| Food is wet or contains too much water (i.e. frozen food). | Remove any ice and dry the food thoroughly before frying. |
| Wrong oil or different types of oil/fat have been mixed. | Empty and clean the bowl. Refill the bowl with one type of oil/fat. |
| Unsuitable oil/fat has been used. | Use a good quality blended vegetable oil/fat (see p. 8). |
| Food does not become golden and remains soft. | |
| Pieces are too thick and contain too much water. | Experiment by lengthening the cooking time or by slicing food smaller and thinner. |
| Too much food is being cooked at the same time and the cooking oil/fat is not at the right temperature. | Respect the recommended quantities of food (see table of cooking p.11). |
| The temperature of the frying oil/fat may not be high enough: the temperature is set incorrectly. | Set the thermostat selector to the recommended temperature. |
| French fries stick together. | |
| Potatoes have not been washed before immersed in hot oil/fat. | Cut the potatoes and wash them well to remove starch and then dry them thoroughly. |
| Too much food is being cooked at the same time. | Respect the recommended quantities of food (see table of cooking p.11). |
| The timer no longer works (depending on model) | |
| The battery is low. | Have it replaced by an approved Service Center. |